Selenium vs Puppeteer vs Chai Mocha

The software life cycle has undergone drastic changes in the last decade.
So much to the extent that the role of the tester has completely changed! With the coming in of the PDO (Product Driven Organization) structure, there are no more testers and developers but only full-stack engineers.
The bottom line is testing still needs to be done.
Who does that? How does it fit in the 2-week agile sprint? Is manual testing even possible in such a short time?
The Answer
To start with, the scope for manual testing has been reduced. Agree to it or not. This is what happens in real-life scenarios. Since testing is still a task on our User Stories, it needs to be completed. Most teams take the help of automation tools.
Now here is the challenge, many small and even big companies are going to open-source automation tools which give them the flexibility to customize as per their need without any investment.
There are several tools available for you to choose from based on the kind of application you have like a web-based app or a mobile app a desktop software etc.

Selenium

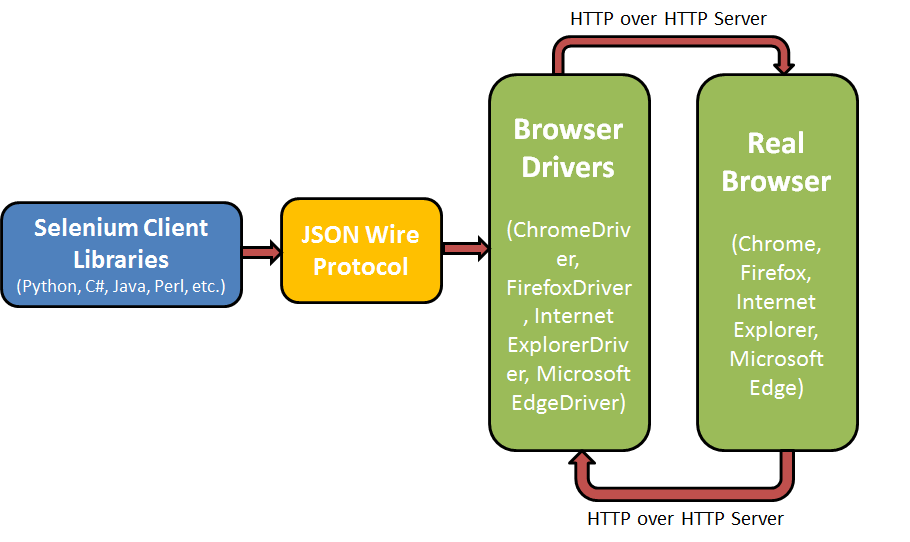
Selenium is a popular open-source framework for automating web applications. Jason Huggins created it originally as a tool called “JavaScriptTestRunner” to automate repetitive tasks in web testing. Later, he changed the name to Selenium after hearing a joke about mercury poisoning from selenium supplements.
Selenium has a thriving community of developers, testers, and quality assurance professionals who help it grow and improve. The open-source nature encourages frequent updates and improvements. As of my most recent knowledge update in September 2021, the most recent version was Selenium 4, which introduced a number of significant changes and features.
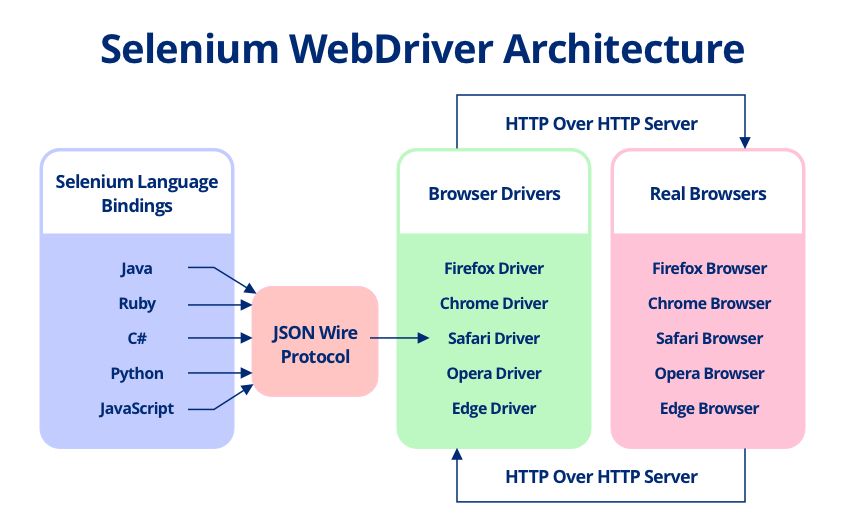
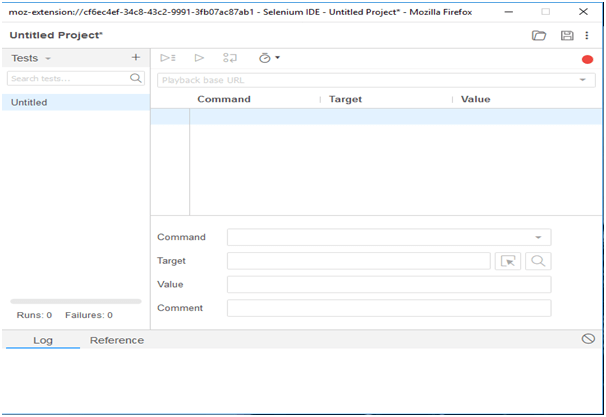
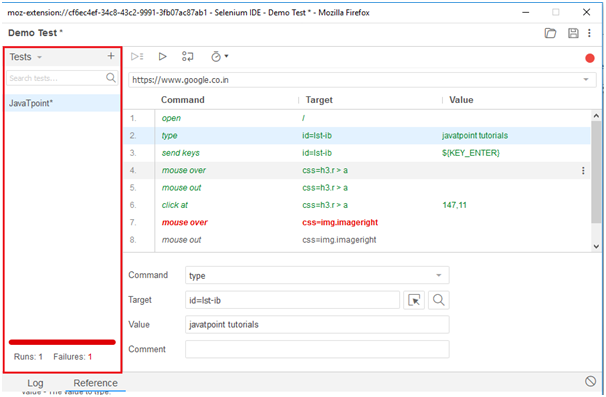
Support for multiple programming languages such as Java, Python, C#, and others is one of Selenium’s key features. Selenium WebDriver for browser automation, Selenium IDE for recording and playback, and Selenium Grid for parallel testing across multiple machines and browsers are among the tools available.
Several factors contribute to selenium’s popularity. First and foremost, it is open-source, which means it is freely available to developers and organizations of all sizes. Because it supports a wide range of programming languages and browsers, it is highly adaptable to a variety of testing environments. Furthermore, the active community keeps Selenium up to date with the latest web technologies and provides solid support and documentation.

Puppeteer

Puppeteer is a well-known open-source Node.js library that offers a high-level API for controlling headless or full browsers via the DevTools Protocol. It was created by Google’s Chrome team, making it a dependable and powerful tool for browser automation and web scraping tasks.
Puppeteer has a vibrant and growing community of web developers and enthusiasts who actively contribute to its development and upkeep. Puppeteer has evolved since my last knowledge update in September 2021, and new versions have been released, each bringing improvements, bug fixes, and new features.
Some notable features of Puppeteer include the ability to capture screenshots and generate PDFs of web pages, simulate user interactions such as clicks and form submissions, and navigate through pages and frames. It also works with a variety of browsers, including Google Chrome and Chromium, and supports both headless and non-headless modes.
Puppeteers are highly regarded for a variety of reasons. For starters, it offers a simple and user-friendly API that simplifies complex browser automation tasks. Its compatibility with the Chrome DevTools Protocol enables fine-grained control over browser behavior. Puppeteer’s speed and efficiency make it a popular choice for web scraping, automated testing, and generating web page snapshots for a variety of purposes.
Several factors contribute to selenium’s popularity. First and foremost, it is open-source, which means it is freely available to developers and organizations of all sizes. Because it supports a wide range of programming languages and browsers, it is highly adaptable to a variety of testing environments. Furthermore, the active community keeps Selenium up to date with the latest web technologies and provides solid support and documentation.

Chai & Mocha

Chai and Mocha are two distinct JavaScript testing frameworks that are frequently used in web development. They play complementary roles, with Chai serving as an assertion library and Mocha serving as a testing framework, and when combined they provide a robust testing solution. Let’s take a look at each one:

Chai:

  • Chai is a Node.js and browser assertion library that provides a clean, expressive syntax for making assertions in your tests.
  • It provides a variety of assertion styles, allowing developers to select the one that best meets their testing requirements, whether BDD, TDD, or assert-style.
  • Chai’s extensibility allows developers to create custom assertions or plugins to extend its functionality.
  • Its readability and flexibility are widely praised, making it a popular choice among JavaScript developers for writing clear and comprehensive test cases.

Mocha:

  • Mocha is a versatile JavaScript test framework that provides a structured and organised environment in which to run test suites and test cases.
  • It supports a variety of assertion libraries, with Chai being one of the most popular.
  • Mocha provides a simple and developer-friendly API for creating tests, suites, and hooks.
  • Its ability to run tests asynchronously is one of its key strengths, making it suitable for testing asynchronous code such as Promises and callbacks.
  • Both Chai and Mocha are open-source projects with active developer communities that contribute to their growth and upkeep.

Their popularity stems from their ease of use, versatility, and widespread adoption within the JavaScript ecosystem. The expressive syntax of Chai and the flexible testing framework of Mocha combine to form a formidable combination for writing robust and readable tests, which is critical for ensuring the quality of web applications and JavaScript code. Because of their ease of use and extensive documentation, developers frequently prefer this pair for testing in JavaScript projects.

Installing Selenium, Puppeteer and Chai Mocha

Installing Selenium:

Install Python: Selenium primarily works with Python, so ensure you have Python installed. You can download it from the official Python website.
Install Selenium Package: Open your terminal or command prompt and use pip, Python’s package manager, to install Selenium:
pip install selenium
WebDriver Installation: Selenium requires a WebDriver for your chosen browser (e.g., Chrome, Firefox). Download the WebDriver executable and add its path to your system’s PATH variable.
Verify Installation: To verify your installation, write a simple Python script that imports Selenium and opens a web page using a WebDriver.

Installing Puppeteer:

Node.js Installation: Puppeteer is a Node.js library, so you need Node.js installed. Download it from the official Node.js website.
Initialize a Node.js Project (Optional): If you’re working on a Node.js project, navigate to your project folder and run:
npm init -y
Install Puppeteer: In your project folder or a new one, install Puppeteer using npm (Node Package Manager):
npm install puppeteer
Verify Installation: Create a JavaScript or TypeScript script to launch a headless Chromium browser using Puppeteer.

Installing Chai Mocha:

Node.js Installation: Chai Mocha is also a Node.js library, so ensure you have Node.js installed as mentioned in the Puppeteer installation steps.
Initialize a Node.js Project (Optional): If you haven’t already, initialize a Node.js project as shown in the Puppeteer installation steps.
Install Chai and Mocha: Use npm to install both Chai and Mocha as development dependencies:
npm install chai mocha –save-dev
Create a Test Directory: Create a directory for your test files, typically named “test” or “tests,” and place your test scripts there.
Write Test Scripts: Write your test scripts using Chai’s assertions and Mocha’s testing framework.
Run Tests: Use the mocha command to run your tests. Ensure your test files have appropriate naming conventions (e.g., *-test.js) to be automatically detected by Mocha.

Criteria Selenium Puppeteer Chai Mocha
Purpose Web application testing across Headless browser automation for JavaScript testing framework for
various browsers and platforms. modern web applications. Node.js applications.
Programming Supports multiple languages: Java, Primarily used with JavaScript. JavaScript for test assertions and
Language Support Python, C#, etc. Mocha as the test framework.
Browser Cross-browser testing across major Chrome and Chromium-based N/A (Not a browser automation tool)
Compatibility browsers (e.g., Chrome, Firefox, browsers.
Edge, Safari).
Headless Mode Supported Supported N/A (not applicable)
DOM Manipulation Limited support for interacting with the DOM. Provides extensive support for interacting with the DOM. N/A (focused on test assertions)
Ease of Use Relatively complex setup and usage. User-friendly API and clear Straightforward API for defining
documentation. tests and assertions.
Asynchronous Yes, with explicit wait commands. Native support for asynchronous Yes, supports asynchronous code.
Testing operations and Promises.

Use Cases:

  • Selenium is widely used for automating the testing of web applications across different browsers and platforms.
    Example: Automating the login process for a web-based email service like Gmail across Chrome, Firefox, and Edge. Puppeteer: Headless Browser Automation
  • Puppeteer is ideal for tasks like web scraping, taking screenshots, generating PDFs, and automating interactions in headless Chrome.
    Example: Automatically navigating a news website, capturing screenshots of articles, and saving them as PDFs. Chai Mocha: JavaScript Testing
  • Chai Mocha is primarily used for unit and integration testing of JavaScript applications, including Node.js backends.
    Example: Writing tests to ensure that a JavaScript function correctly sorts an array of numbers in ascending order.

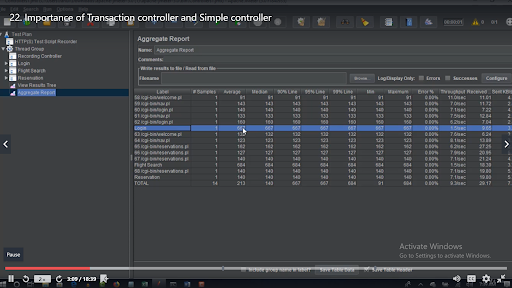
Let us see how the tools discussed here can help you with your testing tasks.

Testing Type Selenium Puppeteer Chai Mocha
Functional Yes Yes Yes
Regression Yes Yes Yes
Sanity Yes Yes Yes
Smoke Yes Yes Yes
Responsive Yes No No
Cross Browser Yes No Yes
GUI (Black Box) Yes Yes Yes
Integration Yes No No
Security Yes No No
Parallel Yes No Yes


Advantages and Disadvantages

Selenium’s Benefits and Drawbacks:

Advantages:

  • Selenium supports a variety of web browsers, allowing for comprehensive cross-browser testing.
  • Multi-Language Support: Selenium supports multiple programming languages, making it useful for a variety of development teams.
  • Selenium has a large user community, which ensures robust support and frequent updates.
  • Robust Ecosystem: It provides a diverse set of tools and frameworks for mobile testing, including Selenium WebDriver,
  • Selenium Grid, and Appium.
  • Selenium has been in use for a long time, making it a stable and reliable option.

Disadvantages:

  • Complex Setup: Selenium can be difficult to set up and configure, particularly for beginners.
  • Selenium tests can be time-consuming, especially when dealing with complex web applications.
  • Headless Browser Support is Limited: Headless browser support in Selenium is not as simple as it is in Puppeteer.
  • Because of its extensive features and complexities, Selenium can have a steep learning curve.

Puppeteer Advantages and Disadvantages:

Advantages:

  • Headless Mode: Puppeteer includes native support for headless browsing, which makes it useful for tasks such as web scraping and automated testing.
  • Puppeteer is simple to install and use, especially for developers who are familiar with JavaScript.
  • Puppeteer’s integration with the Chrome browser is excellent because it is maintained by the Chrome team.
  • Puppeteer is optimized for performance and can complete tasks quickly.
  • Puppeteer is promise-based, which makes it suitable for handling asynchronous operations.

Disadvantages:

  • Puppeteer primarily supports Chrome and Chromium-based browsers, which limits cross-browser testing capabilities.
  • Puppeteer is dependent on JavaScript, so it may not be suitable for teams working with other programming languages.
  • Smaller Community: Puppeteer’s community is smaller than Selenium’s, which may limit available resources and support.

Chai Mocha’s Benefits and Drawbacks:

Advantages:

  • Chai Mocha was created specifically for testing JavaScript applications, making it ideal for Node.js and front-end testing.
  • Support for Behavior-Driven Development (BDD) testing: Chai Mocha supports BDD testing, which improves collaboration between developers and non-developers.
  • Chai, a component of Chai Mocha, provides flexible assertion styles, making it simple to write clear and expressive tests.
  • Plugins from the community: Chai has a thriving ecosystem of plugins that can be used to extend its functionality.

Disadvantages:

  • Chai Mocha is primarily focused on JavaScript, which limits its utility for projects involving other programming languages.
  • Chai Mocha is not suitable for browser automation or cross-browser testing, which Selenium and Puppeteer excel at.
  • It has a limited scope because it is intended for unit and integration testing but lacks features for end-to-end testing and browser automation.

Hope this data comparison is helpful for you to decide which one to pick up for your team and project. My suggestion, if you are dealing with only Chrome then go for Puppeteer.
But if you want your application to run across all platforms and you want it to be tested in multiple browsers and platforms Selenium would be the right choice.
With Selenium, the coding and tool expertise required is also limited, which means you can build up your team and competency faster.
So our personal choice is Selenium which offers more features and online support forums for guidance as well.
Take your pick.

Selenium IDE Tutorial For Beginners

Welcome to a fascinating journey into the Selenium IDE world, aspirant testers and tech enthusiasts.

This tutorial is your key to mastering Selenium IDE’s amazing features, whether you’re a novice eager to delve into the world of automated testing or a seasoned professional looking to improve your skills.

Prepare for an exciting journey as we uncover this tool’s secrets and give you the knowledge and abilities to write reliable, effective test automation scripts. So prepare for an insightful Selenium IDE tutorial that will elevate your testing game by grabbing your virtual testing lab coat and donning your coding glasses.

Latest News About Selenium IDE

Selenium IDE encountered a fork in its journey when Firefox’s unfortunate withdrawal of support presented itself.

A brand-new Selenium IDE that is independent of any particular browser was developed as a result of the quick response of the committed Selenium community to the challenge.

This updated Selenium IDE, developed as a web extension, offers a plethora of improvements and features that address the changing requirements of automated testing.

The new Selenium IDE, which embraces a cross-browser approach, supports popular browsers like Chrome and Firefox, giving testers the ability to seamlessly run their automated tests across various platforms.

The new Selenium IDE features a new and dynamic interface with enhanced recording capabilities, advanced debugging tools, and comprehensive test reports that continue to streamline the test automation process for both novices and experts.

+This tenacious transformation proves the Selenium community’s unwavering dedication to offering an exceptional testing experience and guarantees that Selenium IDE continues to flourish even in the face of shifting technological environments.

Features of the New IDE

Cross-Browser Compatibility: By supporting popular web browsers like Chrome and Firefox, the new Selenium IDE enables testers to create and run tests on various platforms.

Improved Recording and Playback: Testers can easily record and automate their interactions with web applications thanks to improved recording capabilities. The playback feature makes sure that tests go off without a hitch and consistently.

Intelligent Element Locators: The IDE offers intelligent locators that adjust to changes in the application’s structure, simplifying test maintenance and lowering the demand for ongoing updates.

Strong Debugging Tools: With features like breakpoints, step-by-step execution, and variable inspection, debugging is made simple. The root causes of failures can be found and efficiently resolved by testers.

Test Data Management: The IDE provides a range of adaptable options for handling test data, such as data-driven testing, which enables testers to run the same test against various datasets.

Customizable: Selenium IDE can be customized and extended using plugins and custom scripts, allowing testers to improve its functionality in accordance with their unique needs.

Test reporting and metrics: The IDE generates thorough reports that include specific information about test results, such as pass/fail status, execution time, and screenshots. These reports help identify areas that need more attention and offer insightful information about test coverage.

Collaboration and Knowledge Sharing: Test scripts are easily shared and worked on by teams, encouraging productive teamwork and knowledge exchange.

Integration with Selenium Grid: Thanks to the new Selenium IDE’s seamless integration with Selenium Grid, testers can distribute tests across multiple machines and run them concurrently, greatly cutting down on the time it takes to complete a test.

Support for Continuous Integration (CI): The IDE easily integrates with well-known CI/CD tools, giving testers the ability to incorporate automated tests into their development workflows and achieve continuous testing.

About Selenium IDE

Selenium integrated development environment that is plugged into Firefox. It is an automation testing tool that is very simple, easy and user-friendly.  It offers easy installation, learning, and creation of test scripts. Selenium IDE is based on record and playback principle. It is good for all kinds of testing.

Features of Selenium IDE That Makes it the Best!
selenium ide features
Selenium is a widely used automation testing tool and offers extensive features. Some of the common features of Selenium IDE are:

  • It offers an easy and simple record and playback features
  • Supports Intelligent field selection
  • Auto-completion of Selenium commands
  • Walkthrough tests
  • Easy Debugging capabilities
  • Easy setting of breakpoints
  • Save tests as HTML, Ruby, Python, C# scripts, or any other format
  • Supports Selenium user-extensions.js
  • Supports automatic assertion of title for all pages
  • Supports easy customization
  • Does not require programming skills

The Drawback of Selenium IDE

Selenium IDE is a Firefox plug-in hence it supports only Firefox and the test scripts Created in Selenium IDE can only be executed in the Firefox browser.

Step-by-Step Tutorial about learning Selenium IDE

Downloading and Installing Selenium IDE

Now when we have a good idea on what is Selenium IDE, let us move to the next step of Downloading and Installing Selenium IDE.
To download Selenium IDE you need to have Mozilla Firefox, if you have it well and good if you don’t have it, download it.

Steps to download and install Selenium IDE

1)     Launch Mozilla Firefox Browser.
2)      Open Selenium IDE Add-ons page by typing URL: https://addons.mozilla.org/en-us/firefox/addon/selenium-ide/ in your browser. Next Click on Add to Firefox button.
11111
3)     You will get a popup asking for your permission to install Selenium IDE Add-ons or not. Click the Install button over the popup.

4)     Firefox will then install Selenium IDE software and you will get a popup asking you to restart the Firefox. Click the restart button. The Selenium installation will now be reflected on your browser.
5)     After you restart you ur browser you can find the selenium IDE under the tools menu list present at the top bar

6)     Click on selenium ide your selenium ide will launch

Sections of Selenium IDE

Selenium IDE is divided into different sections. Before start working on it, you must know about these categories:

Menu Bar

present at the uppermost of the Selenium IDE window. The menu bar consists of five sub-modules.

File Menu

 File Menu Create, Save and Export Test Case and Test Suite of Selenium IDE. You can open the file menu by pressing Alt + F, or by clicking on the File menu.

Under File menu you can find:

  • New Test Case: It creates a new blank Test Case
  • Open: It  Open already saved Test Cases.
  • Save Test Case: Saves the opened Test case.
  • Save Test Case As: Saves opened Test Case in a specific location and has a specific name.
  • Export Test Case As: Assists exporting test cases in various languages like Ruby/Python/Java/C# in both Selenium Remote Control and Selenium WebDriver Format.
  • Recent Test Cases: Returns a list of few last saved Test Cases.
  • Add Test Case: Search test cases and merge them into the currently opened test case.
  • Properties: returns the properties opened test case.
  • New Test Suite: creates a blank Test Suite
  • Open Test Suite: Opens existing Test Suite.
  • Save Test Suite: Saves opened Test Suite.
  • Save Test Suite As: Saves opened Test Suite in a specific location and has a specific name.
  • Export Test Suite As: Assists exporting test Suite in various languages like Ruby/Python/Java/C# in both Selenium Remote Control and Selenium WebDriver Format.
  • Recent Test Suites: Returns a list of few last saved Test Suite.

Default Interface of Selenium IDE
Edit Menu

Edit Menu helps to Cut Copy Paste and Insert Command in Selenium IDE Test. You can open the Edit menu by pressing Alt + E, or by clicking on the Edit menu.
Under the Edit menu you can find:

  • Undo: last action or few last performed actions are undone
  • Redo: Re-do the last undone action or series of last undone actions.
  • Cut: Copies and removes the selected command or test step from the current location to some other location in the test.
  • Copy: Copies selected command or test step from current location to some other location in the test. But it does not remove the command from the previous locations.
  • Paste: Pastes cut/copied command to a selected location in the test.
  • Delete: Deletes the chosen command.
  • Select All: Select all the commands in Test Step Pane.
  • Insert New Command: Insert a  row at a selected location to write new commands
  • Insert New Comment: Insert a  row at a selected location to write a new comment

Read also: Selenium 4: New Features and Updates

Actions Menu

Helps us to learn Options to Record Play Run And Debug Selenium IDE Test.

  • Record: It Records the user actions on the webpage via the Firefox Web Browser. While recording, the menu item keeps displaying a chack against items.
  • Play Entire test suite: it play-back/re-run every Test Case in the Test Case Pane, following top to bottom approach.
  • Play the current test case: play-back the selected Test Case.
  • Playtest Suites periodically: let the specified test suite to execute at specific times. It is the best way when test suits are required to be rerun periodically as it does not require any human intervention, once specified it will rerun test cases automatically
  • Toggle Breakpoint: allows you to specify one or more breakpoint(s) to forcefully break the execution at specified steps.
  • Set / Clear Start Point: it permits the testers to select a start point to start executing the test. It is important for subsequent runs.
  • Pause / Resume: this enables the pausing and resuming of the test at any point between the test execution.
  • Step: it permits to step through the playing-back of the test case. It is important for debugging purposes.
  • Execute this command: This allows testers to execute a particular command instead of executing the complete test case. It is important when testers want to see the behavior of any specific command
  • Fastest/Faster/Slower/Slowest: it allows you to set the execution speed from fastest to lowest concerning the responsiveness of the application under test.

Other categories available at Menu Bar are:

Options Menu and Help Menu

Tool Bar

The ToolBar includes the Buttons that Control the execution of test cases, for debugging the test cases, setting up the speed of the test, Stopping, Playing and Recording of test cases.

Test Case Pane

All the test cases recorded by IDE are available in Test Case Pane. It can open more than one test case at the same time and supports easy shuffling between the test cases.

It also offers Test Execution Result Summary including entire Test Suite status, Total number of Test Executed, etc.

Test Case Pane

It is the place where Test Case Steps are recorded. All the user actions are recorded in the order they are performed. It also allows the editing and changing of the test cases

Output Pane

The bottom pane or the Log Pane offers the following functions

  • Log, 
  • Reference, 
  • UI-Element, and 
  • Rollup 

The function performed depends upon which tab is selected.

Record the Selenium IDE Test Case.

  1. Launch Firefox Selenium IDE. Type the URL. Click the Record button, a red button on the top right corner. It will record Test Cases.
  2. In Firefox, type the same URL as in step 1. Firefox will take you to the related webpage.
  3. Right-click anywhere on this page, you will get Selenium IDE context menu. In the context menu go to Show Available Commands> Web Page Name.
  4. Click on MyAccount
  5. Enter UserName and Password and then click on the login button.
  6. To stop the recording click the record button again. Click on the Table tab and you will be able to see the recorded commands.
  7. Click on the Source tab to see HTML Code.

Read also: 11 Awesome Selenium Alternatives For Testers in 2019

Save the Selenium IDE Test Case.

  1. To save a test case go to File Menu and click on Save Test Case As.

File -> Save Test Case As.

  1. Choose the desired location and give your file a name and click on Save.
  2. You can see the name of the saved test case on the left-hand side.
  3. The file will be saved as HTML.

Playback Selenium IDE Test Script

Open a new tab Firefox. Click the Play button in Selenium IDE. It will execute the previously recorded tests.
Selenium Commands

Selenium commands or Selenese are a set of test cases that are deployed to test web applications using Selenium.
Selenium commands are of three types:

Actions

Actions commands control the state of the application. Operations under action commands are:

  1. type this box,
  2. click this link
  3. select option.

Some of these commands can be suffixed with AndWait like click and wait, type and wait. This prompts Selenium to wait until the web page is loaded. If these commands fail, the existing test is stopped.

Accessors

These commands automatically create Assertions and inspect the state of the application.

Assertions

They inspect the state of the application adapts to what is anticipated.
They can be further divided into three categories:

  • Assert:
  • Verify:
  • WaitFor:

Some of the Commonly used commands in Selenium IDE:

  • type: Set the value of the input field
  • open: Opens a web page through the given URL.
  • click clicks on a checkbox, link, button or radio button.
  • clickAndWait: When you click on the checkbox, link, button or radio button, and a new page is loaded it calls waitForPageToLoad.
  • select: It selects an option drop-down.
  • selectFrame: It is used to select a frame from the present window.
  • verify title/assert title: Authenticates an anticipated page title.
  • verifyElementPresent: Confirms if the
  • indicated element is present on the page.
  • highlight: Altersthe backgroundColor of the indicated element.
  • pause: Wait for the indicated time period
  • echo: Prints indicated message in your Selenium command tables.

What are Locators?

Locators in Selenium IDE are used to find and match the elements in the web page that are required to communicate with. The use of the right locator promises faster, more trustworthy and low maintenance tests. But choosing the right locators can sometimes become a challenging task.

Locators in selenium IDE


Locators tell on which GUI elements do Selenium IDE needs to operate on. The correct identification of the locators is very important and it is equally challenging.
There are many commands in Selenium IDE that do not require Locators, but most of the commands do require locators. The locators to be used depends on the AUT.
The various types of locator are:

Locator: ID

It is a common way to locate different elements as every element has a unique ID.

Target Format: id=id of the element

Consider any test app, let it be Facebook.

  • Check the “Email” text box using Firebug and note down Locator: ID
  • Launch Selenium IDE and write “id=(Locator ID you retrieved in the first step)” in the Target box. When you click on the Find button next to the target box, the “Email ID” text box will be emphasized with a yellow and green border. This means that Selenium IDE has located the “Email ID” text box correctly.

Locator: Name

Locator name is quite similar to Locator: ID. The only difference is that here we use name instead of ID.
Target Format: name=name of the element.
Consider any test app, let it be Facebook.

  • Check the “Email” text box using Firebug and note down Locator: Name
  • Launch Selenium IDE and write “Name=(Locator name you retrieved in the first step)” in the Target box. When you click on the Find button next to the target box, the “Email ID” text box will be emphasized with a yellow and green border. This means that Selenium IDE has located the “Email ID” text box correctly.

Locator: Link

This locator is used for hyperlink texts. It can be used by beginning the target with “link=” tailed by hyperlink text.
Target Format: link=link_text

Consider any web app as a text app.

  • Check any element that has a hyperlink text and  using Firebug and notes down Link Text
  • Launch Selenium IDE and write “Link =(Link Text you retrieved in the first step)” in the Target box. When you click on the Find button next to the target box, the corresponding text box will be emphasized with a yellow and green border. This means that Selenium IDE has located the element correctly.

Locator: CSS

CSS Selectors are though a complex method to locate elements on a web page, but they are the most preferred method of locating elements in advanced Selenium as they can even detect elements that have no name or no ID.
CSS Selectors are also strung patterns That has the ability to recognize an element based on its arrangement of HTML tag, id, class, and attributes. CSS Selectors have many formats, but the most  common are:

  • Tag and ID
  • Tag and class
  • Tag and attribute
  • Tag, class, and attribute
  • Inner text

Locator: Xpath

XPath is a language for navigating the DOM (document object model) of a web page. It can locate any element on the web page and is hence the most potent and supple locator.

Some of the Firefox Add-ons that can help in finding  XPath of an element:

Locator: DOM

The Document Object Model is an HTML document that can be accessed using JavaScript. It uses hierarchical dotted notation to locate an element on the page.

Conclusion

If you wish to learn more about selenium we have comprised a tutorial just for you which will take you deep into the tool.

Get an eBook: Download PDF

Jmeter Tutorial: Learn about the tool in a jiffy!

Jmeter Tutorial blog by us will help you in learning about the famous tool and what’s it is used for.  Usually, Apache JMeter is used for performance testing. Performance testing is one of the important testings to be performed on AUT. It will let you know the load which your application can handle and what happens if that load exceeds prescribed limits.
Through, meter tutorial let us know more about JMeter and see how it can be used for performance testing. 

About JMeter – Jmeter tutorial introduction
JMeter is an open-source software which is designed by Apache Foundation. It is used to apply load to AUT to know its performance. With the help of JMeter, you will be able to apply a heavy load to the application with concurrent or multiple traffic to emulate real-time user behavior.
For applications such as Amazon who release flash day sales, it is very important to do performance testing. On a single day and in a time interval of 5 mins many customers hit the site and we must make sure that the application behaves expectedly without any flaws. One more application where performance testing is very important is the railway ticket booking website where a large chunk of people hit the server at the same time. In these cases, it becomes very necessary to test out the website under heavy load. 
JMeter is usually used for testing of web or FTP application. With JMeter, you will able to identify how many concurrent users a server can handle. Thinking of hitting Amazon with 1000 concurrent users. For achieving the scenario, you cannot purchase 1000 machines to achieve the behavior. JMeter allows you to hit the Amazons server with 1000 requests concurrently. JMeter simulated real-time user’s behavior intelligently. JMeter sends requests to the target server and then retrieves the statistical information of the server. With this information, it generates test reports in different formats. 
Some benefits which you gain via JMeter is a User-friendly GUI, Graphical Test Results, easy installation, and platform independence. It has an amazing record and playback feature which makes it very easy to learn even for the novice. Also, its script test can be integrated with Selenium tests and beach shells for more robust automated testing. Through the Jmeter tutorial, we are trying to et up a tutorial for people to learn about this magnificent tool.

Step-by-step  Jmeter tutorial

How to Download and Install Apache JMeter
JMeter is a java application and it needs Java in the machine so that it can run seamlessly. JMeter can be installed in Windows, Linux, Ubuntu, and Mac operating systems. Before installing JMeter, make sure that you have Java installed in your machine. You can check by hitting the command in your terminal. java -version
If java version is highlighted then java is installed in your system and if nothing appears then install Java by clicking here
How to Download and Install Apache JMeter

  1. Now it is the time to download JMeter. Download the latest version by clicking here. Download the binary file shown below. 

download JMeter
2. The installation of JMeter is very easy. The download binary file must be unzipped into the folder where you want to download JMeter. The unzipped folder would like just as below snapshot.

3. Run JMeter in GUI mode by clicking on the bin folder and then jmeter.bat file. 

4. After clicking, JMeter will open just as below. 
How to Download and Install Apache JMeter
More on Thread Group, Samplers, Listeners and Configuration of JMeter

  • Thread Group is basically the application of multiple threads to AUT. Each thread represents one user who is accessing the application. With the help of the thread group, you can apply a number of threads which is defined by you. 

More on Thread Group, Samplers, Listeners and Configuration of JMeter

  • Samplers allow JMeter to support testing of different protocols such as HTTP, FTP, JDBC, and others. 

  • FTP Request: If you want to do performance testing for the FTP server then you can use the config element of the FTP request. You can send a download a file or upload a file request to the FTP server. You need to add parameters to the sampler such as server name, remote file name (to be downloaded or uploaded), port number, username, and password. 


  • HTTP request

With this help of the HTTP request sampler, you can request an HTTP request to the server. With the help of this request, you can retrieve HTML files and images from the server. 
HTTP request

  • JDBC request

With this help of a JDBC request sampler, you can perform database performance testing. You will be able to send a JDBC request to the server. You should be able to add the SQL query in the query tag. 
JDBC request

  • SMTP Server

If you want to test the mail server then you must use the SMTP server sampler. With this protocol, we can send emails. 

  • CSV Data set Config

If you want to test the website with different users who are having different credentials, you must take the help of CSV data set the config to pass the credentials. You can store the credentials in the text file. It will read lines from the file using a delimiter. 
You must pass the data in a text file the same as the below snapshot.

  • HTTP Cookie Manager

When you log in to some website then your browser stores cookie so that you do not have to login again and again. Similarly, an HTTP cookie manager also does the same task for you. If the website is returning cookie in response, then it will save a cookie for you to maintain a session.  You can add an HTTP cookie manager in your test plan with the help of the config element. When you will record sessions using Blaze meter, it will automatically record cookies in the HTTP cookie manager. 
HTTP Cookie Manager

  • Listeners

Listeners listen to the results fetched by the JMeter and let you analyze the results with the help of visual reports. 
Listeners

  • View Results Tree: You get to see all the user requests in HTML format using view results listener. 

  • Aggregate Reports

With the help of aggregate reports, you can get total samples, average, median, minimum, maximum, and throughput. 

  • Jmeter Timers

Once you start sending requests to your AUT, you should have timers between each request so that it can simulate real-time behavior and the server does not get confused with so many requests hitting the server. Let us see the different kinds of timers which we can integrate to simulate real-time behavior

  • Constant Timer


It delays each request by the same amount of time. 

  • Gaussian Random Timer

Gaussian Random Timer
It delays each request by any random amount of time. You can define the deviation around which the delays would be adjusted. Also, offset can be added with the gaussian distribution of deviation value and then the total delay time can be calculated. 

How to do load testing with Apache Jmeter? Click here

  • Uniform Random Timer

Uniform Random Timer
It also delays each request by a random amount of time. You can define the random delay maximum time and the offset value which will be added to the random value. 

  • Bean shell, BSF and JSR223 timers

Bean shell timers introduce a delay time between each request using bean shell scripting. BSF timer is used to add a delay time between each request using BSF scripting language. Similarly, JSR223 adds a time delay using the JSR223 scripting language. 
The most used timers are constant and gaussian timers. 
Assertions in JMeter
Assertions are very useful in any kind of testing as verification and validation are the heart of testing. You must compare the results with the expected results to know if we are getting the correct response or not. Let us have a look at the most common types of assertions. 

  • Response assertion

It allows you to check the response against pattern strings. Take an example of Amazon.com. If you hit the server with some product then the response list should contain the product mentioned in the search list given in the request payload. 
You can choose text response and add the test which you want to validate. I have added the text in patterns to test. 
Response assertion
Also, we can validate the status code with the response assertion Select the field to test as response code and mention the code in the patterns to test. 

  • Duration Assertion

Duration Assertion
It tests that the server’s response is received time limits. If it is taking more than the time mentioned, then the assertion will be failed. 

  • Size Assertion

Size Assertion
It checks the response has the expected number of bytes contained in it. If it is above the defined limit, then assertion will be failed. In the below snapshot, if the response has equal or less than 5000 bytes then the assertion will be passed. 

  • XML and HTML Assertion

XML assertion verifies that the response data has correct XML syntax while HTML assertion verifies that the HTML syntax of response is correct. 
Controllers in JMeter
Controllers are used in JMeter to handle requests in an organized manner. There are different kinds of controllers that can be integrated with the JMeter Test Plan. These controllers let you handle the order of requests to be sent to the server. Let us have a look at different kinds of controllers. 

  • Recording Controller

Recording Controller
JMeter will record your testing steps but for storing them in a container you require a recording controller. 

  • Simple Controller


Simpler Controller is just a container to store your requests. You can give a meaningful name to the controller. In this way, if you want to duplicate the requests, you can simply add the simple controller without again and again adding so many requests. It is just for clubbing requests and in the view, results graph you will not see any controller name. 

  • Loop Controller

It allows the requests to run a specified number of times or forever if the number has not been defined. 

  • Transaction Controller


The transaction controller is similar to the simple controller which records the overall time for the requests to finish. It has an additional benefit over simple controller as you will be able to see the controller name which has the clubbed requests instead of individual requests name in view results graph. 

  • Module Controller

Module Controller
It is based on the idea of modularity which says that a set of requests can be clubbed in a simple or transaction controller. A module controller can be used to add any set of requests by selecting the controller. Suppose if you have 3 simple controllers named login, search and logout, then with the module container you will be able to select which you want to simulate again so that you don’t have to add the same requests again and again. 

  • Interleave Controller


This controller pickups one sampler per iteration and it is executed from top to bottom. In the below snapshot, we are having one interleave controller having 3 samplers names News Page and FAQ Page and Gump Page. It is running with 2 threads and a loop count of 5. So, a total of 10 requests will be executed per thread. 

  • Runtime Controller

This controller controls the execution of its samplers for the given time. If you specify the run time as 10 seconds, then JMeter will run your tests for 10 seconds. 
Runtime Controller

  • Random Controller

It is the same as the Interleave controller but instead of running from top to bottom, the random controller picks any requests randomly. 

  • If Controller

It runs the requests only when a set of conditions is fulfilled. 
Apache Jmeter tutorial 7
Processor in JMeter
Processors are used for modifying the samplers. There are two types of processors. 

  • Pre-processor are the processors which are applied before sampler requests. If you want JMeter to check all the links on the page and then retrieve the HTML. You can add HTML link parser which will parse links before a request is made to the server. 
  • Post-Processor: If the request is made to the server and is the requests send you an error then the post-processor should stop the further execution. 


In the above snapshot, if you choose Stop Test Now. This will stop the test if there will be any error in the response.
There is one more post-processor named debug processor which tracks the values of variables that are in the requests. 
Apache Jmeter tutorial 6
Jmeter Distributed (Remote) Testing
It is used to do testing on multiple systems. Applying all the load on a single server is not appropriate and can bring unexpected results. It is good to perform distributed testing with master-slave architecture.         There will be one master who will be driving various clients which will be again JMeter servers which will be putting load to the application under test. The firewall should be switched off in all the machines as it can block the traffic. All machines should share the sub-network and the JMeter version should be kept the same in all the machines to avoid any kind of complexities. 

Steps to setup master-slave architecture (Jmeter tutorial bonus)
1.       Go to the slave server and then go to the bin directory where JMeter is downloaded. You must then execute a file named JMeter-server.bat. Suppose the slave machine has IP address 120.178.0.9. 
2.       Now, go to the master machine and go to the bin directory. There, you have to edit JMeter.properties file. You must add the IP of the slave machine in front of remote_hosts. 
3.       Now for running the tests, you must go to the GUI of JMeter. Select the Run section on the menu bar of JMeter and then select a remote start and then the IP address of the slave machine. 
Apache Jmeter tutorial 5
Detailed Steps to Use JMeter for Performance & Load Testing (Jmeter tutorial exclusive)
1.       Start JMeter. 
2.       Add the BlazeMeter extension to the google chrome browser. Now hit the URL on the google chrome browser and record the flow with BlazeMeter. Once the steps have been captured then you can download the file from BlazeMeter in JMX extension. 
3.       You can then open the JMX file in your JMeter. It will appear as below. 
Apache Jmeter tutorial
4. Now, you must add a number of threads, ramp-up periods, and loop count. Number of Threads is the total number of users accessing the website. The number of times per thread will execute. Ramp-up period is the delay that should be applied before starting the next user. Suppose if you have 1000 users and a ramp period of 1000 seconds then delay between every user request will be 1000/1000 = 1 second.  

5. Now, add the listeners to view the graphical results. Let us add the most used listeners such as View Results and Assertions Results. 
Apache Jmeter tutorial
6. You can also name the requests in different transaction controllers such as login can go to login controller, authenticate, and secure to security controller and logout to sign off the controller. If you want to execute extensive tests, then these controllers will help you running many requests. 
7. Add Post-processor which would stop the tests in case you get any errors in the response. 
Apache Jmeter tutorial
8. Add Constant timer with a time period of 300 ms between each user request.
Apache Jmeter tutorial
9. For each request, you can add assertions to validate that if the requests are giving proper response. Different Response assertions can be used to validate the status code as 200 and to validate the test in the output response. You can also add duration assertion to check if the requests are completed in a particular amount of time. Size assertion can be used to check the response in bytes. 
Apache Jmeter tutorial
10. Now, run the tests using the green run button on top. Now it’s time to analyze view results and assertion results. 
Apache Jmeter tutorial
You have to analyze the throughput and deviation. Throughput is the server’s ability to handle a number of requests per minute. The higher the throughput the higher is the capacity of the server to handle user requests. The deviation is the second parameter which is of utmost importance in this graph to be analyzed. It means the variation from the average. Throughput should be higher, and deviation should be least. These parameters, you will be getting from the client which you have to validate and send a report to the client with these graphs. 
Also, you must remember in this Jmeter tutorial,  is the Assertion report. 
You will see the different assertions been passed and failed in this tree so that you can know which ones are failing. 
One more important listener is the View Results Tree listener. You will be seeing which requests got passed and which ones got failed. The ones which are in green color are passed and the ones which are in red color are failed. 
The last important listener which you can add is the Summary report which will let you know total samples, average, Min, Max, Error %, Deviation, and Throughput. This report is of the utmost importance to stakeholders. Let us see how it looks. 
Conclusion for Jmeter Tutorial
That sums Use JMeter tutorial to use performance and load testing so that your application is robust and can sand load without giving unexpected results. Use the wonderful elements of JMeter to share excellent reports with the stakeholders. 
Hope you are satisfied with our Apache Jmeter tutorial. Please get back to us if you have any suggestions

Protractor vs Selenium: What are the major differences?

Protractor vs selenium who will win? Both the test automation tools are equally good. However, one has some features that make it supreme to the other.
Test Automation is the need of the hour and is widely adopted by the testing teams across the globe; to assist testers in automation testing several testing tools are now available in the markets.
To achieve the best testing results, it is very important to choose the most appropriate testing tool according to your requirements.
Sometimes, testers sometimes get stuck between two automation testing tools.
And if you are the one, who is having a difficult time picking the aptest testing tool out of Selenium vs Protractor, then go ahead and read this article to find out a solution.

Selenium 
Selenium is used for automation testing of web applications and is an open-source testing tool.
Selenium is meant only for web-based applications and can be used across various browsers and platforms.
Selenium is an all-inclusive suite that is licensed under Apache License 2.0. It constitutes of four different tools under it:

  • Selenium Integrated Development Environment (IDE)
  • WebDriver
  • Selenium Remote Control (RC)
  • Selenium Grid


Selenium IDE
Selenium IDE GIF
The simplest among all the four tools under Selenium is Selenium IDE. Selenium IDE is used to record the sequence of the workflow.
This Firefox plugin is easy to install and is also companionable with other plugins.
It has some of the most basic features and is largely used for prototyping purposes. It is very easy to learn and use.
Selenium RC
RC
Selenium Remote Control (RC) allows the testers to choose their preferred programming language.
It’s API is quite matured and supports extra features to assists tasks beyond even browser-based tasks.
Selenium supports  Java, C#, PHP, Python, Ruby, and PERL and can perform even difficult level testing.
Selenium WebDriver

Selenium WebDriver is an advanced version of Selenium RC. It provides a modern and steady way to test web applications.
Selenium directly interacts with the browser and retrieves the results.
An added benefit of WebDriver is that it does not require JavaScript for Automation. It also supports Java, C#, PHP, Python, Ruby, and PERL.
Selenium Grid
Selenium grod
The main benefit of automation tools is faster execution and time-saving. In Selenium, Selenium Grid is responsible for the same.
It is specially curated for parallel execution of tests, on various browsers and environments; it is based on the concept of hub and nodes.
The main advantage of using this is time saving and faster execution.
What Protractor is all about?
Protractor is a powerful testing tool for testing AngularJS applications.
Though it is specially designed for AngularJS applications, it works equally well for other applications as well.
It works as a Solution integrator by assimilating the dominant technologies like Jasmine, Cucumber, Selenium, NodeJS, Web driver, etc.
Protractor also has a high capability to write automated regressions tests for web applications. Its development was started by Google but was later turned into an open-source framework.
Protractor
Why do we need Protractor?
Here are a few reasons to convince you to use Protractor:

  • Generally, most of the angular JS applications have HTML elements like ng-model and ng-controller, Selenium could not trace these elements, whereas Protractor can easily trace and control such web application attributes.
  • Protractor can perform multiple browser testing on various browsers like Chrome, Firefox, Safari, IE11, Edge. It assists in quick and easy testing on various browsers.
  • Protractor is suitable for both Angular and Non-Angular web applications.
  • Because of the parallel execution feature, it allows executing test cases in multiple instances of the browser simultaneously.
  • It permits the installation of various packages as and when needed. In simple words working with packages is easier in Protractor.
  • Working with multiple assertion libraries is possible with Protractor.
  • Protractor supports various cloud testing platforms like SauceLabs and CrossBrowserTesting, etc.
  • It assists in faster testing.
  • Runs on both real browsers and headless browsers.

What is Selenium Protractor?
If the app you are developing is on AngularJSit’s always a better option to use Protractor since

  • it’s meant for AngularJS apps
  • We can create customization from Selenium in creating Angular JS apps
  • Protractor can run on top of selenium giving all the advantages of Selenium
  • You can use API exposed by Webdriver and Angular
  • Uses the same web driver as that of Selenium

What is the best IDE for protractor?

  • Visual Studio
  • CodeSublime
  • TextAtom Editor
  • Brackets
  • Eclipse
  • EclipseVisual Studio
  • ProfessionalWebstorm

Difference between Protractor vs Selenium
Here are the basic points of differences between Selenium and Protractor:

Comparison Basis Selenium Protractor
Supported Front End Technology-Based Web Application Supports all front end technology Specially designed for Angular and AngularJS applications, but can be used for Non-angular applications also.
Supported Languages C#, Java, Haskell, Perl. PHP, JavaScript, Objective-C, Ruby, Python, R JavaScript and TypeScript.
Supported Browsers Chrome, Firefox, Internet Explorer ( IE), Microsoft Edge, Opera, Safari,  HtmlUnitDriver Chrome, Firefox, Internet Explorer ( IE), Microsoft Edge, Safari
Synchronization or Waiting Does not support automatic synchronization between tests and application. It needs to be explicitly synchronized using different waits. Supports Automatic wait for Angular applications, but they are not applicable for Non-angular applications. But you can explicitly synchronize waits in Protractor.
Supported Locators Strategies Supports common locator strategies like Id, className, name, linkText, tagName, partial link text, XPath and CSS  for all web applications Supports common locator strategies like Id, className, name, linkText, tagName, partial link text, XPath and CSS  for all web applications plus it also supports angular specific locator strategies such as model, repeater, binding, buttonText, option, etc. also permits the creation of custom locators.
 
Supported Test Frameworks
 
Based on language binding, it supports various Test Frameworks C#- NUnit,
Java- JUnit, TestNG
Python- PyUnit, PyTest
JavaScript- WebDriverJS, WebDriverIO
 
Protractor aids Jasmine and Mocha. The protractor is provided with Jasmine as a default framework.
Support for BDD Yes. (Serenity, Cucumber, JBehave, etc). Yes. Mocha,  Jasmine, Cucumber and Serenity/JS
Reporting Requires third-party tools:- TestNG, Extent Report, Allure Report, etc. Requires third-party tools:- protractor-beautiful-reporter, protractor-HTML-reporter etc
Managing browser drivers Requires third-party tools like  WebdriverManager to sync browser version and driver. Requires web driver-manager CLI to automatic sync between browser version and driver for Chrome and Firefox.
Parallel Testing Requires third-party tools like TestNG. Supports parallel testing.
Cost Open-source Open-source
Nature of Execution Synchronous Asynchronous
Needed Technical Skills Average Moderate
Support No official support operates on open community model No official support operates on open community model
Ease to automate Angular Applications Not easy, a lot of sync issues and difficult to find real wait conditions. It is made for angular applications hence it is easy to automate Angular Applications
Test Execution Speed Slower Faster
Ease of Scripting Requires more lines of code and hence scripting is difficult. Even more difficult than Selenium.
Support for Mobile Application No direct support Direct support
CI/CD integration Yes Yes
Docker Support Yes Yes
Debugging Easy Difficult
Test Script Stability Less stable scripts More stable scripts


Is protractor better than selenium?
Both Selenium and protractor are automated test tools for web applications.
Both are used to automate Angular Applications. As Protractor is specially designed for angular applications, so if you are testing angular applications, it is better to opt for a protractor.
By now you would have been pretty clear about the differences in both. and it would now be easier for you to choose the better tool for your requirements and the winner in Protractor vs selenium will change according to it.
Study your requirements clearly and pick the aptest tool for more efficient testing results.

8 Best Python Test Automation Framework

Python test automation framework ! Yes you have heard it right. Python has got framework that can be used for testing. Since the language is Python, regarded one of the most versatile language in the world, quirks of such framework is many. Some of them are,

  • The quality of the script of the framework
  • Easiness of test case
  • Method to execute modules

Considering the following points you can easily pick out the best framework for your purposes. Some of the commonly used python frameworks are;
1. Robot Framework

Robot framework is largely used for acceptance testing. It is counted among one of the best python framework. The robot is used in Python but it can run on .net-based IronPython and on Jython which is Java based.

The robot is compatible with various platforms including Windows, MacOS or Linux. Robot framework requires Python 2.7.14 or above. To run Robot you will also require ‘pip’ or python package manager. You should also download a development framework to use robot framework.
Advantages of Robot Framework

  • It helps testers to create readable test cases easily using keyword-driven-test approach.
  • Easy usability of Test data syntax
  • It allows using individual elements in separate projects.
  • Having numerous APIs is highly extensible.
  • Supports parallel running of tests via a Selenium Grid.

Disadvantages of Robot Framework

  • Creating customized HTML reports using Robot can be very tricky.
  • Not enough support for parallel testing.

2. Pytest Framework

Pytest Framework
Pytest can assist in test automation of all kinds of software testing. It is easy to learn, open source Python-based framework extensively used by QA teams.
Its veteran features like ‘assert rewriting’; it is being extensively adopted by testers worldwide. Using python does not require any specific prerequisites except for working knowledge of Python. Apart from this, you should also have a python package manager, command line interface, and an IDE.
Advantages of Pytest Framework         

  • Supports compact test suits.
  • Unlike other tools, Pytest does not require debugger or explicitly checking the logs.
  • Supports easy creation of test cases.
  • Pytest allows the use of multiple fixtures.
  • Pytest is extensible by using plugins
  • It offers easy and fewer bugs prone development of test cases.

Disadvantages of Pytest Framework        
The main issue with pytest is the compatibility issue. It does not allow using the test cases written in pytest to be shared with other frameworks.
3. PyUnit/UnitTest Framework
PyUnit/UnitTest FrameworkUnittest or PyUnit is a unit testing Python framework. In the PyUnit framework, the base class TestCase provides assertion methods and the cleanup and setup routines. The methods name starts with “test” in the subclass of TestCase to allow them to execute as test cases.
For the grouping and loading of tests, it supports the load methods and the TestSuite class. It also supports XML reports and unittest-sml-reporting. PyUnit comes with Python by default.
Advantages of PyUnit/UnitTest Framework         

  • No additional module is required to be installed.
  • It is easy to work even for people with no high-end knowledge of Python
  • It offers simple and flexible executing test cases execution.
  • Quick generation of test reports.

Disadvantages of PyUnit/UnitTest Framework

  • The snake_case naming method of python codes and camelCase naming method of JUnit causes confusion.
  • Unclear intent of the test code.
  • Requires boilerplate code.

4. Behave Framework

Behave allows software teams to run BDD testing without any difficulties. It is similar to SpecFlow and Cucumber. Behave allows writing test cases in easily readable language.
Behave requires Python 2.7.14 or any above version, Python package manager or pip, and any IDE like Pycharm or other.
Advantages of Behave Framework

  • Easy coordination among the teams and easy execution of all kinds of test cases.
  • Promotes detailed Reasoning and thinking
  • Clarity of QAs and Devs output.

Disadvantages of Behave Framework

5. Lettuce Framework

It is a behavior driven automation tool that is easy to use and it getting highly popular for BDD testing. It is based on Python and cucumber. It makes the process simpler and entertaining by its BDD approach. Lettuce requires Python 2.7.14 or any above version, Python package manager or pip, and any IDE like Pycharm or other.
Advantages of Lettuce Framework

  • It uses simple language and allows developers to create more than one scenario.
  • Supports cooperation among Dev and QA teams.
  • Helps in running behaviour driven tests cases for black box testing.

Disadvantages of Lettuce Framework
It required strong coordination and communication among developers, testers, and stakeholders.
6. RedwoodHQ Framework


The RedwoodHQ framework lets multiple testers to connect in a single web location to execute the tests simultaneously. It supports complete automation and management of software testing.
REdwoodHQ supports action keyword enabling creating test cases quickly and easily. Supports writing test cases in Python and other languages such as C#, Java, etc. It has an inbuilt IDE.
It helps in easy creation, modification, and execution of test cases. It records a history of all the test runs for future references.
Advantages of RedwoodHQ Framework

  • It is a very user-friendly framework
  • Supports parallel testing
  • Compatible with continuous integration tools such as Jenkins and TeamCity.
  • Suitable for front-end and back-end testing
  • Supports the parallel running of test cases
  • Helps testing teams to easily create and modify the tests.

7. Jasmine Framework
Jasime is a behaviour driven development (BDD) framework. It supports Python as well as Ruby and JavaScript unit test automation. It combines the server-client unit testing. To run Jasmine you are required to have Karma tests runner.
Advantages of Jasmine Framework

  • Supports both asynchronous and DOM-less test cases.
  • Simple, user-friendly and readable syntax
  • Parallel execution of server and client side test cases
  • No external dependencies
  • Available in a ready-to-use state
  • Active community for support issues.

Disadvantage of Jasmine Framework

  • More stress on applications of business value than the technical details.

8. Gauge framework

Gauge is an impeccable tool made from the same team that made Selenium. Since Gauge is an open source framework, there are plenty of quirks in using it. If you wish to integrate continuous testing into CI/CD pipeline, Gauge is one of the best options. Gauge is nowadays gaining lots of momentum owing to its cross-browser testing functionality.
Advantages of Gauge framework

  • Supports variety of plug-in such as java runner, c# runner, Ruby runner, JavaScript runner, Golang runner, Python runner, IDE plugins, Reports, build management etc.
  • Supports all major programming language including Python
  • Command line support
  • Defects can be quickly detected
  • Easy to write test cases
  • Cross browser tests can be automated
  • Scalability of product requirement across QA, Dev and business teams.

Disadvantage

  • Relatively young. Will take time to evolve

How to pick the best test automation framework?
In large a good test automation framework should have best

  • Scripts
  • Test cases
  • Assumptions
  • Techniques to run every module and code
  • High capability to detect the flaws and weaknesses.

But every project is different and might require one or more of the above parameters. So while selecting the best framework for test automation considers the following points:

  • Resource it requires
  • It’s functionalities
  • Test drivers that it includes.
  • Reporting features
  • Integration with third-party tools

It is better to break the project into smaller modules and then look out for the best fit. Not to ignore your budget. You need to consider your budget and then look out for a framework that offers maximum benefits and features for your project.
What to look for in a testing automation framework?
The framework helps in automating your testing process while reducing the manual efforts and making the testing process faster and more efficient. When looking out for an expert framework for your testing requirements consider the following points:

  • The capability of the framework to justify your testing needs
  • Ease of use
  • Library with reusable components
  • Maintenance overheads
  • Integrating with other tools and frameworks
  • Functionalities of your framework
  • Integration with the third-party tools
  • Complexity
  • Features of the framework
  • Support and Maintenance features
  • Triggering automatically without requiring human intervention
  • Stability, flexibility, and extensibility
  • Report creations

There are just the generic points you might consider before picking up a framework for your testing process. On a larger picture, developer’s requirements, an application under test, environment and more play a more important role in selecting the best framework for your requirements.
Conclusion

Now when we are acquainted with various python frameworks, choosing the best one could be a tricky task. Though all of them are good and serves different requirements. It is best to take a note of all your requirements and then pick the framework that fulfils your maximum requirements.

Selenium Tutorial For Beginners [Step by Step]

Everybody knows about the impeccable selenium! The ultimate tool for testing web applications! for you to learn in detail about how to carry out automation testing, we have written an extensive Selenium tutorial just for you!
This blog comprises of three part,
1. Selenium Tutorial For Beginners
2. Selenium Intermediate Level Tutorial
3. Selenium Advanced level Tutorial

Selenium Tutorial For Beginners

What makes Selenium better?

You don’t need to code anything in Selenium and with this; any beginner will be able to record and play the simplest web application scripts.
Usually, Selenium RC needs a server to be up and running for sending commands to the browser. It is used for cross-browser testing and you can write the code in any language.
Selenium Web Driver is a better version of IDE and RC. It directly sends commands to the browser without the need of a server to be up and running.

Different languages can be used for coding the scripts like Java, C#, PHP, Python, Perl, and Ruby. Selenium Grid is used for parallel testing in multiple browsers and environments. It used the hub and node concept where hub acts as a source of Selenium commands and each node is connected to it.
Now, here we will discuss Selenium WebDriver. How a beginner can start learning Selenium WebDriver and how he can excel in it.
Now, first, we will look at the steps we need to follow to download Selenium Web Driver in your machine.

Ways to download and install Selenium WebDriver

  • You should have Java installed in your machine. This is the pre-requisite for Selenium Web Driver to work.
  • You can visit the page: http://seleniumhq.org/download/ and download the client drivers and language bindings. You have the select binding for Java.
  • This download will be named – selenium-2.25.0.zip.
  • Now, you can import all the Jars in Eclipse. You have to right click on the project and import jar files by selecting all the downloaded jar files. For this, you can click on the Libraries tab and then click on “Add External JARs”.

Now Let’s look the First Selenium WebDriver Script

Let’s take an example of the first Selenium Script which we would create using Selenium basic methods.
Let’s first look at the script in detail. In this script, we will do the following test steps.

  • Go to the home page of the test application
  • Verify the title of the page
  • Do a comparison of the result.
  • Close the browser after the script is done.

package projectSelenium;
import org.openqa.selenium.WebDriver;
import org.openqa.selenium.chrome.ChromeDriver;
public class seleniumTest {
public static void main(String[] args) {
System.setProperty(“webdriver.chrome.driver”,”C:\\chromeDriver.exe”);
WebDriver driver = new ChromeDriver();
String baseUrl = “https://google.com”;
String expectedTitle = “Google”;
String actualTitle = “”;
        // launch Fire fox and direct it to the Base URL
driver.get(baseUrl);
        // get the actual value of the title
actualTitle = driver.getTitle();
/*
* compare the actual title of the page with the expected one and print
* the result as “Passed” or “Failed”
*/
if (actualTitle.contentEquals(expectedTitle)){
System.out.println(“Test Passed!”);
} else {
System.out.println(“Test Failed”);
}
driver.close();
}
}

Things to look at the above code:

  • In the first two lines, we have imported two packages. You have to import – org.openqa.selenium and org.openqa.selenium.firefox.FirefoxDriver.
  • The most important step is to instantiate the browser. This is done by line

WebDriver driver = new ChromeDriver();
//This is done to invoke a chrome browser.
You can invoke a FireFox browser by following line of code
WebDriver driver = new FirefoxDriver();
You can invoke an IE browser by following line of code:
WebDriver driver = new InternetExplorerDriver ();
Also, while invoking a browser you have to pass the path of the executable file. You can do it by following line of code:
System.setProperty(“webdriver.chrome.driver”,”Path of chrome driver”);
System.setproperty(“webdriver.ie.driver”,”Path of ie driver”);

  • Get() method is used to enter a url in a browser.
  • getTitle() method of selenium webdriver is used to fetch the title of a web page.
  • Now, we have to compare the expected title with the actual title.

If(expectedTitle.equals(actualTitle))
{
System.out.println(“TEST PASSED”):
}

  • For terminating the browser, close() method is used. Driver.close() closes the active browser window. If you want to close all the opened browser windows by selenium web driver then you can use driver.quit().
  • You can run this test by right clicking on the program and then select as “Run As” as “Java Application”.
  • Next thing which is of utmost important while writing a test script is to identify web Elements which will be explained in detail in the below section.

Locating Web Elements

Locating web elements is very easy. Various selectors are available for that process. find Elements is one such 2 in which selenium webdriver is used for locating a web element and then, you can perform an action on that.

Know More: Selenium Automation Testing With Cucumber Integration

Let’s see some of the methods by which you can identify web element on a web page.

  • className – It will locate web element based on the class attribute. Eg: By.className(“abc”);
  • cssSelector – used to locate web element based on css selector engine. Eg:- By.cssSelector(“#abc”);
  • id – If some web element has id attribute, then you can directly identify the web element using id tag. Eg:- By.id(“abc”);
  • linkText – It will find a link element by text mentioned by you in the test script. By.linkText(“Login”);
  • name – If any web element has name attached to it then you can identify it using name attribute. Eg: By.name(“name”);
  • partialText – It will find a link element by text containing the text mentioned by you in the test script. By.partialText(“abc”);
  • tagName – It will locate all elements which will have this tag.
  • xpath – It is the most used locator in a selenium test script. It will identify the element using html path. It can be relative or absolute. Absolute xpath traverses the path of the web element by root and relative takes the reference of any web element and then traverse to that specified web element. It is better to refer an element by relative xpath rather than absolute xpath.

Basic Actions on a web element

You can click on a web element by using click() method of selenium web driver. You can locate a web element and then perform an action on it.
Eg: driver.findElement(By.xpath(“”)).click();
Also, you can send keys to a particular web element by using send Keys() method of selenium web driver. You can locate a web element and then you can enter some text in it using sendKeys() method.
Eg: driver.findElement(By.xpath(“”)).sendKeys(“name”);
Also, there are other actions which you can perform on a web element by using action class.
WebElement wb = driver.findElement(By.xpath(“”));
Actions actions = new Actions(Driver);
Actions.moveToElement(wb).build(). Perform ();
You can even switch to alert boxes which come when you click on some webelement. You can do it by switchTo().alert() method.
Eg code:
WebElement wb = driver.findElement(By.xpath(“”));
Wb.click();
Driver.switchTo().alert();
Now, you will be able to access the alert box. You can retrieve the message displayed in the text box by getting the text from it.
String alertMessage = driver.switchTo().alert().getText();
Also, you can accept the alert box by function accept(). You can see the sample code as below:
Driver.switchTo().alert().accept();
You can even check conditional operations on a web element.
Also, check whether a web element is enabled or not. If it will be enabled then you can do some operation on it.
Apart from all these, you can check if some web element is displayed or not. In the case of radio buttons, you can check if the radio button is selected or not. You can do these checks by – isEnabled(), isSelected() and isDisplayed() option.

Waits in Selenium Web Driver

Selenium Web Driver
If you want some step to get completed before any other step then you have to wait for the prior step to get completed. In manual testing, it is very easy to achieve but in automation testing, it is bit tedious and you have to wait for the previous step to get completed or a condition to be fulfilled before moving on wards to the next step.
This can be achieved by adding waits in between. There are two types of wait- explicit and implicit wait. If you are expecting a particular condition to be fulfilled before moving to the next step,
Another feature is that you can use explicit wait while if you just want a universal wait, then you can go ahead to use implicit wait. The implicit wait is used to set the default time out for the whole script.
A perfect automation script is made by adding both type of waits – Explicit and Implicit. You have to judiciously use both types of waits to make an efficient test case.

Know More : Top 50 Selenium Interview Questions and Answers

Explicit Wait

Syntax of Explicit Wait:
WebDriverWait wait = new WebDriverWait(WebDriverRefrence,TimeOut);
wait.until(ExpectedConditions.visibilityOfElementLocated(By.xpath(“”));
Expected Condition can be used with so many conditions. Some conditions which can be used with it are:

  • alertIsPresent()
  • elementSelectionStateToBe()
  • elementToBeClickable()
  • elementToBeSelected()
  • frameToBeAvaliableAndSwitchToIt()
  • invisibilityOfTheElementLocated()
  • invisibilityOfElementWithText()
  • presenceOfAllElementsLocatedBy()
  • presenceOfElementLocated()
  • textToBePresentInElement()
  • textToBePresentInElementLocated()
  • textToBePresentInElementValue()
  • titleIs()
  • titleContains()
  • visibilityOf()
  • visibilityOfAllElements()
  • visibilityOfAllElementsLocatedBy()
  • visibilityOfElementLocated()

Implicit Wait

Syntax of Implicit Wait:
driver.manage().timeouts().implicitlyWait(TimeOut, TimeUnit.SECONDS);
For this, you have to import a package into your code. The package name is java.util.concurrent.TimeUnit;

Selenium Intermediate Level Tutorial

Through the section Selenium Tutorial for Beginners, We gave you the basic info that you need to know about the tool. Now let’s go further and learn much more about this impeccable web app testing tool.
How to upload a file in Selenium test cases?
To upload a file, first, you have to identify the element on which you have to upload your file. There you can directly use sendKeys() function of selenium web driver. You can pass the path of the location in sendKeys. In this way, you will be able to upload a file using selenium web driver.

public static void main(String[] args) {
System.setProperty(“webdriver.gecko.driver”,”path of gecko driver”);
String baseUrl = “http://www.google.com /upload/”;
WebDriver driver = new FirefoxDriver();
driver.get(baseUrl);
WebElement element = driver.findElement(By.id(“id of element”));
uploadElement.sendKeys(“C:\\newhtml.html”);
//Here,  above you have to pass the path of the file where your file is located.
// Then you can click the upload file link
driver.findElement(By.xpath(“”)).click();
}
How to use a web table in selenium script
You have to access a web table and the elements present in the table. You can get it by making an xpath. Suppose you have had1 0a table with four blocks.
selenium intermediate tutorial
The first thing which you have to do is to find the XPath of the web element in this web table. Let’s say you want to get to the third element in the above web element.
The coding of the above web table is as below:

Selenium Intermediate Level TutorialSelenium Intermediate Level Tutorial
Now, you can analyze that first there is a table and then there is a tbody. In that tbody there are two rows. One row is having two tables. The first row is having two cells – First and Second. The second row is having two cells – Third and Fourth.
Our goal is to reach to the third cell. Let’s try to make the XPath of it.
The XPath of it will be //table/tbody/tr[2]/td[1]
So, the table is the parent node from which we will iterate to go the third element. From there, we will go to the tbody section and then the second row. From there we will get the first column.
Let’s write a script to get the text out of it.
public static void main(String[] args) {
String url = “http://testsite.com/test/write-xpath-table.html”;
WebDriver driver = new FirefoxDriver();
driver.get(baseUrl);
String txtWebelement = driver.findElement( By.xpath(“//table/tbody/tr[2]/td[1]”).getText();
System.out.println(txtWebelement);
driver.close();
}
}
Let’s take an example of a nested web table. You have to then analyze it carefully and get the XPath of it. Let’s look at the example below to get more information on it.
Selenium Intermediate Level Tutorial:
So, if you want to access the web element which is having text 10-11-12 then you can do it by traversing from the table and then iterating through the rows and columns to reach there.
Xpath would be: //table/tbody/tr[2]/td[2]/table/tbody/tr[2]/td[2]
public static void main(String[] args) {
String url = “http://testsite.com/test/write-xpath-table.html”;
WebDriver driver = new FirefoxDriver();
driver.get(baseUrl);
String txtWebelement = driver.findElement( By.xpath(“//table/tbody/tr[2]/td[2]/table/tbody/tr[2]/td[2]
”)getText();
System.out.println(txtWebelement);
driver.close();
}
}
This way, you can iterate through the rows and columns to reach to a specific cell from a web table.
Now, one of the most important concepts in selenium which will help you in many cases when you won’t be retrieving any text from a web element or to enable a web element to get the text or to perform any action on it.
Let’s talk about JavaScript Executor in detail. It is an interface which helps to execute javascript.
JavaScript Executor
Sometimes you are not able to click on a web element using click() function. You can then use javascript executor to execute click function on a web element. Let’s have a look at the code.
WebDriver driver= new FirefoxDriver();
// JavascriptExecutor interfaceobject creation by type casting driver object
JavascriptExecutor js = (JavascriptExecutor)driver;
You can now click on a webelement using below command.
WebElement button = driver.findElement(By.xpath(“”));
Js.executeScript(“arguments[0].click();”,button);
Also, if send keys isn’t working. You can make use of java script executor to send keys. Let’s look at the example below.
WebDriver driver= new FirefoxDriver();
// JavascriptExecutor interfaceobject creation by type casting driver object
JavascriptExecutor js = (JavascriptExecutor)driver;
js.executeScript(“document.getElementById(‘id’).value=”value;”);
You can even make use of java script executor to refresh a web page. You can do it by following command:
WebDriver driver= new FirefoxDriver();
// JavascriptExecutor interfaceobject creation by type casting driver object
JavascriptExecutor js = (JavascriptExecutor)driver;
js.executeScript(“history.go(0)”);
Sometimes, getText() doesn’t work and then you have to make use of java script executor to get text of a web element. You can do it by following line of code:
WebDriver driver= new FirefoxDriver();
// JavascriptExecutor interfaceobject creation by type casting driver object
JavascriptExecutor js = (JavascriptExecutor)driver;
js.executeScript(“history.go(0)”);
Sysout(js.executeScript(“return document.documentElement.innerText;”).toString());
You can even get the title and URL of a web page using java script executor. The procedure is very simple. Let’s have a look at the following lines of code.
WebDriver driver= new FirefoxDriver();
// JavascriptExecutor interfaceobject creation by type casting driver object
JavascriptExecutor js = (JavascriptExecutor)driver;
System.out.println(js.executeScript(“return document.title;”).toString());
System.out.println(js.executeScript(“return document.URL;”).toString());
Desired Capabilities Concept in selenium web driver
You can make the set of configurations on which you want a particular test script to run. You can pass browser name, version to specify the type of environment on which you want a test case to run.
Let’s see some of the capabilities which you can set in a test case for IE browser.
//it is used to define IE capability
DesiredCapabilities cap = DesiredCapabilities.internetExplorer();
cap.setCapability(CapabilityType.BROWSER_NAME, “IE”);
cap.setCapability(InternetExplorerDriver.INTRODUCE_FLAKINESS_BY_IGNORING_SECURITY_DOMAINS,true);
In the above capability, we have passed the capability browser name and we have ignored the security domain.
After setting the capabilities you can pass the capabilities to the web driver instance so that it executes the test on a particular configuration.
Let’s have a look at the complete set of code.
public static void main(String[] args) {
//it is used to define IE capability
DesiredCapabilities cap = DesiredCapabilities.internetExplorer();
cap.setCapability(CapabilityType.BROWSER_NAME, “IE”);
cap.setCapability(InternetExplorerDriver.INTRODUCE_FLAKINESS_BY_IGNORING_SECURITY_DOMAINS,true);
System.setProperty(“webdriver.ie.driver”, “path of executable”);
WebDriver driver = new InternetExplorerDriver(capabilities);
driver.get(“http://gmail.com”);
driver.quit();
}
Handling a drop down in selenium web driver
You have to first import following packages: org.openqa.selenium.support.ui.Select.
First, you have to identify from DOM whether the dropdown is of select type or not. If it is of select type then you have to go for the below steps.
Then, you have to uniquely identify the select tag. You have to first make the object of Select class and pass the element for which you have to choose the options from the drop-down.
Select dropdown = new Select(driver.findElement(By.xpath(“”)));
Now, there are three main methods which you have to use to select any element from this select object.

  1. selectByVisibleText
  2. selectByIndex
  3. selectByValue

You can either select any element from this drop-down by matching the visible text with that of the text passed by you. You can also select any web element from the drop-down using an index. Last option is to select by value tag.
Also, there are some more functions which are available. Some of them are selectAll() and deselectAll() too select and deselect all the elements when more than one element can be selected.
But, if the dropdown is not of select type then you can’t go for the conventional method. You have to follow another method. You have to uniquely identify the web element on which you have to select a dropdown option. You can identify it and the sendKeys() function of selenium web driver to send keys to the uniquely identified dropdown.
WebElement dropdown = driver.findElement(By.xpath(“”));
Dropdown.sendKeys(“value to be selected”);
How to select the checkbox and radio button is selenium
Sometimes, you come across situations where you have to select checkboxes and radio buttons. You can do it easily with selenium web driver. You just have to use click() function of web driver to click on checkbox and radio button. You can even check of the web element is selected or not.
.isSelected() checks if any web element is selected or not.
It gives false if the web element is not selected and it gives true if the web element is selected.
This way, you can handle radio buttons and checkboxes in a selenium script.

Selenium Advanced level Tutorial

Now, you know almost the stuff which is required for selenium intermediate and beginner level. Now, you are proficient enough to deal with all the advanced level of selenium web driver. You can then practice those and while you are done with those, you can move forward to the advanced level of course.
Let’s see what lies ahead and what can give you an edge in your interviews. You can look at this advanced course so that you can be ahead of all the candidates who just know the basic and intermediate selenium course. Let’s have a look at Selenium Advanced level Tutorial

Selenium Grid


Selenium Grid is issued for running various tests on different browsers, operating systems, and machines in parallel. It used a hub and node concept. You don’t want test cases to run on a single machine. You have your machine as a hub and various systems on which test cases will be distributed. You call those machines as nodes.
The hub is the central point and there should be only one hub in a system. This hub is your machine from which you want to distribute the test cases among all the clients.
This is the machine on which test cases will run and those will be executed on the nodes. There can be more than one node. Nodes can have different configurations with different platforms and browsers.
Let’s see how you can establish a selenium grid in your machine.
You can download the selenium grid server from the official site. You can place Selenium server.jar in a hard drive. You have to place it in all nodes and hub c drive.
Open the command prompt in your hub and then, go to C directory. There you have to fire the below command java -jar selenium-server-standalone-2.30.0.jar -role hub
Now, if you want to check if the selenium grid server is running on localhost that is 4040 port or not. You can visit the local host on your browser.
You have to then go to C directory of the node and open command prompt in it. Also, when you have made the selenium grid server up in the hub, you have to note down the IP address and port.
java -Dwebdriver.gecko.driver=”C:\geckodriver.exe” -jar selenium-server-standalone-3.4.0.jar -role webdriver -hub ip address of hub -port port number of hub
When you fire the above command, again go to hub browser and the port number 4040. Refresh the page and you will see IP address which will be linked to the hub.
Now, you have set up machines with different configurations. But how would the hub know which test case would be run on which node.
This will be done by desired capabilities which will tell that this test script would run on a particular set of configuration.
One can do it using below source code:
This way, you will be able to distribute the test cases across different machines and browsers. You will be able to do parallel testing using Selenium Grid.

Maven and Jenkins Integration with Selenium


Maven is a build management tool which is used to make the build process easy. Maven avoids hard coding of jars and you can easily share the project structure across the team using artifact and version id.
Every team member would be at the same page. You can make a maven project by going to File – New – Other – Maven project. You have to then specify the artifact id and then version id. You will be prompted to select a template. For starting, select a quik start template.
You will get a folder structure where you will be having two folders – src/main/java and src/main/test. In java folder, you will maintain all other stuff except tests while in test folder you will maintain all the test cases.
You will be having pom.xml file where you have to define all the dependencies so that it can download from the maven repository and place them in ./m2 repository in your local project structure.
You can get the dependency from the maven official site and then place in pom.xml. It will download all the required jars.
Also, Jenkins issued for continuous integration of the latest build with the production environment. Whenever a developer will fire the latest build then the smoke test will start running on that build.
If the build gets passed then it can be deployed to the production else the developer and tester would get a notification about the failed build. It makes the delivery cycle very fast.
Also, you can do it by downloading Jenkins war file and then running it so that Jenkins server will be up and running on port number 4040.

After doing that you can install all the necessary plug-ins. You can then create a new item and does the post-build actions.
Also, you can pass the path of git repository from which it will fetch the latest build. If you are using a local server then you pass the path of pom.xml from the system.
You can even set nightly runs with Jenkins, You have to specify the time when you want your test to run. They will run and you will get the reports on the Jenkins server the next morning. Isn’t it time-saving?

Database Testing using Selenium WebDriver

Integrating Selenium tests to the database is so easy in the latest version of the tool. You have to make use of JDBC library for database connections. It allows connection of Java and databases. First, make a connection to the database with the following command:

DriverManager.getConnection(URL, “userid”, “password” )
After doing that you can load the JDBC driver. You can do it by following lines of code:
Class.forName(“com.mysql.jdbc.Driver”);
Now, you have to send the query to the database. How will you do it? You can create an object of a statement class and then execute the query using the statement object.
Statement stmt = con.createStatement();
stmt.executeQuery(select *  from employee;);
Now, you can get the result in the result set. You can do it by following command:
ResultSet rs= stmt.executeQuery(query);
After doing all the operations, you can close the connection.
Con.close();
In this way, you can get the result set and then do all the validations on the result set.

How to take screenshots in selenium web driver

You should get the screenshot of the failed test cases so that you can get to know where exactly is the problem. This will help in better-debugging skills.

Let’s look at the steps involved in taking a screenshot:
TakesScreenshot scrShot =((TakesScreenshot)webdriver);
This step caste a driver instances to Takes Screenshot interface. Now, you have one method which is getting screenshots which will get the image file.
File SrcFile=scrShot.getScreenshotAs(OutputType.FILE);
Now, you have taken the screenshot but you have to place it somewhere. You can create some folder which will be used for storing all the screenshots captured during the execution.
You can do it by following the line of code:
FileUtils.copyFile(SrcFile, DestFile);
This is the way to capture screenshots. But if you want that only the screenshot is taken when a test case fails. You can use ITestListener.
It has various methods and one of the methods is onFailure() which will do the specified task when every there is any failure in a test case.
So you can put this code in that method so that whenever any test fails it will take the screenshot and place it in the folder specified by you.

How to drag and drop in a web page using Selenium Web driver

Now if you want o drag and drop something o a web page, you would be confused. It is very simple. You have to make use of Actions class which gives you a method dragAndDrop() which will drag and drop a web element from a source destination to the desired destination.
Actions actions = new Actions(driver);
Actions. dragAndDrop(Sourcelocator, Destinationlocator).build().perform();
Make sure that the source locator and destination locator have correct xpaths. In this way, you will be able to drag and drop any element on a web page.

How to do right click and double click on a web page

You can do a right-click on a web page using Actions class. Actions class provides a doubleClick method which allows to double click on a web element. You can do it by following lines of code:

Actions actions = new Actions(driver);
WebElement elementLocator = driver.findElement(By.id(“ID”));
actions.doubleClick(elementLocator).perform();
You have to do right-click in selenium using action class only. It is very easy. It provides a method – contextClick() and then right click on a web element.
Actions actions = new Actions(driver);
WebElement elementLocator = driver.findElement(By.id(“ID”));
actions.contextClick(elementLocator).perform();
This way, you will be able to right click and double click on a web element.
How to switch to an iFrame

iFrame is a web page which is embedded into another web page. Whenever you want to click on a web element, which is in another iframe. First, you have to switch to that iframe and then perform an action on it.
You can do switching by
Driver.switchTo().frame(index or name or id of iframe);
Conclusion
Before learning Selenium it’s better to have a thorough understanding of any object-oriented language. languages that Selenium support includes, Java, Perl, C#,  PHP, Ruby, and Python Currently.
We genuinely hope this tutorial has helped in understanding selenium better.

Get a eBook : Download PDF

Top 13 Resources to Learn Selenium Automation

When QA engineers started with the selenium testing journey, they really had a tough time finding out good resources to help them in improving their skills.
The resources then were mediocre once and a very few that could actually help. So with so much of activities happening over the internet, we thought of finding some good selenium resources to help you get started.
Below is a list of top 13 selenium automation resources that will prove helpful to you throughout your learning journey.

1. Selenium 2 WebDriver Basics With Java
Selenium WebDriver is the web automation tool that has the market and its expertise sought after. When you master utilizing the Selenium WebDriver tool, you can make sure of expanding your capacity to compose those awesome automation codes.
This seminar on the web has some truly astonishing video guides and learning materials that will enable you to find more without anyone else. This Alan Richardson’s course is simply too moving to even think about learning.
2. Clean Coders by Uncle Bob Martin
This ought to be your most loved go-to site for adopting best practices being developed. On the off chance that you seek to wind up a really sparkling mechanization hotshot, you need great information about practices being developed. Clean Coders is likewise accessible as a handbook on different web-based business sites.
All the more imperatively, you will be tested to reassess your expert qualities and your responsibility to your art.

Know More:  15 Top Selenium Webdriver Commands For Test Automation

3. Selenium Guidebook by Dave Haeffner
With the exercises in this book and the elemental Selenium tips, you will be ready to play out a genuinely decent arrangement of automatized acceptance tests against the application over some stretch of time and numerous cycles.
As such, we ask you to purchase the book. It’s somewhat more exorbitant than comparative Selenium books, however it’s substantially more successful.
As a matter of fact, this is a gathering of Dave’s extraordinary assets. You get an e-book, video instructional exercises and cheat sheets.
4. gcreddy.com
An online instructional exercise, gcreddy.com gives you recordings and class notes with the goal that you can undoubtedly learn Selenium.
All these demo instructional exercises can be a superb learning and practice stage for you. You can likewise structure a test situation number to computerize in the wake of looking at the usefulness given by every exercise.
This instructional exercise can be given an attempt without a doubt!
5. Ultimate QA
This online course is the main instructional exercise on the planet that will show you how to work without any preparation.
It furnishes you with deep-rooted structure advancement aptitudes. Created by Nikolay Advolodkin to make the best QA engineers, Ultimate QA offers a full Selenium WebDriver adapting course.
You can watch video courses on the web, get a rundown of sites for testing automation, read books, e-learning stage, and browse to slides/introductions, online classes, recordings and significantly more.
Toward the end of this online course, you will have a nitty gritty comprehension about selenium web testing.
6. Selenium – Automation Step by Step – Raghav Pal
Before we figure out how to walk and run, we need somebody to hold our hand and help us make the initial couple of strides.
Each course in this online instructional exercise is intended for fledglings who think nothing about the subject. The sections are rearranged and separated into straightforward subject.
You will gain some new useful knowledge from each video instructional exercise, so we think the more you investigate, the more you learn.
7. Selenium Easy
Selenium Easy is available to students by a little group of experts who work in different associations. The primary goal of the online investigation entry is to give a space to learning and down to earth execution.
They give tests and guides to give you an unmistakable image of your needs. You may need to do little work to meet your present prerequisites.
8. Guru 99 Free Selenium Tutorials
Guru 99 Selenium instructional exercises are helpful for people of Selenium from beginning to advanced edge levels.
They bit by bit proceed onward to advance edge subjects, for example, Framework Creation, Selenium Grid and Cucumber BDD, beginning from the essential Selenium ideas.
To show you Selenium WebDriver, it’s extremely elusive great assets. Also, Guru 99 is one of them.

Know More:  50 Selenium Interview Questions and Answers(2019)

9. Selenium Academy – CrossBrowserTesting
This course demonstrates to you how you can utilize your Selenium matrix for testing on cell phones, including web testing. While you need some earlier learning, beginning with a vigorous cloud testing tool like Cross Browser Testing is an incredible asset.
What’s more, Selenium Academy has a whole course index in your favored programming language covering everything automatization.
10. Selenium Conference
There is no better method to gain from individuals who really use selenium than by going to an individual meeting. On the off chance that you need to break into test automatization, the Selenium Conference is the spot to be.
The uplifting news for you is that the vast majority of the general population are dynamic via web-based networking media and dependably share their tips, traps and counsel on test computerization.
11. Stack Overflow
Do you have any questions? When you hit a knock out and about, here’s the place you sought answers. Stack Overflow is the place in excess of 50 million designers and analyzers share their insight, so you realize somebody will assist you with an issue, regardless of how little, explicit or basic it might appear.
Also, on the off chance that you need the most exact data, go straightforwardly to the source code individuals post for you
12. Software Testing Help
Software testing help is another incredible emotionally supportive network for testers endeavoring to make the change to selenium automation, and these instructional exercises begin from fundamental ideas through cutting edge points, for example, system creation, Selenium Grid and Cucumber BDD.
As you experience these instructional exercises, you’ll see that writing test cases is substantially more reasonable than you thought previously.
13. Selenium 101 Series
The complete Selenium 101 Series gives the tools you have to test selenium tests and achieve the desired results. Selenium 101 Series offers a helpful and edible asset for cleaning your aptitudes by tending to the most widely recognized selenium challenges, including highlights, for example, our intuitive selenium life structures, learning test and eBooks for testing automatization.

Conclusion
Testing is an active industry and the community is constantly talking about more efficient automation. Fortunately, you have a lot of resources to learn Selenium. This list includes some of our favourite content, but it only skims the top of everything.
Take the time to talk to other testers and see what worked for them, practice frequently, and you’re going to write your own test cases in no time.

Top 15 Automation Testing Tools For (Desktop/Mobile) Applications

Automation testing tools has to get the lion share of the credit when it comes to successful test automation/automation testing.
However, if you are a testing enthusiast or a software testing company who is in search of a perfect automation testing tools you might be in a bit of confusion since a plethora of tools are available now.
To help you with that, we have compiled a top 10 list for you to choose from the best.

    1. Selenium
    2. Testio.im
    3. TestComplete
    4. QMetry Automation Studio
    5. Robot Framework
    6. Watir
    7. Ranorex
    8. SoapUI
    9. Katalon Studio
    10. HPE Unified Functional Testing
    11. TestProject
    12. Tricentis Tosca
    13. Eggplant
    14. Calabash
    15. KIF
    16. Serenity
    17. Unified Functional Testing – Quick Test Professional
    18. Applitools
    19. QASymphony qTest
    20. Appium

1. Selenium

Topping the list as always in all the web automation testing tools, clearly, selenium is an outstanding open-source automation testing tool that is accessible today in the market.
Features

      • Being good with a considerable amount of programming languages, testing systems, operating systems, and browsers, Selenium has duly made its reputation in the automation tool market.
      • The robust Selenium WebDriver supports test engineers perform more advanced and complex automation scripts.
      • It assists you in making exceptionally compelling test scripts for exploratory testing, regression testing, and speedy bug reproduction

2. Testim.io

Testim.io uses artificial intelligence technology for the authoring, execution, maintenance, troubleshoot, reporting, and much more automation test cases.
Features

      •  It is not just a tool but a platform that covers almost all the principal factors of automated tests.
      • With the initiation of the notion of Dynamic locators, they concentrate more few testing types like the end to end testing, functional testing, and UI testing.
      • You can utilize its dynamic locators and learn with each execution. The result is too quick authoring and resolute tests that learn, hence, taking out the need to ceaselessly direct tests with each code change.
      •  Wix.com, Netapp, Verizon Wireless, and others are running more than 300,000 tests utilizing Testim.io consistently.
      • The testim.io tool can run Firefox, Chrome, Edge, IE, and Safari browsers. Testim.io grows the stability and extensibility of the test suites.
      •  Furthermore, it also offers the organizations and the teams, the versatility to increase the functionalities of the platform practicing complicated programming logic with HTML and JavaScript.

The tool further encourages organizations quicken time-to-market and accomplish exceptional quality at a small amount of time of conventional arrangements
3. TestComplete

TestCompleteis a SmartBearproduct, an amazing commercial automation testing tool for web, mobile, and desktop testing. TestComplete can also be integrated smoothly with other products contributed by SmartBear.
Features

      • TestComplete can also be integrated smoothly with other products contributed by SmartBear.
      • It permits testers to perform both data-driven and keyword-driven testing and also includes features of an easy-to-use visual record and playback.
      • TestComplete possesses an object recognition engine that can correctly identify dynamic user interface components. Its engine is particularly valuable in applications that have dynamic and continually evolving user interfaces.
      •  The GUI object recognition of TestComplete diminishes the struggle it takes to control up test scripts as the AUT changes.
      • Test engineers can directly apply TestComplete’s feature of record and playback, like Katalon Studio. They can include checkpoints into test levels to confirm results.

4. QMetry Automation Studio

The QMetry Automation Studio is a part of the AI-empowered QMetry Digital Quality Platform, a standout amongst the most extensive software quality system allowing test automation, test management, quality analytics in one suite.

QMetry Automation Studio is a major software automated tool based on Eclipse IDE and primary open source systems – Appium and Selenium.
Features

      • The tool serves efficiency, structure, and reusability to automation endeavors. The studio backs advanced automation procedures with coded automation and empowers manual groups to change into automation flawlessly through its script-less automation strategies.
      • This automation tool gives a combined resolution for an Omnichannel, multi-locale, and multi-device situation by supporting the mobile native, web, micro-services, and web services elements. This encourages the digital endeavor to scale automation along these lines wiping out the requirement for specific purpose tools.
      • Supports different scripting languages such as C++Script, JavaScript, Python, and VBScript.

5. Robot Framework

This is an open-source automation system that performs the keyword-driven methodology for Acceptance Test-Driven Development (ATDD) and acceptance testing. The framework is application-independent being an operating system. The main structure is achieved using Python, and it runs likewise on IronPython (.NET) and Jython (JVM).
Features

      • Robot Framework gives frameworks to various test automation demands. Its test capacity can be additionally spread out by executing other test libraries utilizing Java and Python. Selenium WebDriver is a mainstream external library utilized in the Robot Framework.
      • Robot Framework is also amongst the most famous frameworks adopted with Selenium for Continuous Testing. Further, test professionals can use Robot Framework as an automation system for web testing as well as for iOS and Android test automation.
      •  This tool is not at all difficult to learn for test engineers who understand the keyword-driven testing.

6. Watir

Watir is also an open-source testing framework for web automation testing dependent on Ruby libraries.
Features
• Helps in cross-browsing testing including Opera, Firefox, headless browser, and IE. It additionally backs data-driven testing and incorporates with BBD tools such as Cucumber, RSpec, and Test/Unit.
• Watir with integrations with CI tools and systems like cucumber enable you to accomplish the objectives of testing in the continuous delivery lifecycle or DevOps.
• Scripts are written in Ruby language
• Supports multiple domains and has an in-built recorder

Also Read: Software Testing Trends 2019: What To Expect?

7. Ranorex

Ranorex Studio provides different kinds of testing automation tools that comprise testing all web, desktop, and mobile applications. Additionally, this tool works extraordinarily on both Android and iOS gadgets.
Features

      • With over 14,000 undertakings depending on this automation tool, they have shown their determination. As a whole lot of giant and well-known IT ventures depend on the Ranorex Studio tool for testing, the device has become a common name in the business.
      • With Ranorex Studio you can run tests in correspondence and stimulate cross-browser testing for Firefox, Chrome, Microsoft Edge, Safari, and others.
      • The tool works effectively with ERP and SAP packages as well, and it can rely on data and cloud servers for running tests locally and remotely, respectively. Also, by using this tool the company and its team will waste less time fixing issues with unstable tests and more time evaluating the condition of the application.

8. SoapUI

This is an open-source, web service testing tool for Representational State Transfers (REST) and Service-Oriented Architectures (SOA). It allows automated load testing, automated functional testing, and compliance testing. The tool additionally possesses mocking and simulation traits along with web service research.

Features

      • SoapUI isn’t a test automation application for mobile or web application testing; however, it very well may be a device of choice to test API and services as well.
      •  It is a headless functional testing application, especially for API testing.
      • The tool offers a quite a comprehensive feature set for API testing like drag and drop, point-and-click test generation, asynchronous testing, powerful data-driven testing from databases and files, reusing of scripts, etc.

9. Katalon Studio

Katalon Studio is a robust test automation tool for a mobile, web application, and web services. Being based on the Selenium and Appium systems, this tool takes the benefits of these systems for integrated software automation.
Features

      • The platform helps distinctive levels of the testing capabilities. Non-developers can even find the tool simple to begin an automation testing venture like utilizing Object Spy to record the test scripts while advanced automation testers and software engineers can save time on developing new libraries and sustaining their scripts.
      • Katalon Studio can be integrated into CI/CD procedures and functions admirably with prominent devices in the QA procedure including JIRA, qTest, Jenkins, and Git.
      •  It provides a great component called Katalon Analytics that gives users overall perspectives of test execution reports through dashboard comprising of charts, metrics, and graphs.

10. HPE Unified Functional Testing

Unified Functional Testing (UFT) has for some time been a standard among commercial testing systems for functional testing, consisting of features that support API, GUI, and web testing for applications on any platform.
Features

      • It provides a high-level automation process through reusable test segments, smart object recognition, automated documentation, and a robust error administration mechanism.
      • UFT is developed for Windows and utilizes Visual Basic Scripting Edition to register testing procedures and object control. Also, it coordinates with other quality control devices such as  Mercury Quality Center, Mercury Business Process Testing, and CI so you can without any difficulty integrate it into existing work processes.
      • HPE Unified Functional Test is a pioneer cross-platform testing device. It can automate desktop, web,  Java, SAP, Delphi, PeopleSoft,   Oracle,  Flex, Net, Mobile, Siebel, Stingray, PowerBuilder, ActiveX, Visual Basic among different applications. The list for its development environment is quite enormous!

11. TestProject
testproject Logo PNG
100%  opensource, free tool for web-based testing that has a considerable community backup

      • You can forget the complex installation. Testproject has built-in Selenium and Appium for web-based mobile app testing and web app testing
      • You can avail reusable script that’s generated within the community for faster testing
      • A well-built collaborative repository that can be managed int he cloud.
      • You can monitor the execution process in your entire operation with the help of a single dashboard
      • You can seamlessly integrate with CI/CD with the help of DevOps tools that have been integrated into TestProject.

12. Tricentis Tosca
Tricentis Tosca
A supreme continuous testing platform that will help you in testing without any script or coding. Tricentis Tosca has the support of over 160+ technologies and enterprise applications.

      • MBTA (Model-based Test Automation)  in Tricentis will help in testing without the help of test code
      • Easy to use Automation Recording Assistant (ARA)
      • Risk-based testing helps in removing redundancies of test cases
      • intuitive interface and for better automation of APIs
      • OSV (Orchestrated Service Virtualization)helps in building virtual services without much technical knowledge
      • Readily available and reliable test data

13. EggPlant
Eggplant logo
AI-assisted testing is the forte of EggPlant. Testing and monitoring can be easily done through the platform. A cloud-based system is mainly used to ease the testing process. You can test and monitor testing related activities from any nook and corner of this world.

      • Be it OS (operating system) or browser Eggplant can automate with ease
      • Equipped RPA, machine learning, and AI to avoid the hustle of manually operating the tests
      • Data-driven testing
      • Detailed load and performance testing features
      • Ability to do automated as well as manual tests
      • You control the tests even when  it’s running

14. Calabash
Calabash logo
Helps in automating UI acceptance tests for mobile/web apps with ease. What makes the tool special is that it’s open-source and it supports Cucumber based activities.

      • Natural language is enough to write test in this tool
      • Tests in Calabash can be understood by business experts, technical experts as well as non-technical peoples
      • Helps in enabling UI interaction with applications

15. Keep it Functional  (KIF)
iOS integration test framework which allows easy test automation of iOS apps. The software used the XCTest testing target to build tests. Let’s have a look at the features

      • All the tests have to be written in Objective-C
      • Can be integrated directly to the x-code project
      • The suite is run against iOS 8+ and Xcode 7+
      • Imitates actual user input

16. Serenity
serenity-bdd logo png
Serenity is a prominent automation testing tool. It is most preferred for automated acceptance testing and regression testing. It offers a bundle of features that makes it top the list of automation testing tools. Some of its main features are:

      • It has a Java-based framework that cordially collaborates with BDD tools such as JBehave and Cucumber.
      • Supports easy writing of Selenium and BDD tests.
      • Supports high-level test scenarios while also including lower-level application details.
      •  It behaves like a cover on top of Selenium WebDriver and BDD tools. 
      • Serenity BDD was initially called Thucydides 
      • Supports managing state between steps, handling WebDriver management, taking screenshots, parallel test execution, helping Jira integration.
      • Supports the creation of detailed reports.
      • Creates Selenium BDD test results and also application documentation.

17. Unified Functional Testing – Quick Test Professional
UFT logo png
Mercury Interactive venture which was initially named as Quick Test Professional (QTP), is now prominently known as Unified Functional Testing. Its name was changed when HP acquired it and renamed it as Unified Functional Testing. It is now again acquired Micro Focus.
QTP/UFT is among the top automation testing tools present in the markets. Some of the features that make it a preferred automation testing tools are:

      • Supports web testing functionality
      • Supports Oracle, PeopleSoft, WPF, NET, SAP, Terminal Emulators,  Siebel, and more. 
      • Supports end-to-end automation of testing processes.

18. Applitools
Applitools logo png
Applitools is an automation testing tool developed especially for visual validation assurance, i.e. User Interface (UI) application. some of its main features are:

      • Supports UI display testing. 
      • Validates content or data
      • Provides layout and appearance of each visual element.

19. QASymphony qTest
qtest-logo png
qTest, a JIRA was created to manage BDD/TDD end-to-end workflows. The main features of QASymphony qTest are:

      • Creates and executes tests.
      • faster testing
      •  Is a centralized repository for test defects management, test results, and resolution. 
      • Enhances productivity and collaboration
      • focuses on end-users
      • Supports scaling test-first efforts across your organization

20. Appium

Appium logo png
Appium is another leading automation testing tool. It is a free, cross-platform, open-source mobile automation tool. Some of its main features are:

      • Supports creating UI tests for mobile applications.
      • Supports Android, iOS, and other prominent OSs. 
      • Supports test scripts creation using the Selenium JSON

21. CA Agile Designer
CA Agile Designer logo png
 CA Agile Requirements Designer is not so prominent, but definitely a worthy automation tool.  It has its own peculiar outlook to test automation. It does not emphasize on the code and designs automated tests automatically. It uses model-based requirements for developing automated tests. Whenever any change is done to the model, it auto-generates and updates test cases. 
Final words…
It’s presently quite impossible to envision a software world without using automated testing tools. With these tools, the businesses can ensure that all the products delivered to the market are free of any glitch and bug.
The automation tools listed above will slash the time spent on testing and further support companies save loads of resources. These tools will additionally, help the businesses decrease their team size pretty efficiently.
automation testing tools

6 Reasons For Automation Testing Failure

 Around 90% of the test automation community doesn’t know test coding, rather just a small percentage of the people know their tool, program and they understand coding as well.

Most of them go for the easy way!
Most hacks occur because individuals can’t afford real options, lack access to appropriate products which exist in a market that just doesn’t recognize their requirements. This similar strategy which is infused in our nature is applied by the test automation engineers.
There are primarily 4 types of automation tester who adapt to simple hacks for performing automation testing:
1. The Now Syndrome Tester: Whose aim is to fix the code now and rest will be tackled later on and that never again arises.
2. The Lazy Tester: These sorts testers have no time to write the codes or to learn new from the projects.
3. The Never-Failing Tester: Whatever arises these testers will make the test pass.
4. The Cod Puzzler: The testers who don’t know what they are writing in the codes.
So, what is the wrong way of coding? When you have utter disregard for anything you do that work monotonously.
You try to find the easiest solution to deliver the result as soon as possible, no matter how you are doing it.
Such kind of attitude is clumsily adopted by someone who is not proficient in the field. This is what people are doing in test automation projects, who know nothing about coding or don’t even want to the learn proper way.
There is a good chance that a failed automated tester will be having the following symptoms:

  • Automation testers do shortcut kind of work i.e. copy &paste.
  • Automation testers are horribly lazy to append more features.
  • Automation testers are not sure to make adjustments in the system.
  • Automation testers are scared to refactor the framework.

Rather than modeling tests every time, writing four lines of code and using test assertion from the test engine, and trying to catch bugs every time, testers believe to do 10 lines of coding.
They give weight to quantity instead of quality. And the good news is many of these code snippets technique is used all around the world, not just in India.
But it’s not something to take pride in because it basically is not the accurate method of testing.
Let’s have a look different types of coding shortcuts/hacks strategies applied by automation testers which categorize them as failed testers.
1. For Loop Method
Almost 38000of lines go through thought work, test runners don’t use test engine, especially in C#.
They start with the for loop for first 10 tests, then read the copied codes from excel and make this a regular procedure that sums up to 25000 tests.
This is the method of for loop with hardcore process calls. And these are really easy to accomplish automation test hacks which might seem unbelievable.
However, it’s a bitter reality of how unlearned testers are performing automation testing these days.
2. Duplicating of Tests
Another instance of such improper automation testing approach is taking one copy of tests as the point the variable changes in another scenario, even operating system changes but copied the content of code is taken in all the environments.
It’s never revealed by testers that the copy of the same test from a previous one is performed instead they tell that is was the same kind of test.
And this is done continuously on different scenarios. Moreover, after a certain time, the test code does not remain the same but it becomes similar since difference always occurs in automation testing–it’s impossible to refactor the code.
Since right testing is an outcome of hard work, not the hack of using “control + C” and “control + V” technique from the excel sheet –this is an extremely bad habit in coding and testing.
Spreadsheet IDE for Keyword-Driven Testing
There are many cases of test automation engineers who have complete codes saved in their excel sheets which they use in their keyword drove testing process.
banner
Hence, in this way keyword driven testing has outlasted its purpose. Why? There are tests that need coding than some other tests require well representation by employing the keyword driven strategy.
But this addiction to copying code from spreadsheet practice has eventually ruined the whole process.
The automation testers are simply reading and copying from their spreadsheets, do string formatting, generate the C# file, organize it at the runtime and run the code!
Such failed testers don’t know how to model, even don’t want to study C# or.Net reflections just take the easy road to test, i.e. copying the codes. And this pathetic hack is run in almost all the keyword driven testing.
4. Researching Approach
Individuals nowadays state they are researching to learn better coding skills, but here too such testers use Google search engine to find the shortcut solutions.
How?
The testers open the links from the first few results of the Google page than they directly apply the same strategy –copying&pasting the codes from these links.

They do not model it; even they don’t notice that these codes already exist in their previous spreadsheets, because such automation testers are not trying to understand the real and accurate intent of testing. Surprisingly, they proudly declare that they write so many codes in a day.
5. Delete Assertion Rule
Further, these types of unprofessional automated testers work on the goal of deleting the assertion.
It’s our duty that in case that the automation testing begins to fail, we need to work on them rather than thinking that company will consider us a bad tester if we show them the failed testing results.
So, to save them from a shame the automated tester deletes the assertion which is a total misunderstanding of performing the test automation properly.
There is nothing wrong if a test fails basically, the goal is not passing the test. But the rule in an unskilled tester’s diary is – comment – run the code – create the report – uncomment it, eventually to pass the test anyhow.
6. Repeat Testing Technique
Then there’s a repeater automation tester. What is this type of tester’s goal?
The person doesn’t want to learn multi-threading so he/she instead of solving any issue will read it only once per test considering there are merely 10 or 12 tests that need to be run, so it’s fine using such technique! Most of the testers are working on this strategy.
So, the same file is read hundreds or thousands of times rather than learning something new.
Consequences of using Coding Hacks in Test Automation.

  • Collections of the plagiarized part
  • Neither an original innovation nor a relevant solution
  • Inefficient, insecure, improperly designed, and also illegal
  • These solutions can never satisfy the customer
  • Violation of IP rights
  • Can fail shortly as should be

Wrapping up…
To be honest, never can an automation testing be performed and achieved in this way. Hence, the test automation is not at all meant for the failed developers, knowing nothing about testing and coding.
app testing
Testing is not for everyone, not just for anybody who doesn’t know to code appropriately. In fact; automation testing is also not for the one who knows a few codes.
This great process needs right aptitudes, understanding of coding languages and eagerness to further learn something to sharpen the testing skills.

Also Read: Mobile App Testing companies are in plenty. Know why testbytes is the best choice for you

Translation of Manual Test Cases to Automation Script: Know How?

Automation testing comes ahead of manual testing.
Manual testing should be done extensively on an application under test so that manual test cases become reliable.

They should be executed at least once and on their basis, automation scripts have to be made.
Let’s assume a simple scenario of logging onto Facebook. This test case is very simple when you look at the manual test steps.

Step No Precondition Step Test Data Expected Result Actual Result
1 Google Chrome is launched and ready to use Hit URL www.facebook.com The Facebook homepage opens  
2 User Name and Password Enter Username and Password abcd@gmail.com
 
*****
Username and Password are entered  
3.   Click on Sign In   The user is logged in Facebook  

The Process of Translation of Manual Test cases to automation scripts
There are various steps involved in translating manual test scripts to automation.
Steps that are required for testing and which need to be automated.
State of the Application -> Test Steps -> Verification and Validation -> Test Data -> Results -> Post Operation
1. State of Application
It is the precondition for the test to be automated. These requisites should be there to perform a particular step.
Let’s say if you want to begin a test, you need a browser on which you can perform all these operations.
The Browser should be launched and should be ready to use. But you must be wondering how you would be doing in automation.
It depends on which automation tool you are using.
If you are using Selenium, then you can just have a reference variable of WebDriver and make the object of the browser you want to instantiate.


WebDriver driver = new FirefoxDriver();     // for firefox driver.
System.setProperty(“webdriver.chrome.driver”,”Path of Chrome driver”);
WebDriver driver = new ChromeDriver();     // for chrome driver
System.setProperty(“webdriver.ie.driver”,”Path of ie driver”);
WebDriver driver = new InternetExplorerDriver();     // for ie driver
This way, you will be able to instantiate your browser in your test. Your browser would then be ready for use and for execution of the step.
Also, if you want step number 2 to get completed then you have to wait for step number 1 to get completed.
In manual testing, it is very easy but in automation testing, you have to wait for step number 1 to get executed.
banner
You can achieve this by adding waits in between. Wait can be both explicit and implicit.
If you are expecting the particular condition to be attained then you can use explicit wait while if you just want a global wait, then you can go ahead to use implicit wait.
A perfect automation script is made by adding both type of waits – Explicit and Implicit.
Syntax of Explicit Wait:
WebDriverWait wait = new WebDriverWait(WebDriverRefrence,TimeOut);
wait.until(ExpectedConditions.visibilityOfElementLocated(By.xpath(“”)); 
Expected Condition can be used with so many conditions. Some conditions which can be used with it are:
1. alertIsPresent()
2. elementSelectionStateToBe()
3. elementToBeClickable()
4. elementToBeSelected()
5. frameToBeAvaliableAndSwitchToIt()
6. invisibilityOfTheElementLocated()
7. invisibilityOfElementWithText()
8. presenceOfAllElementsLocatedBy()
9. presenceOfElementLocated()
10. textToBePresentInElement()
11. textToBePresentInElementLocated()
12. textToBePresentInElementValue()
13. titleIs()
14. titleContains()
15. visibilityOf()
16. visibilityOfAllElements()
17. visibilityOfAllElementsLocatedBy()
18. visibilityOfElementLocated()
Implicit Wait
The syntax of Implicit Wait:
driver.manage().timeouts().implicitlyWait(TimeOut, TimeUnit.SECONDS);
2. Test Steps
Test Steps would be written in your script itself.
It should have logical names of variables so that machine and anyone can understand what’s happening in the system.
You have to add for all steps verification and validation because the assertions will only tell whether the step got passed or not.
Make sure to add comments for more readability. You can even add debugging statements to test if it got stuck at one particular point.
Along with this, you should have output statements so that the output can be written to a console.
3. Verification and Validation
Testing has verification and validation as its core part. Without it, it is baseless.
You should have so many checkpoints, conditional statements, and loop statements.
These should be used to effectively test the application under test.
For example: in the above scenario, you can create validation steps of the login page of Facebook.
You can test the text of the logo of Facebook or the title of the page so as to make sure whether you have landed onto the right page or not.
Also, after entering username and password you can have more assertions added in your test case to check whether you have successfully signed in or not.
4. Test Data
Test Data is a very crucial part of testing. First thing is to decide where you must place this data.
gametesting
The simplest answer to this is an Excel sheet. You must hard code the data or not.
For this, you can use an excel sheet to store the data and then fetch the data from it to use on your test case.
File file = new File(“Path of Excel Sheet”);
FileInputStream fis = new FileInputStream(file);
XSSFWorkbook wb = new XSSFWorkbook(fis);
Sheet sh = wb.getSheet(sheetName);
In this way, you can access the sheet and then fetch the data from it according to your test requirements.
5. Results
You need something to post your results.
Your automation tool should have some good reporting add-on so that you can get some good quality reports.
You can leverage TestNG for this. Or you can prefer Behaviour Driven development framework like cucumber to get reports.
Allure reports even give you more advances presentation of reports. These all options can be integrated with your test to make the result look more attractive.
6. Post Operation
After the execution of the test step, it is very important to close the browser.
In automation, once the script has been executed, you should close the browser diligently by using
Driver.quit(); // for closing all the sessions opened by selenium
Driver.close(); // for closing the browser on which operation is performed.
Conclusion
Thus you will be able to automate your manual test steps following this.
app testing
You can have the regression suite running after all steps are automated to know which functionality is having most of the bugs.
All the best!

Also Read : 11 Reasons Why Transition from Manual Testing to Automation is Beneficial