How to Install Appium Server and Node on Windows through Command Line

Are you ready to dive deeply into the exciting world of mobile application testing with Appium but feeling a tad overwhelmed about where to begin? You’ve hit the jackpot by landing here!
Consider this guide your go-to pal, guiding you through the ins and outs of setting up Appium Server and Node.js on your Windows machine, and guess what? We’re doing it all using the charm of the Command Line.
That’s right—we’re skipping the maze of GUI setups in favor of some good old-fashioned command-line wizardry.

We’re here to simplify the whole process into easy-to-follow steps that even those new to the game can tackle without breaking a sweat.

Whether you’re preparing to put your innovative app through its paces or aiming to make your testing workflow as smooth as silk, getting Appium and Node.js up and running on your system is your starting line.

So, why not pour yourself a cup of your preferred drink, and let’s tackle this setup together, one command at a time? Stick with us, and before you know it, you’ll be all set to dive into your testing quests with gusto!

banner

Let’s understand How the Architecture of Appium Works

Appium is basically an HTTP server. This server is written in Node.js and it helps to create multiple web Driver session against different platforms. This Appium server receives request from java client which listens for commands from Appium Server.
Let’s have a look at Appium in detail with this video representation.

The way of working of Appium server is almost the same as in selenium RC. The way iOS and android interact with server is quite different. In case of Ios, an Appium proxy commands to a UIAutomation Script. This script would be running in MAC environment.
This application in Ios is called Instruments. In case of android almost everything is same where the server proxy commands to a UIAutomator test case. UIAutomator is a native UI Automation framework which supports junit test cases.
Now let us look at the command line way in which you can install Appium Server on your windows machine.

Installing Appium Server and Node on Windows

Mentioned below is a step-by-step guide on how to install Appium Server and Node on a Windows machine using the command line:

Step #1: Install Node.js

  • Open a command prompt by pressing Win + R, typing cmd, and pressing Enter.
  • Check if Node.js is already installed by running the following commands:
  • Node -v npm -v 
  • If Node.js is not installed, download the latest version from the official website and follow the installation instructions.

Step #2: Install Appium Server

  • Open the command prompt and install Appium globally using npm:
  • npm install -g appium 
  • Verify the installation by checking the Appium version:

appium -v 

Step #3: Install Appium Dependencies for Android

If you plan to automate Android applications, you must install Appium dependencies for Android. Follow these steps:

  1. Install the Android SDK:
  • Download Android Studio from the official website.
  • Run the installer and follow the on-screen instructions.
  • Open Android Studio, go to “Configure” > “SDK Manager,” and install the necessary SDK components.
  1. Set the ANDROID_HOME environment variable:
  • Open the System Properties window by right-clicking on “This PC” or “Computer” and selecting “Properties.”
  • Click on “Advanced System settings” > “Environment Variables.”
  • Add a new system variable named ANDROID_HOME and the path to the Android SDK as the variable value.

Add Android tools to the system PATH:

  • Edit the Path variable in the System Variables section and add the following paths:

perlCopy code

%ANDROID_HOME%\platform-tools %ANDROID_HOME%\tools %ANDROID_HOME%\tools\bin 

Step #4: Install Appium Dependencies for iOS (Mac only)

If you plan to automate iOS applications, you must install Appium dependencies for iOS. Follow these steps:

  • Install Xcode from the Mac App Store.
  • Install Appium dependencies using npm:

npm install -g appium-doctor 

  • Run appium-doctor to check for any missing dependencies:

Follow the instructions provided by Appium-doctor to install any missing dependencies.

Step #5: Start Appium Server

  • Open a command prompt and start the Appium server:
  • Appium will start, and you’ll see logs indicating that the server is listening on a specific address and port.

Note: If you encounter any issues related to ports being in use, you can specify a different port using the –port option:

bashCopy code

appium –port 4725 

Step 6: Test Appium Installation

After installing Appium successfully, it is time to test the installation by running a simple test script. Create a new file with a .js extension (e.g., test.js) and add the following code:

const wdio = require(‘webdriverio’); const opts = { port: 4723, capabilities: { platformName: ‘Android’, platformVersion: ‘YOUR_ANDROID_VERSION’, deviceName: ‘YOUR_DEVICE_NAME’, app: ‘PATH_TO_YOUR_APK’, automationName: ‘UiAutomator2’, }, }; const driver = wdio.remote(opts); (async () => { await driver.init(); const field = await driver.$(‘ID_OR_XPATH_OF_AN_ELEMENT’); await field.setValue(‘Hello, Appium!’); await driver.deleteSession(); })(); 

Replace the placeholder values (YOUR_ANDROID_VERSION, YOUR_DEVICE_NAME, PATH_TO_YOUR_APK, and ID_OR_XPATH_OF_AN_ELEMENT) with appropriate values for your Android device and application.

Run the test script using the following command:

node your_test_script.js

If everything is set up correctly, Appium will launch your application on the specified device, interact with the specified element, and close the session.

Why Appium?

If you are wondering why Appium is a preferred choice for mobile testing, here are some of the common reasons:

  • Cross-Platform Compatibility: Appium supports Android and iOS, allowing you to write tests for both platforms using a single codebase.
  • Programming Language Agnostic: You can write Appium tests in multiple programming languages, including Java, Python, C#, and more.
  • Open Source: Because Appium is open source, a worldwide community of developers is constantly improving it. This ensures that it stays up-to-date with the latest mobile technologies.
  • No App Modification: Appium tests your app in the same way that users use it, without modifying the app. This provides a more realistic testing environment.

Prerequisites of Installing Appium

Before installing Appium, make sure you have the following prerequisites:

  • Java Development Kit (JDK): Appium is built on Java, so you must install the JDK on your machine. You can download the latest JDK version from the official Oracle website.
  • Android Studio: If you plan to automate Android applications, install Android Studio to set up the necessary Android dependencies. Download Android Studio from the official website.
  • Xcode: For automating iOS applications, you’ll need Xcode. Install it from the Mac App Store if you’re using a Mac.
  • Node.js: Appium is built on Node.js, so you need to have Node.js installed. Download the latest version from the official Node.js website.

Conclusion

Hence, now you got to know that installation of Appium is damn easy with the command line rather than doing it manually. NPM is a wonderful package installer and makes your task easier. Install it and start the automation. All the best!!

FAQs

Why is Appium important in iOS and Android App testing? Is it because of its architecture?

Appium plays a pivotal role in iOS and Android app testing, primarily due to its unique architecture, which allows for seamless cross-platform testing.

This tool operates on a client-server model, enabling testers to write tests in their preferred language using standard APIs. Its significance lies in the ability to test native, hybrid, and mobile web apps without needing to alter the app code.

By supporting Android and iOS platforms, Appium facilitates a more efficient testing process, reducing the time and resources spent on writing and maintaining separate tests for each platform.

This approach not only enhances productivity but also ensures consistency in testing across different environments.

How Appium Architecture Works?

Test Script Initialization:

  • The developer writes a test script using their preferred programming language and the corresponding Appium client library.

Appium Server Startup:

  • The developer starts the Appium Server, specifying the desired capabilities such as the platform (Android or iOS), device details, application path, and other relevant configurations.

Connection Establishment:

  • The Appium client library in the test script initiates a connection to the Appium Server by providing the server’s address (IP and port) and the desired capabilities for the test session.

WebDriver Commands:

  • The test script, through the Appium client, sends WebDriver commands to the Appium Server. These commands include actions like tapping on an element, entering text, or navigating between screens.

Translation and Execution:

  • The Appium Server translates the WebDriver commands into corresponding actions supported by the mobile platform. For example, a WebDriver “click” command might translate to a tap on the screen.

Interaction with Mobile Device:

  • The translated commands are then executed on the mobile device, interacting with the application just as a user would. This interaction includes gestures, input, and navigation.

Response Handling:

  • The Appium Server captures the responses from the mobile device and communicates them back to the Appium client. These responses may include success or failure indicators, as well as any relevant data.

Test Script Completion:

  • The test script processes the responses received from the Appium Server, making decisions based on the success or failure of each command. The script may also include assertions to verify the expected behavior of the application.

Session Closure:

  • Once the test script completes its execution, the Appium Server closes the WebDriver session, releasing the resources associated with the test session.

How To Start the Appium server in CMD?

To start the Appium server via the Command Prompt (CMD) on Windows or Terminal on macOS/Linux, you first need to have Appium installed. If you haven’t installed Appium, you can install it using Node.js’s package manager (npm) with the following command:

npm install -g appium

Once Appium is installed, you can start the server by opening CMD or Terminal and running the following command:

appium

This command starts the Appium server with the default settings, typically listening on port 4723. If you want to specify a different port or customize other settings, you can use various flags. For example, to start the Appium server on port 5000, you can use:

appium -p 5000

For more advanced configurations and options, you can refer to the official Appium documentation or use the appium --help command to see a list of all available command-line options.

Is node js mandatory for Appium?

Yes, Node.js is mandatory for Appium. Appium is built on the Node.js platform and uses JavaScript for its execution. The installation of Appium itself is typically managed through npm (Node Package Manager), which is a part of Node.js.

Therefore, having Node.js installed on your system is a prerequisite for installing and running Appium for automated mobile application testing.

How to install Appium using npm on Windows?

To install Appium on Windows using npm, follow these steps:

  1. Open Command Prompt as an administrator.
  2. Ensure Node.js is installed by running node -v. If not installed, download and install it from nodejs.org.
  3. Install Appium by executing npm install -g appium.
  4. Verify the installation with appium -v.

This installs Appium globally on your Windows system, making it accessible from any command prompt.

How do I run an Appium server?

To run an Appium server, follow these simple steps:

  1. Open your command prompt or terminal.
  2. Type appium and press Enter.

This command starts the Appium server with default settings. You can customize its behavior using various flags (e.g., appium --port 4723 to specify a different port).

How to install node on Windows Terminal?

To install Node.js on Windows using Windows Terminal, follow these steps:

  1. Visit the official Node.js website (nodejs.org) to download the Windows installer.
  2. Choose the version you need (LTS for stability or Current for the latest features).
  3. Once downloaded, run the installer (.msi file) and follow the installation prompts. Ensure to select the option to add Node.js to the PATH if asked.
  4. After installation, open Windows Terminal.
  5. Verify the installation by running node -v and npm -v to check Node.js and npm versions, respectively.

This process installs Node.js and npm (Node Package Manager), enabling you to run Node.js applications and install packages globally.

How to install node test?

To verify that Node.js is installed on your system:

  • Open your terminal or command prompt.
  • Type node -v and press Enter. This command will show the installed Node.js version, indicating that Node.js is installed.
  • You can also check npm (Node Package Manager), which comes with Node.js, by typing npm -v and press Enter. This will display the installed npm version.

Installing a Package Named “test”

If there’s a specific npm package you’re looking to install named “test” (this is a hypothetical scenario as there might not be a package with this exact name meant for general use), you can install it using npm with the following command:

npm install test

For installing any package for development purposes and saving it to your project’s package.json file, you can use:

npm install test –save-dev

Replace “test” with the package name you intend to install. If you’re experimenting with or learning about npm packages, you can replace “test” with a real package name, like “express” for a web server framework or “jest” for testing.

Note

If you’re new to Node.js and npm, it’s worth mentioning that “test” is often used in documentation and tutorials as a placeholder for the actual package name you wish to install or the command to run tests defined in a package.json file. To run tests defined in your package’s package.json, you would use:

npm test

This command runs the test script specified in the “scripts” section of package.json.

A Study Towards Regression Testing Techniques and Tools

Regression testing verifies that no new mistakes have been added to the programme after the adjustments have been made by testing the modified portions of the code and the portions that may be impacted due to the alterations. Regression is the term for anything coming back, and in the context of software, it refers to a defect.

When should you do regression tests?

1. When a new feature is added to the system and the code is changed to accommodate and incorporate that feature with the current code.
2. When a software flaw has been found and is being fixed by debugging the code.
3. When a code change is made to improve performance.

App Bug fixing

Regression testing procedure:

Initially, anytime we make changes to the source code for whatever reason—such as adding new functionality or optimising existing code—our software fails in the previously created test suite for apparent reasons when it is run. After the failure, the source code is debugged to find the program’s faults. The necessary changes are done after finding the problems in the source code. Then suitable test cases are chosen from the test suite that already exists and covers all the updated and impacted portions of the source code. If more test cases are needed, we can add them. Regression testing is ultimately carried out utilising the chosen test cases.

Regression testing procedure

  • All test cases are chosen with in this manner from the test suite that is already in place. Although it is the simplest and safest method, it is not very effective.
  • Randomly choose test cases: This strategy involves choosing test cases at random from the test suite already in place; however, it is only effective when every test case has an equal capacity to identify faults, which is extremely uncommon. Because of this, it is rarely used.
  • Choose test cases that cover and test the updated portions of the source code and the parts that are affected by these modifications are chosen in this approach.
  • Pick higher priority test cases: In this method, each test case in the test suite is given a priority code based on its capacity to identify bugs, client requirements, etc. The test cases with the greatest priorities are chosen for regression testing after giving the priority codes.The test case with the highest priority is ranked first. A test case with priority code 2 is less significant than one with priority code 1, for instance.

Read Also: Difference Between Regression Testing and Retesting

  • Tools for regression testing: In regression testing, we often choose test cases from the current test suite itself, ; so, we don’t need to compute their expected outcome and it can thus be readily automated. Automating the regression testing process will be extremely effective and time saving.

The following are the most often used regression testing tools:

  • Selenium
  • WATIR (Web Application Testing In Ruby)
  • QTP (Quick Test Professional)
  • RFT (Rational Functional Tester)
  • Winrunner
Regression testing provides the following benefits:
  • It makes sure that no new defects have been created after the system has received new functionality.
  • Since the majority of the test cases chosen for regression testing are already part of the test suite, their anticipated results are known. As a result, automated tools may readily automate it.
  • It aids in preserving the source code’s quality.
The drawbacks of regression testing include:
  • If automated tools are not employed, it may take a lot of time and resources.
  • Even after relatively minor modifications to the code, it is necessary.

Selenium

It is one of the best automated tools for testing web applications for regression. You may use Selenium Web Driver to create robust browser-based regression automation suites and tests.

A selection of Selenium’s functionalities is available for automating web applications. It is still one of the best tools available for cross platform and browser-based regression testing. Data-driven testing and automated test scripts that cycle over data sets are supported by Selenium. For large-scale quality assurance teams with knowledgeable testers, this is the right course of action. However, small and mid-size teams struggle with its high learning curve.

Features of the Tool:

  1. Selenium supports several OSs, browsers, and environments.
    It works with many different programming languages and testing frameworks.
  2. It is, without a doubt, a fantastic tool for performing regular regression testing.

Read Also: Optimum Software Developer to Software Tester Ratio?

WATIR (Web Application Testing In Ruby)

A Ruby programming language-based open-source package, Watir stands for Web Application Testing in Ruby. It allows for the creation ofto create and maintain simple-to-read and maintain tests on a light and adaptable user interface.

Watir enables a range of user interaction features for website testing, including the ability to click links, complete forms and validate texts across a number of browsers.

Features of the Tool:

  • Extremely portable and user-friendly gadget
  • Excellent browser interaction features are included with this programme.
  • Designed to test web applications.
    Enables the creation of understandable, maintainable, and easy automated tests.
  • Support for cross-platform technologies
    Numerous large corporations, like SAP, Oracle, Facebook, etc., use it
  • Technology independent

QTP (Quick Test Professional)

It is an automated functional testing tool that consumes high resources and requires a license. QTP provides customer support in the form of selenium community forums. For parameterization in QTP, built-in tools are available. QTP supports only Windows and VB Script. There is support for testing on both web and desktop-based applications. There is built-in test report generation within the tool QTP, and there is a built-in object repository in QTP. QTP is user-friendly, and there is a build-in recovery scenario in QTP. Browsers supported in QTP are specific versions of Google Chrome, Mozilla Firefox, and Internet Explorer.

Benefits of Automation using QTP

  • It allows for recording and replay.
  • It allows testers refer to the screen object attributes when recording scripts on an active screen.
  • It has a great system or procedure for identifying objects.
  • It supports a variety of add-ins, including those from PeopleSoft, Oracle, Java, SAP, NET, and others.
  • Through an active screen, you may improve the current tests even without the AUT.
  • It supports well-known automation frameworks, including data-driven testing, modular testing, and keyword testing.
    It has an internal IDE.
  • It can be connected with test management programmes like Winrunner, Quality Center, and Test Director.
  • It is simple to manage several suite kinds, including Smoke, Regression, and Sanity.
  • It works with XML.
  • Through QTP, test reporting is possible for analytical purposes.
    Easily maintained.

RFT (Rational Functional Tester)

An object-oriented automated functional testing tool called Rational Functional Tester can run automated functional, regression, GUI, and data-driven tests. HTML, Java,.NET, Windows, Eclipse, SAP, Siebel, Flex, Silverlight, Visual Basic, Dojo, GET, and PowerBuilder programmes are just a few of the many applications and protocols that RFT supports.

Benefits

The following are the primary advantages of Rational Functional Tester:

  • Reusability: Tests may be immediately performed on several iterations of an application, cutting down on the time required for regression testing.
  • Consistency: The exact same actions will be taken each time an RFT script-based test is executed.
  • Productivity: Automated testing is quick and flexible, requiring no additional resources.
  • Rational Team Concert and Rational Clear Case are two source control management technologies that RFT interfaces with. Users may manage their RFT functional test assets using either Rational Clear Case or Rational Team Concert by integrating RFT with these source control management programs.
  • RFT and Rational Quality Manager have excellent integration. Users may run test scripts from within Rational Quality Manager after integrating RFT with RQM using the adaptor.

Features

  • Broad skills match: The RFT tool is designed for users with a range of technical skills to ensure that your quality assurance team is not limited to basic testing and that other subject matter experts in your company can participate in and comprehend the test flow using a visual storyboard format.
  • New software versions can employ user interface features that technology has learned, reducing time spent writing new test scripts.
  • Automated scripts – Rational Functional Tester gives your development teams the ability to write scripts with keyword associations that are simple to reuse, increasing productivity.
  • Using the Eclipse Java Developer Toolkit editor, your team may quickly and easily develop Java test scripts. It includes sophisticated debugging features and automates code completion

Read Also: How Much Does App Testing Cost?

Winrunner

For functional testing, Win Runner is a popular automated software testing tool. Mercury Interactive created it. C and web technologies including VB, VC++, D2K, Java, HTML, Power Builder, Delphe, and Cibell (ERP) are supported. WinRunner makes it simple to create tests by capturing your application development process. You may navigate your application’s GUI (Graphical User Interface) elements by pointing and clicking.

A test script written in the C-like Test Script Language is generated by WinRunner. With hand programming, we can improve our test scripts even further. The Function Generator, which is part of WinRunner, makes it simple and quick to add functions to our recorded tests.

The crucial features of WinRunner include:

  • We are able to do functional and regression testing on a range of application software created in languages, including PowerBuilder, Visual Basic, C/C++, and Java. Additionally, we are able to test ERP/CRM software programs.
  • Runs tests on many browser settings, including Internet Explorer and Netscape Navigator, as well as all versions of the Windows operating system.
  • In the “record” mode, we may record GUI operations. A test script is automatically generated by WinRunner.
    To compare actual and anticipated outcomes, we can add checkpoints. Bitmap checkpoints, GUI checkpoints, and web links are some examples of the checkpoints.
  • It offers a tool for test case synchronization.
    A recorded test may be transformed into a data-driven test using Data Driver Wizard. So, within a test script, we may swap out data for variables.
  • During automated testing, database checkpoints are utilised to validate data in a database. We will maintain database integrity and transaction correctness by highlighting the records that are added, removed, changed, or updated.
  • WinRunner is taught to detect, record, and replay custom objects using the Virtual Object Wizard.
  • The reporting tools offer the ability to create test results automatically and examine flaws.
  • Many testing-related tasks may be automated by integrating WinRunner with the testing management programme, TestDirector.

Silktest

Silk Test is a solution for corporate application regression and function testing. It was first created by Segue Software, which Borland purchased in 2006. Micro Focus International purchased Borland in 2009. QA Partner was the original name of the product from 1993 to 1996.

Silk Test provides a range of clients:

  • Silk Test Workbench supports visual automated testing (much like the previous TestPartner) and uses the VB.Net scripting language.
  • For automated scripting, Silk Test Classic makes use of the domain-specific 4Test language. Similar to C++, it is an object-oriented language. Classes, objects, and inheritance are all used.
  • UFT Developer, formerly known as Silk4J, enables automation in Eclipse using Java as the scripting language.
  • UFT Developer, formerly Silk4Net, enables the same functionality in Visual Studio using VB or C#.

Conclusion

An essential component of software development processes is test automation. Similar to this, automated regression testing is regarded as a crucial component.

Product teams may obtain more detailed feedback and react immediately with a speedy regression testing procedure. Regression testing finds new vulnerabilities early in the deployment cycle, saving firms the expense and work of fixing the accumulated flaws. Apparently, a little change can occasionally have a cascading effect on the product’s essential capabilities.

Because of this, developers and testers must not let any modification—no matter how small—that falls outside of their sphere of influence.
Functional tests don’t take into account how new features and capabilities interact with the old ones; they merely look at how they behave. Therefore, determining the main cause and the product’s architecture is more challenging and time-consuming without regression testing.

55 Best Software Testing Tools For 2023

Software testing tools are one of the major parts of SDLC and it is very important to choose one that’s the right fit for your project.

To assist you in the task of software testing hundreds of software testing tools lists are now available in the market. But you cannot randomly pick any.

Shortlisting the best among them is again a tedious and very time-consuming job. So in order to help you out in selecting the best software testing tools for your task, we have curated a list of top 55 software testing tools along with their key features.

Top 55 software testing tools 2023

  1. selenium
  2. Squish 
  3. HP Unified Functional Testing (UFT)
  4. IBM Rational Functional Tester
  5. Katalon Studio
  6. Egg Plant
  7. Bugzilla
  8. Ranorex
  9. Waitr
  10. WebLOAD 

Top 10 doesn’t mean that they are the best. However, in terms of popularity, they surpass everyone.  To make u understand the best, we have compiled a list of 55 below this, Read and enjoy.
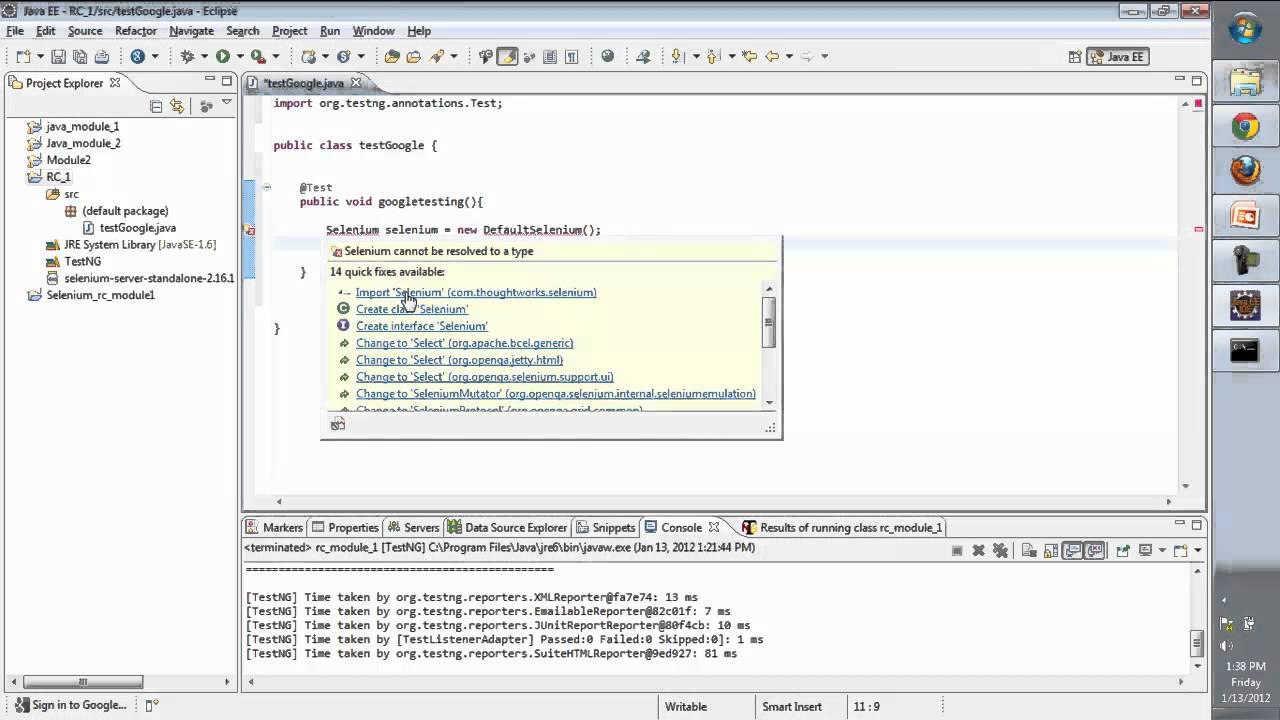
1. Selenium

Designed to test functional automation testing of web-based applications it supports wide-ranging platforms and browsers.
Features:

  • Supports parallel test execution
  • Requires fewer resources as compared to other testing tools.
  • Supports various different OS
  • Supports various programming languages like Python, Java, Perl, C#, PHP, and JavaScript.


2. Squish 

GUI-based Test Automation tool to automate the functional regression tests It is completely a cross-platform tool.
Key Features:

  • Supports many GUI technologies
  • Supports various platforms like a desktop, mobile, web and embedded
  • Supports Test script recording
  • Supports object and image-based identification and verifications
  • Does not depend on visual appearance
  • Solid IDE (Integrated development environment)
  • Supports various scripting languages
  • Supports Behaviour Driven Development (BDD)
  • Offer command-line tools for full control
  • Integrates with CI-Systems and Test Management


3. HP Unified Functional Testing (UFT)

Was initially known as QuickTest Professional (QTP) and assists in automated back-end service and GUI functionality testing.
Key Features:

  • Offers reusable test components.
  • Strong partner network.
  • Supports Agile development.
  • Automates manual testing resources.
  • Supports functional testing over various devices.
  • Assimilation with various test tools.


4. Katalon Studio

Mobile and web automation framework covering both Selenium and Appium,
Key Features:

  • It is a cross-platform tool.
  • Supports  Agile method.
  • Easy to use even for non-programmers.
  • Support CI workflow.
  • Supports Dual scripting interface.
  • Integration with qTest and JIRA.


5. IBM Rational Functional Tester

Used for automating functional testing using a data-driven approach.
Key features

  • Supports various applications.
  • Allows Test Scripting
  • Supports storyboard testing.
  • Offers reliable testing tools.
  • Offers incorporation with other test tools.


6. Worksoft Certify

Worksoft is a continuous test automation platform for enterprise applications. It helps the users and companies to fully automate and optimize the end-to-end business processes starting from process intelligence to test automation to RPA.

Key features

  • End-to-end automation in one codeless platform
  • Helps save time and cost across all the phases of testing and automation.
  • Parallel execution is possible allowing business users and IT teams to make the most of the assets.
  • Allows for single project automation and that can be extended to enterprise-wide adoption.


7. Egg Plant
Egg plant tool logo
Uses an image-based approach to do automated functional testing.
Key Features:

  • Tests from the perspective of a user.
  • Fast development.
  • Offers lab management.
  • Supports all device types.
  • Supports CI integration.
  • Requires very little automation skills.


8. Ranorex

With an affordable pricing model, it provides easy setup and execution of test automation scripts.
Key features:

  • Offers strong GUI object recognition
  • Developer-friendly
  • Supports reusable code modules
  • Offers record/playback functionality
  • Offers script-free functionality.


9. Tricentis Tosca Testsuite

Model-based Functional Software Test Automation Tool.
Key Features:

  • Focuses on problem-solving vs. test case design.
  • Supports Agile method.
  • Offers end-to-end testing.
  • Includes test data management and Orchestration tools.
  • Offers recording capabilities.
  • Requires less maintenance and is easy reuse of test suit.


10. Quick Test Professional (QTP)

A scripting language-based automated functional GUI testing tool for web or client-based computer applications. QTP is apt for functional regression test automation.
Key Features:

  • Very easy to use even for beginners.
  • Test cases are available in a simple workflow.
  • wholesome authentication of software using a full balance of checkpoints


11. Waitr

It is an open-source web application testing tool. It is a cross-platform tool of Ruby libraries.
Key Features:

  • Watir is completely free to use.
  • Supports multiple browsers and platforms.
  • A lightweight but powerful tool.
  • Supports human-like interaction with the browser to form filling, clicking links, and validating the text.


12. Testim 

Uses machine learning to speed automation testing. It supports a quick analysis of test cases and their execution on various web and mobile platforms.
Key Features:

  • Assists in easy addition of comments.
  • Uses bug tracker for easy and fast sharing of annotated screenshots
  • Just by clicking the automated bug tests, a tester can automatically reproduce them in a browser.


 13. Telerik Studio

It is a web and desktop applications testing tool for Windows OS. It is a functionality, load, and performance testing tool for testing Cross-browsing issues.
Key Features:

  • Supports AJAX Applications test automation
  • Supports Telerik UI Controls
  • Assists in Browser Dialogs and HTML Popups testing
  • Supports JavaScript
  • Uses the Build server for Continuous Integration


14. TestComplete

TestComplete is a functional testing platform from SmartBear Software. It can handle the automation testing of windows, web, android, and iOS-based applications with equal ease. It boasts of an intelligent object repository and recognition for over 500 controls giving the users maximum flexibility with the GUI testing. Key Features:

  • It helps to automate the UI tests with scriptless record-and-playback or keyword-driven testing.
  • It offers dynamic object recognition based on the object properties and AI-powered visual recognition.
  • Excellent and automated reporting and analysis. A single interface provides all the real-time date information regarding the execution.
  • Sufficient training material and support are available if you are a first-time user of the tool.
  • It can also be integrated with DevOps to provide the required testing for the continuous integration cycle.

15. CA Technologies Application Test


CA Technologies Application Test uses a declarative workflow model.
Key Features:

  • Offers automated mobile testing
  • Supports visual tests
  • Customized load testing
  • Supports mainframe
  • Advanced analytics
  • Integration with mobile testing
  • Offers improved visual editing by Integrating with Selenium


16. IBM Rational Test Workbench

Offers testing tools for enterprises covering complete software development lifecycle.
Key Features:

  • Continuous integration testing
  • Supports automaton
  • Offers mobile, regression, performance, and scalability testing capabilities
  • Ability to expand its capabilities by Integrating with IBM Rational testing suite


17. ParasoftSOAtest

Offers end-to-end test automation. ParasoftSOAtest assists in web UI testing, API testing, service virtualization, web and performance testing, API security testing, development testing, SOA testing, and runtime error testing.
Key Features:

  • Supports a wide selection of messaging/protocols
  • Support for REST
  • Creates reusable test cases
  • Supports numerous platforms, protocols, and messaging formats

18. SmartBear Ready! API

It is an end-to-end API testing platform.
Key features:

  • SupportsAPI security testing, API functional testing, API load testing,  service virtualization, API testing in code, API performance management, and defining, building, and managing APIS
  • Provides metrics and reporting, script support, project management, and discovery
  • Numerous API testing abilities
  • Supports constant amalgamation


19. Crosscheck Networks SOAPSonar

Leveraging dynamic mutation technology assists in performance and security testing and functional automation.
Key features:

  • Offers API virtual performance modeling.
  • Provides API emulation and virtualization, API service testing, and API security gateway technologies.
  • Supports numerous protocols like RES, JSON, and SOAP.

Test Management Tool

20. qTest

qTest by QASymphony is a testing platform for Agile and DevOps applications.
Key Features:

  • Real-time integration with Jenkins, Jira, and GitHub
  • Supports test management, automation, and reporting
  • Unified CI integrations and test automation scheduling
  • Modern, browser-based UI
  • Agile test management
  • Enterprise BDD
  • Concrete analytics and reporting
  • Investigative and Term Based Testing


21. TestPad
textpad
A simple manual test tool that works over logic than process.
Key features:

  • Offers Guest testing to those who don’t have an account
  • Offers checklist-inspired test plans
  • Simple to use even for non-testers
  • Adapted to Exploratory testing
  • Keyboard-driven editor
  • javascript-powered UI
  • Adapted to syntax highlighted BDD
  • Drag’n’ drop option to manage test plans
  • Allows to add new tests during testing
  • Integration with JIRA


22. PractiTest

An end-to-end testing tool.
Key Features:

  • Offers third-party integrations with many automation tools, bug trackers, and robust API
  • Fully customizable & flexible
  • Ability to Reuse tests and correlate test results
  • Enables a deeper and broader understanding of testing results
  • Matchless hierarchical filter trees
  • Visualize data with advanced dashboards and reports
  • enables full visibility into the testing process
  • Fast professional and methodological support


23. Zephyr

Provides complete testing solutions for agile teams.
Key Features:

  • Easy integration with Confluence, JIRA, Bamboo, Jenkins, and more
  • Server, Cloud, and Data Centre Deployment Options
  • Offers Advanced Analytics
  • Provides DevOps Dashboards
  • Provide extraordinary visibility, flexibility, and insights


24. QMetry

Best suited for Agile teams, this testing tool decreases the release cycle times.
Key Features:

  • Offers recreation and reuse of modular test cases.
  • Integration with HipChat, JIRA Capture, & Confluence.
  • Helps in faster building, managing, and deploying quality software.
  • Step by step advancement of the test cases.
  • Assists in real-time reporting & trending analytics


25. TestRail

It supports full  JIRA add-on integration permitting integration with all the JIRA versions and editions, including JIRA Cloud.
Key Features:

  • Centralized testing efforts like managing, organizing, and tracking.
  • Easy drag & drop
  • Allows testing the highly productive user interface.
  • Supports Screenshot feature
  • Supports Test Report & Metrics Automation


26. Test Collab

It is a web-based test management tool that uses a unique identifier for each reusable step for repeatedly using them without typing them.
Key Features:

  • Supports multiple operations in a single window
  • Permit assigning steps to multiple users
  • Offers secure communication among different team members


27. QA complete

It is suitable for enterprise-level testing and supports Agile teams and DevOps.
Features:

  • Supports prioritizing testing effort
  • Helps identify high-risk issues
  • Provides Enhanced security using SSL and Single Sign
  • Decide test coverage
  • Ensure all-inclusive tests presence
  • Ability to program automated Test Runs
  • Integration with JIRA, Jenkins, Selenium, and many other tools.
  • Offers Service Level Agreements (SLA) monitoring


28. TestLink

This web-based test management tool offers software quality assurance for test plans, test cases, user management, and reports and statistics.
Key Features:

  • Offers export and import of test cases easily.
  • Easy integration with various Defect management tools
  • Easy distribution of test cases to different users

29. WebLOAD

It is a powerful load testing tool with dominant scripting capabilities. It supports many technologies including Selenium to mobile, enterprise application to web protocols. It allows generating load in the cloud and on-premise.
Features:

  • Easy creation of load test scenarios
  • With more than 80 types of reports and graphs, it assists in the easy identification of performance bottlenecks.
  • Supports Amazon EC2 to run performance testing from the cloud


30. LoadRunner

It supports load testing of Windows and Linux-based web applications. It efficiently determines the performance and tests the working of web applications under heavy loads.
Features:

  • Can test various types of Web Apps
  • Supports multiple enterprise environments.
  • Supports single dashboard control over various users.
  • Supports numerous types of protocols.
  • User-Friendly monitoring and analysis
  • Easy to use the testing tool.


31. Wapt

Windows-based stress and load testing tool. It works with the same efficiency on dynamic content, secure HTTPS websites, and RIA applications under data-driven mode.
This testing tool also provides supports for RIA applications in the data-driven model.
Features:

  • Collaboration among multiple users in a single test
  • Simulate real load conditions using various advanced techniques
  • Support testing of SSL secured applications


32. LoadUI

It is an open-source load testing tool that permits creating and updating test cases during the execution process.
Features:

  • Support the creation of multiple performance strategies.
  • Supports reusing existing SoapUI Pro functional tests.
  • Supports Real-time feedback.
  • Supports the concurrent running of multiple load tests.


33. Silk Performer

This load testing tool is very cost-effective and suited for even most performance expectations, critical applications, and service-level requirements.
Features:

  • Quick in detecting performance issues
  • Provides in-depth analysis
  • Simulate enormous loads without any expensive hardware setup
  • Indefinite scalability with Cloud
  • Validate real-time user experience
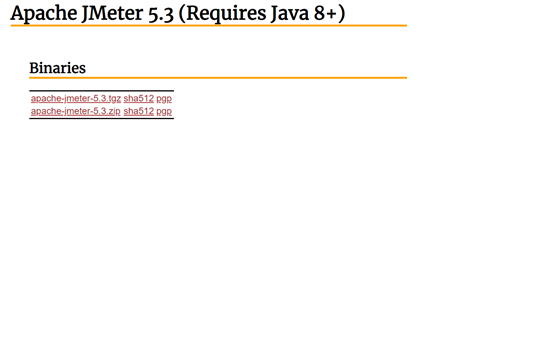
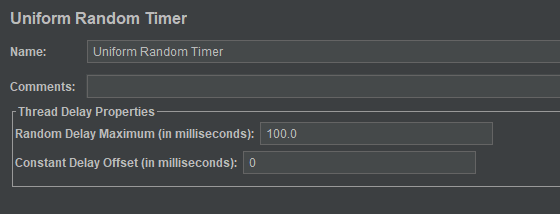
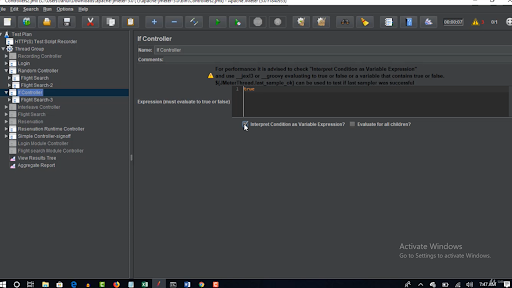
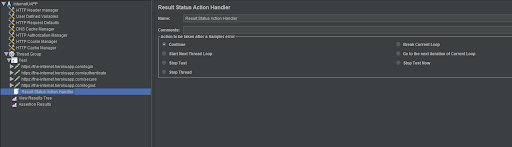
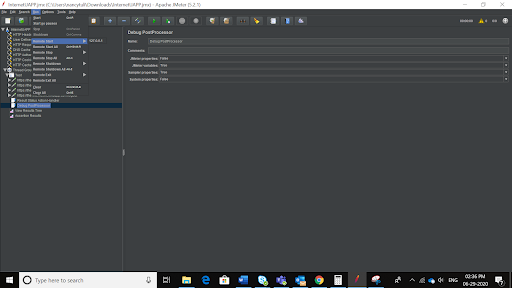
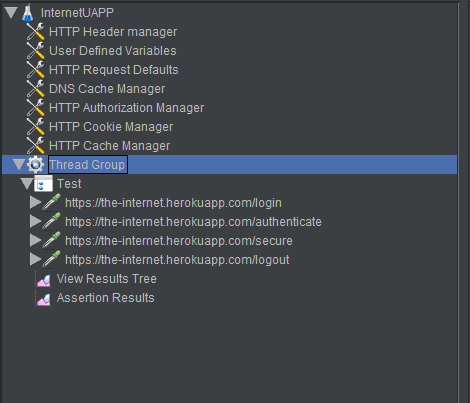
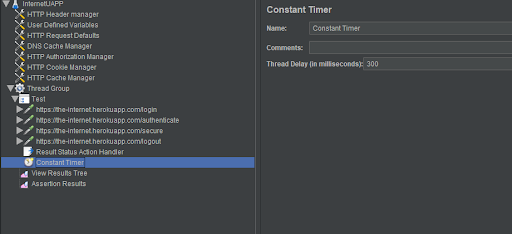
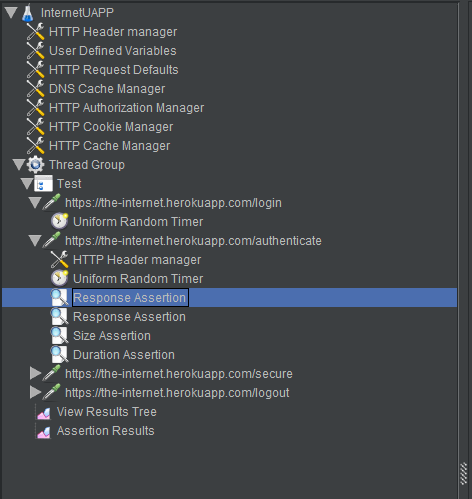

34. Apache JMeter

Initially developed for load testing of web applications, this open-source load testing tool is expanded to various other test functions.
Features:

  • Performs load and performance testing of different types of servers.
  • Allows users to generate a test plan using a text editor as test plans are stored in XML format.
  • Also performs automated and functional testing.
  • It is a Java application for performance and load testing.


35. AgileLoad

AgileLoad efficiently conducts load and performance testing on web and mobile applications.
Features:

  • Supports dynamic web
  • Supports mobile technologies
  • Outstanding monitoring
  • All-inclusive analysis diagnostics
  • Creates customizable test reports
  • Improve the application performance quickly

Also Read: Top Penetration Testing Tools For 2019

36. LoadFocus

It is a cloud-based load and performance testing tool.
Features:

  • Supports Cloud Load Test Website and RESTful APIs
  • Supports cloud and secure servers
  • Website Speed Testing
  • Offers Insight Analytics
  • Supports various cloud testing services like Mobile Applications, Website Speed Testing, Mobile Emulation, and APIs testing


37. Load Impact

A cloud-based load testing tool used to perform load tests on web-based apps, mobile applications, websites, and APIs.
Features:

  • Real-life simulation of traffic.
  • No hidden caching.
  • Can simultaneously generate load from 10 different locations.
  • Uses a proxy recorder to record an HTTP session.

Defect Tracking Tools

38. JIRA

This defect tracking and project management tool is used for recording, reporting, and assimilation with the code development environment.
Features:

  • Creates rapid filters with a single click
  • Creates custom workflows
  • Install plug-and-play add-ons
  • Used for recording, reporting.
  • Participates with the coding department.
  • Complete visibility using Kanban board
  • Customizable scrum boards
  • Real-time, actionable insights with Agile reporting


39. Mantis Bug Tracker

It is an open-source bug tracking tool. Assists team in efficiently managing their teammates and clients.
Features:

  • Internal issue tracking
  • Bitbucket and GitHub support allows Single-sign-on
  • Features inbuilt time tracking.


40. FogBugz

It is a defect tracking tool to track the status of defects.
Features:

  • Provides flexibility to find the information.
  • Supports Agile project management
  • Supports Notifications and emails
  • Tracks bugs for multiple projects.


41. Bugzilla

This open-source defect tracking tool allows to keep track of bugs and is readily used by small-scale and large-scale organizations to keep a track of the defects in their system.
Features:

  • Offers Optimized database structure
  • Advanced query tool
  • Editable user profiles
  • Comprehensive email preferences
  • Highly Customizable Installations using the extension mechanism.


42. BugNet

It is a cross-platform, open-source Bug Finding Tool under GPL license written in ASP.NET and uses MySQL database as a backend tool. It makes the codebase simple and easy to deploy.
Features:

  • Simple to file, manage and report bugs
  • Multiple databases support
  • Easy navigation
  • Easy administration


43. The bug genie

It is an open-source, web-based bug tracking software for issue tracking, bug reporting, and project management.
Features:

  • Easy source code management
  • Interactive project planning is a plus
  • Powerful command-line tools
  • Supports Incoming and outgoing email
  • Supports feedback publishing system


44. Redmine

It is an open-source defect tracking tool that supports Ruby. If you ignore the time taken for installation, it provides you with effective defect tracking and promises smooth running once installed.
Features:

  • Uses email for Issue creation
  • Multiple databases support
  • The issue tracking system is very flexible
  • Access controls are flexible and role-based

Mobile Testing Tools

45. Appium

Appium is one of the most commonly used open-source tools in the market today for testing native, hybrid, and web mobile applications. A recently added feature, now allows Appium to run automated tests on desktop applications as well.

Features:

  • Test the same application which is going to the marketplace.
  • Very simple to use
  • Allows parallel execution
  • Requires little memory for the test process.
  • Testing Native apps do not need SDK
  • Offers standard automation APIs for all types of platforms.
  • Supports simulators and emulators.
  • It supports coding multiple languages like Java, Python, C#, PHP, node.js, and more.


46. Espresso

It is an open-source enterprise mobile testing tool.
Features:

  • Is Simple to Use
  • Less Mobile Testing Flakiness
  • Consistent feedback to developers
  • Can extend within the working environment
  • Allows creation of tests without writing even a single line of test code.


47. Perfecto

It is a SAAS platform for web, mobile &IoT software testing.
Features:

  • Cloud-based mobile application testing
  • Supports Agile Environment
  • Integration with other testing tools like Selenium and Appium
  • This tool also allows customers to select the deployment options that are best for the specific project.


48. Experitest

It is a quality assurance tool that performs Manual Testing, Performance Testing, and load testing for mobile applications.
Features:

  • Ability to create and execute automated tests on either simulators or emulators
  • Ability to automatically record tests to code and use the same test script for different mobile OS.
  • It offers reports with video or Screen HTML-based reporting
  • View mobile apps element structure and generate identifiers with ease
  • Supports all mobile OS like iOS, Android, Windows Phone, and Blackberry.


49. Robotium

This is an open-source mobile test automation tool for Android UI testing.
Features:

  • Fast Android UI testing
  • Supports emulators and actual devices recording
  • Detects resource IDs automatically
  • Supports native and hybrid Android apps
  • Performs functional testing, System Testing, and user acceptance testing over Android-based apps.


Cross Browser Testing Tools
50. Browsera

This cross-browser testing tool tests the website in multiple browsers. It also tests layout and scripting errors of websites and webpages.
Features:

  • It compares the browser’s output to detect cross-browser layout problems.
  • It collects JavaScript errors and reports them after every test.
  • Offers crawling feature to test all the web pages of the single site.


51. Cross-browser testing

It validates that web applications work well over different browsers.
Features:

  • Assists in parallel execution of multiple Tests on Multiple Devices
  • Execute test cases for iOS, Androids, & other desktop browsers
  • It permits running testing frameworks like Nightwatch and WebDriver.IO
  • Provides comparing screenshots
  • Supports remotely debugging of real desktop and mobile browsers.


52. Browsershots

It is a cross-browser testing tool for Windows, MacOS, Android or iOS.
Features:

  • It is a free tool.
  • Supports 200+ different browsers to capture screenshots.
  • Features like disabling JavaScript, enabling/disabling Java and flash, and Changing Color Depth.
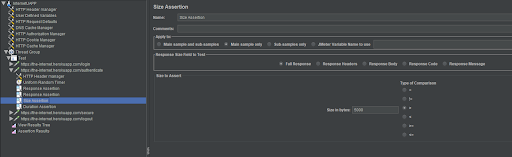
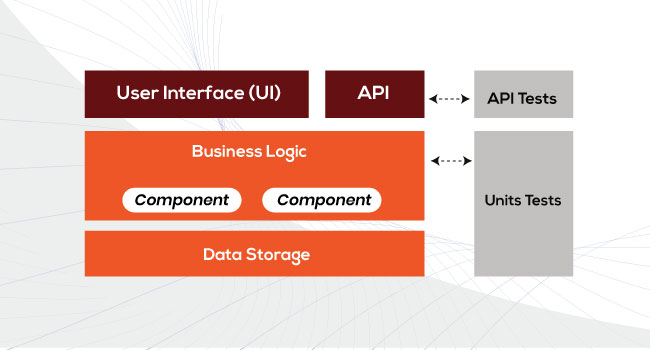
53. SoapUI

soap ui logo

Web services are a critical part of any mobile or application software. There can be numerous API calls for even a single button click. Thus the need for testing these APIs is very important. SoapUI is one of the most popular tools in that area. It is an open-source tool used for testing SOAP web services, RESTful web services, or HTTP-based services. It can be easily integrated with ReadyAPI (paid tool) to enhance its capabilities and get extra functionalities.

Key Features:

  • The simple UI and user-friendly features make it very easy to use even for first-time users of the tool.
  • It can be used to do functional testing, security, and vulnerability testing, and also load testing.
  • It allows automation with groovy
  • It supports data-driven testing.
  • It has assertions that can be used to validate the response from the API calls.
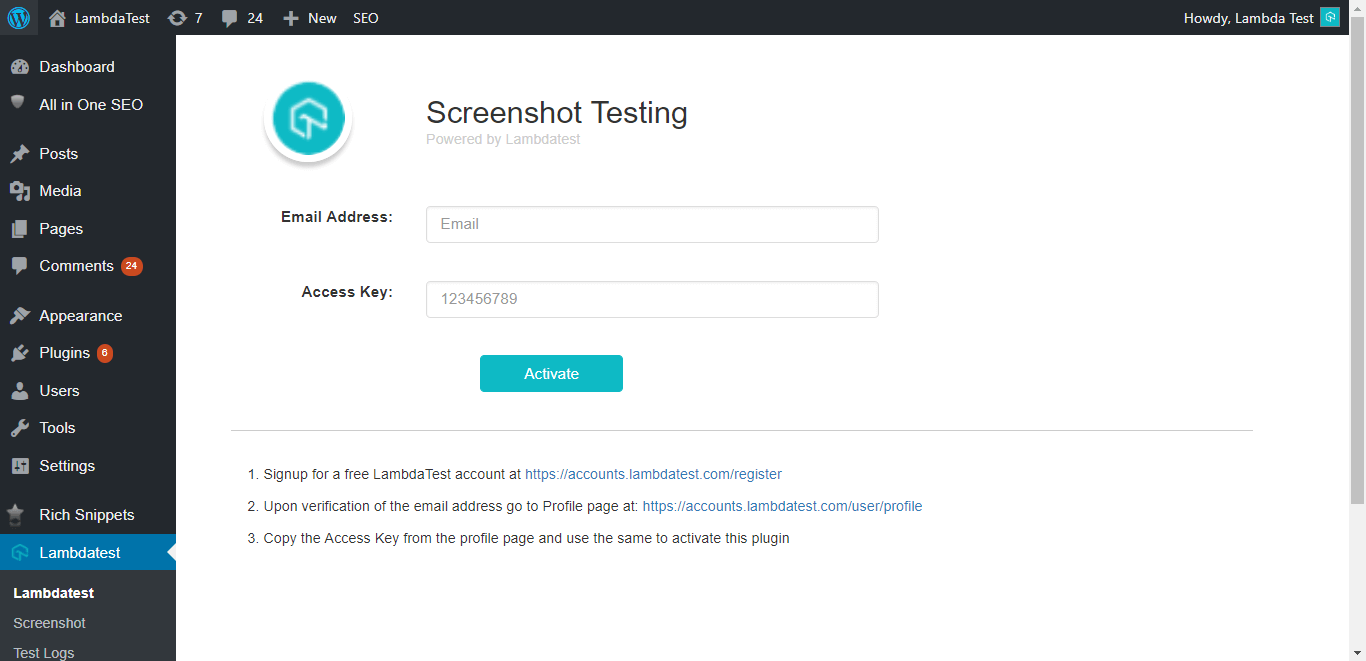
 

54. Lambda test

lambdatest_logo

Lambda Test is one of the most popular cloud-based cross-browser testing tools. The best part about this tool is that it allows performing cross-browser testing for web applications across more than 2000 browsers, operating systems, and devices. It allows you to perform both manual and automation testing.

Key Features:

  • It allows live cross-browser testing across different browsers, browser versions, resolutions, etc.
  • It allows testing with the latest desktop browsers.
  • It allows performing responsive testing across devices with different screen sizes and resolution
  • It comes with a chrome extension allowing the users to take full-screen screenshots easily
  • It has an in-built issue tracker that allows the users to easily manage the identified defects.
  • It also provides 24×7 support to the customers in case needed.

55. Kobiton

KObiton logo

Kobitron is another popular cloud-based automation and manual testing tool for mobile and web-based applications. It allows the users to perform testing manual and automation testing using mobile devices in the cloud. It allows the integration with Appium and Selenium.

Key Features:

  • It allows parallel testing
  • It allows manual and automation testing on real devices
  • It supports Selenium, Appium, and Katalon Studio.
  • It allows video recording of the actions performed on the mobile devices for reference.
  • It can be integrated into the CI pipeline with tools like GitHub, Jenkins, TeamCity, and more.


Conclusion:
Hope you would by now have enough names of various software testing tools to dispose of them off for your benefit.

Jmeter Tutorial: Learn about the tool in a jiffy!

Jmeter Tutorial blog by us will help you in learning about the famous tool and what’s it is used for.  Usually, Apache JMeter is used for performance testing. Performance testing is one of the important testings to be performed on AUT. It will let you know the load which your application can handle and what happens if that load exceeds prescribed limits.
Through, meter tutorial let us know more about JMeter and see how it can be used for performance testing. 

About JMeter – Jmeter tutorial introduction
JMeter is an open-source software which is designed by Apache Foundation. It is used to apply load to AUT to know its performance. With the help of JMeter, you will be able to apply a heavy load to the application with concurrent or multiple traffic to emulate real-time user behavior.
For applications such as Amazon who release flash day sales, it is very important to do performance testing. On a single day and in a time interval of 5 mins many customers hit the site and we must make sure that the application behaves expectedly without any flaws. One more application where performance testing is very important is the railway ticket booking website where a large chunk of people hit the server at the same time. In these cases, it becomes very necessary to test out the website under heavy load. 
JMeter is usually used for testing of web or FTP application. With JMeter, you will able to identify how many concurrent users a server can handle. Thinking of hitting Amazon with 1000 concurrent users. For achieving the scenario, you cannot purchase 1000 machines to achieve the behavior. JMeter allows you to hit the Amazons server with 1000 requests concurrently. JMeter simulated real-time user’s behavior intelligently. JMeter sends requests to the target server and then retrieves the statistical information of the server. With this information, it generates test reports in different formats. 
Some benefits which you gain via JMeter is a User-friendly GUI, Graphical Test Results, easy installation, and platform independence. It has an amazing record and playback feature which makes it very easy to learn even for the novice. Also, its script test can be integrated with Selenium tests and beach shells for more robust automated testing. Through the Jmeter tutorial, we are trying to et up a tutorial for people to learn about this magnificent tool.

Step-by-step  Jmeter tutorial

How to Download and Install Apache JMeter
JMeter is a java application and it needs Java in the machine so that it can run seamlessly. JMeter can be installed in Windows, Linux, Ubuntu, and Mac operating systems. Before installing JMeter, make sure that you have Java installed in your machine. You can check by hitting the command in your terminal. java -version
If java version is highlighted then java is installed in your system and if nothing appears then install Java by clicking here
How to Download and Install Apache JMeter

  1. Now it is the time to download JMeter. Download the latest version by clicking here. Download the binary file shown below. 

download JMeter
2. The installation of JMeter is very easy. The download binary file must be unzipped into the folder where you want to download JMeter. The unzipped folder would like just as below snapshot.

3. Run JMeter in GUI mode by clicking on the bin folder and then jmeter.bat file. 

4. After clicking, JMeter will open just as below. 
How to Download and Install Apache JMeter
More on Thread Group, Samplers, Listeners and Configuration of JMeter

  • Thread Group is basically the application of multiple threads to AUT. Each thread represents one user who is accessing the application. With the help of the thread group, you can apply a number of threads which is defined by you. 

More on Thread Group, Samplers, Listeners and Configuration of JMeter

  • Samplers allow JMeter to support testing of different protocols such as HTTP, FTP, JDBC, and others. 

  • FTP Request: If you want to do performance testing for the FTP server then you can use the config element of the FTP request. You can send a download a file or upload a file request to the FTP server. You need to add parameters to the sampler such as server name, remote file name (to be downloaded or uploaded), port number, username, and password. 


  • HTTP request

With this help of the HTTP request sampler, you can request an HTTP request to the server. With the help of this request, you can retrieve HTML files and images from the server. 
HTTP request

  • JDBC request

With this help of a JDBC request sampler, you can perform database performance testing. You will be able to send a JDBC request to the server. You should be able to add the SQL query in the query tag. 
JDBC request

  • SMTP Server

If you want to test the mail server then you must use the SMTP server sampler. With this protocol, we can send emails. 

  • CSV Data set Config

If you want to test the website with different users who are having different credentials, you must take the help of CSV data set the config to pass the credentials. You can store the credentials in the text file. It will read lines from the file using a delimiter. 
You must pass the data in a text file the same as the below snapshot.

  • HTTP Cookie Manager

When you log in to some website then your browser stores cookie so that you do not have to login again and again. Similarly, an HTTP cookie manager also does the same task for you. If the website is returning cookie in response, then it will save a cookie for you to maintain a session.  You can add an HTTP cookie manager in your test plan with the help of the config element. When you will record sessions using Blaze meter, it will automatically record cookies in the HTTP cookie manager. 
HTTP Cookie Manager

  • Listeners

Listeners listen to the results fetched by the JMeter and let you analyze the results with the help of visual reports. 
Listeners

  • View Results Tree: You get to see all the user requests in HTML format using view results listener. 

  • Aggregate Reports

With the help of aggregate reports, you can get total samples, average, median, minimum, maximum, and throughput. 

  • Jmeter Timers

Once you start sending requests to your AUT, you should have timers between each request so that it can simulate real-time behavior and the server does not get confused with so many requests hitting the server. Let us see the different kinds of timers which we can integrate to simulate real-time behavior

  • Constant Timer


It delays each request by the same amount of time. 

  • Gaussian Random Timer

Gaussian Random Timer
It delays each request by any random amount of time. You can define the deviation around which the delays would be adjusted. Also, offset can be added with the gaussian distribution of deviation value and then the total delay time can be calculated. 

How to do load testing with Apache Jmeter? Click here

  • Uniform Random Timer

Uniform Random Timer
It also delays each request by a random amount of time. You can define the random delay maximum time and the offset value which will be added to the random value. 

  • Bean shell, BSF and JSR223 timers

Bean shell timers introduce a delay time between each request using bean shell scripting. BSF timer is used to add a delay time between each request using BSF scripting language. Similarly, JSR223 adds a time delay using the JSR223 scripting language. 
The most used timers are constant and gaussian timers. 
Assertions in JMeter
Assertions are very useful in any kind of testing as verification and validation are the heart of testing. You must compare the results with the expected results to know if we are getting the correct response or not. Let us have a look at the most common types of assertions. 

  • Response assertion

It allows you to check the response against pattern strings. Take an example of Amazon.com. If you hit the server with some product then the response list should contain the product mentioned in the search list given in the request payload. 
You can choose text response and add the test which you want to validate. I have added the text in patterns to test. 
Response assertion
Also, we can validate the status code with the response assertion Select the field to test as response code and mention the code in the patterns to test. 

  • Duration Assertion

Duration Assertion
It tests that the server’s response is received time limits. If it is taking more than the time mentioned, then the assertion will be failed. 

  • Size Assertion

Size Assertion
It checks the response has the expected number of bytes contained in it. If it is above the defined limit, then assertion will be failed. In the below snapshot, if the response has equal or less than 5000 bytes then the assertion will be passed. 

  • XML and HTML Assertion

XML assertion verifies that the response data has correct XML syntax while HTML assertion verifies that the HTML syntax of response is correct. 
Controllers in JMeter
Controllers are used in JMeter to handle requests in an organized manner. There are different kinds of controllers that can be integrated with the JMeter Test Plan. These controllers let you handle the order of requests to be sent to the server. Let us have a look at different kinds of controllers. 

  • Recording Controller

Recording Controller
JMeter will record your testing steps but for storing them in a container you require a recording controller. 

  • Simple Controller


Simpler Controller is just a container to store your requests. You can give a meaningful name to the controller. In this way, if you want to duplicate the requests, you can simply add the simple controller without again and again adding so many requests. It is just for clubbing requests and in the view, results graph you will not see any controller name. 

  • Loop Controller

It allows the requests to run a specified number of times or forever if the number has not been defined. 

  • Transaction Controller


The transaction controller is similar to the simple controller which records the overall time for the requests to finish. It has an additional benefit over simple controller as you will be able to see the controller name which has the clubbed requests instead of individual requests name in view results graph. 

  • Module Controller

Module Controller
It is based on the idea of modularity which says that a set of requests can be clubbed in a simple or transaction controller. A module controller can be used to add any set of requests by selecting the controller. Suppose if you have 3 simple controllers named login, search and logout, then with the module container you will be able to select which you want to simulate again so that you don’t have to add the same requests again and again. 

  • Interleave Controller


This controller pickups one sampler per iteration and it is executed from top to bottom. In the below snapshot, we are having one interleave controller having 3 samplers names News Page and FAQ Page and Gump Page. It is running with 2 threads and a loop count of 5. So, a total of 10 requests will be executed per thread. 

  • Runtime Controller

This controller controls the execution of its samplers for the given time. If you specify the run time as 10 seconds, then JMeter will run your tests for 10 seconds. 
Runtime Controller

  • Random Controller

It is the same as the Interleave controller but instead of running from top to bottom, the random controller picks any requests randomly. 

  • If Controller

It runs the requests only when a set of conditions is fulfilled. 
Apache Jmeter tutorial 7
Processor in JMeter
Processors are used for modifying the samplers. There are two types of processors. 

  • Pre-processor are the processors which are applied before sampler requests. If you want JMeter to check all the links on the page and then retrieve the HTML. You can add HTML link parser which will parse links before a request is made to the server. 
  • Post-Processor: If the request is made to the server and is the requests send you an error then the post-processor should stop the further execution. 


In the above snapshot, if you choose Stop Test Now. This will stop the test if there will be any error in the response.
There is one more post-processor named debug processor which tracks the values of variables that are in the requests. 
Apache Jmeter tutorial 6
Jmeter Distributed (Remote) Testing
It is used to do testing on multiple systems. Applying all the load on a single server is not appropriate and can bring unexpected results. It is good to perform distributed testing with master-slave architecture.         There will be one master who will be driving various clients which will be again JMeter servers which will be putting load to the application under test. The firewall should be switched off in all the machines as it can block the traffic. All machines should share the sub-network and the JMeter version should be kept the same in all the machines to avoid any kind of complexities. 

Steps to setup master-slave architecture (Jmeter tutorial bonus)
1.       Go to the slave server and then go to the bin directory where JMeter is downloaded. You must then execute a file named JMeter-server.bat. Suppose the slave machine has IP address 120.178.0.9. 
2.       Now, go to the master machine and go to the bin directory. There, you have to edit JMeter.properties file. You must add the IP of the slave machine in front of remote_hosts. 
3.       Now for running the tests, you must go to the GUI of JMeter. Select the Run section on the menu bar of JMeter and then select a remote start and then the IP address of the slave machine. 
Apache Jmeter tutorial 5
Detailed Steps to Use JMeter for Performance & Load Testing (Jmeter tutorial exclusive)
1.       Start JMeter. 
2.       Add the BlazeMeter extension to the google chrome browser. Now hit the URL on the google chrome browser and record the flow with BlazeMeter. Once the steps have been captured then you can download the file from BlazeMeter in JMX extension. 
3.       You can then open the JMX file in your JMeter. It will appear as below. 
Apache Jmeter tutorial
4. Now, you must add a number of threads, ramp-up periods, and loop count. Number of Threads is the total number of users accessing the website. The number of times per thread will execute. Ramp-up period is the delay that should be applied before starting the next user. Suppose if you have 1000 users and a ramp period of 1000 seconds then delay between every user request will be 1000/1000 = 1 second.  

5. Now, add the listeners to view the graphical results. Let us add the most used listeners such as View Results and Assertions Results. 
Apache Jmeter tutorial
6. You can also name the requests in different transaction controllers such as login can go to login controller, authenticate, and secure to security controller and logout to sign off the controller. If you want to execute extensive tests, then these controllers will help you running many requests. 
7. Add Post-processor which would stop the tests in case you get any errors in the response. 
Apache Jmeter tutorial
8. Add Constant timer with a time period of 300 ms between each user request.
Apache Jmeter tutorial
9. For each request, you can add assertions to validate that if the requests are giving proper response. Different Response assertions can be used to validate the status code as 200 and to validate the test in the output response. You can also add duration assertion to check if the requests are completed in a particular amount of time. Size assertion can be used to check the response in bytes. 
Apache Jmeter tutorial
10. Now, run the tests using the green run button on top. Now it’s time to analyze view results and assertion results. 
Apache Jmeter tutorial
You have to analyze the throughput and deviation. Throughput is the server’s ability to handle a number of requests per minute. The higher the throughput the higher is the capacity of the server to handle user requests. The deviation is the second parameter which is of utmost importance in this graph to be analyzed. It means the variation from the average. Throughput should be higher, and deviation should be least. These parameters, you will be getting from the client which you have to validate and send a report to the client with these graphs. 
Also, you must remember in this Jmeter tutorial,  is the Assertion report. 
You will see the different assertions been passed and failed in this tree so that you can know which ones are failing. 
One more important listener is the View Results Tree listener. You will be seeing which requests got passed and which ones got failed. The ones which are in green color are passed and the ones which are in red color are failed. 
The last important listener which you can add is the Summary report which will let you know total samples, average, Min, Max, Error %, Deviation, and Throughput. This report is of the utmost importance to stakeholders. Let us see how it looks. 
Conclusion for Jmeter Tutorial
That sums Use JMeter tutorial to use performance and load testing so that your application is robust and can sand load without giving unexpected results. Use the wonderful elements of JMeter to share excellent reports with the stakeholders. 
Hope you are satisfied with our Apache Jmeter tutorial. Please get back to us if you have any suggestions

21 Best API Testing Tools That are insanely good –

API testing tools, the right strategies, and processes have become cardinal when it comes to software development and CI/CD workflow nowadays. Before we get into the details of API testing tools let’s have at the process in a concise manner.
What is an API?
API or application programming interface is a set of tools, rules, and protocols that help in developing a software application. An API also defines how various components of software should interact with each other.
Why API testing is needed?

  • Investigating an app at API level would be catastrophic so it’s better to do it at first
  • Core functionalities of the API can be validated
  • Consumes less time than that of GUI functional testing
  • Test data is mostly derived as JSON or XML. So the process, not language dependant
  • Can be easily integrated with GUI testing

API Testing ad
What is API testing in software testing?
Testing API becomes a much-needed part of the complete software ware testing. It forms the second layer of testing and requires almost 20% of testing efforts. Since there is no GUI, API testing is done at the message level. It includes testing the REST API’s, and soap web services. These APIs can be sent over HTTP, JMS, HTTPs, and MQ.
API testing flow
Because of API testing characteristics, it cannot be done manually, and hence there arises a need for various API testing tools for automated API testing. Various testing is done during API testing are security testing, functionality testing, load testing, reliability testing, API documentation testing, and proficiency testing.
Wish to know about the app testing process? Click here
Here let’s have a look at some of the top API testing tools for the year 2020.

  1. ReadyAPI

Ready APi testing tool
ReadyAPI is a popular API testing tool by Smartbear. Some of its prominent features are:

  • It assists in functional, security, and load testing of RESTFUL, SOAP, GRAPHQL, and other web services.
  • Ensure complete quality checks for all the web services.
  • It is a four in one tool assimilating API performance testing, API functional testing, API & web virtualization, and API security testing.
  • Supports integration of API testing with CI/CD pipeline.
  • Supports command-line
  • Supports the creation of comprehensive functional API tests and data-driven functional API tests.
  • Removes dependencies.
  • Native support for DOCKER, GIT, AZURE, JENKINS, etc.
  • Parallel execution of functional tests and job queuing.
  1. AcceIQ

accelq APi testing tool
AcceIQ is a cloud-based continuous testing podium for API automation testing. It assists in API testing without even writing a single code. It helps in automating various testing stages like test design, planning, test generation, and execution. Some of the features of AcceIQ are:

  • Dynamic environment management
  • Simplified API automation testing
  • Supports chain API tests for complete testing
  • API test planning, test case management, execution and tracking governance
  • Requirements tracking is interrelated with business processes
  • Defect tracking
  • Enhanced regression suite planning
  • Execution tracking
  • Seamless CI/CD and JIRA/ALM integration
  • Links business process with matching API
  • Extendable framework
  • No vendor lock,
  • Open-source aligned
  1. Katalon studio

Katalon studio api testing tool png
It is free to use, API automation testing tool. It is an all-inclusive automation tool providing solutions to the testers.
Some of its features are:

  • Support for both SOAP and REST API
  • All-inclusive API automation support
  • Data-driven approach.
  • Supports both automated and exploratory testing
  • AssertJ compatible
  • Support CI/CD integration.
  • Easy to use even for non-techies
  1. RoboHydra server

robo hydra logo png
It is perfect API testing tools for the users who don’t have a server but requires one. Some of its prominent features are:

  • Allows connecting clients-under-test to it and run the tests.
  • It is very versatile
  • Can test any HTTP, Https, or WebSockets client.
  • Can manage GUIs for mobile applications, public API, and complex java-based programs.
  • Supports exploratory testing and debugging
  • Ability to reverse proxy requests, increasing its utility considerably.
  1. SoupUI

Soap UI API testing tool PNG
SoapUI is a famous API testing tool for functional testing. It allows the automation testing of soap, rest APIs, and web services. SoupUI comes as a free version and a pro version, pro version offering more features than the free version. Some of the features of both of them are mentioned below:
Free package:

  • It allows access to full source code and to create their preferred features.
  • Quick and easy creation of tests using drag and drop, point-and-click
  • Scripts can be reused.

Pro package:

  • Powerful data-driven testing
  • Support CI/CD integrations
  • Supports asynchronous testing
  1. Postman

POstman API testing tool
One o f the most preferred API automation testing tool. It is best for the testers who want to evade coding in IDE using development language. Its features are:

  • Easy-to-use
  • Rich interface
  • Supports both automated and exploratory testing
  • Supports mac, windows, LINUX & chrome apps
  • Supports swagger & RAML formats
  • Offers run, test, document and monitoring features
  • Easy knowledge sharing
  • Support for GRAPHQL request and GRAPHQL variables, schemas, and GRAPHQL query auto-completion function.
  1. Tricentis Tosca

Tricentis Tosca API Testing tool
Tricentis Tosca is API testing tool for agile and DevOps. Some of its prominent features are:

  • Supports various protocols: AMQP, HTTP(S) JMS, RABBIT MQ, IBM MQ, SOAP, TIBCO EMS, REST, NET TCP
  • Maximize reuse
  • Integrates with AGILE and DevOps cycle
  • Sustainable automation
  • API testing on mobile, packaged apps, cross-browser, etc…
  • Reduced regression testing timing
  1. Apigee

Apigee API Testing tool
Apigee is an award-winning cross-cloud API testing tool.  It allows us to measure and test API performance. Its important features are:

  • It is powered by JAVA script
  • It is multi-step.
  • Supports design monitor, deploy, and scale APIs
  • Identify performance issues
  • Easily create API proxies
  • Deploy API proxies in the cloud
  • Supports cloud, on-premise, or hybrid deployment model
  • It is useful for digital business, and the data-rich mobile-driven APIs
  • It is secure,
  • Self-healing with Apigee-Monit,
  • Virtual host management
  1. Jmeter

Jmeter API testing tool
Jmeter though was created for load testing, it also supports functional API testing. Some of its prominent features are:

  • Replay test results
  • Supports CSV files
  • Integration between Jmeter and Jenkins
  • Supports both static and dynamic resources performance testing
  1. Rest-assured

Rest assured api testing tool logo
It is a java domain-specific language tool. It is used for testing rest API services. It is bundled with many features, permitting users to continue testing without much coding. Let’s have a look at some of its features:

  • Integration with serenity automation framework
  • Supports BDD
  • Requires only native knowledge of HTTP
  • Supports apache johnson
  • OSGi support.
  • It is an open-source tool
  1. Assertible

Assertible API testing tool logo
Features of Assertile are,

  • Supports continuous integration and delivery pipeline.
  • Integration with Slack, GitHub, and Zapier.
  • Validates HTTP responses
  • Offers sync features that automatically update tests with every change in API.
  • Supports encrypted variables that enhance API testing security practices.
  1. Karate DSL

Karate API testing tool logo
Karate DSL is an API testing tool that’s perfect for BDD methodology. Features of Karate DSL includes,

  • Quicker API testing
  • Build on cucumber-JVM
  • It helps in the creation of scenarios for API-based BDD tests easily.
  • Runs java project
  • No java knowledge required to write tests
  • Even non-programmers can write tests easily using karate DSL
  • It is open source
  1. Airborne

Airborne API testing tool
If you are a ruby API developer, airborne can be your perfect API testing partner. Some of its most inviting features are:

  • It is an open-source API automation test tool
  • Compatible with rack- and rails-based applications.
  • It is developed in ruby and RSPEC
  • It has no user interface of its own
  • Have wrappers to simplify calls
  • Ability to reuse parts of API calls.
  • Requires users to learn a few important methods and basics of RUBY and RSPEC
  • May important features for the API framework.
  • Allows to prolong and generate assertions, and chaining
  1. Swagger

Swagger Api testing tool
Swagger is an API testing tool for functional, security, and performance testing. Some of its features are:

  • Easy to quick creation, management, and execution of API tests.
  • Capability to inspect API request-responses,
  • Easy validation of schema rules
  • Automatically generate assertions
  • Complex load scenarios generation
  • Support services from REST, SOAP to Graphql
  • Open-source
  1. Fiddler

Fiddler API testing tool
Fiddler is another prominent API testing tool. Some of its features are:

  • Users can monitor, modify, and recover HTTP requests.
  • Supports HTTP caching and compression
  • Detects bottlenecks in the website
  • Perfect for layman testers to proficient testers
  • Log and debug HTTP traffic
  • Supports security testing.
  1. Webinject

webinject logo png
Webinject is one of the trusted API testing tools. Some of its prominent features are:

  • Creates fully automated test suites for functional, regression, and acceptance testing.
  • Allows testing of all applications with HTTP interface, including CGI, JSP, AJAX, SOAP, SERVLETS, REST, AND XML web services.
  • Collects and analyses result to prepare an automated report.
  • It also acts as a test runner.
  • It can function on different platforms using PERL interpretation.

Wish to know about the talk of the town when it comes to programming languages? Click here!

  1. HttpMaster express

HttpMaster express API testing tool logo
HttpMaster express is a renowned name among API testing tools. Some of its main features you can count upon are:

  • Supports testing of rest-based web services,
  • Monitors API responses
  • Efficient command-line interface
  • Supports request data builder and response data-viewer
  • HTTPMASTER offers the standard rest methods
  • Also offers custom verbs, defined global parameters
  • Supports customized API requests
  • Integration with dynamic data with their requests.
  • Compatible with swagger
  1. Rest console

Rest Console API testing tool
Rest console is a perfect API testing tool for building, debugging, and testing. Some of its features are:

  • It is a rest-based HTTP client visualizer and constructor
  • Intuitive interface
  • Easy identification of errors.
  • Support basic, plain, and OAuth validation,
  • Customizable interface
  • Allows users to develop customized headers
  • Supports auto-complete feature.
  • Flexible authentication protocols
  • Supports custom authentication.
  • Easy keyboard navigation and shortcuts
  1. Restsharp

Restsharp API testing tool
With full .net compatibility, Rest Sharp is one of the best API testing tool. Some of the features that make it one of the best API testing tools are:

  • Supports exhaustive testing.
  • Easy application creation
  • Streamlined interface
  • Free-to-use HTTP client library
  • Supports post, get, patch, put, options, head, and delete operations.
  • It is intuitive
  • Easy to use and install,
  • Supports serialization and deserialization support synchronous and asynchronous requests.
  • Support analysis of XML and JSON.
  • Supports uploading files and forms in multiple parts.
  • Supports validation protocols like basic, OAUTH1, NLTM, OAUTH2, and parameter-based authentication.
  1. PyRestTest

pryrest api testing tools
Another efficient tool used for mac based and LINUX based systems is. Some of its common features you can count upon are:

  • Easy to use
  • It supports YAML or JSON.
  • It is written in Python
  • Can support many add-ons.
  • Ideal for smoke-tests
  • Can create full test scenarios,
  • Deploys on-server quickly
  • Good for system health-checks.
  • Supports creation, extraction, and validation tools.
  • For a failed scenario it returns an exit code, which can be converted into parseable logs.
  1. Unirest

UnirestApi testing tool logo
Unirest is a library of almost every HTTP request client. Hence it is one of the highly preferred API automation testing tools. Some of its prominent features are:

  • Support for major programming languages: NODE, PYTHON, RUBY, OBJECTIVE-C, PHP, .NET, AND JAVA.
  • Includes a documentation page for reference
  • Unirest can combine with XUNIT or BDD runner
  • Includes code snips


Conclusion
There are various API testing tools available in the market offering various different features. Though some of the basic features are common. Your best pick will depend on your requirements.
Study your project requirements and API testing tools features in detail and figure out the best API testing tool for yourself.

How to use Cypress Testing Framework?

Cypress testing framework can be called a next-generation front end tool for testing built for the modern web.
Testing has become an important factor in software engineering. Writing software for complexities can be a messy task, which gets worse as more people begin working on the same codebase.
This issue is worsened in the frontend development, where several moving parts are present, which makes writing functional and unit tests insufficient to verify the correctness of an application.
End-to-end testing comes to the rescue, as it allows the programmer to replicate the behavior of the user on their app and verify that all the things work as they should. This article will talk about cypress testing framework in detail, including the advantages of Cypress testing, how it is different, and how to install it.

What is Cypress Testing?
Cypress can be understood as an end-to-end testing framework based on JavaScript, which comes with various inbuilt features. You will need these features in any automation tool. Cypress utilizes the Mocha testing framework as well as the chai assertion library in the framework.
Cypress, primarily, is not built over selenium and is a new driver which operates within your app and this lets you exercise very good control over the backend and frontend of your app. Cypress enables a programmer to write every type of tests like unit tests, integration tests, and end-to-end tests. It can also test anything which runs in a browser.
Advantages of Cypress
There are numerous advantages that Cypress offers, but below are the most fascinating ones.

  • Debuggability– Cypress provides you the ability to debug your app directly under test from the chrome Dev-tools. This not only offers you straight forward messages of error but also suggest how you should approach those messages.
  • Real-time reloads– Cypress functions intelligently and it knows that once you save your test tile, you will run it again. This is why Cypress automatically hits the run next to the browser as soon as you save your file. So, you will not require to manually hit the run.
  • Automatic waiting– Automatically Cypress waits for DOM to load, for the element to become prominent, animation to get finished, AJAX and XHR calls to be completed and a lot more. Hence, you would not require defining explicit and implicit waits.
  • Cypress is not only a UI testing tool, but it also has a plugin ecosystem where you are able to integrate plugins of Cypress or make your plugin and extend Cypress’s behavior. Apart from functional testing, you can perform unit testing, visual testing, accessibility testing, API testing, etc. on Cypress.
  • Cypress also offers an amazing dashboard, which gives you insights and a summary of tests executed across the CI/CD tools. This dashboard is similar to other dashboards provided by CI/CD tools that give you execution details and logs of your tests.
  • Another advantage provided by Cypress if the GUI tool to execute/view your tests view the configuration, and view tests executed from dashboards. You can also watch your tests running as well as get more insights into the test run.
  • It is free and open-source.
  • It is fast with less than 20 ms response time.
  • It helps you find a locator.
  • It has an active community on Gitter, StackOverflow, and GitHub.
  • It has the ability to either stub responses or let them hit your server.

How Is Cypress Different?
Cypress personalization

  • Works on Network Layer -The tool operates at the network layer by altering and reading web traffic on the fly. This lets Cypress to modify everything coming out of and in the browser as well as to alter code that might interfere with its ability regarding automating the browser. Cypress ultimately exercises control over the complete automation procedure from top to bottom.
  • Architecture– Numerous testing tools function by running outside of the browser and executing the remote commands over the network. However, testing is completely opposite and is executed in the parallel run loop as your app.
  • Shortcuts– Cypress saves you from being forced to act like a user always to generate the status of a particular situation. This means you are not required to visit the login page, type in your password and username, and wait for the webpage to redirect or login for each test you run. Through Cypress, you have the ability to take shortcuts as well as programmatically log in.
  • New Kind of Testing– If you have total control over your app, native access to all the host objects, and network traffic, you can unlock new ways of testing, which was never possible. Rather than being locked out of your app and being unable to control it, by Cypress, you can change any aspect of the way your app works.

How to Install Cypress?
The process of installing Cypress is an easy task. The only thing you require is node.js installed in the machine and then two npm commands – npm init, npm install cypress –save-dev.
The first command will form a package.json and the second one will install Cypress as the devDependencies array in the package descriptor (package.json) file. It would take almost three minutes to install Cypress based on the speed of your network.
Now, Cypress has been installed to ./node_modules directory. After you have completed the installation part, you will have to open Cypress for the very first time by running this command at the same location where you have the package.json file – ./node_modules/.bin/cypress open
Cypress has its own folder structure, which gets generated automatically when you open it for the very first time at that specific location. It comes with ready-made recipes that depict how to test common scenes in Cypress.
Read also: Best test automation tools out there! Click here
How do you write a Cypress test?
Writing a Cypress test might require some brushing up for the beginners. So, if you have the app installed on your device, here are the three tests you can do to initiate your hand into Cypress testing.

  1. Writing a Passing Test

Add the following code to any IDE file you would like to run the test on.
describe(‘My First Test’, function() {
  it(‘Does not do much!’, function() {
    expect(true).to.equal(true)
  })
})
Save the file and reload it upon the browser.
There will be no significant changes in the application but this is the first passing test that you have performed using Cypress.

  1. Writing a Failing Test

Here is the code for writing your first failing test.
describe(‘My First Test’, function() {
  it(‘Does not do much!’, function() {
    expect(true).to.equal(false)
  })
})
Now, save the file and try reloading it. The result will be a failed test because True and False are two different values.
The Test Runner screen will show you the assertions and more activity. The comments, page events, requests, and other essentials will be displayed upon the same screen later.

  1. Writing a Real Test

The three phases you will have to go through to run a successful test in real-time are:

  1. Set up the application state in your device.
  2. Prompt an action.
  3. Assert the resulting application state after the action has been taken.

The application is made to run through the above phases so that you can see where you are going with the project.
Now, let us take a closer look at how you can set up a Cypress testing code in the above three phases and deliver a perfect application.
Step 1. Visit the Web Page
Use any application you want to run the test upon. Here, we shall use the Kitchen Sink app. Use cy.visit() command to visit the URL of the website. Use the following code.
describe(‘My First Test’, function() {
  it(‘Visits the Kitchen Sink’, function() {
    cy.visit(‘https://example.cypress.io’)
  })
})
Once you save the file and reload, you will be able to see the VISIT action on the Command Log. The app preview pane will show the Kitchen Sink application with a green test.
Had the test failed, you would have received an error.
Step 2. Performing Action
Now that we have our URL loaded, we need to give it a task to perform so that we can see changes.
describe(‘My First Test’, function() {
  it(‘finds the content “type”‘, function() {
    cy.visit(‘https://example.cypress.io’)
    cy.contains(‘type’)
  })
})
The above code uses cy.contains() function to find an element (type) in the web page.
Now, if your page has the element, it will show a green sign in the Command Log. Otherwise, your action will fail and go red in about 4 seconds.
Step 3. Click and Visit
Since you have highlighted an element on the web page, we should hyperlink it too. Therefore, you can use the .click() command to end the previous one.
describe(‘My First Test’, function() {
  it(‘clicks the link “type”‘, function() {
    cy.visit(‘https://example.cypress.io’)
    cy.contains(‘type’).click()
  })
})
Now, when you save and reload the app, you will be able to click on “type” to visit a new page.

  1. Assertion

Did you know that by using the .should() function you can make your action work only on certain conditions which should be adhered to. If not, the result is a failed command.
describe(‘My First Test’, () => {
  it(‘clicking “type” navigates to a new url’, () => {
    cy.visit(‘https://example.cypress.io’)
    cy.contains(‘type’).click()
    // Should be on a new URL which includes ‘/commands/actions’
    cy.url().should(‘include’, ‘/commands/actions’)
  })
})
Apart from the above functions and commands, there are various you can perform to make your web page more interesting and interactive. You can also become well-versed with the more complex commands by practicing testing with, Cypress.

Is Cypress better than selenium? Cypress VS Selenium
Selenium is a popular tool in the source automation tool market which has now transformed into Selenium 2.0. It is an open-source test automation toolkit to allow you to test your application’s functioning.
What makes Selenium different from the rest is that it makes direct calls to the browser using their fundamental automation support. Tests on Selenium work as if you are in complete control of the browser. However, there is a steep learning curve involved.
Coming back to the question, we have prepared a quick breakdown of Cypress and Selenium with what they have to offer.

  Cypress Selenium
Ease of Installation Easy to install as the divers and dependencies come with the .exe file. The configuration of the divers and language binding is done separately.
Browsers Supported Chrome and Electron Chrome, Safari, Edge, Firefox, or any other.
Open Source Apart from access to the Dashboard, the tool is open to all. Open-source application with optional additions that need to be paid for.
Architecture The test runs within the browser since the test it executed alongside the loop of the application. Selenium is known to work outside the browser by calling the commands from a remote server.
Target Users A developer-centric tool to make TDD development work. QA developers or engineers working as testers.
Compilation Language JavaScript Java or Python

Read also: Looking for an alternative to Selenium? Click here
Both the test automation tools have strengths of their own and serve different purposes. Therefore, the decision rests with the developer.
Which browser does Cypress support?
Cypress is a multi-platform browser. So, you can use it on Chrome and Electron. Moreover, they have put up a beta version for Firefox on the markets too.
Which browser is best for Selenium?
Selenium is more diverse as compared to Cypress when it comes to browser support since it can adapt to the automation of several browsers such as Safari, Chrome, Firefox, Edge and IE.
Does Cypress use selenium?
No, Cypress does not use Selenium despite of the popular belief. While most end-to-end testing tools out there are using Selenium, Cypress has an independent architecture.
Is Selenium testing easy?
Yes, Selenium testing is easy for individuals who know either Java or Python.
Why is Selenium better than tools?
Selenium is considered better than other automated testing tools because it is open-source software with a comparatively easier learning curve. Yes, you can couple it with any programming language you know and integrate any kind of solution you are looking for into it.
Availability, affordability, and flexibility are a few advantages that its counterparts such as QTP cannot offer.
What is a Cypress framework?
Cypress is a tool that can automate the tests every time you run your application. However, it is not based on Selenium that calls for the test directly from outside the web browser. However, Cypress works within the DOM of a browser.
What language does Cypress use?
Cypress can be a cakewalk for you if you know JavaScript as it uses NPM for JavaScript.
Is Selenium a tool or framework?
Selenium is essentially a tool and not a test framework. Test frameworks are used to create libraries of data, run tests, and organize test results. However, Selenium automates testing through web browsers.
What is Cypress automation?
Cyprus automation refers to the ability of the user to run the test code along with the application run. Not only is the test executed in the same loop, but it also takes place within the browser too. For the tasks that take place outside of the browser, a Node.js server is leveraged by this tool.
Who uses Selenium?
Mostly, it is the QA developers and tester-type engineers who are known to use selenium for facilitating the functioning of organizations from varied sectors such as hospitality, computer software, financial services, information, and technology, etc.
The Takeaway
Cypress is a JavaScript-based end-to-end testing framework, which does not use selenium at all. Cypress is built over Mocha that is a feature-rich test framework based on JavaScript. It also utilizes a chain – a BDD/TDD library for the node as well the browser that can be paired with JavaScript testing frameworks.
Selenium, on the other hand, is a more established automation testing tool that makes calls to the browsers to use their automation for conducting the test.
So, Cypress and Selenium are independent tools with different platforms, purposes, and automation. Other than the fact that Cypress is comparatively new and doesn’t support many browsers yet, it is a beneficial testing tool.


Protractor vs Selenium: What are the major differences?

Protractor vs selenium who will win? Both the test automation tools are equally good. However, one has some features that make it supreme to the other.
Test Automation is the need of the hour and is widely adopted by the testing teams across the globe; to assist testers in automation testing several testing tools are now available in the markets.
To achieve the best testing results, it is very important to choose the most appropriate testing tool according to your requirements.
Sometimes, testers sometimes get stuck between two automation testing tools.
And if you are the one, who is having a difficult time picking the aptest testing tool out of Selenium vs Protractor, then go ahead and read this article to find out a solution.

Selenium 
Selenium is used for automation testing of web applications and is an open-source testing tool.
Selenium is meant only for web-based applications and can be used across various browsers and platforms.
Selenium is an all-inclusive suite that is licensed under Apache License 2.0. It constitutes of four different tools under it:

  • Selenium Integrated Development Environment (IDE)
  • WebDriver
  • Selenium Remote Control (RC)
  • Selenium Grid


Selenium IDE
Selenium IDE GIF
The simplest among all the four tools under Selenium is Selenium IDE. Selenium IDE is used to record the sequence of the workflow.
This Firefox plugin is easy to install and is also companionable with other plugins.
It has some of the most basic features and is largely used for prototyping purposes. It is very easy to learn and use.
Selenium RC
RC
Selenium Remote Control (RC) allows the testers to choose their preferred programming language.
It’s API is quite matured and supports extra features to assists tasks beyond even browser-based tasks.
Selenium supports  Java, C#, PHP, Python, Ruby, and PERL and can perform even difficult level testing.
Selenium WebDriver

Selenium WebDriver is an advanced version of Selenium RC. It provides a modern and steady way to test web applications.
Selenium directly interacts with the browser and retrieves the results.
An added benefit of WebDriver is that it does not require JavaScript for Automation. It also supports Java, C#, PHP, Python, Ruby, and PERL.
Selenium Grid
Selenium grod
The main benefit of automation tools is faster execution and time-saving. In Selenium, Selenium Grid is responsible for the same.
It is specially curated for parallel execution of tests, on various browsers and environments; it is based on the concept of hub and nodes.
The main advantage of using this is time saving and faster execution.
What Protractor is all about?
Protractor is a powerful testing tool for testing AngularJS applications.
Though it is specially designed for AngularJS applications, it works equally well for other applications as well.
It works as a Solution integrator by assimilating the dominant technologies like Jasmine, Cucumber, Selenium, NodeJS, Web driver, etc.
Protractor also has a high capability to write automated regressions tests for web applications. Its development was started by Google but was later turned into an open-source framework.
Protractor
Why do we need Protractor?
Here are a few reasons to convince you to use Protractor:

  • Generally, most of the angular JS applications have HTML elements like ng-model and ng-controller, Selenium could not trace these elements, whereas Protractor can easily trace and control such web application attributes.
  • Protractor can perform multiple browser testing on various browsers like Chrome, Firefox, Safari, IE11, Edge. It assists in quick and easy testing on various browsers.
  • Protractor is suitable for both Angular and Non-Angular web applications.
  • Because of the parallel execution feature, it allows executing test cases in multiple instances of the browser simultaneously.
  • It permits the installation of various packages as and when needed. In simple words working with packages is easier in Protractor.
  • Working with multiple assertion libraries is possible with Protractor.
  • Protractor supports various cloud testing platforms like SauceLabs and CrossBrowserTesting, etc.
  • It assists in faster testing.
  • Runs on both real browsers and headless browsers.

What is Selenium Protractor?
If the app you are developing is on AngularJSit’s always a better option to use Protractor since

  • it’s meant for AngularJS apps
  • We can create customization from Selenium in creating Angular JS apps
  • Protractor can run on top of selenium giving all the advantages of Selenium
  • You can use API exposed by Webdriver and Angular
  • Uses the same web driver as that of Selenium

What is the best IDE for protractor?

  • Visual Studio
  • CodeSublime
  • TextAtom Editor
  • Brackets
  • Eclipse
  • EclipseVisual Studio
  • ProfessionalWebstorm

Difference between Protractor vs Selenium
Here are the basic points of differences between Selenium and Protractor:

Comparison Basis Selenium Protractor
Supported Front End Technology-Based Web Application Supports all front end technology Specially designed for Angular and AngularJS applications, but can be used for Non-angular applications also.
Supported Languages C#, Java, Haskell, Perl. PHP, JavaScript, Objective-C, Ruby, Python, R JavaScript and TypeScript.
Supported Browsers Chrome, Firefox, Internet Explorer ( IE), Microsoft Edge, Opera, Safari,  HtmlUnitDriver Chrome, Firefox, Internet Explorer ( IE), Microsoft Edge, Safari
Synchronization or Waiting Does not support automatic synchronization between tests and application. It needs to be explicitly synchronized using different waits. Supports Automatic wait for Angular applications, but they are not applicable for Non-angular applications. But you can explicitly synchronize waits in Protractor.
Supported Locators Strategies Supports common locator strategies like Id, className, name, linkText, tagName, partial link text, XPath and CSS  for all web applications Supports common locator strategies like Id, className, name, linkText, tagName, partial link text, XPath and CSS  for all web applications plus it also supports angular specific locator strategies such as model, repeater, binding, buttonText, option, etc. also permits the creation of custom locators.
 
Supported Test Frameworks
 
Based on language binding, it supports various Test Frameworks C#- NUnit,
Java- JUnit, TestNG
Python- PyUnit, PyTest
JavaScript- WebDriverJS, WebDriverIO
 
Protractor aids Jasmine and Mocha. The protractor is provided with Jasmine as a default framework.
Support for BDD Yes. (Serenity, Cucumber, JBehave, etc). Yes. Mocha,  Jasmine, Cucumber and Serenity/JS
Reporting Requires third-party tools:- TestNG, Extent Report, Allure Report, etc. Requires third-party tools:- protractor-beautiful-reporter, protractor-HTML-reporter etc
Managing browser drivers Requires third-party tools like  WebdriverManager to sync browser version and driver. Requires web driver-manager CLI to automatic sync between browser version and driver for Chrome and Firefox.
Parallel Testing Requires third-party tools like TestNG. Supports parallel testing.
Cost Open-source Open-source
Nature of Execution Synchronous Asynchronous
Needed Technical Skills Average Moderate
Support No official support operates on open community model No official support operates on open community model
Ease to automate Angular Applications Not easy, a lot of sync issues and difficult to find real wait conditions. It is made for angular applications hence it is easy to automate Angular Applications
Test Execution Speed Slower Faster
Ease of Scripting Requires more lines of code and hence scripting is difficult. Even more difficult than Selenium.
Support for Mobile Application No direct support Direct support
CI/CD integration Yes Yes
Docker Support Yes Yes
Debugging Easy Difficult
Test Script Stability Less stable scripts More stable scripts


Is protractor better than selenium?
Both Selenium and protractor are automated test tools for web applications.
Both are used to automate Angular Applications. As Protractor is specially designed for angular applications, so if you are testing angular applications, it is better to opt for a protractor.
By now you would have been pretty clear about the differences in both. and it would now be easier for you to choose the better tool for your requirements and the winner in Protractor vs selenium will change according to it.
Study your requirements clearly and pick the aptest tool for more efficient testing results.

11 Best Vulnerability Assessment Scanning Tools

Computer systems, applications, software, and other network interfaces are vulnerable to a lot of threats. These threats need to be identified by experts as potential risks. Further, these threats are classified into different types. Then these vulnerabilities are prioritized, and the issue is resolved for the safety of the system. There are tools in existence that can fish out the issues impeccably. They are called Vulnerability assessment tools.
Before we get to that let’s have a look at the term vulnerability assessment and how it’s classified.
Table of Contents

What is Vulnerability Assessment?
The term vulnerability assessment is self-descriptive. Assessing the vulnerabilities in a system or application is called vulnerability assessment. These vulnerabilities are very risky for big IT techs or huge enterprises. These entities need to undertake proper vulnerability assessment and act on the recommendations immediately to cancel out any potential threats to the system.
Vulnerability Assessment
These threats can give access to hackers to enter the security system of any giant company and exploit it to their advantage cause huge losses to the company. Hence, it becomes necessary to address these issues through a vulnerability assessment.
To carry out this assessment efficiently, one needs to use some already available tools like the task cannot be done manually with complete perfection. These tools include some scanners which scan the whole system for any possible threat and generate an assessment report for the user to go through and act upon it accordingly.
There are a lot of types of vulnerability assessment that can be carried out in a system, such as: –

  1. Network-based: Detects possible threats and vulnerabilities on wired and wireless networks.
  2. Host-based: This scans ports and networks related to hosting like servers and workstations. It is like a network-based scan but provides a better and detailed scan of hosts.
  3. Application scans: This scans the websites in order to figure out possible threats and vulnerabilities in software.
  4. Database scans Scans databases to find out possible vulnerabilities in them.
  5. Wireless network scans: Scans the company’s Wi-Fi networks to find out possible leaks and threats.

The whole process of identifying threats, scanning systems, and applications, prioritizing threats, creating patches and applying them is a long process and doing it manually is not a very efficient choice. For the purpose of identification and prioritizing, vulnerability assessment tools are available which are basically software and applications that scan your system and create an assessment report. Some vulnerability assessment scanning tools go to the extent of fixing some potential threats and patching for you.
These vulnerability scanning tools reduce your work to a great extent, and you are mostly left with the job of fixing or checking the reports. These scans can be either carried out internally after logging in as an authorized user or externally to look for threats from the point of view of a hacker. The sole cause of vulnerability scanners is to keep the system secure and safe while resolving any leaks or security vulnerabilities in the system.

Top Vulnerability Assessment Tools
There are many paid tools available for the purpose, but if you do not want to spend money on vulnerability assessment tools, there are some tools that are available as open-source and you can use them for the required task without paying anything. Here are some of the best vulnerability assessment tools that are available for you:
1. Qualys Vulnerability Management
This tool can seem a little expensive to many, but the truth is that great things come at a cost. Although Qualys Vulnerability Management is expensive than most other vulnerability management tools, it provides extensive protection from possible malicious attacks.

  • Qualys has the capability of working under extreme internal complex networks and works behind the firewall to look for vulnerabilities.
  • It can also scan the cloud storage system for security purposes. Further, Qualys Vulnerability Management can also scan the shared networks geographically, which is really commendable.
  • It claims that its accuracy goes up to 99% making it an almost perfect tool that figures out most of the vulnerabilities and presents them to you for fixing and patching.

2. Nessus Professional
Nessus Professional is one of the best tools available for vulnerability assessment scans. It checks the system for compliance. It also searches the Internet protocol addresses and the websites for any potential risks that can attack the system later on.

  • Nessus scans all the sensitive data to protect it from hackers and malicious attackers.
  • The best part about Nessus Professional is that it is easy to use a scanner that comes with a user-friendly interface to enable the users to enjoy an easy experience.
  • Nessus professionals can also detect an SQL injection attack which is hard to detect.
  • It provides a detailed and unlimited assessment of the system.
  • It comes with an advanced detection technology which gives an additional and upgraded assessment of the system.
  • Nessus Professional is the kind of vulnerability scanning tools that gives deep insight into the vulnerabilities of the system and exposes all network threats.

3. Skybox
Skybox has great user reviews for its capability to protect the system from alarming threats and system dangers. Skybox is unique because it provides the assessment of the vulnerabilities of the system without using any scanning procedures.

  • Skybox provides you with the benefit of prioritizing the threats which helps you to look at the threat, which is most dangerous at the present moment.
  • The prioritization helps you to decide about which threat is supposed to be fixed first.
  • Well, that is not all! Skybox also provides special features to secure the system.
  • Skybox is great at looking for blind spots. It uses third party scanners to look for threats and then uses its own intelligence to prioritize them.
  • After making the report of the threats, it provides the benefit of controlling vulnerability which makes it very efficient at what it does.
  • It is better to use Skybox in medium to large-sized organizations.

4. Intruder
Intruder works just like its name. Its scanning abilities are based on the cloud. The software tool looks for any security breaches in the entire computer system that would give out a way for the malicious attackers to intrude in the system and exploit the security of the user.

  • For a simple vulnerability scan, Intruder offers around tens of thousands of checks to ensure the security of the system.
  • Intruder comes with a notification offer. You can be emailed the notification after it completes scanning the whole system for any breaches.
  • Even the reports of the scan of a month can be aggregated in a PDF format, and you can choose to receive it through email every month.
  • It is a friendly software and can even be coupled with other software to give better results to protect the system.

Read also: Top 10 Software Testing Tools For 2020

5. Tripwire IP360
Tripwire IP360 can secure the system from many vulnerability threats. It can work on critical systems and generate reports about such systems so that the user can protect the important files. It also offers management of the cloud environment. Tripwire has many other features like protection from vulnerabilities, security controls, security management, and many other benefits.

  • The structure of Tripwire IP360 is modernized and updated with the present time needs.
  • It can classify the high priority risks and low priority ones.
  • It has the capability to fulfill all needs that one can have from a vulnerability management tool.
  • Tripwire IP360 is an integrated system of many other tools that you would require separately to secure your system.
  • Tripwire IP360 provides you with the benefits of all such tools by bringing them in one place for your integrated use.
  • It looks through the assets of the company to protect them securely.

6. Wireshark
This vulnerability assessment tool keeps its notice over the networks of the system. The report generated by this tool can be viewed in the TTY mode. Another way of viewing its results of the assessment is through using a graphical user interface that presents you with the whole assessment report.

  • Wireshark captures the details of threats, securities in the live-action and saves it for later.
  • When the system is offline, it analyses the data collected and generates an analysis report for the organization.
  • It can read many files of varying formats that work to the additional benefit of the user.
  • It can run on various operating systems which includes Windows and Linux.
  • The analysis report can be converted into simple and plain text for the user to understand it easily without diving deep into the computer science terms.
  • It supports decryption too for some selective protocols.

7. BeyondTrust
BeyondTrust is perfect for someone who does not want to spend some bucks on vulnerability assessment tools. BeyondTrust is an open-source and absolutely free application for anyone to use and assess their systems. BeyondTrust is available online and easily accessible to anyone who wants to use it.

  • BeyondTrust searches the network systems, virtual environment, and operating system.
  • It also scans the devices and computers to look for vulnerabilities. Along with vulnerability identification, BeyondTrust offers its management with the help of some patch fixes.
  • The tool is designed to increase the ease of use and does so brilliantly with its user-friendly interface.
  • It also aims at risk management and prioritizes the threats.
  • The vulnerability assessment tool can be paired up with other software and can be used to scan the virtual environment.
  • Further, it also supports the scanning of virtual images. Having so many features for free software is truly commendable.

8. Paessler
Paessler, a vulnerability assessment scanning tool, comes with higher and advanced technology. It provides advanced infrastructure management to the concerned system. Paessler uses technologies like simple network management protocol, windows management instrumentation, representational state transfer, application program interface, structured query language, and many others. By using so many technologies, Paessler provides an advanced management system.

  • Paessler can monitor over a vast range of systems which includes internet protocols, firewalls, Wi-Fi, LAN, SLA, and many others.
  • The result report is available via emails. Any potential risk triggering items are scanned and tested, and the user is informed if any malicious behavior is noticed.
  • Paessler supports the web interface for multiple users at a time.
  • It provides the facility for monitoring the network connections through a map that is visually convenient.
  • Apart from monitoring the data carefully, Paessler gives you the data, demographics, graphs and all the numerical data related to the data which is supposed to be monitored.

Read also: 10 Major Bug Tracking Software For 2020

9. OpenVAS
OpenVAS provides with the high-level scanning technology. It can test both authenticated and unauthenticated protocols. It also scans the industrial protocols. The industrial protocol can be of both high level and low level. Along with all this, it also scans the Internet protocols that may range from high level to low level.

  • The vulnerability tests that are carried out are extremely detailed, bringing up all the history.
  • The vulnerability assessment scans are updated regularly to keep up with the malicious intents of hackers.
  • It contains more than fifty thousand tests for vulnerability assessment, which means that it looks through the entire system in extreme detail.
  • Now, if you are still not satisfied with the kind of performance that it delivers, then you can work on the internal programming code that it provides. With Open VAS you can perform any kind of vulnerability tests you want to.

10. Aircrack
The technology of Aircrack is aimed at securing Wi-Fi networks with the utmost security possible. It consists of Wired Equivalent Privacy (WEP) key along with Wi-Fi protected access and Wi-Fi protected Access 2 encryption keys. These encryption keys provide the means to resolve issues generated due to Wi-Fi networks.

  • Aircrack is a kind of universal assessment tool as it supports all kinds of the operating system along with all types of platforms.
  • Fragmentation attack is another raising issue in terms of network attacks. Aircrack provides safety from fragmentation attacks.
  • The tracking speed is improved in the case of Aircrack. It also supports protocols required to provide security from Wired Equivalent Privacy attacks.
  • It also supports multiple numbers of cards and drivers. With Aircrack, the Wi-Fi network system is secured.
  • The connection problems are resolved, and you can be free from issues in the Wi-Fi.

11. Microsoft Baseline Security Analyzer (MBSA)
Powered by Microsoft, Microsoft Baseline Security Analyzer (MBSA) looks for any security configurations that are missing from the system. It also looks for configuration issues in the systems that are common in computer systems.

  • The unique feature of Microsoft Baseline Security Analyzer is that it provides it download in a variety of languages that includes German, French, Japanese and English.
  • This makes it easier for users to use the services of Microsoft Baseline Security Analyzer universally.
  • The Microsoft Windows system is scanned carefully with the local or remote scan available.
  • The vulnerability assessment tool supports two of the common interfaces, i.e., the command-line interface for high-level skilled programmers and graphical user interface for lesser-skilled programmers.
  • Any error or missing security settings is reported to the user, and a patch for fixing the issue is expected.


Conclusion
There are various vulnerability assessment tools that are available both for free and some basic cost. It is very necessary to secure the system from potential cyber threats and malicious attacks so that your organization or company stays free of the danger of the outside world.
The main motive of these assessment scanning tools is to secure the leaks and patches before any malicious intent intruder can figure it out to exploit the system.
So select the one which meets your requirements and take a firm step towards securing your system from vulnerabilities.

Top 11 WordPress Plugins For Developers and Testers

Wonder how WordPress helps in developers and testers to create better user experience?  WordPress has you covered with their built-in plugins for different types of testing. These plugins are constantly updated and they are also bringing in a lot of plugins from time to time for the better assistance of the testers and the developers.
Here we have compiled a list of the top WordPress plugins for the benefit of both the testers and developers.
1.WPSandbox

WPSandbox, one of the most used plugins provided by WordPress helps the users get timely upgrades, better options with themes, settings changes, etc.
Features

  • The tool can be used to have a complete WordPress upgrade too. Just use the existing hosting provider and a few clicks of the mouse on the system and there one can have an entire testing site.
  • No need to copy the complex local test setups.
  • The plugin will also help in creating multiple Sandboxes just in case any different iteration is needed for one’s website.
  • Valuable insights about customers can be gained using the tool
  • Will be up and running in no time

2. Usernap

One of the most trusted and the most used WordPress plugins put to use for bug tracking. This plugin helps the testers to have a complete track over the bugs, with no extra time to be spent on the same.
Features

  • Usernap allows the users to capture the screenshots of the browser together with the visual bug report and send the same to the respective team, either in Usernap or any other bug tracking or project management tools that are being used.
  • From a developer perspective getting actual details of the issue is very important and at the same time, asking a client to send a browser screenshot or video of the issue can be quite a task.
  • Usernap makes both these things easy and that too without installing anything extra. The client-side JavaScript takes error reporting to a level.
  • This makes life easy for developers as well as end-users. It will also help speed up the defect fixing process as the turnaround time is reduced considerably.

3. Lambda Test

With the multitude of browsers and devices available in the market today, it is essential that you do cross-browser testing before your website hits production. Lambda test is the must-have plugin that helps you do that.
Features

  • Lambda Test can be used to take screenshots of the full page and keep a track of any issues related to cross-browser compatibility.
  • This plugin also makes sure that a tester or developer is able to perform the tests across for platforms from the WordPress admin panels.
  • Multiple integrations such as JIRA, ASANA, GITHUB, SLACK, Chrome Extensions, etc.

4. SitePush

SitePush plugin will provide an amazing experience for its users to work on the same. There exists a small issue that the same takes time to get installed (which is ignored in front of the type of service provided by the Plugin) but once done, the user will be satisfied by its service.
Features

  • With SitePush one can easily generate a copy of website data and transfer the same for a proper test to another server.
  • Can easily test the copy of the website data generated here by simply clicking on the links (all of the same) just as to make sure that the plugin has an expected connection.
  • It can be used to test the basic functions like contact forms and keep track of the functionality of the same.

5. Browser Stack

Browser Stack is a free plugin used for Cross-browser testing. It allows all the developers and testers out there to test their websites on real browsers, with a hassle-free experience.
Features

  • Can be used to check the responsive capability of the web design
  • Helps in testing local and internal servers, and also, local folders that contain HTML, JAVA script files, etc.
  • Extensive browser testing capabilities
  • Contains a pre-installed debugging tool

6. Yoast SEO

Have an SEO requirement? Well, Yoast SEO is one of the most widely used plugins for providing SEO help. One can easily improve their search results by using this plugin.
Features

  • Yoast plugin has the capability to check the SEO keywords in the page content and also provides suggestions to improve the SEO ranking.
  •  Real-time content analysis
  • Helps in organizing the content

7. NS Cloner

Need multiple copies of your website content? Use NS cloner plugin and copy the content in one go for the different types of testing. This is one of the easiest and fastest methods of creating a clone for your website in terms of the theme, theme settings, plugin configuration, content, videos, pictures, etc.
Features

  • During the cloning process, everything is reserved and intelligent replacements are made.
  • works only with WordPress multisite
  • With these developers can test various aspects on the clone site
  • Issue detection and advanced validation
  • Effective process logging that helps in troubleshooting

8. Debug Bar

This is a useful plugin that can be used to monitor the performance parameters of a website. The parameters include memory usage, actions performed, time is taken, etc. This data can, in turn, be used to alter slow websites. The data related to cache, hooks and remote requests can be analyzed to understand why the site is slow. Identifying the root cause makes it easier to fix as well.
Features

  • Can be used to add a helpful  debug menu to the admin bar
  • WP_DBUG can track PHP warnings
  • SAVEQUERIES in the plugin can be used to track MySQL queries
  • A large text area for running arbitrary PHP
  • A registered shortcode panel for the current request

9. TrackDuck

TrackDuck is another very popular and useful plugin for Visual Bug Tracking and feedback. The plugin allows users, clients and peers to submit feedback related to the UI, the wireframes etc. basically more on the UI front and its layout.
Features

  • All users of your website can actually act like your testers but at the same time, they are sharing feedback and not issues. A win-win situation for both sides.
  • The easiest part is that the user can click on any part of the UI and submit a comment. It can’t get simpler than this. A mail is triggered to the developer with the UI details and the added comment. He can then analyze and try to fix and enhance the UI.
  • This plugin is also extensively used for sharing the feedbacks on mockup designs.

10. Theme Check

This is the best plugin for checking the home themes. A handy tool for both developers as well as testers.
Features

  • Specifically designed for the themes and allows the user/developer/tester to run all the automated tests on the selected theme which normally WordPress would run when a new theme is submitted to it.
  • The Theme Check is very easy to use and can be launched from the admin console.
  • Once the testing is over the results are displayed in the admin console itself.
  • This is the easiest way to understand if your theme is in compliance with the WordPress standards and how it will fare with the clients as well.

11. Beta Flags

Want to manage all the new releases of features of the website? Beta Flags, helps you manage these releases with ease. No execution of code for the production environment from the moment Beta Flags are deployed.
Just a simple wrap (a conditional one) and the work gets easy as you can activate it from the back end. It is almost similar to the A/B Testing except that it can be either in ON or OFF mode and nothing in between So if you are a developer and looking options to deploy your code with ease, then you must check this out.

Also Read: Top 20 Free Usability Testing Tools Available Now

So what are you waiting for? Check out these plugins offered by WordPress. It is also to be noted that WordPress comes with very innovative as well as useful plugins from time to time to make things better for its users. So make sure you follow their and our updates judiciously.
Happy working with WordPress.

Bamboo vs Jenkins : Which CI/CD Tool is Better? [Table included]

Bamboo vs Jenkins! both are continuous integration automation tools. Both of them are widely used by agile teams to quicken and make their process more efficient. Bamboo and Jenkins can also assist agile teams to regularly share their work.
However, which one to use if they are equally good? Go through this comparison blog and find out.

What is Continuous integration?

Continuous Integration is a process progressively being adopted by software development teams to enhance the frequent sharing of their work with the rest of the team to fasten and enhance their software development process.
Every time integration takes place it is verified/tested by a build that includes test cases. This results in early detection and correction of bugs and streamlining and fastening the development process.

What is Jenkins?

Jenkins is a renowned open-source CI/CD tool. It is an automation server that will help in the software development process. It is also a Java-based tool that assists the development team to focus on continuous delivery.
Another feature of Jenkins is that it’s a server-based system that runs in a servlet ( a small java program that runs in a web server) containers. For instance, Apache tomcat
Features of Jenkins

  • Jenkins is easy to install across OS
  • Jenkins makes sure that your code is well through continuous integration
  • Increases code coverage by facilitating transparent dev
  • Hundreds of plugins are available

What is Bamboo?

Bamboo is a continuous integration tool used by development team members to continuously share their work with the team. Bamboo services were originally available as both in-house and cloud computing services. But later cloud computing services were discontinued.
Top Features of Bamboo

  • Can run multiple builds in parallel
  • Build failure analysis, including a stack trace
  • Offers REST API
  • Great Plugin Support
  • Supports build tasks for build tools
  • Supports testing tools
  • Customizable build notifications
  • Supports importing data from Jenkins

Major differences between Bamboo vs Jenkins

Let us have a look at the major differences between Bamboo and Jenkins

  • Open Source

Jenkins is open-source while Bamboo is a paid tool. Bamboo charges money; based on the user’s requirements. It can be quite costly for high-end projects and projects having various versions.
In short, Jenkins is completely free and Bamboo is not. Bamboo starts with a minimal cost of as low as $10 but this cost rapidly grows to a massive $880 a year.

  • User Community

Being completely free Jenkins has a huge user community. It adds an advantage to look out for various upgrades, updates, and bugs. But searching for some solutions can be a hectic process as a user might have to search through a large number of threads to look out for a solution.
While Bamboo is a paid service and hence has a smaller user community. But it offers professional support and is completely user-friendly and can be customizable.

  • Plugins

Being an open-source tool, Jenkins supports a massive library of plugins. It has a library of over 1400 plugins. You can readily use these plugins to customize Jenkins and to extend its functionalities.
In the case of Bamboo, the number of plugins is rather less.  But not to miss on the quality of the plugins. The plugins that Bamboo offers are almost perfect with no bugs.

  • Cloud Support

With gradually, the world depending upon cloud services, comparing the two continuous integration tools – Bamboo and Jenkins on the basis of this feature is worth it.
Both Jenkins and Bamboo initially supported both on-premises and cloud services. But later on, Bamboo discontinues its cloud version. Hence current scenarios only Jenkins offers cloud support while Bamboo does not.

  • Setup Complexity

Another important feature to discuss is setup complexity. While Bamboo comes with an easy to use user-interface and full professional support for your queries, Jenkins misses on all these features.

Read also : 15 Best Mobile App Testing Tools For 2019

Jenkins has a pretty complex user interface that is even less attractive than Bamboo. Jenkins does not offer any professional support to set up your tool or to resolve any query, whereas Bamboo offers pretty good professional support to its customers. But being open-source, missing on these features is completely justifiable for Jenkins.

  • Integration with other tools

Atlassian Bamboo is renowned for its integration capability with other Atlassian tools like JIRA and Bitbucket. You can easily and quickly integrate such tools with Bamboo.
Though Jenkins can also integrate with such tools, thanks to a massive number of plugins Jenkins supports, integration is rarely required. However, If you are dealing with big projects, the integration could be very inconvenient.

  • Project Support

Bamboo is a preferred choice for large enterprise projects with extended budgets, Projects with massive software systems and supporting various versions can be easily handled by Bamboo. But for simpler and stand-alone projects Jenkins is a better choice as it is open-source.
A Quick Look on the Differences:

Feature

Jenkins

Bamboo

Availability

Open-Source

Not an Open-Source

Price

Free

Depending upon your requirement price varies from $11 to $900.

Source Code

Java

Java

Supported operating systems

Windows, Ubuntu, Red Hat, Mac OS

Windows, Linux, Solaris

Browsers Support

Chrome, Firefox, Internet Explorer

Firefox, Chrome, Safari, Edge

Plugins

A massive number of Plugins

Fewer Plugins

User Community

Very big

Smaller

Backup facility

Complex

Easy

Git branching workflows

Not Available

Available

Built-in Deployment Projects

Not Available

Available

Test Automation

Tricky but possible using Plugins

Is built-in

Distributed Build support

Remote Nodes

Remote Agents

Integration with Jira

 Tricky but possible using Plugins

Easy integration with Jira

Built-in Integration for Bitbucket Server

Tricky but possible using Plugins

Easy integration with Bitbucket

REST APIs

Yes

Yes

Professional Support

No

Yes

Usage

Complex

Easy

User-Interface

Difficult to Use

Easy to use

Which is better?
With new processes like Agile and DevOps out-casting age-old software CI/CD tools to fasten and streamline your software development process. Bamboo vs Jenkins for sure is the two most popular CI/CD tools available in the markets.
Picking up one among the two as a better tool is practically not possible. To pick up on one of these two tools entirely depends upon your requirements.

If you have a standalone software system and have a constrained budget, then definitely Jenkins is a better pick for you. But if you are looking for an extremely professional setup to deal with enterprise software systems having multiple builds and versions, then Bamboo is a better option for you.
So it’s time to analyze your requirements and pick the best suited CI tool to fasten and make your software development process more progressive.