TestCafe vs Selenium : Which is better?

In the realm of web testing frameworks, TestCafe and Selenium stand out for their unique approaches to automation testing. TestCafe, a Node.js tool, offers a straightforward setup and testing process without requiring WebDriver.

Its appeal lies in its ability to run tests on any browser that supports HTML5, including headless browsers, directly without plugins or additional tools.

On the other hand, Selenium, a veteran in the field, is renowned for its extensive browser support and compatibility with multiple programming languages, making it a staple in diverse testing scenarios.

This comparison delves into their technical nuances, assessing their capabilities, ease of use, and flexibility to determine which framework better suits specific testing needs.

Firstly, we’ll understand the role of both automation tools and later see a quick comparison between them.

All About TestCafe

Developed by DevExpress, TestCafe offers a robust and comprehensive solution for automating web testing without relying on WebDriver or any other external plugins.

It provides a user-friendly and flexible API that simplifies the process of writing and maintaining test scripts. Some of its key features include:

  1. Cross-browser Testing: TestCafe allows you to test web applications across multiple browsers simultaneously, including Chrome, Firefox, Safari, and Edge, without any browser plugins.
  2. Easy Setup: With TestCafe, there’s no need for WebDriver setup or additional browser drivers. You can get started with testing right away by simply installing TestCafe via npm.
  3. Automatic Waiting: TestCafe automatically waits for page elements to appear, eliminating the need for explicit waits or sleep statements in your test scripts. This makes tests more robust and reliable.
  4. Built-in Test Runner: TestCafe comes with a built-in test runner that provides real-time feedback during test execution, including detailed logs and screenshots for failed tests.
  5. Support for Modern Web Technologies: TestCafe supports the testing of web applications built with modern technologies such as React, Angular, Vue.js, and more, out of the box.


Read About:Learn How to Use Testcafe For Creating Testcases Just Like That

Installation of TestCafe

Installing TestCafe is straightforward, thanks to its Node.js foundation. Before you begin, ensure you have Node.js (including npm) installed on your system.

If you haven’t installed Node.js yet, download and install it from the official Node.js website.

Here are the steps to install TestCafe:

Step 1: Open a Terminal or Command Prompt

Open your terminal (on macOS or Linux) or command prompt/powershell (on Windows).

Step 2: Install TestCafe Using npm

Run the following command to install TestCafe globally on your machine. Installing it globally allows you to run TestCafe from any directory in your terminal or command prompt.

npm install -g testcafe

Step 3: Verify Installation

To verify that TestCafe has been installed correctly, you can run the following command to check its version:

testcafe -v

If the installation was successful, you will see the version number of TestCafe output to your terminal or command prompt.

Step 4: Run Your First Test

With TestCafe installed, you can now run tests. Here’s a quick command to run an example test on Google Chrome. This command tells TestCafe to use Google Chrome to open a website and check if the title contains a specific text.

testcafe chrome test_file.js

Replace test_file.js with the path to your test file.

Note:

  • If you encounter any permissions issues during installation, you might need to prepend sudo to the install command (for macOS/Linux) or run your command prompt or PowerShell as an administrator (for Windows).
  • TestCafe allows you to run tests in most modern browsers installed on your local machine or on remote devices without requiring WebDriver or any other testing software.

That’s it! You’ve successfully installed TestCafe and are ready to start automating your web testing.

How To Run Tests In TestCafe

Running tests with TestCafe is straightforward and does not require WebDriver or any other testing software. Here’s how you can run tests in TestCafe:

1. Write Your Test

Before running tests, you need to have a test file. TestCafe tests are written in JavaScript or TypeScript. Here’s a simple example of a TestCafe test script (test1.js) that navigates to Google and checks the title:

import { Selector } from 'testcafe';

fixture `Getting Started`
.page `https://www.google.com`;

test(‘My first test’, async t => {
await t
.expect(Selector(‘title’).innerText).eql(‘Google’);
});

2. Run the Test

Open your terminal (or Command Prompt/PowerShell on Windows) and navigate to the directory containing your test file.

To run the test in a specific browser, use the following command:

testcafe chrome test1.js

Replace chrome with the name of any browser you have installed (e.g., firefox, safari, edge). You can also run tests in multiple browsers by separating the browser names with commas:

testcafe chrome,firefox test1.js

3. Running Tests on Remote Devices

TestCafe allows you to run tests on remote devices. To do this, use the remote keyword:

testcafe remote test1.js

TestCafe will provide a URL that you need to open in the browser on your remote device. The test will start running as soon as you open the link.

4. Running Tests in Headless Mode

For browsers that support headless mode (like Chrome and Firefox), you can run tests without the UI:

testcafe chrome:headless test1.js

5. Additional Options

TestCafe provides various command-line options to customize test runs, such as specifying a file or directory, running tests in parallel, or specifying a custom reporter. Use the --help option to see all available commands:

testcafe --help

Example: Running Tests in Parallel

To run tests in parallel in three instances of Chrome, use:

testcafe -c 3 chrome test1.js

All About Selenium

Selenium provides a suite of tools and libraries for automating web browsers across various platforms. Selenium WebDriver, the core component of Selenium, allows testers to write scripts in multiple programming languages such as Java, Python, C#, and JavaScript. I

ts key features include:

  1. Cross-browser and Cross-platform Testing: Like TestCafe, Selenium supports cross-browser testing across different web browsers such as Chrome, Firefox, Safari, and Internet Explorer.
  2. Large Community Support: Selenium has a large and active community of developers and testers who contribute to its development, provide support, and share best practices.
  3. Flexibility: Selenium offers flexibility in terms of programming language and framework choice. You can write test scripts using your preferred programming language and integrate Selenium with popular testing frameworks such as JUnit, TestNG, and NUnit.
  4. Integration with Third-party Tools: Selenium can be easily integrated with various third-party tools and services such as Sauce Labs, BrowserStack, and Docker for cloud-based testing, parallel testing, and containerized testing.
  5. Support for Mobile Testing: Selenium Grid allows you to perform automated testing of web applications on mobile devices and emulators, making it suitable for mobile testing as well.

How To Install Selenium

Installing Selenium involves setting up the Selenium WebDriver, which allows you to automate browser actions for testing purposes.

The setup process varies depending on the programming language you’re using (e.g., Java, Python, C#, etc.) and the browsers you intend to automate. Below is a general guide to get you started with Selenium in Java and Python, two of the most common languages used with Selenium.

For Java

Install Java Development Kit (JDK):

  • Ensure you have the JDK installed on your system. If not, download and install it from the official Oracle website or use OpenJDK.
  • Set up the JAVA_HOME environment variable to point to your JDK installation.

Install an IDE (Optional):

  • While not required, an Integrated Development Environment (IDE) like IntelliJ IDEA or Eclipse can make coding and managing your project easier.

Download Selenium WebDriver:

Add Selenium WebDriver to Your Project:

  • If using an IDE, create a new project and add the Selenium JAR files to your project’s build path.
  • For Maven projects, add the Selenium dependency to your pom.xml file:
<dependencies>
<dependency>
<groupId>org.seleniumhq.selenium</groupId>
<artifactId>selenium-java</artifactId>
<version>LATEST_VERSION</version>
</dependency>
</dependencies>

For Python

Install Python:

  • Ensure Python is installed on your system. If not, download and install it from the official Python website.
  • Make sure to add Python to your system’s PATH during installation.

Install Selenium WebDriver:

  • Open your terminal (Command Prompt or PowerShell on Windows, Terminal on macOS and Linux).
  • Run the following command to install Selenium using pip, Python’s package installer:
pip install selenium

Browser Drivers

Regardless of the language, you will need to download browser-specific drivers to communicate with your chosen browser (e.g., ChromeDriver for Google Chrome, geckodriver for Firefox). Here’s how to set them up:

Download Browser Drivers:

Set Up the Driver:

  • Extract the downloaded driver to a known location on your system.
  • Add the driver’s location to your system’s PATH environment variable.

Verify Installation

To verify that Selenium is installed correctly, you can write a simple script that opens a web browser:

For Java

import org.openqa.selenium.WebDriver;
import org.openqa.selenium.chrome.ChromeDriver;
public class SeleniumTest {
public static void main(String[] args) {
System.setProperty(“webdriver.chrome.driver”, “PATH_TO_CHROMEDRIVER”);
WebDriver driver = new ChromeDriver();
driver.get(“https://www.google.com”);
}
}

For Python

from selenium import webdriver

driver = webdriver.Chrome(executable_path=‘PATH_TO_CHROMEDRIVER’)
driver.get(“https://www.google.com”)

Replace PATH_TO_CHROMEDRIVER with the actual path to your ChromeDriver.

This guide should help you get started with Selenium. Remember, the exact steps may vary based on your development environment and the browsers you want to automate.

Also Read : Why is TestNG Awesome? Advantages of Integrating it with Selenium

Comparison Between TestCafe And Selenium

Feature TestCafe Selenium
Language Support JavaScript, TypeScript Java, C#, Python, Ruby, JavaScript, Kotlin, PHP
Browser Support Runs on any browser that supports HTML5. Includes support for headless browsers and mobile browsers via device emulators. Wide range of browsers including Chrome, Firefox, Internet Explorer, Safari, Opera, and Edge. Requires additional drivers for each browser.
WebDriver Requirement Does not require WebDriver or any external dependencies. Requires WebDriver to interact with web browsers.
Installation and Setup Simple setup with no dependencies other than Node.js. Easily installed via npm. More complex setup due to the need for installing WebDriver for each browser.
Test Execution Executes tests directly in the browser using a server. Can run tests on remote devices. Communicates with browsers through the WebDriver protocol.
Parallel Test Execution Built-in support for running tests concurrently across multiple browsers or devices. Supports parallel test execution with additional tools like Selenium Grid or third-party frameworks.
Cross-Browser Testing Simplified cross-browser testing without additional configurations. Requires configuration and setup for each WebDriver to enable cross-browser testing.
Integration with CI/CD Easy integration with popular CI/CD tools like Jenkins, TeamCity, Travis CI, and GitLab CI. Broad support for integration with various CI/CD systems.
Mobile Testing Supports mobile testing through device emulation in browsers. Supports real mobile devices and emulators through Appium integration.
Record and Replay Provides a feature to record actions in the browser and generate test code (with TestCafe Studio). Third-party tools and plugins are required for record and replay capabilities.
Community and Support Active community with support available through forums and chat. Commercial support is available through DevExpress for TestCafe Studio. Very large and active community with extensive resources, forums, and documentation.
Use Case Ideal for teams looking for a quick setup and easy JavaScript/TypeScript integration. Best suited for projects that require extensive language support and integration with various browser drivers and mobile testing through Appium.

Conclusion: Which one is Better? Based On Our Experience.

Both TestCafe and Selenium offer powerful capabilities for web testing, but the choice between them depends on specific project requirements, such as the preferred programming language, ease of setup, browser support, and testing environment complexity.

TestCafe might be more appealing for projects that prioritize ease of use and quick setup, while Selenium provides greater flexibility and language support, making it suitable for more complex automation tasks that may involve a wider range of browsers and integration with mobile testing frameworks like Appium.

11 Awesome Selenium Alternatives For Testers

Selenium is a suite of open-source tools mainly used to test web applications. It works as an API for browser automation. Selenium testing is clearly the most prevalent approach for QA testing, giving the capacity to make custom test automation situations that outfit an assortment of browsers and languages. Selenium is indeed good; is there any selenium competitors or selenium-like tools in the market?

Why Do People Use Selenium Web Testing Framework?

The Selenium Web Testing Framework is becoming increasingly popular as a choice among testers for a number of good reasons.

The Selenium Web Testing Framework is so popular among testers because it’s very flexible, compatible across different browsers, supports multiple programming languages, and, most of all, is an open-source tool.

It allows testers to write their scripts in languages like Java, Python, and C#, which makes integrating Selenium with other tools a breeze.

With Selenium, one can test web applications across different browsers and platforms, ensuring the test coverage is comprehensive.

The fact that there’s strong community support for this framework and regular updates are released contributes even more to its popularity.

For all of these reasons and more, the Selenium Web Testing Framework remains the preferred choice as a leading tool for automatic website testing in a variety of different environments.

Pros and Cons of Selenium Test Automation

Pros Cons
Free and Open Source: No licensing fees, accessible to everyone. Requires development skills: Scripting knowledge needed for test creation.
Cross-browser and platform compatibility: Tests can run on different browsers and operating systems. Maintenance intensive: Scripts need updating as applications evolve.
Flexible and customizable: Adapts to specific testing needs with various frameworks and libraries. Steep learning curve: Initial setup and framework understanding require time and effort.
Extensive community and resources: Abundant documentation, tutorials, and support available online. Limited support for non-web applications: Not suitable for desktop or mobile app testing.
Promotes faster regression testing: Automates repetitive tasks, freeing up time for exploratory testing. Can be fragile: Test scripts might break with UI changes, requiring adjustments.
Improves test coverage: Enables running more tests than manual testing allows. Not a silver bullet: Doesn’t replace manual testing entirely, best used in combination.
Integrates with CI/CD pipelines: Automates testing as part of the development process. Can be slow to develop tests: Scripting can be time-consuming compared to record-and-playback tools.

What Makes People Search for Alternatives to Selenium?

  • Complex Setup and Configuration: Selenium can require a significant amount of setup and configuration, especially for beginners or those unfamiliar with programming concepts.
  • Limited Support for Non-Web Applications: Selenium is primarily designed for web applications, and users working with desktop or mobile applications might seek more suitable tools.
  • Requires Strong Programming Skills: Writing tests in Selenium necessitates a good grasp of programming, which can be a barrier for non-technical testers or those looking for a simpler, no-code solution.
  • No Built-In Test Management and Reporting: Selenium lacks built-in features for test management and reporting, requiring integration with third-party tools, which can complicate the testing process.
  • Browser Compatibility Issues: While Selenium supports multiple browsers, maintaining cross-browser compatibility can be challenging due to the frequent updates of web browsers.
  • Performance and Scalability Issues: Some users may encounter performance bottlenecks with Selenium, especially when dealing with large test suites or requiring high concurrency in test execution.
  • Limited Support for Visual Testing: Selenium does not natively support visual testing (UI testing that involves comparing screenshots of web pages), which is crucial for ensuring UI consistency across different devices and screen sizes.
  • Community Support Variability: Although Selenium has a large community, the quality and timeliness of support can vary, leading users to seek tools with more reliable or official support channels.
  • Looking for More Comprehensive Solutions: Users may seek alternatives that offer a more integrated approach, including features like test creation, management, execution, and reporting in a single platform.
  • Interest in Latest Technologies: With the rapid advancement in AI and machine learning, testers are exploring new tools that incorporate these technologies for smarter, more efficient testing processes.

Applications have turned out to be progressively intricate in recent years, particularly with the utilization of prominent JavaScript structures, for example, Angular.js, React.js, Vue.js, and Ember.js for developing web applications; Selenium has assumed it to be challenging to adjust to these advances.

But there is no need to panic as there are great alternatives to Selenium available in the market. Here is our list of the

11 Best Alternatives to Selenium for the Year 2024.

#1. Robot Framework

Features Of Robot Framework

  • Robot Framework is an open-source automation framework without licensing costs, supported by the Robot Framework Foundation.
  • It is designed to be open and extensible, allowing for integration with virtually any tool for powerful automation solutions.
  • Supports libraries implemented with Python, Java, or many other programming languages to extend its capabilities.
  • Operates across different platforms and environments, featuring an easy syntax with human-readable keywords for test cases.
  • It boasts a rich ecosystem of libraries and tools developed as separate projects, surrounded by a vibrant community offering support and contributions.
  • Suitable for both test automation and robotic process automation (RPA), offering comprehensive documentation for users at all levels.
  • Continuously developed with regular additions of new features and improvements.
  • Integration-friendly, seamlessly working with CI/CD tools like Jenkins and version control systems like Git.
  • Offers versatile testing capabilities, including acceptance testing, end-to-end testing, API testing, and more.
  • It comes with various built-in tools and libraries for immediate use in testing activities.
  • Allows for the creation of custom libraries to extend functionality further and adapt to specific testing needs.
  • Generates detailed reports and logs for in-depth analysis of test runs and features easy installation via package managers.
  • Enables real browser testing through libraries like SeleniumLibrary, and supports mobile application testing with libraries such as AppiumLibrary.
  • Capable of testing web services and APIs with dedicated libraries and allows for desktop application testing, showcasing its wide-ranging automation capabilities.

Cons Of Robot Framework

  • Performance may decrease with large test suites.
  • Non-developers might find a steep learning curve.
  • Requires external libraries for advanced testing.
  • UI testing can be less intuitive compared to specialized tools.
  • Debugging capabilities are limited.
  • Extensive documentation can be overwhelming for new users.
  • Integrating with modern DevOps tools may need extra setup.
  • Mobile and desktop testing require additional libraries.
  • Quality and speed of community support can vary.
  • Limited visual testing capabilities without extra libraries or solutions.

Also Read:- TestCafe vs Selenium: Which is better?

#2. Cypress

Cypress is a newly launched test automation framework that contributes another way forward. Cypress is a feature-rich tool that is entirely open source, with the exception of the dashboard application, and it is undeniably more strictly regulated by current development practices and devices than Selenium.

Features

  • Cypress offers real-time reloads, updating tests automatically with script changes.
  • Features “Time Travel” for viewing test states at each step, aiding debugging.
  • Automates waiting for commands and assertions to be completed, reducing flaky tests.
  • Allows control, stubbing, and testing of network traffic for in-depth testing scenarios.
  • Executes tests directly in the browser for consistent results.
  • Captures screenshots of failures and records videos of test runs for detailed analysis.
  • Supports cross-browser testing, including Chrome, Firefox, Edge, and Electron.
  • Provides an intuitive dashboard for detailed insights into test runs and debugging.
  • Handles both unit and end-to-end testing, making it versatile for web application testing.
  • Seamlessly integrates with CI tools for fitting into automated testing pipelines.
  • Supported by a strong community and comprehensive documentation.

Cons

  • Cypress has historically had limited browser support, focusing primarily on Chrome, though it has recently expanded to include Firefox and Edge.
  • It does not support testing scenarios that require interacting with multiple browser tabs simultaneously.
  • Cypress does not natively support running tests across multiple browsers in parallel.
  • Cypress tests can only be written in JavaScript, limiting flexibility for teams using other programming languages.
  • Some users report slower performance with very large test suites, affecting test execution time.
  • Testing content inside iFrames can be more complex and challenging with Cypress.
  • It is specifically designed for web application testing and may not be suitable for desktop or mobile applications.
  • New users, especially those not familiar with JavaScript, may experience a learning curve when getting started with Cypress.

#3. Katalon Studio

One more effective alternative to Selenium is Katalon Studio. It integrated the ground-breaking programming of the Selenium system to accommodate a very well-planned GUI, and the outcome is an amazing test automation system.

Pros

  • Katalon Studio offers a comprehensive test automation solution for web, mobile, API, and desktop applications.
  • It supports codeless and scripted modes, making it accessible to users of all technical levels.
  • Integrates seamlessly with popular CI/CD tools like Jenkins, TeamCity, and Bamboo for automated testing pipelines.
  • Provides built-in support for behavior-driven development (BDD) with features for writing and managing Gherkin test cases.
  • Offers a centralized platform for managing test cases, test execution results, and project artifacts.
  • Features an intelligent object repository and an object spy tool for efficient object management and identification.
  • Includes a powerful test recording feature that simplifies the process of creating automated tests.
  • Supports data-driven testing, allowing users to execute tests with various data sets easily.
  • Facilitates collaboration among team members with its project sharing and version control capabilities.
  • Katalon Studio integrates with Jira, qTest, and other ALM tools for enhanced project management and tracking.
  • Provides advanced reporting and analytics features for detailed insights into test execution and outcomes.
  • Users can extend the functionality of Katalon Studio with custom plugins from the Katalon Store or by developing their own.


Cons

  • Katalon Studio’s extensive feature set can overwhelm beginners, presenting a steep learning curve.
  • The free version has limitations, requiring a paid subscription for full access to advanced features and capabilities.
  • Performance can be slower with large test suites or complex test scenarios, impacting test execution time.
  • Some users report occasional stability issues, especially when working with extensive or complex projects.
  • Integration with certain third-party tools and systems may require additional configuration or workarounds.
  • The codeless automation approach, while accessible, may not offer the same level of flexibility and control as custom scripting for more advanced testing needs.
  • Reports generated in the free version may lack the depth and customization options available in the paid version.
  • While it supports both web and desktop applications, mobile testing capabilities might not be as comprehensive as dedicated mobile testing tools.
  • Custom plugins or extensions may be necessary to meet specific testing requirements, adding complexity to the setup.
  • The community and support resources, though extensive, may not always provide immediate solutions to less common issues or advanced use cases.

#4. Screenster

Screenster gives visual User Interface test automation to web applications. It is the single device that approves the screens which users really see. While recording a UI test, Screenster breaks down the DOM and matches individual UI components to their performance on the screen. Thus, a tester can confirm each on-page component.

Features:

  • Offers visual regression testing, automatically detecting UI changes and anomalies.
  • Provides a cloud-based platform, eliminating the need for local setup and maintenance.
  • Enables automated test recording by capturing actions in the browser without writing code.
  • Supports testing across different browsers and devices to ensure consistent UI experiences.
  • Integrates baseline management, allowing easy review and approval of visual changes.
  • Facilitates team collaboration with shared test projects and results.
  • Generates detailed reports highlighting visual differences with screenshots.
  • Allows for easy test maintenance by updating baselines and reusing tests across projects.

Cons:

  • Visual testing can generate false positives due to minor and inconsequential visual differences.
  • May require manual review of test results to confirm genuine issues versus expected UI changes.
  • Limited to web applications, not suitable for testing non-web-based software or mobile applications natively.
  • Dependence on cloud infrastructure might raise concerns for teams with strict data security or privacy requirements.
  • Could be less flexible for complex test scenarios that go beyond UI comparison.
  • Pricing model may not fit all budgets, especially for small teams or individual developers.
  • Learning curve for users unfamiliar with visual regression testing concepts and best practices.
  • Integration with existing test suites or CI/CD pipelines may require additional setup.

#5. CasperJS

CasperJS is an open-source, quick, lightweight, and simple-to-configure testing utility and navigation scripting embedded in CoffeeScript or JavaScript for PhantomJS and SlimerJS.

The tool has the capability of testing the page status, functional navigation, scrapping information off the website page, and also automatically checking network traffic.

Features:

  • Enables automated navigation scripting for web applications, simplifying the process of defining and executing navigation scenarios.
  • Facilitates the creation of automated tests, including functional and regression tests, for web applications.
  • Offers detailed event logging and screenshot capture capabilities to assist in debugging and test verification.
  • Supports headless browser testing through PhantomJS, allowing tests to run without a graphical user interface for faster execution.
  • Provides a straightforward syntax for writing test scripts, making it accessible for developers and testers with JavaScript knowledge.
  • Allows for page scraping and automation tasks, making it useful for web scraping projects in addition to testing.
  • Capable of simulating multiple user interactions with web pages, including clicking links, filling out forms, and capturing the resulting changes.
  • Integrates with other tools and frameworks for continuous integration and testing workflows.

Cons:

  • As development has been suspended, the tool may not receive updates, bug fixes, or support for newer web technologies and standards.
  • Limited to PhantomJS (also no longer actively maintained) or SlimerJS for browser environments, which may not reflect the latest browser behaviors accurately.
  • Lacks native support for testing across multiple real browsers, limiting its effectiveness in cross-browser testing scenarios.
  • The scripting approach can become cumbersome for very complex applications or tests that require extensive setup and teardown.
  • Users may encounter challenges integrating CasperJS with modern JavaScript frameworks and libraries due to its suspension and the rapid evolution of web technologies.
  • The community support and resources may dwindle over time, making it harder for new users to find help or existing users to solve emerging issues.
  • May not be the best choice for projects that prioritize long-term maintenance and compatibility with future web standards.

#6. Watir

Watir is an open-source and free tool launched under the license of BSD. As the test scripts are written in Ruby, it is simple to adapt, particularly for Ruby designers.

Also, because the Ruby language is very brief, the tests made utilizing the Waitr tool are not at all difficult to create and upgrade. Along these lines, the long-term upkeep of the test suits requires less overhead.

Further, Watir’s web driver is based on the WebDriver system, which can drive the most famous systems out there, making Watir utterly usable with numerous browsers.

Features

  • Open-source Ruby library for automating web browsers, offering a powerful tool for web application testing.
  • Supports multiple browsers, including Chrome, Firefox, Internet Explorer, and Safari, directly through their respective drivers.
  • Enables interaction with web elements in a way that mimics human actions, such as clicking buttons, filling out forms, and navigating through pages.
  • Allows for the execution of tests on real browsers, ensuring that applications work as expected in real-world scenarios.
  • Integrates easily with testing frameworks like RSpec, Cucumber, and Test::Unit, allowing for the development of readable and maintainable test code.
  • Provides support for headless browser testing, enabling tests to run faster and in environments without a graphical interface.
  • Facilitates cross-browser testing, helping ensure that web applications function correctly across different browser types and versions.
  • It features a simple and intuitive API, making it accessible for beginners and experienced testers.

Cons

  • Primarily focused on web applications, with limited capabilities for testing non-web or mobile applications.
  • Being a Ruby library, it might not be the preferred choice for teams working primarily in other programming languages.
  • Some users might find the setup and configuration process challenging, especially when integrating with various browsers and driver versions.
  • The performance of tests can be affected by the speed and stability of the web browsers being automated.
  • Requires a good understanding of Ruby for writing more complex test scripts or extending the framework’s capabilities.
  • Like any open-source project, the speed and availability of updates and new features can depend on the community and contributors.

#7. Cucumber

Cucumber removes any barrier between non-technical and technical project personnel.

Fundamentally, that is the crucial element of its mystery sauce. Actually, cucumber can go about as a selenium alternative or perform in pairs with selenium.

Features:

  • Supports Behavior-Driven development (BDD), allowing the creation of test cases in plain English, making them understandable to non-technical stakeholders.
  • Enables writing of specifications using Gherkin language, which is highly readable and serves as living documentation for the project.
  • Integrates with various programming languages including Ruby, Java, and JavaScript, making it versatile across different development environments.
  • Facilitates collaboration between developers, QA teams, and business analysts by using language that is easy to understand for all parties involved.
  • Offers support for various testing frameworks such as RSpec, Test::Unit, and JUnit, allowing for flexible test execution.
  • Provides detailed reports on test execution, making it easier to identify and address failures.
  • Supports scenario outlines and examples, enabling parameterized testing for covering multiple scenarios with a single test case.
  • Can be integrated into CI/CD pipelines, enhancing continuous testing practices.

Cons:

  • The abstraction layer introduced by Gherkin can sometimes lead to misunderstandings if not accurately expressed, affecting test accuracy.
  • Writing and maintaining step definitions requires additional effort, potentially slowing the development process.
  • The initial setup and learning curve can be steep for teams unfamiliar with BDD or Gherkin syntax.
  • Overusing Cucumber for simple unit tests that don’t benefit from BDD might lead to unnecessary complexity.
  • Requires diligent management of feature files and step definitions to avoid duplication and keep tests maintainable.
  • The performance of test suites can be slower compared to direct unit testing, especially for large projects.
  • Balancing the granularity of scenarios to be neither too broad nor too detailed can be challenging and time-consuming.
  • Dependency on the active involvement of business stakeholders to reap the full benefits of BDD may not always be feasible.

#8. Ghost Inspector

Ghost Inspector is a browser-based framework that works through a Chrome plugin. This tool is a Selenium IDE alternative that appears to get record/playback best in Ghost Inspector.

Features:

  • Offers easy creation of automated browser tests without the need for coding, using a Chrome extension for recording actions.
  • Allows tests to run in the cloud, eliminating the need for local test execution environments and infrastructure.
  • Provides immediate visual feedback by comparing screenshots of test runs, helping to catch UI changes or errors quickly.
  • Integrates with popular CI/CD tools and services like Jenkins, CircleCI, and GitHub for seamless automation workflows.
  • Supports the scheduling of tests to run automatically at specified intervals, ensuring regular monitoring of web applications.
  • Includes detailed reports and notifications for test outcomes via email, Slack, and other channels, keeping teams informed.
  • Offers a dashboard for managing tests, organizing them into suites, and tracking historical test results and trends.
  • Enables testing on various screen sizes and custom environments to ensure responsiveness and compatibility across devices.
  • Facilitates team collaboration with shared access to tests and results, enhancing communication and efficiency.

Inspector Cons:

  • While powerful for UI testing, it might not be as effective for testing backend processes or non-UI-based interactions.
  • Dependency on the cloud-based platform means limited control over the test execution environment compared to local or self-hosted solutions.
  • May incur additional costs for high usage levels, as pricing is based on test execution frequency and suite sizes.
  • Learning how to effectively use the recording tool and understand the nuances of test creation can take time for new users.
  • Limited programming capabilities mean complex test logic or custom scripting might be difficult to implement compared to more code-intensive testing frameworks.
  • Managing many tests and ensuring they remain up-to-date with application changes can be challenging.
  • While it offers integrations with several CI/CD tools, setup and configuration might require a learning curve for teams new to automation


10. TestCraft

TestCraft is a codeless Selenium test automation framework. It can rapidly integrate and use modules created by the community. Its advanced AI innovation and exceptional visual modeling enable quicker test generation and performance while wiping out the test support overhead. The tool considerably decreases maintenance costs.

Testers can also make completely automated test cases without coding in them. Users discover bugs quicker, deliver all the more often, coordinate with CI/CD, and enhance the general property of their digital products.

Scripts are adapted to change automatically because of the AI mechanism. Also, a tester can make significant changes with just a couple of clicks using this tool.


11. Protractor
It is an open-source automation framework created specifically for the automation of AngularJS web applications.
The protractor is based on JavaScript Selenium WebDriver, so it supports every one of the traits that are accessible with Selenium WebDriver.
With one or two commands, both Selenium WebDriver and the testing framework will be installed pleasantly. Protractor tests the application by communicating with it as a user.

This tool is formally called an E2E,i.e. end-to-end testing structure.

The utilization of JavaScript, one of the most simple-to-use programming languages to adapt, particularly for those who have an inadequate programming background makes this tool a good alternative.

With its ‘Automatic Waiting’ element, the test executes automatically to the following stage without waiting for the test and web page to sync.

Protractor also supports tools like Cucumber, Jasmine, and Mocha to compose test suites as it is a wrapper of WebDriverJS.

Puppeteer
It is a library for Node that automates headless Chrome or Chromium through the DevTools Protocol and gives high level API to developers. This enables the developers to perceive a web browser as an object and uses methods such as .goto () or .type (). Puppeteer is a browser- driven framework that was built and maintained by the Chrome DevTools team. Its main features are better management of Chrome, web scraping support, UI testing using screenshot and PDF capturing abilities as well as loading times measured by means of the Chrome Performance Analysis tool.

WebdriverIO
WebdriverIO is a framework that supports automated testing of modern web and mobile applications, playing the role of end-to-end testing under OpenJS Foundation. Being a NodeJS application, it performs tests in JavaScript/TypeScript. WebdriverIO is often used with WebdriverProtocol providing functions such as cross-browser testing. However, it is distinct from Cypress because of the absence of a commercial version. Important aspects of the product are an increased test suite scalability, reliability and stability testing; a flexible nature provided by built-in plugins as well as community contributions ; support for native mobile applications’ testing easy installation procedures.

Playwright
Playwright is an open-sourced test automation library built by contributors of Microsoft. It is a Node.js library which automates browsers such as Chromium, Firefox and WebKit using a unified API. Playwright supports programming languages such as Java, Python and NodeJS. However the frameworks developed prefer to be in NodeJS or Javascript/Typescript tools. The major features are ease of setup and configure, the ability to support Chrome , Edge, Safari as well as Firefox in a multi-browser manner; compatibility with multiple programming languages; parallel browser testing capability on different browsers or tabs.

NightwatchJS
BrowserStack develops and maintains NightwatchJS, a Node.js framework that uses the Webdriver Protocol. This framework allows running different testing types such as End-to-End, component and visual regression tests, accessibility, API unit integration. Importantly, it is easy to extend and personalize the framework using Nightwatch. One of the major highlights is fast installation and setup. In particular, NightwatchJS test scripts are written as legible code and the framework allows for testing in different browsers such as Chrome, Firefox, Edge among others.
Importantly, it expands its usability to in-house mobile app testing and hence is useful for every user. Moreover, NightwatchJS implements the page object pattern to assure better structure and test scripts’ maintainability.

banner

Conclusion
We hope you like the list that we have complied.  Go through them and choose which alternative to selenium suits your needs the best

Selenium vs Puppeteer vs Chai Mocha

The software life cycle has undergone drastic changes in the last decade.
So much to the extent that the role of the tester has completely changed! With the coming in of the PDO (Product Driven Organization) structure, there are no more testers and developers but only full-stack engineers.
The bottom line is testing still needs to be done.
Who does that? How does it fit in the 2-week agile sprint? Is manual testing even possible in such a short time?
The Answer
To start with, the scope for manual testing has been reduced. Agree to it or not. This is what happens in real-life scenarios. Since testing is still a task on our User Stories, it needs to be completed. Most teams take the help of automation tools.
Now here is the challenge, many small and even big companies are going to open-source automation tools which give them the flexibility to customize as per their need without any investment.
There are several tools available for you to choose from based on the kind of application you have like a web-based app or a mobile app a desktop software etc.

Selenium

Selenium is a popular open-source framework for automating web applications. Jason Huggins created it originally as a tool called “JavaScriptTestRunner” to automate repetitive tasks in web testing. Later, he changed the name to Selenium after hearing a joke about mercury poisoning from selenium supplements.
Selenium has a thriving community of developers, testers, and quality assurance professionals who help it grow and improve. The open-source nature encourages frequent updates and improvements. As of my most recent knowledge update in September 2021, the most recent version was Selenium 4, which introduced a number of significant changes and features.
Support for multiple programming languages such as Java, Python, C#, and others is one of Selenium’s key features. Selenium WebDriver for browser automation, Selenium IDE for recording and playback, and Selenium Grid for parallel testing across multiple machines and browsers are among the tools available.
Several factors contribute to selenium’s popularity. First and foremost, it is open-source, which means it is freely available to developers and organizations of all sizes. Because it supports a wide range of programming languages and browsers, it is highly adaptable to a variety of testing environments. Furthermore, the active community keeps Selenium up to date with the latest web technologies and provides solid support and documentation.

Puppeteer

Puppeteer is a well-known open-source Node.js library that offers a high-level API for controlling headless or full browsers via the DevTools Protocol. It was created by Google’s Chrome team, making it a dependable and powerful tool for browser automation and web scraping tasks.
Puppeteer has a vibrant and growing community of web developers and enthusiasts who actively contribute to its development and upkeep. Puppeteer has evolved since my last knowledge update in September 2021, and new versions have been released, each bringing improvements, bug fixes, and new features.
Some notable features of Puppeteer include the ability to capture screenshots and generate PDFs of web pages, simulate user interactions such as clicks and form submissions, and navigate through pages and frames. It also works with a variety of browsers, including Google Chrome and Chromium, and supports both headless and non-headless modes.
Puppeteers are highly regarded for a variety of reasons. For starters, it offers a simple and user-friendly API that simplifies complex browser automation tasks. Its compatibility with the Chrome DevTools Protocol enables fine-grained control over browser behavior. Puppeteer’s speed and efficiency make it a popular choice for web scraping, automated testing, and generating web page snapshots for a variety of purposes.
Several factors contribute to selenium’s popularity. First and foremost, it is open-source, which means it is freely available to developers and organizations of all sizes. Because it supports a wide range of programming languages and browsers, it is highly adaptable to a variety of testing environments. Furthermore, the active community keeps Selenium up to date with the latest web technologies and provides solid support and documentation.

Chai & Mocha

Chai and Mocha are two distinct JavaScript testing frameworks that are frequently used in web development. They play complementary roles, with Chai serving as an assertion library and Mocha serving as a testing framework, and when combined they provide a robust testing solution. Let’s take a look at each one:

Chai:

  • Chai is a Node.js and browser assertion library that provides a clean, expressive syntax for making assertions in your tests.
  • It provides a variety of assertion styles, allowing developers to select the one that best meets their testing requirements, whether BDD, TDD, or assert-style.
  • Chai’s extensibility allows developers to create custom assertions or plugins to extend its functionality.
  • Its readability and flexibility are widely praised, making it a popular choice among JavaScript developers for writing clear and comprehensive test cases.

Mocha:

  • Mocha is a versatile JavaScript test framework that provides a structured and organised environment in which to run test suites and test cases.
  • It supports a variety of assertion libraries, with Chai being one of the most popular.
  • Mocha provides a simple and developer-friendly API for creating tests, suites, and hooks.
  • Its ability to run tests asynchronously is one of its key strengths, making it suitable for testing asynchronous code such as Promises and callbacks.
  • Both Chai and Mocha are open-source projects with active developer communities that contribute to their growth and upkeep.

Their popularity stems from their ease of use, versatility, and widespread adoption within the JavaScript ecosystem. The expressive syntax of Chai and the flexible testing framework of Mocha combine to form a formidable combination for writing robust and readable tests, which is critical for ensuring the quality of web applications and JavaScript code. Because of their ease of use and extensive documentation, developers frequently prefer this pair for testing in JavaScript projects.

Installing Selenium, Puppeteer and Chai Mocha

Installing Selenium:

Install Python: Selenium primarily works with Python, so ensure you have Python installed. You can download it from the official Python website.
Install Selenium Package: Open your terminal or command prompt and use pip, Python’s package manager, to install Selenium:
pip install selenium
WebDriver Installation: Selenium requires a WebDriver for your chosen browser (e.g., Chrome, Firefox). Download the WebDriver executable and add its path to your system’s PATH variable.
Verify Installation: To verify your installation, write a simple Python script that imports Selenium and opens a web page using a WebDriver.

Installing Puppeteer:

Node.js Installation: Puppeteer is a Node.js library, so you need Node.js installed. Download it from the official Node.js website.
Initialize a Node.js Project (Optional): If you’re working on a Node.js project, navigate to your project folder and run:
npm init -y
Install Puppeteer: In your project folder or a new one, install Puppeteer using npm (Node Package Manager):
npm install puppeteer
Verify Installation: Create a JavaScript or TypeScript script to launch a headless Chromium browser using Puppeteer.

Installing Chai Mocha:

Node.js Installation: Chai Mocha is also a Node.js library, so ensure you have Node.js installed as mentioned in the Puppeteer installation steps.
Initialize a Node.js Project (Optional): If you haven’t already, initialize a Node.js project as shown in the Puppeteer installation steps.
Install Chai and Mocha: Use npm to install both Chai and Mocha as development dependencies:
npm install chai mocha –save-dev
Create a Test Directory: Create a directory for your test files, typically named “test” or “tests,” and place your test scripts there.
Write Test Scripts: Write your test scripts using Chai’s assertions and Mocha’s testing framework.
Run Tests: Use the mocha command to run your tests. Ensure your test files have appropriate naming conventions (e.g., *-test.js) to be automatically detected by Mocha.

Criteria Selenium Puppeteer Chai Mocha
Purpose Web application testing across Headless browser automation for JavaScript testing framework for
various browsers and platforms. modern web applications. Node.js applications.
Programming Supports multiple languages: Java, Primarily used with JavaScript. JavaScript for test assertions and
Language Support Python, C#, etc. Mocha as the test framework.
Browser Cross-browser testing across major Chrome and Chromium-based N/A (Not a browser automation tool)
Compatibility browsers (e.g., Chrome, Firefox, browsers.
Edge, Safari).
Headless Mode Supported Supported N/A (not applicable)
DOM Manipulation Limited support for interacting with the DOM. Provides extensive support for interacting with the DOM. N/A (focused on test assertions)
Ease of Use Relatively complex setup and usage. User-friendly API and clear Straightforward API for defining
documentation. tests and assertions.
Asynchronous Yes, with explicit wait commands. Native support for asynchronous Yes, supports asynchronous code.
Testing operations and Promises.

Use Cases:

  • Selenium is widely used for automating the testing of web applications across different browsers and platforms.
    Example: Automating the login process for a web-based email service like Gmail across Chrome, Firefox, and Edge. Puppeteer: Headless Browser Automation
  • Puppeteer is ideal for tasks like web scraping, taking screenshots, generating PDFs, and automating interactions in headless Chrome.
    Example: Automatically navigating a news website, capturing screenshots of articles, and saving them as PDFs. Chai Mocha: JavaScript Testing
  • Chai Mocha is primarily used for unit and integration testing of JavaScript applications, including Node.js backends.
    Example: Writing tests to ensure that a JavaScript function correctly sorts an array of numbers in ascending order.

Let us see how the tools discussed here can help you with your testing tasks.

Testing Type Selenium Puppeteer Chai Mocha
Functional Yes Yes Yes
Regression Yes Yes Yes
Sanity Yes Yes Yes
Smoke Yes Yes Yes
Responsive Yes No No
Cross Browser Yes No Yes
GUI (Black Box) Yes Yes Yes
Integration Yes No No
Security Yes No No
Parallel Yes No Yes


Advantages and Disadvantages

Selenium’s Benefits and Drawbacks:

Advantages:

  • Selenium supports a variety of web browsers, allowing for comprehensive cross-browser testing.
  • Multi-Language Support: Selenium supports multiple programming languages, making it useful for a variety of development teams.
  • Selenium has a large user community, which ensures robust support and frequent updates.
  • Robust Ecosystem: It provides a diverse set of tools and frameworks for mobile testing, including Selenium WebDriver,
  • Selenium Grid, and Appium.
  • Selenium has been in use for a long time, making it a stable and reliable option.

Disadvantages:

  • Complex Setup: Selenium can be difficult to set up and configure, particularly for beginners.
  • Selenium tests can be time-consuming, especially when dealing with complex web applications.
  • Headless Browser Support is Limited: Headless browser support in Selenium is not as simple as it is in Puppeteer.
  • Because of its extensive features and complexities, Selenium can have a steep learning curve.

Puppeteer Advantages and Disadvantages:

Advantages:

  • Headless Mode: Puppeteer includes native support for headless browsing, which makes it useful for tasks such as web scraping and automated testing.
  • Puppeteer is simple to install and use, especially for developers who are familiar with JavaScript.
  • Puppeteer’s integration with the Chrome browser is excellent because it is maintained by the Chrome team.
  • Puppeteer is optimized for performance and can complete tasks quickly.
  • Puppeteer is promise-based, which makes it suitable for handling asynchronous operations.

Disadvantages:

  • Puppeteer primarily supports Chrome and Chromium-based browsers, which limits cross-browser testing capabilities.
  • Puppeteer is dependent on JavaScript, so it may not be suitable for teams working with other programming languages.
  • Smaller Community: Puppeteer’s community is smaller than Selenium’s, which may limit available resources and support.

Chai Mocha’s Benefits and Drawbacks:

Advantages:

  • Chai Mocha was created specifically for testing JavaScript applications, making it ideal for Node.js and front-end testing.
  • Support for Behavior-Driven Development (BDD) testing: Chai Mocha supports BDD testing, which improves collaboration between developers and non-developers.
  • Chai, a component of Chai Mocha, provides flexible assertion styles, making it simple to write clear and expressive tests.
  • Plugins from the community: Chai has a thriving ecosystem of plugins that can be used to extend its functionality.

Disadvantages:

  • Chai Mocha is primarily focused on JavaScript, which limits its utility for projects involving other programming languages.
  • Chai Mocha is not suitable for browser automation or cross-browser testing, which Selenium and Puppeteer excel at.
  • It has a limited scope because it is intended for unit and integration testing but lacks features for end-to-end testing and browser automation.

Hope this data comparison is helpful for you to decide which one to pick up for your team and project. My suggestion, if you are dealing with only Chrome then go for Puppeteer.
But if you want your application to run across all platforms and you want it to be tested in multiple browsers and platforms Selenium would be the right choice.
With Selenium, the coding and tool expertise required is also limited, which means you can build up your team and competency faster.
So our personal choice is Selenium which offers more features and online support forums for guidance as well.
Take your pick.

Selenium IDE Tutorial For Beginners

Welcome to a fascinating journey into the Selenium IDE world, aspirant testers and tech enthusiasts.

This tutorial is your key to mastering Selenium IDE’s amazing features, whether you’re a novice eager to delve into the world of automated testing or a seasoned professional looking to improve your skills.

Prepare for an exciting journey as we uncover this tool’s secrets and give you the knowledge and abilities to write reliable, effective test automation scripts. So prepare for an insightful Selenium IDE tutorial that will elevate your testing game by grabbing your virtual testing lab coat and donning your coding glasses.

Latest News About Selenium IDE

Selenium IDE encountered a fork in its journey when Firefox’s unfortunate withdrawal of support presented itself.

A brand-new Selenium IDE that is independent of any particular browser was developed as a result of the quick response of the committed Selenium community to the challenge.

This updated Selenium IDE, developed as a web extension, offers a plethora of improvements and features that address the changing requirements of automated testing.

The new Selenium IDE, which embraces a cross-browser approach, supports popular browsers like Chrome and Firefox, giving testers the ability to seamlessly run their automated tests across various platforms.

The new Selenium IDE features a new and dynamic interface with enhanced recording capabilities, advanced debugging tools, and comprehensive test reports that continue to streamline the test automation process for both novices and experts.

+This tenacious transformation proves the Selenium community’s unwavering dedication to offering an exceptional testing experience and guarantees that Selenium IDE continues to flourish even in the face of shifting technological environments.

Features of the New IDE

Cross-Browser Compatibility: By supporting popular web browsers like Chrome and Firefox, the new Selenium IDE enables testers to create and run tests on various platforms.

Improved Recording and Playback: Testers can easily record and automate their interactions with web applications thanks to improved recording capabilities. The playback feature makes sure that tests go off without a hitch and consistently.

Intelligent Element Locators: The IDE offers intelligent locators that adjust to changes in the application’s structure, simplifying test maintenance and lowering the demand for ongoing updates.

Strong Debugging Tools: With features like breakpoints, step-by-step execution, and variable inspection, debugging is made simple. The root causes of failures can be found and efficiently resolved by testers.

Test Data Management: The IDE provides a range of adaptable options for handling test data, such as data-driven testing, which enables testers to run the same test against various datasets.

Customizable: Selenium IDE can be customized and extended using plugins and custom scripts, allowing testers to improve its functionality in accordance with their unique needs.

Test reporting and metrics: The IDE generates thorough reports that include specific information about test results, such as pass/fail status, execution time, and screenshots. These reports help identify areas that need more attention and offer insightful information about test coverage.

Collaboration and Knowledge Sharing: Test scripts are easily shared and worked on by teams, encouraging productive teamwork and knowledge exchange.

Integration with Selenium Grid: Thanks to the new Selenium IDE’s seamless integration with Selenium Grid, testers can distribute tests across multiple machines and run them concurrently, greatly cutting down on the time it takes to complete a test.

Support for Continuous Integration (CI): The IDE easily integrates with well-known CI/CD tools, giving testers the ability to incorporate automated tests into their development workflows and achieve continuous testing.

About Selenium IDE

Selenium integrated development environment that is plugged into Firefox. It is an automation testing tool that is very simple, easy and user-friendly.  It offers easy installation, learning, and creation of test scripts. Selenium IDE is based on record and playback principle. It is good for all kinds of testing.

Features of Selenium IDE That Makes it the Best!
selenium ide features
Selenium is a widely used automation testing tool and offers extensive features. Some of the common features of Selenium IDE are:

  • It offers an easy and simple record and playback features
  • Supports Intelligent field selection
  • Auto-completion of Selenium commands
  • Walkthrough tests
  • Easy Debugging capabilities
  • Easy setting of breakpoints
  • Save tests as HTML, Ruby, Python, C# scripts, or any other format
  • Supports Selenium user-extensions.js
  • Supports automatic assertion of title for all pages
  • Supports easy customization
  • Does not require programming skills

The Drawback of Selenium IDE

Selenium IDE is a Firefox plug-in hence it supports only Firefox and the test scripts Created in Selenium IDE can only be executed in the Firefox browser.

Step-by-Step Tutorial about learning Selenium IDE

Downloading and Installing Selenium IDE

Now when we have a good idea on what is Selenium IDE, let us move to the next step of Downloading and Installing Selenium IDE.
To download Selenium IDE you need to have Mozilla Firefox, if you have it well and good if you don’t have it, download it.

Steps to download and install Selenium IDE

1)     Launch Mozilla Firefox Browser.
2)      Open Selenium IDE Add-ons page by typing URL: https://addons.mozilla.org/en-us/firefox/addon/selenium-ide/ in your browser. Next Click on Add to Firefox button.
11111
3)     You will get a popup asking for your permission to install Selenium IDE Add-ons or not. Click the Install button over the popup.

4)     Firefox will then install Selenium IDE software and you will get a popup asking you to restart the Firefox. Click the restart button. The Selenium installation will now be reflected on your browser.
5)     After you restart you ur browser you can find the selenium IDE under the tools menu list present at the top bar

6)     Click on selenium ide your selenium ide will launch

Sections of Selenium IDE

Selenium IDE is divided into different sections. Before start working on it, you must know about these categories:

Menu Bar

present at the uppermost of the Selenium IDE window. The menu bar consists of five sub-modules.

File Menu

 File Menu Create, Save and Export Test Case and Test Suite of Selenium IDE. You can open the file menu by pressing Alt + F, or by clicking on the File menu.

Under File menu you can find:

  • New Test Case: It creates a new blank Test Case
  • Open: It  Open already saved Test Cases.
  • Save Test Case: Saves the opened Test case.
  • Save Test Case As: Saves opened Test Case in a specific location and has a specific name.
  • Export Test Case As: Assists exporting test cases in various languages like Ruby/Python/Java/C# in both Selenium Remote Control and Selenium WebDriver Format.
  • Recent Test Cases: Returns a list of few last saved Test Cases.
  • Add Test Case: Search test cases and merge them into the currently opened test case.
  • Properties: returns the properties opened test case.
  • New Test Suite: creates a blank Test Suite
  • Open Test Suite: Opens existing Test Suite.
  • Save Test Suite: Saves opened Test Suite.
  • Save Test Suite As: Saves opened Test Suite in a specific location and has a specific name.
  • Export Test Suite As: Assists exporting test Suite in various languages like Ruby/Python/Java/C# in both Selenium Remote Control and Selenium WebDriver Format.
  • Recent Test Suites: Returns a list of few last saved Test Suite.

Default Interface of Selenium IDE
Edit Menu

Edit Menu helps to Cut Copy Paste and Insert Command in Selenium IDE Test. You can open the Edit menu by pressing Alt + E, or by clicking on the Edit menu.
Under the Edit menu you can find:

  • Undo: last action or few last performed actions are undone
  • Redo: Re-do the last undone action or series of last undone actions.
  • Cut: Copies and removes the selected command or test step from the current location to some other location in the test.
  • Copy: Copies selected command or test step from current location to some other location in the test. But it does not remove the command from the previous locations.
  • Paste: Pastes cut/copied command to a selected location in the test.
  • Delete: Deletes the chosen command.
  • Select All: Select all the commands in Test Step Pane.
  • Insert New Command: Insert a  row at a selected location to write new commands
  • Insert New Comment: Insert a  row at a selected location to write a new comment

Read also: Selenium 4: New Features and Updates

Actions Menu

Helps us to learn Options to Record Play Run And Debug Selenium IDE Test.

  • Record: It Records the user actions on the webpage via the Firefox Web Browser. While recording, the menu item keeps displaying a chack against items.
  • Play Entire test suite: it play-back/re-run every Test Case in the Test Case Pane, following top to bottom approach.
  • Play the current test case: play-back the selected Test Case.
  • Playtest Suites periodically: let the specified test suite to execute at specific times. It is the best way when test suits are required to be rerun periodically as it does not require any human intervention, once specified it will rerun test cases automatically
  • Toggle Breakpoint: allows you to specify one or more breakpoint(s) to forcefully break the execution at specified steps.
  • Set / Clear Start Point: it permits the testers to select a start point to start executing the test. It is important for subsequent runs.
  • Pause / Resume: this enables the pausing and resuming of the test at any point between the test execution.
  • Step: it permits to step through the playing-back of the test case. It is important for debugging purposes.
  • Execute this command: This allows testers to execute a particular command instead of executing the complete test case. It is important when testers want to see the behavior of any specific command
  • Fastest/Faster/Slower/Slowest: it allows you to set the execution speed from fastest to lowest concerning the responsiveness of the application under test.

Other categories available at Menu Bar are:

Options Menu and Help Menu

Tool Bar

The ToolBar includes the Buttons that Control the execution of test cases, for debugging the test cases, setting up the speed of the test, Stopping, Playing and Recording of test cases.

Test Case Pane

All the test cases recorded by IDE are available in Test Case Pane. It can open more than one test case at the same time and supports easy shuffling between the test cases.

It also offers Test Execution Result Summary including entire Test Suite status, Total number of Test Executed, etc.

Test Case Pane

It is the place where Test Case Steps are recorded. All the user actions are recorded in the order they are performed. It also allows the editing and changing of the test cases

Output Pane

The bottom pane or the Log Pane offers the following functions

  • Log, 
  • Reference, 
  • UI-Element, and 
  • Rollup 

The function performed depends upon which tab is selected.

Record the Selenium IDE Test Case.

  1. Launch Firefox Selenium IDE. Type the URL. Click the Record button, a red button on the top right corner. It will record Test Cases.
  2. In Firefox, type the same URL as in step 1. Firefox will take you to the related webpage.
  3. Right-click anywhere on this page, you will get Selenium IDE context menu. In the context menu go to Show Available Commands> Web Page Name.
  4. Click on MyAccount
  5. Enter UserName and Password and then click on the login button.
  6. To stop the recording click the record button again. Click on the Table tab and you will be able to see the recorded commands.
  7. Click on the Source tab to see HTML Code.

Read also: 11 Awesome Selenium Alternatives For Testers in 2019

Save the Selenium IDE Test Case.

  1. To save a test case go to File Menu and click on Save Test Case As.

File -> Save Test Case As.

  1. Choose the desired location and give your file a name and click on Save.
  2. You can see the name of the saved test case on the left-hand side.
  3. The file will be saved as HTML.

Playback Selenium IDE Test Script

Open a new tab Firefox. Click the Play button in Selenium IDE. It will execute the previously recorded tests.
Selenium Commands

Selenium commands or Selenese are a set of test cases that are deployed to test web applications using Selenium.
Selenium commands are of three types:

Actions

Actions commands control the state of the application. Operations under action commands are:

  1. type this box,
  2. click this link
  3. select option.

Some of these commands can be suffixed with AndWait like click and wait, type and wait. This prompts Selenium to wait until the web page is loaded. If these commands fail, the existing test is stopped.

Accessors

These commands automatically create Assertions and inspect the state of the application.

Assertions

They inspect the state of the application adapts to what is anticipated.
They can be further divided into three categories:

  • Assert:
  • Verify:
  • WaitFor:

Some of the Commonly used commands in Selenium IDE:

  • type: Set the value of the input field
  • open: Opens a web page through the given URL.
  • click clicks on a checkbox, link, button or radio button.
  • clickAndWait: When you click on the checkbox, link, button or radio button, and a new page is loaded it calls waitForPageToLoad.
  • select: It selects an option drop-down.
  • selectFrame: It is used to select a frame from the present window.
  • verify title/assert title: Authenticates an anticipated page title.
  • verifyElementPresent: Confirms if the
  • indicated element is present on the page.
  • highlight: Altersthe backgroundColor of the indicated element.
  • pause: Wait for the indicated time period
  • echo: Prints indicated message in your Selenium command tables.

What are Locators?

Locators in Selenium IDE are used to find and match the elements in the web page that are required to communicate with. The use of the right locator promises faster, more trustworthy and low maintenance tests. But choosing the right locators can sometimes become a challenging task.

Locators in selenium IDE


Locators tell on which GUI elements do Selenium IDE needs to operate on. The correct identification of the locators is very important and it is equally challenging.
There are many commands in Selenium IDE that do not require Locators, but most of the commands do require locators. The locators to be used depends on the AUT.
The various types of locator are:

Locator: ID

It is a common way to locate different elements as every element has a unique ID.

Target Format: id=id of the element

Consider any test app, let it be Facebook.

  • Check the “Email” text box using Firebug and note down Locator: ID
  • Launch Selenium IDE and write “id=(Locator ID you retrieved in the first step)” in the Target box. When you click on the Find button next to the target box, the “Email ID” text box will be emphasized with a yellow and green border. This means that Selenium IDE has located the “Email ID” text box correctly.

Locator: Name

Locator name is quite similar to Locator: ID. The only difference is that here we use name instead of ID.
Target Format: name=name of the element.
Consider any test app, let it be Facebook.

  • Check the “Email” text box using Firebug and note down Locator: Name
  • Launch Selenium IDE and write “Name=(Locator name you retrieved in the first step)” in the Target box. When you click on the Find button next to the target box, the “Email ID” text box will be emphasized with a yellow and green border. This means that Selenium IDE has located the “Email ID” text box correctly.

Locator: Link

This locator is used for hyperlink texts. It can be used by beginning the target with “link=” tailed by hyperlink text.
Target Format: link=link_text

Consider any web app as a text app.

  • Check any element that has a hyperlink text and  using Firebug and notes down Link Text
  • Launch Selenium IDE and write “Link =(Link Text you retrieved in the first step)” in the Target box. When you click on the Find button next to the target box, the corresponding text box will be emphasized with a yellow and green border. This means that Selenium IDE has located the element correctly.

Locator: CSS

CSS Selectors are though a complex method to locate elements on a web page, but they are the most preferred method of locating elements in advanced Selenium as they can even detect elements that have no name or no ID.
CSS Selectors are also strung patterns That has the ability to recognize an element based on its arrangement of HTML tag, id, class, and attributes. CSS Selectors have many formats, but the most  common are:

  • Tag and ID
  • Tag and class
  • Tag and attribute
  • Tag, class, and attribute
  • Inner text

Locator: Xpath

XPath is a language for navigating the DOM (document object model) of a web page. It can locate any element on the web page and is hence the most potent and supple locator.

Some of the Firefox Add-ons that can help in finding  XPath of an element:

Locator: DOM

The Document Object Model is an HTML document that can be accessed using JavaScript. It uses hierarchical dotted notation to locate an element on the page.

Conclusion

If you wish to learn more about selenium we have comprised a tutorial just for you which will take you deep into the tool.

Get an eBook: Download PDF

15 Top Selenium WebDriver Commands For Test Automation

The use of selenium webdriver helps in testing every aspect of the web application. It is an open-source website automation tool that is used mostly by the automation testers.
With the help of Selenium Webdriver, applications are tested to see whether they are working as expected or not.
To ease your work we will provide you with some basic commands list which you can use in selenium webdriver. Using these commands it will make things easier for you.
Basic Commands List for Selenium Web driver
1. To Select Multiple Items in a Drop down
2. get() commands
3. Use of linkText() and partialLinkText() command
4. Form Submission Command
5. Using quit() and close() Commands
6. Command to handle Multiple Frames
7. findElements(By,by) and click() Command
8. isEnabled() Command
9. Using findElements(By, by) with sendKeys() Command
10. Using findElements(By, by) with getText() Command
11. Using findElements(By, by) with size() Command
12. select() Command
13. navigate() Command
14. getScreenshotAs() Command
15. pageLoadTimeout(time,unit) Command
1. To Select Multiple Items in a Drop down
There are two options which you can use to select items in a drop-down i.e. single select dropdown and multi-select drop-down. Single select dropdown allows the user to select only one item from the drop-down whereas Multiple-select dropdown allows the user to select multiple items from the dropdown list.
You can use this code to generate a list in which you can select multiple items in a drop-down.
<select name=”Country” multiple size=”6”>
<option value=”India”>India</option>
<option value=”Belgium”>Belgium</option>
<option value=”England”>England</option>
<option value=”France”>France</option>
<option value=”Italy”>Italy</option>
</select>
When a form is submitted the value has to be sent to a server, this value is sent specifically by the value attribute. Content will pass as a value if the value attribute is not specified.
Syntax- <option value=”value”> where ‘value’ is the value which has to be sent o the server.
2. get() commands

  • get(): This command is used to launch a new browser with the specific URL in the browser. This command uses a single string type which is generally the URL of the application under test. The syntax of the command can be given as driver.get(http://facebook.com)
  • getCurrentUrl(): The command is used to fetch the current URL of the webpage which user is accessing. It returns a string value and doesn’t need any external parameters. The syntax of the command is given as driver.getCurrentURL();
  • getTitle(): This command fetches the title of the webpage which user is currently using. This command doesn’t require any external parameters and returns a string value. If the webpage doesn’t have any title it will return a null string. The syntax of the command is given as String new = driver.getTitle();
  • getAttribute(): This command is used to fetch the value of the specific attribute. This command uses a string which refers to an attribute whose value we want to know and returns a string value. The syntax of the command is given as driver.findElements(By.name(“x”)).getAttribute(“value”);
  • getText(): This command is used fetch the inner text of the element including sub-elements. This command returns a string value and doesn’t need any external parameters. This command is often used for verification or errors in the message or content in the web pages. The syntax of the command is given as String new = driver.findElements(By.name(“Inner_text”)).getText();
  • getClass(): This command is used to fetch the class object. The syntax of the command is given as driver.getClass();
  • getPageSource(): This command is used to fetch the page of the web page which user is currently working on. This command returns a string value and doesn’t require any other parameters. The syntax of the command is given as String new = driver.getPageSource();


3. Use of linkText() and partialLinkText() command
These commands are used to access the hyperlinks which are available on a webpage. By using these commands user is redirected to another page.
Let us consider there are two links mentioned in the webpage Google and Yahoo.

  • linkText(): Twitter and Yahoo links can be accessed using the command driver.findElements(By.linkText(“Twitter”)).click();

driver.findElements(By.linkText(“Yahoo”)).click();
This command finds the element by using linkText() and then click on that link. The user is then redirected to the page followed by the link.

  • partialLinkText(): Links can be accessed by using command driver.findElements(By.partialLinkText(“Twitt”)).click();

driver.findElements(By.partialLinkText(“Yaho”)).click();
This command finds the element partially by using partialLinkText() and then clicks on it.
4. Form Submission Command
Almost every webpage contain forms which have to be filled by the user. There are various types of forms like login, registration, file upload or new signup etc. While testing of the website the command submit() is used. It triggers the submit button without clicking on the submit button. The code for the form submission is as follows:
//First Name
<input type=”text” name=”FirstName”>
//Last Name
<inpur type=”text” name=”LastName”>
//Email ID
<input type=”text” name=”EmailID”>
//Mobile Number
<input type=”text” name=”MobileNo”>
<input type=”submit” value=”submit”>
5. Using quit() and close() Commands
These commands are used to close the web pages which are currently used by the user.

  • quit(): The quit() command is used to close down all the web pages in the web browser. All the web pages which are being opened by the users are closes down instantly. The syntax of the command is given as driver.quit(); This command doesn’t need any other parameters and doesn’t return any value.
  • close(): the close() command is used to close down the current webpage which is being opened by the user. This command only closes a single webpage unlike quit(). This command doesn’t need any other parameters and doesn’t return any value. The syntax of the command is given as driver.close();

6. Command to handle Multiple Frames
There are scenarios where the users have to work on various frames and iframes. The script tester verifies the working of the frames through script code. The illustration of the code is given below where there are different frames in the webpage.
<html>
<head>
<title>Window handle</title>
</head>
<body>
<div>
<iframe id=”FirstFrame”>
<iframe id=”SecondFrame”>
<input type=”text” id=”Name”>FirstName</input>
<input type=”text” id=”Name”>LastName</input>
</iframe>
<button id=”Submit”>Submit</button>
</iframe>
</div>
</body>
</html>
In this HTML code, two iframes are present. Thus to access the second frame user has to navigate through the first frame. Only by dealing first frame user are allowed to navigate to the second frame. It is impossible for the user to access directly the second frame without using the first frame.

  • Frame(index): swtichTo().frame(0);
  • Frame(frame name):switchTo().frame(Frame name”);
  • Frame(Web element):switchTo().defaultContent();

These commands can be used by the user to return back to the main window.

  • Selecting iframe by ID: switchTo().frame(“Frame ID”);

7. findElements(By,by) and click() Command
This command is used by the user to search or locate the first element on the webpage. The parameters which are used in the syntax fetch the element on the current working page. Click, submit or another type of actions are mainly used by this command. The syntax of this command is given as driver.findElements(By.Name(”login”)).click();

Also Read : Automation Test For Website and Web Apps Using Selenium

This command is used to locate and searches the first element of the web page with the name ”login” and then clicks on it.
8. isEnabled() Command
This command is used to check whether the element in the selenium webdriver is enabled or not. The syntax of this command is given as
Boolean check = driver.findElements(By.xpath(“Name”)).isEnabled();
This command finds the element and checks whether the element is enabled or disabled.
9. Using findElements(By, by) with sendKeys() Command
This command is typically used for filling in forms. The general syntax for this command is given as driver.findElements(By.name(“FirstName”)).sendkeys(“Tony”);
This command will search for the first name field and then enter the value “Tony” in it.
10. Using findElements(By, by) with getText() Command
With the help of the getText() command, it will get the inner element of the webpage. By using this command we can store the value of the element into the string object. The syntax for this command can be given as
String new = driver.findElements(By.TagName(“NewFile”)).getText();
This command will look for the field name “new file” then take its inner file and stores it into the string name “new”.
11. Using findElements(By, by) with size() Command
With the help of this command, we can verify whether the element which we are looking for is present in the webpage or not. The syntax for this command can be given as
Boolean check = driver.findElements(By.xpath(“FileName”)).size()! = 0;
It will check the element whether it is available or not. The Boolean will set the “Check” to TRUE or FALSE respectively.
12. select() Command
This command is used to select or deselect the values from the list. To select a value we can use different commands like selectByVisbibleText(), selectByValue() or selectByIndex() according to the situations. The syntax for these commands can be given as
Newfile.selectByVisibleText(“Google”);
Newfile.selectByIndex(“Google”);
Newfile.selectByValue(“Google”);
These syntaxes are used for selection only. We can also deselect the values from the list by the following syntax.
Newfile.deselectByVisibleText(“Google”);
Newfile.deselectByIndex(“Google”);
Newfile.deselectByValue(“Google”);
“New file” is the element containing the values which has to be selected.

13. navigate() Command
This command is used to navigate between different URLs in the webpage. By using this command we can navigate back and forth in the current webpage. The syntax for the command can be given as
driver.navigate().to(“http://www.Google.com”);
driver.navigate().back();
driver.navigate().forward();
This command will help the user to navigate http://www.Google.com, navigate back and navigate forward.
14. getScreenshotAs() Command
This command will enable the user to screenshot the entire page in the selenium webdriver. The syntax of the command is given as
File screenshot = ((TakeScreenshot)driver).getScreenshotAs(outputType.FILE);
FileUtils.copyFile(screenshot, new File(“c:\\ss.jpeg”));
This command will take the screenshot and will save the file in C drive as ss.jpeg
15. pageLoadTimeout(time,unit) Command
When the servers are down or there is an issue in the network, the page often takes more time to load. This might cause an error in the program. To avoid this situation, a command is used to set a wait time. The syntax can be given as
driver.manager().timeouts().pageLoadTimeout(200, SECONDS);
By using this command 200 seconds will be enabled. It will wait 200 seconds for a page to load.
16. Switch to window
driver.switchTo().window(“windowName”);
17. Find the location of the element
WebElement name = driver.findElement(By.id(“Name”));
Point point = name.getLocation();
String strLine = System.getProperty(“line.separator”);
System.out.println(“X cordinate# ” + point.x + strLine + “Y cordinate# ” + point.y);
19. Find the value of CSS property
WebElement name = driver.findElement(By.id(“Name”));
String strAlign = name.getCssValue(“text-align”);
20. Check the visibility of web command
WebElement user = driver.findElement(By.id(“User”));
boolean is_displayed = user.isDisplayed();
//Or write the code in the below style.
boolean is_displayed = driver.findElement(By.id(“User”)).isDisplayed();
We genuinely hope that this selenium webcommands is of great use to you

Also Read : 10 Best Automation Testing Tools For 2018

Selenium 4: New Features and Updates

There are a lot of new features that are being promised as part of the new Selenium 4 package.

For those who are still wondering what the new features and capabilities are that are being brought and how it will impact and improve your day to day work, then please read on.

  1. Webdriver will be W3C protocol compatible

If you are an automation professional you would already know that usage of the webdriver is not restricted to Selenium.
selenium 4
It is also widely used in appium and iOS drivers.
The latest version of Selenium thus comes with W3C standard which would make it compatible with the implementation of the webdriver across multiple platforms.
More details regarding the bindings and the protocols are available in the GitHub if you wish to dive deeper.

  1. Selenium IDE TNG

One major drawback which Selenium suffered all these years is that it does not support parallel execution.
Well, not anymore. With Selenium 4, they have plugged that gap. The new IDE supports a lot of new features and much-improved browser support.
This is apart from the robust record and plays options that have been built into the new version.
The new and improved IDE is completed dependent on the webdriver, which as mentioned above is also W3C compatible.

  1. Improved Selenium Grid

For those of you who have actually worked with the Selenium grid, you know how difficult it is to get the setup up and running.
There are so many challenges involved.
Hurray, the makers heard you. So now you have a much-improved grid which also allows you to run your tests in multiple devices at the same.
What is more is that in Selenium 4, the grid acts as both the hub and the node, thereby avoiding the issues arising out of connecting these together.

  1. Improved Analysis

Another important update in Selenium 4 is with respect to the logging, debugging, observations, hooks, etc.
The latest version of Selenium promises to offer details of hooks, request tracing, etc, which help in better analysis of the problems and help in fixing them at a much faster rate.
It will also give the testers a better of the requests that are initiated, the hooks to which it is latched and much more.
With the new and improved analysis feature, the tester would be equipped with much more data to share with the development team for fixing an issue.

  1. Detailed Documentation

Documentation is a very important part of any tool.
It really helps in self-learning the tool as well as fixing some very common and basic things that we may have missed.
The latest offering of Selenium comes with very detailed documentation which is easy to understand, follow and implement.
You will not need external help again if you go step by step with the documentation available.
With more and more companies switching to automation using free tools, Selenium is the forerunner.
Though primary java it supports python as well…

Know More: Selenium Tutorial For Beginners – An Overall View!

The new features will definitely add more value to this product which now widely used not only by testers but also by developers.
Now with the alpha build out, it is very likely that we will get the official confirmation for release of Selenium 4 very soon. Waiting with the abetted breadth

11 Tips and Tricks For Appium and Selenium

Selenium and Appium are two well-known automation testing tools. Selenium is largely leveraged for testing web applications whereas Appium is widely used for testing mobile applications. Bundled with many features, both these tools are highly recommended for software testing.
But you need to have a proper understanding of these appium and selenium tools to get best out of them.  There are few tips and tricks that can help you get best out these tools and leverage them to their best abilities.
Let’s make our job easier with these veteran Tips and Tricks about Appium and Selenium.

The Use of Waits: 

Using Thread.Sleep() is a common method of “waiting” while any processing is going on. But it possesses a few drawbacks. Here is how we can overcome it.
a)    WebDriverWait.  It census your query every 500ms, and return when the wait condition is fulfilled. WebDriverWait can explicitly put a maximum threshold to elude locks and infinite waiting.
b)    FindElementBy / FindElement(..): Second method is by invoking FindElementBy or just FindElement(..). FindElementBy waits until the element is found and returns null if maximum wait time passes. But be sure you have to explicitly configure the implicitly waits.
1. Locating Elements
Locating element is not a tough job in selenium and there are many ways to do it. But the haunting part is getting StaleElementReferenceException.
It happens when you assign IWebElement reference but it already has some other location in the DOM. The solution to StaleElementReferenceException is to re-query and reassign the element reference.
2. Sending Keyboard input
Selenium allows sending inputs in two ways. First is by setting “value” property of editable elements by using ExecuteScript() / ExecuteAsyncScript(). Second is to use SendKeys() API.
I would suggest you use ExecuteScript() / ExecuteAsyncScript() method when you are more concerned about filling in a few fields and when you are not concerned about DOM events being fired and concurrent character-by-character verification.
But if you want to focus on real-time validation, the second method i.e. using SendKeys() API will be more apt for you.
3. Executing JavaScript code
You can execute JavaScript in either of the below-given ways depending upon your requirements.
i)    ExecuteScript().ExecuteScript() does not execute the next line of         test code till script execution is returned.
ii)    ExecuteAsyncScript() does not block your test code.
4. Drag & Drop Interfaces
Action Builder API, and the “DragAndDrop” and “DragAndDropToOffset” methods support easy drag and drop interface in Selenium.
5. Switching between windows and iframes
You can easily switch between windows and frames in Selenium.

  1. For iFrames

driver.SwitchTo().Frame(frameElement); //IWebElement

  1. For Windows

driver.SwitchTo().Window(handle);// driver window handle
and then can switch back to the original window by using
driver.SwitchTo().DefaultContent();

  1. Using drivers for multiple browsers

When using the driver API, always refer it by using RemoteWebDriver class for all the browsers used for running tests.
It is good to label your environment in a text/XML file and then deconstruct this and return the correct driver instance.
6. Cleaning UP
When you are done with your testing, you need to free all the resources and close the browser.
For this you can use Close(), Quit(), and Dispose().  Quit() closes all browsers, close() closes the existing browser  while Dispose() calls the quit() and closes all browsers.
Now when we are done with a few tips and tricks of working with selenium, let us now get better in our Apium skills.
Appium is one of the widely used mobile app testing tools. Though its users encounter some common problems while using it…
Here are some tips and tricks that can help you handle some common problems faced in using it and making it’s working more efficient and effective.
So, here we go…
7. Writing cross-platform tests 
One of the major issue in testing mobile apps is we have to write different test scenario for Android and iOS. Having common tests can be a big benefit in terms of saving time and efforts.
Though it gets much easier having the same set of test cases for both if your application is the same from a UI point-of-view.

Read also :  Testcafe Vs Selenium. Which is Better?

Just make sure that the accessibility IDs on corresponding UI elements in each version of the app matches with each other. If it stands true, you can run the same test on both applications. Also, be sure your test sets up the appropriate capabilities for each platform.
Based on different platforms, here are some more and little-known tips and tricks about Appium that can make your testing easier.
8. For All Platforms

  • AutoWebView – it is very useful for Cordova apps and helps to start in the webview context.

9. For Android

  • ignoreUnimportantViews – It is a very useful method to quicken your Android tests.
  • nativeWebScreenshot – Helps you to take a screenshot from UIAutomator. It is very useful if your screenshots from chromedriver are not as expected.

10. For IoS

  • locationServicesAuthorized – It helps you to prevent showing an alert when you are trying to use the user’s location by pre-authorizing location services.
  • Auto[Accept|Dismiss]Alerts – It helps you avoid alerts from disrupting your tests.
  • nativeWebTap – Permits users to use non-javascript taps.
  • safariIgnoreFraudWarning – It is beneficial in cases where your test environment doesn’t have 100% perfect SSL setup.
  • interKeyDelay – Sometimes Appium’s typing speed can cause a problem with your application, in such cases, interKeyDelay can evade the problem.
  • sendKeyStrategy – Helps in avoiding the keyboard altogether.

11. Networking Conditioning
You can use driver.setNetworkConnection(value) to stimulate various states of connectivity when you run your tests.
Hope these tips will prove helpful to you, will be back soon with some more useful testing tips and tricks. So stay tuned!

Selenium Tutorial For Beginners [Step by Step]

Everybody knows about the impeccable selenium! The ultimate tool for testing web applications! for you to learn in detail about how to carry out automation testing, we have written an extensive Selenium tutorial just for you!
This blog comprises of three part,
1. Selenium Tutorial For Beginners
2. Selenium Intermediate Level Tutorial
3. Selenium Advanced level Tutorial

Selenium Tutorial For Beginners

What makes Selenium better?

You don’t need to code anything in Selenium and with this; any beginner will be able to record and play the simplest web application scripts.
Usually, Selenium RC needs a server to be up and running for sending commands to the browser. It is used for cross-browser testing and you can write the code in any language.
Selenium Web Driver is a better version of IDE and RC. It directly sends commands to the browser without the need of a server to be up and running.

Different languages can be used for coding the scripts like Java, C#, PHP, Python, Perl, and Ruby. Selenium Grid is used for parallel testing in multiple browsers and environments. It used the hub and node concept where hub acts as a source of Selenium commands and each node is connected to it.
Now, here we will discuss Selenium WebDriver. How a beginner can start learning Selenium WebDriver and how he can excel in it.
Now, first, we will look at the steps we need to follow to download Selenium Web Driver in your machine.

Ways to download and install Selenium WebDriver

  • You should have Java installed in your machine. This is the pre-requisite for Selenium Web Driver to work.
  • You can visit the page: http://seleniumhq.org/download/ and download the client drivers and language bindings. You have the select binding for Java.
  • This download will be named – selenium-2.25.0.zip.
  • Now, you can import all the Jars in Eclipse. You have to right click on the project and import jar files by selecting all the downloaded jar files. For this, you can click on the Libraries tab and then click on “Add External JARs”.

Now Let’s look the First Selenium WebDriver Script

Let’s take an example of the first Selenium Script which we would create using Selenium basic methods.
Let’s first look at the script in detail. In this script, we will do the following test steps.

  • Go to the home page of the test application
  • Verify the title of the page
  • Do a comparison of the result.
  • Close the browser after the script is done.

package projectSelenium;
import org.openqa.selenium.WebDriver;
import org.openqa.selenium.chrome.ChromeDriver;
public class seleniumTest {
public static void main(String[] args) {
System.setProperty(“webdriver.chrome.driver”,”C:\\chromeDriver.exe”);
WebDriver driver = new ChromeDriver();
String baseUrl = “https://google.com”;
String expectedTitle = “Google”;
String actualTitle = “”;
        // launch Fire fox and direct it to the Base URL
driver.get(baseUrl);
        // get the actual value of the title
actualTitle = driver.getTitle();
/*
* compare the actual title of the page with the expected one and print
* the result as “Passed” or “Failed”
*/
if (actualTitle.contentEquals(expectedTitle)){
System.out.println(“Test Passed!”);
} else {
System.out.println(“Test Failed”);
}
driver.close();
}
}

Things to look at the above code:

  • In the first two lines, we have imported two packages. You have to import – org.openqa.selenium and org.openqa.selenium.firefox.FirefoxDriver.
  • The most important step is to instantiate the browser. This is done by line

WebDriver driver = new ChromeDriver();
//This is done to invoke a chrome browser.
You can invoke a FireFox browser by following line of code
WebDriver driver = new FirefoxDriver();
You can invoke an IE browser by following line of code:
WebDriver driver = new InternetExplorerDriver ();
Also, while invoking a browser you have to pass the path of the executable file. You can do it by following line of code:
System.setProperty(“webdriver.chrome.driver”,”Path of chrome driver”);
System.setproperty(“webdriver.ie.driver”,”Path of ie driver”);

  • Get() method is used to enter a url in a browser.
  • getTitle() method of selenium webdriver is used to fetch the title of a web page.
  • Now, we have to compare the expected title with the actual title.

If(expectedTitle.equals(actualTitle))
{
System.out.println(“TEST PASSED”):
}

  • For terminating the browser, close() method is used. Driver.close() closes the active browser window. If you want to close all the opened browser windows by selenium web driver then you can use driver.quit().
  • You can run this test by right clicking on the program and then select as “Run As” as “Java Application”.
  • Next thing which is of utmost important while writing a test script is to identify web Elements which will be explained in detail in the below section.

Locating Web Elements

Locating web elements is very easy. Various selectors are available for that process. find Elements is one such 2 in which selenium webdriver is used for locating a web element and then, you can perform an action on that.

Know More: Selenium Automation Testing With Cucumber Integration

Let’s see some of the methods by which you can identify web element on a web page.

  • className – It will locate web element based on the class attribute. Eg: By.className(“abc”);
  • cssSelector – used to locate web element based on css selector engine. Eg:- By.cssSelector(“#abc”);
  • id – If some web element has id attribute, then you can directly identify the web element using id tag. Eg:- By.id(“abc”);
  • linkText – It will find a link element by text mentioned by you in the test script. By.linkText(“Login”);
  • name – If any web element has name attached to it then you can identify it using name attribute. Eg: By.name(“name”);
  • partialText – It will find a link element by text containing the text mentioned by you in the test script. By.partialText(“abc”);
  • tagName – It will locate all elements which will have this tag.
  • xpath – It is the most used locator in a selenium test script. It will identify the element using html path. It can be relative or absolute. Absolute xpath traverses the path of the web element by root and relative takes the reference of any web element and then traverse to that specified web element. It is better to refer an element by relative xpath rather than absolute xpath.

Basic Actions on a web element

You can click on a web element by using click() method of selenium web driver. You can locate a web element and then perform an action on it.
Eg: driver.findElement(By.xpath(“”)).click();
Also, you can send keys to a particular web element by using send Keys() method of selenium web driver. You can locate a web element and then you can enter some text in it using sendKeys() method.
Eg: driver.findElement(By.xpath(“”)).sendKeys(“name”);
Also, there are other actions which you can perform on a web element by using action class.
WebElement wb = driver.findElement(By.xpath(“”));
Actions actions = new Actions(Driver);
Actions.moveToElement(wb).build(). Perform ();
You can even switch to alert boxes which come when you click on some webelement. You can do it by switchTo().alert() method.
Eg code:
WebElement wb = driver.findElement(By.xpath(“”));
Wb.click();
Driver.switchTo().alert();
Now, you will be able to access the alert box. You can retrieve the message displayed in the text box by getting the text from it.
String alertMessage = driver.switchTo().alert().getText();
Also, you can accept the alert box by function accept(). You can see the sample code as below:
Driver.switchTo().alert().accept();
You can even check conditional operations on a web element.
Also, check whether a web element is enabled or not. If it will be enabled then you can do some operation on it.
Apart from all these, you can check if some web element is displayed or not. In the case of radio buttons, you can check if the radio button is selected or not. You can do these checks by – isEnabled(), isSelected() and isDisplayed() option.

Waits in Selenium Web Driver

Selenium Web Driver
If you want some step to get completed before any other step then you have to wait for the prior step to get completed. In manual testing, it is very easy to achieve but in automation testing, it is bit tedious and you have to wait for the previous step to get completed or a condition to be fulfilled before moving on wards to the next step.
This can be achieved by adding waits in between. There are two types of wait- explicit and implicit wait. If you are expecting a particular condition to be fulfilled before moving to the next step,
Another feature is that you can use explicit wait while if you just want a universal wait, then you can go ahead to use implicit wait. The implicit wait is used to set the default time out for the whole script.
A perfect automation script is made by adding both type of waits – Explicit and Implicit. You have to judiciously use both types of waits to make an efficient test case.

Know More : Top 50 Selenium Interview Questions and Answers

Explicit Wait

Syntax of Explicit Wait:
WebDriverWait wait = new WebDriverWait(WebDriverRefrence,TimeOut);
wait.until(ExpectedConditions.visibilityOfElementLocated(By.xpath(“”));
Expected Condition can be used with so many conditions. Some conditions which can be used with it are:

  • alertIsPresent()
  • elementSelectionStateToBe()
  • elementToBeClickable()
  • elementToBeSelected()
  • frameToBeAvaliableAndSwitchToIt()
  • invisibilityOfTheElementLocated()
  • invisibilityOfElementWithText()
  • presenceOfAllElementsLocatedBy()
  • presenceOfElementLocated()
  • textToBePresentInElement()
  • textToBePresentInElementLocated()
  • textToBePresentInElementValue()
  • titleIs()
  • titleContains()
  • visibilityOf()
  • visibilityOfAllElements()
  • visibilityOfAllElementsLocatedBy()
  • visibilityOfElementLocated()

Implicit Wait

Syntax of Implicit Wait:
driver.manage().timeouts().implicitlyWait(TimeOut, TimeUnit.SECONDS);
For this, you have to import a package into your code. The package name is java.util.concurrent.TimeUnit;

Selenium Intermediate Level Tutorial

Through the section Selenium Tutorial for Beginners, We gave you the basic info that you need to know about the tool. Now let’s go further and learn much more about this impeccable web app testing tool.
How to upload a file in Selenium test cases?
To upload a file, first, you have to identify the element on which you have to upload your file. There you can directly use sendKeys() function of selenium web driver. You can pass the path of the location in sendKeys. In this way, you will be able to upload a file using selenium web driver.

public static void main(String[] args) {
System.setProperty(“webdriver.gecko.driver”,”path of gecko driver”);
String baseUrl = “http://www.google.com /upload/”;
WebDriver driver = new FirefoxDriver();
driver.get(baseUrl);
WebElement element = driver.findElement(By.id(“id of element”));
uploadElement.sendKeys(“C:\\newhtml.html”);
//Here,  above you have to pass the path of the file where your file is located.
// Then you can click the upload file link
driver.findElement(By.xpath(“”)).click();
}
How to use a web table in selenium script
You have to access a web table and the elements present in the table. You can get it by making an xpath. Suppose you have had1 0a table with four blocks.
selenium intermediate tutorial
The first thing which you have to do is to find the XPath of the web element in this web table. Let’s say you want to get to the third element in the above web element.
The coding of the above web table is as below:

Selenium Intermediate Level TutorialSelenium Intermediate Level Tutorial
Now, you can analyze that first there is a table and then there is a tbody. In that tbody there are two rows. One row is having two tables. The first row is having two cells – First and Second. The second row is having two cells – Third and Fourth.
Our goal is to reach to the third cell. Let’s try to make the XPath of it.
The XPath of it will be //table/tbody/tr[2]/td[1]
So, the table is the parent node from which we will iterate to go the third element. From there, we will go to the tbody section and then the second row. From there we will get the first column.
Let’s write a script to get the text out of it.
public static void main(String[] args) {
String url = “http://testsite.com/test/write-xpath-table.html”;
WebDriver driver = new FirefoxDriver();
driver.get(baseUrl);
String txtWebelement = driver.findElement( By.xpath(“//table/tbody/tr[2]/td[1]”).getText();
System.out.println(txtWebelement);
driver.close();
}
}
Let’s take an example of a nested web table. You have to then analyze it carefully and get the XPath of it. Let’s look at the example below to get more information on it.
Selenium Intermediate Level Tutorial:
So, if you want to access the web element which is having text 10-11-12 then you can do it by traversing from the table and then iterating through the rows and columns to reach there.
Xpath would be: //table/tbody/tr[2]/td[2]/table/tbody/tr[2]/td[2]
public static void main(String[] args) {
String url = “http://testsite.com/test/write-xpath-table.html”;
WebDriver driver = new FirefoxDriver();
driver.get(baseUrl);
String txtWebelement = driver.findElement( By.xpath(“//table/tbody/tr[2]/td[2]/table/tbody/tr[2]/td[2]
”)getText();
System.out.println(txtWebelement);
driver.close();
}
}
This way, you can iterate through the rows and columns to reach to a specific cell from a web table.
Now, one of the most important concepts in selenium which will help you in many cases when you won’t be retrieving any text from a web element or to enable a web element to get the text or to perform any action on it.
Let’s talk about JavaScript Executor in detail. It is an interface which helps to execute javascript.
JavaScript Executor
Sometimes you are not able to click on a web element using click() function. You can then use javascript executor to execute click function on a web element. Let’s have a look at the code.
WebDriver driver= new FirefoxDriver();
// JavascriptExecutor interfaceobject creation by type casting driver object
JavascriptExecutor js = (JavascriptExecutor)driver;
You can now click on a webelement using below command.
WebElement button = driver.findElement(By.xpath(“”));
Js.executeScript(“arguments[0].click();”,button);
Also, if send keys isn’t working. You can make use of java script executor to send keys. Let’s look at the example below.
WebDriver driver= new FirefoxDriver();
// JavascriptExecutor interfaceobject creation by type casting driver object
JavascriptExecutor js = (JavascriptExecutor)driver;
js.executeScript(“document.getElementById(‘id’).value=”value;”);
You can even make use of java script executor to refresh a web page. You can do it by following command:
WebDriver driver= new FirefoxDriver();
// JavascriptExecutor interfaceobject creation by type casting driver object
JavascriptExecutor js = (JavascriptExecutor)driver;
js.executeScript(“history.go(0)”);
Sometimes, getText() doesn’t work and then you have to make use of java script executor to get text of a web element. You can do it by following line of code:
WebDriver driver= new FirefoxDriver();
// JavascriptExecutor interfaceobject creation by type casting driver object
JavascriptExecutor js = (JavascriptExecutor)driver;
js.executeScript(“history.go(0)”);
Sysout(js.executeScript(“return document.documentElement.innerText;”).toString());
You can even get the title and URL of a web page using java script executor. The procedure is very simple. Let’s have a look at the following lines of code.
WebDriver driver= new FirefoxDriver();
// JavascriptExecutor interfaceobject creation by type casting driver object
JavascriptExecutor js = (JavascriptExecutor)driver;
System.out.println(js.executeScript(“return document.title;”).toString());
System.out.println(js.executeScript(“return document.URL;”).toString());
Desired Capabilities Concept in selenium web driver
You can make the set of configurations on which you want a particular test script to run. You can pass browser name, version to specify the type of environment on which you want a test case to run.
Let’s see some of the capabilities which you can set in a test case for IE browser.
//it is used to define IE capability
DesiredCapabilities cap = DesiredCapabilities.internetExplorer();
cap.setCapability(CapabilityType.BROWSER_NAME, “IE”);
cap.setCapability(InternetExplorerDriver.INTRODUCE_FLAKINESS_BY_IGNORING_SECURITY_DOMAINS,true);
In the above capability, we have passed the capability browser name and we have ignored the security domain.
After setting the capabilities you can pass the capabilities to the web driver instance so that it executes the test on a particular configuration.
Let’s have a look at the complete set of code.
public static void main(String[] args) {
//it is used to define IE capability
DesiredCapabilities cap = DesiredCapabilities.internetExplorer();
cap.setCapability(CapabilityType.BROWSER_NAME, “IE”);
cap.setCapability(InternetExplorerDriver.INTRODUCE_FLAKINESS_BY_IGNORING_SECURITY_DOMAINS,true);
System.setProperty(“webdriver.ie.driver”, “path of executable”);
WebDriver driver = new InternetExplorerDriver(capabilities);
driver.get(“http://gmail.com”);
driver.quit();
}
Handling a drop down in selenium web driver
You have to first import following packages: org.openqa.selenium.support.ui.Select.
First, you have to identify from DOM whether the dropdown is of select type or not. If it is of select type then you have to go for the below steps.
Then, you have to uniquely identify the select tag. You have to first make the object of Select class and pass the element for which you have to choose the options from the drop-down.
Select dropdown = new Select(driver.findElement(By.xpath(“”)));
Now, there are three main methods which you have to use to select any element from this select object.

  1. selectByVisibleText
  2. selectByIndex
  3. selectByValue

You can either select any element from this drop-down by matching the visible text with that of the text passed by you. You can also select any web element from the drop-down using an index. Last option is to select by value tag.
Also, there are some more functions which are available. Some of them are selectAll() and deselectAll() too select and deselect all the elements when more than one element can be selected.
But, if the dropdown is not of select type then you can’t go for the conventional method. You have to follow another method. You have to uniquely identify the web element on which you have to select a dropdown option. You can identify it and the sendKeys() function of selenium web driver to send keys to the uniquely identified dropdown.
WebElement dropdown = driver.findElement(By.xpath(“”));
Dropdown.sendKeys(“value to be selected”);
How to select the checkbox and radio button is selenium
Sometimes, you come across situations where you have to select checkboxes and radio buttons. You can do it easily with selenium web driver. You just have to use click() function of web driver to click on checkbox and radio button. You can even check of the web element is selected or not.
.isSelected() checks if any web element is selected or not.
It gives false if the web element is not selected and it gives true if the web element is selected.
This way, you can handle radio buttons and checkboxes in a selenium script.

Selenium Advanced level Tutorial

Now, you know almost the stuff which is required for selenium intermediate and beginner level. Now, you are proficient enough to deal with all the advanced level of selenium web driver. You can then practice those and while you are done with those, you can move forward to the advanced level of course.
Let’s see what lies ahead and what can give you an edge in your interviews. You can look at this advanced course so that you can be ahead of all the candidates who just know the basic and intermediate selenium course. Let’s have a look at Selenium Advanced level Tutorial

Selenium Grid


Selenium Grid is issued for running various tests on different browsers, operating systems, and machines in parallel. It used a hub and node concept. You don’t want test cases to run on a single machine. You have your machine as a hub and various systems on which test cases will be distributed. You call those machines as nodes.
The hub is the central point and there should be only one hub in a system. This hub is your machine from which you want to distribute the test cases among all the clients.
This is the machine on which test cases will run and those will be executed on the nodes. There can be more than one node. Nodes can have different configurations with different platforms and browsers.
Let’s see how you can establish a selenium grid in your machine.
You can download the selenium grid server from the official site. You can place Selenium server.jar in a hard drive. You have to place it in all nodes and hub c drive.
Open the command prompt in your hub and then, go to C directory. There you have to fire the below command java -jar selenium-server-standalone-2.30.0.jar -role hub
Now, if you want to check if the selenium grid server is running on localhost that is 4040 port or not. You can visit the local host on your browser.
You have to then go to C directory of the node and open command prompt in it. Also, when you have made the selenium grid server up in the hub, you have to note down the IP address and port.
java -Dwebdriver.gecko.driver=”C:\geckodriver.exe” -jar selenium-server-standalone-3.4.0.jar -role webdriver -hub ip address of hub -port port number of hub
When you fire the above command, again go to hub browser and the port number 4040. Refresh the page and you will see IP address which will be linked to the hub.
Now, you have set up machines with different configurations. But how would the hub know which test case would be run on which node.
This will be done by desired capabilities which will tell that this test script would run on a particular set of configuration.
One can do it using below source code:
This way, you will be able to distribute the test cases across different machines and browsers. You will be able to do parallel testing using Selenium Grid.

Maven and Jenkins Integration with Selenium


Maven is a build management tool which is used to make the build process easy. Maven avoids hard coding of jars and you can easily share the project structure across the team using artifact and version id.
Every team member would be at the same page. You can make a maven project by going to File – New – Other – Maven project. You have to then specify the artifact id and then version id. You will be prompted to select a template. For starting, select a quik start template.
You will get a folder structure where you will be having two folders – src/main/java and src/main/test. In java folder, you will maintain all other stuff except tests while in test folder you will maintain all the test cases.
You will be having pom.xml file where you have to define all the dependencies so that it can download from the maven repository and place them in ./m2 repository in your local project structure.
You can get the dependency from the maven official site and then place in pom.xml. It will download all the required jars.
Also, Jenkins issued for continuous integration of the latest build with the production environment. Whenever a developer will fire the latest build then the smoke test will start running on that build.
If the build gets passed then it can be deployed to the production else the developer and tester would get a notification about the failed build. It makes the delivery cycle very fast.
Also, you can do it by downloading Jenkins war file and then running it so that Jenkins server will be up and running on port number 4040.

After doing that you can install all the necessary plug-ins. You can then create a new item and does the post-build actions.
Also, you can pass the path of git repository from which it will fetch the latest build. If you are using a local server then you pass the path of pom.xml from the system.
You can even set nightly runs with Jenkins, You have to specify the time when you want your test to run. They will run and you will get the reports on the Jenkins server the next morning. Isn’t it time-saving?

Database Testing using Selenium WebDriver

Integrating Selenium tests to the database is so easy in the latest version of the tool. You have to make use of JDBC library for database connections. It allows connection of Java and databases. First, make a connection to the database with the following command:

DriverManager.getConnection(URL, “userid”, “password” )
After doing that you can load the JDBC driver. You can do it by following lines of code:
Class.forName(“com.mysql.jdbc.Driver”);
Now, you have to send the query to the database. How will you do it? You can create an object of a statement class and then execute the query using the statement object.
Statement stmt = con.createStatement();
stmt.executeQuery(select *  from employee;);
Now, you can get the result in the result set. You can do it by following command:
ResultSet rs= stmt.executeQuery(query);
After doing all the operations, you can close the connection.
Con.close();
In this way, you can get the result set and then do all the validations on the result set.

How to take screenshots in selenium web driver

You should get the screenshot of the failed test cases so that you can get to know where exactly is the problem. This will help in better-debugging skills.

Let’s look at the steps involved in taking a screenshot:
TakesScreenshot scrShot =((TakesScreenshot)webdriver);
This step caste a driver instances to Takes Screenshot interface. Now, you have one method which is getting screenshots which will get the image file.
File SrcFile=scrShot.getScreenshotAs(OutputType.FILE);
Now, you have taken the screenshot but you have to place it somewhere. You can create some folder which will be used for storing all the screenshots captured during the execution.
You can do it by following the line of code:
FileUtils.copyFile(SrcFile, DestFile);
This is the way to capture screenshots. But if you want that only the screenshot is taken when a test case fails. You can use ITestListener.
It has various methods and one of the methods is onFailure() which will do the specified task when every there is any failure in a test case.
So you can put this code in that method so that whenever any test fails it will take the screenshot and place it in the folder specified by you.

How to drag and drop in a web page using Selenium Web driver

Now if you want o drag and drop something o a web page, you would be confused. It is very simple. You have to make use of Actions class which gives you a method dragAndDrop() which will drag and drop a web element from a source destination to the desired destination.
Actions actions = new Actions(driver);
Actions. dragAndDrop(Sourcelocator, Destinationlocator).build().perform();
Make sure that the source locator and destination locator have correct xpaths. In this way, you will be able to drag and drop any element on a web page.

How to do right click and double click on a web page

You can do a right-click on a web page using Actions class. Actions class provides a doubleClick method which allows to double click on a web element. You can do it by following lines of code:

Actions actions = new Actions(driver);
WebElement elementLocator = driver.findElement(By.id(“ID”));
actions.doubleClick(elementLocator).perform();
You have to do right-click in selenium using action class only. It is very easy. It provides a method – contextClick() and then right click on a web element.
Actions actions = new Actions(driver);
WebElement elementLocator = driver.findElement(By.id(“ID”));
actions.contextClick(elementLocator).perform();
This way, you will be able to right click and double click on a web element.
How to switch to an iFrame

iFrame is a web page which is embedded into another web page. Whenever you want to click on a web element, which is in another iframe. First, you have to switch to that iframe and then perform an action on it.
You can do switching by
Driver.switchTo().frame(index or name or id of iframe);
Conclusion
Before learning Selenium it’s better to have a thorough understanding of any object-oriented language. languages that Selenium support includes, Java, Perl, C#,  PHP, Ruby, and Python Currently.
We genuinely hope this tutorial has helped in understanding selenium better.

Get a eBook : Download PDF

Selenium Automation Testing With Cucumber Integration

Selenium is a Web Automation Tool and can be used to do regressive automated testing to test any web application.
app testing
Selenium is a power tool though it lacks an ability to bridge the gap between business analyst and technical personnel.
If we follow the old requirement gathering process and obsolete software life cycle then there are maximum chances of building a completely different product as to what client expected.
This happens because of mis-interpretations and Cucumber solves them all. Cucumber is BDD driven framework which test any application on the basis of its behaviour.
It uses Simple Gherkin language which is easy to understand and communication gap would be eliminated.

Video Courtesy : Execute Automation
In this video we will be talking about an introduction to Cucumber and also an high level introduction on BDD and Gherkin.
Prerequisites for using Cucumber
 Before using Cucumber you should have some prerequisites in your system else Cucumber won’t run. Let’s see what those prerequisites are.
1. Selenium Jars.
2. Cucumber Jars : You can download from here. For other jars, just search in Maven repository and either you can download them or add their dependencies in your pom.xml. Following Jars are required:

  • cucumber-core
  • cucumber-java
  • cucumber-junit
  • cucumber-jvm-deps
  • cucumber-reporting
  • gherkin
  • junit
  • mockito-all
  • cobertura

3. Download Cucumber Eclipse plugin in Eclipse from Eclipse Marketplace.
First Project with Cucumber and Selenium
 Now let’s start with Cucumber and Selenium.

  • Create a Java Project with name “CucumberProject” in Eclipse.
  • Add all jars what you have downloaded in earlier section.
  • You can add Jars by clicking on Project -> Properties -> Java Build Path.
  • Now, you are all set to start with Cucumber Feature File. One can make Feature file by first creating a features folder inside the Project. Now, you can create a file inside the folder “Features” with name as “FirstTest.feature”.
  • Your first file is created and now you can start writing scenarios in it to test your web application.

Feature: Reset functionality on login page of Application
Scenario: Verification of Reset button
Given Open Google Chrome and launch the site
When Enter Username and Password
Then Reset the credential
And Close the Browser
The above Scenario explains you about the reset functionality. Line 1 tells you to open a browser which is Google Chrome and launch a a particular application. Next line says to enter the credentials in application. 3rd line says to reset the credentials and then close the browser.

  • Now, you need a test runner to run the feature file because feature file can’t run by itself. First you have to make a RunnerTest Package and then create a testRunner.java class in it.

package RunnerTest ;
import org.junit.runner.RunWith;
import cucumber.api.CucumberOptions;
import cucumber.api.junit.Cucumber;
@RunWith(Cucumber.class)
@CucumberOptions(features=”Features”,glue={“StepDefinition”})
public class testRunner
{
}

Also Read : 15 Top Selenium WebDriver Commands For Test Automation

Annotations are used to start executing the test. @RunWith annotations helps in executing the test and @CucumberOptions  annotations is used to set properties of your cucumber tests.

  • Now your Feature file is ready and runner file as well. Now comes the test of actual implementation of the steps defined in the scenario. The file in which you will write the implementation of the steps of scenario is called Step Definition file.

Make a package named as StepDefinition in your Project Structure and add “TestSteps.java” file in it. Here, you will actually write your test script to test the application.
package StepDefinition;
import cucumber.api.java.en.Given;
import cucumber.api.java.en.Then;
import cucumber.api.java.en.When;
public class TestSteps {
WebDriver driver;
@Given(“^Open Google Chrome and launch the site$”)
public void open_the_Firefox_and_launch_the_application() throws Throwable
{
System.setProperty(“webdriver.chrome.driver”,”Path of Chrome.exe file”);
driver = new ChromeDriver();
driver.manage().window().maximize();
Driver.get(“URL”);
System.out.println(“This Step open Chrome and launch the site.”);
}
@When(“^Enter Username and Password$”)
public void enter_the_Username_and_Password() throws Throwable
{
driver.findElement(By.name(“uid”)).sendKeys(“username”);
driver.findElement(By.name(“password”)).sendKeys(“password”);
System.out.println(“This step enter the credentials on the login page.”);
}
@Then(“^Reset the credential$”)
public void Reset_the_credential() throws Throwable
{
driver.findElement(By.name(“btnReset”)).click();
System.out.println(“This step click on the Reset button.”);
}
@Then(“^Close the Browser$”)
Public void Close_the_browser() throws Throwwable
{
driver.close();
System.out.println(“This step closes the browser”);
}
}
There are 5 main annotation tags which are uses in Cucumber:

  • Given : This is used for a pre condition.
  • When : This is used for an action which occurs after a pre condition.
  • Then : This occurs for a reaction for an event.
  • And: This adds a particular step in addition to the defined above.
  • But : This adds a negative step.

 
banner
Whatever tags you will be using in Feature file; you will have to use the same tags in the step definition file. In this way each scenario would be mapped with the test steps defined in the step definition file.

  • Now comes the main step, how to run these files. You can run the feature files by right clicking on Test Runner file and click on “Run with” JUnit Test. When you will execute your test feature file you will observe that the Selenium test scripts start running and System.out.println is printing on the console.

Thus, you ran your tests script for a set of data with Cucumber. But if there is a scenario where you want data driven testing or you want to run the same scenario for three times and then only you can pass the data from feature file itself.
Feature: Reset functionality on login page of Application with 2 sets of data
Scenario: Verification of Reset button
Given Open Google Chrome and launch the site
When Enter Username and Password
|username | password |
|user1    | pass1    |
|user2    | pass2    |
Then Reset the credential
And Close the Brows
@When(“^Enter the Username \”(.*)\” and Password \”(.*)\”$”)
public void enter_the_Username_and_Password(String username,String password) throws Throwable
{
driver.findElement(By.name(“uid”)).sendKeys(username);
driver.findElement(By.name(“password”)).sendKeys(password);
}
Only this step needs to be edited and the whole scenario would run for two number of times. This is called data driven testing with Cucumber.
Conclusion
Cucumber is a great tool used for BDD driven testing. This helps to make business analyst, client and technical people at a same level and thus bugs would decrease and the application will become more stable.
You just need to create simple Feature files which is written in English language ( Gherkin ) and thus your test scripts are ready.

Also Read10 Key Factors for Successful Test Automation

100 Important Selenium Interview Questions and Answers

Easily prepare for the Selenium interview with our detailed list of over selenium interview questions and answers.
These interview questions are solely designed to serve the purpose to enrich you with knowledge.
These sample questions are meant for both beginners and professionals that will help them to become more advanced and knowledgeable to face any typical interview.

Q 1. What is Selenium?
Selenium is a WebDriver automation tool that is used to test web-based applications via automating the test procedure. It supports various browsers, programming languages, and platforms.

Q 2. What is Automation Testing?
Automation Testing is a procedure for automating the manual steps or processes to test the application or software.
It requires an additional testing tool to create test scripts that can be executed repeatedly.

Q 3. What are the advantages of automating the test procedure?
Advantages of automation testing are:

  • Improvement in accuracy by eliminating human-generated errors
  • Efficient and time-saving process
  • Helps in testing a large application
  • Tests can be repeatedly executed
  • Allows another test to run simultaneously
  • Provides test reports automatically

Q 4. Name some automation tools which are used for application testing?
Automation tools used for application testing are

  • Selenium
  • TestingWhiz
  • Katalon
  • Tosca Testsuite
  • TestComplete
  • Ranorex

Q 5. Why do we need software testing?
Once an application is developed, it is mandatory to check whether that application contains any errors or not.
Software testing provides a tester to check for substantial errors or bugs in the application and resolves it.

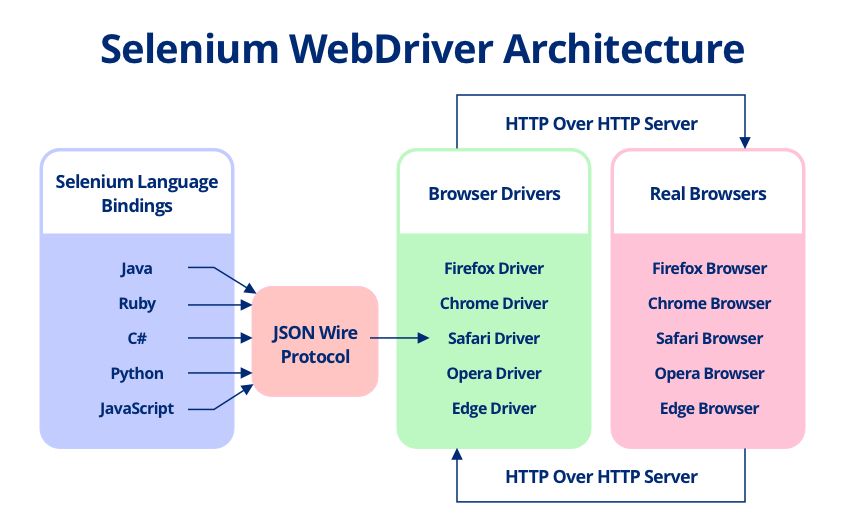
Q 6. Explain different components of Selenium?
Selenium consists of four components:

  • Selenium Web Driver: It is used for automation testing of web-based applications with the browser’s class method.
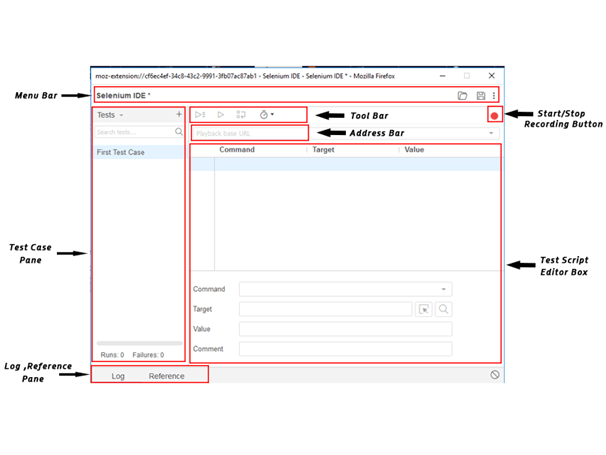
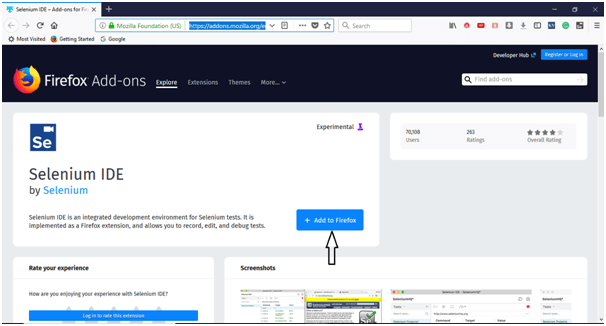
  • Selenium Integrated Development Environment (IDE): It is a Firefox plugin used to record and playback test cases.
  • Selenium Remote Control (RC): Selenium RC works on JavaScript to automate test procedures for web applications.
  • Selenium Grid: It helps selenium to run different tests simultaneously.

Q 7. What are the advantages of using Selenium?
Below are the advantages of using Selenium:

  • It is an open-source automation tool that is available freely without any licensing cost.
  • It supports multiple languages such as Java, Python, Ruby, etc.
  • It also supports various browsers.
  • It has a rich community that provides any type of information to any problem.
  • It is user-friendly and even a beginner can easily understand and write the automated scripts for the test.

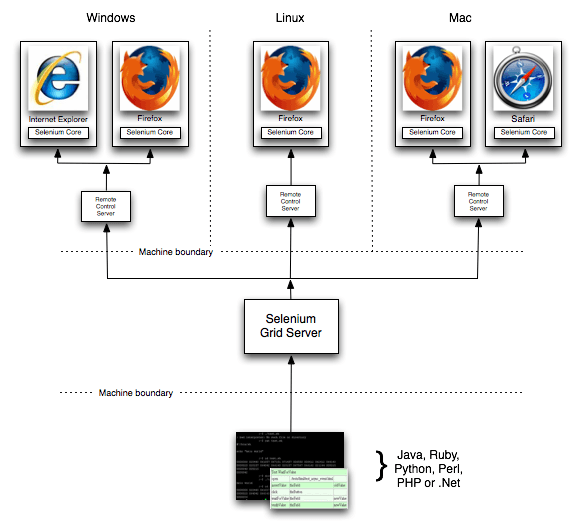
Q 8. When will you choose to use Selenium Grid?
When there are multiple tests to be executed, we will use the selenium grid.
It will enable us to run some test scripts on multiple platforms simultaneously and thus reducing the time consumption.

Q 9. Can you illustrate the drawbacks of Selenium?
Below are the drawbacks of Selenium:

  • It cannot be used for desktop application testing.
  • Also, it cannot perform tests on web services.
  • To create vigorous scripts, knowledge of programming languages is required.
  • External libraries are required to perform tasks in Selenium.

Q 10. Name a few browsers that are supported by Selenium? Also, mention the name of the drivers.
Some common browsers supported by Selenium are:

Sr. No. Browsers Drivers
1. Google Chrome Chrome Driver
2. Mozilla Firefox Firefox Driver
3. Internet Explorer Internet Explorer Driver
4. Safari SafariDriver
5. HtmlUnit HtmlUnitDriver

Q 11. Name the types of testing in Selenium?
Selenium supports the following types of testing that are:

  • Regression Testing
  • Functional Testing
  • Load Testing

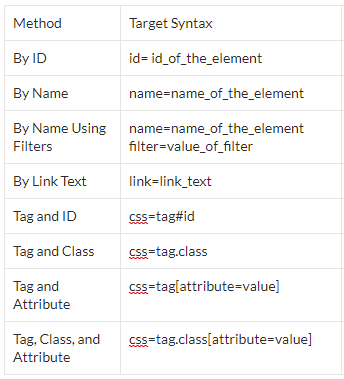
Q 12. Name the different ways to find an element in a web page using Selenium?
Every object on a web page is referred to as an element in selenium. These can be found using different ways such as:

  • ID
  • CSS Selector
  • Attribute
  • Link text
  • Xpath
  • Name
  • DOM
  • ClassName
  • Tag, etc.

Q 13. Can you test APIs or web services using Selenium Web Driver and why?
No, we cannot test web services using Selenium. Web services are headless and it only uses browser’s class method to automate web applications. Thus it cannot automate web services.

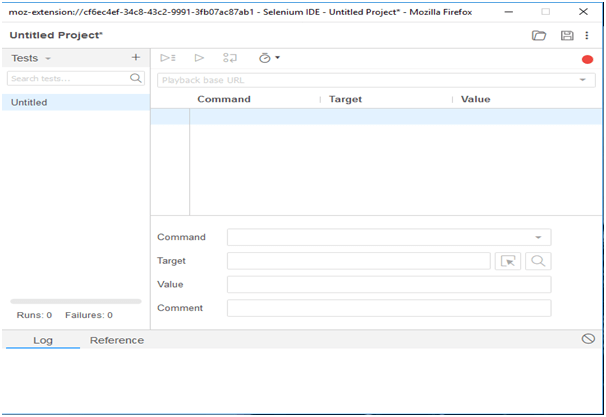
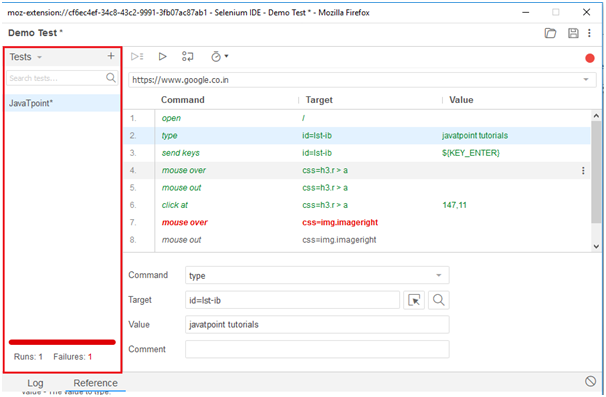
Q 14. When will you choose to use Selenium IDE?
When there is repetition in the test procedure and we want to run the same sequence over and over again. Thus, Selenium IDE provides a record and playback feature that we can use to run tests repeatedly in the same sequence.

Q 15. What is X Path in Selenium?
X Path is a locator that uses an XML path to locate a web element in Selenium.
It can also be used to locate HTML elements. X Path uses references from another element to find the specific element on a web page.

Q 16. Can you state the difference between Verify and Assert commands?
Verify: Verify command checks whether the given condition is true or not.
Whatever the results, the program execution will not be halt. Even if the given condition is false, the program execution will not be stopped.
Also Read : Top 25 Software Testing Companies to Look Out For in 2018
Assert: Assert command also check whether the given condition is true or not.
If the condition is true, the program will continue to execute to the next step. But, if the given condition is false, it will immediately halt the execution of the program.

Q 17. Can you state the difference between the use of a single slash (/) and a double slash (//) in X Path?
In X Path single slash is used to derive the absolute path from the root node whereas a double slash creates relative X Paths.

Q 18. What is the basic difference between absolute and relative X Path?
The basic difference between them is:
Absolute X Path: It uses a complete path starting from the node of the root element to go to the desired element.
Relative X Path: It only uses references from another element to go to the desired element.

Q 19.How will you launch the browser using Selenium Web Driver?
We will use the following syntax to launch the browser using Selenium Web Driver.

Sr. No Browser Syntax
1. Google Chrome WebDriver driver = new ChromeDirver();
2. Mozilla Firefox WebDriver driver = new FirefoxDriver();
3. Internet Explorer WebDriver driver = new InternetExplorerDriver();

Q 20. Can you name the parameters which you have to pass in Selenium?
Yes, there are four parameters that need to be pass in Selenium. These are listed below:

  • Port Number
  • Host
  • Browser
  • URL

Q 21. Have you ever automated test cases, If yes, how many per day?
Yes, I’ve automated test cases and on average I can automate 3-5 test cases each day. Although, these test cases can be sometimes complex and lengthy that can take a day to complete.

Q 22. Can we locate the elements by only using their text in XPath?
Yes, we can simply use the text() method to locate the element by using their text.

Syntax: xPathExpression = //*[text()=’username’]

Q 23. Can you name the latest Selenium tool and its use?
WebDriver is the latest selenium tool used to automate web application testing and checks whether it is working as expected or not.

Q 24. How will you type in a textbox using Selenium and also give the syntax?
To enter the text in the textbox, we can use sendkeys(“Enter desired string”). The syntax is given below:

WebElement username = drv.findElement(By.id(“Email”));
// entering username
username.sendKeys(“sth”);

Q 25. How will you find if an element is displayed on the screen?
Web  Driver lets the user check the visibility of the web elements including labels, radio buttons, checkboxes, drop boxes etc. with the following methods:

Sr. No Command Syntax
1. isEnabled() boolean searchIconEnabled = driver.findElement(By.id(“trial”)).isEnabled();
2. isSelected() boolean buttonSelected =
driver.findElement(By.id(“trial”)).isSelected();
3. isDisplayed() boolean buttonPresence = driver.findElement(By.id(“trial”)).isDisplayed();

Q 26. How can you launch different browsers in Selenium Web Driver?
We can easily use the given syntax to launch multiple browsers:

WebDriver driver = new FirefoxDriver();

Q 27. Can you state the difference between driver.get(“URL”) and driver.navigate().to(“URL”) command? What is the use of them?
Both commands are similar and hence there is no difference between them.
These commands are used to navigate to the URL which is declared in the command.

Q 28. How will you select the value in a drop-down?
We can easily select the value in a dropdown using the syntax given below:

Sr. No. Command Syntax
1. selectByValue Select selectByValue = new Select(driver.findElement(By.id(“One”)));
selectByValue.selectByValue(“greenvalue”)
2. selectByVisibleText Select selectByVisibleText = new Select (driver.findElement(By.id(“Two”)));
selectByVisibleText.selectByVisibleText(“Lime”);
3. selectByIndex Select selectByIndex = new Select(driver.findElement(By.id(“Three”)));
selectByIndex.selectByIndex(2);

Q 29. When will you use findElement() and findElements()?
 findElement(): This command is used to fetch the first element of the current webpage which is matching to the specified locator value in the syntax.

Syntax:  WebElement element = driver.findElements(By.xpath(“//div[@id=’sample’]//ul//li”));

findElements(): This command is used to fetch all the elements of the current webpage which is matching to the specified locator value in the syntax.

Syntax: List <WebElement> elementList = driver.findElements(By.xpath(“//div[@id=’sample’]//ul//li”));

Q 30. Can you state the difference between driver.close() and driver.quit() command?
driver.close(): This command is used to close the current web browser window opened by the user.
driver.quit(): This command is used to close all the web browser window opened by the user.

Also Read: 52 Software Tester Interview Questions That Can Land You the Job

Both commands don’t need any parameters and do not return any value.

Q 31. Will Selenium be able to handle the windows based pop up if it shows up?
No, Selenium is only meant for web-based applications thus it only supports web-based pop-ups.

Q 32. How will you assert the title on your web page?
With the use of given syntax, we can easily assert the title on a web page.

Syntax: assertTrue(“The title is incorrect.”,driver.getTitle().equals(“Title of the page”));

Q 33. How will you clear the text which is written in a textbox?
We will use clear() command to clear the text which is written in a text box.

Syntax: driver.findElement(By.id(“elementLocator”)).clear();

Q 34. Can you state the difference between regression and functional testing?
Regression Testing: Regression testing is a repeated test of an already tested program.
Usually, it ensures to check the proper functioning of the application even if the minor modification is done that can create unexpected problems.

Functional Testing: Functional testing usually ensures the functionality of the software program.
The design and user experience remain untouched as the goal of functional testing is only to check the functionality of the program.

Q 35. What is the use of TestNG in Selenium?
TestNG in Selenium is used to cover a wide range of test categories such as functional, unit, end-to-end, etc.
Using TestNG we can easily generate a proper report of test cases and can easily gather information on how many test cases were passed, failed, or skipped.

Q 36. Are you familiar with the term GeckoDriver in Selenium? Why is it needed?
GeckoDriver is a web browser engine that forms a bridge between the Firefox browser and Selenium to interact with each other.
GeckoDriver is needed in Selenium because, until Firefox version 47, Selenium uses the Firefox driver to interact with the browser. Now, Firefox has introduced a new version starting from version 48 that won’t allow any third party to directly interact with the browser.
Thus, Selenium version 3 uses the driver to interact and run tests with the Firefox browser (version 48 onwards) which is GeckoDriver.

Q 37. Can we verify the image using Selenium?
No, we cannot verify the image in Selenium but we can easily verify whether the image is displayed or not using properties.

Q 38. Can you state the difference between ‘Type’ and ‘TypeAndWait’ command?
Type: When the user needs to enter the text into a text field, type command is used.
TypeAndWait: This command is generally used to reload the web page as soon as the typing of the text is completed.

Q 39. What are the different types of mouse actions supported by Selenium?
Following are the various mouse actions that are supported by Selenium:

Sr.No Syntax
1. click(WebElement element)
2. contextClick(WebElement element)
3. doubleClick(WebElement element)
4. mouseUp(WebElement element)
5. mouseDown(WebElement element)
6. mouseMove(WebElement element)
7. mouseMove(WebElement element, long xOffset, Long, yOffset

Q 40. Do you know who developed the Selenium and in which year?
It was Jason Huggins who developed the Selenium in the year 2004.

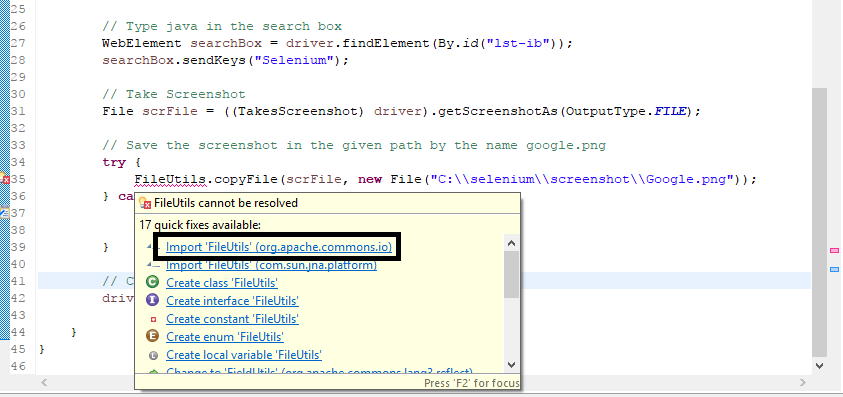
Q 41. How will you take screenshots using Selenium?
We can easily take screenshot using TakeScreenShot function with getScreenshotAs() method. Example:

File scrFile = ((TakeScreenshot)driver).getScreenshotAs(screenshot.JPG);

Q 42. Can you go back and forth in the browser using Selenium?
Yes, we can easily use the following commands to move back and forth in the browser using Selenium:

  • navigate().back()
  • navigate().forward()

Q 43. How would you delete the cookies using Selenium?
To delete the cookies, we will use the deletedAllCookies() command.

Syntax: driver.manage().deleteAllCookies();

Q 44. Write the code to double-click an element?

Actions action = new Actions(driver);
WebElement element = driver.findElement(By.id(“elementId”));
action.doubleClick(element).perform();

Q 45. Can you list all the navigation methods which are used in Selenium?
Yes, the following are the different navigation methods use in Selenium:

Sr. No. Syntax
1. driver.navigate().to(String url);
2. driver.navigate().refresh();
3. driver.navigate().forward();
4. driver.navigate().back();

Q 46. How will you perform drag and drop in Selenium?

Actions action = new Actions(WebDriver);
action.dragAndDrop(sourceWE, destWE)

Q 47. Which command will you use to retrieve the color of an element in Selenium?
We will use the following command:

getCssValue(“Color”)
getCssValue(“Background-color”)

Q 48. Which command will you use to copy the file from one location to another location?
We will use FileUtils.copyFile(srcLocation, destLocation) to copy the file from one location to another location.

Q 49. In what format the source view shows the script in Selenium IDE?
 The source view shows the script in XML format.

Q 50. How will you verify whether the element is visible or not?
To verify whether the element is visible or not, we’ll use the following syntax:

WebElement e = driver.findElement();
boolean result = e.isDisplayed();

Recommended For You: Top 10 Mobile App Testing Companies In India

Q 51. What are the exceptions available in the Selenium Web driver?
Ans. Selenium web driver supports most of the exceptions available in another programming language. Some of these are:
  • TimeoutException – it is triggered when an operation can not be performed within time.
  • NoSuchElementException – it is triggered when an element with the mentioned properties is not found on the page.
  • ElementNotVisibleException – It is triggered when the element is present in the page or DOM but its visible property is set to false.
  • StaleElementException – it is triggered when the element is deleted from the DOM.
Q 52. How do you navigate between different frames in Selenium?
Ans: switchTo() command can be used to switch between different frames in Selenium. It can be used to go to the default frame, parent frame and any specific frame based on the window ID or frame name as well.
Q 53.How can you submit a form in Selenium?
Ans: There are 2 methods to submit a form using Selenium

  • click() on the “Submit” button in the form
  • submit() – submit method for the element itself.

Both work equally well.

Q54. What is the implicit and explicit wait?
Ans: Implicit wait directs the web driver to wait for a fixed time before throwing a “No Such Element Exception”. The default value is 0 and we need to set the wait time programmatically as below.
driver.manage().timeouts().implicitlyWait(TimeOut, TimeUnit.SECONDS);
Explicit wait, on the other hand, tells the web driver to wait for a certain condition before throwing the exception. These conditions can be element visible, element enabled, text present, title present etc.

Q55. What is a robot class in Selenium?
Ans: The robot class is used to perform actions using the keyboard or the mouse. It includes methods like KeyPress(), MouseMove(), MousePress() etc.

Q 56. When do you use robot class and methods?
Ans: Methods from the robot class can be used when the other functions do not work or there are issues with entering the value in the text box. Some examples:

  • It can be used for swiping in the screens
  • It can be used to type keys (shortcuts)

Q 57. What are listeners in Selenium?
Ans: Listeners allow the customization of reports and log. They help analyze failures.
There are 2 main listeners used with Selenium

  • WebDriver Listener
  • TestNG Listener 

Q 58. How can you get the size or set the size of a browser?
Ans: The maximize() method can be used to maximize the size of the browser.
driver.manage().window().maximize();
We can use getSize() and setSize methods to get and set the size of the browser.
System.out.println(driver.manage().window().getSize());
Dimension d = new Dimension(420,600);
driver.manage().window().setSize(d);

Q 59. How can you upload a file in Selenium?
Ans: To upload the file, we first need to identify the web element and then we can just send the file path using the send_keys method.
<input type=”file” name=”uploaded_file” size=”50″ class=”pole_plik”>
element = driver.find_element_by_id(”uploaded_file”)
element.send_keys(“C:myfile.txt”)

Q 60. Is it possible to skip a method or code block in TestNG? How?
Ans: Yes, it is possible to skip a method in TestNG. It can be done by setting the enabled parameter to false in the test annotation as below.
@Test(enabled = false)

Q 61. What is a Group Test in TestNG?
Ans: Methods in TestNG can be categorized into groups. The speciality of these groups is that when a group is executed, all the methods in the group also get executed. A group can be executed by calling it in the @Test annotation.
@Test(groups={“xxx”})

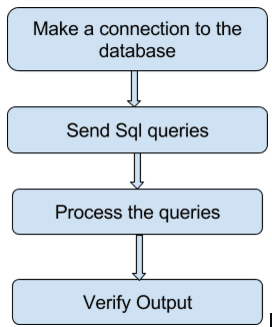
Q 62. How can you do database testing using Selenium?
Ans: Selenium does not support database testing, but it can still be used to do the testing partially with ODBC and JDBC connection strings.

Q 63. What is the latest version of Selenium?
Ans: The latest version is Selenium 4.0.0 Alpha 5, released in March of 2020.

Q 64. What is the “Same Origin Policy”?
Ans: The “Same Origin Policy” is like a security feature. It blocks scripts from other sites to access the contents of your site. According to this policy, the code loaded in a browser can only work within that domain and not outside.

Q 65. Name the JUnit annotations used with Selenium?
Ans: The JUnit annotations are:

  • @Before: This method is executed before the main test. It is used to set the perquisites for the test and also for the initialization of the variables.
  • @Test: Main test
  • @After: This method is called after the completion of the main test. It is used to clear out the variables and kill the drivers. A clean up is what is done by the @After method.

Q 66. What are the different types of locators available in Selenium?
Ans: The different type of locators are:

  • id()
  • name()
  • tagName()
  • className()
  • linkText()
  • partialLinkText()
  • xpath()
  • cssSelector()

Q 67. What is a recovery scenario and how can you use it in Selenium?
Ans: A recovery scenario is used to recover from an error and continue with automation execution without the need for manual intervention.
In Selenium, the recovery scenario used will be based on the programming language used. For Java, it can be done with the help of a simple “Try Catch Block”.

Q 68. What is a Selenese?
Ans: A Selenium set of commands used for running the tests is called Selenese.
There are mainly 3 types of Selenese:

  • Actions
  • Assertions
  • Accessors

Q 69. How do you debug a test in Selenium?
Ans: You can debug a test by inserting a breakpoint. When you run the tests, the execution will pause at the breakpoint, from there you can run it one step at a time. You may also want to monitor the value of the variables at each step to debug and analyze the code.

Q 70. What is a regular expression and how is it used?
Ans: Regular expressions are like search strings which are used to search for a range of strings or patterns. In Selenium, this can be done with the help of the keyword “regexp” as a prefix with the search string.

Q 71. Can you work with multiple windows in Selenium? How?
Ans: Yes, we can work with multiple windows in Selenium. For switching between the windows we can use the selectWindow() method.

Q 72. When will use AutoIt with Selenium?
Ans: Selenium works well with web-based applications. It is not designed to handle windows pop-ups or non-HTML pop-ups. In cases where one needs to handle such pop-ups as part of the automation, we can make use of AutoIT tool.

Q 73. What function or method can be used to scroll up and down on the web page using Selenium?
Ans: scrollBy() and scrollIntoView() are the 2 methods that can be used to scroll through a long web page.
((JavascriptExecutor) driver).executeScript(“window.scrollBy(0,500)”);
((JavascriptExecutor) driver).executeScript(“arguments[0].scrollIntoView();”, element);

Q 74. How to press ALT/CTRL/SHIFT with other keys to perform special functions using Selenium?
Ans: In some cases, we may need to work with keyboard shortcuts using the ALT, CTRL, or SHIFT keys in combination with others. In such cases, we can keyUp() and keyDown() method. The keyDown() method assumes that the keys will remain pressed till the keyUp() method is called. This helps to automation a special combination key.
Actions builder = new Actions(driver);
Action seriesOfActions = builder
 .moveToElement(txtUerName)
 .click()
 .keyDown(txtUserName, Keys.SHIFT)
 .sendKeys(txtUserName, “hello”)
 .keyUp(txtUserName, Keys.SHIFT)
 .doubleClick(txtUserName);
 .contextClick();
 .build();
seriesOfActions.perform();
}

Q 75. What are the programming languages supported by Selenium?
Ans: Selenium supports:

  • Java
  • Python
  • C-Sharp
  • JavaScript
  • Ruby
  • PHP
  • Perl

Q 76. What is the main difference between xpath and css selectors?
Ans: With xpath you traverse in both directions, forward and backwards. But in the case of css you can traverse only in one direction, i.e. forward.

Q 77. Which are the open-source frameworks supported by Selenium?
Ans: Selenium can be easily integrated and widely used with the following frameworks:

  • JUnit
  • TestNG
  • Maven
  • FitNesse
  • Xebium

Q 78. Is it possible to perform a mouse hover using Selenium?
Ans: Actions class can be used to perform the hover over any object in the webpage. We can use the moveToElement() method for performing the hover.
actions.moveToElement(driver.findElement(By.id(“id of the object”))).perform();

Q 79. What is POM (Page Object Model)?
Ans: Every webpage will have a page class that helps locate the page elements and perform the tasks on them. A POM is a design that makes use of this page class to build an object repository for these web elements. It helps to improve code reusability and readability.

Q 80. Can you use Selenium to automate captcha?
Ans: No, the idea of using the captcha is to prevent the use of the webpage using automation tools or bots. Also, Selenium is not very good when it comes to images.

Q 81. How can you handle authentication pop-up for Username and password in some web pages like SharePoint?
Ans. It can be done by first confirm the visibility of the authentication pop-up and then pass the authentication parameter using the alert class.
Alert alert = wait.until(ExpectedConditions.alertIsPresent());
alert.authenticateUsing(new UserAndPassword(<username>, <password>));

Q 82. What is the difference between typeKeys and type commands?
Ans: typeKeys is used to simulates a keystroke by collecting the key attributes using JavaScript. Type command on the other hand imitates the keypress just like a real user.

Q 83. What is the difference between setSpeed() and sleep() commands in Selenium?
Ans: Both the commands are used to alter the speed of execution of the automation script. In the case of sleep(), the execution is paused for a specific interval of time as passed in the method parameter. After this time elapses, the execution continues normally. In the case of setSpeed(), each line of code is delayed by a fixed time interval.

Q 84. What is a hub and node in Selenium?
Ans: A hub is a server or central point which can be used to run the automation scripts on different machines. The individual machines controlled by the hub are called nodes.

Q 85. Which WebDriver implementation is the fastest?
Ans. HTMLUnitDriver is the fastest WebDriver implementation because it does not execute the tests in the browser. It uses an HTML request and response mechanism for test case execution.

Q 86. What are the different commands that can be used to refresh the browser in Selenium?
Ans: There are multiple ways to refresh the browser, they are:

  • navigate().refresh()
  • get(“url”) or driver.getCurrentUrl()
  • navigate().to(“url”)
  • sendKeys(Keys.F5)

Q 87. How can we handle hidden elements using WebDriver?
Ans: We can make use of the javaScript executor to work with the hidden objects as below:
(JavascriptExecutor(driver)).executeScript(“document.getElementsByClassName(ElementLocator).click();”);

Q 88. How to find broken links on a web page?
Ans: In Selenium, we make use of request and response to find out the broken links on a web page. For that, we need to first collect all the links using the <a> tag. Once we collect these, we need to send an HTTP request to each and check the response received.
Codes in the series of 400 and 500 indicate broken links.

Q 89. How can you handle the chrome browser notifications using Selenium?
Ans: To avoid the chrome browser notifications from popping up, we can programmatically disable them using Selenium.
ChromeOptions options = new ChromeOptions();
options.addArguments(“disable-infobars”);
WebDriver player = new ChromeDriver(options);

Q 90.Name the listeners available in TestNG?
Ans: The different listeners available in TestNG are:

  • IAnnotationTransformer
  • IConfigurable
  • IConfigurationListener
  • IExecutionListener
  • IHookable
  • IInvokedMethodListener
  • IInvokedMethodListener2
  • IMethodInterceptor
  • IReporter
  • ISuiteListener
  • ITestListener

Q 91.How can you configure parallel execution using Selenium?
Ans: Parallel execution can be done in Selenium using the concept of hub and nodes. Hub controls the multiple nodes where the scripts are executed.

Q 92. How can you verify colour changes as verification points in Selenium?
Ans: For the color change type verifications, we can fetch the css color codes and verify.

Q 93. How can we move to the parent of an element using xpath?
Ans: “/..” is appended to the xpath of an expression to move to the parent element of the child element.

Q 94. How can we move to the nth-child position using xpaths?
Ans: There are 2 ways to navigate to the nth-child element.

  • Using index within square brackets div[2]
  • Using position(). div[position()=2]

Q 95. How can you right-click an element in Selenium?
Ans: We can perform a right-click with the help of an action class. Here is the code.
Actions action = new Actions(driver);
WebElement element=driver.findElement(By.id(“elementId”));
action.contextClick(element).perform();

Q 96. Name some TestNG annotations?
Ans: Some of the important TestNG annotations are:

  • @Test – The test method
  • @BeforeSuite – runs once before all the test in the test suites
  • @AfterSuite – runs once after all the test in the test suites
  • @BeforeClass – runs once before the first test method in the current class
  • @AfterClass – runs once after all the test methods in the current class

Q 97. What is the use of the testng.xml file?
Ans: The testing.xml is the file that is used for configuring the execution. This file enables the user to create test suites, test groups, indicate the tests to be run in parallel, details of the hubs and nodes etc. It is also used to pass the test parameters and trigger the test suite.

Q 98. What is the default priority of a test method in TestNG?
Ans: The default priority of a test method is 0. Now, if you have a test method with priority 1 and another test method with no priority mentioned, then the default value for the priority will be taken as 0 and it will be executed first.

Q 99. What is a properties file in Selenium?
Ans: It is a text file with key and value pairs. We can create a properties file with element name and element property. The benefit of using the property file is that if there is a change in the property (like a change in object name or text), we can simply make the change in the property file without having to touch the code.

Q 100.What are the DesiredCapabilities in Selenium WebDriver?
Ans: DesiredCapabilities file or simply the capability file contains key-value pairs and is used to set the properties for the WebDriver. This can be used to set the properties of the browser before launching like the version, cookie settings, size of the browser, and more.