Game Testing Tutorial: How To Perform Game Testing ?

Video games hold a substantial share of the software market, creating a constant demand for innovation and complexity in the gaming industry.

Game development involves a collaborative effort among various professionals, including game designers, writers, visual artists, sound designers, and, crucially, game testers.

Therefore, it is important to be aware of the comprehensive process of game development and the pivotal role played by game testing in the entire process. Understanding the intricate phases of game development and the strategic implementation of testing strategies is essential for delivering a flawless gaming experience to users.

Game Development Process: Step-by-Step
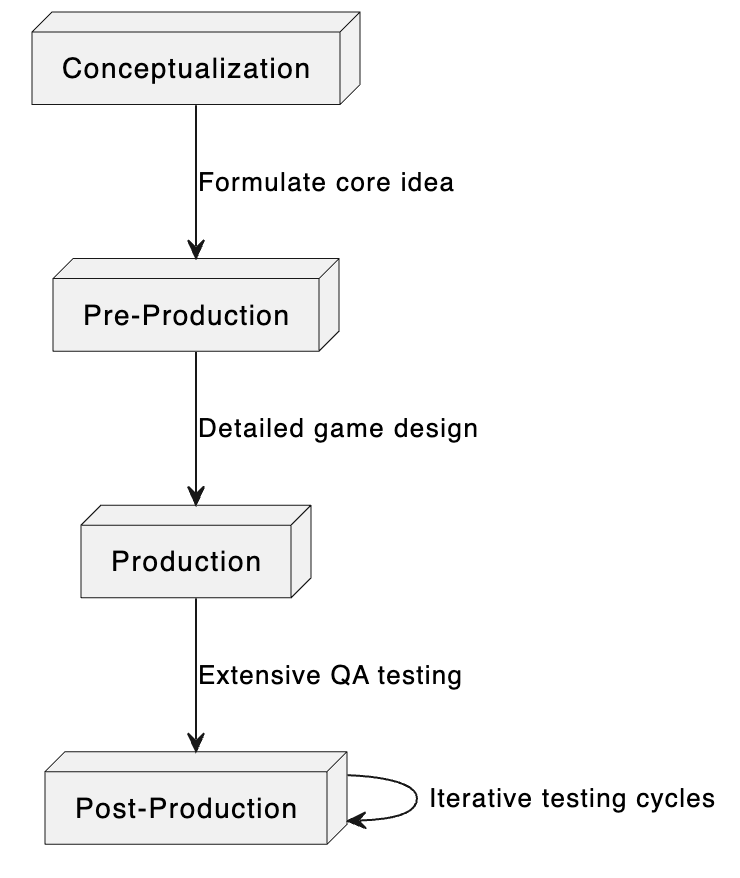
Phase #1

Conceptualization The game development journey starts with conceptualizing the game, involving brainstorming to formulate the core idea, theme, and unique selling points.

Existing intellectual properties in various media or original concepts might serve as inspiration for this fundamental idea. This stage is critical for aligning the game’s vision across the development team and stakeholders.

Phase #2

Pre-Production In pre-production, detailed game design documents (GDDs) are prepared, outlining gameplay mechanics, narratives, character designs, and environment concepts.

This phase sees the creation of technical prototypes to validate gameplay ideas and mechanics.

Storyboards and concept art are developed to visually represent game narratives, environments, and characters, facilitating a shared understanding and vision among the creative team.

Phase #3

Production The production phase marks the bulk of game asset creation and coding. It involves the detailed development of game levels, character models, textures, animations, and game-specific logic.

Programming teams work on developing the game engine (if custom), integrating third-party libraries, and coding game mechanics, physics, AI behavior, and user interface elements.

This phase requires rigorous coordination between artists, designers, and programmers to ensure consistency and adherence to the game’s vision and design documents.

Phase #4

Post-Production Post-production focuses on refining the game through extensive QA testing. The game, now in its alpha state, is scrutinized for bugs, performance issues, and gameplay imbalances.

Feedback from alpha testing leads to adjustments and bug fixes, progressing the game to a beta state for wider testing, including compatibility testing and compliance checks with platform-specific standards.

This phase is iterative, with multiple testing cycles, feedback, and refinement until the game meets quality and compliance benchmarks for launch readiness.

Phases in game testing

Marketing

Marketing Simultaneously with late development stages or post-production, the marketing phase ramps up to generate anticipation and demand. This includes creating promotional materials, engaging with media and influencers, and showcasing the game at industry expos.

Marketing strategies are tailored based on target demographics and platforms, focusing on highlighting the game’s features and unique aspects.

For indie developers or smaller studios, this phase might also involve direct community engagement through social media and crowdfunding platforms to build a supportive player base pre-launch.

What do you think the Game Testing Stage is intended to reveal?

The testing stage is a critical component of the game development process.

In addition, revealing potential bugs in the program—for example, in-game objects not running legitimately—. It should likewise check for irregularities in the fictional structure of the game, consistency (and culmination) of artwork, and additionally be testing the gameplay—is the game connecting with, too simple, or too hard, for instance?

Who is a Game Tester?

Game testers play a pivotal role in ensuring the quality of a game before its final release. They thoroughly test games on various platforms, including consoles and desktops, to identify bugs and defects. Without game testers, games could suffer from numerous issues, potentially damaging the reputation of the development company.

What are the requirements to Become a Game Tester

  • Attentive behavior
  • Understanding of video game console controllers
  • Awareness of SDLC
  • Good communication skills
  • Great writing skills
  • Primary computer programming aptitudes

Central Skills

  • Principles and perception
  • Analytical thinking
  • Knowledge of computer hardware parts
  • Investigating and exploring aptitudes
  • Versatility to tedious and redundant obligations

Typically, gaming companies don’t have a specific degree requirement. The skills are quite often tested at the interview. Still, education plays a significant role in game testing. The titans of the gaming industry prefer to hire employees with degrees in:

  • software development
  • computer programming
  • Computer science or some other technical field.

What does a Games Tester do?

Some of the key responsibilities of a game tester include the following:

  • Be repetitive and unpredictable to identify and break down potential issues.
  • Test different versions of games on various platforms.
  • Explore specific areas of the game and test all available options.
  • Play through different modes and characters to reveal glitches.
  • Report errors, spelling mistakes, and language issues.
  • Document bug reports in a bug-tracking system.
  • Understand the difference between reporting bugs and reporting features.
  • Test the game repeatedly in various conditions to ensure stability.
  • Analyze new game versions to check if previous bugs have been addressed.


The process involved in Game Testing

By far, we know that testing has an imperative function in Game development. A game is tested at the distinctive level of its development procedure. Usually, in the software engineering method, the Software test design document contains all the data about testing the product. However, game testing is not quite the same as testing the software.

testbytes-mobile-app-testing-banner

There are numerous steps included other than test cases for a game, generally in light of the fact that almost all game testing is black box testing. The developers generally don’t test their own games, nor do they have time to test them completely, nor is it a wise idea to test games by themselves.

Before presenting their code for integration with the rest of the game or as third-party code for use by other game developers, game developers only test small portions of it.

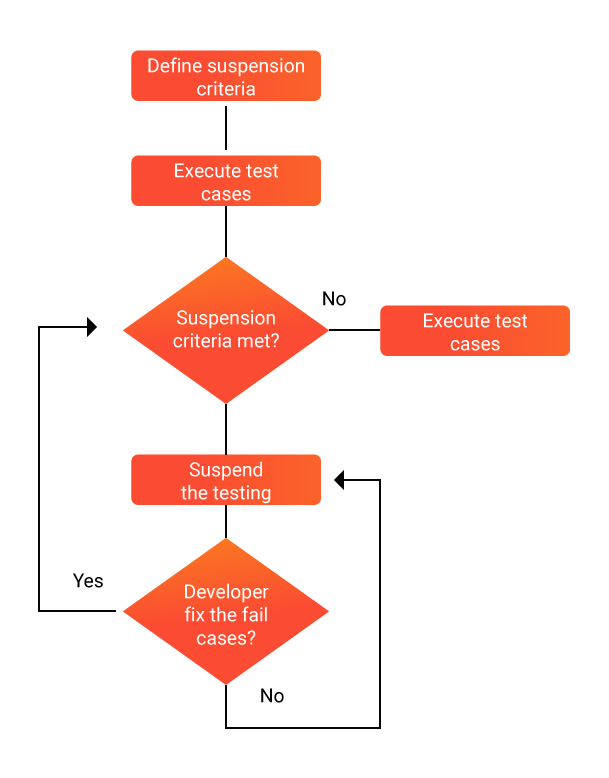
6 Steps of the game testing are as follows:

  1. Plan and Outline the Test – Although quite a bit of this plan was done before in the programming test plan document, still with each new prototype of the game, this document should be returned to upgrade any adjustments in the test cases, specifications, and new setup support. The game tester ought to guarantee that no new issues are presented.
  2. Set up the Test – All the teams should upgrade their code, documents, tests, and test environment and regulate it with each other. The test development group should mark the bugs settled and the test time taken to confirm them.
  3. Play out the Test – Run the test suit once more. In the event that any bug is discovered, test around the error to ensure that the bug is real.
  4. Report the Outcomes – Complete insights about the bugs are reported.
  5. Repair the Bug – The game testing team engages in this step by uncovering the bug to the development team and giving direct testing to track the bug.
  6. Return to Stage 1 and Retest – A new build is delivered after one cycle.

The game test is performed in a structured way. Regardless of the size of the game and the time required for creating the game, all game testing should follow the fundamental structure.

Parts of Games That Undergo Testing

  • the menu and the menu functions
  • art (character model, terrain or world, texture, objects, crowd, etc.)
  • animation (the likeness and quality of the realism, movement, and frame rate)
  • music
  • audio and the sound effects (in connection with the facial animation, e.g., the animation series and lip sync)
  • any movie clips
  • camera (zoom in and out, cinematic view, replay)
  • title screens
  • game logic and flow
  • world/scene/level
  • the action properties
  • the player’s properties
  • the situation to advance to the subsequent level (what are the commands?)
  • the application of environmental objects
  • the object/event triggers
  • increasing levels of difficulty
  • the scoring
  • the AI logic (for both offensive play and defensive play; player positioning and movement)
  • statistics (pre-game and in-game, like high score and player statistics)
  • SFX – Special effect
  • NIS – Non-Interactive Sequence
  • the gamepad
  • the vibration/shock effect of the gamepad
  • the usability of the button functions
  • the application of multi-button actions (also known as button mashing)
  • the use of analog and digital mode
  • legal text
  • the game options (game start or menu selection, game pause, pause menu options, hints, and scrolling, such as driving by the accessible choices on the screen, so forth.)

Types of Game testing that need to be followed in the Testing Process

The game development cycle on all platforms has phases that are known as milestones. The milestones show that the game is at a specific level of development. The milestones, usually, are first playable, alpha phase, beta phase, gold phase, and post-release phase. The initial playable version is related to that of a demo version; here, the feel of the game is perceived and evaluated.

In a simplistic view, testing is recognizing bugs found in the game so the issue can be resolved. There are diverse types of tests that can be classified as black-box testing and clear-box testing. Their testing goal and general procedures are trivialities (e.g., test planning, test design, testing execution, regression testing, and bug reporting), yet their aim stresses various parts of the game. Let’s know what those techniques are:
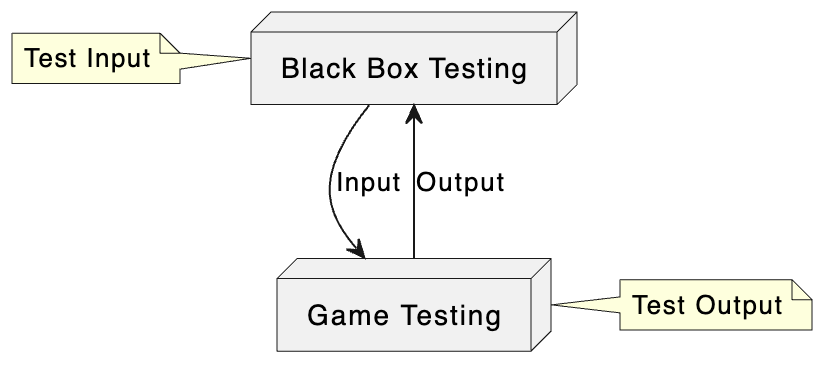
Black Box Testing

It centers on the playability or functional parts of the game. For instance, testing the UI (e.g., the utilization of buttons and the selection menus), the “look and feel” (e.g., the designs and animation), and the real gameplay.

For Black Box testing, the game tester must know how to play the game, the utilization of the gamepad, and the game flow and the rules.

Blackbox Testing in Game testing

Clear Box Testing

It centers on the design and integration parts of the game software. For instance, the utilization of a database, pipelines, the integration and reconciliation of game segments like the AI engine, the rendering engine, sound, etc.

For Clear Box testing, the game tester must comprehend what coding is. The software tester employs a run-time troubleshooting environment, encourages the code or pieces of code with input, i.e., setting variables, data, and so forth, and interprets the test outcome.

Clear Box Testing in game testing

Functional Testing

 Its purpose is likely to be to recognize deviations from functional necessities. It comes down to driving through the game repeatedly to distinguish issues and the environments in which they can be rectified.

Functional Testing Diagram

Stress/Load Testing

When testing the games, it is fitting to create conditions that require a huge computational load. So, the game tester can check system execution in an unpleasant condition. With load testing, it is less demanding to see and fix possibly perilous code segments in time. Test for odd circumstances, like loading a game with no memory card, running the game for 48 hours, and checking how the game reacts.

Stress/Load Testing in Game Testing

Combinatorial Testing

 This type of testing is a process of experimental design that is applied for commercial software testing and to create test cases. Using combinatorial testing for game testing improves test performance efficiency, produces high-grade quality, decreases cost, and ensures reliable phase containment.

Every conceivable sequence of values of the parameters is incorporated into this test. Here the parameters are chosen from game elements, functions, events, character attributes, play options, settings, customization choices, and so forth.

combinatorial testing flow diagram

Compatibility Testing

 Much of the time, game programming is performed on laptops or PCs. Notwithstanding, numerous games can be intended for different devices: smartphones, game consoles, communicators, and so forth. Game development is performed on the test systems of these gadgets, yet they vary greatly from the original. In this way, later on, a few challenges may arise when beginning the game on the original gadget.

Plus, one should give careful consideration to the authorization of programming. In case of any aberrations, the game can be returned for correction, which takes additional time and a loss of funds. So, it is vital to check whether the game fulfills the necessities of the devices.

Feature Testing

 This testing is performed to confirm the smooth functioning of the features in the game. For covering discrete features, detailed test cases are more appropriate. Task-based experiments require a predominant level of detail. At the point when there is an assortment of features for various player statuses, test frameworks get convenient and beneficial.

Critical Path Test

Critical path testing is a procedure to recognize the critical paths in the game. This type of testing technique uncovers the conditions that cause disappointment.

Play Testing

Playtesting is the technique of game testers playing the game to break down non-useful features like fun variables, balance, difficulty levels, and so forth. Here, a selected team of testers plays the incomplete variants of the game to check the work process.

Limitation testing:

The games are regularly converted into the languages of the nations where they are assumed to be made available on the market. It happens that translators can’t give a totally exact interpretation, which would be completely reliable with the game events. Indeed, even if interpreted appropriately, it may not indicate the circumstances and abrade on the ears of the local speakers. Thus, after localization, it is helpful to test the game by natives of those nations where the ultimate game would be available.

Smoke Testing

 It is performed to test a new CD burn. The name Smoke Testing originates from the engineering lab testing new automobile engines. Before a new engine is taken for road testing, the engineers would just begin the engine and check whether it runs. In the event that smoke turns out from the motor, they would know promptly that a few sections don’t work appropriately.

Much like making another form, the game tester will essentially run the game; if it continues crashing, the tester will know a few sections are incorrect.

Regression Testing

 This type of game testing is done to retest the unaltered parts of the product. Here, test cases are re-checked to investigate whether the operation of the past elements of the application works fine and that new changes have not presented any new mistakes or vulnerabilities.

Multiplayer Testing

 Multiplayer testing is an entirely different beast in itself. Numerous players, all the while, associate with the game world, with game servers, with PC-controlled opponents, and with each other. Such huge numbers can turn out badly.

Furthermore, it regularly requires a complete team of game testers, various troublesome risk-based decisions to make, and the need to invest boundless amounts of time and energy in testing distinctive situations.

A comprehension of multiplayer game configuration and how to test proficiently as a group is required for this sort of game testing technique.

Sound Testing

 Sound testing is common in all products that make some sort of sound or play media. But games have a one of a kind feature that other software does not need to consider on a similar level. Game music must include the user in the game and upgrade the gameplay. Not only should the sound play without missing or shuttering components, but it ought to likewise add to the gameplay. This demands broad sound aptitude and a particular comprehension of game audio. Quite a specific master of domain awareness.

Ad-hoc Testing

 Ad-hoc testing is likewise, at times, alluded to as general testing. It is a less organized test. Ad hoc testing enables the game tester to investigate paths in view of their instinct. There are two types of ad hoc testing.

In the first place, there is free testing, which is a testing game with no arrangement or documentation. The other is direct testing, which is a solitary test performed spontaneously to answer a particular issue.

Test Flow Diagrams

Test flow diagrams are practiced to produce models depicting game behavior from the player’s point of view. Game testing involves examining the model along every potential path to examine unexpected game situations. A test Flow diagram is a formal way to test design. Since it is graphical in nature, it is simple to review, investigate, and give feedback on the test designs.

Complex test flow diagrams can interpret compact features, but typically, small test flow diagrams are preferable.

Test Trees

A test tree is a usability procedure for sorting out test cases that supports selecting an appropriate set of tests for a given arrangement of code changes. Test Tree enhances the general comprehension of complex game traits and deals with conceivably complicated functions, particularly when these functions connect with other game principles, elements, and functions.

The test tree is developed by disintegrating the element into a subset until the bottom nodes distinguish elements to utilize or spec to perform while game testing.

What is Bug Hunting?

Bug Hunting is a regular practice for some game testing companies worldwide, yet some test administrators wrongly feel they go Hunting when their game testers casually play with the application, keeping in mind the end goal of discovering “border case errors.”. Bug Hunts are Informal Testing activities; this should not be mixed up with playing with the system without a reason or goal.

  • Bug Hunts should be directed as team activities.
  • Bug Hunts are there so as to include non-testers and find less-ordinary bugs.
  • Bug Hunts require the system to be steady to be helpful.

Thus, to accomplish something (and not waste your time and efforts!!) on performing these Bug Hunts, you have to follow a particular procedure, execute planning and preparation activities, as well as observe and control the procedure all through its execution.

Types of Game Bugs in Game Testing

Crash

A crash bug is a severe issue that freezes or completely shuts down the game, often leading to a “Crash to Desktop” (CTD) scenario. Executing particular commands, loading into new areas, or coming across specific enemies are just a few examples of the in-game actions that can cause these bugs. Crashes are considered high-priority bugs, and game developers prioritize eliminating them to ensure a smooth gaming experience..

mobile app

General

General bugs are issues that do not halt game progression but still disrupt the gameplay experience. For example, a character disappearing unexpectedly, though not affecting the main storyline, can be classified as a general bug.

While these bugs may not be game-breaking, they can lead to player frustration and impact the game’s overall quality.

Minor

Minor bugs are small issues that have a minimal impact on gameplay but still need attention.

Examples include a character’s mouth not moving during dialogue or other subtle graphical glitches. Although minor bugs may not be prioritized, they contribute to the overall polish and professionalism of the game.

Severe

Severe bugs hinder the player’s progress without causing a game crash. These bugs can range from a disappearing character crucial for advancing a quest to a malfunctioning door preventing access to the next game area.

While not as critical as crash bugs, severe bugs are significant and must be addressed to maintain a coherent gaming experience.

Graphics

Graphics bugs primarily involve issues with the visual elements of the game, including texture errors and map imperfections. An example of a graphics bug is an incorrect ground texture applied to a door.

Addressing graphics bugs is essential for maintaining the aesthetic appeal and immersion of the game.

Sound

Sound bugs relate to issues with in-game audio, such as incorrect timing or missing music cues. These bugs can occur anywhere in the game, from the main menu to the closing credits.

Sound bugs can disrupt the game’s overall atmosphere and must be corrected for a complete gaming experience.

Algorithm Bugs

Algorithm bugs occur at collision detection points within the game. Incorrectly placed walls or floors can cause players to leave the intended map boundaries, indicating a failure in collision detection.

Fixing algorithm bugs is crucial to prevent players from getting stuck or experiencing unintended interactions within the game environment.

Fatal

Fatal bugs are game-breaking issues that prevent players from advancing further due to critical functionality failures.

An example is a jumping bug where a player needs to jump to progress, but the jumping mechanism fails, hindering progression. Fatal bugs demand immediate attention to ensure the game works correctly at all levels.

Configuration Trigger

Configuration trigger bugs occur when game settings have not been adequately tested, leading to failures.

These bugs can affect graphics and sound settings, potentially causing textures to disappear or altering audio configurations.

Configuration trigger bugs are uncommon in well-known games made by skilled programmers, but they can appear in online games that are downloadable.

How to Write a Bug Report Effectively?

A career as a computer games tester isn’t all fun and buffoonery. When you find a bug, you have to report it. Composing a game error report may look like a basic assignment. However, it is accompanied by a lot of duties. This is a correspondence from which other individuals will construct a plan of action with respect to game improvement. Those activities frequently incorporate submitting costly assets to settle the issue.

Here are a few tips for creating a bug report as a game tester. An adequate game bug report contains:

  • Title or Subject –

  1. Compile the critical elements of the issue.
  2. A basic overview of what, where, why, when, and how it is generated, featuring the most vital contemplations.
  3. Shows how extreme it is.
  4. Others utilize it to design a course of action; thus, it should be comprehended at once.
  • Classification

  1. A concise depiction of what, where, why, when, and how is generated with each and every detail.
  2. Here you ought to portray precisely “everything” about the issues.
  3. Classify it in such a manner that the reader can follow it entirely from the classification and comprehend totally what is going on.
  4. You may utilize industry-standard language to help precisely depict the issue.
  • Generation Steps –

  1. Well-ordered guide on the best way to replicate the issue.
  2. You ought to consider the individual heeding this guide has never observed the product and may even be new to the platform. Show them correctly what to do to reproduce the issue.
  3. Abstain from industry-standard language to guarantee the guide can be trailed by anybody.
  • Extra Information –

  1. Give additional helpful data.
  2. Assessment and theory, you can discuss how this bug may influence the player and conceivable inevitabilities created by the issue (such as bad customer reviews)
  3. Conclusions about different ways this may influence the game.

(Note: This segment is unnecessary in creating a report, though.)


What are the Opportunities as a Game Tester

Game-producing organizations, to achieve more profits, are always contracting computer game testers. So, finding the right source for the organization, whoever is hiring, is absolutely necessary. There are essentially three sorts of game testers. These are:

  1. Freelance Game Tester: The game testers who are freelancing are all around experienced and search out organizations that outsource forthcoming games to test the games. These testers are regularly the backbone of the game testing method. These game testers are usually contracted on a project-to-project basis. These testers are mostly used for black-box testing. Promptness, clarity, and communication in writing are critical attributes you should have.
  2. Full-Time Corporate Video Game Tester: There are potential people for being hired by big game-producing companies for full-time. For individuals who have a passion for playing games, no other activity can be as fascinating as this. Furthermore, the main capability required for this sort of employment is experience. No degrees or certificates are mandatory.
  3. Second-Party Testers: These game testers work on the testing team of a secondary or subsidiary organization under a bigger company. The second-party game testers can be either fully employed or contracted. Because of their close association with game developers, they frequently obtain access to more advanced tools. This usually results in a powerful focus on test cases and white-box testing. Most second-party testers are at least somewhat experienced in the game testing process.

Further, if you are looking forward to embracing video game testing as your profession, you must become more acquainted with the levels of game testing that are in charge of testing distinctive parts of the game. Quality assurance, Alpha testing, and Beta testing are the three primary kinds of game testing processes you will dependably need to begin with when you select this field as a profession. Alongside, there are other testing processes too.

Levels of Game Testing

  1. Alpha Testing

    • The initial testing phase is where the game is evaluated for major bugs.
    • Involves internal testing by the development team.
  2. Beta Testing

    • A select group of outside users test the game during pre-release testing.
    • Aims to identify potential issues and gather user feedback.
  3. Quality Assurance (QA) Testing

    • Comprehensive testing phase to ensure the game meets quality standards.
    • Conducted by experienced game testers.

What is Gold Testing or Post-Release Testing?

This is the testing stage, where the game is completely tested, has been launched to the general population has a totally finished product, and players have total access to the game.

Despite the fact that the game is completely completed, there is plenty of chances where a player can discover glitches or even game-crashing bugs. Under these circumstances, the developers need to discharge patches with a specific goal to fix them.

In the Gold testing level, every single crucial bug (hangs, crashes, and function disappointments) is resolved. 90% of every single significant bug (performance and functionality) is solved.

85% of every minor bug (system execution problems that hit a few users) is settled. Furthermore, release-level performance (i.e., 60-fps frame rate) is accomplished.

During its life cycle, if the game was delivered with even a couple of terrible bugs, it’s the ideal opportunity for an update or patch.

For each patch, the dev team must return to the whole list of bugs and consolidate some new, clean features. Every individual bug patch or polish element implies more testing (yet should be prepared).

Each new fix must be tested to detect whether it works with the base game and prior patch versions.

Mobile Game Testing

While many testing techniques overlap between different platforms, mobile game testing presents its own set of challenges and considerations. Ensuring a mobile game functions seamlessly, adheres to specific requirements, and provides an exceptional user experience is no small feat, especially given the diverse array of mobile configurations. 

The Significance of Mobile Game Performance

Mobile games captivate players with striking graphics, animations, and rich media. However, if the performance of a mobile game is lacking, these captivating elements become futile. Gamers expect a smooth, uninterrupted experience with consistent progress in gameplay. The importance of performance assessment cannot be overstated, as it directly impacts the player’s satisfaction and engagement.

Testing Navigation Flow, Usability, and User Experience

Emphasizing the genuine user experience, mobile game testing necessitates using actual devices rather than relying on emulators. Intricacies such as battery consumption, the impact of battery chargers, and potential intrusions significantly influence the overall user experience and entertainment value. Testing on real devices allows for a more accurate assessment of these factors.

Graphics Execution and Early-Stage Performance Tests

The graphics execution of a mobile game is intricately linked to user experience. While striking graphics and animations enhance the visual appeal, their effectiveness diminishes if the game’s performance lags. To address potential performance blockages, it is essential to conduct performance tests during the early stages of game development. Identifying and resolving performance issues early in the development process ensures a streamlined gaming experience.

Three Basic Phases of Mobile Game Testing

  • Device Performance Testing
  1. Start-Up of Game: The initial screen should appear within 1-2 seconds of pressing the game icon. b. Memory Consumption: Adding functionalities increases memory usage, requiring careful management. c. Software/Hardware Variation: Test the game on various devices with different RAM and processor specifications. d. Battery Time: Continuous gameplay should not excessively drain the battery or cause the device to overheat. e. App in Background: Resuming the game from the background should retain its previous state. f. Usage with Other Apps: The game should run seamlessly when used simultaneously with other applications.
  • Network Performance Testing
  1. Jitters: Networks using packet switches cause address delays in data transmission. b. Network Speed: Test the game on 2G, 3G, and 4G or 5G networks, including mobile networks and Wi-Fi.
  • Testing API/Server Performance
  1. API Calls: Limit the number of calls from the game to ensure optimal performance. b. Information To and From Server: Efficiently handle data transmission between the game and server. c. Server Down Time: Implement failover database servers to ensure continuous availability in case of server issues.


Conclusion

Effective game testing is a structured and comprehensive process that involves various types of testing techniques. From functional testing to stress testing and bug hunting, each step is crucial in ensuring a flawless gaming experience for users. Understanding the components of games that undergo testing, the types of testing involved, and the techniques used are essential for game testers and developers to deliver high-quality games to the market. The iterative nature of the testing process ensures continuous improvement and refinement, ultimately contributing to the success of the gaming industry.

How To Create a Test Plan? Step-By-Step Tutorial

Test plans define a structured process under the control of test managers, serving as roadmaps for software testing. Team members with in-depth system knowledge create these blueprints, ensuring that each test case is functional and going through a thorough review by senior experts.

Importance of test plans

  • Risk Identification: Test plans aid in identifying potential risks associated with the software, allowing preemptive mitigation strategies.
  • Resource Planning: They assist in planning resources, including human resources, tools, and infrastructure required for testing activities.
  • Scope Definition: Test plans clearly outline the scope of testing, ensuring that all functionalities and scenarios are covered.
  • Quality Assurance Guidelines: Establishing quality assurance guidelines ensures adherence to standards, promoting consistency across testing phases.
  • Communication Tool: The document serves as a communication tool, fostering understanding among developers, testers, and business managers.
  • Traceability Matrix: Test plans often include a traceability matrix, linking test cases to requirements and enabling comprehensive test coverage.
  • Estimation and Budgeting: Test plans facilitate accurate estimation of testing efforts, aiding in budgeting and resource allocation.
  • Continuous Improvement: Post-implementation test plans contribute to continuous improvement by capturing lessons learned and refining future testing processes.


What Are The Objectives Of The Test Plan?

  1. Quality Assurance: Define a roadmap for thorough testing, ensuring software functions as intended and meets user needs.
  2. Identify Risks & Issues: Proactively anticipate potential problems like bugs or performance bottlenecks before they impact users.
  3. Scope & Efficiency: Establish clear testing boundaries and prioritize tasks, avoiding wasted time and ensuring resource allocation.
  4. Communication & Collaboration: Set expectations for testing activities, roles, and responsibilities, promoting teamwork and transparency.
  5. Measurable Improvement: Define success metrics (e.g., bug coverage, defect rate) to track progress and assess test effectiveness.

Remember, a good test plan is a living document – updated as needed to adapt to changing circumstances and ensure smooth software development.

Step-by-step Process of Creating An Effective Test Plan

      1. Step #1. Product Analysis
      2. Step #2. Designing test strategy
      3. Step #3. Identifying the Testing Type
      4. Step #4. Interpret test objectives
      5. Step #5.  Outline test criteria
      6. Step #6.  Planning Resources
      7. Step #7. Define test Environment
      8. Step #8. Create Test Logistics
      9. Step #9. Document Risk & Issues
      10. Step #10. Outline Test Criteria
      11. Step #11. Estimation and Scheduling

Let’s dive into the step-by-step tutorial of How To Create a Test Plan

Step #1. Product Analysis

Requirements Analysis:

    • Initiate the test plan creation process by conducting a comprehensive analysis of software requirements. This forms the foundation for subsequent testing phases.

System Analysis:

    • Prioritize thorough system analysis to gain a holistic understanding of the software’s architecture, functionalities, and interactions.

Website and Documentation Review:

    • Scrutinize the website and product documentation to extract detailed insights into software features, configurations, and operational procedures.

Stakeholder Interviews:

    • Engage in interviews with key stakeholders, including owners, end-users, and developers, to garner diverse perspectives and nuanced insights into the software.

Client Research:

    • Conduct in-depth research on the client, end-users, and their specific needs and expectations. Understand the client’s business objectives and how the software aligns with those goals.

Key Questions for Analysis:

    • Pose critical questions to guide the analysis process:
      • What is the intended purpose of the system?
      • How will the system be utilized?
      • Who are the end-users, and how will they interact with the system?
      • What are the development requirements for implementing the system effectively?

Clarification Interviews:

        • If any aspect of the system’s requirements remains unclear, conduct interviews with clients and relevant team members for detailed clarification.

Qa staffing and hiring
Step #2. Designing test strategy

Definitely, the scope of the testing is very important. To put it in simple words, know what you need to test and what you don’t need to test. All the components that need to be tested can be put under “in scope,” and the rest can be defined as “out of scope.”.
It helps

  • To give precise information on the testing being done
  • Also, it helps testers to know exactly what they need to test.

But the main question that arises here is how you would know what needs to be “in scope” and what needs to be “out of scope.”
There are a few points that you need to keep in mind while defining the scope of the test

  • Look into what exactly customer requirements are
  • What is the budget of your project?
  • Focus nicely on Product Specification
  • You should also take into account your team members’ skills and talents.

Step #3. Identifying the Testing Type: which testing should happen 

Now that we’ve established a thorough understanding of what needs to be tested and what doesn’t, the next crucial step is defining the types of testing required. Given the diverse array of testing methodologies available for any software product, it’s essential to precisely identify the testing types relevant to our software under test.

Prioritization becomes key, allowing us to focus on the most pertinent testing methodologies. This ensures that our testing efforts align with the specific needs and intricacies of the software, optimizing the overall quality assurance process.

You can consider the budget of the project, the time limitations, and your expertise to prioritize the testing type.

Step #4. Interpret test objectives

Defining precise test objectives is paramount for effective test execution, ensuring a systematic approach to identifying and resolving software bugs. The ultimate goal is to ascertain that the software is devoid of defects. The process of interpreting and documenting test objectives involves two critical steps:

  1. Feature and Functionality Enumeration:
    • Compile an exhaustive list of all system features, functionalities, performance criteria, and user interface elements. This comprehensive catalog serves as the foundation for targeted test scenarios.
  2. Target Identification:
    • Based on the listed features, establish the desired end result or target. This involves defining the expected outcomes, performance benchmarks, and user interface standards that signify successful software operation.

Step #5.  Outline test criteria

The test criteria are a rule or a standard on which the test procedure is based. 2 types of test criteria need to be resolved:

1. Suspension Criteria: Here, you specify the critical suspension criteria for a test. When the suspension criteria are met, the active test cycle is suspended.
2. Exit Criteria: Exit criteria specify the successful completion of a test phase.

Exit Criteria
How to create a test plan: exit criteria

For example, if 95% of all the tests pass, you can consider the test phase to be complete.
The run rate and pass rate are two prominent ways to define exit criteria
Run rate = the number of test cases executed/total test cases of the test specification.
Pass rate = numbers of test cases passed / test cases executed.
These are retrieved from test metrics documents.
The major Run rate has to be 100%. The exception can be considered if a clear and eligible reason is mentioned for a lower run rate.
The pass rate can be variable depending on the project scope. But certainly, a higher pass rate is always a desirable goal.

Step #6.  Planning Resources

Resource planning, as the name implies, involves crafting a comprehensive overview of all essential resources essential for project execution. This encompasses a spectrum of elements, including human resources, hardware, software, and other necessary materials.

The significance of resource planning lies in its ability to detail the requirements crucial for the project’s success.

By explicitly specifying the required resources, the test manager can formulate precise schedules and accurate estimations, facilitating the seamless and effective execution of the project. This process ensures optimal utilization of resources, contributing to the overall success of the testing project.

No. Member Tasks
1 Test Manager Manages the entire project.

Directs the team.

Hires require efficient resources.

2 Tester Identifies test techniques, tools, and automation architecture.

Creates comprehensive test plans.

Executes tests, logs results, and reports defects.

3 Developer in Test Executes test cases, test suites, and related activities.
4 Test Administrator creates and manages the test environment and its assets.

Assists testers in effectively utilizing the test environment.

Some of the system resources you should look for are

  1. Server
  2. Test tool
  3. Network
  4. Computer

Step #7. Define test Environment

The test environment is a critical element, encompassing both hardware and software, where the test team executes test cases. It constitutes a real-time instance that mirrors the actual user experience, incorporating the physical environment, including servers and front-end interfaces. To comprehensively define the test environment:

  1. Hardware Configuration:
    • Specify the hardware components required for testing, detailing server specifications, network configurations, and end-user devices.
  2. Software Configuration:
    • Outline the software components crucial for testing, including operating systems, databases, browsers, and any specialized testing tools.
  3. User Environment:
    • Consider the end-user experience by replicating the conditions they will encounter during actual system usage.
  4. Server Setup:
    • Detail the server architecture, configurations, and any specific settings essential for testing server-side functionalities.
  5. Front-End Interface:
    • Define the front-end interfaces, detailing the user interfaces, GUI elements, and any specific design considerations.
  6. Data Configuration:
    • Specify the test data required for executing test cases, ensuring it accurately represents real-world scenarios.
  7. Dependencies:
    • Identify any external dependencies, such as APIs, third-party integrations, or external services, is crucial for testing.
  8. Test Environment Documentation:
    • Create comprehensive documentation detailing the entire test environment setup, configurations, and any unique considerations.

Step #8. Create Test Logistics

Creating effective test logistics involves addressing two crucial aspects:

1. Who Will Test?

  • Skill Analysis: Conduct a thorough analysis of team members’ capabilities and skills. Understand their strengths, expertise, and proficiency in specific testing types or tools.
  • Task Assignment: Based on the skill set, assign appropriate testing tasks to team members. Ensure that each tester is aligned with testing activities that match their expertise.
  • Responsibility Allocation: Clearly define roles and responsibilities within the testing team. Specify who is responsible for test case creation, execution, result analysis, and defect reporting.
  • Cross-Training: Consider cross-training team members to enhance flexibility. This ensures that multiple team members can handle critical testing tasks, reducing dependencies.

2. When Will the Test Occur?

  • Timelines: Establish strict timelines for testing activities to prevent delays. Define specific start and end dates for each testing phase, considering dependencies and overall project timelines.
  • Test Scheduling: Develop a comprehensive test schedule that outlines when each testing activity will take place. This includes unit testing, integration testing, system testing, and any other relevant testing phases.
  • Parallel Testing: If applicable, plan for parallel testing to expedite the overall testing process. This involves conducting multiple testing activities simultaneously.
  • Continuous Monitoring: Implement a continuous monitoring mechanism to track progress against timelines. This helps identify potential delays early on and allows for timely corrective actions.
  • Coordination: Foster clear communication and coordination among team members to ensure everyone is aware of the testing schedule and any adjustments made.


Step #9. Document Risk & Issues


Risk Potential Issues Mitigation Strategy
Skill Lack in Team Members Inefficient testing, missed bugs, project delays – Arrange training workshops or boot camps.

– Mentor junior team members by senior members.

– Hire experienced professionals to fill skill gaps.

Short Deadlines, Lack of Rest Periods Reduced testing quality, burnout, compromised health – Prioritize critical test cases and optimize the testing flow.

– Negotiate realistic deadlines and adjust the project scope if needed.

– Schedule regular breaks and encourage team members to take leave.

Lack of Management Skills Unclear roles, poor communication, demotivated team – Implement leadership training programs.

– Delegate tasks and empower team members to take ownership.

– Establish clear communication channels and promote collaboration.

Lack of Collaboration Among Team Members Silos, knowledge gaps, inefficient teamwork – Encourage team-building activities and social events.

– Implement cross-functional collaboration initiatives.

– Create a culture of knowledge sharing and open communication.

Budget Overruns Financial constraints, project delays, resource limitations – Clearly define the test scope and focus on high-impact areas.

– Implement cost-effective testing tools and methodologies.

– Monitor expenses closely and adjust resource allocation as needed.

Step #10. Outline Test Criteria

“Suspension criteria” refers to predefined conditions or thresholds that, when met, trigger the temporary halt or suspension of a testing phase until specific issues are addressed. In the context you provided, the suspension criteria is set at a failure rate of 40% for test cases. Let’s elaborate on this:

Suspension Criteria Explanation:

In your testing process, you’ve established a key metric to evaluate the health and readiness of the software being developed. This metric is the percentage of failed test cases. When this metric reaches or exceeds 40%, it serves as a trigger for the suspension of testing activities. This implies that if a sizable portion of the test cases are failing, the testing phase will temporarily stop until the development team addresses the identified issues.

Purpose of Suspension:

The need to make sure that the software is of sufficient quality before continuing testing is what drives the decision to suspend testing at a 40% failure rate. A high failure rate indicates potential critical issues or bugs that, if left unaddressed, could lead to a suboptimal product or system.

Workflow after Suspension:

Once the suspension criteria are met, the testing team communicates the situation to the development team. The development team then focuses on fixing the identified issues, whether they are coding errors, logic flaws, or other bugs causing the test failures. Once the fixes are implemented, the testing team resumes their activities to verify that the issues have been adequately addressed.

Benefits of Suspension Criteria:

  1. Quality Assurance: It ensures that only software meeting a certain quality standard progresses through the testing phases.
  2. Efficiency: By pausing testing during a high failure rate, it prevents the identification of additional issues that might arise due to the existing, unresolved problems.
  3. Collaboration: Encourages collaboration between testing and development teams to resolve identified issues promptly.
  4. Resource Optimization: Prevents the allocation of resources for testing on software that is likely to have significant issues.

Mobile app test cost calculator
Step #11. Estimation and Scheduling

Estimation and Scheduling in the Test Environment Phase:

In the test environment phase, the test manager plays a crucial role in estimating the resources, time, and effort required for testing activities. Estimation involves predicting the testing effort, duration, and resources needed to complete the testing process successfully. The test manager uses various techniques and relies on key inputs to arrive at a realistic estimate. Additionally, the estimation is closely tied to the overall project schedule.

Key Inputs for Estimation in a Test Environment:

  1. Project Deadline: The overall deadline for the project is a critical input. It sets the time boundary within which testing activities must be completed to ensure timely delivery.
  2. Project Estimation: The estimated effort and schedule for the entire project, as determined during the project planning phase, provide a baseline for the testing phase. The test manager considers the overall project timeline and allocates a proportionate timeframe for testing.
  3. Project Risk: Understanding the project risks is essential for accurate estimation. Risks such as unclear requirements, frequent changes, or complex functionalities can impact testing effort and duration.
  4. Employee Availability: The availability of team members and their skill levels directly affect the estimation. The test manager considers the capacity of the testing team and ensures that resources are available when needed.

Estimation Techniques:

  1. Bottom-Up Estimation: Breaking down the testing activities into smaller tasks and estimating each task individually. This detailed approach provides a more accurate estimation but requires a thorough understanding of the testing requirements.
  2. Expert Judgment: Relying on the expertise of experienced team members or industry experts to provide insights into the effort required for testing activities.
  3. Analogous Estimation: Drawing on past projects with similar characteristics to estimate the effort and time required for the current testing phase.

Binding Estimation to Test Planning Schedule:

Once the estimation is complete, the test manager aligns it with the overall project schedule and creates a detailed test plan. The test plan outlines the testing strategy, scope, resources, schedule, and deliverables. It includes milestones, timelines for different testing activities, and dependencies on development milestones.

Benefits of Binding Estimation to Schedule:

  1. Alignment with Project Goals: Ensures that testing activities are synchronized with the overall project timeline and objectives.
  2. Resource Planning: Helps in allocating resources effectively, avoiding bottlenecks, and ensuring that team members are available when needed.
  3. Risk Mitigation: Identifies potential scheduling risks and allows the test manager to plan for contingencies or adjustments as needed.
  4. Communication: Clearly communicates the testing schedule to all stakeholders, fostering transparency and accountability.

By binding estimation to the schedule, the test manager enhances the likelihood of meeting project deadlines while maintaining the quality and thoroughness of the testing process. This integrated approach contributes to successful project delivery.

Step #12. Govern test deliverables

Governance of test deliverables is a critical aspect of the testing process, ensuring that all documents, components, and tools developed to support testing efforts are managed, monitored, and delivered effectively. This involves establishing processes, controls, and guidelines to ensure the quality, accuracy, and timeliness of the deliverables. Here’s how the governance of test deliverables can be approached:

  1. Define Clear Standards:
    • Establish clear and standardized templates for test deliverables. This ensures consistency across different testing phases and projects.
    • Define standards for document structure, content, and formatting to enhance readability and understanding.
  2. Document Version Control:
    • Implement a robust version control system to track changes and updates to test deliverables. This ensures that stakeholders are always working with the latest and approved versions.
    • Clearly label and document version numbers, revision dates, and changes made in each version.
  3. Traceability:
    • Ensure that there is traceability between test deliverables and project requirements. This helps in validating that all testing activities align with the defined requirements.
    • Maintain traceability matrices to track the relationship between requirements, test cases, and other deliverables.
  4. Review and Approval Process:
    • Institute a formal review process for all test deliverables. This involves involving relevant stakeholders, including developers, business analysts, and project managers.
    • Obtain necessary approvals before progressing to the next phase or releasing deliverables to other teams or clients.
  5. Delivery at Specified Intervals:
    • Plan and communicate the delivery schedule for test deliverables at specified intervals, aligning with the overall development timeline.
    • Ensure that stakeholders, including development teams and project managers, are aware of the delivery milestones and can plan their activities accordingly.
  6. Comprehensive Test Deliverables:
    • Test deliverables should cover all relevant aspects of testing, including but not limited to:
      • Test plans outlining the testing strategy, scope, resources, and schedule.
      • Design specifications detailing test cases, scenarios, and data.
      • Simulators or test environment setup documents.
      • Error and execution logs for tracking issues and test execution results.
      • Installation and test procedures for deploying and conducting tests.
  7. Documentation Maintenance:
    • Establish procedures for ongoing maintenance of test documentation. This includes updating documents based on changes in requirements, test cases, or any other relevant information.
  8. Auditing and Compliance:
    • Conduct periodic audits to ensure compliance with established standards and processes.
    • Address any non-compliance issues promptly and make necessary improvements to the documentation processes.

Difference Between Test Plan And Test Strategy

Difference between test plan and test strategy

Test Plan Example

TestPlan Document Example

Conclusion

While the steps outlined above serve as a comprehensive guide for creating a test plan, it’s crucial to recognize that the approach may vary based on the unique requirements and scope of each project.

Your company should establish its own set of guidelines and procedures tailored to the specific needs of the organization. Now, take a moment to breathe a sigh of relief and dive confidently into your testing work.

With a well-crafted test plan and a clear roadmap, you’re equipped to navigate the challenges and contribute to the success of your project. Best of luck!

AngularJS Testing Tutorial – Cypress, Karma and Protractor

AngularJS testing using selenium is not a good approach. Due to the asynchronous behavior of the application selenium is not able to handle the asynchronous calls.
So it is necessary to make use of angularJS testing tools so that asynchronous behavior of the application can be handled. Let us see some good approaches to test angular JS websites below.
Unit Testing AngularJS Apps
To make sure that unit testing is happening easily when it comes to AngularJS Testing, Angular JS has been provided with dependency injection for your XHR requests.  The main reason behind is to simulate requests.  The model can also be tested by altering the DOM directly.  in short, individual sort function can be tested in isolation.
ad angular js
What is Karma?
Karma is a JS runner created by the angular JS team themselves. and is one of the best when it comes to AngularJS Testing.
Jasmine is the framework for testing angular JS code while karma provides us with various methods which makes it easier to call Jasmine tests.
For installing karma, you need to install node JS in your machine. After installing node JS, install Karna using npm installer.
How to test AngularJS apps using Karma?
First of all,
One can install karma using below command
npm install karma –save-dev
After running this command, karma dependencies will be installed. It will be present in package.Json after you run the above command. For making karma available globally use -g option so that you can invoke it from anywhere.
Now, the next step is to install karma plugin which would help us in using the jasmine framework and google chrome browser. Run the below command:
npm install karma-jasmine karma-chrome-launcher –save-dev
After running this command, start making tests in command prompt. For creating tests, run the following command.
mkdir tests        // for making tests directory
touch tests/test1.controller.test.JS     //For creating a test called test1
After creating a test, now it is time to put code in test1.
describe(test1,function(){
beforeEach(module(test1));
var$controller;
beforeEach(inject(function(_$controller_){
$controller=_$controller_;
}));
describe(‘sub’,function(){
it(‘1 – 1 should equal 0’,function(){
var$scope={};
varcontroller=$controller(test1Controller,{$scope:$scope});
$scope.x=1;
$scope.y= 1;
$scope.sub();
expect($scope.z).toBe(0);
});
});
});
Now, after creating the test you should know how to create a test runner, and before creating that we should know the configuration required for the test runner. For configuring the test runner perform the following steps.
karma init karma.conf.JS
Now, for running the tests using the test runner run the following command.
karma start karma.conf.JS
The test output should look like the underlying code.
> @ test /Users/devuser/repos/test1
> ./node_modules/karma/bin/karma start karma.conf.JS
INFO [karma]: Karma server started at http://localhost:8080/
INFO [launcher]: Starting browser Chrome
INFO [Chrome 80]: Connected on socket 2absOkNfa1asasaX0fCJ with id 66276373
Chrome 80 test1 encountered a declaration exception FAILED
ReferenceError: module is not defined
at Suite.<anonymous>(/Users/devuser/repos/repo1/tests/test1.controller.test.JS:3:13)
at /Users/devuser/repos/repo1/tests/test1.controller.test.JS:1:1
Chrome 80): Executed 1 of 1 (1 FAILED) ERROR (0.01 secs / 0.005 secs)
Now, add the following lines to your package.JSon.
{
“scripts”:{
“test”:”karma start karma.conf.JS”
},
Now with the help of this script, we will be able to run any test using npm command. Using the below command, run the jasmine tests.
npmtest
Now, it is time to add the controller logic and for adding it run the following commands.
mkdir app
touch app/test1.controller.JS
Add the following code in test1.controller.JS
angular.module(test1,[]).controller(‘testController’,functiontestController($scope){
$scope.sub=function(){
$scope.z=$scope.x-$scope.y;
};
});f
For adding the angular dependencies, run the following commands. Make a directory called lib in your project and then add all libraries in that folder.
mkdir lib
curl -o lib/angular.min.JShttps://code.angularJS.org/1.4.0-rc.2/angular.min.JS
curl -o lib/angular-mocks.JShttps://code.angularJS.org/1.4.0-rc.2/angular-mocks.JS
Now, it is time to edit the karma config file so that it comes to know about the test folder and the library folder so that jasmine tests can run successfully.
files:[
‘lib/angular.min.JS’,
‘lib/angular-mocks.JS’,
‘app/*.JS’,
‘tests/*.JS’
],
Now, run the tests using the npm test. Your test will run now successfully.
How to test AngularJS applications using Protractor?
Protractor work flow
Protractor is impeccable when it comes to AngularJS Testing. In Angular JS applications are hard to test since the application web elements cannot be captured very easily.
Angular JS applications have some extra attributes like ng-repeater, ng-controller, and ng-model which can be identified using Selenium locators. Protractor is a NodeJS program which is written in JavaScript. The pre-requisite of using Protractor is Selenium and NPM.
Let us see how you can proceed with the installation of Protractor. Run the following command to start with the installation of the protractor.
npm install –g protractor
It will install protractor in your system. Using  -g will make it available globally in your system. Now, after installation of protractor If you want to check the version of the protractor. You can find the following by running the following command.

Protractor –version
For running the protractor tests against the application under test, you would need webDriver manager. Now, you must update the webDriver manager to the latest version. For updating it, run the following command.
webdriver-manager update
Now you must be imagining how would you start the webdriver-manager. You can start it by running in the background by running the following command. It will then listen to all your protractor tests which have to be run against the angular JS application.
webdriver-manager start
Now to see if the webdriver manager plugin if it is properly running or not. Go to the URL: http://localhost:4444/wd/hub/static/resource/hub.htmland you will see the webdriver manager plugin running on it.
Now, we will see how to design the test cases in protractor. To start with designing o the test cases you need 2 files. One is the spec file and the other is the config file. The configuration file has the location for the protractor tests. Also remember, chrome is the default browser for a protractor. While the second file, the spec file has the logics and locators which would be used to interact with the application.
Now, let’s take a test case in which we have to go to URL: https://angularJS.org, and then you have to type your name in the textbox. After entering you will see your name as Hello Name!
Now, let us start with the steps which are required for making this test case and to execute it. In your folder, you will have 2 files. One is spec.JS and the other is conf.JS. The logic for spec.JS which will be there in it.
describe(‘Enter yourname, function() {it(‘should add a Name as your name, function() {browser.get(‘https://angularJS.org’); element(by.model(‘yourName’)).sendKeys(‘Name’);  var name= element(by.xpath(‘html/body/div[2]/div[1]/div[2]/div[2]/div/h1’));expect(name.getText()).toEqual(‘Hello Name!’);  });});
Now, if you see that describe comes from the Jasmine framework. It is basically a module and it can be a class or a function. We are giving this module name as “Enter Your Name”. So, for starting the function we start it with describe keyword. Just like a class can have many methods or a TestNG class can have so many test cases. Similarly, in the Jasmine framework, it starts a new test case.
browser.get(‘https://angularJS.org’);
This command is used for opening the browser with URL mentioned as https://angularJS.org. Now, you must identify the elements. So, you have to inspect the element just like you do in Selenium. You can use By.model for the elements who have ng-model as an attribute.
You can store Web elements in a variable. You can declare a variable using var keyword. Now, it is time to have some assertions. You get the text out of this web element and then compare it to the expected text.
Now, you are done with spec.JS and let us start with the conf.JS. You have to define the path of spec here so that tests can be identified easily.
Paste the following code in conf.JS
exports.config = {seleniumAddress: ‘http://localhost:4444/wd/hub’,  specs: [‘spec.JS’]};
Selenium address is the location where it can communicate with the selenium webdriver. Spcs tell the location of spec.JS
Now, for running the test, first navigate to the directory in which spec.JS and conf.JS are located. First thing to keep in mind that webdriver-manager should be started. If not started, you have to first start it with following command.
webdriver-manager start
Now, it’s time to run the configuration file. After starting the webdriver-manager plugin, run the config.JS file using protractor. Fire the following command.
protractor conf.JS
You have seen how many specs got passed and how many got failed.
Now let’s see how the failure is going to be reflected in the console. We make the assertion false.
Modify the code in spec.JS
describe(‘Enter your name, function() {it(‘should add a Name as your name, function() {browser.get(‘https://angularJS.org’); element(by.model(‘yourName’)).sendKeys(‘Name’);  var name= element(by.xpath(‘html/body/div[2]/div[1]/div[2]/div[2]/div/h1’));expect(name.getText()).toEqual(‘Hello!’);  });});
You will see F which means failed test case. You will get to know the complete description where the test case got failed.
Now, you must be imagining how would the reports be integrated with Jasmine. Let’s install the Jasmine reporter. Run the following command:
npm install –save-dev jasmine-reporters@^2.0.0      
If you want jasmine reporter to installed globally. For installing globally, run the following command.
npm install –g jasmine-reporters@^2.0.0
You have to now modify the conf.JS. You have to add Jasmine reporter in it. Add the following code in it.
exports.config = {seleniumAddress: ‘http://localhost:4444/wd/hub’,      capabilities: {          ‘browserName’: ‘Chrome’      },      specs: [‘spec.JS’],     framework: ‘jasmine2’ ,onPrepare: function() {          var jasmineReporters = require(‘C:/Users/User1/node_modules/jasmine-reporters’);jasmine.getEnv().addReporter(new jasmineReporters.JUnitXmlReporter(null, true, true)          );     }   };
Now, run the tests using protractor conf.JS. You will see the junitresult.xml in the folder path given in conf.JS.
Open the XML file and see the result of the test case. In this way, you can take the help of protractor to test angular JS websites.
How to test the AngularJS app using Cypress?
Cypress is very close to the application. It just has a very thin layer between production code and testing code. It is Javascript E2E testing framework.
It is an open-source AngularJS Testing framework Cypress has bundled various packages such as Mocha, Chai, and Sinon. The only supportive language with Cypress is Javascript. When you open the cypress application using command cypress open, the following application will open.
This application is divided into two parts. On the left side, you write commands. There are different keywords to it. VISIT is for opening the URL and GET is for getting a webelement. CLICK is for clicking on the webelement. Using ASSERT, we can add assertions to our test cases.
For installing Cypress, you should have node.JS installed in your machine. You can then use the npm installer to add dependencies of Cypress.
npmicypress -D
Now for opening the cypress test runner, run the following command.
npx cypress open
If you want your application and Cypress to run at the same time then you have to make some changes in your package.JSon.
“cypress”: “concurrently \”ng serve\” \”cypress open\””
Add these lines in package.JSon.
Now, run the following command
npm run cypress
When you add a new project in cypress then you will have below folder structure.
Fixtures have static data that has to be used by your tests. You can use them by cy.fixture() command.  In the integration folder, you will have your integration tests. The plugin helps you to tweak to your test cases. Just like plugins have a file named index.JS which have a method which will run before every spec file. In Support files, you can have your reusable code.
Now, it is time to create your first test in the integration folder. You name it as test1.spec.JS. You will see it in the Cypress test runner also. Cypress API is present under the global cy project. Now let us put some code in it.
describe(“Test1”, () => {
it(“should visit home page”, () => {
cy.visit(“http://localhost:4200/login”);
});
});
It makes use of description and it blocks from the mocha syntax. It makes the beginning of the test cases. Once you will run this test In the test explorer, on the right side, the execution starts.
When you will run Cypress for the first time, you will see that the cypress.JSon file will get generated. In this, you can store your configuration values. Now let’s store our base URL in cypress. JSON so that we don’t have to change the URL in every test case.
{
“baseUrl”:”http://localhost:4200″
}
It’s time to change the code in spec.JS also.
describe(“Test1”,()=>{
it(“shouldvisit home page”,()=>{
cy.visit(“/login”);
});
});
Now for getting webelement, you can make use of a cypress selector background in the test runner. It is present on the left side of the test runner. You can get the XPath from there.
Use this way to get the webelements.
cy.get(‘.btn-link’).click();
cy.url().should(‘include’, ‘/register’)
This assertion will check the check has registered keywords in it. Hence, we are done with the first test case in cypress.

Conclusion
Now, we have seen different ways of AngularJS Testing. Make use o
f these and test the application in the best possible ways. Optimize your code and have the best test integration practices so that the client can be satisfied with your test metrics. All the best.

Software Testing Tutorial For Beginners

We are sure you are here because you want to know what software testing tutorial is all about and how will it take you to the next level of your career. Before we start, software testing methodologies of verifying and validating that all the bugs/faults in a software product are resolved and is fit for use by the end user.

Software testing doesn’t just stop at fixing all the bugs, but building a strategy that can improve the products usability, accuracy and reliability. In this blog, we’ll help you understand the concepts and techniques involved in the process which will certainly help you to decide if this is the right profession you are looking for.
software testing tutorial
Software testing can be divided into two paces:

  1. Validation
  2. Verification

Validation is referring to various types of pre-specified tasks to ensure it matches with the customers’ requirements. It involves tasks like automated testing, running scripts and checking functional dependencies.
Whereas, Verification refers to checking the tasks that make the product actually run in its real-time. It involves reviewing the test cases, inspections, and documentation

Some key differences are as follows:

S. No               Validation           Verification
1 Does the final product actually meet what was proposed? Is the product built with respect to the requirements?
2 Automated & Manual Testing Document reviews, inspections and walk-throughs
3 Execution of application required Does not require execution of software

Types of Software Testing
If you ever had to visit a training institute or an interview, you certainly must have heard the terms automation and manual testing. Well, that’s nothing but types of testing. So let us classify these two:
Manual Testing:

Manual testing is the process undertaken by a tester himself to check if the systems perform as expected. In other words, the testing is done without using any automated tool or script.
The Manual Tests include a set of test cases defined by the tester and then each case is verified for their respective functions. To do this, the tester has to follow some steps:

  • Requirement Analysis

To successfully run manual tests, you should first know what the application is all about and what output is expected from its behaviors. For this, you need to analyze its requirements and study it thoroughly. By doing this you will know what you are testing and makes reaching your goal a lot easier.

  • Writing Test Cases:

A well-written test case allows you to understand and run the tests with ease. It is like a guide that supports you during your testing process. There are many software’s now that allows you to tip down those cases. While you write the tests, make sure you think like an end-user. After-all you are testing it for them.

  • Regulate the Test Cases

Once you are done writing all test cases, it’s time for executing each one of them. Jot down the “Passed”, “Failed” and “Skipped” tests and leave the rest for the developers to fix.

  • Logging of Bugs

Once you identify the state of the bugs, make sure you follow a proper medium to communicate them to the developing team. A lot of developers prefer using the Mozilla Bugzilla, which is an add-on to the browser.

  • Reporting

The final steps expect you to report any additional assumptions and conditions which couldn’t be marked. Also mention suggestions to improve validations and processes.
Automation Testing


Automation testing, as the named suggests, is automated. It differs from manual testing in a way that uses automated scripts for running the test cases. It is a boon in today’s testing market.
Automated tests are basically conducted on large projects, which otherwise would consume a lot of time in manual. Some companies also run automation after the manual to make sure all the test cases are covered. Follow the below steps before proceeding with your automation tests.

  1. Learn and decide what tests to automate
  2. Test as often as you can
  3. Selecting the right tool for automation
  4. Make sure each test has its own contribution towards the efforts.
  5. Have quality data in hand
  6. Create automated scripts that can accommodate changes in the UI

When should you opt for automation testing
Always go for test automation if:

  1. The project is large and complex
  2. The project requires continues testing for the same area
  3. Time constraints
  4. The software is stable with respect to manual tests.

Tools for automation tests:

The Techniques of Software Testing
Believing you now have a clear idea of what software testing and its types are, let’s see the techniques used. There are 2 techniques defined in software testing:
1. Black-Box Testing
Black Box Testing deals with the internal working of the system where only the system coder has access to the source code. Hence, while testing, the tester has to perform the tests under the guidance of the developing team for inputs and outputs.
Black box testing clearly separates the tester’s and developer’s point of view to look at the software.  Hence is well-suited for large code segments of the project. But certainly, this complicates the designing of test cases.
2. White-Box Testing
White Box testing deals with the program logic and structure of working. For this, you need to first understand the internal working of the code, which is easier than working with the code.
Since the user has an understanding of how the code functions, it’s easier to identify the data to be tested. That’s why it’s also called as glass-box testing or open-box testing.
Levels Of Testing
During testing, you come across various levels of steps. In this section let’s have a brief look at these.
The Levels are divided into 2

  • Functional Testing
  • Non-Functional Testing

Functional Testing
Functional testing is performed when the actual software development is taking place ensuring that all its requirements are met. Not to forget, the test is performed only when a piece of the module is complete.
The process involves 5 steps:

  1. Defining the functionality to be checked
  2. Creating the test cases
  • Comparing the output based on the test cases
  1. Execution of test cases and writing scenarios
  2. Comparing the actual and expected results

Functional testing can be performed by the following tests:
1) Unit Testing: The tests are conducted before the program is handed to the testing team for executing test cases
2)Integration Testing: This testing is done by putting together parts of the application to determine if they together functional properly.
3) System Testing: This testing tests the whole system as one. Once all the system components are integrated, it is checked for the working on specified quality standards.
4) Regression Testing: Many times, when there is an unplanned bug in the system testing, there are possibilities that it might have affected or will affect other components in the system. In such a case, regression testing is carried out.
5) Acceptance testing: Considered as one of the important tests in the functional testing phase, acceptance testing is done purely by the Quality Assurance team. They check it for the final specification meeting the requirements.
6) Alpha Testing: A test conducted by the QA team and the developers, which combines all of the above tests for a final review before it’s tested by the end-users.
7) Beta Testing: The final test before its release, the beta test is done by a chosen audience. The audience may be any non-technical team or a group of new users. The application is run in real-time to check the application runs as expected.
Non-functional Testing
Non-functional testing deals with bugs that are caused by any external factors like network, database processing, client-side downtime, etc. The non-functional testing types include:
1) Performance Testing
Identifies any performance issues that affect the speed, stability, and reliability of the application. Performance testing can be further divided into Load testing and Stress testing based on its qualitative and quantitative aspects.
2) Security Testing
As the name implies, security testing checks for flaws related to the security of the program. It includes confidentiality, validations for inputs, attacks due to SQL insertions, scripting and virus attacks, etc.
Conclusion

So the reason is much simpler now, you know what you deserve in a tester’s career. So if you are a beginner, make sure you understand all the aspects of testing well before jumping in. We will be happy if you are even halfway through to deciding your career in testing. Take your first step towards being an excellent tester.

Exclusive Bonus: Download PDF

Black Box Testing Techniques with Examples

What is black box testing?

Black box testing refers to a software testing method where the SUT (Software under Test) functionality is tested without worrying about its details of implementation, internal path knowledge and internal code structure of the software.

This method of testing is completely based on the specifications and requirements of the software.

The focus of the black box testing is upon the output and inputs of the software system rather than the program’s internal knowledge.

The system that undergoes this type of testing is considered as the “black box”, and it can be any software like a database, website or an Operating System.

black box testing

What Is The Purpose Of Black Box Testing?

Black box testing focuses on testing the complete functionality of the system as well as its behavior.

This testing method is also referred to as behavioral testing and functional testing.

This testing method is critical during the stages of software testing life cycle like regression testing, acceptance, unit, system, integration and software development.

The techniques of Black box testing are beneficial for the end users who wish to perform software verification.

Techniques of Black Box Testing

The following are the techniques employed while using Black box testing for a software application.

BVA or Boundary Value Analysis:

It is one among the useful and critical Black box testing technique that helps in equivalence partitioning. BVA helps in testing any software having a boundary or extreme values.

This technique is capable of identifying the flaws of the limits of the input values rather than focusing on the range of input value. Boundary Value Analysis also deals with edge or extreme output values.

Equivalence Class Partitioning:

Equivalence Class Partitioning

This technique of Black box testing is widely used to write test cases. It can be useful in reducing a broad set of possible inputs to smaller but effective ones.

It is performed through the division of inputs as classes, and each class is given a value.

It is applied when the need for exhaustive testing arises and for resisting the redundancy of inputs.

State Transition Testing


This technique usually considers the state, outputs, and inputs of a system during a specific period.

Based on the type of software that is tested, it checks for the behavioral changes of a system in a particular state or another state while maintaining the same inputs.

The test cases for this technique are created by checking the sequence of transitions and state or events among the inputs.

The whole set of test cases will have the traversal of the expected output values and all states.

wish to know the difference between functional and non-functional testing?

Decision Table Testing:

In some instances, the inputs combinations can become very complicated for tracking several possibilities.

Such complex situations rely on decision tables, as it offers the testers an organized view about the inputs combination and the expected output.

This technique is identical to the graph-based testing technique; the major difference is using tables instead of diagrams or graphs.

Graph-Based Testing:

This technique of Black box testing involves a graph drawing that depicts the link between the causes (inputs) and the effects (output), which trigger the effects.

This testing utilizes different combinations of output and inputs. It is a helpful technique to understand the software’s functional performance, as it visualizes the flow of inputs and outputs in a lively fashion.

Error Guessing Technique:

This testing technique is capable of guessing the erroneous output and inputs to help the tester fix it easily. It is solely based on judgment and perception of the earlier end user experience.

Apart from the above-explained popular techniques of this testing, there are few more, such as the fuzzing technique, all pair testing and orthogonal array testing.

Examples of Black Box Testing

The example given below throws light on how the techniques of this testing can be used to test the specific software with given inputs

While considering a shopping scenario,

  • Shop for $500 and receive a discount of 5%
  • Shop for $1000 and receive a discount of 7%
  • Shop for $1500 or more and receive a discount of 10%

With the help of Equivalence partitioning technique of this testing, it is possible to divide inputs as four partitions, amount less than 0, 0 – 500, 501 – 1000, 1001 – 1500 and so on. The details such as the maximum limit for shopping and the product details will not be considered by this testing technique.

When boundary value is added to the partitions, the boundary values will be 0, 500, 501, 1000, 1001 and 1500. With the BVA technique, the lower and upper values are usually tested, so values like -1, 1 and 499 will be included. Such values will help in explaining the behavior of the input values in software.

According to State Transition Testing technique of Black box testing, when a shopper shops above $1500 two times in a month, their status gets changed from Gold to Platinum, and if he does not shop for the next 2 months, the status gets back to Gold. Using further test cases, it is possible for the tester to such complex track.

Types of Black Box Testing

There are several phases of which are segregated into different types, such as regression testing, unit testing, beta testing, integration testing, system testing, functional testing, load testing, etc. But, the prominent types are explained below.

Functional Testing:

This type of testing is useful for the testers in identifying the functional requirements of a software or system.

Regression Testing:

This testing type is performed after the system maintenance procedure, upgrades or code fixes to know the impact of the new code over the earlier code.

Non-Functional Testing:

This testing type is not connected with testing for any specific functionality but relates to non-functional parameters like usability, scalability and performance.

Difference between Black Box Testing and White Box Testing

Used to test software without knowing the internal structure of the software Performed after knowing the internal structure of the software
Carried out by testers Performed by developers
Does not require programming knowledge Requires programming knowledge
Requires implementation knowledge Does not require implementation knowledge
Higher level testing Lower level testing
Consumes less time Consumes a lot of time
Done in the trial and error method Data domains and boundaries can be tested
Types of black box testing
1. Functional testing
2. Regression testing
3. Non-functional testing
Types of white box testing
1. Path testing
2. Loop testing
3. Condition testing
Not suitable for algorithm testing Suitable for algorithm testing

Levels to with Black Box testing are applicable to

  • Integration testing
  • System testing
  • Acceptance testing

How to do Black Box testing?

  • Requirement and specifications will be examined
  • Positive inputs, as well as negative inputs, will be given to the system to verify it
  • Outputs for the tests will be defined earlier
  • Test cases will be executed
  • Actual outputs and expected outputs will be compared
  • Fixed issued will be retested

Major Tools used for Black Box testing

What is Volume Testing? Why is it essential in Software Testing? (Tutorial)

Volume testing allows one to put the system under the stress of thousands and millions of data files and check them further to working in a perfect working position.

It increases the data load drastically and checks for the efficient work points or the areas that require utmost attention or improvement.
Volume testing le the developer aims to have a tough, efficient, and cost elective software which makes volume testing in the field of software development and maintenance so important.
Typical performance test or the load testing cycle usually is the combination of both volume testing and the performance tuning that ensure in turn that the system is working the international benchmark system of the working.
 volume testing example

What is Volume Testing?

Volume testing is a type of testing which is software based where the software is subject to the stress of huge volume of data, this type of testing is also known as flood testing.
This is basically done to do an analysis of the system performance by increasing data in the given database volume.
This is used for the study of response time impact and the system behavior that can be studied when it is exposed to a high volume of data.
Let us take an example of testing the music site behavior it gives access to millions of users to download songs from the library of thousands of available songs.

What are the benefits of Volume Testing?
  1. Through the help of volume testing, we can identify the load issue, which ultimately can save a lot of money which will be spent on application maintenance.
  2. It helps to have quicker decisions with the better scalability plans and executions
  3. It helps in identifying the challenges and acquires the bottleneck present in different areas.
  4. By doing volume testing you have the assurance that your system is working fully in its competency and capability in the real-time world usage.
What does Volume Testing include?
  1. Test whether there is any data which is lost during the procedure
  2. Check out for the system response time
  3. See if data is stored in the current location.
  4. Countercheck if the data is overwritten without any warning or notification
  5. Now, look at whether the high volumes of the data affect the speed of the processing system or the application.
  6. See if the system application have the desired memory resource r not
  7. Perform the volume test on the whole system.
  8. Check for any of the data volume greater than the specified given requirement
  9. Check for the requirement in the agreement.
  10. See that no larger volume data should appear more than specified.
Procedural steps of Volume Testing

Testing software volume offers the in-depth testing of the performance let us see what are the procedural steps involved in the volume testing.
 what is volume testing

  1. Test management that may include checking for the test environment
  2. Volumetric analysis
  3. Test tool comparison and procurement
  4. Implementation of the system
  5. Building test labs
  6. Building automated test systems and framework
  7. Script development of the system
  8. Test scenario development
  9. Test implementation development
  10. Execution of the test
  11. At the end, producing the test outcomes.
Why should Volume Testing require to be conducted?

Flood testing or volume testing as described is aimed to validate and counter check some of the parameters as well as provide the personified benefits for the software usage.

Let us see some of the benefits of conducting the flood test.

  1. The volume of the software

As the name suggests volume testing is focused on the testing and identifying the basic capacity of the system or the given application in use.
It also provides the required information on whether the given software or the program is normal or of very high volume.

  1. For testing and analyzing the volume of the data

Storage requirement and capabilities of the system or a given application needs to be tested hence volume testing comes in the picture.
It works n the basis of identifying the tuning issues that are present in the software to prevent a system from reaching requires service level agreement.
This is known as volume targets. So we can say that volume testing provide the right in-depth tuning solution and the services.

  1. Detect and minimize the errors

Volume testing minimizes the risk which is associated along with the degradation of the performance, also the possibilities of the breakdowns or failures of under loads which are secondary due to increased pressure n the database.
It looks after the system operations and performance and discovers the bottleneck issues and provides the solutions and recommendations to resolve the outcome in the form of error.

  1. Get the desired information also the deliverables

Along with the given information about the changes in the system application and its performance is the valuable parameter in the IT industry to check for the efficacy under stress of high data volume.
This also helps in the improvement of the structural component and the infrastructural architect which can be provided through the result of volume testing.
This provides detailed explained information for the best possible results.

  1. System response time when verifies

System response time is the important parameter to keep a check upon in the software development and working of its applications.
System response time is known as the time lag between the time taken for the system to display the results and the system receiving the data.
For the successful outcome, this has to be on the minimum side o the scale.
For this volume testing provide best and efficient service in ni time. This is also useful in conditions in which the data input are usually very large.

  1. Check for the loss of the data

Along with the above-described points, another important purpose of volume testing is to ensure that all the given data infused for the purpose of the test to be considered is not lost.
This also allows a correct finding of system efficiency without causing any of the harm to the data.

  1. Storage of the data

Volume testing also ensures that the given data is stored in the correct location in the appropriate manner.
This point becomes important because if the data will be stored properly then only the stored data can provide reliable and accurate data result.

Key features of the Volume Testing
  1. Data that is used in increments

During the process of the inception of software development, the data is usually small and compact in respective sizes in comparison to their successive stage of the development of particular software application on the system.
As soon as the development of the software or its application go on the floor along with this the volume of the data is also increased, this is also done to ensure that the mature application among all can handle the influx of huge amount of data

  1. Auto-generation of the data

As in the software the data requirement is generally in huge amount which is sometimes self-generated or by manual.
When the data is auto-generated this allows the prevention of excessive expenditure which in turn makes the software development more cost-efficient.

  1. No logo can interference of the data is required

As we all know that the main aim of the testing is to check for the performance irregularities and even illogical data among all can provide inputs and the best part of it is that it will not interfere with the testing and can be used for increasing the volume also.

  1. Software performance

As the influx increases, the quality of the software decreases with time.
This makes the application to decline in its function and deteriorates in functionality.
This can be prevented by performing volume testing on time.
Volume testing belongs to non-functional tests related to volume stress and the load that is usually performed to analyze the performance of the system by in turn increasing the data volume.
This volume can be anything ranging from the size of the data at various locations or it could be just a simple file that is needed to be tested.
If someone wishes to test the application or the system with a given specific limit size of the database then testing also requires having that type of setting to check for the performance.

Know More: Adhoc Testing: A Brief Note with Examples

Moreover, volume testing is also used to test the behavior at the site when there are more than thousands of objects which are available under one category.

What are the objectives of volume testing?

There two basic objective of the volume testing which is explained as below-

  1. To check for the load of the volume on the given data representation on the which the whole stability of the system is based and if not cumulated properly than the quality can be compromised.
  2. To identify issues which can prevent the system failure before it reaches above the desired volume targets given in the service level agreement.

Keeping these objectives in mind let the developer or tester have a system that can meet the required expectation.

Characteristics of volume testing

Let us see some of the basic important characteristics of the volume testing

  1. Small quality of data is usually taken during the testing stage of software development.
  2. As far as the volume of the data is concerned if it increases then the performance is nosedive.
  3. The crude base of the generation of test data is the design document,
  4. As the insight of the data is not much required hence the importance of data is not so much driven.
  5. When we are through in the software testing the tester will log and track the results further, this finishes off the final step toward the completing of the test.
Let us see some of the examples of the volume testing

To really understand the example of volume testing let us look at some of its examples-

  • When a developer is working on the application or the system development that has to be used in more than thousands of the laptop or computers then one should stimulate the functions that seem to have the same number of the computers that will be in the use in real time.

We have to understand all the activities to be performed are in real time and should be ultimately focused on the activities which are performance-based.
This may including all things like file opening, creation of the file, and finally, the processing of the data.
If a developer wants to test the application with the database of a given determined size then the corresponding database should be increased in volume by adding more data in the database until the targets are reached.

What are the best practices to perform volume testing?
  1. All servers should be stopped and all logs should be checked.
  2. Properly execute the scenario of the applications manually before loading the test.
  3. Developer should stay out the number of users if a useful result is desired
  4. Balance of think time is must if there is essence contained.
  5. Once the baseline has been established the scope of improvement should be a check upon.
  6. One must be cautious about the new build.


Volume testing and Load testing

  1. Volume testing does the testing of applications on the basis of a large number of files in the database as much as possible whereas in load testing the applications are subjected to a particular level of load to further analyze the behavior pattern of the application.
  2. Volume testing tries verifying if the system response to an expected volume, which may include the time for the increment in the size of the given file. On the other hand, load testing is for checking the performance system whenever a user load is increased, this may further involve the increment in the number of the file.

What are the challenges that are faced by the developers during volume testing

  1. Difficulty in generating memory fragmentation
  2. A key generation is dynamic in nature.
  3. Generated data’s rational integration

Know More: Database Testing: A Quick Guide

Mobile App Installation Testing: Ultimate Guide

Installation is a crucial aspect for the survival of any app. it doesn’t matter how well your app is working a minor flaw in installation sequence itself is enough for users to discard your app and never look back at it again. So, for the assurance, you need app installation testing.
Since we all believe in the saying that“Customer is the king” and “The first impression is the last impression”.
It is a must to keep our customers happy and leave a good impression on them. And thus it becomes very important to test your application for successful implementation to leave a good first impression on your customers.

So let us learn more about Application Installation Testing.
What is Application Installation Testing?
Application Implementation testing aka Application Installation Testing tests the successful installation of your mobile application across various mobile gadgets, models and operating systems.
Application Installation Testing is generally carried out before your application first interacts with its customers.
Application Installation Testing is the last phase of software testing life cycle (STLC).

Why should you do Application Installation Testing?
What if while installing your application, it corrupts the complete OS of user’s high-end mobile phone? FURY! Is all that you can expect.
To avoid such situations, it is a must that your application goes through an intensive round of Application Installation Testing.
Here are a few aspects that might help you apprehend the importance of Application Installation Testing.

  1. The first impression promotes the users to go deep into that thing and explore it. With an application, its implementation forms the first impression on its customers. Make sure your application is fit to be successfully installed by proper Application Installation Testing.
  2. Application Installation Testing makes sure that all the components of your application are entirely coordinated.
  3. Apart from Application Installation Testing, you cannot take application uninstallation testing lightly. After you uninstall the application from your hand-held device, it is important that all the related files are also deleted and application uninstallation testing ensures it commendably.


Type of Mobile Application Installation–Which one does your application supports?
Silent Installation: This kind of mobile Installation does not prompt any messages at the time of its installation. The related messages are saved in a log file.
Attended application installation: In attended mobile application installation, when you install your application; you are prompted and asked for various inputs. Few of the inputs that might be required from your end are:

  1. Accepting EULA/end user license.
  2. Entering the password is another input that you might be asked for.
  3. You can also be asked to give your input on various errors like internet connectivity issues.
  4. Some bigger applications can also ask you to use WiFi connection instead of mobile data for their installation.

Unattended mobile installation: In such type of installation you are not prompted during installation but if user intervention is required, it is done using an answer file where user mentions all the inputs that are required for installation.
Headless mobile installation/Network mobile Installation: Sometimes mobile networks install apps on their user’s mobile devices without having physical access to their devices. Such applications are installed from a network on a targeted mobile gadget.
Clean mobile Installation: In such mobile installation no older version of the application is installed, and it is being installed for the first time.
Automated mobile Installation: Such mobile installation is apt for applications where some prerequisite conditions are set and on meeting them the installation automatically starts.
Like for a few big applications user set a condition to be installed when the WiFi connection is on. When the application detects a WiFi connection on the gadget, it automatically installs it on the device.
Now when you know what type of installation does your application supports, its time to move on further.
Things to keep in mind before performing Application Installation Testing:

  1. Operating systems your application supports.
  2. Type of installation your application performs.
  3. The operating system on which you have to test your application.

How to perform Application Installation Testing?
Testing your application for proper installation is a must for a proper kick start of your application. Here are the steps that can help you carry out the testing properly.

  1. Check for an existing application and validate if your application checks for them too.
  2. Validate if installers draw all the instructions properly.
  3. Stop the installation process in between and check if the system returns to its original state.
  4. Manually check for the disk space and then validate if the application installer calculated the disk space appropriately.
  5. Confirm application responses for low disk space. Test if your application returns an appropriate error message when the disk space of your device is low.
  6. Test for registry changes that take place during the application installation process.
  7. Another important part that you need to consider isapplication uninstallation testing. After you uninstall the application from your hand-held device, it is important that all the related files are also deleted and application uninstallation testing ensures it commendably.

Know More: How To Test A Location-based App?

Test Cases for Application Installation Testing
Typical test cases you can test while performing Application Installation Testing:

  • Take into account your requirements and consider Test cases for all workflows.
  • Include test cases to check if the old version of an application is already installed and if it is available, and then have a test case to verify the installation of the application on the same path.
  • Have Test cases to check the Disk Space availability for installation.
  • Include Test cases which verify that your application prompts appropriate error message if an error occurs during installation.
  • Have Test cases to test the disk space before and just after installation.
  • Include Test script for checking the changes in the registry.
  • Include Test cases for the installation’s forced stop.
  • Include Test cases for custom installation and Default installation path.
  • Test your application installation when some other application of similar type is running concurrently.
  • Have test cases to test your application installation while an application that uses a lot of RAM for its operation is running.
  • Have Test cases for insufficient RAM condition and corresponding error message for it.
  • Test for inadequate disk space and corresponding error message for it.
  • Test application installation under high security, when the Firewall is on.
  • Test your installation process for variable Network speed.
  • Have test cases for multiple Concurrent installations.
  • Include Test cases for checking the Time in which installation and extraction process is completed.
  • Include test cases to test the path of extraction of application.
  • Test the log files that contain a list of all the events of installation.
  • Your testing should include test cases for Uninstallation and to test whether all related files are removed at the time of uninstallation.
  • Test for patch installation and Update installation.
  • Have Test cases to check uninstallation behavior when it is stopped in midway.
  • Have test cases to check the installer’s reaction when a newer version of the application is present, and the user is trying to install an older version.
  • Test if an older version of your application exists, the newer version is stored on the same path.
  • Have test cases for various interruptions like an incoming call or a message, low battery, putting in the charging socket, etc.
  • Have test cases to check the path of installation both in SD card and phone memory.


Challenges incurredinApplication Installation Testing
With, various mobile gadgets and operating systems the Application Installation Testing requires a complex execution and becomes time-consuming. It can also become very challenging sometimes. Some common challenges that can be faced while performing Application Installation Testing are:
Compatibility

    : With the wide increase in usage of mobile phones, year on year companies keep bringing new models of mobile phones and better versions of OS. It is important to check that your application is compatible with all of them. Checking your application’s compatibility with each of the gadgets and OS comes very challenging.

  • Interruptions: Testing should be done in various conditions. There are various conditions where your installation process might be interrupted like by an incoming call, low battery, a ping, etc. Checking for all such conditions can be another challenge for the tester.
  • Application Installation Testing is time-consuming, and the challenge is further enhanced with the running of multiple test cases on different configurations.
  • There are no clear test models, tools and test coverage criterion for Application Installation Testing that further increases the challenge for the testers.


Conclusion:
With the mobile application development industry blooming at a faster pace and more and more people finding their career in this field, it becomes very important to be best in it to survive this very tough competition.
Hence to offer your best make sure your application is free from all kinds of bugs and defects. And Application Installation Testing promises you a good starting interaction with your customers.
So make sure to conduct a round of Application Installation Testing before you launch your application in the market.

Selenium Tutorial For Beginners [Step by Step]

Everybody knows about the impeccable selenium! The ultimate tool for testing web applications! for you to learn in detail about how to carry out automation testing, we have written an extensive Selenium tutorial just for you!
This blog comprises of three part,
1. Selenium Tutorial For Beginners
2. Selenium Intermediate Level Tutorial
3. Selenium Advanced level Tutorial

Selenium Tutorial For Beginners

What makes Selenium better?

You don’t need to code anything in Selenium and with this; any beginner will be able to record and play the simplest web application scripts.
Usually, Selenium RC needs a server to be up and running for sending commands to the browser. It is used for cross-browser testing and you can write the code in any language.
Selenium Web Driver is a better version of IDE and RC. It directly sends commands to the browser without the need of a server to be up and running.

Different languages can be used for coding the scripts like Java, C#, PHP, Python, Perl, and Ruby. Selenium Grid is used for parallel testing in multiple browsers and environments. It used the hub and node concept where hub acts as a source of Selenium commands and each node is connected to it.
Now, here we will discuss Selenium WebDriver. How a beginner can start learning Selenium WebDriver and how he can excel in it.
Now, first, we will look at the steps we need to follow to download Selenium Web Driver in your machine.

Ways to download and install Selenium WebDriver

  • You should have Java installed in your machine. This is the pre-requisite for Selenium Web Driver to work.
  • You can visit the page: http://seleniumhq.org/download/ and download the client drivers and language bindings. You have the select binding for Java.
  • This download will be named – selenium-2.25.0.zip.
  • Now, you can import all the Jars in Eclipse. You have to right click on the project and import jar files by selecting all the downloaded jar files. For this, you can click on the Libraries tab and then click on “Add External JARs”.

Now Let’s look the First Selenium WebDriver Script

Let’s take an example of the first Selenium Script which we would create using Selenium basic methods.
Let’s first look at the script in detail. In this script, we will do the following test steps.

  • Go to the home page of the test application
  • Verify the title of the page
  • Do a comparison of the result.
  • Close the browser after the script is done.

package projectSelenium;
import org.openqa.selenium.WebDriver;
import org.openqa.selenium.chrome.ChromeDriver;
public class seleniumTest {
public static void main(String[] args) {
System.setProperty(“webdriver.chrome.driver”,”C:\\chromeDriver.exe”);
WebDriver driver = new ChromeDriver();
String baseUrl = “https://google.com”;
String expectedTitle = “Google”;
String actualTitle = “”;
        // launch Fire fox and direct it to the Base URL
driver.get(baseUrl);
        // get the actual value of the title
actualTitle = driver.getTitle();
/*
* compare the actual title of the page with the expected one and print
* the result as “Passed” or “Failed”
*/
if (actualTitle.contentEquals(expectedTitle)){
System.out.println(“Test Passed!”);
} else {
System.out.println(“Test Failed”);
}
driver.close();
}
}

Things to look at the above code:

  • In the first two lines, we have imported two packages. You have to import – org.openqa.selenium and org.openqa.selenium.firefox.FirefoxDriver.
  • The most important step is to instantiate the browser. This is done by line

WebDriver driver = new ChromeDriver();
//This is done to invoke a chrome browser.
You can invoke a FireFox browser by following line of code
WebDriver driver = new FirefoxDriver();
You can invoke an IE browser by following line of code:
WebDriver driver = new InternetExplorerDriver ();
Also, while invoking a browser you have to pass the path of the executable file. You can do it by following line of code:
System.setProperty(“webdriver.chrome.driver”,”Path of chrome driver”);
System.setproperty(“webdriver.ie.driver”,”Path of ie driver”);

  • Get() method is used to enter a url in a browser.
  • getTitle() method of selenium webdriver is used to fetch the title of a web page.
  • Now, we have to compare the expected title with the actual title.

If(expectedTitle.equals(actualTitle))
{
System.out.println(“TEST PASSED”):
}

  • For terminating the browser, close() method is used. Driver.close() closes the active browser window. If you want to close all the opened browser windows by selenium web driver then you can use driver.quit().
  • You can run this test by right clicking on the program and then select as “Run As” as “Java Application”.
  • Next thing which is of utmost important while writing a test script is to identify web Elements which will be explained in detail in the below section.

Locating Web Elements

Locating web elements is very easy. Various selectors are available for that process. find Elements is one such 2 in which selenium webdriver is used for locating a web element and then, you can perform an action on that.

Know More: Selenium Automation Testing With Cucumber Integration

Let’s see some of the methods by which you can identify web element on a web page.

  • className – It will locate web element based on the class attribute. Eg: By.className(“abc”);
  • cssSelector – used to locate web element based on css selector engine. Eg:- By.cssSelector(“#abc”);
  • id – If some web element has id attribute, then you can directly identify the web element using id tag. Eg:- By.id(“abc”);
  • linkText – It will find a link element by text mentioned by you in the test script. By.linkText(“Login”);
  • name – If any web element has name attached to it then you can identify it using name attribute. Eg: By.name(“name”);
  • partialText – It will find a link element by text containing the text mentioned by you in the test script. By.partialText(“abc”);
  • tagName – It will locate all elements which will have this tag.
  • xpath – It is the most used locator in a selenium test script. It will identify the element using html path. It can be relative or absolute. Absolute xpath traverses the path of the web element by root and relative takes the reference of any web element and then traverse to that specified web element. It is better to refer an element by relative xpath rather than absolute xpath.

Basic Actions on a web element

You can click on a web element by using click() method of selenium web driver. You can locate a web element and then perform an action on it.
Eg: driver.findElement(By.xpath(“”)).click();
Also, you can send keys to a particular web element by using send Keys() method of selenium web driver. You can locate a web element and then you can enter some text in it using sendKeys() method.
Eg: driver.findElement(By.xpath(“”)).sendKeys(“name”);
Also, there are other actions which you can perform on a web element by using action class.
WebElement wb = driver.findElement(By.xpath(“”));
Actions actions = new Actions(Driver);
Actions.moveToElement(wb).build(). Perform ();
You can even switch to alert boxes which come when you click on some webelement. You can do it by switchTo().alert() method.
Eg code:
WebElement wb = driver.findElement(By.xpath(“”));
Wb.click();
Driver.switchTo().alert();
Now, you will be able to access the alert box. You can retrieve the message displayed in the text box by getting the text from it.
String alertMessage = driver.switchTo().alert().getText();
Also, you can accept the alert box by function accept(). You can see the sample code as below:
Driver.switchTo().alert().accept();
You can even check conditional operations on a web element.
Also, check whether a web element is enabled or not. If it will be enabled then you can do some operation on it.
Apart from all these, you can check if some web element is displayed or not. In the case of radio buttons, you can check if the radio button is selected or not. You can do these checks by – isEnabled(), isSelected() and isDisplayed() option.

Waits in Selenium Web Driver

Selenium Web Driver
If you want some step to get completed before any other step then you have to wait for the prior step to get completed. In manual testing, it is very easy to achieve but in automation testing, it is bit tedious and you have to wait for the previous step to get completed or a condition to be fulfilled before moving on wards to the next step.
This can be achieved by adding waits in between. There are two types of wait- explicit and implicit wait. If you are expecting a particular condition to be fulfilled before moving to the next step,
Another feature is that you can use explicit wait while if you just want a universal wait, then you can go ahead to use implicit wait. The implicit wait is used to set the default time out for the whole script.
A perfect automation script is made by adding both type of waits – Explicit and Implicit. You have to judiciously use both types of waits to make an efficient test case.

Know More : Top 50 Selenium Interview Questions and Answers

Explicit Wait

Syntax of Explicit Wait:
WebDriverWait wait = new WebDriverWait(WebDriverRefrence,TimeOut);
wait.until(ExpectedConditions.visibilityOfElementLocated(By.xpath(“”));
Expected Condition can be used with so many conditions. Some conditions which can be used with it are:

  • alertIsPresent()
  • elementSelectionStateToBe()
  • elementToBeClickable()
  • elementToBeSelected()
  • frameToBeAvaliableAndSwitchToIt()
  • invisibilityOfTheElementLocated()
  • invisibilityOfElementWithText()
  • presenceOfAllElementsLocatedBy()
  • presenceOfElementLocated()
  • textToBePresentInElement()
  • textToBePresentInElementLocated()
  • textToBePresentInElementValue()
  • titleIs()
  • titleContains()
  • visibilityOf()
  • visibilityOfAllElements()
  • visibilityOfAllElementsLocatedBy()
  • visibilityOfElementLocated()

Implicit Wait

Syntax of Implicit Wait:
driver.manage().timeouts().implicitlyWait(TimeOut, TimeUnit.SECONDS);
For this, you have to import a package into your code. The package name is java.util.concurrent.TimeUnit;

Selenium Intermediate Level Tutorial

Through the section Selenium Tutorial for Beginners, We gave you the basic info that you need to know about the tool. Now let’s go further and learn much more about this impeccable web app testing tool.
How to upload a file in Selenium test cases?
To upload a file, first, you have to identify the element on which you have to upload your file. There you can directly use sendKeys() function of selenium web driver. You can pass the path of the location in sendKeys. In this way, you will be able to upload a file using selenium web driver.

public static void main(String[] args) {
System.setProperty(“webdriver.gecko.driver”,”path of gecko driver”);
String baseUrl = “http://www.google.com /upload/”;
WebDriver driver = new FirefoxDriver();
driver.get(baseUrl);
WebElement element = driver.findElement(By.id(“id of element”));
uploadElement.sendKeys(“C:\\newhtml.html”);
//Here,  above you have to pass the path of the file where your file is located.
// Then you can click the upload file link
driver.findElement(By.xpath(“”)).click();
}
How to use a web table in selenium script
You have to access a web table and the elements present in the table. You can get it by making an xpath. Suppose you have had1 0a table with four blocks.
selenium intermediate tutorial
The first thing which you have to do is to find the XPath of the web element in this web table. Let’s say you want to get to the third element in the above web element.
The coding of the above web table is as below:

Selenium Intermediate Level TutorialSelenium Intermediate Level Tutorial
Now, you can analyze that first there is a table and then there is a tbody. In that tbody there are two rows. One row is having two tables. The first row is having two cells – First and Second. The second row is having two cells – Third and Fourth.
Our goal is to reach to the third cell. Let’s try to make the XPath of it.
The XPath of it will be //table/tbody/tr[2]/td[1]
So, the table is the parent node from which we will iterate to go the third element. From there, we will go to the tbody section and then the second row. From there we will get the first column.
Let’s write a script to get the text out of it.
public static void main(String[] args) {
String url = “http://testsite.com/test/write-xpath-table.html”;
WebDriver driver = new FirefoxDriver();
driver.get(baseUrl);
String txtWebelement = driver.findElement( By.xpath(“//table/tbody/tr[2]/td[1]”).getText();
System.out.println(txtWebelement);
driver.close();
}
}
Let’s take an example of a nested web table. You have to then analyze it carefully and get the XPath of it. Let’s look at the example below to get more information on it.
Selenium Intermediate Level Tutorial:
So, if you want to access the web element which is having text 10-11-12 then you can do it by traversing from the table and then iterating through the rows and columns to reach there.
Xpath would be: //table/tbody/tr[2]/td[2]/table/tbody/tr[2]/td[2]
public static void main(String[] args) {
String url = “http://testsite.com/test/write-xpath-table.html”;
WebDriver driver = new FirefoxDriver();
driver.get(baseUrl);
String txtWebelement = driver.findElement( By.xpath(“//table/tbody/tr[2]/td[2]/table/tbody/tr[2]/td[2]
”)getText();
System.out.println(txtWebelement);
driver.close();
}
}
This way, you can iterate through the rows and columns to reach to a specific cell from a web table.
Now, one of the most important concepts in selenium which will help you in many cases when you won’t be retrieving any text from a web element or to enable a web element to get the text or to perform any action on it.
Let’s talk about JavaScript Executor in detail. It is an interface which helps to execute javascript.
JavaScript Executor
Sometimes you are not able to click on a web element using click() function. You can then use javascript executor to execute click function on a web element. Let’s have a look at the code.
WebDriver driver= new FirefoxDriver();
// JavascriptExecutor interfaceobject creation by type casting driver object
JavascriptExecutor js = (JavascriptExecutor)driver;
You can now click on a webelement using below command.
WebElement button = driver.findElement(By.xpath(“”));
Js.executeScript(“arguments[0].click();”,button);
Also, if send keys isn’t working. You can make use of java script executor to send keys. Let’s look at the example below.
WebDriver driver= new FirefoxDriver();
// JavascriptExecutor interfaceobject creation by type casting driver object
JavascriptExecutor js = (JavascriptExecutor)driver;
js.executeScript(“document.getElementById(‘id’).value=”value;”);
You can even make use of java script executor to refresh a web page. You can do it by following command:
WebDriver driver= new FirefoxDriver();
// JavascriptExecutor interfaceobject creation by type casting driver object
JavascriptExecutor js = (JavascriptExecutor)driver;
js.executeScript(“history.go(0)”);
Sometimes, getText() doesn’t work and then you have to make use of java script executor to get text of a web element. You can do it by following line of code:
WebDriver driver= new FirefoxDriver();
// JavascriptExecutor interfaceobject creation by type casting driver object
JavascriptExecutor js = (JavascriptExecutor)driver;
js.executeScript(“history.go(0)”);
Sysout(js.executeScript(“return document.documentElement.innerText;”).toString());
You can even get the title and URL of a web page using java script executor. The procedure is very simple. Let’s have a look at the following lines of code.
WebDriver driver= new FirefoxDriver();
// JavascriptExecutor interfaceobject creation by type casting driver object
JavascriptExecutor js = (JavascriptExecutor)driver;
System.out.println(js.executeScript(“return document.title;”).toString());
System.out.println(js.executeScript(“return document.URL;”).toString());
Desired Capabilities Concept in selenium web driver
You can make the set of configurations on which you want a particular test script to run. You can pass browser name, version to specify the type of environment on which you want a test case to run.
Let’s see some of the capabilities which you can set in a test case for IE browser.
//it is used to define IE capability
DesiredCapabilities cap = DesiredCapabilities.internetExplorer();
cap.setCapability(CapabilityType.BROWSER_NAME, “IE”);
cap.setCapability(InternetExplorerDriver.INTRODUCE_FLAKINESS_BY_IGNORING_SECURITY_DOMAINS,true);
In the above capability, we have passed the capability browser name and we have ignored the security domain.
After setting the capabilities you can pass the capabilities to the web driver instance so that it executes the test on a particular configuration.
Let’s have a look at the complete set of code.
public static void main(String[] args) {
//it is used to define IE capability
DesiredCapabilities cap = DesiredCapabilities.internetExplorer();
cap.setCapability(CapabilityType.BROWSER_NAME, “IE”);
cap.setCapability(InternetExplorerDriver.INTRODUCE_FLAKINESS_BY_IGNORING_SECURITY_DOMAINS,true);
System.setProperty(“webdriver.ie.driver”, “path of executable”);
WebDriver driver = new InternetExplorerDriver(capabilities);
driver.get(“http://gmail.com”);
driver.quit();
}
Handling a drop down in selenium web driver
You have to first import following packages: org.openqa.selenium.support.ui.Select.
First, you have to identify from DOM whether the dropdown is of select type or not. If it is of select type then you have to go for the below steps.
Then, you have to uniquely identify the select tag. You have to first make the object of Select class and pass the element for which you have to choose the options from the drop-down.
Select dropdown = new Select(driver.findElement(By.xpath(“”)));
Now, there are three main methods which you have to use to select any element from this select object.

  1. selectByVisibleText
  2. selectByIndex
  3. selectByValue

You can either select any element from this drop-down by matching the visible text with that of the text passed by you. You can also select any web element from the drop-down using an index. Last option is to select by value tag.
Also, there are some more functions which are available. Some of them are selectAll() and deselectAll() too select and deselect all the elements when more than one element can be selected.
But, if the dropdown is not of select type then you can’t go for the conventional method. You have to follow another method. You have to uniquely identify the web element on which you have to select a dropdown option. You can identify it and the sendKeys() function of selenium web driver to send keys to the uniquely identified dropdown.
WebElement dropdown = driver.findElement(By.xpath(“”));
Dropdown.sendKeys(“value to be selected”);
How to select the checkbox and radio button is selenium
Sometimes, you come across situations where you have to select checkboxes and radio buttons. You can do it easily with selenium web driver. You just have to use click() function of web driver to click on checkbox and radio button. You can even check of the web element is selected or not.
.isSelected() checks if any web element is selected or not.
It gives false if the web element is not selected and it gives true if the web element is selected.
This way, you can handle radio buttons and checkboxes in a selenium script.

Selenium Advanced level Tutorial

Now, you know almost the stuff which is required for selenium intermediate and beginner level. Now, you are proficient enough to deal with all the advanced level of selenium web driver. You can then practice those and while you are done with those, you can move forward to the advanced level of course.
Let’s see what lies ahead and what can give you an edge in your interviews. You can look at this advanced course so that you can be ahead of all the candidates who just know the basic and intermediate selenium course. Let’s have a look at Selenium Advanced level Tutorial

Selenium Grid


Selenium Grid is issued for running various tests on different browsers, operating systems, and machines in parallel. It used a hub and node concept. You don’t want test cases to run on a single machine. You have your machine as a hub and various systems on which test cases will be distributed. You call those machines as nodes.
The hub is the central point and there should be only one hub in a system. This hub is your machine from which you want to distribute the test cases among all the clients.
This is the machine on which test cases will run and those will be executed on the nodes. There can be more than one node. Nodes can have different configurations with different platforms and browsers.
Let’s see how you can establish a selenium grid in your machine.
You can download the selenium grid server from the official site. You can place Selenium server.jar in a hard drive. You have to place it in all nodes and hub c drive.
Open the command prompt in your hub and then, go to C directory. There you have to fire the below command java -jar selenium-server-standalone-2.30.0.jar -role hub
Now, if you want to check if the selenium grid server is running on localhost that is 4040 port or not. You can visit the local host on your browser.
You have to then go to C directory of the node and open command prompt in it. Also, when you have made the selenium grid server up in the hub, you have to note down the IP address and port.
java -Dwebdriver.gecko.driver=”C:\geckodriver.exe” -jar selenium-server-standalone-3.4.0.jar -role webdriver -hub ip address of hub -port port number of hub
When you fire the above command, again go to hub browser and the port number 4040. Refresh the page and you will see IP address which will be linked to the hub.
Now, you have set up machines with different configurations. But how would the hub know which test case would be run on which node.
This will be done by desired capabilities which will tell that this test script would run on a particular set of configuration.
One can do it using below source code:
This way, you will be able to distribute the test cases across different machines and browsers. You will be able to do parallel testing using Selenium Grid.

Maven and Jenkins Integration with Selenium


Maven is a build management tool which is used to make the build process easy. Maven avoids hard coding of jars and you can easily share the project structure across the team using artifact and version id.
Every team member would be at the same page. You can make a maven project by going to File – New – Other – Maven project. You have to then specify the artifact id and then version id. You will be prompted to select a template. For starting, select a quik start template.
You will get a folder structure where you will be having two folders – src/main/java and src/main/test. In java folder, you will maintain all other stuff except tests while in test folder you will maintain all the test cases.
You will be having pom.xml file where you have to define all the dependencies so that it can download from the maven repository and place them in ./m2 repository in your local project structure.
You can get the dependency from the maven official site and then place in pom.xml. It will download all the required jars.
Also, Jenkins issued for continuous integration of the latest build with the production environment. Whenever a developer will fire the latest build then the smoke test will start running on that build.
If the build gets passed then it can be deployed to the production else the developer and tester would get a notification about the failed build. It makes the delivery cycle very fast.
Also, you can do it by downloading Jenkins war file and then running it so that Jenkins server will be up and running on port number 4040.

After doing that you can install all the necessary plug-ins. You can then create a new item and does the post-build actions.
Also, you can pass the path of git repository from which it will fetch the latest build. If you are using a local server then you pass the path of pom.xml from the system.
You can even set nightly runs with Jenkins, You have to specify the time when you want your test to run. They will run and you will get the reports on the Jenkins server the next morning. Isn’t it time-saving?

Database Testing using Selenium WebDriver

Integrating Selenium tests to the database is so easy in the latest version of the tool. You have to make use of JDBC library for database connections. It allows connection of Java and databases. First, make a connection to the database with the following command:

DriverManager.getConnection(URL, “userid”, “password” )
After doing that you can load the JDBC driver. You can do it by following lines of code:
Class.forName(“com.mysql.jdbc.Driver”);
Now, you have to send the query to the database. How will you do it? You can create an object of a statement class and then execute the query using the statement object.
Statement stmt = con.createStatement();
stmt.executeQuery(select *  from employee;);
Now, you can get the result in the result set. You can do it by following command:
ResultSet rs= stmt.executeQuery(query);
After doing all the operations, you can close the connection.
Con.close();
In this way, you can get the result set and then do all the validations on the result set.

How to take screenshots in selenium web driver

You should get the screenshot of the failed test cases so that you can get to know where exactly is the problem. This will help in better-debugging skills.

Let’s look at the steps involved in taking a screenshot:
TakesScreenshot scrShot =((TakesScreenshot)webdriver);
This step caste a driver instances to Takes Screenshot interface. Now, you have one method which is getting screenshots which will get the image file.
File SrcFile=scrShot.getScreenshotAs(OutputType.FILE);
Now, you have taken the screenshot but you have to place it somewhere. You can create some folder which will be used for storing all the screenshots captured during the execution.
You can do it by following the line of code:
FileUtils.copyFile(SrcFile, DestFile);
This is the way to capture screenshots. But if you want that only the screenshot is taken when a test case fails. You can use ITestListener.
It has various methods and one of the methods is onFailure() which will do the specified task when every there is any failure in a test case.
So you can put this code in that method so that whenever any test fails it will take the screenshot and place it in the folder specified by you.

How to drag and drop in a web page using Selenium Web driver

Now if you want o drag and drop something o a web page, you would be confused. It is very simple. You have to make use of Actions class which gives you a method dragAndDrop() which will drag and drop a web element from a source destination to the desired destination.
Actions actions = new Actions(driver);
Actions. dragAndDrop(Sourcelocator, Destinationlocator).build().perform();
Make sure that the source locator and destination locator have correct xpaths. In this way, you will be able to drag and drop any element on a web page.

How to do right click and double click on a web page

You can do a right-click on a web page using Actions class. Actions class provides a doubleClick method which allows to double click on a web element. You can do it by following lines of code:

Actions actions = new Actions(driver);
WebElement elementLocator = driver.findElement(By.id(“ID”));
actions.doubleClick(elementLocator).perform();
You have to do right-click in selenium using action class only. It is very easy. It provides a method – contextClick() and then right click on a web element.
Actions actions = new Actions(driver);
WebElement elementLocator = driver.findElement(By.id(“ID”));
actions.contextClick(elementLocator).perform();
This way, you will be able to right click and double click on a web element.
How to switch to an iFrame

iFrame is a web page which is embedded into another web page. Whenever you want to click on a web element, which is in another iframe. First, you have to switch to that iframe and then perform an action on it.
You can do switching by
Driver.switchTo().frame(index or name or id of iframe);
Conclusion
Before learning Selenium it’s better to have a thorough understanding of any object-oriented language. languages that Selenium support includes, Java, Perl, C#,  PHP, Ruby, and Python Currently.
We genuinely hope this tutorial has helped in understanding selenium better.

Get a eBook : Download PDF

Golang Testing: Tutorial Exclusively for You!

Go, the renowned programming language was designed by Ken Thompson, Rob Pike, and Robert Griesemer and is very similar to C, which was first released 46 years ago in 1972.

Go programming language or Golang offers exclusive features like garbage collection, memory safety, CSP-style concurrency, and structural typing. It is an open source language, which means you can use the tools, source code, and the compiler for free.

 The language is often described as having the efficiency and static typing of C++ and Java and, ease of use and productivity of JavaScript and Python.  

Golang is mostly used as a standard for API documentation, building, testing, and package management.

Golang testing acts as a micro benchmark and can be used for unit testing. The language also comes with a special package that makes writing tests very easy.   

Understanding Golang Testing

Testing is a crucial part of every website, web application, and mobile application development process. It is a series of processes that give the same results and confirms that the software is free of errors.

Tests are not limited to the software work. Every time you go to buy an electronic, you switch it on and check if it is working fine.

Tests can be simple or complicated like DiRT by Google. Golang testing is very similar to it. For testing, you have to write a code, which makes the typing automatic.

It is usually faster than manual testing because it is written in code and developers can share it among themselves.

For example, if you wrote a code to check the sum of two numbers, you will have to write the following test to ensure it works as expected.

Golang Testing

You run this test on Go Playground to check if its giving the expected results. In this test, we wrote the main package, which isn’t a problem when you are testing a small function.

 You cannot write the main package over and over again, as it is not only time consuming, but also takes up unnecessary space.

When you start the test with a tool by Golang, you only have to mention the Go testing package and begin with the sub part.

Golang Testing

This is what you will write for the same addition function we mentioned above. Package testing101 is the main package.

Golang Testing

This is how the test result will look like.

Naming files for go testing

Golang testing is so easy because it is a standardized process. You need to name the files in a particular way for them to be recognized by the tester. Here’s the protocol that you should always remember:

1. File name

Golang needs you to end each file name with _test.go. It is easier for the language to identify files that are to be tested and provide the exact functionality during the testing process.

banner
2. Type of package

After selecting the file name, you have to select the testing package. It can be for identifying an error or deviation from the expected result.

3. Function name

In the above example, the function name that you should use is TestSum(). When you write the code, you should write it as func TestXxx(*testing.T). Xxx is any name that you want to give to it. Remember, the first character should always be an uppercase character or a number.

Adding Multiple Tests For one Function

The test code that we mentioned above is a very simple one. There is only one test for the function but when you are writing it, you might be realise that you want to check the function’s other features as well. For example, you might want to test if the function can handle negative numbers or not.

Also Read: Adhoc Testing: A Brief Note With Examples

Golang is the easiest when it comes to adding multiple tests to one code. All you have to do is create another file, for example – sum_test.go. Then you add the function of negative numbers, which can be TestSumWithNegatives().

Here, you don’t need to create multiple test functions but only one – testing.T. Add Run() to it, which lets you add a sublet test.

Golang Testing

This is how your code with multiple functions look like.

Advanced Golang testing techniques

Now that you know the basics, it is time to go a level up and take a look at some of the advanced Golang testing techniques.

1. Test suites

In suite testing, you develop a test that is 100 percent contrasting from the common interface. You can use it to check different types of test implementations. Check below to see how the test you code will look like after you use suite testing.

Golang Testing

You may have previously had the chance to work with codebases that use this kind of testing. They are mostly used in plugin-based systems because they use tests that are coded against the interface.

Their primary use of it is to check if the system meets all the behavior requirements as intended. Suite testing is going to save you days of work and give you more time to focus on solving P versus NP problems.

In this type of testing, you swap two types of testing without needing to write more number of tests.

You will have to use the dependency injection to set up the suite from your testing package to implement it.

 Check the golang.org/x/net/nettest library to find wonderful examples of suite testing. You will also find some handy ones on Github.

2. Non-interface pollution

An interface is crucial for testing and is considered as the most powerful tool, which means you need to understand how to use it correctly.

 A package exports an interface, which is either used by the consumers to try a package implementation mock or export a mock that they develop.

Before you export the interface, you need to carefully analyze them. Instead of exporting an interface that mocks out consumer behavior, developers should develop a document that increases hard dependency their package and that of the customers.

If you don’t want to use a particular interface, you can keep it within the package by using internal/ package subtree.

After doing so, you don’t have to worry about the customers taking advantage of it. It is a flexible choice as developers can create new interfaces according to new requirements.

 To run tests locally, you can use dependency injection and create interfaces only for external dependencies.

3. Use net/http/httptest

When you use http test, you can access the http. Handler code without having to bind to a port or spin up a server. T

he tests are a lot faster and you can run all of them simultaneously, without any obstruction. Let’s take a look at how the test will look like when you use net/http/httptest advanced testing method.

With net/http/httptest, you can divide the test into different sections and test only a particular part of the function.

You don’t have to face any side effects like no middleware or no routers, when you use handler factories, servers, handler factory factories, and other services that are a part of Golang testing.

4. Separate _test package

Even though you develop files in pkg_test.go, they are stored under one domain — package pkg.

 However, you can create a new test package within a package and name it foo_test.go. The test will be saved in the foo/ library and declared as package foo_test. If you want to download some dependencies, you can visit github.com/example/foo to import them.

 We recommend you to use this method for cyclic dependencies and make the package easy to use. You no more need to perform brittle tests.

Benefits of using Golang Testing

Golang has made a lot of news in last couple of years because it makes the process of software development easy and more enjoyable. Here are four reasons why you need to start using Golang testing:

1. Tried and tested

Some of the best companies across the world use Golang testing. These companies include Dropbox, Apple, Google, The Economist, Twitter, IBM, YouTube, Facebook, The New York Times, Docker, and BBC. This indicates that Golang is a programming language fit for fulfilling the needs of the future.

2. Open source

Golang is just one of the things that Google offers for free to everyone who would like to use them. Since it is an open-source programming language, it is clean and more efficient compared to other languages.

3. Simple and fast

Thanks to its simple syntax and structure, Golang. It is also easy to learn as the whole language is based on functions. Golang offers a short processing time, which means you can release your product faster in the market. It not only saves time, but also gives you more time to capture the market.

4. Special features

Golang has an automatic memory management that keeps up the speed of the performance. It is easy to keep bugs away with the language because it is a compilation of several others. Developers need to stay more attentive while coding for the code to be accurate and neat.

Information Security Testing Guide For You

Online applications are becoming increasingly refined as the world gets more organized.
Small and mid-sized organizations currently depend aggressively on web applications for maintaining their business and expanding income.

Application engineers, designers, and developers are currently centered around making more secure application structures and on planning and composing secure code.
With the end goal to make an application safe, it is basic to have a solid procedure for security testing.
What’s exactly Information Security Testing?
Information security testing is the act of testing stages, administrations, frameworks, applications, gadgets and procedures for data security vulnerabilities.
It is regularly exceptionally robotized with instruments that examine for known vulnerabilities and mimic assaults utilizing realized risk designs.
It might likewise incorporate a progression of manual risks by talented data security pros.
How do you start with Information Security Testing?
Installing security testing in the improvement procedure is basic for uncovering application layer security flaws.
Subsequently, security testing must begin ideally from the necessity gathering stage to comprehend the security prerequisites of the application.
The ultimate objective of security testing is to recognize whether an application is powerless against risks, if the data framework ensures the information while looking after usefulness, any capability of data spillage, and to survey how the application acts when looked with a destructive attack.
Security testing is likewise a part of practical testing since there are some fundamental security tests that are a piece of functional testing.

Also Read : The Security Challenge Posed by the Internet of Things: How to Rectify Them

Additionally, security testing should be organized and implemented independently. Not at all like functional testing that approves what the analyzers know and ought to be valid, security testing centers around the unclear components and test the endless ways that application would be able to.
Types of Security Testing:
In order to come up with a safe application, security analyzers need to direct the accompanying tests:
Vulnerability Checks:
Vulnerability check tests the whole framework under test, to recognize framework vulnerabilities, escape clauses, and suspicious powerless marks.
This sweep recognizes and characterizes the framework shortcomings and furthermore predicts the adequacy of the countermeasures that have been taken.
Infiltration Testing:
An infiltration test additionally called a pen test, is a recreated test that copies an attack by a programmer on the framework that is being tried.
This test involves gathering data about the framework and recognizing passage focuses on the application and endeavoring a break-in to decide the security shortcoming of the application.
This test resembles a ‘white hat attack’. The testing focuses on testing where the IT group and the security analyzers cooperate, outer testing that tests the remotely noticeable passage focuses, for example, servers, gadgets, space names and so on.
Inside testing, that is led behind a firewall by an approved client, checks how the application acts in case of a genuine attack.
Security Risk Assessment:
This testing includes the appraisal of the danger of the security framework by exploring and breaking down potential dangers.
banner
These dangers are then ordered into high, medium and low classifications dependent on their seriousness level.
Characterizing the correct alleviation systems dependent on the security stance of the application at that point pursues.
Security reviews to check for administration passageways, between the system, and intra-arrange access, and information assurance is directed at this level.
Moral Hacking:
Moral hacking utilizes an ordered authority to enter the framework imitating the way of genuine programmers.
The application is attacked from inside to uncover security defects and vulnerabilities and to recognize potential dangers that pernicious programmers may exploit.
Security Scanning:
To upgrade the extent of security testing, analyzers should direct security outputs to assess arrange shortcoming.
Each sweep sends malignant solicitations to the framework and analyzers must check for conduct that could show a security weakness.
SQL Injection, XPath Injection, XML Bomb, Malicious Attachment, Invalid Types, Malformed XML, Cross Site Scripting and so forth are a portion of the outputs that should be rushed to check for vulnerabilities which are then learned finally, broke down and afterward settled.
Access Control Testing:
Access Control testing guarantees that the application under testing must be gotten to by the approved and authentic clients.
The goal of this test is to survey the separating strategy of the product parts and guarantee that the application execution adjusts to the security arrangements and shields the framework from unapproved clients.
Why is Information Security Testing Important?
A complete security testing structure manages approval over all layers of an application.
aaz
Beginning with examination and assessment of the security of the application, it moves additionally covering the system, database and application presentation layers.
While application and mobile testing serve to assess security at these levels, cloud penetration testing uncovers the security chunks, when the application is facilitated in the cloud.
These testing ideas make utilization of a mix of automated scanner instruments that assess lines of code for security irregularities and infiltration testing that reenacts attacks by unintended access channels.
Defenselessness appraisal shapes a critical part of security testing. Through this, the organization can assess their application code for vulnerabilities and take therapeutic measures for the equivalent.
As of late, a significant number of the product improvement enterprises have been making utilization of secure software development lifecycle procedures to guarantee recognizable proof and correction of vulnerable areas at an early stage in the application improvement process.
How does Security Testing increase the value of Organizations?
In the present interconnected world with buyers depending even more on online channels to make exchanges, any security threats, however major or minor it might be, prompts misfortune in client certainty and at last income.
Further, the security threats have additionally developed exponentially, both in quality and in addition to affecting potential prospects.
In such a situation, information security testing plays the main role that enables an association to recognize where they are defenseless and take the restorative measures to repair the holes in security.
An ever increasing number of enterprises are completing the security reviews and testing measures with the end goal to guarantee that their central goal i.e. basic applications are protected from any breaks or unintended entrance.
The broader an organizations security trying methodologies are, the better are its odds of prevailing in a progressively menacing innovation terrain.
Information safety efforts empower an organization to dodge the traps emerging from accidental leakage of delicate information.
Ordinarily, such spillages cost them beyond a reasonable doubt, by virtue of legal difficulties emerging because of affectability of data.
Information safety efforts diminish the consistency cost by improving information review components and automating them.
They additionally empower the organization to guarantee respectability of information by avoiding unapproved use and alterations.
app testing
In the present, very much associated world, appropriation of information security procedures and systems guarantee that the association is all adjusted to the legitimate and consistence norms across nations.