Positive Vs. Negative Testing: Examples, Difference & Importance

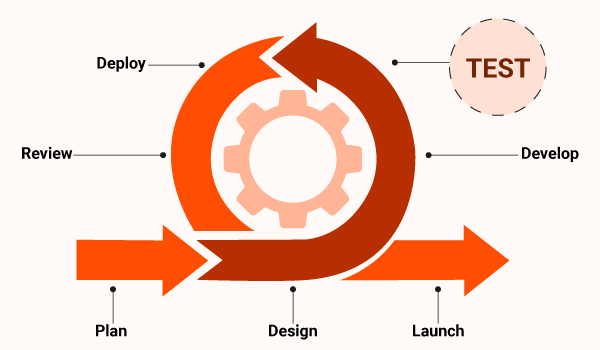
Effective software testing goes beyond confirming that an application functions as expected with valid inputs; it includes both positive and negative testing.

While positive testing ensures the system works correctly with valid inputs, negative testing explores how well the application handles invalid inputs and unexpected scenarios.

Remarkably, a substantial portion of test cases—approximately 85%—usually correspond to just 70% of the overall requirements. This emphasizes the significance of validating positive scenarios. However, the often overlooked 30% dedicated to failed negative value testing is equally crucial. This aspect ensures that the application exhibits robust behavior under unfavorable conditions and unexpected inputs.

This comprehensive approach, covering both positive and negative scenarios, contributes significantly to delivering a dependable and high-quality software product.

 What Is Positive Testing With Example

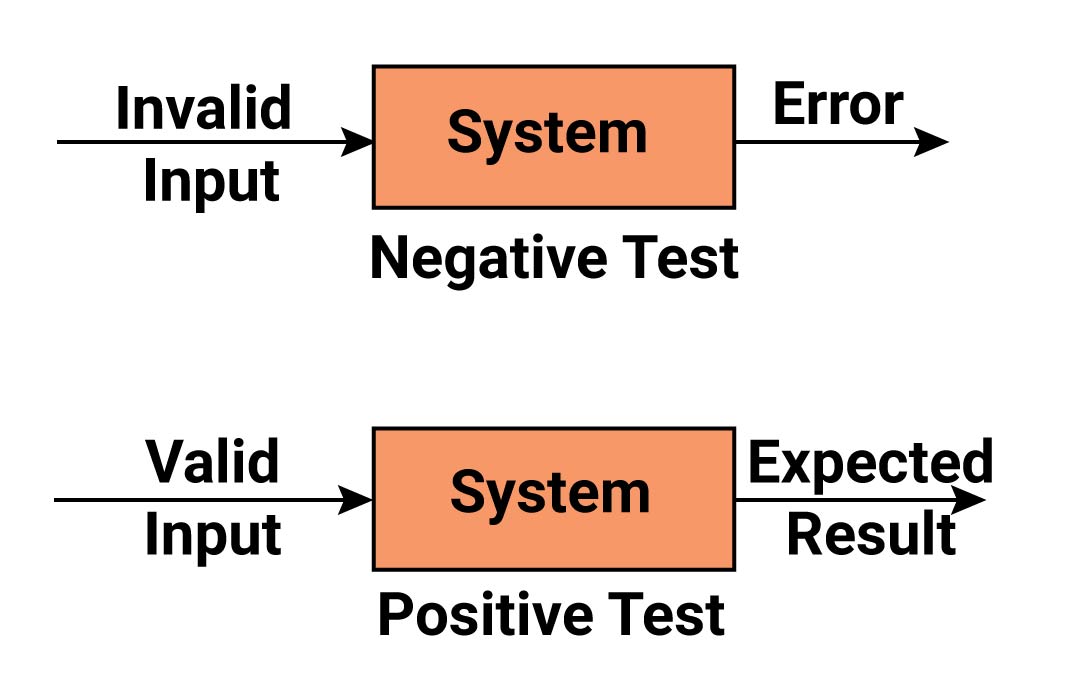
Positive testing involves validating an application’s functionality with valid inputs to ensure that it performs as expected. Testers do this by creating test cases based on predetermined outputs with the intention of confirming that the system accepts inputs for typical user use.

This type of testing is crucial and helpful for identifying vulnerabilities and ensuring the system’s resilience against inappropriate data.

For instance, consider a login functionality where a user is required to enter a username and password. In this scenario, positive testing would involve verifying that the system allows access with the correct combination of a valid username and password.

Positive testing not only ensures the system’s expected behavior but also aids in knowledge sharing regarding the system architecture throughout the Software Development Life Cycle (SDLC).Example of Positive Testing

The method is the same as that of negative testing. But here, instead of false data, valid data will be entered, and the expected result is the system accepting the code with no problem.

Example of the Positive Test Scenarios

  • The password box should not accept less than 7 characters
  • The password box should be up to 22 characters
  • Password box should accept special characters up to 6-20 characters in length

Importance of Positive Testing

  • Functionality Verification: At its core, positive testing is about making sure the software does what it’s supposed to do. It confirms that the basic features and user flows work as designed.
  • Building Confidence: Successful positive tests give developers, stakeholders, and end-users confidence that the fundamental system works. This is crucial before moving on to more complex testing.
  • Catching Early Errors: While focused on success, positive testing can still uncover major bugs or inconsistencies. Fixing these early is more efficient and cost-effective.
  • Baseline for Further Testing: Positive tests establish a working baseline. If issues arise in later negative tests or other test types, you can refer back to see if core functionality has been affected.
  • User Experience Focus: Positive testing aligns with how real users would interact with the software, ensuring the intended experience is smooth and functional.

Specific Benefits

  • Improved Software Quality: Regular positive testing helps maintain quality standards across development cycles.
  • Reduced Risk of Failure: By catching core functional issues early, you decrease the chance of major problems after release.
  • Time Efficiency: Positive tests are often straightforward to design, making them a time-efficient way to verify essential system components.
  • Positive User Perception: A well-functioning product due to thorough positive testing leads to satisfied users and positive brand reputation.

 What Is Negative Testing?

Negative testing explores the system’s behavior when it is subjected to invalid inputs or unexpected conditions.

The objective of negative testing is to ensure that the system responds appropriately by displaying errors when necessary and not exhibiting errors in situations where it should not.

Negative testing is essential for uncovering vulnerabilities and testing scenarios that may not have been explicitly designed.

For instance, consider a scenario where a user is required to enter a password. Negative testing in this context would involve entering invalid inputs, such as passwords with special characters or exceeding the allowed character limit.

The purpose is simple – to test the system’s ability to handle unexpected inputs and scenarios that may arise during real-world usage.

Examples of Negative Testing

Filling up Required Fields – Imagine that there are fields in the website that require a user to fill it up.  Negative testing can be done by feeding the box with negative inputs such as alphabets; either the webpage should show an error message or it should not accept the input.
Factors that need to be considered while performing a negative test

  • Input data
  • Action
  • Output

Example of the Negative Test Scenarios

  • Password box should not accept more than 7 characters
  • Password box should not exceed 22 characters
  • Password box should not accept special characters

Importance of Negative Testing

Forget about simply aiming to crash your application. True negative testing is about resilience and smart defense:

  • Exposing Hidden Flaws: Many bugs lurk specifically in how the software reacts to the unexpected. Negative testing drags those out into the light where they can be fixed proactively.
  • Bulletproofing Error Handling: A well-made app doesn’t just fall over when it gets strange input. Negative testing ensures it has clear error messages, ways to recover, and doesn’t leave users frustrated.
  • Forging Security: Malicious users LOVE to poke at edges and find gaps. Negative tests simulate some of those attacks, helping you close security holes before they can be exploited.

The Real-World Impact

Think of users out there – they won’t always be perfect. Negative testing makes sure your software is ready for:

  • Accidental Mistakes: Typos, missed fields, fat-fingered touches… negative testing ensures the app gracefully guides the user to correct these.
  • Unconventional Thinking: Some people try things “outside the box.” Negative tests make sure the app doesn’t punish them and helps them get back on track.
  • Unexpected Conditions: Internet flakiness, weird device settings – negative testing reveals if your app adapts instead of simply failing.

The Bottom Line for Testers

Not doing negative testing is like boxing training without ever sparring. Sure, they know the moves, but a real fight is messy. Negative tests get us ready for the real-world chaos users inevitably create, ensuring a robust, user-friendly experience.

Difference Between Positive and Negative Testing

Difference Between Positive and Negative Testing

While each type of testing has its own unique characteristics and features, as mentioned below
are some of the key differences between positive and negative testing

Feature Positive Testing Negative Testing
Scope of Inputs Focuses on testing a specific number of user inputs with a valid set of values. Involves testing with excessive (load) inputs and an invalid set of values.
Perspective Done with a positive point of view, ensuring that the system accepts valid inputs. Approached with a negative point of view, testing for scenarios and inputs that are not designed.
Test Conditions Identifies a known set of test conditions based on client requirements. Conducted with an unknown set of test conditions, testing anything not mentioned in client requirements.
Password Test Example Validates that the password test scenario accepts 6–20 characters, including alphanumeric values. Ensures the password test scenario does not exceed 20 characters and does not accept special characters.

Conclusion

Positive and negative testing are integral components of software testing, collectively working towards achieving a 100% reliable and quality application.

Positive testing ensures that the system performs as expected under normal circumstances, while negative testing explores how the system behaves when subjected to invalid inputs and unanticipated scenarios.

Therefore, it is important for organizations and testers to recognize the significance of both testing methodologies and incorporate them into their testing strategies to deliver bug-free software and enhance overall software quality.

By understanding and implementing positive and negative testing effectively, testers can contribute significantly to the development of robust and resilient software applications.

FAQs

How to write positive and negative test cases in selenium?

Writing positive and negative test cases in Selenium involves crafting scenarios that cover expected behaviors (positive) and potential failure scenarios (negative). Here are examples for both:

Positive Test Case:

Scenario: User Login with Valid Credentials

Test Steps:

  1. Open the application login page.
  2. Enter valid username.
  3. Enter valid password.
  4. Click on the “Login” button.

Expected Result:

  • User should be successfully logged in.
  • Verify that the user is redirected to the dashboard.

Selenium Code (Java):

@Test
public void testValidLogin() {
// Test steps to open login page, enter valid credentials, and click login
// Assert statements to verify successful login and redirection
}

Negative Test Case:

Scenario: User Login with Invalid Credentials

Test Steps:

  1. Open the application login page.
  2. Enter invalid username.
  3. Enter invalid password.
  4. Click on the “Login” button.

Expected Result:

  • User should not be logged in.
  • An error message should be displayed.

Selenium Code (Java):

@Test
public void testInvalidLogin() {
// Test steps to open login page, enter invalid credentials, and click login
// Assert statements to verify login failure and error message presence
}

In both cases, use assertions (e.g., Assert.assertEquals(), Assert.assertTrue()) to validate the expected outcomes. Make sure to handle synchronization issues using appropriate waits to ensure the elements are present or visible before interacting with them.

Remember, negative testing should cover various failure scenarios such as incorrect inputs, missing data, or unexpected behaviors.

FAQs

#1) What is the difference between positive testing and happy path testing?

Positive Testing

  • Purpose: Verifies that the software behaves as expected when given valid inputs and conditions.
  • Focus: Confirms that the core functionality of the system works under normal circumstances.
  • Scope: Encompasses a wider range of test cases that involve correct inputs and anticipated user actions.

Happy Path Testing

  • Purpose: Validates the most typical, successful flow of events through a system.
  • Focus: Ensures the basic user journey functions without issues. Streamlines testing for the most common use case.
  • Scope: A narrower subset of positive testing, focused on the primary “happy path” a user would take.

Key Differences

  • Breadth: Positive testing casts a wider net, including variations in valid input and expected results. Happy path testing maintains a tight focus on the core, ideal user experience.
  • Complexity: Happy path tests usually design simpler scenarios, while positive testing can explore more intricate edge cases and alternative paths.

Example

Consider testing a login form:

  • Positive Testing:

    • Successful login with correct username and password.
    • Successful login with case-insensitive username.
    • Successful login after using “Forgot Password” functionality
  • Happy Path Testing:

    • User enters correct username and password, clicks “Login,” and is successfully taken to their dashboard.

#2) Top 10 negative test cases

1. Invalid Data Format

  • Test: Attempt to enter data in a format the field doesn’t accept.
  • Example: Entering letters into a phone number field, or an invalid email address.

Negative Test case No 1

(Source)

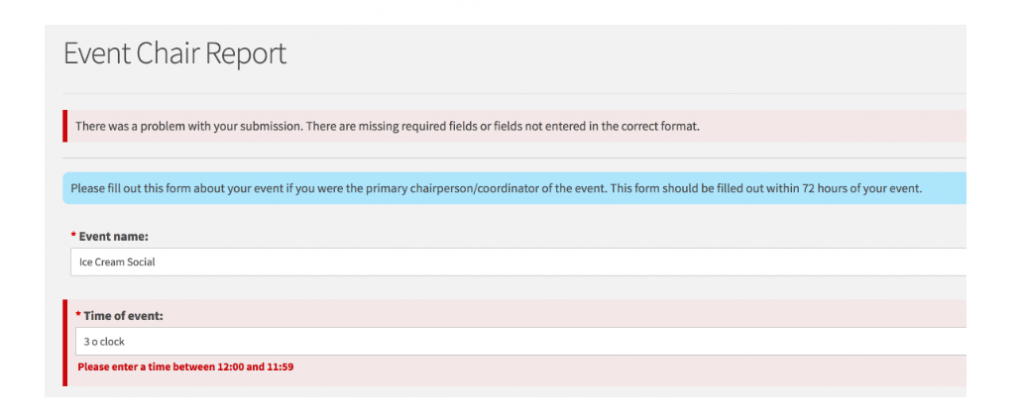
2. Boundary Value Testing

  • Test: Input values at the extremes of valid ranges.
  • Example: If a field accepts numbers between 1-100, test with 0, 1, 100, and 101.

3. Entering Invalid Characters

  • Test: Use special characters, SQL commands, or scripting tags in input fields.
  • Example: Entering “<script>alert(‘XSS’)</script>” to test for cross-site scripting (XSS) vulnerabilities.
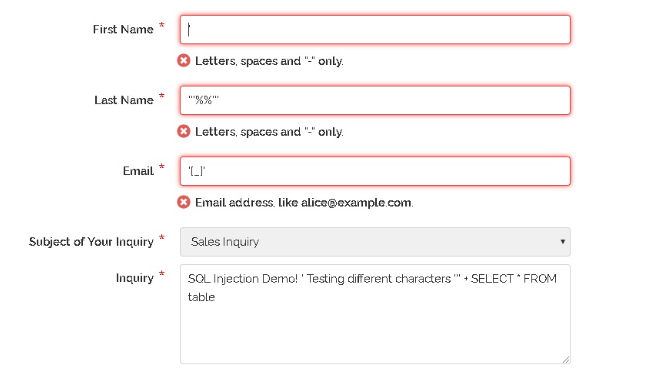
Entering Invalid Characters

( Source )

4. Mandatory Field Omission

  • Test: Leave required fields blank and try to proceed.
  • Example: Submitting a signup form without filling in the username or password fields.

Mandatory Field Omission

( Source )

5. Incorrect Data Combinations

  • Test: Submit data where individual fields might be valid, but their combination isn’t.
  • Example: Selecting a birth year in the future, or a shipping address in a different country than the selected billing country.

6. Duplicate Data Entry

  • Test: Attempt to create records that are already present.
  • Example: Registering with a username that already exists.
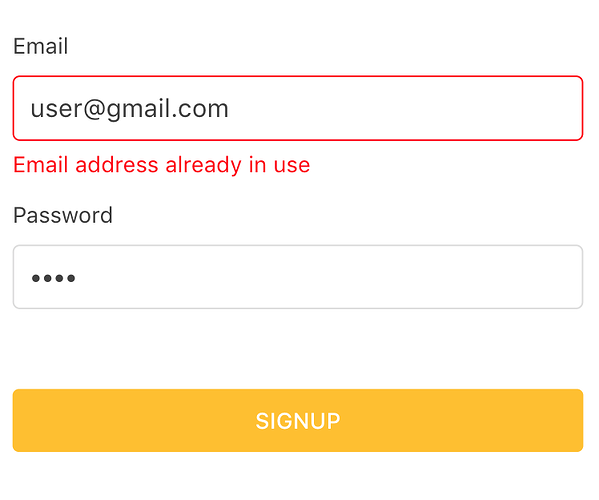
Duplicate Data Entry

( Source )

7. File Upload Errors

  • Test: Try uploading files of unsupported types, incorrect sizes, or those containing malicious code.
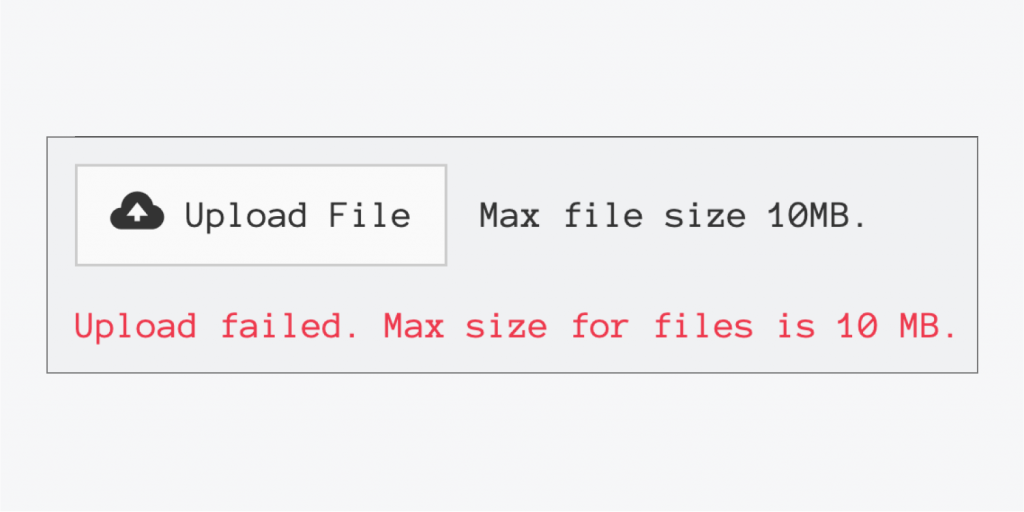
Upload Errors

( Source )

8. Interrupted Operations

  • Test: Simulate actions like closing the browser, losing internet connection, or device power failures during a process.
  • Example: Interrupting a large file download to see if it can resume correctly.

9. Session Expiration

  • Test: Check if the application handles session timeouts gracefully, prompting users to re-authenticate or save their work.
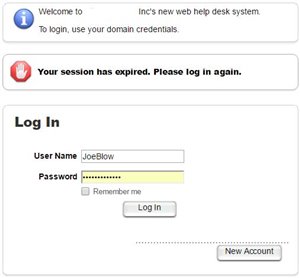
Session Expiration

( Source )

10. Excessive Data Input

    • Test: Enter more data than the field can accommodate.
    • Example: Pasting a huge block of text into a field with a character limit.

Verification vs. Validation: Key Differences and Why They Matter

Ever poured hours into a project, only to discover it wasn’t what the customer wanted? Or felt the sting when, despite rigorous testing, critical bugs emerged post-launch?

These scenarios are all too familiar to those in quality assurance and product development, underscoring the frustration of seeing efforts fall short of expectations.

This pain points to a crucial misunderstanding in the industry: the conflation of verification and validation. Although both are essential for product quality, they serve distinct purposes.

Verification asks, “Are we building the product right?” focusing on whether the development aligns with specifications. Validation, on the other hand, asks, “Are we building the right product?” ensuring the outcome meets user needs and requirements.

Clarifying this distinction is more than semantic—it’s foundational to delivering solutions that not only work flawlessly but also fulfill the intended purpose, ultimately aligning products closely with customer expectations and market needs.

What Is Verification And Validation With Example?

Definition Of Verification

Verification is the process of checking if a product meets predefined specifications. It’s a methodical examination to ensure the development outputs align exactly with what was planned or documented.

For instance, if the specification dictates, “The login button should be blue,” verification involves a direct check to confirm that the button is indeed blue.

This phase is crucial for catching discrepancies early on, before they can evolve into more significant issues.

Types of verification activities include code reviews, where peers examine source code to find errors; static analysis, a process that automatically examines code to detect bugs without executing it; and inspections, a thorough review of documents or designs by experts to identify problems.

Through these practices, verification acts as a quality control measure, ensuring the product’s development is on the right track from the start.

Verification Example:

Scenario: Developing a web application that allows users to register and login.

Verification Step: Before coding begins, the development team reviews the design documents, including use cases and requirements specifications, to ensure they understand how the registration and login system should work.

They check if all the functional requirements are clearly defined—for instance, the system should send a confirmation email after registration and allow users to reset their password if forgotten.

This step verifies that the system is being built correctly according to the specifications.

Definition of Validation

Validation is the process of ensuring that a product fulfills its intended use and meets the needs of its end-users.

Unlike verification, which focuses on whether the product was built according to specifications, validation addresses the question, “Have we built the right product for our users?” It’s about verifying the product’s actual utility and effectiveness in the real world.

For example, even if a login button is the specified shade of blue (verification), validation would involve determining whether users can find and understand how to use the button effectively for logging in.

This process includes activities like user acceptance testing, where real users test the product in a controlled environment to provide feedback on its functionality and usability, and beta testing, where a product is released to a limited audience in a real-world setting to identify any issues from the user’s perspective.

Through validation, developers and product managers ensure that the final product not only works as intended but also resonates with and satisfies user needs and expectations.

Validation Example:

Scenario: After the web application is developed and deployed to a testing environment.

Validation Step: Testers manually register new accounts and try logging in to ensure the system behaves as intended.

They validate that upon registration, the system sends a confirmation email, and the login functionality works correctly with the correct credentials.

They also test the password reset feature to confirm it operates as expected. This step validates that the final product meets the user’s needs and requirements.

Verification vs. Validation – The Key Difference

Two guiding principles can neatly sum up the difference between verification and validation in product development: verification is about “building the thing right,” whereas validation is about “building the right thing.”

This analogy underscores the fundamental difference in their objectives—verification ensures the product is being built according to specifications, while validation ensures the product built is what the end-user actually needs and wants.

 Comparing Verification and Validation

Factor Verification Validation
Objective To check if the product meets specified requirements/designs. To ensure the product meets user needs and expectations.
Focus Process correctness and adherence to specifications. Product effectiveness in real-world scenarios.
Timing Conducted throughout the development process. Generally conducted after verification, closer to product completion.
Methodology Involves methods like code reviews, static analysis, and inspections. Involves user acceptance testing, beta testing, and usability studies.
Performed by Engineers and developers focus on technical aspects. End-users, stakeholders, or QA teams focusing on user experience.
Outcome Assurance that the product is built correctly according to the design. Confidence that the product fulfills its intended use and satisfies user requirements.
Feedback Loop Internal, focuses on correcting issues against specifications. External, often lead to product adjustments based on user feedback.
Documentation Specifications, design documents, and test reports. User requirements, test scenarios, and feedback reports.

Verification And Validation In Various Aspect Of Quality Assurance

In the realm of software development, ensuring that a product not only functions correctly but also meets user expectations is paramount.

This necessitates a comprehensive approach to quality assurance that encapsulates two crucial processes: verification and validation.

While both aim to ensure the quality and functionality of software, they do so through distinctly different means and at different stages of the software development lifecycle (SDLC).

Verification: Ensuring the Product Is Built Right

Verification is the process of evaluating the work-products of a development phase to ensure they meet the specifications set out at the start of the project.

This is a preventative measure, aimed at identifying issues early in the development process, thus making it a static method of quality assurance.

Verification does not involve code execution; instead, it focuses on reviewing documents, design, and code through methods such as desk-checking, walk-throughs, and reviews.

Desk checking is an example of a verification method where the developer manually checks their code or algorithm without running the program.

This process, akin to a dry run, involves going through the code line by line to find logical errors.

Similarly, walk-throughs and peer reviews are collaborative efforts where team members critically examine the design or code, discussing potential issues and improvements.

These activities underscore verification’s objective of ensuring that each phase of development correctly implements the specified requirements before moving on to the next phase.

Validation: Building the Right Thing

Conversely, validation is a dynamic process, focusing on whether the product fulfills its intended purpose and meets the end-users’ needs.

This process involves executing the software and requires coding to simulate real-world usage scenarios. Validation is carried out through various forms of testing, such as black box functional testing, gray box testing, and white box structural testing.

Black box testing is a validation method where the tester evaluates the software based on its inputs and outputs without any knowledge of its internal workings.

This approach is effective in assessing the software’s overall functionality and user experience, ensuring it behaves as expected under various conditions.

Gray box testing combines aspects of both black and white box testing, offering a balanced approach that leverages partial knowledge of the internal structures to design test cases.

White box testing, or structural testing, delves deep into the codebase to ensure that internal operations perform as intended, with a focus on improving security, flow of control, and the integrity of data paths.

The Complementary Nature of Verification and Validation

While verification and validation serve different purposes, they are complementary and equally vital to the software development process.

Verification ensures that the product is being built correctly according to the predefined specifications, thereby minimizing errors early on.

Validation, on the other hand, ensures that the product being built is the right one for its intended users, maximizing its real-world utility and effectiveness.

The timing of these processes is also crucial; verification is conducted continuously throughout the development process, while validation typically occurs after the software has been developed.

This sequential approach allows for the refinement and correction of any discrepancies identified during verification before validating the final product’s suitability for its intended use.

Cost Implications and Process Ownership

The cost implications of errors found during verification and validation differ significantly.

Errors caught during verification tend to be less costly to fix since they are identified earlier in the development process.

In contrast, errors found during validation can be more expensive to rectify, given the later stage of discovery and the potential need for significant rework.

The responsibility for carrying out these processes also varies. The Quality Assurance (QA) team usually performs verification, comparing the software against the specifications in the Software Requirements Specification (SRS) document.

Validation, however, is often the purview of a testing team that employs coding and testing techniques to assess the software’s performance and usability.

Real-World Analogy

To contextualize verification and validation, consider ordering chicken wings at a restaurant. Verification in this scenario involves ensuring that what you’re served looks and smells like chicken wings—checking its appearance and aroma against what you expect chicken wings to be like.

Validation, then, is the act of tasting the wings to confirm they meet your expectations for flavor and satisfaction. Just as in software development, both steps are essential: verification ensures the product appears correct, while validation confirms it actually meets the consumer’s desires.

In conclusion, verification and validation are indispensable to the software development lifecycle, each serving a distinct but complementary role in ensuring that a product is not only built correctly according to technical specifications but also fulfills the intended purpose and meets user expectations.

Employing both processes effectively is crucial for delivering high-quality software that satisfies customers and stands the test of time.

Here’s The Crux Of The Blog In An Infographic

Conclusion

while verification and validation serve distinct purposes within the software development lifecycle, their success is interdependent, highlighting the synergy between ensuring a product is built right and ensuring it is the right product for its users.

Two key takeaways underscore the nuanced roles these processes play: First, the act of verification, focusing on adherence to specifications, does not necessarily require programming expertise and often precedes the product’s final form, frequently involving reviews of documentation and design.

In contrast, validation, with its emphasis on real-world utility and user satisfaction, necessitates coding skills as it involves executing the software to test its functionality and performance. Therefore, understanding the differences between these processes, including

Also Read : QA( quality accurance) and QC ( quality control), How do they differ?

FAQs

Verification vs validation Engineering

Verification

  • Meaning: The process of ensuring that a product, service, or system conforms to its specified requirements and design specifications. It answers the question: “Are we building the product right?”

  • Methods:

    • Design reviews (walkthroughs, inspections)
    • Code reviews
    • Static analysis
    • Unit testing
    • Integration testing
    • System testing
  • Example: An engineer designs a bridge with specific load-bearing requirements. Verification would involve checking calculations, design simulations, and testing physical models against those defined load parameters.

Validation

  • Meaning: The process of determining whether a product, service, or system meets the real-world needs and expectations of its intended users. It answers the question: “Are we building the right product?”

  • Methods:

    • User acceptance testing (UAT)
    • Requirements analysis and traceability
    • Prototyping and user feedback
    • Field testing
    • Performance monitoring under operational conditions
  • Example: After the bridge from the previous example is built, validation would focus on whether it can handle the intended traffic flow, withstand environmental conditions, and meet the overall transportation needs of the community it serves.

Key Differences

Feature Verification Validation
Focus Specifications and design User needs and intended purpose
Question “Are we building the product right?” “Are we building the right product?”
Timing Throughout the development cycle Often concentrated towards the end of the process
Methods Reviews, testing, analysis User testing, field testing, operational monitoring

Why Verification and Validation Matter in Engineering

  • Ensuring quality: They help ensure that the final product is safe, reliable, performs as intended, and meets the defined specifications.
  • Saving cost and time: Identifying errors early on through verification helps save costs that would be exponentially higher to fix later in the process. Validation prevents the development of a product that doesn’t meet the actual need.
  • Reducing risk: Thorough verification and validation lower the risk of product failures, recalls, and safety hazards.
  • Meeting regulatory standards: Many industries (aerospace, automotive, medical devices) have strict V&V requirements as part of their compliance.
  • Improving user satisfaction: Validation ensures the product solves the real-world problem it was intended to solve, leading to higher user satisfaction.

What is the difference between validation and testing?

Validation and testing are both integral components of the quality assurance process in software development, yet they serve distinct purposes and focus on different aspects of ensuring a software product’s quality and relevance to its intended users.

Here’s a breakdown of the differences between validation and testing:

Validation

  • Purpose: Validation is the process of evaluating software at the end of the development process to ensure it meets the requirements and expectations of the customers and stakeholders. It’s about ensuring the product fulfills its intended use and solves the intended problem.
  • Question Addressed: “Are we building the right product?” Validation seeks to answer whether the software meets the real-world needs and expectations of its users.
  • Activities: Involves activities like user acceptance testing (UAT), beta testing, and requirements validation. It is more about the software’s overall functionality and relevance to the user’s needs.
  • Outcome: The main outcome of validation is the assurance that the software does what the user needs it to do in their operational environment.

Testing

  • Purpose: Testing, often considered a subset of validation, is more technical and focuses on identifying defects, errors, or any discrepancies between the actual and expected outcome of software functionality. It’s concerned with the internal workings of the product.
  • Question Addressed: “Are we building the product right?” Testing is about ensuring that each part of the software performs correctly according to the specification and design documents.
  • Activities: Includes a variety of testing methods like unit testing, integration testing, system testing, and regression testing. These activities are aimed at identifying bugs and issues within the software.
  • Outcome: The primary outcome of testing is the identification and resolution of technical issues within the software to ensure it operates as designed without defects.

In essence, while testing is focused on the technical correctness and defect-free operation of the software, validation is concerned with the software’s effectiveness in meeting the user’s needs and achieving the desired outcome in the real world. Testing is a means to an end, which helps in achieving the broader goal of validation.

TestCafe vs Selenium : Which is better?

In the realm of web testing frameworks, TestCafe and Selenium stand out for their unique approaches to automation testing. TestCafe, a Node.js tool, offers a straightforward setup and testing process without requiring WebDriver.

Its appeal lies in its ability to run tests on any browser that supports HTML5, including headless browsers, directly without plugins or additional tools.

On the other hand, Selenium, a veteran in the field, is renowned for its extensive browser support and compatibility with multiple programming languages, making it a staple in diverse testing scenarios.

This comparison delves into their technical nuances, assessing their capabilities, ease of use, and flexibility to determine which framework better suits specific testing needs.

Firstly, we’ll understand the role of both automation tools and later see a quick comparison between them.

All About TestCafe

Developed by DevExpress, TestCafe offers a robust and comprehensive solution for automating web testing without relying on WebDriver or any other external plugins.

It provides a user-friendly and flexible API that simplifies the process of writing and maintaining test scripts. Some of its key features include:

  1. Cross-browser Testing: TestCafe allows you to test web applications across multiple browsers simultaneously, including Chrome, Firefox, Safari, and Edge, without any browser plugins.
  2. Easy Setup: With TestCafe, there’s no need for WebDriver setup or additional browser drivers. You can get started with testing right away by simply installing TestCafe via npm.
  3. Automatic Waiting: TestCafe automatically waits for page elements to appear, eliminating the need for explicit waits or sleep statements in your test scripts. This makes tests more robust and reliable.
  4. Built-in Test Runner: TestCafe comes with a built-in test runner that provides real-time feedback during test execution, including detailed logs and screenshots for failed tests.
  5. Support for Modern Web Technologies: TestCafe supports the testing of web applications built with modern technologies such as React, Angular, Vue.js, and more, out of the box.


Read About:Learn How to Use Testcafe For Creating Testcases Just Like That

Installation of TestCafe

Installing TestCafe is straightforward, thanks to its Node.js foundation. Before you begin, ensure you have Node.js (including npm) installed on your system.

If you haven’t installed Node.js yet, download and install it from the official Node.js website.

Here are the steps to install TestCafe:

Step 1: Open a Terminal or Command Prompt

Open your terminal (on macOS or Linux) or command prompt/powershell (on Windows).

Step 2: Install TestCafe Using npm

Run the following command to install TestCafe globally on your machine. Installing it globally allows you to run TestCafe from any directory in your terminal or command prompt.

npm install -g testcafe

Step 3: Verify Installation

To verify that TestCafe has been installed correctly, you can run the following command to check its version:

testcafe -v

If the installation was successful, you will see the version number of TestCafe output to your terminal or command prompt.

Step 4: Run Your First Test

With TestCafe installed, you can now run tests. Here’s a quick command to run an example test on Google Chrome. This command tells TestCafe to use Google Chrome to open a website and check if the title contains a specific text.

testcafe chrome test_file.js

Replace test_file.js with the path to your test file.

Note:

  • If you encounter any permissions issues during installation, you might need to prepend sudo to the install command (for macOS/Linux) or run your command prompt or PowerShell as an administrator (for Windows).
  • TestCafe allows you to run tests in most modern browsers installed on your local machine or on remote devices without requiring WebDriver or any other testing software.

That’s it! You’ve successfully installed TestCafe and are ready to start automating your web testing.

How To Run Tests In TestCafe

Running tests with TestCafe is straightforward and does not require WebDriver or any other testing software. Here’s how you can run tests in TestCafe:

1. Write Your Test

Before running tests, you need to have a test file. TestCafe tests are written in JavaScript or TypeScript. Here’s a simple example of a TestCafe test script (test1.js) that navigates to Google and checks the title:

import { Selector } from 'testcafe';

fixture `Getting Started`
.page `https://www.google.com`;

test(‘My first test’, async t => {
await t
.expect(Selector(‘title’).innerText).eql(‘Google’);
});

2. Run the Test

Open your terminal (or Command Prompt/PowerShell on Windows) and navigate to the directory containing your test file.

To run the test in a specific browser, use the following command:

testcafe chrome test1.js

Replace chrome with the name of any browser you have installed (e.g., firefox, safari, edge). You can also run tests in multiple browsers by separating the browser names with commas:

testcafe chrome,firefox test1.js

3. Running Tests on Remote Devices

TestCafe allows you to run tests on remote devices. To do this, use the remote keyword:

testcafe remote test1.js

TestCafe will provide a URL that you need to open in the browser on your remote device. The test will start running as soon as you open the link.

4. Running Tests in Headless Mode

For browsers that support headless mode (like Chrome and Firefox), you can run tests without the UI:

testcafe chrome:headless test1.js

5. Additional Options

TestCafe provides various command-line options to customize test runs, such as specifying a file or directory, running tests in parallel, or specifying a custom reporter. Use the --help option to see all available commands:

testcafe --help

Example: Running Tests in Parallel

To run tests in parallel in three instances of Chrome, use:

testcafe -c 3 chrome test1.js

All About Selenium

Selenium provides a suite of tools and libraries for automating web browsers across various platforms. Selenium WebDriver, the core component of Selenium, allows testers to write scripts in multiple programming languages such as Java, Python, C#, and JavaScript. I

ts key features include:

  1. Cross-browser and Cross-platform Testing: Like TestCafe, Selenium supports cross-browser testing across different web browsers such as Chrome, Firefox, Safari, and Internet Explorer.
  2. Large Community Support: Selenium has a large and active community of developers and testers who contribute to its development, provide support, and share best practices.
  3. Flexibility: Selenium offers flexibility in terms of programming language and framework choice. You can write test scripts using your preferred programming language and integrate Selenium with popular testing frameworks such as JUnit, TestNG, and NUnit.
  4. Integration with Third-party Tools: Selenium can be easily integrated with various third-party tools and services such as Sauce Labs, BrowserStack, and Docker for cloud-based testing, parallel testing, and containerized testing.
  5. Support for Mobile Testing: Selenium Grid allows you to perform automated testing of web applications on mobile devices and emulators, making it suitable for mobile testing as well.

How To Install Selenium

Installing Selenium involves setting up the Selenium WebDriver, which allows you to automate browser actions for testing purposes.

The setup process varies depending on the programming language you’re using (e.g., Java, Python, C#, etc.) and the browsers you intend to automate. Below is a general guide to get you started with Selenium in Java and Python, two of the most common languages used with Selenium.

For Java

Install Java Development Kit (JDK):

  • Ensure you have the JDK installed on your system. If not, download and install it from the official Oracle website or use OpenJDK.
  • Set up the JAVA_HOME environment variable to point to your JDK installation.

Install an IDE (Optional):

  • While not required, an Integrated Development Environment (IDE) like IntelliJ IDEA or Eclipse can make coding and managing your project easier.

Download Selenium WebDriver:

Add Selenium WebDriver to Your Project:

  • If using an IDE, create a new project and add the Selenium JAR files to your project’s build path.
  • For Maven projects, add the Selenium dependency to your pom.xml file:
<dependencies>
<dependency>
<groupId>org.seleniumhq.selenium</groupId>
<artifactId>selenium-java</artifactId>
<version>LATEST_VERSION</version>
</dependency>
</dependencies>

For Python

Install Python:

  • Ensure Python is installed on your system. If not, download and install it from the official Python website.
  • Make sure to add Python to your system’s PATH during installation.

Install Selenium WebDriver:

  • Open your terminal (Command Prompt or PowerShell on Windows, Terminal on macOS and Linux).
  • Run the following command to install Selenium using pip, Python’s package installer:
pip install selenium

Browser Drivers

Regardless of the language, you will need to download browser-specific drivers to communicate with your chosen browser (e.g., ChromeDriver for Google Chrome, geckodriver for Firefox). Here’s how to set them up:

Download Browser Drivers:

Set Up the Driver:

  • Extract the downloaded driver to a known location on your system.
  • Add the driver’s location to your system’s PATH environment variable.

Verify Installation

To verify that Selenium is installed correctly, you can write a simple script that opens a web browser:

For Java

import org.openqa.selenium.WebDriver;
import org.openqa.selenium.chrome.ChromeDriver;
public class SeleniumTest {
public static void main(String[] args) {
System.setProperty(“webdriver.chrome.driver”, “PATH_TO_CHROMEDRIVER”);
WebDriver driver = new ChromeDriver();
driver.get(“https://www.google.com”);
}
}

For Python

from selenium import webdriver

driver = webdriver.Chrome(executable_path=‘PATH_TO_CHROMEDRIVER’)
driver.get(“https://www.google.com”)

Replace PATH_TO_CHROMEDRIVER with the actual path to your ChromeDriver.

This guide should help you get started with Selenium. Remember, the exact steps may vary based on your development environment and the browsers you want to automate.

Also Read : Why is TestNG Awesome? Advantages of Integrating it with Selenium

Comparison Between TestCafe And Selenium

Feature TestCafe Selenium
Language Support JavaScript, TypeScript Java, C#, Python, Ruby, JavaScript, Kotlin, PHP
Browser Support Runs on any browser that supports HTML5. Includes support for headless browsers and mobile browsers via device emulators. Wide range of browsers including Chrome, Firefox, Internet Explorer, Safari, Opera, and Edge. Requires additional drivers for each browser.
WebDriver Requirement Does not require WebDriver or any external dependencies. Requires WebDriver to interact with web browsers.
Installation and Setup Simple setup with no dependencies other than Node.js. Easily installed via npm. More complex setup due to the need for installing WebDriver for each browser.
Test Execution Executes tests directly in the browser using a server. Can run tests on remote devices. Communicates with browsers through the WebDriver protocol.
Parallel Test Execution Built-in support for running tests concurrently across multiple browsers or devices. Supports parallel test execution with additional tools like Selenium Grid or third-party frameworks.
Cross-Browser Testing Simplified cross-browser testing without additional configurations. Requires configuration and setup for each WebDriver to enable cross-browser testing.
Integration with CI/CD Easy integration with popular CI/CD tools like Jenkins, TeamCity, Travis CI, and GitLab CI. Broad support for integration with various CI/CD systems.
Mobile Testing Supports mobile testing through device emulation in browsers. Supports real mobile devices and emulators through Appium integration.
Record and Replay Provides a feature to record actions in the browser and generate test code (with TestCafe Studio). Third-party tools and plugins are required for record and replay capabilities.
Community and Support Active community with support available through forums and chat. Commercial support is available through DevExpress for TestCafe Studio. Very large and active community with extensive resources, forums, and documentation.
Use Case Ideal for teams looking for a quick setup and easy JavaScript/TypeScript integration. Best suited for projects that require extensive language support and integration with various browser drivers and mobile testing through Appium.

Conclusion: Which one is Better? Based On Our Experience.

Both TestCafe and Selenium offer powerful capabilities for web testing, but the choice between them depends on specific project requirements, such as the preferred programming language, ease of setup, browser support, and testing environment complexity.

TestCafe might be more appealing for projects that prioritize ease of use and quick setup, while Selenium provides greater flexibility and language support, making it suitable for more complex automation tasks that may involve a wider range of browsers and integration with mobile testing frameworks like Appium.

Selenium vs Puppeteer vs Chai Mocha

The software life cycle has undergone drastic changes in the last decade.
So much to the extent that the role of the tester has completely changed! With the coming in of the PDO (Product Driven Organization) structure, there are no more testers and developers but only full-stack engineers.
The bottom line is testing still needs to be done.
Who does that? How does it fit in the 2-week agile sprint? Is manual testing even possible in such a short time?
The Answer
To start with, the scope for manual testing has been reduced. Agree to it or not. This is what happens in real-life scenarios. Since testing is still a task on our User Stories, it needs to be completed. Most teams take the help of automation tools.
Now here is the challenge, many small and even big companies are going to open-source automation tools which give them the flexibility to customize as per their need without any investment.
There are several tools available for you to choose from based on the kind of application you have like a web-based app or a mobile app a desktop software etc.

Selenium

Selenium is a popular open-source framework for automating web applications. Jason Huggins created it originally as a tool called “JavaScriptTestRunner” to automate repetitive tasks in web testing. Later, he changed the name to Selenium after hearing a joke about mercury poisoning from selenium supplements.
Selenium has a thriving community of developers, testers, and quality assurance professionals who help it grow and improve. The open-source nature encourages frequent updates and improvements. As of my most recent knowledge update in September 2021, the most recent version was Selenium 4, which introduced a number of significant changes and features.
Support for multiple programming languages such as Java, Python, C#, and others is one of Selenium’s key features. Selenium WebDriver for browser automation, Selenium IDE for recording and playback, and Selenium Grid for parallel testing across multiple machines and browsers are among the tools available.
Several factors contribute to selenium’s popularity. First and foremost, it is open-source, which means it is freely available to developers and organizations of all sizes. Because it supports a wide range of programming languages and browsers, it is highly adaptable to a variety of testing environments. Furthermore, the active community keeps Selenium up to date with the latest web technologies and provides solid support and documentation.

Puppeteer

Puppeteer is a well-known open-source Node.js library that offers a high-level API for controlling headless or full browsers via the DevTools Protocol. It was created by Google’s Chrome team, making it a dependable and powerful tool for browser automation and web scraping tasks.
Puppeteer has a vibrant and growing community of web developers and enthusiasts who actively contribute to its development and upkeep. Puppeteer has evolved since my last knowledge update in September 2021, and new versions have been released, each bringing improvements, bug fixes, and new features.
Some notable features of Puppeteer include the ability to capture screenshots and generate PDFs of web pages, simulate user interactions such as clicks and form submissions, and navigate through pages and frames. It also works with a variety of browsers, including Google Chrome and Chromium, and supports both headless and non-headless modes.
Puppeteers are highly regarded for a variety of reasons. For starters, it offers a simple and user-friendly API that simplifies complex browser automation tasks. Its compatibility with the Chrome DevTools Protocol enables fine-grained control over browser behavior. Puppeteer’s speed and efficiency make it a popular choice for web scraping, automated testing, and generating web page snapshots for a variety of purposes.
Several factors contribute to selenium’s popularity. First and foremost, it is open-source, which means it is freely available to developers and organizations of all sizes. Because it supports a wide range of programming languages and browsers, it is highly adaptable to a variety of testing environments. Furthermore, the active community keeps Selenium up to date with the latest web technologies and provides solid support and documentation.

Chai & Mocha

Chai and Mocha are two distinct JavaScript testing frameworks that are frequently used in web development. They play complementary roles, with Chai serving as an assertion library and Mocha serving as a testing framework, and when combined they provide a robust testing solution. Let’s take a look at each one:

Chai:

  • Chai is a Node.js and browser assertion library that provides a clean, expressive syntax for making assertions in your tests.
  • It provides a variety of assertion styles, allowing developers to select the one that best meets their testing requirements, whether BDD, TDD, or assert-style.
  • Chai’s extensibility allows developers to create custom assertions or plugins to extend its functionality.
  • Its readability and flexibility are widely praised, making it a popular choice among JavaScript developers for writing clear and comprehensive test cases.

Mocha:

  • Mocha is a versatile JavaScript test framework that provides a structured and organised environment in which to run test suites and test cases.
  • It supports a variety of assertion libraries, with Chai being one of the most popular.
  • Mocha provides a simple and developer-friendly API for creating tests, suites, and hooks.
  • Its ability to run tests asynchronously is one of its key strengths, making it suitable for testing asynchronous code such as Promises and callbacks.
  • Both Chai and Mocha are open-source projects with active developer communities that contribute to their growth and upkeep.

Their popularity stems from their ease of use, versatility, and widespread adoption within the JavaScript ecosystem. The expressive syntax of Chai and the flexible testing framework of Mocha combine to form a formidable combination for writing robust and readable tests, which is critical for ensuring the quality of web applications and JavaScript code. Because of their ease of use and extensive documentation, developers frequently prefer this pair for testing in JavaScript projects.

Installing Selenium, Puppeteer and Chai Mocha

Installing Selenium:

Install Python: Selenium primarily works with Python, so ensure you have Python installed. You can download it from the official Python website.
Install Selenium Package: Open your terminal or command prompt and use pip, Python’s package manager, to install Selenium:
pip install selenium
WebDriver Installation: Selenium requires a WebDriver for your chosen browser (e.g., Chrome, Firefox). Download the WebDriver executable and add its path to your system’s PATH variable.
Verify Installation: To verify your installation, write a simple Python script that imports Selenium and opens a web page using a WebDriver.

Installing Puppeteer:

Node.js Installation: Puppeteer is a Node.js library, so you need Node.js installed. Download it from the official Node.js website.
Initialize a Node.js Project (Optional): If you’re working on a Node.js project, navigate to your project folder and run:
npm init -y
Install Puppeteer: In your project folder or a new one, install Puppeteer using npm (Node Package Manager):
npm install puppeteer
Verify Installation: Create a JavaScript or TypeScript script to launch a headless Chromium browser using Puppeteer.

Installing Chai Mocha:

Node.js Installation: Chai Mocha is also a Node.js library, so ensure you have Node.js installed as mentioned in the Puppeteer installation steps.
Initialize a Node.js Project (Optional): If you haven’t already, initialize a Node.js project as shown in the Puppeteer installation steps.
Install Chai and Mocha: Use npm to install both Chai and Mocha as development dependencies:
npm install chai mocha –save-dev
Create a Test Directory: Create a directory for your test files, typically named “test” or “tests,” and place your test scripts there.
Write Test Scripts: Write your test scripts using Chai’s assertions and Mocha’s testing framework.
Run Tests: Use the mocha command to run your tests. Ensure your test files have appropriate naming conventions (e.g., *-test.js) to be automatically detected by Mocha.

Criteria Selenium Puppeteer Chai Mocha
Purpose Web application testing across Headless browser automation for JavaScript testing framework for
various browsers and platforms. modern web applications. Node.js applications.
Programming Supports multiple languages: Java, Primarily used with JavaScript. JavaScript for test assertions and
Language Support Python, C#, etc. Mocha as the test framework.
Browser Cross-browser testing across major Chrome and Chromium-based N/A (Not a browser automation tool)
Compatibility browsers (e.g., Chrome, Firefox, browsers.
Edge, Safari).
Headless Mode Supported Supported N/A (not applicable)
DOM Manipulation Limited support for interacting with the DOM. Provides extensive support for interacting with the DOM. N/A (focused on test assertions)
Ease of Use Relatively complex setup and usage. User-friendly API and clear Straightforward API for defining
documentation. tests and assertions.
Asynchronous Yes, with explicit wait commands. Native support for asynchronous Yes, supports asynchronous code.
Testing operations and Promises.

Use Cases:

  • Selenium is widely used for automating the testing of web applications across different browsers and platforms.
    Example: Automating the login process for a web-based email service like Gmail across Chrome, Firefox, and Edge. Puppeteer: Headless Browser Automation
  • Puppeteer is ideal for tasks like web scraping, taking screenshots, generating PDFs, and automating interactions in headless Chrome.
    Example: Automatically navigating a news website, capturing screenshots of articles, and saving them as PDFs. Chai Mocha: JavaScript Testing
  • Chai Mocha is primarily used for unit and integration testing of JavaScript applications, including Node.js backends.
    Example: Writing tests to ensure that a JavaScript function correctly sorts an array of numbers in ascending order.

Let us see how the tools discussed here can help you with your testing tasks.

Testing Type Selenium Puppeteer Chai Mocha
Functional Yes Yes Yes
Regression Yes Yes Yes
Sanity Yes Yes Yes
Smoke Yes Yes Yes
Responsive Yes No No
Cross Browser Yes No Yes
GUI (Black Box) Yes Yes Yes
Integration Yes No No
Security Yes No No
Parallel Yes No Yes


Advantages and Disadvantages

Selenium’s Benefits and Drawbacks:

Advantages:

  • Selenium supports a variety of web browsers, allowing for comprehensive cross-browser testing.
  • Multi-Language Support: Selenium supports multiple programming languages, making it useful for a variety of development teams.
  • Selenium has a large user community, which ensures robust support and frequent updates.
  • Robust Ecosystem: It provides a diverse set of tools and frameworks for mobile testing, including Selenium WebDriver,
  • Selenium Grid, and Appium.
  • Selenium has been in use for a long time, making it a stable and reliable option.

Disadvantages:

  • Complex Setup: Selenium can be difficult to set up and configure, particularly for beginners.
  • Selenium tests can be time-consuming, especially when dealing with complex web applications.
  • Headless Browser Support is Limited: Headless browser support in Selenium is not as simple as it is in Puppeteer.
  • Because of its extensive features and complexities, Selenium can have a steep learning curve.

Puppeteer Advantages and Disadvantages:

Advantages:

  • Headless Mode: Puppeteer includes native support for headless browsing, which makes it useful for tasks such as web scraping and automated testing.
  • Puppeteer is simple to install and use, especially for developers who are familiar with JavaScript.
  • Puppeteer’s integration with the Chrome browser is excellent because it is maintained by the Chrome team.
  • Puppeteer is optimized for performance and can complete tasks quickly.
  • Puppeteer is promise-based, which makes it suitable for handling asynchronous operations.

Disadvantages:

  • Puppeteer primarily supports Chrome and Chromium-based browsers, which limits cross-browser testing capabilities.
  • Puppeteer is dependent on JavaScript, so it may not be suitable for teams working with other programming languages.
  • Smaller Community: Puppeteer’s community is smaller than Selenium’s, which may limit available resources and support.

Chai Mocha’s Benefits and Drawbacks:

Advantages:

  • Chai Mocha was created specifically for testing JavaScript applications, making it ideal for Node.js and front-end testing.
  • Support for Behavior-Driven Development (BDD) testing: Chai Mocha supports BDD testing, which improves collaboration between developers and non-developers.
  • Chai, a component of Chai Mocha, provides flexible assertion styles, making it simple to write clear and expressive tests.
  • Plugins from the community: Chai has a thriving ecosystem of plugins that can be used to extend its functionality.

Disadvantages:

  • Chai Mocha is primarily focused on JavaScript, which limits its utility for projects involving other programming languages.
  • Chai Mocha is not suitable for browser automation or cross-browser testing, which Selenium and Puppeteer excel at.
  • It has a limited scope because it is intended for unit and integration testing but lacks features for end-to-end testing and browser automation.

Hope this data comparison is helpful for you to decide which one to pick up for your team and project. My suggestion, if you are dealing with only Chrome then go for Puppeteer.
But if you want your application to run across all platforms and you want it to be tested in multiple browsers and platforms Selenium would be the right choice.
With Selenium, the coding and tool expertise required is also limited, which means you can build up your team and competency faster.
So our personal choice is Selenium which offers more features and online support forums for guidance as well.
Take your pick.

Difference between regression testing and retesting

Regression testing Re testing
Done whenever there is a change in code A confirmation technique used once the defect is fixed
To  assure that new changes hasn’t caused new issues To find out whether the issue has been rectified and functionality is restored
Can be done parallel with retesting Should be performed before regression testing
Passed test cases are used Failed test cases are put to use
Defect verification is not apart Defect verification is a part
Can be used to check unexpected results Confirms that the original fault has been corrected
Automation is the key Can’t be automated

 
difference between regression testing and re testing

Difference Between White box and Black box Testing

Black Box testing: it’s kind of testing where the tester doesn’t know the architecture of the software he is testing. These tests can either be functional or non-functional. It’s high-level testing that’s meant to test the behavior of the software.
White box testing: White box testing is used to test the internal structure of the system. In this type of testing, usually code statements, branches conditions, etc. are covered. White box testing is considered a low-level testing often called a glass box, transparent box or code base testing.
difference between white box and black box testing

Difference between use case and test case

Use case Test case
Set of variables, conditions or steps used to define the interaction between a role and a system to attain certain objectives. Conditions or variables used to define the functionality and behavior of a software
Prepared by business analyst Prepared by test engineers
Different case can be combined One at a time
Use case is something that has to be designed Testcase is something that has to be executed
Describes the flow of events of  the software A document that contains events, action and expected result of the software
Provided to developers Provided to testers
 
Managed by diagrams Managed by function tests
Requires proper document and research Requires test scripts are required

 
Difference between use case and test case

Smoke Testing Vs Sanity Testing: What’s the difference?

Smoke testing vs sanity testing! which one hail? To be frank, each process is important and the situation and requirement demand which one to choose from.

However, the comparison depicted here in this blog will help you understand more about smoke and sanity testing.

Smoke Testing

Smoke Technique is one of the testing types that’s instigated from hardware testing.

This technique comes into the scenario at the time of attaining build software from the development team.

The main reason to go for the smoke testing is to find out whether the software which is built is testable or not.

It is usually done at the point where the software is built.  This process has been given another name as well. It is actually called “Day 0″.

The smoke Testing process is counted as the best one because it is a time-saving one.

The most astounding feature about the process is that the time consumed is less since the testing is only done when the main functions of the application are not properly working or if certain major bugs are not sorted till that moment.

The main emphasis of Smoke Testing is on the working of the major features and primary functions of the application.

Going for the test is the basic and important feature of an application before one goes for the deep, accurate testing (before understanding all probable positive and negative values) is referred to as smoke testing.

The whole emphasis while going for the smoke testing is on the productive flow of the claim and it possesses only the verified data, not the unacceptable one.

In smoke testing,  the process confirms every build is testable or not; hence it is called Build Verification Testing.

When smoke testing is being conducted then one can look for the blocker bug at the initial period only so that the test engineer just doesn’t have to sit idle, or they can go on further and do the analysis of the independent testable modules.

Which test comes first smoke or sanity?

Smoke testing is usually performed on a new build/feature.  The main motto behind smoke testing is to ensure that the software is ready to be tested.

Sanity testing is performed when time is not at the disposal of the dev team. Smoke testing is done first and then the application goes through quick regression or sanity testing

What is the process for conducting smoke testing

The process to Conduct Smoke Testing:

For Smoke testing, there is no requirement to create test cases. In this, the only requirement is to pick the required test cases from the already created test cases.

As stated before too, Smoke Testing emphasis the workflow of core applications so that choosing test case suits that cover the main functionality of the application is done.

It is vital to bring down the number of test cases as much as possible and the time of implementation should not be more than half an hour.

When smoke testing is performed

Usually when the new build is implemented then one round of smoke testing is conducted because there are chances of blocker bugs in the latest one which is created.

However, there can be a certain change that might have wrecked a major feature that as fixing the bug or adding a new function which can affect a major piece of the original software, or the smoke testing is done where the installation is taking place.

When the stable build is all installed then smoke testing is conducted to find the blocker bug.

Why is smoke testing done?

There are certain reasons because of which smoke testing is conducted. Stated below are the important ones.

  • The smoke testing is basically done to make sure that the product is testable.
  • The smoke testing is done in the beginning so that the bugs which are there in the basic features could be detected and further can be sent to the development team so that the development team gets a lot of time to get rid of the bug.
  • Smoke testing is done to ensure that the application is installed in the approved manner.

Types of Smoke Testing

The Smoke testing is further divided into two types:

 Formal smoke testing

In this, kind of testing the application is sent to the Test Lead by the development team.

Further, the test lead will divide the task of testing the app among respective tests along with reports which state the whole scenario after going through the smoke testing.

Once the testing team is over with smoke testing, they will report for the testing done to the test lead.

 Informal smoke testing

Here, the Test lead notifies that the application is all set for further testing.

The test leads do not give any specific instructions to perform the smoke testing, but still, the testing team begins with the testing procedure of the application by going for the smoke testing.

Example for smoke testing

A detailed explanation about smoke testing and example for the process is given in this blog, please go through

Sanity Testing

Sanity Testing is a division of regression testing. Sanity testing is usually done to make sure that the code changes which are being done are carried out properly.

Sanity testing is a general strike to note down that the testing for the build can further go on or not.

The main emphasis of the team while doing the sanity testing process is to confirm the functioning of the application and not about the detailed testing.

Sanity testing is usually carried out on build where the production deployment is essential right away similar to a critical bug fix.

The functionality of Sanity Testing:

The main reason for which sanity testing is conducted is to know about the changes or the projected functionality is being done in the same order as it was mentioned.

If the sanity test fails, the software product is declined by the testing team to stay on a safer side in terms of time and money.

It is carried out once the software product has carried out the smoke test and the Quality Assurance team has acknowledged for the further testing.

Features of Sanity Testing:

  • Division of Regression Testing:

Sanity testing is further a division of regression testing and emphasizes the smaller part of the application.

  • No script required

There is no such script available for sanity testing most of the time.

  • No documentation

There is no documentation required for the sanity testing so it is undocumented.

  • Narrow and extensive

Sanity testing is narrow but at the same time it is an extensive approach of testing where limited functionalities are covered in depth.

  • Carried out by testers

Usually, sanity testing is carried out by the testers only.

Advantages of Sanity Testing:

  • Sanity testing is a great aid when it is about quick identification of the defects in the main area of functionality.
  • It can be further performed in a lesser time as there is no need for any kind of documentation for performing the sanity testing.
  • During the sanity testing if there are defects found then the project is further declined and this is a great way to save out on time which can be further utilized to carry out regression tests.

Example for Sanity Testing

  • For instance, build 2 has a multitude of feature which are tested and fixed accordingly.
  • Now build 3 with added features and integration has again come for testing
  • To make sure that the new features haven’t affected the existing ones, smoke testing will be performed
  • Once that’s done a high-level analysis of the entire software will be carried out to ensure no new bugs have surfaced.

Sanity Testing Process

The main reason for which the sanity test is performed is to know about the incorrect outcomes or faults which are not accessible in the constituent process.

Even it is done to make sure that the newly added features do not disturb the functionalities of ongoing features.

Further, three steps are implemented in the sanity testing process that is Identification, Evaluation, and Testing

First step- Identification

In the sanity testing process, the first step is the Identification one where one finds out the newly added constituents and features along with the adjustment there in the code while going for the process of fixing the bug.

Second step- Evaluation

Once the identification step is completed, one needs to analyze the recently implemented constituents, characteristics and further change them so as to verify their proposed and suitable working as mentioned in the stated requirements.

Third step- Testing

After performing the identification and evaluation step one needs to go further to the third step which is testing.

In this step, we examine and evaluate all the connected constraints, constituents, and fundamentals of all the above analyzed attributed and change them so as to ensure that all of it is working properly.

Once all the above-stated steps are going in the right manner, the build can be made to undergo more exhaustive and strenuous testing, and the release can be carried further for the thorough testing process.

Comparison of Smoke Testing and Sanity Testing

Thus both the tests have their own unique traits which make them required for the software processes.

Smoke testing vs sanity testing

                               Smoke Testing                  Sanity Testing
Used for checking critical functionalities of a software The focus will be on a particular area or minor functionalities
Performed to check the stability Used to verify the rationality
Both manual and automated test cases can be used Generally, sanity testing does not have a test script or test cases
Usually performed before passing the build to the testing team Executed before UAT and regression
Carried over by developers Performed by testers
A subset of acceptance testing A subset of regression testing

Some testing vs sanity testing

Conclusion

Hope you got to know the difference between sanity testing and smoke testing and are able to understand, smoke testing vs sanity testing has no meaning to it as both processes have equal importance.

Load Testing vs Stress Testing: What’s the difference?

Load Testing vs Stress Testing what’s the striking differences between both the process?
In the following sections, we will discuss in detail load and stress testing. People often get confused between these 2 and refer to them as a load and stress test. But there are fundamental differences between these 2 performance tests, as we will discuss in the upcoming sections. These are the 2 most important performance tests that you may wish to see the results for before your product or application goes live. This is especially true for applications that are connected to the internet.
Load Testing
As the name suggests, in a load test, many users are loaded into the system or application, and then the transactions are performed to see how well they work. Load test gives you an idea of how your application would perform in the real world with “n” numbers of users (referred to as the load) active in the system.
The results of a load test are generally expressed in terms of TPS or transactions per second. This means the system can process “N” transactions per second with an active user load of “X” thousand. The value for “N” and “X” needs to be defined by the business based on the expected number of users and the infrastructure you have in place to handle this load.
Type of performance testing
Stress Testing
In Stress testing, the system is put under stress and then its performance is measured. It is used to verify the stability and reliability of the system under stress. It is also done to ensure the system does not crash at any point.
Considering your application can handle 1o0 concurrent users. In a stress test, you may start by having 100 or more users in the system performing data transactions. Slowly you would stress the system by either increasing the load or having more transactions performed. Then you would monitor how your application is performing in this stressed situation. The stress test is also performed to understand at which point your system is likely to crash or break.

Major Differences between Load and Stress Testing?
Here are some major differentiation points between load and stress testing.

Sno Load Testing Stress Testing
1 It is used to check the performance/functionality of the system under load (multiple active users) It is used to test the reliability of the system under stress or extreme load
2 The load is set up with multiple active users – virtual or real – inserted into the system Stress is created by creating more users, data, and transactions in the system
3 Load test helps to identify the upper limit of the users that the system can handle. A stress test is used to understand the behavior and reliability of the system under extreme load or stress.
4 The performance of the app is measured with load in the system The reliability and stability of the system is measured under extreme load or stress
5 Some of the load testing tools are Jmeter, NeoLoad, Headspin, Experitest, etc Some tools recommended for stress testing are Stress Testers, Jmeter, NeoLoad

Difference between stress testing and load testing
Examples of load and stress testing
To better understand the difference between load and stress testing, let us look at an example. Let us take an example of an online shopping site. Assuming that your application is designed to handle 1000 concurrent users. When you do a load test, you may want to start with a 50% load. So, you set up your systems to simulate 500 users and then check how the system responds by checking the API response times. If the response time is within acceptable limits, you progressively increase the load to 700, 800, 900, and 1000 to see how your application performs under the different loads.
For the same application, if you were to do a stress test, you will 1000+ users simultaneously generating calling multiple APIs. This will stress out the system which is designed to handle only 1000 users. The reliability of the system is then checked by checking the correctness of the API response, to check if the application or pages crash at any point, the data is saved to and from the database, etc.
Some other examples of load testing are sending multiple files for printing at the same time to the printer, sending thousands of emails at a time to load the mail server, or changing large volumes of data in a word or excel or any other processing system.
Some scenarios that emphasize the need for a stress test are an educational website at the time of result declaration, or eCommerce website during their annual sales or new and anticipated product launches, or the latest vaccination availability and booking apps as well.

Wish to know about the best performance testing tools in the market? Read here!

Performance testing includes various types of testing including Load, Stress, and others. A performance test is done to validate the reliability and stability of the system, ensure the response time is within the defined SLA, and also ensure that the system is scalable.
Load test only concentrates on the performance of the application or system with many active users or with a load. Hence, Load testing can be considered as a subset of the performance test.
What is the purpose of load testing?
The main purpose of Load testing is to understand, how the system would perform under the real-life load. For this, the business first needs to analyze the expected user base for the application. Then a load similar to that number is simulated and the performance of the system is measured. The results are normally mentioned as successful transactions per second under “X” load or “X” active users.
It is very helpful in understanding the achievable performance of business-critical transactions along with resource utilization. Based on the load test result, the business decides to scale up or scale down the backend infrastructure.

What are the different types of load and stress testing?
Load testing can be further divided into 4 different categories based on the load used. These are

  1. Load Testing: Here you simply check the performance of the system under different levels of load which are well within the expected load limits.
  2. Capacity Testing: Also called scalability testing capacity testing is mainly done to identify the maximum load the system and the infrastructure can take without breaking down or without breaching the SLA.
  3. Stress Testing: It is done to find out how the system performs under stress or extreme load. This is achieved by reducing the infrastructure, reducing the database size along increasing the load many folds.
  4. Soak Testing: It is a long-form of load testing where system performance or degradation in performance is monitored over a long duration.

How are load and stress testing done?
Every application or system will have a limit to the load it can handle at a particular time. This limit is decided by the size of the database and servers used. Both in load and stress testing,  load or stress in the system is simulated using real users or using tools.
Load testing is done with real users and with simulated users as well. When real users are used, due to the limitation to the number of users available to database, servers, and other infrastructures are scaled down to create a load on the system. Then the testing is performed and the response times are calculated. The results are then extrapolated to derive the performance numbers for the actual infrastructure. When tools are used, any number of users can be simulated, so the actual infrastructure is tested.
Stress testing can be performed only with the help of tools. Here the system is put under stress by having inserting users many-folds than the expected told, or by putting stress on the DB and servers with many transactions and API calls. The aim is to check the stability and reliability of the system under extreme load. It also helps to identify the point at which the system is likely to crash. Based on the results of the load and stress testing, the business may decide to scale up the infrastructure for better application performance and reduced downtimes.
What are the goals of load and stress testing?
The goal of load and stress testing in to find the performance defects in the application and in the infrastructure or network that can affect the application.
The main goals of load testing are:

  1. To ensure that under different permissible the response time for all the transactions is within the SLA (Service Level Agreement) as fixed by the business.
  2. To measure the performance of different application modules under different loads.
  3. To measure the network latency and other components that can impact the response time.
  4. To uncover application design issues that can reduce the performance.
  5. To check the server configurations for web and application to ensure they can handle the load.

The main goals of stress testing are:

  1. To uncover issues that occur only at extreme load conditions.
  2. To check the stability and reliability of the application under heavy load.
  3. To uncover synchronizations issues, memory leaks, and race conditions
  4. Optimizing the system to prevent a breakdown in production.
  5. Planning for the scalability and best utilization of the available infrastructure.

Do you know that volume testing is absolutely needed before app release? Read more

Soak Testing is a type of Performance Testing where the performance of the system under load is analyzed for long-duration similar to a production scenario. Some applications need to be online 24/7 like the eCommerce websites. They may have a different load at different points, a soak test would put the system under test with a specific or varying load and monitor its performance for hours or even days.
A soak test aims to identify issues that occur only after the system has been active for long durations. The most common issue identified in a soak test is related to memory leaks where the system starts degrading after being live for a long time.
Conclusion
The performance of a software application is critical to the success of the application. For this purpose after the functional testing, performance tests are performed. The most common performance tests are load and stress tests. Based on the results of the load and stress test the business decides on the infrastructure needed to support the application.
The load and stress result thus play a very important part not only in the success of the application but also helps business in optimizing resource utilization and improved profit.
 

Agile VS DevOps: Difference between Agile and DevOps

Agile vs DevOps which is better? Agile, Scrum, and DevOps are some of the buzzwords these days. They are changing the way people look at how and when testing and automation need to be done. In this section, we will discuss the difference between Agile and DevOps and the testing methodology in both.
What is Agile Methodology?
Agile Methodology diagram
Agile literally means “moving quick and easy”. In terms of software development, Agile means delivering small chunks of stand-alone and workable codes that are pushed to production frequently. This means your traditional project plans that spanned over months and sometimes years in now cut short to sprints no longer than 2-3 weeks. All timelines are shrunk to deliver working code at the end of each sprint.
Know more: Why Agile testing is so innovative!
What is DevOps Methodology?
DevOps Methodology
DevOps is a set of practices that aim to automate the development, testing, and deployment so that code gets deployed to production as small and rapid releases as part of continuous development and continuous deployment (CI/CD). DevOps is a combination of the terms Development and Operations and aims to bridge the gap between the two entities enabling smooth and seamless production code moves. 
Test your app in various screens
Testing in Agile
The traditional STLC holds no good when it comes to Agile. There is no time for all the documentation and the marked-out phases. Everything from plan, design, development, testing, and deployment needs to be winded up in a 2 to 3-week sprint.
Here are some pointers that explain how testing is done in Agile projects:

  • Testing is a continuous process. It happens along with the development. The feedback is shared with the dev team then and there, ensuring a quick turn-around. 
  • Testing is everyone’s responsibility and not only of the testing team. Product quality is the greatest priority. 
  • With shrinking timelines, documentation is a bare minimum.
  • Automation Testing is used for the N-1 iteration code. That is, in the current iteration, the automation team would be automating the functionalities of the last iteration and running the automation code for N-2 iterations. This will give more time for the manual testing team to work on the thorough testing of the current iteration functionalities

Agile Testing Methods
Traditional testing methods are difficult to fit in Agile and are unlikely to give the desired results. The best-suited methods for agile testing are listed below:

  • Behavior Driven Testing (BDD)

BDD Testing makes life simple for both testers and developers. The test cases and requirements are written in readable English with keywords (Gherkin Given/When/Then syntax). These requirement documents double up as test cases. 

  • Acceptance Test-Driven Testing

This is another way of ensuring the best test results for an Agile process. Think and test as a customer would do. In this case, meetings are held between developers, testers, and other team members to come up with different test scenarios to match the application usage by the end-user. These are given the highest priority for testing.  

  •  Exploratory Testing

Another very useful but non-structured testing approach frequently used in the Agile process is exploratory testing. This involves playing around with the application and exploring all areas as per the understanding of the tester. This is done to ensure that there are no failures or app crashes. 
Testing in DevOps
DevOps testing is mostly automated just like most of the other things in DevOps. The moment there is a code check-in, automated code validation is triggered. Once that passes the testing suite or Smoke test is triggered to ensure nothing is broken. If everything goes well, the code is pushed to production. 

  • Most business-critical functionalities are tested through automation or API responses to make sure there are broken functionalities due to the latest code change. 
  • Based on the business requirement, the automation code can be expanded to include more functionalities or limit to a smoke/sanity test. 
  • The testing is triggered with the help of microservices and API responses. 

DevOps Testing Methods
Here we discuss some tools and techniques in testing that can be very beneficial for the DevOps process. These help to reduce the time-to-market and also improves the overall product and testing efficiency. 

  • Test-Driven Development (TDD)

In a TDD approach, the developers are expected to write unit test cases for every piece of their code covering all the workflows. These tests ensure that the piece of code is working as per the expectation. 
Apart from TDD the DevOps teams also use the ATDD and BDD approach as discussed above in the Agile section. These are equally helpful in ensuring greater quality and a streamlined approach to continuous development and deployment to production. 
Read also: Software testing Models: Know about them
Core Values of Agile and  DevOps (Agile VS DevOps)
Let us now discuss the core values of Agile and DevOps that make them different from each other. 
Agile – Core Values
Below are the values that govern any Agile process. 

  1. People over Process: In Agile there is more focus on the people, their skills, and how best to put them to use. This means elaborate processes and multiple tools may take a backseat. While the process is important, things as rigid as the traditional waterfall model can not work in Agile 
  2. Working code over documentation: Agile lays more importance on a stand-alone working code to be delivered at the end of every sprint. This means that there may not be enough time for all the documentation. In most cases, there will be a minimal document for the agile development processes and more focus is on getting a working code at the end of the sprint. 
  3. Customer Feedback over contract: While there are contracts in place on when and how the complete project needs to be delivered, in Agile the team closes work with the customer and is flexible to move around the dates of the planned features within a specific project line. This means if the client needs a certain feature ahead of time and needs some improvements these can be easily prioritized for the next sprint. 
  4. Flexible over fixed plan: Agile sprints can be redesigned and re-planed as per the customer’s needs. This means the concept of fixed plans does not fit in Agile. Since the Agile plans are created for sprints that are only about 2-3 weeks long, it is easier to move features from one sprint to another as per the business and customer needs easily. 

DevOps – Core Values
DevOps is an amalgamation of Development and Operations. Both these teams work together as one to deliver quality code to the market and customers. 

  • Principle of flow: Flow means the actual development process. This part of DevOps normally follows Agile or Lean. The onus is more on quality than quantity. The timelines are not as important as the quality of the products delivered. But this is true only for new features, not the change requests and hot fixes. 
  • Principle of feedback: The feedback and any broken functionalities reported in production need to be immediately fixed with hotfixes. The delivery features are flexible based on the feedback received from the features already in production. This is the most important aspect of the feedback principle. 
  • Principle of continuous learning: The team needs to continuously improvise to streamline the delivery of features and hotfixes. Whatever is developed needs to be automatically tested and then a new build delivered to prod. This is a continuous process.

Test your ecommerce website for bugs
Wish to know about TMMI (Test Maturity Model Integration) Reas this!
Agile VS DevOps: The key differences
In this section, we have tabulated the differences between Agile and DevOps for a quick understanding and review. 

Feature  Agile DevOps
Type of Activity Development Includes both Development and Operations.
Common Practices Agile, Scrum, Kanban, and more CI (Continuous Integrations), CD (Continuous Deployment)
Purpose Agile is very useful to run and manage complex software development projects DevOps is a concept to help in the end-to-end engineering process. 
Focus  Delivery of standalone working code within a sprint of 2-3 weeks  Quality is paramount with time being a high priority in the feedback loop (hotfixes and changes requests)
Main Task Constant feature development in small packets Continuous testing and delivery to production
Length of Sprint typically, 2-4 weeks It can be shorter than 2 weeks also based on the frequency of code check-ins. The ideal expectation would be code delivery once in a day to once every 4 hours. 
Product Deliveries Frequent, at the end of every sprint Continuous delivery. Coding, testing, and deployment happen in a cyclic manner
Feedback Feedback and change requests are received from the client or the end-users Feedback and errors are received from automated tools like build failure or smoke test failures etc.
Frequency of Feedback Feedback received from the client at the end of every sprint or iteration Feedback is continuous
Type of Testing Manual and Automation Almost completely automated
Onus of Quality More than quality, priority is on working code. Ensuring good quality is the collective effort by the team. Very high-quality code only is deployed once it passes all the automated tests. 
Level of Documentation Light and Minimal Light and Minimal (sometimes more than Agile though)
Team Skill Set The team will have a varied skill set based on the development language used and types of testing used The team will be a mix of development and operations. 
Team Size Agile teams are small so they can work together delivering code faster Teams are bigger and include many stakeholders
Tools Used JIRA, Bugzilla, Rally, Kanban Boards, etc. AWS, Jenkins, TeamCity, Puppet

Agile VS DevOps Infographics for quick understanding
difference between agile and devops
Last Thoughts,
Agile VS DevOps which one is better?
Both Agile and DevOps are here to stay. While Agile is a methodology or process that focuses on the delivery of small packets of working code to production, DevOps is more like a culture. A culture that advocates continuous delivery of code to production automatically after successful testing. Agile enhances DevOps and its benefits too. Both work hand-in-hand for a better and more quality product.