Automation Testing Tutorial For Beginners

Automation testing not only relieves testers of repeatedly executing the same test cases again and again but also enhances the execution speed and decreases the chances of human prone errors. Will not you like something as effective as automation testing to be on your stride?
Let us learn more about automation testing here
What is Automation Testing?
Automation Testing, automates the manual testing nullifying human efforts.  It uses an automation tool to run your test cases. These automation tools do not require any human intervention and automatically enters test data into the System under Test, compare expected and actual results and generate detailed test reports.
Why do I spend Extra Money on Automation testing?
Below mentioned benefits of automation testing will definitely convince you to consider automation testing for your system and will assure you it will not be a waste of money.

  1. Sometimes you have to repeatedly execute the same test cases for many numbers of times, test automation tool allows you to record the test suite and re-execute it when required.
  2. Thus it eliminates the boredom of executing the same test case again and again. It also improves the ROI as no human intervention is required for automated test suits.
  3. Automation testing saves time, as manually testing all scenarios for various devices and browsers can be very time-consuming.
  4. Testing multilingual sites manually can be very difficult; hence automation testing is very beneficial in such a case.
  5. In case of long test cases, they can be left unattended whole night in automated testing.
  6. Increases the speed of testing.
  7. It gives wider coverage of test cases.
  8. Manual testing can be boring at times and can hence be error-prone; this issue is very well taken care by automated testing.

But it is not a good idea to automate all type of testing, so be particular in deciding when to automate your test cases and when not.
Which Test Cases should We Automate?
Our main aim is to get a higher ROI. Based on it, here are few test cases you can consider automating

  • High Risk – Business Critical test cases
  • Test cases to be executed repeatedly
  • Tedious or difficult test cases
  • Time-consuming test cases

There are a few types of test cases that are better suited for manual testing. So it is better not to automate such test cases.

  • New test cases that are not even manually executed even once
  • Test Cases with frequently changing requirements
  • Test cases executed on an ad-hoc basis.


What are the Common Myths of Automation Testing?
Many myths are linked to software testing. It is important to be well aware of these misconceptions before you kick off your automation testing
Some of the common myths associated with automation testing are:

  • Automation completely replaces Manual Testing

Automation testing is definitely not a complete replacement of manual testing. There are many unpredicted scenarios that might require human intervention and there are some errors that are better determined by manual testing.

  • Automation Testing is not necessary, Manual Testing provides a solution to all kinds of Testing.

There is another side of the coin where some people believe that everything can be done manually. But there are some scenarios like regression testing where manual testing cannot be effective and might take longer to accomplish the tasks.

  • Automation consumes a Lot of Time

It might seem that automating the tests is time-consuming, but if we consider the complete picture, once automated, the automation testing can save us a lot of time.

  • Automation Is Very Easy

Automation testing as believed is not an easy-peasy task. Writing test scripts requires knowledge and experience and is definitely not an easy task. But if you compare it with manual testing, it definitely is easier if you know how to write the test cases.

  • Automation is only for Regression Testing

To much automation testing is only meant for regression testing. But the fact is that it covers many other areas like performance, product setup, security, compatibility, and many others.

  • Automation testing does not require cooperation between the Testers

It is completely a myth that automation testing has nothing to do with cooperation among the testers. Software development as a whole requires a fine-tuning among the engineers and automation testing is no different and requires close cooperation between the testers.

  • It returns a Faster ROI

Automation testing is a long term process and expecting immediate returns on your automation investments is a huge mistake. You have to be very patient to start getting a positive ROI.

  • Automation Testing only detects Bugs

If you are the one who believes automation testing only finds the errors then let us acknowledge you with its other benefits. It delivers valuable data and insights which help in improving the end product and solve many technical issues.
What should you do and what not in Automation testing?
There are always Dos and Don’ts for everything. These dos and don’ts are very important to perform your task effectively. Here are dos and don’ts of Automation testing that can help you conduct your automation testing effectively.
The Dos of Test Automation

  1. Break Your Tests Into smaller And Autonomous Scenarios

Shorter and more specific scenarios can help you detect issues with ease. Single test scenario makes troubleshooting difficult.

  1. Choose the Tests to Automate wisely

Automating all the test cases are not a wise idea, so be very ingenious while selecting the test cases to automate.

  1. Start small, don’t hurry

Don’t be in a hurry to create the complete test suits all at once. Follow the project’s workflow and automate only what is required.

  1. Set Priorities

Prioritize your work. Spend more time on test cases for the functions that are more crucial the simple and less important ones.

  1. Employ Professionals

Using an expert hand for your automation testing requirements can promise you greater benefits.
The Don’ts of Test Automation

  1. Do Not start Automating From the First Day Itself

Don’t be in a haste to automate your test cases. Give your project a little time and understand the scope of automation for your project.

  1. Don’t Try Running Everything at Every Time

It’s certainly not a good idea to test everything all the time. Spend time on testing only the functionalities that require testing and don’t waste time on testing everything all the time.

  1. Don’t Automate All the Manual Tests

Automating everything is not a good idea. Manual testing holds a very important place in software testing and is capable of finding the most unexpected defects at time.

  1. Don’t Automate Everything

Don’t just automate everything; it could be simply a waste of time and money.

  1. Don’t Ignore Further Development

Don’t ever think your work of automation testing is done. Keep a track of developments in the project and don’t miss to add test cases for them.
How to automate Test Cases?
Automating test cases follows a predefined process. Here are the basic steps to follow while automating your test cases.

  1. Test Tool selection

Test Tool we select is largely dependent on the technology your application is built on. It’s a good idea to conduct a Proof of Concept of Tool on Application Under Test.

  1. Define the scope of Automation

The scope is the part of your Application that has:

  • Scenarios with extensive data
  • Business important features
  • Functionalities that is common among applications.
  • Technical feasibility
  • Components with Reusable test cases
  • Complex test cases
  • Components to be tested across cross-browser testing
  1. Planning, Design, and Development

This phase is all about automation, strategy, design, and development. Your automation planning and design should include the below-given points:

  • Shortlisted Automation tools
  • Design and features of the Framework
  • Automation testbed preparation
  • Scripting and execution schedule and timelines
  • All the Deliverables

  1. Test Execution

Finally, it’s time to execute the test cases. In this phase, input test data are set to run and after execution, the test report is produced. You can directly execute test cases through automation tools or through test management tools that further invoke the automation tools.

  1. Maintenance

Maintenance is an on-going and a very important phase of automation testing life cycle. Whenever new functionalities are added to the system under test, automation scripts need to be reviewed and revised. Hence maintenance becomes important to enhance the effectiveness of automation scripts.
What are the various tactics for Automation Testing?
Automation testing is a crucial part of STLC. To accomplish it you can follow any of these three approaches.

  • Code-Driven: Code-driven automation testing, which is popularly used in agile software focuses on validating whether the code works as per expectations or not.
  • Graphical user interface (GUI) testing: It is meant for GUI rich applications. User actions can be recorded here and can be analysed multiple times. It supports test cases in multiple languages like C#, Java, Perl, Python, etc.
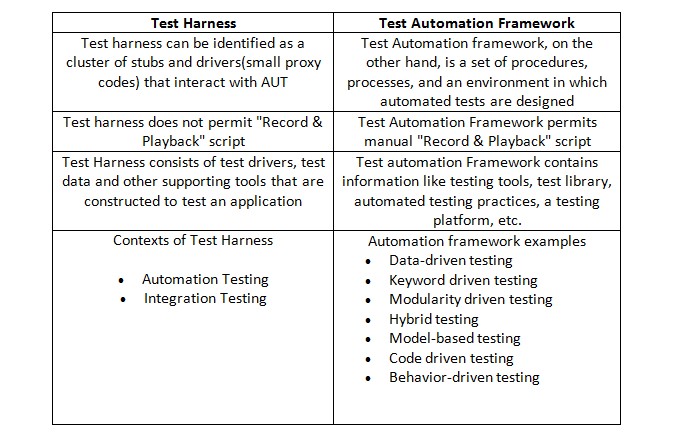
  • Test Automation Framework: A Set of automation guidelines, modularity, project hierarchies, concepts, coding standards, reporting mechanism, practices, processes, test data injections, etc. are predefined to help execute automation testing effectively.

These are the various methods that you can deploy to automate your software testing. Let us now learn in detail about the most important one – Framework for Automation
A Set of automation guidelines, modularity, project hierarchies, concepts, coding standards, reporting mechanism, practices, processes, test data injections, etc. are predefined to help execute automation testing effectively.  You can use these guidelines while automating test cases to get effective results.
What are the advantages of Test Automation Framework?

  1. Enhances code Reusability
  2. Maintains test consistency
  3. Gives Maximum coverage
  4. Minimum code usage
  5. Recovery scenario
  6. Low-cost code maintenance
  7. Minimal manual intervention
  8. Data involvement when required
  9. Reduced training period
  10. Easy Reporting
  11. Enhanced test structuring

There are five types of frameworks used in automation software testing:

  • Data-driven Framework: It focuses on separating test scripts logic from test data.
  • Linear Scripting Framework: Focuses on sequential or linear recording and replaying of test scripts.
  • Modular Testing Framework: Dividing application into numerous modules and creating their test scripts separately.
  • Hybrid Testing Framework: A combination of all the frameworks to pull the powers of each.
  • Keyword-driven Framework: test scripting is done based on the keywords specified in the excel sheet and accordingly tests are executed.

What are the Automation Testing Best Practices?
The below given best practices can help you increase your ROI and to get the best result from your automation testing:

  • It is always advisable to set the scope of Automation before starting the project. It helps in setting the right expectations from the project.
  • Selecting the right automation tool can make a huge difference in your testing results. You should always select the tool that suits your requirements and not the one with the best ratings and high popularity.
  • The framework plays a very important role in the success of automation testing. So spend time in creating a framework for your automation.
  • Always follow the best Scripting Standards. You can follow the below-given standards to meet your requirements.
  • Create uniform comments, scripts, and indentation of the code
  • Be prepared for Exception handling; the automation tool should be well prepared to handle unexpected errors and exceptions in.
  • For the ease of testers, the error logging messages should be standardized.
  • Defining the Success of automation requires some metrics. You cannot just compare the manual effort with the automation effort. Below are some of the metrics that you need to take into account to define your automation test success:
  • Defects percentage
  • Productivity improvement
  • Automation testing time for each cycle
  • Minimal release Time
  • Index for Customer Satisfaction

What are the Advantages of Automation Testing?
Automation testing has many advantages and it is a good idea to consider it for your testing whenever required.

  • It is around 70% quicker than manual testing
  • The results of automation testing are more reliable and less prone to human intervened errors
  • Automation testing Guarantee Consistency
  • It saves a lot of Time and Cost
  • Higher ROI
  • Increases accuracy
  • Does not require any Human Intervention for execution
  • It enhances Efficiency
  • Test scripts can be re-used whenever required, hence saving a lot of time for recreating them.
  • Automation testing gives a wider coverage of test cases

Know More: Top 10 Automation Testing Tools 2019

What are the Applications of Automation Testing?
Automation can cover a big part of testing. Some of the common applications of automation testing are:

  • Performance testing: Automated testing is very efficient for testing the performance of your software product.
  • Test data generation:  Automation testing can help you to program tests to automatically generate entry data.
  • Product Setup:  Automating Product setup ensures that your software product is efficiently set up.
  • User interface components’ interaction: It takes care of smooth interaction between various components of a user interface.
  • Regression Testing:  Automated regression testing helps to avoid errors incurred because of code changes.
  • Security Testing:  Atomization of tests helps in easy detection of security-related bugs if any.
  • Functional (White-Box and Black-Box):  Functional testing can be a daunting task at times; it is a wise idea to automate functional testing.
  • Installation / Integration / System: Testing installation/integrations and system bugs can be head honking if done manually. Automation of such test cases can easily ensure proper installation and integration of components within a system.
  • Smoke and Sanity Testing: Automated scripts can reliably conduct both smoke and sanity testing.
  • Usability/UI/GUI Testing: The user interface, GUI and usability testing are other tests that can be better if automated
  • Compatibility: Compatibility testing is another task which is very time consuming and daunting if done manually, automating compatibility testing can promise better results and wider coverage.
  • Internationalization: Internationalization is better when automated.
  • User Acceptance: User acceptation demands greater accuracy, and Automation promises you enhanced accuracy.

How to Choose Which Automation Testing Tool is best for me?
You cannot just randomly pick an automation tool for your automation testing. Picking up the right tool is very important for getting the maximum benefit out of your automation testing. The following criteria can help you pick the best automation tool:

  • Environment Support
  • Testing of Database
  • Ease of use
  • Image Testing
  • Object identification
  • Object Mapping
  • Tools that support various types of test
  • Error Recovery Testing
  • Scripting Language Used
  • A tool that can identify objects in every environment
  • Multiple testing frameworks support
  • Easy to debug the automation software scripts
  • Minimal training cost
  • Detailed test reports and results

What are the Various Automation Testing Tools?
Selecting the best automation tool is a challenging task. We would advise you to first identify your requirements, study about different automation tools and their features and then choose the one that fits your requirements the best.
Here are the Names of some very Popular Automation Testing Tools.

  • Selenium – It is a very popular automation testing tool for a web application, supporting various platforms and browsers.
  • Watir – It is an open source automation testing tool for web applications. It is created using Ruby libraries.
  • Ranorex – Ranorex is a GUI automated testing tool for multiple environments and devices.
  • Appium – Appium is known to be one of the best Open source mobile automation testing tool.

Can We trust all Testers for our Automation Testing needs?
With time automation testing has become very simple and a manual tester can easily accomplish it if he has a good business.
Any tester can execute expert’s created test automation scripts.
But there is another side of the coin, there are different skill sets that require more technical knowledge which is not easy to be learned by a manual tester overnight.
Today a test automation expert is expected to design an overall automation strategy for the entire product.
They require knowledge to select the right set of tools for every stage and give a cost-effective and unified integration strategy.
Automation testers are also expected to develop functions that can reduce manual testing and test data generation work.
Hope you would have found this article informative!

Top 20 Free Usability Testing Tools Available now

To improve the execution of your site, you have to see how users are utilizing it. Usability testing is an approach to assess how effectively people can achieve a given task. In this test, a subject is approached to finish a task, usually while being seen by a researcher, to reveal possible user issues. A usability test is otherwise called a user test.
We’ve accumulated the top 20 usability testing tools that will help you perform this test productively.

  1. Optimizely

Optimizely is an A/B testing platform which is pretty famous for being user-friendly, enabling its users to track both visits and conversions. This tool provides a lot of features including:

It’s free for users on the basic plan, though some additional features are available only on the enterprise paid plan.

  1. Usabilla

It is an advance usability testing tool which empowers you to gather feedback from your real users. You can additionally get in-depth reviews from potential users. From these, you can find what your visitors consider of your content, letting you optimize the web pages better.
Features of this tool include:

  • User-friendly
  • Heatmap analysis
  • Instant feedback
  • Offers solutions for visual surveys as well as email feedback
  1. Usability Hub

Usability Hub is a tool to test your mockups and designs on real users. They aren’t free, yet you can procure free tests by helping test other websites. This tool demonstrates interactions of visitors on your site, what they recall and where they commit errors. It can likewise be utilized before your site goes live.

Their tools include:

  • Five Second Test – for design
  • Nav Flow – to track conversion funnels
  • Click Test – to test clicks on site’s landing page

These features can give you every bit of knowledge essential to enhance your site’s ease of use and begin drawing more clients.

  1. Userbrain

Userbrain is a free remote usability testing tool, which is so simple to utilize that you’ll get dependent on testing your application with real users.
You can watch video recordings of individuals visiting your site and hear what they think. It’ll enable you to spot bugs, issues, and complex areas. You can consistently improve your website’s experience and assemble better products for more satisfied users with the help of weekly automated user tests.
Other features are:

  • Test on numerous devices and in various languages to encounter your site under different conditions
  • No restriction on the number of tasks you can request from the testers to perform

The tool is available at a moderate cost with just $14 for every user test with 100% satisfaction assurance. Also, there is no recruiting requisite as you get access to a pool of over 15,000 testers from throughout the world.

  1. Crazyegg

It’s a valuable and well-known visual analytics tool. Crazyegg is a great optimization tool which supports you in tracking the user’s behavior on your sites utilizing mouse tracking to get real-time reviews.
A click-based user experience tool with four critical features:

  • Heatmap – logs where every guest clicks on your website page.
  • Scrollmap – demonstrates how far down the page every visitor scrolls usually.
  • Confetti – gives comprehensive information about search terms, visitor sources, other different elements.
  • Overlay – separates the number of clicks on per page element.

Users get a free 30-day trial, without any requirement to buy a paid membership. Although these aren’t costly too, beginning at $9 for a month.

  1. Chalkmark

Users can initiate tasks and welcome others to participate after uploading of the screenshot for the UI they need to test. The outcomes are given heatmaps to indicate where visitors clicked, and a report determining the average time taken to finish the undertakings.
Key features include:

  • Build personas and assign tasks
  • Create up to three tasks on a similar image or different images for every test.
  • Wireframing and design
  • Information architecture
  • Analyze the test results
  1. Trymyui

Trymyui is a stunning tool available online for usability testing. It just takes minutes to set up your test with this tool.
It empowers testers to personalize their tasks. You can compose a list of tasks or questions that you want users to reply or perform on your site.
You’ll at that point get constant feedback which unmistakably proves what visitors think about your application or site and notices where they’re restricting.
Other features include:

  • Impression testing
  • Demographic curation
  • Written survey
  • Keystrokes
  • Video screen caps
  1. OptimalWorkshop

This tool offers three distinct parts of usability, and every one of them comes with a free-for-life plan. While the complimentary benefits have a few conditions, utilizing them could enable you to determine if it’s worth to try for a paid test.
The key features are:

  • Optimal Sort for card sorting
  • Treejack to perceive how individuals connect with your website structure
  1. IntuitionHQ

Utilizing IntuitionHQ gives you target data about how visitors will utilize the pages designed by you.To make a usability test, you transfer screenshots after that compose tasks to be completed by users.
With the free plan, you can:

  • conduct ten live tests with up to 350 participants
  • create unlimited questions
  1. UserPlus

The UserPlus is a free tool, presently available in alpha. The tool offers incredible tips and best practices for improving the usability of your website.
In three simple steps, users can:

  • Transfer a screenshot
  • Tag elements on the page you are searching for guidance on
  • Discover the usability score

Also, with UserPlus Advisor, users can find the most significant hindrances that might negatively affect your income stream. Users can sign up to be welcomed to participate.

  1. Five Second Test

When users use five seconds test, they don’t just get a chance to set up their test for the website.However, it also enables them to test others’ site.
Intended to enable users to quantify the viability of their designs, users can direct a five-second test to discover which components of your designs are the most notable. You can do this in two different methods:

  • Memory test: In it, users have five seconds to take a look at the design and after that are approached to recall particular components.
  • Click test: In it, users have five seconds to find and tap on the particular components of their design.
  1. Feng-GUI

With Feng-GUI usability testing platform you get a free demo that enables you to test one picture at regular intervals. The features include:

  • an algorithm to simulate users
  • an eye-tracking map to indicate which regions of the page get the most attention

  1. GTMetrix

GTmetrix gives you understanding into how well your site loads and gives significant suggestions on the most proficient method to improve it. Alongside that monitor performance of the page with scheduled managing and picture it with intuitive graphs.
The key features you get with this tool are

  • Page load time
  • Total page size
  • Total number of requests
  1. Google Analytics

Every site must use it by default because it can tell you so much about sharpening and improving its usability. It determines where you are losing visitors and after how much time.
Other features are:

  • Establish conversion goals and measure them
  • Offers valuable insights to tweak layout and content
  1. Google PageSpeed Insights

It’s a free tool which is a simple dashboard enabling you to insert any URL you require speed data on, and within a few seconds, you get an accurate report on its speed.
The data is offered on two specific metrics to check how fast a web browser of user begins to show the pixels of your site after the user clicks a button. Those metrics are:

  • First Contentful Paint (FCP)
  • DOM Content Loaded (DCL)
  1. Website Grader

Usability tester by Hubspot, which shows UX score of your website in four simple sections:

  • Performance grades
  • Mobile grades
  • SEO grades
  • Security grades
  1. Mouseflow

Mouseflow comes with a free version using it you can see detailed heatmaps and scroll-reach statistics. Heatmaps are overlays displayed on top of the content of your site where you can view precisely which portions of the page are receiving the maximum attention.
Its features cover:

  • Tweaking layouts to boost conversion rates
  • Doing analytics
  1. Qualaroo

It’s a platform which integrates directly with your site as well as with many other software tools used by you. Its features are:

  • Offers insight relying on how your visitors behaved on it
  • Generate brief exit questions to present to the visitors when they leave your site
  1. ClickHeat

An open source software which gives a visual heatmap of clicks on a webpage. It remains on your web server, so you get results from the actual website visitors.

Its key features include:

  • Low logging activity
  • Screen sizes and browsers are logged
  • Allows you to group the same pages
  1. WebPageTest

One more open source optimization tool developed by Google & AOL for checking website performance. A thorough visual comparison is likewise possible with it.
Its test results offer rich diagnostic data including:

  • Page Speed optimization checks
  • Resource loading waterfall charts
  • Suggestions for changes

Important Test Cases For Mobile Applications

Mobile application development is gradually taking a front seat in software development. Mobile testing is day by day increasing its prospects. But still, testers have many questions regarding mobile testing like how to create test cases and test scenarios, how to use various mobile testing tools, etc. In this article, we will cater to test cases and test scenarios for mobile testing.
Below we have curated a list of sample test cases and test scenarios for various types of mobile testing.

Types of Test Cases

  • Performance Testing Test Cases
  • Functional Testing Test Cases
  • Compatibility Testing Test Cases
  • Security Testing Test Cases
  • Recoverability Testing Test Cases
  • Usability Testing Test Cases

Performance Testing Test Cases

Performance testing for the mobile application ensures that your application performs as required under certain performance requirements like a number of users, memory requirements, etc.
In performance testing, we largely need to have test cases for

  • Device performance
  • Server/API Performance
  • Network Performance

Your test cases should deal with the following aspects:

Device Performance:

  • Application start-up time
  • Memory consumption
  • Usage with other Applications
  • Battery Time while using the application
  • Hardware and Software variation
  • An application running in the background

Server/API Performance:

  • API calls generated
  • Data to and from the server.
  • Server downtime

Network Performance:

  • Network Speed
  • Packet Loss

Also Read: How to create Test cases For Android Application

Few test cases that you can conduct for performance testing are

  1. Test application performance under different load conditions.
  2. To test if the network coverage supports the application at various user levels.
  3. To test the application performance under prevailing client-server configuration setup.
  4. To detect infrastructure and application bottlenecks that hold back your application from working as expected.
  5. To test the response time.
  6. To evaluate the application for planned and unplanned load volumes.
  7. To evaluate battery time while using application
  8. To test application during network change from WIFI to 2G/3G/4G or vice versa.
  9. To test the memory leaks, Camera, battery consumption, resources like GPS.
  10. To test if the application works well when the device is being moved from one location to another.

Functional Testing Test Cases

In mobile testing functional testing generally deals with testing the user interactions and the transactions. When conducting functional testing, you have to consider a few scenarios

  1. Business functionality usage of your application like banking, gaming, social or business
  2. Target audience type like consumer, enterprise, education
  3. Distribution channel you would like your application to share one.eg. Apple App Store, Google play, direct distribution

Based on your application and requirement you can have following test cases for your testing:

  1. To verify if the essential and non-essential fields can be easily identified and are displayed on the screen in a distinctive way.
  2. To test the essential fields for their proper working.
  3. To test that during an incoming call the application goes to minimized mode.
  4. To verify your application does not crop up any hindrance for other applications installed on the system.
  5. To test the application’s compatibility with required versions of the devices.
  6. To test the application for the proper working during starting and closing.
  7. To test your application supports required social network options such as posting, sharing, and navigation, etc.
  8. To test for truncation errors. Any truncation error should not harm your system and should be under a safe limit.
  9. To test for proper network error message during improper network connection.
  10. To test the smooth installation of the application provided all requirements are fulfilled.
  11. To test the auto-start facility based on the requirements.
  12. To test if the mobile is able to receive and store messages while your application is running.
  13. To test if your application does not hinder the multitasking capability of the device.
  14. To verify the required navigation among the related modules
  15. To test if application restarts at the same point after a system crash.
  16. To test the availability of the user guide.
  17. To test any payment gateway transaction support if required by the application.
  18. To test for required page scrolling scenarios.
  19. To test newly added functionalities or changes made to the code.

Compatibility Testing Test Cases

Compatibility testing is very important as markets are flooded with various kinds of mobile devices. Your application should be compatible with all these devices to reach wider customers. Compatibility tests your application compatibility with various mobile devices, OS, and a combination of both.
Some of the prominent test cases for compatibility testing are:

  1. To test user Interface of the application on various screen size.
  2. To test your application supports various mobile devices.
  3. Test application’s compatibility with various OS
  4. Test applications compatibility with a combination of different devices and different OS.
Security Testing Test Cases

In times of increasing cyber-crime, security testing is very important. It checks whether your application fulfills all the security requirements.
Below are some of the most important security testing test cases for mobile apps that can ensure better security of your application:

  1. To your application withstanding capabilities against brute force attack
  2. To test the application against buffer overflows and memory corruption cases.
  3. Test custom created files and test that they do not perform any malicious deeds.
  4. To test applications immunity against malicious runtime injections.
  5. To test the well-being of cryptography code.
  6. To test if your application supports a strong password protection system, and does not allow an unauthorized person to change password.
  7. To detect dynamic dependencies.
  8. To test security against SQL injection-related attacks.
  9. To detect and recuperate from unmanaged code scenarios.
  10. To test if certificates are verified and whether your application support Certificate Pinning.
  11. To test the application response from the denial of service attacks.
  12. To analyze data validation requirements.
  13. To test the business logic implementation is secured.
  14. To test file system interactions.
  15. To test the protocol handlers.
  16. To test applications immunity tonasty client-side injections.
  17. To test that keyboard cache is protected from apprehensive data storage.
  18. To test if regular audits for data protection analysis are supported.
  19. To test if your application goes through a proper authentication process before sharing sensitive information.
  20. To test your application is immune to insufficient session expiration.
  21. To inspect file caching.
  22. To test for cookies.
  23. To test whether session management is enabled to prevent unauthorized users to access unwanted information.
  24. To test different data streams.
Recoverability Testing Test Cases
  1. Test for Crash recovery
  2. Verify recovery state of the applicationafter unanticipated crash
  3. Test for Transaction interruptions.
  4. Verify application’s transaction handling capabilities during a power failure (i.e. Battery dies or sudden manual shutdown of the device)
  5. The application recoverability when the connection is suspended.

Usability Testing Test Cases

The usability testing tests whether your mobile application is easy for the users to use. The main objective of usability testing is to whether your application supports intuitive, easy-to-use, and industry-accepted interfaces.

  1. Test that the buttons on your application are of the required size.
  2. To test icons consistency with the application.
  3. To test for the colour coding of the buttons as per the requirements.
  4. To test for zoom- out and zoom-in facilities support in your application.
  5. To test the proper acceptance of keyboard input.
  6. To test the support for undoing an action within a time limit, when any wrong item is touched.
  7. To test no overloading of contextual menus.
  8. To test that the text is simple, readable and clearly visible to the users.
  9. To test for the apt font.
  10. To test that the users are prompted when they download a large amount of data not beneficial for the application performance.
  11. To verify the closing and reopening of application from various states.
  12. To test for language translation facility.
  13. To test the synchronization of application items as per the user actions.
  14. To ensure the availability of user manual for the ease of the users.

Conclusion
Usability is all in all a manual testing approach as only a human can understand the usability accepts and ease of using the application. We hope these test cases will help you with your mobile testing endeavor.

What is Quality Assurance (QA)? Process and Methodology

Quality Assurance (QA) is something other than manual testing. The current frameworks are more unpredictable than customary methodologies can deal with. New automated test methods have developed enabling machines to automatically and thoroughly test themselves for flaws.

With this article, we are going to give you in-depth knowledge about Quality Assurance.
quality assurance
What is Quality Assurance?

Quality Assurance (QA) or Software Quality Assurance (SQA) is a planned and systematic model of activities essential to give satisfactory assurance that a product adjusts to prerequisites amid software improvement.

SQA incorporates the complete software development life cycle, and the purpose is to make sure that the development and support processes are refined continuously to generate products which satisfy specs.

Remember that the range of quality isn’t restricted to merely Software Testing. For instance, how adequately the requirements are asserted and also maintained quite matter.

Software Quality Assurance comprises of strategies and practices of evaluating the software development methods, processes, technologies, and tools used to guarantee the quality of the created product. It is typically accomplished by using well-planned standard systems, covering processes and tools, for quality control to assure the reliability and dependability of the product.

What are the principles of software quality assurance?

The important principles to follow for software quality assurance are:

1. Stopping Problems Before They Happen: It is better to prevent mistakes in the software development process from occurring rather than correcting them later on. This principle states the importance of finding and temporarily resolving issues at an early stage in a procedure.

2. Always Getting Better: Quality assurance of software is not a one-off process. It should be an integral part of the entire development cycle. This principle advocates for constant checking and updating of the software throughout its operation.

3. Including Everyone: All stakeholders, such as developers clients and testers along with the project managers need to work together. This principle notifies that all need to communicate and work together to produce quality software.

4. Focusing on the Big Risks: It is necessary to define and manage the most significant risks in software. This principle refers to focusing on the risks that have the maximum potential impact on software.

Due to these principles, the software is not just fixed when problems appear but it is made with high quality from the beginning.

The Quality Assurance process can involve –

  • Recognizing standards when any applied in software development methods.
  • To carry traditional processes, for example, quality reviews.
  • Conduct in-process test data recording processes.
  • Encouraging documentation procedure measures.

This extraordinary issue fills in as a platform for experts to display hypothesis, results, understanding, and different progressions in Software Quality Assurance process.
Process of Quality Assurance


Below are a few quality characteristics of the Quality Assurance process –

  1. Concentrate on the User Experience

Testing at all stages of the venture is critical. However, the most dominant point is the user experience.
In case that the UX is terrible, it unavoidably implies the quality isn’t of standard. Despite the fact that this will presumably result in variations in the earlier stage of software development, the user experience should dependably be at the leading place.

  1. Automation and Continuous Integration

Automation is essential since it offers quick review, empowering continuous integration – an important part of the agile approach.
Automation is additionally solution to lessening costs and improving the productivity of your QA staff; that is one of the principle reasons why QA engineers must teach themselves and be apt to execute automation processes.

  1. Test and Code Coverage

Numerous QA managers ramble about “test coverage,” that gives a decent broad image of the quality of the product. But to accomplish genuine quality, test cases and code coverage examination both ought to be held.
For instance, regardless of the fact that 100% test coverage is performed by you, you have to, in any case, go for a minimum 90% function code coverage to guarantee the best outcomes.

  1. The Shift-Left Approach

Software testing begins commonly once the coding stage is finished. In any case, for ideal quality in an agile strategy, you have to drive the concentration and start checking as well as testing directly from the origin of the venture. It guarantees bugs are identified sooner, that saves both money and time.
Additionally, it ensures a positive association with developers in the group, quickens the delivery of the application, and takes into consideration more noteworthy test coverage.

  1. Smart Testing

Full and thorough testing can now and again lead to a challenge since numerous personals might not have resources or time to experience each reasonable combination of cases.
But you ought to be smart in how and what to test. It implies, speaking with the engineer to discover little experiments that will identify the best number of bugs.

  1. Bug Prevention

QA managers are prepared to detect bugs, but an ingenious QA specialist will likewise consider how to avoid them in any case.
Conventional QA begins testing at the UI level, yet an agile process begins with the functional and unit testing and after that moves to the UI phase. This methodology keeps bugs from entering the top level of development which can later on lead to more severe issues and likely postpone the delivery.
Furthermore, concentrate on major crucial bugs and errors at first as opposed to many small errors.

  1. Portability

It is critical for software to adjust to various environments. For example, a framework should operate just as efficiently on a web platform as it works on mobile.
The versatility, installability, replaceability, and conformance of the product should be recorded respectively.

  1. Reliability

A system crash is not a unique situation. However, in quality testing, you require to check the system’s capacity to resist component breakdown. The system ought to be ready to get back into complete control even after a possible malfunction in the product.

  1. Documentation

This process manages the administration and archiving of documents. Any variation in a record is done by using the appropriate change control method. Approval of all kinds of documents is also done in this process.
Methods Used in Quality Assurance


There are a few distinct kinds of QA testing, which are all critical for guaranteeing your application is having no bug. Beneath, we’ve given the most vital QA testing methods to offer you a full comprehension of the testing procedure and how it improves your application, product, or software.
Non-functional Testing
QA testing can be separated into two sections: functional and non-functional testing. Before we discuss the functional testing, how about we take a look at the four phases of non-functional testing –

  • Vulnerability Testing

Vulnerability testing includes testing a site or application to find security holes and vulnerabilities that could be exploited by hackers. The objective of this phase of testing is to make sure that there are no security risks that could compromise users’ information or other sensitive data.

  • Compatibility Testing

Similarity testing includes checking that product is completely compatible with the software and hardware it will be running on.
A few components are tested amid this stage, from internet browsers to hardware, operating systems, integral modules, and that’s only the tip of the iceberg.

  • Usability Testing

Convenience testing includes testing that the software is intuitive and easy to use. The objective of this phase of the testing process is to ensure that the end user can utilize the product without dissatisfaction or confusion because of its design and UI.

  • Performance Testing

Performance testing includes confirmation that the product performs adequately in an assortment of conditions that could influence users, from substantial load to insufficient battery power.
The goal of a performance test is to make sure the application runs as it ought to and to determine its confinement utilizing load testing.
Functional Testing
Functional testing is generally separated into four segments. Every one of them is depicted beneath –

  • Unit Testing

The Unit testing method is the testing of individual software modules or parts that make up a system or an application.
The module’s developers normally write these tests and in a test-driven-improvement strategy, (for example, Agile, XP, or Scrum).They are written before the module is made as a component of the spec. Every module function is tested by a particular unit test installation written in a similar programming language like the module.

  • Integration Testing

This part of the testing process includes the testing of the distinctive modules or components that have been effectively unit tested when incorporated together to perform particular activities and tasks (otherwise called scenario testing).
This testing is typically finished with a combination of manual testing and automated functional tests relying upon the fact that it is easy to make automated tests for particular integrated components.

  • System Testing

System testing expands the scale of integration testing to test the whole framework all in all. A standard system test includes running the whole framework so as to find beforehand neglected bugs, stability problems, and serious issues.
As should be obvious, the initial three phases of functional testing include a steady increment in range, from a sole unit to many integrated units to a whole system.

  • Acceptance Testing

The acceptance testing technique is the last stage of functional software testing and includes ensuring that all the project or product necessities have been met. It also assures that the customers and end-users have tested the framework to ensure it works as assumed and meets all their defined prerequisites.

Different approaches to SQA

Within the scope of Software Quality Assurance (SQA), several approaches can be adapted depending on the specific nature of the software development process. Here’s an overview of different approaches:

1. Traditional Approach (Waterfall Model):
The traditional approach follows a hierarchical process, which is also referred to as the Waterfall model. All stages of requirement analysis, design, coding, testing and maintenance are completed before moving on to the next one. SQA is performed at the end of each gateway to verify requirements are met and minimize errors and defects.

2. Agile Approach:
The Agile approach includes its iterative, incremental and dynamic nature. It involves the delivery of small sections of software as well as enabling cooperation between development teams, testing teams and stakeholders. The focus is on self-organizing teams, continuous integration, testing test delivery and feedback which allows obtaining better results.

3. DevOps Approach:
As a combination of development and IT operations, DevOps puts customer satisfaction first. It focuses on collaboration, automation and continuous delivery while relying on continuous integration, testing and deployment of software for efficiency. This technique is appropriate for projects that need frequent revisions.

4. Six Sigma Approach:
The Six Sigma method uses a data-driven approach to minimize defects and errors in the software product. Through the use of statistical methods, it measures and enhances software quality. This methodology is appropriate for projects that focus on defect elimination.

5. Lean Approach:
Efficiency and waste reduction are the focus concerning Lean software development. Pointing to continuous improvement and elimination of non-value-added activities it is appropriate for projects aimed at efficacy enhancement and waste minimization.

6. Continuous Integration and Continuous Deployment (CI/CD) Approach:
CI/CD, on the other hand, focuses on continuous integration and deployment of software products. Focusing on automation, continuous testing and delivery, it is suitable for projects that require constant integration as well as deployment.

7. Test-Driven Development (TDD) Approach:
In Test-Driven Development, automated tests are written before the code is developed. This enables the code to comply with the requirements and specifications of a software product. Activities involved in the process are test case development, execution of tests and restructuring code to ensure quality results.

8. Risk-Based Approach:
The Risk-Based Approach to SQA implies defining and controlling the risks arising from software products. It includes risk analysis, mitigation and monitoring to ensure compliance with specified standards by the software product.

Finally, organizations can choose the SQA method that suits their goals, needs and resources to have software products with appropriate quality.

What is the importance of software quality assurance?

The importance of Software Quality Assurance (SQA) can be understood through various important aspects.
To commence, SQA ensures compliance of the software with specified quality standards and requirements thus creating a reliable product that is efficient as well as user-friendly.

Second, it saves costs and time by letting developers detect bugs before the program release eliminating prolonged modifications after an application launch.

Moreover, SQA contributes to ensuring the stability and competitiveness of a software product by inspecting every element against industry standards. This granular testing for multiple requirements including reliability, functionality, usability and portability creates a product of high quality.

In addition, SQA preserves a firm’s image by avoiding the delivery of poor-quality products. It is essential for a brand image and reputation to resolve issues before customers notice that there are problems.

Additionally, SQA is critical in driving security and compliance. It aids in helping the organizations to validate that their applications are effective, safe and reliable as per relevant regulatory requirements or industry-specific compliance standards, particularly on matters related to security data.

Finally, SQA ensures customer satisfaction.

In such a way, complete evaluation and testing of the software lead to final product development in line with all needs expressed by customers while functioning perfectly well. In short, the overall SQA process is a mandatory stage of any product launch for software.

What is the difference between quality assurance and quality control?

Two important concepts in software development, quality control and quality assurance often get distorted. Although they are both concerned with the quality of software, their approaches and goals are different.

Now, let us focus on the major distinctions between quality assurance and quality control in software development

Conclusion
Software Quality Assurance covers the entire process of development cycle to make sure that a product has met its specification in the top most quality possible.

Quality assurance identifies weakness and issues related to the process and will make sure that nothing like that surfaces. It works on continually improving the process of producing a better product. Capability Maturity Model Integration (CMMI) and ISO 9000 are widely used systems when it comes to Quality management.

What is a Test Harness in Software Testing?

Harness in a literal sense is a gear that is used to take control of something. In software testing, it is none different. In testing terms, It refers to a collection of software, test drivers, test data and other supporting tools that are constructed to test an application by executing it under different environments and analyzing its results. It uses test libraries to execute tests and generate a report.

A test harness in layman language is to make automation framework and use its constituent elements to take charge of the testing activity to get the best results.

What are the objectives of Test Harness?

  • Automate the testing process.
  • Helps in test case optimization by selecting specific tests to run
  • Execute test suites of test cases.
  • Organizes a run time environment
  • Generate associated test reports.
  • Analyzes test results.

What are the Features of Test Harness?

  • Executes test suit in the framework
  • Assists measure the code coverage at the code level.
  • Enters test data to an application under test
  • Captures the output from the software under test
  • Offers flexibility and support for debugging
  • Records test results

What are the benefits of Test Harness?

  • With more effective automation, increases in productivity.
  • Improved software quality.
  • Automates the testing process.
  • Supports debugging.
  • Supports scheduling of tests.
  • Good for complex conditions.
  • Automated test reports generation.
  • Records test results.
  • Enhanced productivity.
  • Enhance software quality.

Contexts where Test Harness is used
1. Test Harness in Test Automation
Test harness in automation testing refers to the software systems and the framework that includes test data, test scripts, test results and compares them and analyze the results.
For example, if you use any testing tool for functional testing, it organizes and manages all the test data, scripts, runs, and results. The test harness for it will be:

  • The testing tool
  • The scripts and
  • The physical location where they are stored
  • The Test sets
  • Test data for the test scripts
  • The test results and the comparative monitoring attributes

2. Test Harness in Integration Testing
Integration testing is testing whether the combined behavior of two or more integrated code is as expected or not.
In an Ideal scenario, Integration testing of two modules is possible when both of them are 100% ready, unit tested and good to go.
But, this everything can’t be perfect at all times. And we might land up in a situation where above conditions are not fulfilled. Hence we use  (stubs and drivers) to overcome this situation. A stub is a proxy piece of code that substitutes the missing piece of code.

What is the difference between Test automation framework and Test Harness?

Test Harness
Test Harness Tools
Though there are no specific tools, it includes tools like test management tools, automation testing tools, etc. Any similar test tool can be an element of the test harness.
Conclusion
Since now you know a lot about test Harness, do keep an account of this when you leverage for your automation testing. Be wise in your selection and usage of test harness; it can bring huge benefits to your test automation.

ISTQB Certification: What you need to do?

The present situation of the market is aggressive. Taking an online test can enable you to separate yourself from the rest, expand your work possibilities, and result in higher compensation.
One such certification is the ISTQB certification that can help you out with your career choice. ISTQB stands for the “International Software Testing Qualifications Board.” It offers an internationally recognized certification for testers which is also known as “ISTQB Certified Tester”.
So before you think about taking up this course, let us take you through some key points.
1. No certification is complete without good hands-on experience on live projects. It also provides you with crucial knowledge and an understanding of what will work and what won’t.
2. Candidates having work experience are always a preferred choice for people undertaking any course.
3. If you are a fresher, or new to the field of software testing, this certification can certainly come to your rescue. You could also think about taking up an internship program or a higher education course.
The ISTQB certification is divided into 3 levels
Foundation Level
An entry-level certification, this level is designed for both fresher as well as experienced professionals.
The objective of this course is to make sure the key concepts and fundamental practices are well understood by everyone. The syllabus includes 6 major topics:
1. Fundamentals of testing
2. Software testing lifecycle 
3. Static techniques like black box testing and white box testing
4. Testing tools and management
Advance Level
The advanced level course is designed for mid-level professionals who possess a minimum of 5 years of experience. The objective is to learn and understand advanced best practices and concepts of testing. The syllabus includes the following topics:
1. Advanced behavioral testing and standards for business-oriented testers
2. Advanced structural testing for technically-oriented testers
3. Experienced test management concepts for managers.
Expert Level
As the name suggests, the expert level courses are designed for true leaders in the field of software testing.
These professionals have experience of more than 8 years. The objective is to make understanding and execution of the current cutting edge technology.
Since the professionals are leaders in the field, the syllabus covers topics like:
1. Test process improvement
2. Test management
3. Test automation
4. Industry-specific techniques.
How Can You Appear For the ISTQB Certifications?
It is advisable to enroll for the certification well in advance for the given date. The following instructions are designed for ISTQB certification in India.
1. Find the upcoming ISTQB exam dates at (click here)
2. For enrolment, (click here) and complete your signup process
The Course Fee For the ISTQB Foundation Level Course is Currently $229
IQBBA Business Analyst exam fee:  $199
ISTQB Advanced Level exam fees: $249
ISTQB Expert Level exam fee: $375
1. Send a demand draft (DD) in favor of the Software Testing Certification Board, payable at ‘NEW DELHI’ to the ITB office in Noida at their given address.
2. The board will inform you about the time and procedure for taking up the exam.
Don’t forget to mention your registration details that you filled during the enrolment and also mention your contact information at the back of the DD.
1. On the scheduled date and time, be present at the exam venue.

  • Unlike any other exam, do carry your photo identity card like an Aadhar card and voter ID.
  • Since the exam is carried out online, you will be notified of the results immediately.

For all the other exams, the results are notified after 2 weeks.
1. For any other queries, visit their contact page at http://www.istqb.in/contact-us1
Why choose ISTQB Certification?
Several different certifications are available for testers. But the ISTQB continues to be the most favored one among most tester. Here is why:

  1. It is the number one testing certification, globally, with over 6,00,000 testing professionals across 100+ countries.
  2. The syllabus is updated frequently and is always in line with the trending developments in the testing domain. This adds more value to it.
  3. The certification focuses on the practical implementation of the testing concepts rather than theory. This means only professionals with expertise will be able to complete it.
  4. Through the 3 different levels, the certification helps in building a career path for the testing professional. Each level caters to a similar project designation in the organization.
  5. Most companies prefer ISTQB certified candidates over those without the certification. This opens many new and exciting career avenues for testing professionals.

Know More: Must Learn Selenium interview Questions

Is the ISTQB Certification Worth the Try?
Having the ISTQB certification on your resume can certainly add those stars to your qualification.
It is conducted by a non-profit organization which comprises of renowned knowledge experts having years of experience.
The other benefits of undertaking the course include:

  • The course is based on multiple-choice questions (MCQs) and is practical in nature.
  • There’s no specified or minimum qualification required to appear for the test.
  • Every individual with, IT, or non-IT background, can take up the exam. This means you can appear for the exam even when you are about to complete your college studies.
  • Certifications like ISTQB shows your mastery and interest in the software testing industry. You can have the best concepts and knowledge about the field and can help you advance in your career.
  • Also, the course is much less expensive than the course offered by private institutions. You do not need to attend extra classes outside to take up the exam. All the study material and guides will be provided to you.

What’s the Certificate Validity of ISTQB?

  1. Foundation Level: the certification is valid for a lifetime
  2. Advanced Level: also valid for a lifetime
  3. Expert Level: This is valid only for 5 years. It needs to be renewed after 5 years either by taking the exam again or by completing 200 certification extension credits (CECs).

What are the Certification Streams of ISTQB?
In line with the latest changes in the testing domain, it is now possible to take the certification in the chosen stream. Below are the details of the 3 streams currently offered by ISTQB:

  1. Core: Core is the traditional testing certification that was and continues to be followed by ISTQB. It includes the core testing concepts and understandings that are valid across multiple domains.
  2. Agile: This certification corresponds to testing practices and implementation in an Agile environment. With changing project development scenario and the industry-wide acceptance of the agile practices, ISTQB introduced this stream to specifically cater to agile testing.
  3. Specialist: As the name suggests, this certification is for specialization in different fields of testing. It follows a deep-down approach in a particular type of testing and expects the testing professionals to have a deeper understanding and knowledge of these specialized branches of testing. Currently available streams for foundation level include:
  • Acceptance Testing
  • Performance Testing
  • Mobile Application Testing
  • Gaming Industry Tester
  • Automotive Software Tester
  • Usability Testing
  • Model-based Testing

ISTQB Certification
How to prepare for the ISTQB exam?
Here are some points that will help prepare for the ISTQB certification.

  1. Plan well in advance. Do not rush into the certification.
  2. Understand the concepts and don’t just mug up the theory. It may not help.
  3. Get some hands-on experience or read case studies to help you understand the practical implementation of the testing concepts.
  4. Study in a group if possible. Sharing knowledge is the best and the fastest way of learning new things.
  5. If you are going in for a Specialist certificate, chose your niche according to knowledge and expertise.
  6. Avoid dependencies on dumps. The dumps can be used to check your preparedness for the exam but can’t substitute the learning. Do not make the mistake of taking the exam without the dumps.
  7. While preparing always take notes of important things you may want to refer to before the exam.
  8. Read the questions carefully. Sometimes they can be tricky. Take time to read and understand the question before answering them.
  9. During the exam do not spend too much time on a single question. If you find it confusing or you do not know the answer. Move to the next one and come back to it later.
  10. DO NOT PANIC. Ba calm and composed while answering the questions. Give it your best shot. Remember there is always the next time.

What is gray/ grey box testing? Examples Included!

Gray box testing/ grey box testing is a method of testing a software system – application or product, externally and internally by using a combination of “white box testing” and “black-box testing”.
Gray box testing is carried out with limited or partial knowledge of the internal workings of the software system/application.
With a view to conquering the deficiencies and ambiguities found in such type of testing, Grey Box Testing (also spelled as Gray Box Testing) has been developed as a productive merger of white box and black box testing.
White Box Testing – the internal structure (code) is known
Black Box Testing – the internal structure (code) is unknown
Grey Box Testing – the internal structure (code) is partially known
let’s dive dip into the implication of grey/gray box testing in software engineering.
white box testing + black box testing
Grey Box Testing Methodology
First – White Box Testing to study and gain a basic understanding of the internal features of the application.
Second – Design and define test cases based on thorough knowledge and understanding to cover each and every aspect of the application.
Third – Black box testing to execute developed test cases to externally test the qualities of the software application.
Best Suited Applications:
Grey-box testing is an ideal fit for Web-based applications.
Grey-box testing is the best technique for domain or functional testing
Grey Box Testing Strategy in software engineering
It’s not necessary in this methodology that source code is required by the tester to design test cases. To carry out this testing process, test cases can be designed based on the algorithm, knowledge of architectures, internal states, or other advanced descriptions of the program behavior.
It utilizes all the clear-cut techniques of black box testing for function testing. The generation of a test case is based on requirements and presetting all the conditions by the assertion method.
The standard steps to carry out Grey box Testing are as follows:
Step 1: Selection and identification of inputs from White-Box and Black-Box testing inputs.
Step 2: Identification of probable outputs from the above-selected inputs.
Step 3: Identification of all the key paths to pass through during the testing phase.
Step 4: Identification of sub-functions to carry out deep-level testing.
Step 5: Identification of inputs for sub-functions.
Step 6: Identification of likely outputs for sub-functions.
Step 7: Execution of a test case for sub-functions.
Step 8: Verification of the appropriateness of outcome.
Step 9: Repetition of Steps 4 and 8.
Step 10: Repetition of Steps 7 and 8.
Security-related, GUI-related, Database related, Browser related, and Operational system-related testing are all part of the test cases designed for the process.
Types of Grey box testing/gray box testing/Grey box testing techniques
Matrix Testing
Matrix testing, a technique coming under Grey Box testing, defines all the used variables of a particular program. In any program, variables are the essential elements through which values can move through the program.
It should be on par with the requirement without which the readability of the program and speed of the software will be reduced. The matrix technique is a way to eliminate uninitialized and unused variables by identifying used variables from the program.
Examination of inherent risks like technical risks and business risks that are associated with the variables with different frequencies labeled by the software developer is carried out under this type of testing.
The design of test cases becomes smooth and easier when all of this information is summarized in two types of tables as in the following example:
All Info About Grey Box Testing (With Examples) All Info About Grey Box Testing (With Examples)
From the information in the above two tables, the testing analyst can immediately make out that the technical and business aspect of the code, namely saving and deleting records requires testing.
Regression Testing
This type of testing is carried out after executing a functional development or repair to the program.
To verify whether the modification in any of the previous versions of the software has regressed or caused any unintended or adverse side effect in other aspects of the program in the new version, the following testing strategies can be pursued:

  • Retesting within a firewall where dependencies are analyzed for choosing baseline tests
  • Retesting risky use cases where the risk factor is considered
  • Retesting all existing test cases
  • Retesting by profile where time is allocated in proportion to the operational profile
  • Retesting changed segment where code changes are compared for choosing baseline tests

At some stage in confirmation testing, if any defect got rectified, and that part of the software started functioning as intended, there might be a possibility that the rectified defect may have initiated a different defect somewhere else in the software.
Here, regression testing takes care of these types of defects by utilizing the above-mentioned testing strategies. The tester, as a reference, may use 80% of the allowed time to run existing test cases and 20% of the allowed time to execute exploratory testing.
Orthogonal Array Testing or OAT
The intention behind this testing is to locate defective logic in the system by providing coverage with the maximum code as well as GUI functions and with minimum test cases in a statistical and organized way of software testing.
Complex applications and e-comm products can be tested with this technique. Orthogonal Array Testing is composed of an array of values in which a variable is represented in each column and a test case is represented in each row.
A simple example is as follows:
All Info About Grey Box Testing (With Examples)
By conveying values for each factor and then, of course, extrapolating for combined pairing, the total number of test cases will surely come down to nine from 27.
Though simple, this effective technique helps in maximizing the required testing coverage.
Pattern Testing
This testing is carried out by using the record of analysis on the historical data of the previous system defects. These analyses may contain specific reasons for the defect or bug with information on the problem that has been addressed, applicable situation, generic test cases, etc.
Unlike black box testing, grey box testing plows within the code to determine the reason for the failure so that they can be fixed in the next software. It is noteworthy that pattern testing is applicable only to such type of software that has been developed by following the same pattern of previous software as the possibility of similar defects occurs in this software only.
Generally, the Grey box methodology employs automated software testing tools to conduct the testing. Module drivers and stubs are created to relieve the tester from manually generating the code.
Examples for grey/gray box testing
Grey Box Testing is said to be performed when –

  • The codes for two modules or units are studied for designing test cases which is the White Box Testing method and then
  • Actual tests are conducted using the exposed interfaces which are the Black Box Testing method.

For example, during testing of Drupal website containing links, if an error crops up while clicking that link, changes can be made in the HTML code for further checking. Here the user is carrying out white box testing by altering the code and black-box testing by testing on the front end.
Types of testing
Objectives of Grey Box Testing
Some of the main objectives are:

  1. To help combine the inputs from both testers and developers to get the best results
  2. To improve the overall quality of the product with less cost
  3. To find defects early and get the developers more time to fix the issues
  4. To combine the advantages of both black box and white box testing
  5. To reduce the overhead of functional and non-functional test documentations

Advantages of Grey Box Testing
Now, let us look at some of the advantages of choosing Grey Box testing.

  1. The testing is carried out from a user perspective and hence helps to improve the overall quality of the application.
  2. In most cases, the testers do not need technical or programming knowledge to get started with grey box testing. This also means that the manual and automation testers can both perform this testing with equal ease.
  3. Since the defects are found earlier, it gives the development teams more time to fix and deploy the changes.
  4. The clarity and transparency of the test ensure there are no conflicts between the testers and developers.
  5. It can be much more effective both quality-wise and cost-wise when compared to integration testing

Disadvantages of Grey Box Testing
In this section, we look at some disadvantages of Grey Box testing

  1. Since we are looking at only part of the system, it is very difficult to assign defects to a particular module.
  2. Since the testers have only limited access to the code, they have only limited knowledge about the paths traversed. This can reduce the coverage.
  3. It can be difficult to design effective test cases for grey box testing
  4. It can not be used for algorithm testing
  5. Neither white box nor black box testing benefits can be reaped fully through the process.

Challenges in Grey Box Testing
Here, we discuss few common challenges related to Grey Box Testing, that are preventing companies from utilizing it fully.

  1. In some cases, the test case may be a pass but the displayed results would be incorrect. Such cases can not be handled well in grey box testing.
  2. In case the module under test crashes it may lead to aborting the test and it would be difficult to find the reason.
  3. Testers do not have access to the source code, hence they may miss some critical vulnerabilities in the application
  4. For large applications, it can be very time-consuming to check all the input combinations and traverse all the different paths involved.

Tools used for Grey Box Testing
The tools used for automation of black and white box testing can also very well be used for Grey Box Testing. The most popular tools used are:

  • Selenium
  • Appium
  • Postman
  • Chrome Dev Tools
  • Burp Suite
  • JUnit
  • Cucumber
  • RestAssured

What is gray box penetration testing?
The main idea behind the gray box/ grey box pen testing is to form a precise idea about network security.  By leveraging the information provided in the design document of a particular network assessments can be made that can be used to predict risk-prone areas in a network.  Usually minimal credential and information is available for this type of testing.  The level of access a hacker could gain can be envisioned using this type of testing. In short, both internal and external attacks can be simulated
Grey-box-penetration-testing
Conclusion
Nowadays in this modern world, nobody is indisputably safe from cybercrime irrespective of whether it is a big corporate or an individual, government organization, or non-benefit association.
The potentiality of becoming a cybercrime target looms large. Grey box testing comes up as a priceless tool for securing security in software. Significant vulnerabilities can be uncovered by giving in less effort and cost.

Dating Apps Test: How To Test?

Dating Apps Test: Why do we need that? this question might have come across many companies thinking about leveraging the popularity of such apps.
You must Remember that there are hundreds of dating apps out there. Many are not successful? Reason? Bugs! Users will be always driven towards apps that have high user experience and stable.
To make a stable app you need to test it rigorously so that no bug will be there and the app can assure your company success.
to know more about how to perform Dating Apps Test, continue reading this blog

How to test a dating application
Before we move further in the topic of dating application, it is essential to know how these applications are even tested. This solid foundation will open up new doors in terms of coding and testing for us to understand the main concept of the headliner.
There are several applications for dating that can be downloaded in order to test them. Once, you have tested them, you can easily put up a review for developers to understand what goes wrong.
Whereas in most of the scenarios, a testing team is assigned to ensure that they understand the flow of an application and test it with the highest priority.
The main thing that a tester knows better than others is that a location specific application is easy to test but when it comes to multiple locations then it can be a daunting task.
It requires a lot of struggle and localization for the testing methods to come into play. So, let us understand the workflow in order to get a hang off dating application testing.
1. Download an application
It will actually depend whether you are putting up an application in the beta mode of testing or having a team to do the deed.
In the beta mode, some of the users are given an authority to test an application by downloading it and checking on the essential features. Whereas in the testing team mode, the testing team will follow up a certain process to test an application properly.
In the beta mode, a user is required to search an application on the store of their phone. One can easily click into an application with the help of keywords, description, and title of an application given by the developer.
In addition to this, it is essential to know the localization of that particular application. This will help in placing it in the group of a global or local audience.
Once, this is done, the people can download the application which has signed up for the beta mode. They can send out their reviews for developers to understand the bugs or errors. It is the best in case one don’t have local testers or they want the live response of their audience. The first and foremost thing that this will help in is to understand the downloading and installing process.

  • There are times when a user has trouble in downloading an application. This will help in eliminating that trouble.
  • Then there is third-party interference in an application that might trigger a user off. This point must be tested as well.
  • There can be a custom error during the time of launch that can be filtered out.
  • In addition to this, there might be memory errors or location issues.

In order to avoid these problems, it is better to launch an application as the beta testing. This will reveal a new dating application to users and even test your application.
2. Get registered
Now, since the download and installing are handled, comes the registration process of a user. For every single application, we all have seen two types of application. One of them is having a personal user password and ID while other depends on an API network. In the case of testing, it is essential to test both the aspect.
In the personal name and password system, one needs to fill in their account details and get them verified. There are many mandatory conditions such as email address and phone number through which an identity of an individual can be tested.
As the tester, you must know the importance of reset and cancel button as well. Then, once the details are submitted, check in the table and database where it is getting stored and how they are verifying the information. Make sure that no personal data is shared with the third-party application.
In case, some of the information is missing, check on the popup. These are essential things during the whole process. Then, comes the API network of the registration process.
This type of method requires an Open authorization (OAuth) process to check on the checklist of a process. The main thing that check is to know the security of the API network that is followed by the creditability.
3. Match Made
This is the most essential part of the whole dating application. The main work done by such an application is to make a perfect match as per the algorithm. The main aspect will be movies, books, hobbies, music, etc.

In this step, one needs to review the test criteria of a user on which the match is done. This can be achieved with the help of matching criteria test. Then, you need to check that if one criterion is changed then how an application is reacting.
This can be verified while matching the data of both the parties after the match is made. Then, you need to understand the whole concept of rejecting a person in the algorithm. This will give you basic information about the whole process of acceptance and rejection that occur in a dating application.
4. Personal Chats on the application
Once, the work is done, now move to the next step which will be getting in touch with the matched person. It is the part where one gets involved in the personal chat.
This features must be tested as per the connectivity and how many characters are shared among individual. There are two types of testing mode that is used to test this feature such as a functional test and performance test.
In the functional testing mode, the functions are tested in regards to launching a chat, sending and receiving messages, emoticons, files, etc. This will also include sharing off video, image, and even doc files.
The further steps will include the testing of the send button, launching options, visiting the profile, status of chats and even total limit of sending a message.
In the performance testing mode, one will check on the smoothness while running an application. It will include the personal chats time exist, continuous mode of working, the response time of the chats, failed message ratio, and even the sending mode of files. This will involve every aspect and how the application is reacting to the change.
5. Mode of Payment
Nothing is for free in the world, not even a dating application. There is a different mode of earning that is used by the developers to make bucks such as pro-version, in-app ads, in-app purchase and even user subscriptions.
These are the basic mode in which the developers make money. For all the cases, it is essential to test off few essential parts of an application such as card details, data transferring, etc.
The card details will include the personal information of users such as card type, card number, account number user registration number, expiration date, CVV number, holders name, etc.
This type of information is extremely sensitive and requires multiple modes of security. Hence, it becomes essential to test the data transferring to ensure that no data of a user can be leaked. For be sure, a tester needs to test, the server connection security and also the verification mode such as SMS, phone, Chatbot and even emails.
6. Testing user experience
Now, the final step of testing is to test how the total experience of a user is while testing a date application. It can be determined in terms of the technical viewpoint to check on the perspective of a user.

However, this can be tested by the user as per their planning mode since there is a different mode to follow this type of testing. It will have a transition animation scale, window animation scale, animator duration scale, etc.
Final Words
The main reason that people are actually bending toward dating application is that it is extremely popular as compared to other application.
People are depending on them due to advancement in the globalization of an application.
This allows them to get in touch with other people all around the globe. Also, due to modernization, people don’t have much time to go and focus on their love life.
It is a chance for them to get a proper life with different people. Also, one can found their soulmate or a friend for a lifetime. Hence, it is a win-win situation.

11 Tips and Tricks For Appium and Selenium

Selenium and Appium are two well-known automation testing tools. Selenium is largely leveraged for testing web applications whereas Appium is widely used for testing mobile applications. Bundled with many features, both these tools are highly recommended for software testing.
But you need to have a proper understanding of these appium and selenium tools to get best out of them.  There are few tips and tricks that can help you get best out these tools and leverage them to their best abilities.
Let’s make our job easier with these veteran Tips and Tricks about Appium and Selenium.

The Use of Waits: 

Using Thread.Sleep() is a common method of “waiting” while any processing is going on. But it possesses a few drawbacks. Here is how we can overcome it.
a)    WebDriverWait.  It census your query every 500ms, and return when the wait condition is fulfilled. WebDriverWait can explicitly put a maximum threshold to elude locks and infinite waiting.
b)    FindElementBy / FindElement(..): Second method is by invoking FindElementBy or just FindElement(..). FindElementBy waits until the element is found and returns null if maximum wait time passes. But be sure you have to explicitly configure the implicitly waits.
1. Locating Elements
Locating element is not a tough job in selenium and there are many ways to do it. But the haunting part is getting StaleElementReferenceException.
It happens when you assign IWebElement reference but it already has some other location in the DOM. The solution to StaleElementReferenceException is to re-query and reassign the element reference.
2. Sending Keyboard input
Selenium allows sending inputs in two ways. First is by setting “value” property of editable elements by using ExecuteScript() / ExecuteAsyncScript(). Second is to use SendKeys() API.
I would suggest you use ExecuteScript() / ExecuteAsyncScript() method when you are more concerned about filling in a few fields and when you are not concerned about DOM events being fired and concurrent character-by-character verification.
But if you want to focus on real-time validation, the second method i.e. using SendKeys() API will be more apt for you.
3. Executing JavaScript code
You can execute JavaScript in either of the below-given ways depending upon your requirements.
i)    ExecuteScript().ExecuteScript() does not execute the next line of         test code till script execution is returned.
ii)    ExecuteAsyncScript() does not block your test code.
4. Drag & Drop Interfaces
Action Builder API, and the “DragAndDrop” and “DragAndDropToOffset” methods support easy drag and drop interface in Selenium.
5. Switching between windows and iframes
You can easily switch between windows and frames in Selenium.

  1. For iFrames

driver.SwitchTo().Frame(frameElement); //IWebElement

  1. For Windows

driver.SwitchTo().Window(handle);// driver window handle
and then can switch back to the original window by using
driver.SwitchTo().DefaultContent();

  1. Using drivers for multiple browsers

When using the driver API, always refer it by using RemoteWebDriver class for all the browsers used for running tests.
It is good to label your environment in a text/XML file and then deconstruct this and return the correct driver instance.
6. Cleaning UP
When you are done with your testing, you need to free all the resources and close the browser.
For this you can use Close(), Quit(), and Dispose().  Quit() closes all browsers, close() closes the existing browser  while Dispose() calls the quit() and closes all browsers.
Now when we are done with a few tips and tricks of working with selenium, let us now get better in our Apium skills.
Appium is one of the widely used mobile app testing tools. Though its users encounter some common problems while using it…
Here are some tips and tricks that can help you handle some common problems faced in using it and making it’s working more efficient and effective.
So, here we go…
7. Writing cross-platform tests 
One of the major issue in testing mobile apps is we have to write different test scenario for Android and iOS. Having common tests can be a big benefit in terms of saving time and efforts.
Though it gets much easier having the same set of test cases for both if your application is the same from a UI point-of-view.

Read also :  Testcafe Vs Selenium. Which is Better?

Just make sure that the accessibility IDs on corresponding UI elements in each version of the app matches with each other. If it stands true, you can run the same test on both applications. Also, be sure your test sets up the appropriate capabilities for each platform.
Based on different platforms, here are some more and little-known tips and tricks about Appium that can make your testing easier.
8. For All Platforms

  • AutoWebView – it is very useful for Cordova apps and helps to start in the webview context.

9. For Android

  • ignoreUnimportantViews – It is a very useful method to quicken your Android tests.
  • nativeWebScreenshot – Helps you to take a screenshot from UIAutomator. It is very useful if your screenshots from chromedriver are not as expected.

10. For IoS

  • locationServicesAuthorized – It helps you to prevent showing an alert when you are trying to use the user’s location by pre-authorizing location services.
  • Auto[Accept|Dismiss]Alerts – It helps you avoid alerts from disrupting your tests.
  • nativeWebTap – Permits users to use non-javascript taps.
  • safariIgnoreFraudWarning – It is beneficial in cases where your test environment doesn’t have 100% perfect SSL setup.
  • interKeyDelay – Sometimes Appium’s typing speed can cause a problem with your application, in such cases, interKeyDelay can evade the problem.
  • sendKeyStrategy – Helps in avoiding the keyboard altogether.

11. Networking Conditioning
You can use driver.setNetworkConnection(value) to stimulate various states of connectivity when you run your tests.
Hope these tips will prove helpful to you, will be back soon with some more useful testing tips and tricks. So stay tuned!

How to Write an efficient Cucumber Test?

Cucumber is integrated with the testing framework majorly used to introduce behavior driven framework. It allows testers to do the testing according to the behavior of the application.

There are different feature files being written which bridge the gap between different stakeholders of the project. Business Analyst, Customer, and Technical people should come on the same page so that the development of the product can meet the customer’s expectations and bug tracking can be faster as compared to conventional testing.
Now, you know how it is to write feature files. Let’s take an example of a feature file which tests an application login flow.

Feature: Login to the test application

It checks whether the login to the application is performed correctly or not.
Scenario: Successful Login to Test Application
Given User is at the login page
When User enters username as “nancy” and password as “pwd”
And User clicks on login button
Then User is able to successfully login to the Test Application.
Now, writing this feature file in a haphazard manner is very easy but have you ever imagined that there are some effective ways in which you can write your Cucumber Tests which we will be looking at in the below section. Let’s have a look at those:
1. You should use background keyword very wisely. If you want some common steps to run before each scenario of a feature file then you can put those steps in a background scenario. Those steps would run before each scenario in a feature file.

Feature: Test Background Feature

Description: This feature is to test the Background keyword
Given User is at the login page
When User enters username as “nancy” and password as “pwd”
And User clicks on login button
Then User is able to successfully login to the Test Application.

Scenario: Search a product and add the first product to the User basket

Given User type Acer Laptop in search box
When Add the first search result laptop to the basket
Then User basket should display the added item

Know More: Selenium Automation Testing using Cucumber Tool

Scenario: Add selected product and add the same to the User basket

Given User select Lenovo Laptop
When Select on the laptop to add it to the basket
Then User basket should display the added item
2. Every scenario should be independent of any other scenario. Any scenario should not depend on any other scenario for execution. Every scenario should be isolated and in this way, the execution of scenarios should not be dependent on any other scenario.

3. You should use a Scenario Outline when you want one scenario to be executed on a number of times. Just assume the case when you want to test the login scenario for different combinations of username and password. So, in that case, you can specify the combination of username and password for which the scenario will run n number of times.

Feature: Login to the test application using Scenario Outline

Description: It checks whether the login to the application is performed correctly or not for all set of specified users.
Scenario: Successful Login to Test Application using Scenario Outline
Given User is at the login page
When User enters Username as <username> and Password as <password>
And User clicks on login button
Then User is able to successfully login to the Test Application.
Example –
|username|password|
|user1|pwd1|
|user2|pwd2|
|user3|pwd3|
This scenario will run for three sets of users and password. It will, in turn, check the login flow for 3 usernames and password.

Know More: Rest API Testing using Cucumber Tools

4. You should make the scenarios more declarative and not imperative. The declarative styles make the scenarios more readable. It improves the readability of the scenario. Let’s take an example which is written in an imperative way and a scenario which is written in a declarative way. You would feel the difference in the readability of the scenarios.
Example: Imperative Scenario

Feature: Login to the test application

It checks whether the login to the application is performed correctly or not.
Scenario: Successful Login to Test Application
Given User is at the login page
When User enters username as “nancy” and password as “pwd”
And User clicks on login button
Then User is able to successfully login to the Test Application.
Example: Declarative

Feature: Login to the test application

It checks whether the login to the application is performed correctly or not.
Scenario: Successful Login to Test Application
Given User is at the login page
When User login In
Then User should be able to successfully login.

  1. Avoid doing hard coding I step definition files. Always try to parameterize the scenarios by passing username and password.

Feature: Login to the test application using Scenario Outline

Description: It checks whether the login to the application is performed correctly or not for all set of specified users.
Scenario: Successful Login to Test Application using Scenario Outline
Given User is at the login page
When User enters Username as <username> and Password as <password>
And User clicks on login button
Then User is able to successfully login to the Test Application.
Example –
|username|password|
|user1|pwd1|
|user2|pwd2|
|user3|pwd3|
You should write step definition files in which you take parameters from feature file.
@When(“^User enters Username as \”([^\”]*)\” and Password as \”([^\”]*)\”$”)
public void I_enter_Username_as_and_Password_as(String arg1, String arg2) {
driver.findElement(By.id(“email”)).sendKeys(user1);
driver.findElement(By.id(“password”)).sendKeys(pwd1);
driver.findElement(By.id(“login”)).click();
}
6. When you want to conjunct too many steps. You should do it by “and” keyword. Make sure that you do it into two steps and then use “and” keyword. One action per step should be used and it makes the steps more modular. It increases the scenario more readable.

Feature: Login to the test application
It checks whether the login to the application is performed correctly or not.
Scenario: Successful Login to Test Application
Given User is at the login page
When User login In with username and password
And User clicks on login button
Then User should be able to successfully login.

Conclusion

You should follow some steps which will make the cucumber tests more efficient. These steps will make the tests more readable. All the best!