What Is Statement Coverage Testing? Explained With Examples!

Let’s delve deep into the fascinating world of code analysis through statement coverage testing. From dissecting the significance of statement coverage testing to uncovering its practical applications, it’s advantages, disadvantages, along with relevant examples.

We’ll unravel how this technique helps ensure every line of code is scrutinized and put to the test. Whether you’re a seasoned developer or a curious tech enthusiast, this blog promises valuable insights into enhancing code quality and reliability.

Get ready to sharpen your testing arsenal and elevate your software craftsmanship!

What is Statement Coverage Testing?

A fundamental method of software testing called “statement coverage testing” makes sure that every statement in a piece of code is run at least once in order to gauge how thorough the testing was.

This method offers useful insights into how thoroughly a program’s source code has been checked by monitoring the execution of each line of code.

How to Measure Statement Coverage?

When comparing the number of executed statements to the total number of statements in the code, statement coverage is calculated. Statement coverage is calculated as follows:

Statement Coverage is calculated as follows: (Number of Executed Statements / Total Statements) x 100%

Since this evaluation is given as a percentage, testers can determine what fraction of the code has really been used during testing.

Suppose we have a code snippet with 10 statements, and during testing, 7 of these statements are executed.

def calculate_average(numbers):
total = 0
count = 0
for num in numbers:
total += num
count += 1
if count > 0:
average = total / count
else:
average = 0
return average

In this case:

Number of Executed Statements: 7
Total Number of Statements: 10
Using the formula for statement coverage:

Statement Coverage = (Number of Executed Statements / Total Number of Statements) * 100%
Statement Coverage = (7 / 10) * 100% = 70%

Therefore, this code snippet’s statement coverage is 70%. This shows that during testing, 70% of the code’s statements were carried out.

To ensure a more thorough testing of the software, it’s critical to aim for higher statement coverage. In order to thoroughly evaluate the quality of the code, additional coverage metrics like branch coverage and path coverage are also essential.

Achieving 100% statement coverage, however, does not guarantee that all scenarios have been tested.

Example of Statement Coverage Testing:

Let’s consider a simple code snippet to illustrate statement coverage:

def calculate_sum(a, b):

    if a > b:

        result = a + b

    else:

        result = a – b

    return result

Suppose we have a test suite with two test cases:

  1. calculate_sum(5, 3)
  2. calculate_sum(3, 5)

Both the ‘if ‘ and ‘else’ branches are executed when these test cases are applied to the function, covering all the code statements. The 100% statement coverage demonstrates that every statement in the code has undergone testing.

Statement coverage testing ensures that no lines of code are left untested and adds to the software’s overall stability.

It’s crucial to remember, though, that while it offers a basic level of coverage assessment, having high statement coverage doesn’t imply that there won’t be any errors or rigorous testing.

For a more thorough evaluation of code quality, other methods, like branch coverage and path coverage, may be required.

Advantages and disadvantages of statement coverage testing

Statement Coverage Testing Benefits/Advantages

Detailed Code Inspection:

Statement Coverage Testing makes sure that each line of code is run at least once during testing.

This facilitates the discovery of any untested code segments and guarantees a more thorough evaluation of the product.

Consider a financial application where testing statement coverage reveals that a certain calculation module has not been tested, requiring further testing to cover it.

Quick Dead Code Detection:

By immediately identifying dead or inaccessible code, statement coverage enables engineers to cut out superfluous sections.

For instance, statement coverage analysis can indicate the redundancy of a portion of code if it is left undisturbed during testing for an old feature.

Basic quality indicator:

High statement coverage indicates that a significant percentage of the code has been used during testing, according to the basic quality indicator.

It does demonstrate a level of testing rigor, but it does not ensure software that is bug-free. Achieving 90% statement coverage, for instance, demonstrates a strong testing effort within the software.

Statement Coverage Testing Disadvantages

Concentrate on Quantity Rather than Quality:

Statement coverage assesses code execution but not quality. With superficial tests that don’t account for many circumstances, a high coverage percentage may be achieved.

For instance, testing a login system can cover all of the code lines but exclude important checks for invalid passwords.

Ignores Branches and Logic:

When determining statement coverage, conditional structures like if and else statements are ignored.

This could result in inadequate testing of logical assumptions. Software might, for instance, test the “if” portion of an if-else statement but fail to test the “else” portion.

False High Coverage:

Achieving high statement coverage does not imply that the application will be bug-free.

Despite extensive testing, some edge situations or uncommon events might still not be tested.

For instance, a scheduling tool may have excellent statement coverage but neglect to take into account changes in daylight saving time.

Inability to Capture Input Context:

Statement coverage is unable to capture the context of the input values utilized during testing.

This implies that it might ignore particular inputs that result in particular behaviors.

For example, evaluating a shopping cart system might be successful if edge circumstances like negative amounts or large discounts are not taken into account.

Difference Between Statement Coverage And Branch Coverage Testing

Feature Statement Coverage Branch Coverage
Definition Ensures every executable statement in the code is run at least once. Ensures that every possible decision outcome (true/false) of each branch in the code is executed at least once.
Focus Execution of code lines Execution of decision paths
Example If x > 10: <br> &nbsp;&nbsp;print("x is greater") If x > 10: <br> &nbsp;&nbsp;print("x is greater") <br> Else: <br> &nbsp;&nbsp;print("x is not greater")
Measures Percentage of statements executed Percentage of branches executed
Thoroughness Less thorough More thorough
When to Use Early testing phases, as a baseline metric Later testing phases for more comprehensive coverage

FAQs

#1) How do you get 100% statement coverage?

Here’s how you achieve 100% statement coverage, explained in a clear and practical way:

Understanding Statement Coverage:

  • The Goal: It means you’ve designed test cases that execute every single executable line of code in your project at least once. This doesn’t guarantee your code is bug-free, but it’s a foundational testing step.

Steps to Achieve 100% Statement Coverage:

  1. Analyze the Code:

    • Examine your code thoroughly to identify every executable statement. Pay close attention to conditional blocks (ifelseswitch), loops, and function calls.
  2. Design Targeted Test Cases:

    • Create a test case for each execution path in your code. Think about the different input values and scenarios that will trigger every line.
    • Example: If you have a simple if x > 10 condition, you need one test case where x is greater than 10 and another where it’s less than or equal to 10.
  3. Use a Coverage Tool:

    • Coverage tools automate this process! They instrument your code and report which lines are executed during testing. This helps pinpoint areas missing coverage.
  4. Iterate and Improve:

    • With your tool’s help, identify lines not yet covered. Design new test cases to address these gaps. Continue this process until you hit 100%.

Important Considerations:

  • Untestable Code: Sometimes, due to dependencies or complex interactions, certain statements may be impossible to hit in testing. Document these and explain the limitations.
  • Beyond 100%: 100% statement coverage doesn’t mean perfect code. You’ll need more rigorous techniques like branch coverage and mutation testing for further confidence.
  • Tool Choice: Research and select a coverage tool appropriate for your programming language and testing environment.

#2) Does 100% statement coverage mean 100% branch coverage?

Nope, 100% statement coverage doesn’t automatically mean 100% branch coverage. Think of it like this:

  • Statement Coverage: You’ve walked down every street in a neighborhood.
  • Branch Coverage: You’ve walked down every street AND made every possible turn (both left and right at intersections).

You could cover all the streets without taking every turn, missing some pathways!

#3) What is 100% coverage in software testing?

100% coverage in software testing is a bit of a misleading term. Here’s why:

It’s About Different Metrics:

  • Statement Coverage: 100% means every executable line of code has been run at least once during testing.
  • Branch Coverage: 100% means every possible outcome of each decision point (e.g., if/else branches) has been executed.
  • Path Coverage: 100% would be an incredibly difficult goal, as it means testing every possible combination of branches and paths through your code.

Why is the Term Used Loosely?

  • Common Goal: People often desire high levels of coverage with their tests. The term “100% coverage” gets used as a shorthand for aiming for a very thorough testing process.
  • Realistic Targets: In practice, most teams strike a balance between coverage and the time/effort required for different types of testing.

What Should You Focus On?

  • Start with Statements: Statement coverage is a good baseline.
  • Prioritize Branches: Branch coverage provides more confidence in your code’s logic.
  • Context Matters: The right mix of coverage techniques depends on the criticality of your software and the types of risks you want to mitigate.

#4) What is 100% multiple condition coverage?

Here’s a breakdown of 100% multiple condition coverage (MCC):

What it is:

  • A Rigorous Testing Standard: MCC is a type of coverage that focuses on thoroughly testing all possible combinations of outcomes within a decision that has multiple conditions.
  • Example: Let’s say you have a decision based on whether conditionA is true AND conditionB is true. MCC requires test cases covering these scenarios:
    • conditionA: True, conditionB: True
    • conditionA: True, conditionB: False
    • conditionA: False, conditionB: True
    • conditionA: False, conditionB: False

Why it matters:

  • Uncovers Subtle Bugs: Simple branch coverage might miss errors that only occur when specific combinations of conditions are met. MCC increases your chances of finding these.
  • Especially for Complex Decisions: If your code has decisions with lots of combined conditions, MCC is crucial for ensuring the logic works as intended in all scenarios.

How to achieve 100% MCC

  1. Identify Decisions: Analyze your code to find decisions with multiple conditions.
  2. Truth Tables: Create truth tables to list all possible combinations of condition values (true/false).
  3. Design Test Cases: Create test cases that map to each row of your truth table, ensuring all combinations are executed.
  4. Coverage Tool: Use a coverage tool that supports MCC to track your progress and identify missing scenarios.

Important Notes:

  • High Cost: MCC can be more time-consuming to achieve than statement or branch coverage due to the increased number of test cases.
  • Best for Critical Systems: For software where safety or reliability are paramount (e.g., aviation, medical devices), this level of rigor is often justified.
Requirements Elicitation in Software Engineering: A Complete Guide

Requirements Elicitation, a cornerstone in software engineering, is the critical process of gathering and defining the stakeholders’ needs for a software project.

This intricate dance of communication and analysis is not merely about collecting a list of desired features; it’s about deeply understanding the user’s environment, pain points, and aspirations to ensure the final product meets and exceeds expectations.

In this complex procedure, engineers, analysts, and stakeholders collaborate closely, employing various techniques such as interviews, surveys, and observation to capture the nuanced demands of the project.

This initial phase sets the foundation for a software’s development lifecycle, highlighting its pivotal role in successfully realizing robust, user-centric software solutions.

Introduction to Requirements Elicitation

Definition of Requirements Elicitation

Requirements Elicitation is a foundational process in software engineering where stakeholders’ needs, desires, and constraints for a new or altered system are identified, gathered, and understood.

It involves direct interaction with stakeholders, including users, customers, and others involved in the project, to capture detailed system requirements.

This process is not merely about asking what the stakeholders want but involves a deep investigation to uncover and document explicit, implicit, tacit, and future needs.

The goal is to create a comprehensive and accurate requirements document that serves as a cornerstone for all subsequent stages of software development.

Importance in Software Engineering

Requirement elicitation holds paramount importance in software engineering for several reasons:

  • Project Foundation: It sets the foundation for the project by ensuring that the software development team fully understands what needs to be built. This clarity is crucial for defining project scope and preventing scope creep.
  • Stakeholder Satisfaction: By actively involving stakeholders in the elicitation process, it ensures that the final product meets or exceeds their expectations, leading to higher satisfaction and acceptance.
  • Risk Mitigation: Proper elicitation helps identify potential issues and misunderstandings early in the project lifecycle, reducing the risk of project failure due to unmet requirements.
  • Cost Efficiency: Understanding requirements upfront helps in accurate project estimation and planning, reducing the likelihood of costly reworks and delays that stem from incomplete or misunderstood requirements.
  • Quality Enhancement: Detailed and well-understood requirements contribute to better design, development, and testing processes, leading to a higher quality product.

Overview of the Requirements Elicitation Process

The requirements elicitation process typically involves several key phases:

  1. Preparation: Before interacting with stakeholders, it’s crucial to identify who they are, understand their background, and prepare the right set of tools and techniques to facilitate effective elicitation.
  2. Elicitation Techniques Application: Employ techniques tailored to the project and stakeholders involved. Common methods include interviews, focus groups, surveys, document analysis, observation, and prototyping. Each technique has its strengths and is chosen based on the specific context and requirements of the project.
  3. Requirements Documentation: The information gathered from stakeholders is documented in a structured format. This could be in the form of user stories, use cases, requirement specifications, or models. The choice of documentation often depends on the project methodology (Agile, Waterfall, etc.) and the complexity of the system being developed.
  4. Analysis and Negotiation: Analyzing the documented requirements to identify conflicts, redundancies, and gaps. This phase often involves negotiating with stakeholders to prioritize requirements and resolve conflicts arising from differing needs or constraints.
  5. Validation and Verification: Ensuring the requirements document is complete, consistent, and acceptable to all stakeholders. This includes validating that the requirements align with business objectives and verifying that they are feasible within technical, time, and budget constraints.
  6. Baseline and Maintenance: Once validated, the requirements document is often baselined as a reference point for future project activities. Requirements management continues throughout the project, accommodating changes and refinements as the project evolves.

Understanding the Basics

Requirements Elicitation is a critical phase in software development where the stakeholders’ needs, desires, and constraints are identified and documented to guide the design and development of a new or modified system. This process ensures that the software development team fully understands what must be built to meet stakeholders’ expectations effectively. It involves various activities such as interviews, surveys, workshops, and analysis to capture the said and unsaid needs of the users.

Types of Requirements

  1. Functional Requirements:
    • Definition: Specify what the system should do. They describe the interactions between the system and its environment, independent of the implementation.
    • Examples: User login process, data processing logic, and report generation capabilities.
  2. Non-Functional Requirements:
    • Definition: Outline the quality attributes or constraints the system must exhibit. They are not about specific behaviors but how the system performs under certain conditions or constraints.
    • Examples: Performance metrics (response time, throughput), security standards, usability, scalability, and compatibility.
  3. System Requirements:
    • Definition: Detailed specifications describing the software system’s functions, features, and constraints. These can be further divided into software and hardware requirements.
    • Examples: Hardware specifications (CPU, memory, disk space), software dependencies (operating systems, middleware), system integrations, and system behaviors.
  4. User Requirements:
    • Definition: Express the needs and desires of the end-users in terms of tasks they need to perform with the system, often documented in natural language or through use cases.
    • Examples: Ability to export data into various formats, user-friendly interfaces for non-technical users, and custom notification settings.

Stakeholders in Requirements Elicitation

Stakeholders are individuals or groups with an interest in the outcome of the project.

They can have an impact on or have an impact on the project’s success. In requirement elicitation, stakeholders typically include:

  • End-users: Who will directly interact with the system?
  • Business Managers: Those who make strategic decisions based on the system’s output.
  • Project Managers: Who oversees the project’s execution.
  • Development Team: This includes software engineers, designers, and testers who build and maintain the system.
  • Customers: Who commissions the software and funds the project?
  • Regulatory Bodies: Whose standards and regulations must be met by the system.

Challenges in Eliciting Requirements

Eliciting requirements is often fraught with challenges, including:

  1. Communication Barriers: Misunderstandings between stakeholders and the development team due to language, technical jargon, or cultural differences.
  2. Incomplete Requirements: Difficulty in capturing all requirements at the start, leading to changes and revisions later in the project.
  3. Conflicting Requirements: Different stakeholders may have competing or contradictory requirements, necessitating negotiation and prioritization.
  4. Changing Requirements: As the project progresses or external conditions change, requirements may also need to be updated, adding complexity to the project management.
  5. Identifying Tacit Knowledge: Uncovering unspoken or implicit requirements that stakeholders assume but do not communicate.
  6. Stakeholder Engagement: Ensuring all relevant stakeholders are identified, available, and willing to participate in the elicitation process.

Requirements Elicitation Techniques

Technique #1. Brainstorming

Brainstorming in Requirements Elicitation

Brainstorming, as a requirements elicitation technique, embodies a dynamic group activity focused on generating a wide array of ideas, solutions, and requirements for a project.

It thrives on leveraging the collective intelligence and creativity of the participants, usually comprising project stakeholders, team members, and potential users.

This technique is especially valuable in the initial phases of a project, where the goal is to explore various possibilities and identify innovative solutions without the constraints of criticism or feasibility considerations.

Key Objectives and Advantages:

  • Idea Generation: Facilitates the rapid generation of a broad spectrum of ideas, allowing teams to explore various possibilities that might not emerge through individual contemplation.
  • Enhanced Collaboration: Encourages active participation from all stakeholders, fosters a sense of ownership and collaboration across the project team, and ensures a diverse set of perspectives is considered.
  • Creative Freedom: Creates a safe space for free thinking and sharing out-of-the-box ideas, which can lead to innovative solutions and uncover hidden requirements.
  • Problem-Solving: Helps identify and solve complex problems by allowing team members to build on each other’s ideas, leading to more refined and comprehensive solutions.

Process and Implementation:

  1. Preparation: Define the scope and objectives of the brainstorming session, select a diverse group of participants, and choose a facilitator to guide the process.
  2. Idea Generation Phase: Participants are encouraged to freely express their ideas, no matter how unconventional they may seem, without fear of immediate critique or evaluation.
  3. Encouragement of Diverse Ideas: The facilitator encourages the exploration of different angles and perspectives, ensuring a wide-ranging discussion that can lead to innovative solutions.
  4. Building on Ideas: Participants build on each other’s suggestions, enhancing and expanding upon initial concepts, often leading to more refined and creative outcomes.
  5. Documentation: All ideas are recorded verbatim, ensuring nothing is lost or overlooked during the session. This record serves as a valuable resource for subsequent analysis and development phases.
  6. Analysis and Refinement: Following the session, ideas are categorized, evaluated, and refined. This stage may involve prioritization techniques to identify the most promising or critical ideas for further exploration or development.

Challenges and Considerations:

  • Group Dynamics: Managing group dynamics to ensure equal participation and prevent dominance by more vocal participants is crucial for the success of a brainstorming session.
  • Idea Saturation: There may be points during the session where ideas start to wane; the facilitator must employ strategies to reinvigorate the group and stimulate further creativity.
  • Quality vs. Quantity: While brainstorming emphasizes the quantity of ideas over quality, it’s essential to eventually shift focus towards filtering and refining ideas to ensure they align with project goals and constraints.

Technique #2. Interviews

Interviews in requirements elicitation represent a fundamental, direct method for gathering detailed information from stakeholders.

This technique involves structured or semi-structured one-on-one or group discussions with individuals who have a stake in the project, such as end-users, business managers, project sponsors, and others who possess insights into the system’s requirements.

Through interviews, requirements analysts can delve deeply into the stakeholders’ needs, expectations, and experiences, facilitating a thorough understanding of the requirements for the new or improved system.

Key Objectives and Advantages:

  • Depth of Insight: Interviews provide an opportunity to explore complex issues in detail, allowing for a deeper understanding of stakeholder needs and the nuances of their requirements.
  • Clarification and Verification: They offer a direct channel for clarifying ambiguities and verifying assumptions, ensuring the elicited requirements are accurate and fully understood.
  • Flexibility: The format of interviews can be adapted to suit the stakeholder’s familiarity with the subject matter and the specific goals of the elicitation process, ranging from open-ended discussions to more structured question-and-answer formats.
  • Personal Engagement: Interviews facilitate personal interaction, building trust and rapport with stakeholders, which can encourage openness and sharing of critical insights that might not emerge through other elicitation techniques.

Process and Implementation:

  1. Planning: Identify the stakeholders to be interviewed and the objectives for each interview. Prepare a list of questions or topics to be covered, tailored to the interviewee’s role and level of expertise.
  2. Conducting Interviews: Depending on the chosen format (structured, semi-structured, or unstructured), the interviewer guides the conversation through prepared questions or topics while remaining open to exploring new insights that emerge.
  3. Active Listening: It’s crucial for the interviewer to practice active listening, paying close attention to the interviewee’s responses and asking follow-up questions to probe deeper into key areas.
  4. Documentation: Detailed notes or recordings (with the interviewee’s consent) should be taken to ensure that all information is captured accurately for later analysis.
  5. Analysis: The collected data is analyzed after the interview to identify and document the requirements. This may involve coding responses, identifying themes, and prioritizing the requirements based on the information gathered.

Challenges and Considerations:

  • Bias and Influence: Interviewers must be aware of potential biases and strive to maintain neutrality, ensuring that the interviewee’s responses are not unduly influenced by how questions are phrased or presented.
  • Time and Resource Intensive: Conducting and analyzing interviews can be time-consuming, particularly for projects with many stakeholders. Efficient planning and prioritization of interviews are essential.
  • Interpretation and Accuracy: The subjective nature of personal communication requires careful interpretation of responses, particularly for open-ended questions, to ensure that the requirements are accurately understood and documented.

Technique #3. Surveys/Questionnaires

Surveys and questionnaires stand as highly scalable and efficient techniques for requirements elicitation

Surveys and questionnaires stand as highly scalable and efficient techniques for requirement elicitation, enabling data collection from a broad audience in a relatively short period of time.

This method is particularly useful when the project stakeholders are numerous or geographically dispersed, and there’s a need to gather a wide range of opinions, preferences, and requirements for the system under development.

This technique facilitates the quantitative and qualitative stakeholder needs analysis by deploying structured questions.

Key Objectives and Advantages:

  • Broad Reach: Surveys and questionnaires can be distributed to many stakeholders simultaneously, making it possible to gather diverse perspectives efficiently.
  • Quantitative and Qualitative Data: They can be designed to collect quantitative data (e.g., ratings, rankings) and qualitative insights (e.g., open-ended responses), providing a balanced view of stakeholder requirements.
  • Anonymity and Honesty: Respondents might be more willing to provide honest feedback when anonymity is assured, leading to more accurate and truthful responses.
  • Cost-Effective: Compared to other elicitation methods such as interviews and workshops, surveys and questionnaires are more cost-effective, especially when stakeholders are widespread.

Process and Implementation:

  1. Designing the Survey/Questionnaire: Carefully craft questions that align with the objectives of the requirements elicitation. The survey should include a mix of closed-ended questions for statistical analysis and open-ended questions to capture detailed comments and suggestions.
  2. Pilot Testing: Before widespread distribution, conduct a pilot test with a small, representative segment of the target audience to identify any ambiguities or issues in the questionnaire.
  3. Distribution: Choose the most effective means to distribute the survey, considering the stakeholders’ access to and familiarity with digital tools. In some settings, options include email, online survey platforms, or even paper-based questionnaires.
  4. Data Collection: Set a reasonable response deadline, and consider sending reminders to maximize the response rate.
  5. Analysis: Analyze the collected data to identify trends, patterns, and outliers. Quantitative data can be statistically analyzed, while qualitative responses require content analysis to extract meaningful insights.
  6. Feedback and Validation: Share the findings with key stakeholders for validation and to ensure that the interpreted requirements accurately reflect their needs and expectations.

Challenges and Considerations:

  • Design Complexity: Crafting clear, unbiased questions capable of eliciting useful information requires careful consideration and expertise in survey design.
  • Response Rate and Bias: Achieving a high response rate can be challenging, and the results may be biased toward the views of those who chose to respond.
  • Interpretation of Responses: Analyzing open-ended responses and translating them into actionable requirements necessitates a deep understanding of the context and the ability to interpret stakeholder feedback accurately.

Question Types:

  • Closed-Ended Questions: These questions limit responses to a set of predefined options. They are useful for gathering quantitative data that can be easily analyzed. Examples include multiple-choice questions, Likert scale questions for assessing attitudes or preferences, and yes/no questions.
  • Open-Ended Questions: These allow respondents to answer in their own words, providing qualitative insights that can reveal nuanced understanding and novel ideas. While they are more valuable, they require more effort to analyze.
  • Ranking and Rating Questions: These questions ask respondents to prioritize or rate different items according to their preferences or importance. They are useful for understanding the relative significance of various requirements.


Technique #4. Prototyping

Prototyping is a dynamic and interactive requirements elicitation technique that involves creating preliminary versions of a software system to explore ideas, uncover requirements, and gather feedback from users and stakeholders.

Prototyping is a dynamic and interactive requirements elicitation technique that involves creating preliminary versions of a software system to explore ideas, uncover requirements, and gather feedback from users and stakeholders.

This approach allows for a tangible exploration of the system’s functionality and design before developing the full system.

Prototyping bridges the initial concept and the final product, facilitating a deeper understanding and communication among developers, users, and stakeholders. Here’s an in-depth look at how prototyping functions within the context of requirement elicitation:

Purpose and Benefits:

  • Visualization and Concretization: Prototyping converts abstract requirements into tangible forms, enabling stakeholders to interact with a proposed system’s elements. This visualization helps clarify, refine, and validate requirements.
  • Feedback Loop: It creates a continuous feedback loop, allowing users to provide immediate and actionable insights. This iterative process helps identify misunderstandings or missing requirements early in the development cycle.
  • Experimentation and Exploration: Developers and stakeholders can experiment with different approaches and designs to explore the feasibility of certain features or requirements. It encourages innovation and creative solutions.

Types of Prototypes:

  1. Low-Fidelity Prototypes: These are quick and easy to create, often using paper sketches or simple digital mockups. They are useful for initial brainstorming and concept discussions.
  2. High-Fidelity Prototypes: More sophisticated and closer to the final product, these prototypes offer interactive features and a detailed user interface representation. They are used for more detailed feedback and usability testing.
  3. Functional Prototypes: These include working software elements, focusing on functional aspects rather than detailed design. They help in understanding the technical feasibility and functional behavior of the system.

Process and Implementation:

  • Identify Prototyping Goals: Clearly define what aspects of the system the prototype will explore, such as specific functionalities, user interfaces, or workflows.
  • Develop the Prototype: Create the prototype using appropriate tools and technologies based on the goals. The complexity of the prototype can vary depending on the requirements and the stage of the elicitation process.
  • Gather Feedback: Present the prototype to users and stakeholders, encouraging them to interact with it and provide feedback on its functionality, design, and usability.
  • Iterate and Refine: Use the feedback to revise and enhance the prototype. This iterative process may involve several rounds of prototyping and feedback to converge on the final set of requirements.

Challenges and Considerations:

  • Managing Expectations: Ensure that stakeholders understand the purpose of the prototype and do not mistake it for the final product. Clear communication about the scope and objectives of prototyping is crucial.
  • Resource Allocation: While prototyping can save time and resources in the long run by preventing rework, it does require an initial investment of time and resources. Balancing the depth and detail of prototyping against available resources is essential.
  • Integration with Other Techniques: Prototyping is often most effective when used in conjunction with other requirement elicitation techniques, such as interviews, surveys, and workshops. This multi-faceted approach ensures a comprehensive understanding of requirements.

Technique #5. Document Analysis

Document Analysis

Document Analysis is a systematic requirements elicitation technique that involves reviewing and interpreting existing documentation to identify and understand the requirements for a new system.

This method is particularly useful in projects with significant written material, such as reports, manuals, existing system specifications, business plans, and user documentation.

Document analysis helps capture explicit knowledge contained in these materials, offering insights into the system’s current state, business processes, and user needs, which can be invaluable for defining requirements for the new system.

Purpose and Benefits:

  • Leverage Existing Knowledge: It uses documented information, reducing the need for extensive stakeholder consultations in the initial phase.
  • Identify System Requirements: By analyzing existing documentation, analysts can uncover detailed information about the current system’s capabilities, limitations, and areas for improvement.
  • Understand Business Processes: Documents related to business processes provide insights into how the organization operates, which is crucial for ensuring the new system aligns with business objectives.
  • Gap Analysis: Reviewing documents can help identify discrepancies between the current state and the desired future state, guiding the development of requirements to bridge these gaps.

Process and Implementation:

  • Identify Relevant Documents: The first step involves identifying and gathering all documents that could provide insights into the system and its requirements. This includes both technical documentation and business-related materials.
  • Review and Analyze Documents: Conduct a thorough review of the collected documents, extracting relevant information related to the system’s functionality, business processes, user interactions, and any known issues or constraints.
  • Synthesize Findings: Consolidate the information extracted from the documents to understand the existing system and the operational context. This synthesis helps in identifying key requirements for the new system.
  • Validate and Refine Requirements: The preliminary requirements identified through document analysis should be validated with stakeholders and refined based on feedback. This ensures that the requirements accurately reflect the needs and constraints of the project.

Challenges and Considerations:

  • Quality and Relevance of Documentation: The effectiveness of document analysis heavily depends on the quality and relevance of the available documentation. Outdated, incomplete, or inaccurate documents can lead to misunderstandings or misinterpreting requirements.
  • Over-reliance on Existing Material: While existing documents are a valuable source of information, relying solely on document analysis can result in missed opportunities for innovation or improvement. Complementing this technique with other elicitation methods involving direct stakeholder engagement is essential.
  • Integration with Other Techniques: To obtain a comprehensive and accurate set of requirements, document analysis should be used in conjunction with other elicitation techniques such as interviews, workshops, and prototyping. This blended approach ensures that both explicit knowledge contained in documents and tacit knowledge held by stakeholders are captured.

Technique #5 – Storyboarding

Storyboarding in the context of requirements elicitation

Storyboarding in the context of requirements elicitation is a visual and narrative-driven technique used to capture, communicate, and explore user requirements and experiences for a software system.

Originating from film and animation, storyboarding has been adapted into software development as an effective tool for illustrating the user’s journey, interactions with the system, and the context in which these interactions occur.

It involves creating a series of panels or frames that depict key scenarios or use cases, providing a storyboard that narrates the sequence of actions, decisions, and events a user goes through when interacting with the system.

Key Components of Storyboarding:

  • Scenes: Each panel or frame represents a specific scene or step in the user’s interaction with the software, often starting from the initiation of a task and concluding with its completion or the achievement of a goal.
  • Characters: Storyboards include representations of the user(s) or actor(s) involved in the scenario, providing a persona that interacts with the software.
  • Actions: The actions or operations the user performs and system responses illustrate how tasks are executed and objectives are achieved.
  • Annotations: Textual annotations accompany visual elements to provide context, describe user motivations, explain system functionality, or highlight requirements and constraints.

Benefits of Storyboarding:

  • Enhanced Communication: Storyboards facilitate a shared understanding among stakeholders, developers, and designers by visually conveying complex scenarios and user interactions.
  • User-Centered Design Focus: By centering the narrative around the user’s experience, storyboarding emphasizes the importance of designing solutions that meet real user needs and preferences.
  • Early Validation: Allows for the early exploration and validation of design concepts and requirements with stakeholders, enabling feedback and revisions before significant development efforts are undertaken.
  • Creativity and Innovation: Encourages creative thinking about possible solutions and innovations by visualizing user interactions and exploring different scenarios.

Process of Storyboarding in Requirements Elicitation:

  1. Identify Scenarios: Select key scenarios or use cases critical to understanding user interactions with the system. These scenarios should cover a range of normal, exceptional, and alternative flows.
  2. Define Characters: Create personas for the users involved in the scenarios to add depth to the narrative and ensure the system’s design addresses their specific needs.
  3. Sketch the Storyboard: Draw or use digital tools to create a sequence of panels that depict the user’s journey, including interactions with the system, decision points, and outcomes.
  4. Annotate and Describe: Add annotations to the storyboard to clarify actions, motivations, system responses, and any specific requirements or constraints the scenario highlights.
  5. Review and Iterate: Share the storyboard with stakeholders for feedback and use their input to refine the scenarios, requirements, and design concepts.

Challenges:

  • Time and Skill: Creating effective storyboards can be time-consuming and requires a certain level of artistic skill or specialized tools.
  • Complexity Management: Managing and integrating numerous storyboards can be challenging for complex systems with multiple user roles and interactions.

Technique #6: Ethnography

Ethnography, within the realm of requirements elicitation

Ethnography, within the realm of requirements elicitation, refers to a qualitative research approach that deeply immerses researchers in the natural environment of their subjects to observe and understand their behaviors, practices, and interactions with technology.

This anthropological method is adapted to software development to gain insights into user needs, experiences, and the context in which a system will operate. It involves studying users in their work or life settings rather than in artificial environments or laboratory conditions.

Application for Requirements Elicitation:

  • Direct Observation: Researchers observe users going about their daily tasks, noting how they interact with existing systems and identifying pain points, inefficiencies, and unmet needs that the new system could address.
  • Participatory Observation: Sometimes, researchers actively participate in the environment they are studying to get a firsthand understanding of the user experience and the challenges users face.
  • Interviews and Informal Conversations: Engaging with users in their natural settings allows researchers to gather nuanced insights through casual conversations, in-depth interviews, and group discussions.
  • Artifact Collection: Gathering physical or digital artifacts that users interact with (e.g., documents, tools, software) provides additional context about their tasks and workflows.

Benefits:

  • Deep Contextual Understanding: Ethnography offers an in-depth understanding of the user’s work environment, social interactions, and the cultural factors that influence their interactions with technology.
  • User-Centered Design Insights: The rich, qualitative data collected can inform a more user-centered design process, ensuring that the system meets real user needs and fits seamlessly into their existing workflows.
  • Identification of Tacit Needs: This approach can uncover implicit needs and requirements that users themselves might not be consciously aware of or able to articulate in a traditional elicitation setting.

Challenges:

  • Time and Resource Intensity: Ethnographic studies can be time-consuming and resource-intensive, requiring extended periods of observation and analysis.
  • Interpretation and Bias: The qualitative nature of the data collected requires careful interpretation, and researchers must be mindful of their own biases in observing and reporting on user behavior.
  • Scalability: Given its intensive nature, ethnography may not be practical for all projects, especially those with tight timelines or limited resources.

Integration with Software Development:

Ethnography’s insights are particularly valuable in the early stages of software development, helping to define the problem space and identify user requirements.

The findings from ethnographic research can feed into the creation of personas, user stories, and use cases, guiding the design and development of the system.

When combined with other requirements elicitation techniques, such as interviews, surveys, and workshops, ethnography can provide a comprehensive understanding of user needs and the context within which the system will be used.

Technique #7: Use Case Approach

Use Case Approach:

The Use Case Approach in requirements elicitation is a method that focuses on identifying and defining the interactions between a user (or “actor”) and a system to achieve specific goals.

This approach helps in capturing functional requirements by describing how the system should behave from the user’s perspective, providing a clear and concise way to communicate system behavior to both technical and non-technical stakeholders.

It plays a crucial role in the early phases of software development, ensuring that the software functionality aligns with user needs and expectations.

Key Components of the Use Case Approach:

  • Actors: Represents the users or other systems interacting with the subject system. Actors are external entities that initiate an interaction with the system to accomplish a goal.
  • Use Cases: Describes a sequence of actions the system performs that yields an observable value result to an actor. A use case is a specific situation or scenario under which the system interacts with its environment.
  • Scenarios: Detailed narratives or sequences of events, including main, alternative, and exceptional flows, illustrating how actors interact with the system across different use cases.

Process and Implementation:

  1. Identify Actors: Identify all potential system users and other systems that might interact with it. This includes direct users, indirect users, and external systems.
  2. Define Use Cases: For each actor, define the specific interactions they have with the system. This includes the main objectives or tasks the actor wants to accomplish using the system.
  3. Write Scenarios: For each use case, write detailed scenarios that describe the steps the actor and the system take to achieve the goal. This includes the ideal path (main scenario) and variations (alternative and exception scenarios).
  4. Prioritize Use Cases: Prioritize the use cases based on factors such as business value, frequency of use, and complexity. This helps focus development efforts on the most critical aspects of the system.
  5. Validation and Refinement: Validate the use cases and scenarios with stakeholders to ensure they accurately represent user requirements. Refine the use cases based on feedback.

Benefits of the Use Case Approach:

  • User-Centric: Focuses on user interactions, ensuring the system meets the actual needs and expectations of its users.
  • Clear Communication: Provides a common language for discussing system requirements among stakeholders, including non-technical users.
  • Identification of Functional Requirements: Helps in systematically identifying all the functional requirements of a system through the exploration of various user interactions.
  • Facilitates Testing and Validation: Use cases can be directly used as a basis for developing test cases and validation criteria.

Challenges:

  • Complexity in Large Systems: Managing and maintaining the use cases can become challenging for systems with many use cases.
  • Overlooking Non-Functional Requirements: While excellent for capturing functional requirements, the use case approach may overlook non-functional requirements unless explicitly addressed.

The Use Case Approach in requirements elicitation is a powerful tool for understanding and documenting how a system should interact with its users. Focusing on the user’s goals and describing system interactions from the user’s perspective ensures that the developed system can perform its intended functions effectively and meet user expectations.

Technique #7: CRC (Class Responsibility Collaboration) in requirements elicitation

CRC (Class-Responsibility-Collaborator)

CRC (Class-Responsibility-Collaborator) cards are a brainstorming tool used in the design and development phases of software engineering, particularly useful in object-oriented programming for identifying and organizing classes, their responsibilities, and their collaborations.

Although not traditionally framed within the requirements elicitation phase, CRC cards can play a significant role in understanding and refining requirements by fostering a clear understanding of how different parts of the system interact and what their purposes are.

Here’s how CRC cards can be beneficial in requirement elicitation:

Understanding CRC Cards

  • Class: Represents a category or type of object within the system.
  • Responsibility: Outlines what the class knows and does (i.e., its attributes and methods).
  • Collaboration: Indicates how the class interacts with other classes (who the class works with to fulfill its responsibilities).

Role in Requirements Elicitation

  1. Clarifying System Structure: By identifying classes and their interactions early on, stakeholders can gain a clearer understanding of the system’s proposed structure and functionalities.
  2. Facilitating Discussion: The simplicity of CRC cards makes them excellent tools for facilitating discussions among developers, analysts, and stakeholders. They can help in uncovering hidden requirements and ensuring a common understanding.
  3. Identifying Key Components: Through the process of defining classes and their responsibilities, key components of the system that are necessary to meet the requirements can be identified.
  4. Enhancing Collaboration: The collaborative aspect of CRC cards encourages stakeholders to actively participate in the development process, promoting a deeper engagement and understanding of the system requirements.
  5. Iterative Refinement: CRC cards can be easily updated, allowing for iterative refinement of classes and their relationships as more information is gathered or requirements change.

Implementing CRC Cards in Requirements Elicitation

  • Workshops: Organize CRC card sessions with stakeholders to collaboratively define and refine system components.
  • Visualization: Use CRC cards to create visual representations of the system architecture and how different parts interact, aiding in the identification of potential issues or requirements not yet considered.
  • Documentation: Transition the insights gained from CRC card sessions into formal requirements documentation, ensuring that the system’s design aligns with stakeholder needs.

Relation Between Requirement Engineering And Requirement Requirements Elicitation

Requirements Engineering (RE) is a comprehensive discipline within software engineering that encompasses all activities related to the identification, documentation, analysis, and management of the needs and constraints of stakeholders for a software system. Requirements elicitation is a critical phase within this broader discipline, focusing specifically on the initial gathering of these needs and constraints from stakeholders. The relationship between Requirements Engineering and Requirements Elicitation can be understood through their roles, objectives, and how they contribute to the development process.

Role in Software Development:

  • Requirements Engineering: Serves as the foundational process in software development that ensures the final product is aligned with user needs, business objectives, and operational constraints. It covers the entire lifecycle of requirements management, from discovery through maintenance and evolution post-deployment.
  • Requirements Elicitation: This acts as the initial step in the RE process, where the goal is to discover the needs, desires, and constraints of the stakeholders through various techniques such as interviews, surveys, and observation.

Objectives:

  • Requirements Engineering: Aims to establish a clear, consistent, and comprehensive set of requirements that guide the design, development, and testing phases of software development. It seeks to manage changes to these requirements effectively throughout the project lifecycle, ensuring the software remains aligned with stakeholder expectations and business goals.
  • Requirements Elicitation: Focuses on accurately capturing stakeholders’ explicit and tacit knowledge to understand what they expect from the new system, why they need it, and how it will fit into their current operational context.

Contributions to Software Development:

  • Requirements Engineering:
    • Ensures a systematic approach to handling requirements, reducing the risk of project failures due to misaligned or misunderstood stakeholder needs.
    • Facilitates clear communication between stakeholders and the development team as a continuous reference point for validating the software’s alignment with intended outcomes.
    • Helps prioritize requirements based on business value, technical feasibility, and stakeholder impact, guiding resource allocation and project planning.
  • Requirements Elicitation:
    • Provides the initial set of data that forms the basis for all subsequent requirements engineering activities, including analysis, specification, validation, and management.
    • Helps in identifying potential challenges, constraints, and opportunities early in the development process, allowing for proactive planning and design adjustments.
    • Engages stakeholders from the outset, fostering a sense of ownership and collaboration that can enhance project outcomes and stakeholder satisfaction.

Integration within the Development Process:

The seamless integration of requirements elicitation into the broader requirements engineering process is crucial for the success of software projects. Elicitation feeds vital information into the RE process, which then undergoes analysis, specification, and validation to produce a well-defined set of system requirements. This iterative process of refinement and feedback ensures that the evolving understanding of stakeholder needs is accurately reflected in the project’s goals and deliverables.

“Many Business Analysts Use a Combination of Requirements Elicitation Techniques”

When you begin delving into every strategy, you understand that it is tough to do as an independent action.
For instance, brainstorming regularly occurs as a significant aspect of a requirements workshop that can also have an interview segment.
Or on the other hand, to plan an interview, you must first do some record analysis to think of a list of inquiries.

Or on the other hand, to motivate your interviewees to provide you with great data, they need to see a model.

The Requirements Elicitation methods can be joined in whatever way to accomplish the outcome you ask for from their venture. Also, we won’t get to choose elicitation methods from outside of business analysis, which is another approach to increasing your business analysis abilities.

How to Prepare for Requirements Elicitation?

• The first step is to take time and do some research, have multiple discussions,s and find out the business need of the project
• Understanding of the business need will make sure that scope creep and gold plating won’t happen
• Make sure that you have chosen the right technique for requirement elicitation
• The analyst must ensure that an adequate number of stakeholders are added to the project
• Make sure that the stakeholders are actively engaging from the requirement phase itself
• Stakeholders include SMEs, customer end users, project managers, project sponsors, operational support regulators, etc.
• All of them can’t be included in each project. Include stakeholders based on requirements

Final words…

In the business context, it is needed to have a viable method for market surveying to comprehend what a consumer needs and how to be productive over contenders.

We must concentrate on the most proficient technique to influence the users to accomplish their objectives.

The Requirements Elicitation collection procedure will help understand a consumer’s necessities, particularly in the IT business.
Your company’s structure, political atmosphere, the essence of your venture, and your qualities and choices will have much to do with which techniques work best for you.

Manual Software Testing Services – Why Testbytes Stand Out!

In today’s digital landscape, quality software isn’t a luxury; it’s a necessity. While automation is crucial, manual testing remains an indispensable pillar of Quality Assurance (QA). A recent World Quality Report (2023-24) found that 73% of businesses aim for a balanced testing approach, integrating manual and automated methods. The reason? Manual testing’s unique strengths.

Testbytes adopts a unique manual testing methodology that stands out in the industry. Our approach integrates traditional testing techniques with innovative strategies to enhance accuracy and efficiency in identifying bugs and usability concerns. 

By prioritizing user-centric scenarios, Testbytes ensures that applications are technically sound, intuitive, and engaging for end-users. This holistic approach underscores the importance of manual testing in delivering high-quality software products in today’s digital landscape.

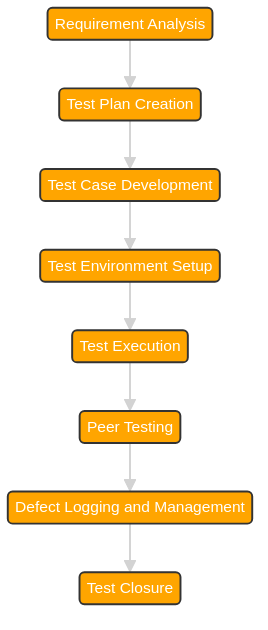
Testbytes Manual Testing Process 

  • Requirement Analysis: The process begins with in-depth software requirements analysis. Testers gain an understanding of the functional and non-functional aspects of the application to ensure comprehensive test coverage.
  • Test Plan Creation: A test plan is developed based on the requirement analysis. This document outlines the strategy, objectives, schedule, resource allocation, and scope of the testing activities.
  • Test Case Development: Testers create detailed test cases that include specific conditions under which tests will be executed and the expected results for each condition. This step is crucial for systematic testing and covers various aspects such as functionality, usability, and performance.
  • Test Environment Setup: The necessary testing environment is set up before executing the test cases. This includes configuring hardware and software requirements that mimic the production environment as closely as possible.
  • Test Execution: Testers manually execute the test cases and document the outcomes during this phase. They compare the actual and expected results to identify any discrepancies or defects.
  • Peer Testing (Added Step):
    • Integration into Workflow: After individual test case execution, peer testing is introduced as an additional step. This involves having another tester, who did not originally write or execute the test case, review and re-run the tests.
    • Benefits: Peer testing brings a fresh perspective to the testing process, often uncovering issues the original tester might have overlooked. It enhances test coverage and accuracy by leveraging the collective expertise of the testing team.
    • Execution: Testers can perform peer testing in pairs or small groups, discussing findings and insights collaboratively. This step encourages knowledge sharing and can lead to more innovative testing approaches.
  • Defect Logging and Management: Any defects found during test execution and peer testing are logged in a tracking system. This includes detailed information about the defect, reproduction steps, and severity level.
  • Test Closure: The testing process concludes with a closure report summarizing the testing activities, coverage, defect findings, and an overall assessment of the application’s quality. This report helps stakeholders make informed decisions about the software release.

Manual Testing Process

Our Creative Approach Towards Manual Testing

Creating Charters and Use Cases from Requirements

We begin by translating the project requirements into detailed charters and use cases. This approach ensures a comprehensive understanding of the application’s expected functionality and user interactions. For each use case, identify the actors involved and outline their impact on the system and the expected outcomes. This methodical preparation lays a solid foundation for effective testing.

Utilizing Exploration Strategies and Guiding Principles

Implement exploration strategies and guiding principles in software testing to direct the execution of test charters. 

Similar to simulated user journeys or focused feature investigations, exploration strategies reveal defects that formal testing methods may overlook. Guiding principles, akin to practical wisdom or best practices, assist testers in efficiently traversing the intricate software environments. 

Distribute a weekly agenda among the team members, detailing the specific exploration strategies and guiding principles to be applied, promoting a unified approach and cooperative endeavor toward enhancing product quality

Applying IPSOVI in Manual Testing:

The IPSOVI technique offers a structured approach for manual testing, covering every software aspect: Input, Process, Storage, Output, Verification, and Interface.

Testers identify inputs, assess processing logic, examine data storage, validate outputs, check verification mechanisms, and test interfaces for external communication. 

This comprehensive method involves creating specific test cases, executing them to observe application behavior, and systematically documenting defects related to IPSOVI components. 

Collaboration and review with the development team ensure thorough coverage and improvement. 

Applying IPSOVI enhances software evaluation, leading to more reliable, high-quality applications by ensuring all critical areas are rigorously tested and validated.

Enhancing Manual Testing with Visual Validation Tools

Visual Validation Tools revolutionize manual testing by automating the visual comparison of applications across devices and platforms, ensuring UI consistency and enhancing user experience. Here’s how they contribute technically:

  • Automated Screenshot Comparisons: Quickly identify visual discrepancies across various environments.
  • Cross-Platform Consistency: Guarantee uniform appearance on different devices and browsers.
  • Pixel-Perfect Validation: Detect minute visual deviations with precision.
  • CI/CD Integration: Incorporate visual checks into automated pipelines for early issue detection.
  • Focus on UX: Free manual testers to concentrate on subjective user experience.

Exploration Strategies and Guiding Principles

Mind Mapping Techniques in Manual Testing

Mind Mapping in manual testing enhances organization and creativity, offering a visual approach to test planning and execution. Here’s how it benefits the testing process:

  • Visual Test Planning: Create intuitive diagrams representing test scenarios, requirements, and strategies.
  • Enhanced Communication: Facilitate clear, visual communication among team members.
  • Efficient Test Case Design: Organize and develop test cases by visually mapping out application features and their interactions.
  • Improved Coverage: Identify gaps in testing by visually assessing coverage areas.
  • Quick Reference: During testing cycles, use mind maps as a dynamic, easy-to-navigate reference tool.

How Do We Do Manual Testing Ticket Management: 

Effective ticket management is crucial in manual testing to streamline issue tracking, resolution, and communication. By leveraging specialized tools and techniques, teams can enhance productivity and ensure software quality. Here’s how to approach ticket management in manual testing:

Centralized Ticketing System

  • Tool Integration: Adopt a centralized ticketing system like JIRA, Trello, or Asana to log, track, and manage defects. These platforms provide a unified view of all issues, facilitating better prioritization and assignment.
  • Features Utilization: Use tagging, statuses, and filters to categorize tickets by severity, type, and responsibility. This helps in quick navigation and the management of tickets.

Effective Ticket Logging

  • Detailed Reports: Ensure each ticket includes comprehensive details like reproduction steps, expected vs. actual results, and environment specifics. Attachments such as screenshots or videos can provide additional context.
  • Standardization: Develop a template or guideline for reporting issues to maintain consistency and clarity in ticket descriptions.

Prioritization and Triage

  • Severity Levels: Define and use severity levels (Critical, High, Medium, Low) to prioritize issue resolution based on impact and urgency.
  • Triage Meetings: Conduct regular triage meetings to review, assign, and re-prioritize tickets, ensuring that critical issues are addressed promptly.

Team Collaboration and Communication

  • Cross-functional coordination: Facilitate collaboration between testers, developers, and project managers within the ticketing system through comments, updates, and notifications.
  • Feedback Loop: Implement a feedback loop for resolved tickets, where testers verify fixes and provide feedback, ensuring issues are thoroughly addressed before closure.

Continuous Improvement

  • Analytics and Reporting: The ticketing system’s tools generate reports on common issues, resolution times, and testing progress. This data can inform process improvements and training needs

Manual Testing Ticket Management: Tools and Techniques

Effective ticket management is crucial in manual testing to streamline issue tracking, resolution, and communication. By leveraging specialized tools and techniques, teams can enhance productivity and ensure software quality. Here’s how to approach ticket management in manual testing:

Centralized Ticketing System

  • Tool Integration: Adopt a centralized ticketing system like JIRA, Trello, or Asana to log, track, and manage defects. These platforms provide a unified view of all issues, facilitating better prioritization and assignment.
  • Features Utilization: Use tagging, statuses, and filters to categorize tickets by severity, type, and responsibility. This helps in quick navigation and management of tickets.

Effective Ticket Logging

  • Detailed Reports: Ensure each ticket includes comprehensive details like reproduction steps, expected vs. actual results, and environment specifics. Attachments such as screenshots or videos can provide additional context.
  • Standardization: Develop a template or guideline for reporting issues to maintain consistency and clarity in ticket descriptions.

Prioritization and Triage

  • Severity Levels: Define and use severity levels (Critical, High, Medium, Low) to prioritize issue resolution based on impact and urgency.
  • Triage Meetings: Conduct regular triage meetings to review, assign, and re-prioritize tickets, ensuring that critical issues are addressed promptly.

Team Collaboration and Communication

  • Cross-functional coordination: Facilitate collaboration between testers, developers, and project managers within the ticketing system through comments, updates, and notifications.
  • Feedback Loop: Implement a feedback loop for resolved tickets, where testers verify fixes and provide feedback, ensuring issues are thoroughly addressed before closure.

Continuous Improvement

  • Analytics and Reporting: The ticketing system’s tools generate reports on common issues, resolution times, and testing progress. This data can inform process improvements and training needs.

Conclusion

Our methodologies are not just procedures; they are the blueprint for success in a digital age defined by user expectations and technological advancements. As we navigate the complexities of software development, our focus remains unwavering: to deliver products that exceed expectations, foster engagement, and drive success.

Don’t let quality be an afterthought in your software development process. Choose Testbytes for manual testing services prioritizing precision, user experience, and efficiency.

Contact us today to learn how our unique approach can elevate your software products, ensuring they are ready to meet the demands of today’s digital landscape. Let’s work together to create exceptional digital experiences that captivate, engage, and endure.

What is TMMI (Test Maturity Model Integration) in Software Testing?

Test Maturity Model Integration (TMMI) is a structured framework that outlines a set of guidelines and criteria for evaluating and improving the maturity of software testing processes.

It provides organizations with a clear roadmap to enhance their testing capabilities systematically, aligning with best practices and industry standards.

TMMI plays a crucial role in the software testing industry by offering a standardized approach to assess and elevate the quality of testing practices. It helps organizations identify weaknesses in their current processes, fosters continuous improvement, and ensures that testing activities effectively support software development goals.

Adherence to TMMI can lead to higher-quality software, reduced time-to-market, and better alignment between testing and business objectives.

This blog post aims to:

  1. Provide a comprehensive overview of the TMMI framework and its components.
  2. Highlight the benefits of implementing TMMI in an organization’s testing processes.
  3. Discuss the steps involved in achieving higher levels of test maturity according to TMM


What is Test Maturity Model Integration?

Test Maturity Model Integration (TMMi) is a framework designed to enhance and standardize software testing processes within organizations, thereby elevating their IT standards.

IT companies are increasingly adopting it to streamline their testing procedures and produce results that are more effective and efficient.

Here are the main components of TMMi, elaborated for better understanding:

  1. Process Area:
    • These are distinct categories within TMMi, each focusing on specific test-related activities such as planning, design, and execution. They provide a structured approach to managing various aspects of the testing process.
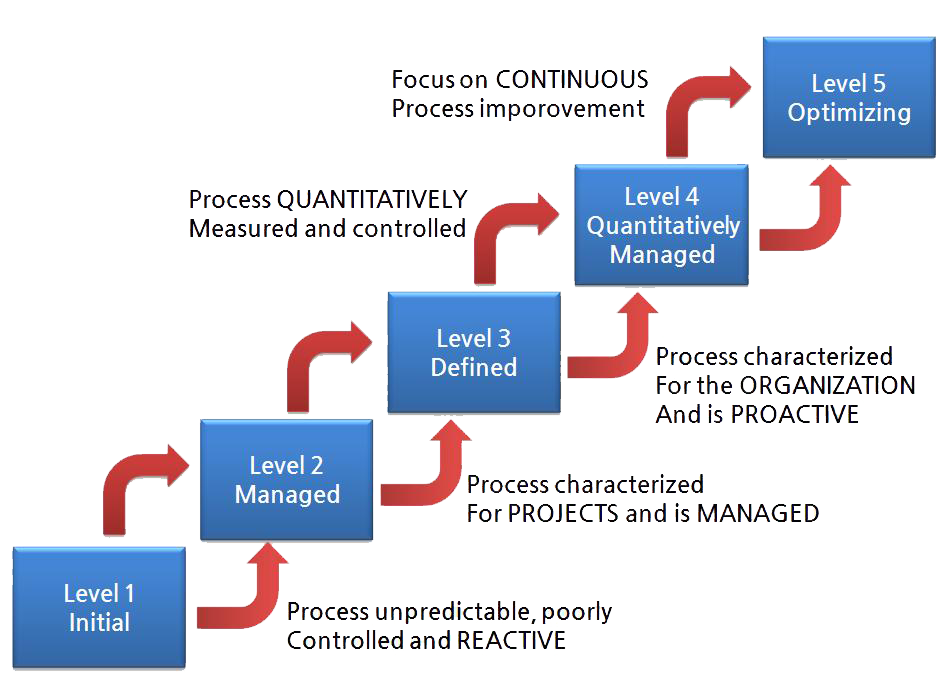
  2. Maturity Levels:
    • TMMi categorizes organizations into five maturity levels, ranging from Level 1 to Level 5. Each level represents a specific degree of process maturity and sophistication in software testing practices. As organizations move up the levels, they demonstrate a more refined and effective approach to testing.
  3. Capability Levels:
    • For each process area, TMMi identifies specific capability levels. These levels help assess an organization’s proficiency in implementing test practices across different domains. This multi-level structure allows organizations to evaluate and enhance their testing capabilities systematically.
  4. Appraisal Method:
    • TMMi provides a systematic method to assess and measure an organization’s test maturity and capability levels. This appraisal method is crucial for organizations to understand their current position and identify areas for improvement in their testing practices.
  5. Key Practices:
    • For each process area and maturity level, TMMi outlines key practices. These are essential activities and guidelines that should be implemented to achieve the desired level of test maturity. They are benchmarks for organizations to follow and integrate into their testing workflows.

In essence, TMMi serves as a comprehensive guide for organizations aiming to achieve excellence in their software testing processes, ensuring that these processes are not only effective but also aligned with the overall goals of the organization.

TMMI Diagram

Benefits of TMMI

Implementing TMMi in IT organizations has provided a range of benefits. Some of the notable advantages observed from various studies and surveys include:

  1. Enhanced Software Quality: One of the primary benefits of TMMi is the enhancement of software quality. By focusing on structured and efficient testing processes, organizations can significantly improve the quality of their software products.
  2. Increased Test Productivity: The adoption of TMMi practices has been associated with increased productivity in test processes. Organizations report being able to conduct more effective and efficient testing, leading to better utilization of resources.
  3. Reduction in Product Risks: Implementing TMMi helps reduce the risks associated with software products. By identifying and addressing potential problems early in the development cycle, it is possible to reduce the likelihood of serious flaws and failures.
  4. Cost and Time Savings: A key advantage of TMMi is the potential for cost and time savings. Structured testing processes can lead to more efficient use of resources and faster time-to-market for software products.
  5. Defect Prevention: TMMi emphasizes the importance of preventing defects rather than merely detecting them at a later stage. This approach helps make the testing process integral to every phase of the software development lifecycle, ensuring early identification and rectification of potential issues.
  6. Improved Customer Satisfaction: By delivering high-quality software that meets or exceeds customer expectations, organizations can see an improvement in customer satisfaction. This can lead to stronger customer relationships and an enhanced brand reputation.
  7. Accreditation and Worldwide Assessment: TMMi provides a framework for accreditation and enables worldwide assessment of testing processes. This international recognition can be beneficial for organizations looking to benchmark their practices against global standards.

Key Components of TMMi

To understand the Test Maturity Model Integration concept, it is essential to know its major components. These components provide the fundamental building blocks that formulate the TMMi framework and offer crucial guidelines to improve the testing maturity of any organization.

The main components of TMMi include:

  • Process Area: This element describes processes involving different test elements such as planning, design, execution, etc.
  • Maturity Levels: TMMi classifies organizations into various maturity levels, from level 1 to level 5. These levels reflect varying degrees of maturity based on standard processes and ongoing improvement.
  • Capability Levels: TMMI states capability levels for all process areas, allowing a comprehensive evaluation of the organization’s ability to implement test practices in various fields.
  • Appraisal Method: TMMi offers an approach to evaluating and measuring the test maturity level and capability levels in the organization.
  • Key Practices: TMMi defines important practices for each process area and maturity level, indicating the main activities to be implemented in the organization’s testing.

 Background and History of TMMi

A. Historical Background of TMMI:

The concept of Test Maturity Model Integration (TMMI) emerged as a response to the growing need for structured and effective testing methodologies in the software industry. Its roots can be traced back to the early 2000s, a period marked by rapid technological advancements and an increased emphasis on software quality.

TMMI was developed to provide a comprehensive framework that specifically addressed the challenges and complexities of software testing, distinct from broader models focused on software development.

B. The Evolution from Earlier Models to TMMI:

Before TMMI, the most prominent model for assessing and improving software processes was the Capability Maturity Model (CMM) and later its successor, the Capability Maturity Model Integration (CMMI).

While these models included aspects of software testing, they did not fully address the unique needs and challenges of the testing process. Recognizing this gap, experts in the field began to develop a model dedicated exclusively to testing.

TMMI was thus formulated, drawing inspiration from the structure and success of CMM/CMMI but tailored specifically to elevate the practice of software testing.

C. Key Contributors and Organizations Involved in TMMI Development:

The development of TMMI was a collaborative effort involving numerous software testing professionals and organizations. Key among these was the TMMI Foundation, a non-profit organization dedicated to the development and promotion of the TMMI framework.

This foundation played a central role in refining the model, ensuring its relevance and applicability to modern software testing practices. Additionally, input from various industry experts, academic researchers, and software organizations contributed to the evolution of TMMI, making it a comprehensive and globally recognized standard in software testing.

Core Principles of TMMI

Test Maturity Model Integration (TMMI) is a structured framework designed for evaluating and improving the test processes in software development. It provides a detailed roadmap for organizations to assess and enhance the maturity of their testing practices systematically. TMMI is structured around specific levels and process areas, focusing exclusively on testing activities and offering a step-by-step approach to elevate testing processes.

The core principles of TMMI revolve around the continuous improvement of testing processes, aiming for a higher quality and efficiency in software development. The main objectives include:

  1. Establishing a structured and standardized approach to testing processes.
  2. Promoting a culture of continuous improvement in testing activities.
  3. Aligning testing processes with business needs and objectives.
  4. Providing a clear and measurable path for testing process maturity.
  5. Enhancing communication and collaboration within testing teams and with other stakeholders. TMMI aims to foster effective, efficient, and high-quality testing practices, leading to the overall improvement of software quality.

TMMI Levels of Maturity

TMMI consists of five maturity levels, each representing a different stage in the development and sophistication of an organization’s testing processes. These levels are hierarchical, with each level building upon the practices and processes established in the previous one.

Key Characteristics and Goals of Each Level:

Level 1 – Initial:

Characteristics: At this level, testing processes are ad hoc and unstructured. There is a lack of formalized testing practices, and processes are often reactive.

Goal: The primary goal is to recognize the need for structured testing processes and to begin establishing basic testing practices.

Level 2 – Managed

Characteristics: Testing processes are planned and executed based on project requirements. Basic testing techniques and methods are in place.

Goal: To establish management control over the testing processes and ensure that testing is aligned with the defined requirements.

Level 3 – Defined:

Characteristics: Testing processes are documented, standardized, and integrated into the software lifecycle. There is a clear understanding of testing objectives and methods across the organization.

Goal: To define and institutionalize standardized testing processes organization-wide.

Level 4 – Measured:

Characteristics: Testing processes are quantitatively managed. Metrics are used to measure and control the quality of the software and the efficiency of the testing processes.

Goal: To use metrics to evaluate the effectiveness and efficiency of the testing processes objectively and to improve these processes continuously.

Level 5 – Optimization:

Characteristics: Focus on continuous process improvement through innovative technologies and advanced testing methods. Testing processes are optimized and fully integrated into the organization’s business goals.

Goal: To optimize and fine-tune testing processes through continuous improvement, innovation, and proactive defect prevention.

The Progression Path Through the Levels:

tmmi levels

Progressing through the TMMI levels involves:

Assessment and Planning: Organizations start by assessing their current testing processes against TMMI criteria and identifying areas for improvement.

Implementation of Practices: Based on the assessment, organizations implement the necessary practices and processes for each level, starting from basic testing procedures at Level 1 to more advanced and integrated processes at higher levels.

Evaluation and Measurement: After implementing the practices, organizations evaluate their effectiveness and measure their impact on software quality.

Continuous Improvement: As organizations progress, they focus on continuous improvement, refining and enhancing their testing processes and integrating new technologies and methods.

Institutionalization: The final goal is to institutionalize these processes, making them an integral part of the organization’s culture and operational framework.

Implementing TMMI in Organizations

Charting the Course: Adopting TMMI in Software Testing

  1. Assess and Align: Conduct a GAP analysis to pinpoint strengths and areas for improvement based on your current testing practices and TMMI maturity levels.
  2. Set Sail with Strategy: Define clear goals and objectives for your TMMI journey, considering your organizational strategy and resources.
  3. Assemble the Crew: Build a dedicated team with champions, stakeholders, and experts to spearhead the implementation and provide ongoing support.
  4. Raise the Sails, Stage by Stage: Prioritize and implement TMMI practices in a phased approach, starting with foundational areas like Test Policy and Strategy.
  5. Continuous Improvement: Monitor progress, measure success, and refine your approach through ongoing assessments and feedback loops.

 Challenges and Solutions

  1. Change Management: Addressing resistance to change and fostering a culture of quality within the organization.
  2. Resource Constraints: Securing budget, personnel, and training resources for effective TMMI implementation.
  3. Tool Integration: Choosing and integrating testing tools that align with the adopted TMMI practices.
  4. Metrics and Measurement: Establishing clear metrics to track progress and demonstrate the value of TMMI initiatives.
  5. Long-Term Commitment: Sustaining momentum and continuous improvement beyond the initial implementation phase.

Success Story: TMMI Implementation Case Study

For an insightful case study on the successful implementation of Test Maturity Model Integration (TMMI), the BHP Billiton case is a notable example.

BHP Billiton, a leading global resources company, engaged Planit for a TMMi Assessment to identify its testing maturity and systematically implement improvements. The assessment revealed several challenges, including conflicts in processes and definitions, which resulted in unnecessary costs and risks.

The solution involved simplifying test delivery, providing a common framework, leveraging tools for automation, and ensuring test coverage was fit for purpose. This led to significant improvements in testing capability, risk management, communication throughout the SDLC, and a reduction in post-production support. T

The outcome was a more efficient and effective Testing Center of Excellence, highlighting the benefits of a TMMi implementation in streamlining testing processes and improving software quality.

TMMI Assessment and Certification

The TMMI assessment and certification process is a structured approach to evaluate and enhance an organization’s testing maturity:

Process of TMMI Assessment:

Organizations undergo a comprehensive review of their testing processes against the TMMI framework. This includes evaluating test planning, execution, management, and improvement practices.

The assessment identifies strengths and areas for improvement, aligning with the five maturity levels of TMMI.

Obtaining TMMI Certification:

After a successful assessment, organizations can apply for TMMI certification. This involves submitting evidence of their compliance with TMMI criteria and processes to a recognized TMMI assessment body.

Once the compliance is verified and approved, the organization is awarded TMMI certification, signifying their testing process maturity.

Maintaining and Improving TMMI Maturity Levels:

Post-certification, organizations should focus on continuous improvement of their testing processes. This involves regular reviews, updates to testing practices, and training to align with evolving TMMI standards.

Periodic reassessment ensures that the organization not only maintains its TMMI maturity level but also strives for higher levels, reflecting ongoing improvement in testing processes.

This process ensures that organizations not only meet the current standards of testing quality but are also geared towards continual improvement and adaptation to new challenges in the field of software testing. For more detailed information, you can refer to the official TMMI website, TMMi Foundation.

TMMI and Agile Methodology

At first glance, TMMi, with its structured approach to test process improvement, and Agile, with its fast-paced, iterative cycles, seem like mismatched dance partners. But watch them on the floor, and you’ll witness a graceful tango of quality and agility.

TMMi sets the rules; Agile calls the steps: TMMi provides a framework for building reliable testing practices, while Agile empowers teams to adapt and respond to changing needs. By weaving TMMi practices into Agile sprints, like early test planning and risk-based testing, teams ensure quality stays in rhythm without sacrificing speed.

Automation: Tools and frameworks, synchronized with Agile cycles, handle repetitive testing, freeing testers to explore further and delve deeper. This collaborative dance between automation and human expertise delivers a flawless performance.

Feedback: Continuous feedback loops, embedded within Agile ceremonies, become the conductor, ensuring everyone stays in tune. Metrics and adjustments made on the fly keep the quality-agility tango smooth and thriving.

The result? Software that shines on stage is free of defects and delivered at lightning speed. It’s a win-win for both audiences: satisfied customers and empowered teams.

Conclusion

In conclusion, TMMI (Test Maturity Model Integration) stands as a pivotal framework in the realm of software testing, providing a structured pathway for organizations to enhance their testing processes and methodologies.

Its comprehensive approach, characterized by distinct process areas, maturity levels, capability levels, appraisal methods, and key practices, offers a clear blueprint for achieving testing excellence.

By adhering to TMMI’s guidelines, organizations can systematically improve the quality, efficiency, and effectiveness of their software testing efforts. This not only leads to higher-quality software products but also aligns testing processes with strategic business objectives.

As the landscape of software development continues to evolve, TMMI remains an invaluable asset for organizations seeking to adapt, excel, and maintain a competitive edge in the ever-changing world of technology.

7 Types of Regression Testing Methods You Should Know

It is common for companies to introduce minor changes from time to time to their products.

However, introducing these changes affects the application in numerous ways, such as its functionality, performance, bugs, etc.

Therefore, it is important to keep the testing process on whether the software is on the market or a small change has been introduced.

Conducting this type of testing is known as regression testing.

app testing

What is Regression Testing?

Regression testing is a type of software testing that aims to ensure that recent code changes have not adversely affected existing features. It involves re-running test cases that have been executed in the past to verify that the existing functionality still performs as expected after the introduction of new code.

The primary goal of regression testing is to uncover any defects that may have been inadvertently introduced as a result of the code modifications. This type of testing helps maintain the overall integrity of the software and prevents the reoccurrence of previously fixed bugs.

Regression Testing DIagram

Benefits of Regression Testing

While the basic aim behind conducting regression testing is to identify bugs that might have developed due to the changes introduced, conducting this test benefits in a number of ways, such as:

  • Increase chances of detecting bugs caused due to new changes introduced in the software
  • Helps in identifying undesirable side effects that might have been caused due to a new operating environment
  • Ensures better-performing software due to early identification of bugs and errors
  • Highly beneficial in situations when continuous changes are introduced in the product
  • Helps in maintaining high product quality

Types of Regression Testing

There are a number of ways in which this testing can be done. However, this depends on factors such as the type of changes introduced, bugs fixed, etc.
Some of the common types of regression testing include:

1) Corrective Regression Testing:

Corrective regression testing is a type of software testing that focuses on verifying that specific issues or defects, which were identified and fixed in the software, have been successfully resolved without introducing new problems. The primary goal is to ensure that the changes made to address reported bugs or issues do not negatively impact the existing functionality of the application.

Here’s an example of corrective regression testing:

Scenario: Corrective Regression Testing for Login Functionality

Initial State:

  • Application with a login page.
  • A bug was reported stating that the application allows access with incorrect credentials.

Bug Details:

  • Bug ID: BUG-12345
  • Description: Users can log in with invalid credentials.

Steps to Reproduce (Before Fix):

  1. Open the application login page.
  2. Enter an invalid username.
  3. Enter an invalid password.
  4. Click on the “Login” button.
  5. Verify that the user is logged in, despite providing incorrect credentials.

Steps to Fix:

  1. Developers investigate and identify the code causing the issue.
  2. Code is modified to validate user credentials properly.
  3. The fix is implemented and tested locally.

Corrective Regression Testing:

Positive Test Case (After Fix):

Test Steps:

  1. Open the application login page.
  2. Enter valid username.
  3. Enter valid password.
  4. Click on the “Login” button.

Expected Result:

  • User should be successfully logged in.
  • Verify that the user is redirected to the dashboard.
Negative Test Case (After Fix):

Test Steps:

  1. Open the application login page.
  2. Enter invalid username.
  3. Enter invalid password.
  4. Click on the “Login” button.

Expected Result:

  • User should not be logged in.
  • An error message should be displayed.

@Test
public void testCorrectiveRegression() {
// Positive test case (after fix)
// Test steps to open login page, enter valid credentials, and click login
// Assert statements to verify successful login and redirection

// Negative test case (after fix)
// Test steps to open login page, enter invalid credentials, and click login
// Assert statements to verify login failure and error message presence
}

This example demonstrates how corrective regression testing ensures that the specific bug (allowing login with invalid credentials) has been successfully addressed without introducing new issues in the login functionality.

2) Retest-all Regression Testing:

Retest-All regression testing, also known as a complete regression test, involves re-executing the entire test suite, including both new and existing test cases, to validate the modified code.

In this approach, every test case is retested to ensure that the changes made to the software have not introduced any new defects and that the existing functionalities remain unaffected.

Example: Suppose a software application undergoes a major update, and several changes are made to the codebase. In a retest-all regression testing scenario, the testing team would execute all the test cases, covering various features and functionalities of the application, to verify that the changes have not caused any unintended side effects. This comprehensive approach ensures that the entire application is thoroughly validated, providing confidence in the stability and reliability of the updated software.

Also Read:-  Top 25 Software Testing Companies to Look Out For in 2024

3) Selective Regression Testing:

Selective regression testing is a software testing strategy where a subset of test cases is chosen based on the areas of the code that have undergone changes. The goal is to verify that the recent modifications have not negatively impacted the existing functionality of the application.

Here’s an example of selective regression testing:

Scenario: Selective Regression Testing for E-commerce Checkout Process

Initial State:

  • An e-commerce application with a functional checkout process.
  • Recent changes were made to optimize the checkout page.

Changes Made:

  • Developers modified the code related to the payment processing module to improve performance.

Steps to Perform Selective Regression Testing:

  1. Identify the Modified Area:
    • Identify the specific module or area of the application that has undergone changes. In this case, it’s the payment processing module.
  2. Select Test Cases:
    • Choose a subset of test cases related to the payment processing and checkout process. Consider scenarios that the recent changes are likely to affect.
  3. Execute Test Cases:
    • Execute the selected test cases to ensure that the recent modifications have not introduced defects in the payment processing functionality.
  4. Validate Existing Functionality:
    • While the primary focus is on the modified area, it’s essential to validate that existing functionality outside the modified scope continues to work as expected.

Example Test Cases for Selective Regression Testing:

Test Case 1: Positive Payment Processing

Test Steps:

  1. Add items to the cart.
  2. Proceed to the checkout page.
  3. Enter valid shipping details.
  4. Enter valid payment information.
  5. Complete the purchase.

Expected Result:

  • Payment is processed successfully.
  • Order confirmation is displayed.

Test Case 2: Negative Payment Processing

Test Steps:

  1. Add items to the cart.
  2. Proceed to the checkout page.
  3. Enter valid shipping details.
  4. Enter invalid payment information.
  5. Attempt to complete the purchase.

Expected Result:

  • Payment failure is handled gracefully.
  • User receives an appropriate error message.

Selenium Code (Java):

@Test
public void testPositivePaymentProcessing() {
// Test steps to simulate positive payment processing
// Assert statements to verify successful payment and order confirmation
}

@Test
public void testNegativePaymentProcessing() {
// Test steps to simulate negative payment processing
// Assert statements to verify proper handling of payment failure and error message
}

In this example, selective regression testing focuses on a specific area (payment processing) that underwent recent changes. The chosen test cases help ensure that the optimizations made to the checkout page did not introduce issues in the payment processing functionality.

4) Progressive Regression Testing:

Progressive regression testing is an approach in software testing where new test cases are added to the existing test suite gradually, ensuring that the application’s new features or modifications are thoroughly tested without compromising the testing efficiency. It involves building upon the existing test suite with each development cycle, making it a continuous and evolving process.

Example Scenario: Progressive Regression Testing in an E-learning Platform

Initial State:

  • An e-learning platform with features like course enrollment, quiz submissions, and user profiles.
  • Ongoing development to introduce a new feature: real-time collaboration on assignments.

Development Cycle 1:

  • Developers implement the initial version of the real-time collaboration feature.

Progressive Regression Testing Steps:

  1. Existing Test Suite:
    • The current test suite includes test cases for course enrollment, quiz submissions, and user profiles.
  2. Identify Impact Area:
    • Identify the potential impact of the new feature on existing functionality. Focus on areas such as user profiles, user interactions, and database changes.
  3. Create New Test Cases:
    • Develop new test cases specifically targeting the real-time collaboration feature. These may include scenarios like simultaneous document editing and version control.
  4. Add to Test Suite:
    • Integrate the new test cases into the existing test suite.
  5. Execute Test Suite:
    • Run the entire test suite, covering both existing and newly added test cases.
  6. Review and Update:
    • Review the test results and update the test suite based on any identified issues or changes in the application.

Progressive Regression Testing Cycle:

  1. Development Cycle 2:
    • Developers enhance the real-time collaboration feature and introduce another new feature: discussion forums.
  2. Repeat Steps 2-6:
    • Identify the impact area, create new test cases for the discussion forums, integrate them into the test suite, and execute the updated suite.

Selenium Code (Java) for Progressive Regression Testing:

@Test
public void testRealTimeCollaboration() {
// Test steps for real-time collaboration feature
// Assertions to validate collaboration functionalities
}

@Test
public void testDiscussionForums() {
// Test steps for discussion forums feature
// Assertions to validate forum interactions
}

In this example, the progressive regression testing approach allows the testing team to adapt to ongoing development cycles seamlessly. It ensures that both existing and new features are continuously validated, maintaining a balance between test coverage and testing efficiency.

5) Complete Regression Testing:

Here’s a comprehensive explanation of Complete Regression Testing with examples:

Complete Regression Testing, also known as Full Regression Testing, is a type of testing that involves re-executing all existing test cases for an application after any change or modification is made. It aims to ensure that no new bugs or defects have been introduced as a result of the changes and that all previously working features continue to operate as expected.

Key Characteristics:

  • Comprehensive Coverage: It covers all functionalities of the application, providing the highest level of confidence in its stability.
  • Time-Consuming: It can be a time-intensive process, especially for large and complex applications with extensive test suites.
  • Resource-Intensive: It often requires significant effort and resources to execute all test cases.
  • Ideal for Critical Changes: It’s best suited for major updates, releases, or when confidence in the application’s stability is paramount.

Example:

Consider a banking application that has undergone a significant upgrade, including changes to its login process, account management features, and fund transfer functionalities. To ensure that the upgrade hasn’t introduced any unintended bugs, the testing team would perform Complete Regression Testing. This would involve re-running all existing test cases for:

  • Login process: Testing various login scenarios (valid/invalid credentials, password reset, multi-factor authentication).
  • Account management: Creating, viewing, editing, and deleting accounts.
  • Fund transfers: Initiating transfers between accounts, handling different amounts and currencies, checking transaction history.
  • Other functionalities: Any other features or modules within the application.

Advantages:

  • Highest Level of Confidence: Provides assurance that changes haven’t compromised existing functionalities.
  • Uncovers Unexpected Issues: May reveal bugs in seemingly unrelated areas due to code dependencies.

Disadvantages:

  • Time and Resource Intensive: Can be costly and delay release cycles.
  • May Not Be Necessary for Minor Changes: Could be overkill for small updates with isolated impact.

Best Practices:

  • Prioritize Based on Risk: Focus on critical functionalities and areas with higher risk of regression.
  • Automate Wherever Possible: Use automation tools to reduce manual effort and improve efficiency.
  • Combine with Other Techniques: Consider Partial Regression Testing or Selective Regression Testing for more focused approaches.
  • Utilize Risk Analysis: Identify high-risk areas to prioritize testing efforts.
  • Plan for Sufficient Time and Resources: Allocate adequate time and resources for Complete Regression Testing in project schedules.

6) Manual Regression Testing

Manual Regression Testing involves re-executing existing test cases without the use of automated tools. It relies on human testers to manually perform the testing steps and verify the results.

Key Characteristics:

  • Human-Driven: Testers manually execute test cases, relying on their expertise and judgment.
  • Flexibility: Allows for exploration and adaptation of test cases during execution.
  • Suitable for Complex Scenarios: Effective for testing intricate user interactions or scenarios that are difficult to automate.
  • Time-Consuming: Can be slower than automated testing, especially for large test suites.
  • Prone to Human Error: Testers may inadvertently introduce errors during manual execution.

Example:

Consider a web application that has undergone changes to its checkout process. To ensure the changes haven’t introduced regressions, a tester would perform manual regression testing by:

  1. Reviewing Test Cases: Analyzing existing test cases covering the checkout process.
  2. Executing Test Steps: Manually navigating through the checkout steps, entering data, and clicking buttons as specified in the test cases.
  3. Observing Results: Carefully observing the application’s behavior, checking for errors, unexpected outcomes, or inconsistencies.
  4. Comparing Results: Verifying that the observed behavior matches the expected behavior defined in the test cases.
  5. Reporting Issues: Documenting any bugs or defects found during testing.

7) Unit Regression Testing

Unit Regression Testing involves the testing of individual units or components of a software application to ensure that new code changes or modifications do not adversely affect the existing functionalities. It focuses on verifying the correctness of specific units of code after each change, providing quick feedback to developers. Below is an example scenario demonstrating Unit Regression Testing.

Example Scenario: Unit Regression Testing for a Login Module

Initial State:

  • A web application with a login module containing functions for user authentication.
  • Ongoing development to enhance the security features of the login process.

Unit Regression Testing Steps:

  1. Existing Unit Test for Login Functionality:
    • Initial unit tests cover basic login functionality, checking username-password validation.
  2. Development Cycle 1:
    • Developers implement changes to enhance security, introducing two-factor authentication (2FA).
  3. Unit Regression Testing Cycle:a. Identify Affected Units:
    • Identify the precise components or operations of the login module that the security enhancement affects.

    b. Modify Existing Test Cases:

    • Update existing unit test cases for the login module to include scenarios related to 2FA.

    c. Create New Test Cases:

    • Develop new unit test cases specifically targeting the new security features, such as testing OTP (One-Time Password) generation and validation.

    d. Execute Unit Tests:

    • Run the modified and new unit tests to verify the correctness of the login module’s updated code.

    e. Review and Update:

    • Review the test results, update unit tests based on any identified issues, and ensure that the existing functionality remains intact.

Unit Regression Testing Code (Java) for Enhanced Login Module:

public class LoginModuleTest {

@Test
public void testBasicLoginFunctionality() {
// Original unit test for basic login functionality
// Assertions to validate username-password validation
}

@Test
public void testTwoFactorAuthentication() {
// New unit test for enhanced security with two-factor authentication
// Assertions to validate OTP generation and validation
}
}

In this example, unit regression testing ensures that modifications to the login module, particularly the introduction of two-factor authentication, do not introduce regressions or negatively impact the existing login functionality. It allows for quick validation at the unit level, enabling developers to catch and address issues early in the development process.

8) Automated Regression Testing

Automated regression testing involves using automated test scripts to re-run existing test cases and verify the unchanged parts of the software after a code change.

This approach uses specialized tools and scripts to execute repetitive tests, allowing for quick validation of the application’s existing functionalities.

Example: In a web application, after implementing new features or making changes to the existing code, automated regression testing can be employed to ensure that previously working features have not been negatively impacted.

For instance, if an e-commerce website adds a new payment gateway, automated regression testing can be used to verify that the existing product browsing, selection, and checkout processes still function correctly after the integration of the new payment system.

Automated regression testing helps maintain the overall quality and stability of the application by swiftly detecting any unintended side effects of code changes.

9) Partial/Selective Regression Testing

Partial or Selective Regression Testing involves testing only a portion of the software application that is affected by recent changes or modifications. Instead of retesting the entire application, this approach focuses on specific areas or functionalities that are likely to be impacted by the introduced changes. Below is an example scenario demonstrating Partial/Selective Regression Testing.

Example Scenario: Selective Regression Testing for an E-commerce Website

Initial State:

  • An established e-commerce website with various modules, including product listing, shopping cart, and checkout functionalities.
  • Ongoing development to optimize the checkout process for a better user experience.

Selective Regression Testing Steps:

  1. Proposed Change:
    • Developers introduce changes to the checkout module to enhance the user interface and streamline the payment process.
  2. Impact Analysis:
    • QA analysts and developers perform an impact analysis to identify the modules and functionalities likely affected by the changes.
  3. Selective Regression Test Plan:
    • Based on the impact analysis, a selective regression test plan focuses on the checkout module and related functionalities.
  4. Test Cases Selection:
    • Test cases related to the checkout process, payment gateway integration, and order confirmation are selected for regression testing.
  5. Execute Selective Tests:
    • Only the identified test cases are executed, verifying that the recent changes in the checkout module did not introduce defects in the overall functionality.
  6. Review and Report:
    • Review the results of selective regression testing, ensuring that the checkout process works seamlessly. Any issues identified are reported for immediate resolution.

Selective Regression Testing Test Cases:

  • Test Case 1: Checkout Process Flow
    • Verify that users can navigate through the enhanced checkout process smoothly.
  • Test Case 2: Payment Gateway Integration
    • Ensure that the payment gateway integration remains secure and functional.
  • Test Case 3: Order Confirmation
    • Confirm that users receive accurate order confirmation details after completing the purchase.

In this example, instead of executing a full regression test covering the entire e-commerce website, the focus is on testing specific areas related to the recent changes. This approach saves time and resources while providing confidence that the recent modifications did not adversely affect critical functionalities. Selective regression testing is particularly useful in agile development environments where frequent changes are made and quick feedback is essential.

Quick Note

  • It is important to make sure that the type of regression testing that needs to be conducted is selected appropriately.
  • This depends on various factors, such as areas of recurrent defects, the criticality of the features, etc.
  • But what remains a priority is ensuring that the software delivers the best functionality and proves to be a beneficial addition to the industry.

Importance of Regression Testing

  • Regression tests are designed to ensure that the code does not regress while debugging is underway.
  • One of the greatest benefits of unit tests is that they are automatically regression tests. After those tests are written, they will be executed subsequently each time you modify or add new features. It is not necessary to write regression tests explicitly.
  • A regression test is a test that you run on a regular basis to make sure your fix is still in effect and functioning after you have fixed the bug. It also serves as validation that you have fixed the bug.
  • Validates that previously developed and tested software remain reliable after modifications.
  • Identifies and prevents the introduction of defects during the software development life cycle.
  • Enhances overall software quality by maintaining consistent performance across iterations.
  • Provides confidence to stakeholders that the software continues to meet specified requirements.
  • Supports the Agile development process by enabling continuous integration and delivery.
  • Detects unexpected interactions between different software modules or components.
  • Saves time and resources by catching issues early, reducing the cost of fixing defects later in the development cycle.
  • Facilitates the smooth evolution of software, allowing for iterative improvements while maintaining stability.

When To Carry Out Regression Testing?

  1. Change in Requirements: Whenever there is an alteration in the project’s requirements, and corresponding code modifications are implemented to align with the new specifications.
  2. Introduction of New Features: When new features are added to the software, ensuring that the existing functionalities remain intact and unaffected by the addition.
  3. Defect Resolution: After addressing and fixing defects or bugs in the software, regression testing ensures that the corrections do not inadvertently impact other parts of the system.
  4. Performance Issue Resolution: Whenever performance-related issues are identified and rectified, regression testing validates that the changes made do not compromise the overall performance of the software.

Difference between Regression Testing and Retesting

The fact is that both are entirely different.

Regression testing ensures that any update made to the code does not affect the existing functionality, whereas retesting is carried out when test cases find some defects in the code.

And when those defects are fixed, the tests are done again to check whether the issues are resolved.

Retesting is to ensure whether the defects are resolved, whereas regression testing detects probable defects caused by the changes made to the code.

Difference between regression and retesting

Challenges of Regression Testing

  • Regression testing forms an important phase of STLC but brings along several challenges for the testers.
  • It is time-consuming; it requires rerunning a complete set of test cases again for a complete set of code.
  • Updates make your code more complex; they even increase the set of test cases for regression testing.
  • Regression testing ensures that updates bring no flaws to the existing code.  However, considering the time taken to complete regression testing, it becomes hard to make non-technical clients understand the value of regression testing.

Also Read: Performance Testing -Types, Stages, and Advantages

Tools For Regression Testing

1) Ranorex Studio
2) SahiPro
3) Selenium
4) Watir
5) TestComplete
6) IBM Rational Functional Tester
7) TimeShiftX
8) TestDrive
9) AdventNet QEngine
10) TestingWhiz
11) WebKing
12) Regression tester
13) silktest
14) Serenity
15) QA wizard
To read about them in detail click here!

Frequently Asked Questions / FAQs

  1. What is regression testing?

Regression testing is a method of software testing that involves rerunning a set of test cases to guarantee that recent code changes did not negatively affect previously existing functionalities. It focuses on identifying any accidental side effects that may have been introduced during the process of development or maintenance.

  1. What are some of the popular regression testing approaches?

The general approaches to the process of regression testing include re-running automated test scripts, manually retesting critical functionalities, using version control systems to compare code changes, employing continuous integration tools for automated builds and tests, and utilizing test automation frameworks that support regression testing.

  1. How frequently should regression testing be done?

The development cycle and code change rate are what determine the regression frequency. In agile development, regression testing normally takes place after every iteration, while in waterfall models it happens within the test phase or before release. CI practices also facilitate frequent regression testing by each code commit.

  1. What problems are present in regression testing?

The drawbacks of regression testing may involve:

choosing and maintaining an efficient group of test cases, 

  • selecting and maintaining an effective set of test cases, 
  • managing the testing environment and data, 
  • dealing with time constraints,
  • balancing the trade-off between thorough testing and quick feedback. 

Automated regression testing may also face challenges related to script maintenance and false positives/negatives.

  1. How do you select test cases for regression testing?

Test case prioritization in regression testing requires that critical and more often used functionalities should be given high priority. The criteria for prioritization can be the business impact, risk analysis, or the areas of the application that are most susceptible to change. This guarantees that efforts of testing are aimed at the most critical issues to optimize the process of testing.

What is ERP Testing? and why is it important?

ERP Testing aka Enterprise Resource Planning software testing is an essential organization as it helps to keep a check on its workflow and technicalities so that there is no room for a mishap.

What is ERP?

ERP (Enterprise Resource Planning) is a software that controls the core processes in a company like HR, Payroll, finance, manufacturing, etc. It helps to integrate all these different sub-systems in one place in a way that enables the easy flow of data and information from one system to the other.
More and more companies are switching to ERP systems to do away with a lot of monotonous and manual data entry work.
With ERP system in place, tedious manual work can be avoided like for example when a new employee joins the organization, a person record is created for him, based on his salary grade the leaves are automatically credited in the HR system, salary calculations get done in the payroll along with employee and manager profile creation in respective sub-systems.

What is ERP Testing?

ERP testing is a specialized form of manual or automation test done on the ERP software to ensure that it is working as expected.
The reason why ERP testing is so important is that each company had the option to customize the rules in ERP software as per their policies.
This calls in for extensive integration testing to validate that the ERP system is set up in line with the company’s needs.
In most cases, ERP testing can be considered as the testing of any other application software apart from the difference that for better testing the ERP system it is important for the user to understand how and where the data flows and which are the different sub-systems where the data is saved.
This is the most critical aspect of ERP testing. Domain knowledge is very important to get good results.

Also Read:- How to Test a Bank ERP System

Different Types of ERP Testing
Just like any other testing, there are different types of testing that ERP software goes through different types of testing phases to make sure it is reliable, stable and scalable too. Here are some of the most commonly used testing for ERP.

  1. Functional Testing: It is done to ensure that each module performs each function as expected once the organization related customizations are done.
  2. Integration Testing: This is the most critical part of any ERP testing and needs in-depth functional and domain knowledge in the software as well as the company policies. In integration testing, one needs to focus on data and information flow across the different modules of the ERP system. The accuracy of the data needs to be validated along with modules where all it gets impacted.
  3. Performance testing: based on the size of the organization a performance testing may be needed to see how the software performs under load and what is the TPS (transactions per second) supported by the software. While is most cases in the load on the system would be negligible since people may not log in regularly but there can be a significant load during situations like when the hike letters are released, the last day of investment declarations, last day of proof submissions, etc.
  4. Security Testing: ERP solution contains end-to-end employee and employer data. It is thus, very important that only the authorized personnel are given access to sensitive data that too on need basis. This is will also help to minimize the chances of data theft. Most companies would do a phased rollout of the ERP software modules. This calls for a regression testing each time a new suite or module is launched after customizations.
  5. User Acceptance Testing (UAT): User Acceptance Testing plays an important role in ERP
    systems. UAT testing ensures that the ERP system not only works flawlessly but is also easy to
    understand by its users.
  6. Stress Testing: Stress testing validates the strength and reliability of ERP systems during
    stressful conditions. It involves loading the system with loads and volumes to verify its breaking
    point. The purpose is to find the potential bottlenecks that may hamper its operation under
    stress.
  7. Recovery Testing: Recovery testing measures the capacity of an ERP system at which it can
    recover after failure. It is a type of performance testing that validates the system’s ability to
    recover from failures.
  8. Regression Testing: Regression testing is very important for ERP systems. It involves testing
    the same functions repeatedly after any updates or changes are made to the system.
    Regression testing verifies that new features do not add any bugs and issues to the existing
    system.
  9. Exploratory Testing: Exploratory testing is a great method to find subtle problems in ERP
    systems. It focuses on the free exploration of the system’s features without adhering to
    predefined test cases.

Why Automated ERP testing is effective?

  • Reduces implementation time to a great extent
  • There are many processes and sub-processes involved in ERP. Software with such complexity requires test automation to discover bugs as quickly as possible.
  • Test automation ensures that all the processes involved in the implementation of ERP in your organization happen in the correct manner.
  • Verification of a centralized data source is cardinal for any ERP application. Test automation helps you test data process and security.

Tips for quick and effective testing of ERP

  • Make sure that everything has been tested before implementation
  • There are no such things as too much testing. Test the ERP application with as much as scenario possible
  • Do not rush others into production and implementation
  • A designated test manager has to be assigned to the project

Market Leaders in ERP Solutions
The use of ERP solutions is on the rise. Many companies are looking to make the switch and those who are already there are trying to take more benefits from the implementation. It is important thus to choose your ERP software provider wisely. Always keep in mind the quality and scalability of the software before buying it.
Here is the list of top 10 ERP product developers in the market today:

  1. SAP – the undoubted leader in ERP Solutions.
  2. Oracle – A close second with traditional PeopleSoft as the base.
  3. Microsoft Dynamics
  4. IFS Applications
  5. Inuit QuickBooks
  6. FIS Global
  7. Fiserv
  8. Cerner Corporation
  9. Constellation Software Inc.
  10. Infor

What is SAP ERP testing?

It’s similar to testing any other ERP software testing. Here the only difference is SAP is the provider.  Whatever changes you make on SAP ERP has to be tested to ensure that the entire system is working fine.
Those who test the ERP system must have impeccable knowledge in it.

Phases involved in SAP ERP testing

Test preparation phase

  • Identification of the business model
  • Automated + manual test case development
  • Test suites creation
  • Test system set up
  • Test data creation

Test execution phase
Execution of tests, reporting and defect handling happens in this phase.

Test evaluation phase
Analysis of test plans, defect analysis, process documentation happens in this, phase.

How to make ERP testing successful
ERP testing can be successful only with a certain level of business logic and understanding of the inter-relation between the different sub-systems or modules. Read on as we share some pointers to make your testing activity more fruitful and the application more robust.

  1. Spend time on UAT: the testing done by real users is very important for the success of ERP products. This is because they will be aware of the nitty-gritty of the system and how it interacts with other modules. They are the best people to find out issues and suggest enhancements to the software.
  2. Test as much as you can: While it may sound lame when it comes to testing ERP solution, no amount of testing can be enough. The complexity would keep growing based on the number of modules that are implemented and the number of inter-related data points.
  3. Drive the implementation professionally: Have a project plan, a project manager, identify the risks, have a mitigation plan ready, create a backup plan and so on. This will ensure better tracking of the implementation as well as the enhancements.
  4. Automate: Automation comes in very handy for most testing activities. It is a boon for ERP testing. Go for it. The main advantage of automation in the case of ERP solutions is to help validate the functionality and the data points after every module is released. Manually it can be a very cumbersome and error-prone process.
  5. Follow the process: Being an in-house implementation, people tend to overlook the importance of following the right standards and processes. Do not make this mistake. Stick the test plan and follow every bit judiciously for the best results.


Challenges in ERP Testing
ERP testing is a special niche and not all functional testers can be ERP testers. This creates some challenges when it comes to ERP testing. Here we talk about some of the most obvious challenges:

  1. Getting the right testers: Testers with extensive experience in ERP testing are hard to find. The success of the ERP testing would depend on their expertise and the amount of domain knowledge they have.
  2. Integration with other systems: ERP solutions are like a single store of data and information. There can be to and fro data communication from the ERP software to other third-party tools. Establishing and testing this integration is still an open challenge.
  3. Dealing with complex business rules: the customization if the ERP system is governed by business rules that drive the flow of information and data from one module to another. Setting up and testing these complex business rules thoroughly can be quite challenging.
  4. Performance Issues: Adhering to SLA’s and performance standards can become challenging for big sized organizations if a proper load and performance testing are not performed.

ERP Domain Knowledge for Software Testers

Using Test Management Systems to Improve ERP Testing

The test management system simplifies administrative issues and accelerates feedback
incorporation in the ERP testing.

It also optimizes ERP testing by providing an integrated platform for test planning, test case
execution and analysis. Some of the reasons to use the TMS system to improve ERP testing
are:

Improved Test Planning:
Test Management System leads to effective test planning. Test managers can specify and
structure test cases systematically. They can also track progress and identify interdependent
test cases. This improves the overall planning phase, ensuring a thorough testing strategy.

Better Test Execution:
The Test Management System facilitates scheduling and assigning the test to a specific tester.
This increases accuracy and collaboration in this testing stage.

Enhanced Collaboration:

Test Management System helps testers communicate with developers and other stakeholders
while sharing information.

Greater Visibility:
A Test Management System provides insight into test status, issues identified and results that
have been completed. It increases visibility, and decision-making throughout the testing
life-cycle.

Significance of ERP Testing

One cannot ignore the importance of ERP testing, knowing how complicated it can be to ensure
that everything works properly and fits business needs. It requires careful planning and
implementation to ensure effective system performance. ERP testing ensures:

Functional Accuracy:
ERP systems, known for the complexity and integration of varied business processes, require
rigorous testing to validate the successful functioning of the system. It ensures that the ERP
system functions as predicted giving a detailed evaluation of its operational capacities.

Issue Identification and Resolution:
One of the primary goals of ERP testing is to identify and fix problems or bugs in the system.
Identifying and resolving these issues before system implementation helps avoid potential
problems.

Alignment with Organizational Needs:
Testing ensures that the ERP system matches the demands of the organization. This thorough
validation process helps to increase the overall efficiency of implementing ERP.

Risk Mitigation:
It is very important to do a thorough testing of the ERP system for risk reduction after its
implementation. Testing identifies possible problems and avoids operational disruptions after
deployment.

Conclusion
While it is true that the ERP system makes the life of the people in the organization much easier after its implementation. The customization, implementation and testing phases would need a lot of planning too. It is thus important to plan the ERP testing well with proper resources and budget.
Rest assured that once the testing is completed successfully, there will be no looking back to the manual ways of capturing and reporting data.

7 Agile Software Development Methodologies

Agile software development methodologies are a group of development techniques or methods that enable software development using various types of iterative development techniques.

These methodologies work on the basis of continued evolution of requirements and solutions that occurs by establishing collaboration between self-organizing cross-functional teams.

A way of encouraging the well-managed and organized project management process, these methodologies allow for recurrent inspection and revision of the tasks.
Giving a scope to adapt the best engineering practices, these methods also assist in the delivery of high-quality software products.

What’s Agile methodology?

Agile is a project management method that divides a project into smaller parts known as sprints. This flexible approach adopted by teams allows them to review and make changes after each sprint.
What is the Agile Manifesto?

In 2001, seventeen software developers developed the Agile Manifesto. It has four values and 12 principles to guide a more adaptive, team-based software development process.
Four Agile Management Principles.

Also Read:- An Analysis of the Effects of the Agile Model in Software Testing

In Agile project management, there are four key principles, often called the pillars:

1. People First: Agile teams value people and interaction more than processes and tools.
2. Working Software Matters: The emphasis is on the development of functional software as opposed to thorough documentation. The main objective is to get the software functioning properly.
3. Customer Involvement is Key: Customer feedback is highly valued in Agile. Collaboration with the customer is the key element as a customer actively directs the software development process.
4. Adaptability Wins: Agile methodologies focus on adaptability. Teams can easily change the strategies and working process without affecting most of the project plan.

What are the 12 Agile principles?

Based on the above 4 values, 12 Agile principles were proposed. These principles are very adaptable and can be tailored to meet the team’s requirements. These 12 principles:

1. Customer collaboration is the key to Agile methodology. It proposes early changes and frequent updates to customers.
2. Agile methodology is highly adaptable. Changes in requirements at a later stage are not a big deal in Agile methodology.
3. Frequent delivery of value to the customer decreases the churn rate.
4. Break down project silos. In Agile, there is collaboration that pushes people to work as a team.
5. Build projects around motivated individuals. Goal-oriented teams perform better in Agile methodology.
6. The best type is face-to-face communication. Connect through methods like Zoom calls, even in the case of distributed teams.
7. Measure progress by working software. Value the function of software over everything else.
8. Maintain a sustainable working pace. Agile is fast but need not be very fast which can result in teams getting burnout.
9. Continuous excellence improves agility. Leveraging the good work of one sprint to the next.
10. Keep it simple. Agile favours simple solutions to complicated issues.
11. The highest value is created by self-organized teams. Proactive teams become valuable assets.
12. Reflect and readjust for better efficiency. Agile teams hold retrospective meetings to learn from past experiences so as not to repeat mistakes.

Also Read:- Agile VS DevOps: Difference between Agile and DevOps

Importance of using agile development methodologies.

In the field of software development where things constantly evolve and change, traditional methods such as the waterfall model prove to be too restrictive. Agile development methodologies are the preferred choice for various reasons given below:

1. Adaptability: Agile development methodologies allow you to change strategies easily during software development without jeopardizing the entire flow of the project. Unlike the waterfall approach, phases here are not very interdependent. Hence, Agile provides a more flexible project management philosophy.

2. Team Collaboration: Agile encourages the use of direct interaction and overcomes project silos. Even in remote working conditions, it lays stress on more face-to-face team interactions using the power of technology, enhancing more collaborative teamwork.

3. Customer Focus: In software, teams can closely accommodate the needs of customers. Agile is designed to ensure that customer feedback is incorporated quickly. This is important because pleasing customers in the software development industry matters a lot. Working with customers enables Agile teams to align features according to their needs, and once those requirements change, a seamless transition into another project is enabled by the flexible nature of an Agile process.

While there are a number of different methodologies available, some of the common ones used are as mentioned below:

1. Scrum
A light-in-weight project management framework, this is an excellent tool for managing and controlling iterative and incremental projects.
Owing to its simplicity, demonstrated efficiency, and ability to act as a wrapper for different engineering projects, Scrum has been able to win a huge clientele in the market.
Now, scrum has been demonstrated to scale to numerous groups crosswise over expansive associations with 800+ individuals.

2. Lean
Originally developed by Mary and Tom Poppendieck, Lean Software Development is an iterative software development methodology that owes a lot of its standards and practices to the Lean Enterprise development, and other organizations like Toyota.
Lean methodology works on the following principles:

  • Eliminating the waste
  • Intensifying learning
  • Choosing as late as permissible
  • Delivering as fast as possible
  • Strengthening the team
  • Building integrity
  • Seeing the whole

Lean methodology underscores the speed and productivity of improvement work process, and depends on quick and solid input amongst software engineers and clients.

It focuses on the effectiveness of the utilization of group assets, attempting to guarantee that everybody is gainful however much of the time as could be expected.

3. Kanban
This methodology is used by the organizations that focus on continual delivery without overburdening the development group.
Like Scrum, Kanban is a procedure intended to enable groups to cooperate all the more successfully.
It works on three basic principles that include:

  • Work flow for the day i.e. seeing every item as informative in context of each other
  • Limiting the amount of work in progress (WIP)- defining the expected work delivery from every team at a particular time
  • Enhanced flow i.e. taking up the next thing on priority in backlog once the current task is completed

4. Extreme Programming (XP)
Extreme Programming  or XP, originally written as Kent Beck, has risen as a standout amongst the well-known and disputable agile methodologies.
A disciplined way to deliver high quality software products, XP advances high client association, rapid feedback loops, ceaseless testing, nonstop planning, and close collaboration to deliver software products frequently.
The first XP formula depends on four basic principles that include simplicity, communication, criticism, and mettle.
As well as twelve supporting practices that include planning the game, minor releases, customer acceptance testing, simple design, pair programming, test-driven  development, re-factoring, continuous integration, collective code ownership, coding standards, metaphor and sustainable pace.

5. Crystal
The Crystal methodology is a standout amongst the most lightweight, versatile ways of software development.
Comprising of a number of agile methodologies like Crystal Clear, Crystal Yellow, Crystal Orange and others, its exceptional qualities are driven by various factors like group estimate, framework criticality, and undertaking needs.
Like other methodologies, Crystal also focuses on early product delivery, high client association, versatility, and removal of distractions.

6. Dynamic Systems Development Method (DSDM)
Dating back to 1994, Dynamic Systems Development Method methodology was developed to meet the need of delivering an industry standard project delivery framework.
It has advanced to a level of developing into a tool that can act as a foundation for planning, managing, executing, and scaling agile process and iterative software development projects.
This tool depends on nine key rules that include business needs/esteem, dynamic client association, enabled groups, visit conveyance, coordinated testing, and partner cooperation.
The major focus of DSDM before delivering the final product is to ensure that a product is fit to meet the business needs.

One must try and complete all the critical works and project using this methodology.

It is also important to include some of the lesser important tasks in each time-box so that they can be replaced with higher-priority work as and when required.

7. Feature-Driven Development (FDD)
Originally developed and articulated by Jeff De Luca, Feature-Driven Development (FDD) is a client centric and pragmatic software process.

As the name indicates, features as use cases are used to the Rational Unified Process and user stories are to Scrum, which are the primary source of requirements and the primary input into your planning efforts.

Driven on the basis of model, FDD is a short-iteration process that begins by setting up an overall model shape followed by a series of two-week “design by feature, build by feature” iterations.
app testing
FDD follows eight practices to complete the entire development process:

  • Domain Object Modeling
  • Developing by Feature
  • Component/Class Ownership
  • Feature Teams
  • Inspections
  • Configuration Management
  • Regular Builds
  • Visibility of progress and results

Specifying very small tasks to be attained, FDD enables better work management by calculating the product’s delivery on the basis of tasks accomplished.

Adaptive Project Framework (APF):

The Adaptive Project Framework, which can be referred to as Adaptive Project Management (APM), has a dynamic approach to project management. It grew from the idea that anything can happen out of nowhere in a project. Think about it as a mechanism that copes with surprises. This approach is primarily aimed at projects in which typical methods of project management may fail.

The realization that project resources are unstable is what APF runs on. Changes in budgets, timing adjustments or project team members are very well dealt with. Finally, APF takes a different approach—it describes what resources the project has at a particular point in time instead of those it initially had. It is about the ability to be flexible even in a state of uncertainty.

Extreme Project Management (XPM):

XPM is the ultimate destination for intricate projects that are full of uncertainties. XPM is characterized by the permanent adjustment of processes towards desirable results. Imagine a project where strategies evolve every week and that is completely normal.

Flexibility is the key here. This approach benefits from constant changes, trial-and-error solutions to problems, and many iterations of self-correction. It’s almost like learning how to navigate the labyrinth—the catch is that your path constantly shifts as you proceed.

Adaptive Software Development (ASD):

ASD enables the teams to quickly adjust their operations when the project needs change. This approach is based on permanent adaptivity. The project unfolds through three main phases: speculate, collaborate, and learn. The exceptional aspect of these stages is that they occur at the same time, not one after another.

Teams involved in ASD often concurrently experience all three phases. The non-linear framework enables phases to overlap thus making it a dynamic process. ASD’s fluidness allows for a higher probability of timely identification and resolution of problems as compared to established project management approaches. It is like dancing through the project, varying your steps in real-time.

Also Read:- What is Agile Testing? Process, Methodology and Strategies

Conclusion
The basis aim behind every agile software development methodologies is to ensure that a high quality software product is delivered within stipulated time.
Therefore, no matter what tool or methodology you use, your priority continues to remain the delivery of superior quality product.

FAQs

1. When should you use Agile?
Use Agile when customer satisfaction is a top priority and you want to engage them throughout.

2. How does agile differ from scrum?
Agile is a software development technique that breaks down large, complicated projects into small sprints. Scrum is a form of Agile Methodology with the same principles and values that incorporates some unique elements on top.

3. What is the Agile framework?
The Agile framework is an iterative approach. With each sprint, teams assess and reflect on what could be improved so that their strategy will change for the next sprint.

10 Types of Software Testing Models

Testing is an integral part of the software development life cycle. Various models or approaches are used in the software development process, and each model has its own advantages and disadvantages. Choosing a particular model depends on the project deliverables and the complexity of the project.

What Are Software Testing Models?

Software testing models are systematic approaches used to plan, design, execute, and manage testing activities. They provide guidelines for carrying out testing processes effectively and ensure comprehensive test coverage.

Each model offers distinct advantages and is chosen based on the specific requirements of the project and the organization’s preferences. Understanding these models is crucial for selecting the most suitable approach for software testing in a given scenario.

Now let us go through the various software testing models and their benefits:

#1. Waterfall Model

Waterfall Model

This is the most basic software development life cycle process, which is broadly followed in the industry. Here, the developers follow a sequence of processes where the processes flow progressively downward towards the ultimate goal. It is like a waterfall where there are a number of phases.

These phases each have their own unique functions and goals. There are, in fact, four phases: requirement gathering and analysis phase, software design, programmed implementation and testing, and maintenance. All these four phases come one after another in the given order.

In the first phase, all the possible system requirements for developing a particular software are noted and analyzed. This, in turn, depends on the software requirement specifications, which include detailed information about the expectations of the end user. Based on this, a requirement specification.

A document is created that acts as input to the next phase, i.e., the software design phase. What needs to be emphasized here is that once you move into the next phase, it won’t be possible to update the requirements. So you must be very thorough and careful about the end-user requirements.

Advantages

  • Easy to implement and maintain.
  • The initial phase of rigorous scrutiny of requirements and systems helps save time later in the developmental phase
  • The requirement for resources is minimal, and testing is done after the completion of each phase.

Disadvantages

  • It is not possible to alter or update the requirements
  • You cannot make changes once you are in the next phase.
  • You cannot start the next phase until the previous phase is completed

#2. V Model

v model in software testing

This model is widely recognized as superior to the waterfall model. Here, the development and test execution activities are carried out side by side in a downhill and uphill shape. In this model, testing starts at the unit level and spreads toward integration of the entire system.

So, SDLC is divided into five phases – unit testing, integration testing, regression testing, system testing, and acceptance testing.

Advantages

  • It is easy to use the model since testing activities like planning and test design are done before coding
  • Saves time and enhances the chances of success.
  • Defects are mostly found at an early stage, and the downward flow of defects is generally avoided

Disadvantages

  • It is a rigid model
  • Early prototypes of the product are not available since the software is developed during the implementation phase
  • If there are changes in the midway, then the test document needs to be updated

#3. Agile model

agile testing quadrants


In this SDLC model, requirements and solutions evolve through collaboration between various cross-functional teams. This is known as an iterative and incremental model.

Also Read:  Selenium Tutorial For Beginners- An Overall View into this Tool.

Advantages

  • Ensure customer satisfaction with the rapid and continuous development of deliverables.
  • It is a flexible model as customers, developers, and testers continuously interact with each other
  • Working software can be developed quickly, and products can be adapted to changing requirements regularly

Disadvantages

  • In large and complex software development cases, it becomes difficult to assess the effort required at the beginning of the cycle
  • Due to continuous interaction with the customer, the project can go off track if the customer is not clear about the goals

#4. Spiral model

spiral model diagram

It is more like the Agile model, but with more emphasis on risk analysis. It has four phases: planning, risk analysis, engineering, and evaluation. Here, the gathering of requirements and risk assessment is done at the base level, and every upper spiral builds on it.


Advantages

  • Risk avoidance is enhanced due to the importance of risk analysis.
  • Its a good model for complex and large systems.
  • Depending on the changed circumstances, additional functionalities can be added later on
  • Software is produced early in the cycle

Disadvantages

  • Its a costly model and requires highly specialized expertise in risk analysis
  • It does not work well in simpler projects

#5. Rational Unified Process

Rational Unified Process Methodology

This model also consists of four phases, each of which is organized into a number of separate iterations. The difference with other models is that each of these iterations must separately satisfy defined criteria before the next phase is undertaken.

Advantages

  • With an emphasis on accurate documentation, this model is able to resolve risks associated with changing client requirements.
  • Integration takes less time as the process goes on throughout the SDLC.

Disadvantages

#6. Rapid application development

This is another incremental model, like the Agile model. Here, the components are developed parallel to each other. The developments are then assembled into a product.

Advantages

  • The development time is reduced due to the simultaneous development of components, and the components can be reused
  • A lot of integration issues are resolved due to integration from the initial stage


Disadvantages

  • It requires a strong team of highly capable developers with individual efficacy in identifying business requirements
  • It is a module-based model, so systems that can be modularized can only be developed in this model
  • As the cost is high, the model is not suitable for cheaper projects

#7 Iterative Model

The iterative model does not require a complete list of requirements before the start of the project. The development process begins with the functional requirements, which can be enhanced later. The procedure is cyclic and produces new versions of the software for each cycle. Every iteration develops a separate component in the system that adds to what has been preserved from earlier functions.

Advantages

  • It is easier to manage the risks since high-risk tasks are performed first.
  • The progress is easily measurable.
  • Problems and risks that are labeled within one iteration can be avoided in subsequent sprints.

Disadvantages

  • The iterative model needs more resources compared to the waterfall model.
  • Managing the process is difficult.
  • The final stage of the project may not entirely determine the risks.

#8 Kanban Model

The Kanban Model is a visual and flow-based approach to software development and project management. It relies on a visual board to represent work items, which move through different process stages. These stages include backlog, analysis, development, testing, and deployment.

Each work item in a Kanban system has a card on the board to represent it, and team members move these cards through the stages as they complete them.

The board provides a real-time visual representation of the work in progress and helps teams identify bottlenecks or areas for improvement.

Continuous improvement is a key principle of Kanban. Teams regularly review their processes, identify areas of inefficiency, and make incremental changes to enhance workflow. This adaptability and focus on improvement make the Kanban Model well-suited for projects with evolving requirements and a need for continuous delivery.

Advantages of Kanban Model:

  • Visual Representation: Provides a clear visual overview of work items and their progress.
  • Flexibility: It is adaptable to changing priorities and requirements, making it suitable for dynamic projects.
  • Continuous Improvement: Encourages regular process reviews and enhancements for increased efficiency.
  • Reduced Waste: Minimizes unnecessary work by focusing on completing tasks based on actual demand.

Disadvantages of the Kanban Model:

  • Limited Planning: Less emphasis on detailed planning may be a drawback for projects requiring extensive upfront planning.
  • Dependency on WIP Limits: Ineffective management of work-in-progress (WIP) limits can lead to bottlenecks.
  • Complexity Management: This may become complex for large-scale projects or those with intricate dependencies.
  • Team Dependency: This relies on team collaboration and communication, which can be challenging if not well coordinated.

#9 The Big Bang Model

  • No Formal Design or Planning: The Big Bang Model is characterized by an absence of detailed planning or formal design before the development process begins.
  • Random Testing Approach: Testing is conducted randomly, without a predefined strategy or specific testing phases.
  • Suitable for Small Projects: This model is often considered suitable for small-scale projects or projects with unclear requirements.

Advantages of the Big Bang Model:

  1. Simplicity: The model is simple and easy to understand.
  2. Quick Start: Quick initiation, as there is no need for elaborate planning.

Disadvantages of the Big Bang Model:

  1. Uncertainty: Lack of planning and design can lead to uncertainty and chaos during development.
  2. Testing Challenges: Random testing may result in inadequate test coverage, and missing critical issues.
  3. Limited Scalability: Not suitable for large or complex projects due to a lack of structured processes.

#10 Scrum Model

  • Framework within Agile: Scrum is a framework operating within the Agile methodology, emphasizing iterative development and collaboration.
  • Sprints for Short Development Cycles: Development occurs in short, fixed intervals known as sprints, typically lasting 2-4 weeks.
  • Adaptability and Rapid Releases: Scrum promotes adaptability to changing requirements and aims for rapid, incremental releases.

Advantages of Scrum Model:

  1. Flexibility: Allows for flexibility in responding to changing project requirements.
  2. Customer Satisfaction: Regular deliverables enhance customer satisfaction and engagement.
  3. Continuous Improvement: Emphasizes continuous improvement through regular retrospectives.

Disadvantages of the Scrum Model:

  1. Lack of Structure: Some teams may struggle with flexibility and lack of a structured plan.
  2. Dependency on Team Collaboration: Success heavily depends on effective collaboration within the development team.
  3. Limited Predictability: It may be challenging to predict the exact outcomes and timeline due to the iterative nature.

The future of software development models

Software application testing is an area that is changing fast with the evolution of new technologies and higher user expectations. Here are some important trends that are going to redefine the way we test software:

  • Artificial Intelligence (AI) and Machine Learning (ML): AI and ML are simplifying testing by dealing with repetitive tasks, determining the extent of test coverage, and predicting potential problems. AI tools can review code, identify patterns, and suggest test cases, so testing is less manual.
  • Shift-Left Testing: Shift-left testing is now becoming a common approach in software testing models. It focuses on finding the bugs at an early stage. This way, problems are found and addressed early.
  • Continuous Testing and Integration (CTI): Software continues to stay stable and bug-free as it evolves by incorporating testing into the continuous integration (CI) pipeline. Issues are identified early and resolved promptly this way.
  • Performance Testing and Monitoring: As the complexity of software and the amount of data it handles increase, it becomes essential to test how well these programs operate. Performance testing and monitoring ensure that the software can process various workloads while remaining responsive.
  • User Experience (UX) Testing: As users expect the software to be easy to use, UX testing is getting even more important. User testing tests how user-friendly and easy-access software is in meeting users’ needs.
  • Security Testing: This type of testing shields software from cyber-attacks and data breaches. It discovers and eliminates weaknesses that can jeopardize the safety of software and user data.
  • Cloud-Based Testing: More individuals are going to test in the cloud because they’re adaptable. This supports continuous testing practices.
  •  Open-Source Testing Tools: They are becoming popular as they are free and customizable testing tools. They allow developers and testers to customize their testing according to specific requirements for individual projects without significant cost.
  •  Automation Testing: Automated testing is becoming more sophisticated, tackling challenging situations without requiring intensive human intervention. This allows testers to concentrate on other issues that are of higher priority.

 Conclusion

In conclusion, the diverse landscape of software testing models within the Software Development Life Cycle (SDLC) offers a range of options to cater to different project requirements and complexities.

From traditional approaches like the waterfall model to more adaptive frameworks like Scrum and Kanban, each model brings its own set of advantages and disadvantages.

The choice of a testing model is crucial, influencing factors such as early issue detection, project adaptability, and overall software quality. As technology evolves, so does the array of testing methodologies, ensuring that software development stays dynamic and responsive to the ever-changing needs of the industry.

How To Create a Test Plan? Step-By-Step Tutorial

Test plans define a structured process under the control of test managers, serving as roadmaps for software testing. Team members with in-depth system knowledge create these blueprints, ensuring that each test case is functional and going through a thorough review by senior experts.

Importance of test plans

  • Risk Identification: Test plans aid in identifying potential risks associated with the software, allowing preemptive mitigation strategies.
  • Resource Planning: They assist in planning resources, including human resources, tools, and infrastructure required for testing activities.
  • Scope Definition: Test plans clearly outline the scope of testing, ensuring that all functionalities and scenarios are covered.
  • Quality Assurance Guidelines: Establishing quality assurance guidelines ensures adherence to standards, promoting consistency across testing phases.
  • Communication Tool: The document serves as a communication tool, fostering understanding among developers, testers, and business managers.
  • Traceability Matrix: Test plans often include a traceability matrix, linking test cases to requirements and enabling comprehensive test coverage.
  • Estimation and Budgeting: Test plans facilitate accurate estimation of testing efforts, aiding in budgeting and resource allocation.
  • Continuous Improvement: Post-implementation test plans contribute to continuous improvement by capturing lessons learned and refining future testing processes.


What Are The Objectives Of The Test Plan?

  1. Quality Assurance: Define a roadmap for thorough testing, ensuring software functions as intended and meets user needs.
  2. Identify Risks & Issues: Proactively anticipate potential problems like bugs or performance bottlenecks before they impact users.
  3. Scope & Efficiency: Establish clear testing boundaries and prioritize tasks, avoiding wasted time and ensuring resource allocation.
  4. Communication & Collaboration: Set expectations for testing activities, roles, and responsibilities, promoting teamwork and transparency.
  5. Measurable Improvement: Define success metrics (e.g., bug coverage, defect rate) to track progress and assess test effectiveness.

Remember, a good test plan is a living document – updated as needed to adapt to changing circumstances and ensure smooth software development.

Step-by-step Process of Creating An Effective Test Plan

      1. Step #1. Product Analysis
      2. Step #2. Designing test strategy
      3. Step #3. Identifying the Testing Type
      4. Step #4. Interpret test objectives
      5. Step #5.  Outline test criteria
      6. Step #6.  Planning Resources
      7. Step #7. Define test Environment
      8. Step #8. Create Test Logistics
      9. Step #9. Document Risk & Issues
      10. Step #10. Outline Test Criteria
      11. Step #11. Estimation and Scheduling

Let’s dive into the step-by-step tutorial of How To Create a Test Plan

Step #1. Product Analysis

Requirements Analysis:

    • Initiate the test plan creation process by conducting a comprehensive analysis of software requirements. This forms the foundation for subsequent testing phases.

System Analysis:

    • Prioritize thorough system analysis to gain a holistic understanding of the software’s architecture, functionalities, and interactions.

Website and Documentation Review:

    • Scrutinize the website and product documentation to extract detailed insights into software features, configurations, and operational procedures.

Stakeholder Interviews:

    • Engage in interviews with key stakeholders, including owners, end-users, and developers, to garner diverse perspectives and nuanced insights into the software.

Client Research:

    • Conduct in-depth research on the client, end-users, and their specific needs and expectations. Understand the client’s business objectives and how the software aligns with those goals.

Key Questions for Analysis:

    • Pose critical questions to guide the analysis process:
      • What is the intended purpose of the system?
      • How will the system be utilized?
      • Who are the end-users, and how will they interact with the system?
      • What are the development requirements for implementing the system effectively?

Clarification Interviews:

        • If any aspect of the system’s requirements remains unclear, conduct interviews with clients and relevant team members for detailed clarification.

Qa staffing and hiring
Step #2. Designing test strategy

Definitely, the scope of the testing is very important. To put it in simple words, know what you need to test and what you don’t need to test. All the components that need to be tested can be put under “in scope,” and the rest can be defined as “out of scope.”.
It helps

  • To give precise information on the testing being done
  • Also, it helps testers to know exactly what they need to test.

But the main question that arises here is how you would know what needs to be “in scope” and what needs to be “out of scope.”
There are a few points that you need to keep in mind while defining the scope of the test

  • Look into what exactly customer requirements are
  • What is the budget of your project?
  • Focus nicely on Product Specification
  • You should also take into account your team members’ skills and talents.

Step #3. Identifying the Testing Type: which testing should happen 

Now that we’ve established a thorough understanding of what needs to be tested and what doesn’t, the next crucial step is defining the types of testing required. Given the diverse array of testing methodologies available for any software product, it’s essential to precisely identify the testing types relevant to our software under test.

Prioritization becomes key, allowing us to focus on the most pertinent testing methodologies. This ensures that our testing efforts align with the specific needs and intricacies of the software, optimizing the overall quality assurance process.

You can consider the budget of the project, the time limitations, and your expertise to prioritize the testing type.

Step #4. Interpret test objectives

Defining precise test objectives is paramount for effective test execution, ensuring a systematic approach to identifying and resolving software bugs. The ultimate goal is to ascertain that the software is devoid of defects. The process of interpreting and documenting test objectives involves two critical steps:

  1. Feature and Functionality Enumeration:
    • Compile an exhaustive list of all system features, functionalities, performance criteria, and user interface elements. This comprehensive catalog serves as the foundation for targeted test scenarios.
  2. Target Identification:
    • Based on the listed features, establish the desired end result or target. This involves defining the expected outcomes, performance benchmarks, and user interface standards that signify successful software operation.

Step #5.  Outline test criteria

The test criteria are a rule or a standard on which the test procedure is based. 2 types of test criteria need to be resolved:

1. Suspension Criteria: Here, you specify the critical suspension criteria for a test. When the suspension criteria are met, the active test cycle is suspended.
2. Exit Criteria: Exit criteria specify the successful completion of a test phase.

Exit Criteria
How to create a test plan: exit criteria

For example, if 95% of all the tests pass, you can consider the test phase to be complete.
The run rate and pass rate are two prominent ways to define exit criteria
Run rate = the number of test cases executed/total test cases of the test specification.
Pass rate = numbers of test cases passed / test cases executed.
These are retrieved from test metrics documents.
The major Run rate has to be 100%. The exception can be considered if a clear and eligible reason is mentioned for a lower run rate.
The pass rate can be variable depending on the project scope. But certainly, a higher pass rate is always a desirable goal.

Step #6.  Planning Resources

Resource planning, as the name implies, involves crafting a comprehensive overview of all essential resources essential for project execution. This encompasses a spectrum of elements, including human resources, hardware, software, and other necessary materials.

The significance of resource planning lies in its ability to detail the requirements crucial for the project’s success.

By explicitly specifying the required resources, the test manager can formulate precise schedules and accurate estimations, facilitating the seamless and effective execution of the project. This process ensures optimal utilization of resources, contributing to the overall success of the testing project.

No. Member Tasks
1 Test Manager Manages the entire project.

Directs the team.

Hires require efficient resources.

2 Tester Identifies test techniques, tools, and automation architecture.

Creates comprehensive test plans.

Executes tests, logs results, and reports defects.

3 Developer in Test Executes test cases, test suites, and related activities.
4 Test Administrator creates and manages the test environment and its assets.

Assists testers in effectively utilizing the test environment.

Some of the system resources you should look for are

  1. Server
  2. Test tool
  3. Network
  4. Computer

Step #7. Define test Environment

The test environment is a critical element, encompassing both hardware and software, where the test team executes test cases. It constitutes a real-time instance that mirrors the actual user experience, incorporating the physical environment, including servers and front-end interfaces. To comprehensively define the test environment:

  1. Hardware Configuration:
    • Specify the hardware components required for testing, detailing server specifications, network configurations, and end-user devices.
  2. Software Configuration:
    • Outline the software components crucial for testing, including operating systems, databases, browsers, and any specialized testing tools.
  3. User Environment:
    • Consider the end-user experience by replicating the conditions they will encounter during actual system usage.
  4. Server Setup:
    • Detail the server architecture, configurations, and any specific settings essential for testing server-side functionalities.
  5. Front-End Interface:
    • Define the front-end interfaces, detailing the user interfaces, GUI elements, and any specific design considerations.
  6. Data Configuration:
    • Specify the test data required for executing test cases, ensuring it accurately represents real-world scenarios.
  7. Dependencies:
    • Identify any external dependencies, such as APIs, third-party integrations, or external services, is crucial for testing.
  8. Test Environment Documentation:
    • Create comprehensive documentation detailing the entire test environment setup, configurations, and any unique considerations.

Step #8. Create Test Logistics

Creating effective test logistics involves addressing two crucial aspects:

1. Who Will Test?

  • Skill Analysis: Conduct a thorough analysis of team members’ capabilities and skills. Understand their strengths, expertise, and proficiency in specific testing types or tools.
  • Task Assignment: Based on the skill set, assign appropriate testing tasks to team members. Ensure that each tester is aligned with testing activities that match their expertise.
  • Responsibility Allocation: Clearly define roles and responsibilities within the testing team. Specify who is responsible for test case creation, execution, result analysis, and defect reporting.
  • Cross-Training: Consider cross-training team members to enhance flexibility. This ensures that multiple team members can handle critical testing tasks, reducing dependencies.

2. When Will the Test Occur?

  • Timelines: Establish strict timelines for testing activities to prevent delays. Define specific start and end dates for each testing phase, considering dependencies and overall project timelines.
  • Test Scheduling: Develop a comprehensive test schedule that outlines when each testing activity will take place. This includes unit testing, integration testing, system testing, and any other relevant testing phases.
  • Parallel Testing: If applicable, plan for parallel testing to expedite the overall testing process. This involves conducting multiple testing activities simultaneously.
  • Continuous Monitoring: Implement a continuous monitoring mechanism to track progress against timelines. This helps identify potential delays early on and allows for timely corrective actions.
  • Coordination: Foster clear communication and coordination among team members to ensure everyone is aware of the testing schedule and any adjustments made.


Step #9. Document Risk & Issues


Risk Potential Issues Mitigation Strategy
Skill Lack in Team Members Inefficient testing, missed bugs, project delays – Arrange training workshops or boot camps.

– Mentor junior team members by senior members.

– Hire experienced professionals to fill skill gaps.

Short Deadlines, Lack of Rest Periods Reduced testing quality, burnout, compromised health – Prioritize critical test cases and optimize the testing flow.

– Negotiate realistic deadlines and adjust the project scope if needed.

– Schedule regular breaks and encourage team members to take leave.

Lack of Management Skills Unclear roles, poor communication, demotivated team – Implement leadership training programs.

– Delegate tasks and empower team members to take ownership.

– Establish clear communication channels and promote collaboration.

Lack of Collaboration Among Team Members Silos, knowledge gaps, inefficient teamwork – Encourage team-building activities and social events.

– Implement cross-functional collaboration initiatives.

– Create a culture of knowledge sharing and open communication.

Budget Overruns Financial constraints, project delays, resource limitations – Clearly define the test scope and focus on high-impact areas.

– Implement cost-effective testing tools and methodologies.

– Monitor expenses closely and adjust resource allocation as needed.

Step #10. Outline Test Criteria

“Suspension criteria” refers to predefined conditions or thresholds that, when met, trigger the temporary halt or suspension of a testing phase until specific issues are addressed. In the context you provided, the suspension criteria is set at a failure rate of 40% for test cases. Let’s elaborate on this:

Suspension Criteria Explanation:

In your testing process, you’ve established a key metric to evaluate the health and readiness of the software being developed. This metric is the percentage of failed test cases. When this metric reaches or exceeds 40%, it serves as a trigger for the suspension of testing activities. This implies that if a sizable portion of the test cases are failing, the testing phase will temporarily stop until the development team addresses the identified issues.

Purpose of Suspension:

The need to make sure that the software is of sufficient quality before continuing testing is what drives the decision to suspend testing at a 40% failure rate. A high failure rate indicates potential critical issues or bugs that, if left unaddressed, could lead to a suboptimal product or system.

Workflow after Suspension:

Once the suspension criteria are met, the testing team communicates the situation to the development team. The development team then focuses on fixing the identified issues, whether they are coding errors, logic flaws, or other bugs causing the test failures. Once the fixes are implemented, the testing team resumes their activities to verify that the issues have been adequately addressed.

Benefits of Suspension Criteria:

  1. Quality Assurance: It ensures that only software meeting a certain quality standard progresses through the testing phases.
  2. Efficiency: By pausing testing during a high failure rate, it prevents the identification of additional issues that might arise due to the existing, unresolved problems.
  3. Collaboration: Encourages collaboration between testing and development teams to resolve identified issues promptly.
  4. Resource Optimization: Prevents the allocation of resources for testing on software that is likely to have significant issues.

Mobile app test cost calculator
Step #11. Estimation and Scheduling

Estimation and Scheduling in the Test Environment Phase:

In the test environment phase, the test manager plays a crucial role in estimating the resources, time, and effort required for testing activities. Estimation involves predicting the testing effort, duration, and resources needed to complete the testing process successfully. The test manager uses various techniques and relies on key inputs to arrive at a realistic estimate. Additionally, the estimation is closely tied to the overall project schedule.

Key Inputs for Estimation in a Test Environment:

  1. Project Deadline: The overall deadline for the project is a critical input. It sets the time boundary within which testing activities must be completed to ensure timely delivery.
  2. Project Estimation: The estimated effort and schedule for the entire project, as determined during the project planning phase, provide a baseline for the testing phase. The test manager considers the overall project timeline and allocates a proportionate timeframe for testing.
  3. Project Risk: Understanding the project risks is essential for accurate estimation. Risks such as unclear requirements, frequent changes, or complex functionalities can impact testing effort and duration.
  4. Employee Availability: The availability of team members and their skill levels directly affect the estimation. The test manager considers the capacity of the testing team and ensures that resources are available when needed.

Estimation Techniques:

  1. Bottom-Up Estimation: Breaking down the testing activities into smaller tasks and estimating each task individually. This detailed approach provides a more accurate estimation but requires a thorough understanding of the testing requirements.
  2. Expert Judgment: Relying on the expertise of experienced team members or industry experts to provide insights into the effort required for testing activities.
  3. Analogous Estimation: Drawing on past projects with similar characteristics to estimate the effort and time required for the current testing phase.

Binding Estimation to Test Planning Schedule:

Once the estimation is complete, the test manager aligns it with the overall project schedule and creates a detailed test plan. The test plan outlines the testing strategy, scope, resources, schedule, and deliverables. It includes milestones, timelines for different testing activities, and dependencies on development milestones.

Benefits of Binding Estimation to Schedule:

  1. Alignment with Project Goals: Ensures that testing activities are synchronized with the overall project timeline and objectives.
  2. Resource Planning: Helps in allocating resources effectively, avoiding bottlenecks, and ensuring that team members are available when needed.
  3. Risk Mitigation: Identifies potential scheduling risks and allows the test manager to plan for contingencies or adjustments as needed.
  4. Communication: Clearly communicates the testing schedule to all stakeholders, fostering transparency and accountability.

By binding estimation to the schedule, the test manager enhances the likelihood of meeting project deadlines while maintaining the quality and thoroughness of the testing process. This integrated approach contributes to successful project delivery.

Step #12. Govern test deliverables

Governance of test deliverables is a critical aspect of the testing process, ensuring that all documents, components, and tools developed to support testing efforts are managed, monitored, and delivered effectively. This involves establishing processes, controls, and guidelines to ensure the quality, accuracy, and timeliness of the deliverables. Here’s how the governance of test deliverables can be approached:

  1. Define Clear Standards:
    • Establish clear and standardized templates for test deliverables. This ensures consistency across different testing phases and projects.
    • Define standards for document structure, content, and formatting to enhance readability and understanding.
  2. Document Version Control:
    • Implement a robust version control system to track changes and updates to test deliverables. This ensures that stakeholders are always working with the latest and approved versions.
    • Clearly label and document version numbers, revision dates, and changes made in each version.
  3. Traceability:
    • Ensure that there is traceability between test deliverables and project requirements. This helps in validating that all testing activities align with the defined requirements.
    • Maintain traceability matrices to track the relationship between requirements, test cases, and other deliverables.
  4. Review and Approval Process:
    • Institute a formal review process for all test deliverables. This involves involving relevant stakeholders, including developers, business analysts, and project managers.
    • Obtain necessary approvals before progressing to the next phase or releasing deliverables to other teams or clients.
  5. Delivery at Specified Intervals:
    • Plan and communicate the delivery schedule for test deliverables at specified intervals, aligning with the overall development timeline.
    • Ensure that stakeholders, including development teams and project managers, are aware of the delivery milestones and can plan their activities accordingly.
  6. Comprehensive Test Deliverables:
    • Test deliverables should cover all relevant aspects of testing, including but not limited to:
      • Test plans outlining the testing strategy, scope, resources, and schedule.
      • Design specifications detailing test cases, scenarios, and data.
      • Simulators or test environment setup documents.
      • Error and execution logs for tracking issues and test execution results.
      • Installation and test procedures for deploying and conducting tests.
  7. Documentation Maintenance:
    • Establish procedures for ongoing maintenance of test documentation. This includes updating documents based on changes in requirements, test cases, or any other relevant information.
  8. Auditing and Compliance:
    • Conduct periodic audits to ensure compliance with established standards and processes.
    • Address any non-compliance issues promptly and make necessary improvements to the documentation processes.

Difference Between Test Plan And Test Strategy

Difference between test plan and test strategy

Test Plan Example

TestPlan Document Example

Conclusion

While the steps outlined above serve as a comprehensive guide for creating a test plan, it’s crucial to recognize that the approach may vary based on the unique requirements and scope of each project.

Your company should establish its own set of guidelines and procedures tailored to the specific needs of the organization. Now, take a moment to breathe a sigh of relief and dive confidently into your testing work.

With a well-crafted test plan and a clear roadmap, you’re equipped to navigate the challenges and contribute to the success of your project. Best of luck!

Adhoc Testing: A Brief Note With Examples

Ad-hoc testing, categorized under ‘Unstructured Testing,’ is a unique approach aimed at breaking the system through unconventional methods. Notably, it lacks a predefined test design technique for creating test cases.

This testing process focuses on uncovering software bugs, and its distinctive feature is the absence of formal documentation due to the spontaneous and unscripted nature of the tests. Let’s delve into the details of this intriguing testing technique.
adhoc principle

What’s Structured and Unstructured Testing?

Structured Testing

In this approach, for every activity that occurs during the testing procedure, from the creation of test cases to their sequential execution, everything is scripted. The testers follow this script to conduct tests according to it.

Unstructured Testing

In this approach, testing is commonly done through error guessing, where the testers create the test cases during the testing process itself.

What is Adhoc Testing?

Adhoc test diagram
Ad-Hoc testing, falling under unstructured testing, doesn’t involve a predefined plan, requirement documentation, or test case design. Conducted by testers well-versed in the software, it relies on error guessing, randomly created test cases, and exploration without adhering to specific requirements.

Often termed Monkey Testing or Random Testing, it efficiently identifies potential software error areas, leveraging testers’ knowledge. Notably, this approach of skipping formalities, such as document creation, is time-saving, making it a valuable testing method.

It is also generally conducted after the structured testing has already been performed. This is done so as to find uncommon flaws in the software that could not be detected by following the prior written test cases.

Types of Adhoc Testing

1) Buddy Testing

  • In this type of Ad-Hoc testing, tests are conducted with the team effort of at least two people. This team is usually made up of at least one software tester and one software developer.
  • This type of testing takes place after the conduction of unit testing of a module is completed.
  • The team of the two ‘buddies’ works together on that module to create valid test cases.
  • This is done so that the tester does not end up reporting errors generated through invalid test cases. This type of testing can also be considered as the combination of both unit and system testing.

2) Monkey Testing

  • The randomness of the approach used in this testing is why it is termed ‘monkey testing’.
  • Here, the software under test is provided by random inputs, for which their corresponding outputs are observed.
  • On the basis of the obtained outputs, any occurrence of errors, inconsistencies, or system crashes is determined.

3) Pair Testing

  • This testing is much like buddy testing. However, here, a pair of testers work together on the modules for testing.
  • They work together to share ideas, opinions, and knowledge over the same machine to identify errors and defects.
  • Testers are paired according to their knowledge levels and expertise to get a different insight into any problem.

Characteristics of Adhoc Testing

  • This testing is done after formal testing techniques have already been conducted on the software. The reason for this is that ad-hoc tests are done to find out the anomalies in the application, which cannot be predicted prior to testing.
  • This testing can only be conducted by those testers who have a good and thorough knowledge of the working of the application. This is because effective ‘error guessing’ can only be done when the tester knows what the application does and how it works.
  • The Ad-hoc testing technique is most suited for finding bugs and inconsistencies that give rise to critical loopholes in an application. Such errors are usually very difficult to uncover.
  • This testing takes comparatively less time than other testing techniques. This is because it is done without prior planning, designing, and structuring.
  • Ad hoc testing is conducted only once, as any errors that are found require to be retested.

Examples of Adhoc Tests

  • Testing for the proper working of an application when the browser settings are different. For example, identifying errors that occur when the option for JavaScript is disabled in different browsers, etc.
  • Testing the application across platforms. It is essential to check whether the developed application can run fluently in different operating systems or browsers.
  • Providing inputs to the system that are outside the valid-inputs range to check whether the resulting action taken by the application is appropriate or not.
  • Copying the application’s URL and manipulating it to run on a different browser. This is done to ascertain that any unauthorized users is not able to get unauthenticated access to the system.
  • Going through a series of random steps or navigating randomly through the application so as to check the results obtained by going through a certain combination of unusual inputs.

When to Conduct Adhoc Testing

  • Usually, ad-hoc testing is conducted when there isn’t enough time to perform exhaustive and thorough testing, which includes preparing test requirements documents, test cases, and test case designs.
  • The perfect time to conduct this type of testing is after the completion of formal testing techniques.
  • However, ad-hoc tests can also be conducted in the middle of the development of the software.
  • It can be performed after the complete development of the software or even after a few modules have been developed.
  • It can also be conducted during the process of formal testing methods as well.
  • There are a few situations where this testing, however, must not be conducted. Therefore, every tester must know when to avoid this testing.

Given below are a few conditions when ad-hoc testing must not be conducted:

  • Ad-Hoc testing must not be conducted when Beta testing is being carried out. This is because Beta testing involves the clients, who test the developed software to provide suggestions for new features that need to be added or to change the requirements for it.
  • This testing is also advised not to be conducted in test cases that already have existing errors in them. The errors must first be properly documented before they are removed from the system. After they are fixed, the test cases must be retested to ensure their proper functioning.

What are the Advantages of Adhoc Testing?

  • Ad-hoc testing has the benefit of allowing for the discovery of many errors that would otherwise go unnoticed when using only formal testing techniques.
  • The testers get to explore the application freely, according to their intuition and understanding of the application. They can then execute the tests as they go, helping them find errors during this process.
  • Testers, as well as the developers of the application, can easily test the application, as no test cases need to be planned and designed. This helps the developers generate more effective and error-free codes easily.
  • This testing can also help in the creation of unique test cases that can ineffectively detect errors. Therefore, such test cases can be added to formal testing with other planned test cases.
  • Ad-Hoc testing can be conducted at any point in time during the software development lifecycle because it does not follow any formal process.
  • It can be combined with other testing techniques and executed to produce more informative and effective results.

What are the Disadvantages of Adhoc Testing?

  • Since the testing process is not documented and no particular test case is followed, it becomes very difficult for the tester to regenerate an error. This is because the tester needs to remember the exact steps that he followed to get that error, which is not possible every time.
  • Sometimes, due to the execution of invalid test cases randomly developed by the tester, invalid errors are reported, which becomes an issue in the subsequent error-fixing processes.
  • If the testers do not have prior knowledge about the working of the application under test, then performing ad-hoc tests will not be able to uncover many errors. This is because the testers need to work through error guessing and intuitively create and execute test cases on the spot.
  • Ad-Hoc testing does not provide assurance that errors will be found. Proactive error guessing for testing totally depends on the skill and knowledge of the tester.
  • Since there are no previously created and documented test cases, the amount of time and effort that go into this testing remains uncertain. Sometimes, finding even one error could take a huge amount of time.

Best Practices to Conduct Adhoc Testing

For effectively conducting the Ad-Hoc testing technique, it is important to know the most effective and efficient ways to do so.
This is because if tests are not conducted in a proper manner, then the effort and time put into the tests will be wasted.
Therefore, to conduct this type of testing, one must know the best practices that can help in a more comprehensive approach to testing:

1) Good Software Knowledge

Make sure that the tester assigned for the testing of the application through the ad-hoc approach has a good hold on the application. The tester must be familiar with all the features of the application so as to facilitate better ‘error guessing’ on the application. With sufficient knowledge to support the tester’s testing process, finding more errors, bugs, and inconsistencies becomes easier.

2) Find Out Error-Prone Areas

If testers are not familiar with the application, then the best practice for them to start their testing process is to check for the part of the application where the majority of the errors lie.
Picking such sensitive areas to perform ad-hoc tests can help them find errors more easily.

3) Prioritize Test Areas

It is always better to start testing in the areas of the application that are most used by end-users or customers. This helps in securing the important features and reporting any bug beforehand.

4) Roughly Plan The Test Plan

Although ad hoc testing requires no prior planning or documentation, it proves to be very useful and efficient if a rough plan is created beforehand.
Just noting down the main pointers and areas that require testing can help the testers cover the maximum part of the application in a short amount of time.

5) Tools

It is essential to make use of the right kind of tools, like debuggers, task monitors, and profilers, to ease the testing process.

6) Error Guessing

Encourage testers to use their experience and intuition to guess potential error areas and vulnerabilities in the software

7) Random Testing

Implement random testing techniques to ensure a diverse range of scenarios are covered, mimicking real-world usage.

8) Effective Communication

Facilitate communication among the testing team to share insights, findings, and potential areas of concern.

9) Balanced Coverage:

Strive for a balance between exploring new, untested areas and revisiting previously tested functionalities to ensure comprehensive coverage.

10) Feedback Loop

Establish a feedback loop with the development team, promptly communicating discovered issues for quick resolution.

11) Regression Testing

Consider performing regression testing alongside Ad-Hoc testing to ensure that new changes don’t adversely impact existing functionalities.


This is because there are times when specific bugs and exceptions cannot be seen and are not caught while testing.
However, using the right tools can help isolate the error in just a short time.

Criteria Adhoc Testing Exploratory Testing
Tester’s Knowledge Testers must have a clear idea about the workflow of the application Testers learn about the application on the go
Testing Process More about perfecting the testing process It’s a learning method to know about the application
Testing Approach A form of positive testing A form of negative system
Test Planning There is no plan A charter-based plan will be put to use
Time Management There is no proposed time limit Time-boxed/character vector
Executor Can be executed by the software test engineer Has to be done by the expert
Focus Area Focus is on the application process Data entry areas will be the prime focus
Complexities Complexities of tests will not bother much in this process Challenges involved

Conclusion/final thoughts

In conclusion, ad hoc testing emerges as a crucible where the tester’s creativity and expertise are rigorously tested. Throughout our exploration, we delved into the nuanced aspects of this testing paradigm, unraveling its types, distinct characteristics, illustrative examples, as well as the associated advantages, disadvantages, and best practices.

Adhoc testing, often synonymous with spontaneity, demands a profound understanding of the software under test.

While its unstructured nature may seem chaotic, it serves as a litmus test for a tester’s acumen, relying on intuition and experience to uncover unforeseen vulnerabilities.

As the software testing landscape evolves, embracing the dynamism of Adhoc testing becomes imperative, recognizing its role in fortifying the robustness of applications and ensuring a resilient user experience.