What is Compatibility Testing? Example Test Cases Included!

Imagine pouring hours into perfecting your software application only to discover it crashes on certain devices or displays bizarre errors in specific browsers.

Compatibility issues are a developer’s hidden nightmare, capable of ruining user experiences and damaging your product’s reputation.

That’s where compatibility testing comes in. It’s your shield against these frustrations, ensuring your software functions seamlessly across the ever-changing landscape of operating systems, hardware, and browsers.

Let’s dive deeper into why compatibility testing is crucial and how it can empower you to deliver an exceptional experience to every user.

What Is Compatibility Testing?

Compatibility testing is a non-functional testing method primarily done to ensure customer satisfaction. This testing process will ensure that the software is compatible across operating systems, hardware platforms, web browsers, etc.

The testing also serves as validation for compatibility requirements that have been set at the planning stage of the software. The process helps in developing software that has the ability to work seamlessly across platforms and hardware without any trouble

Compatibility testing is conducted in mobile applications for the following reasons:

  • This testing is performed to make sure that the final app product performs as expected on various mobiles and devices of different make and models
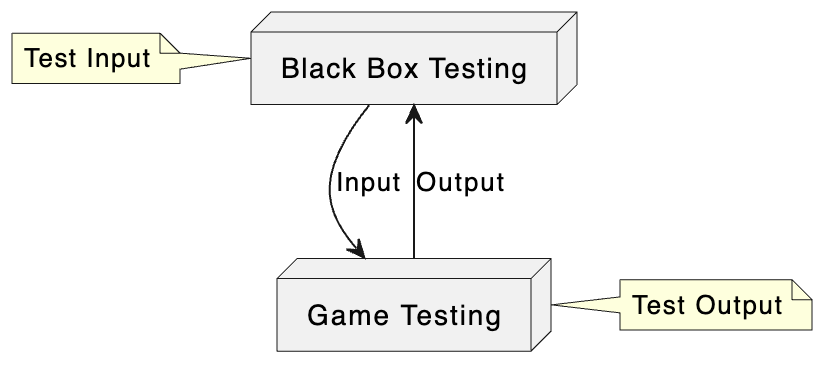
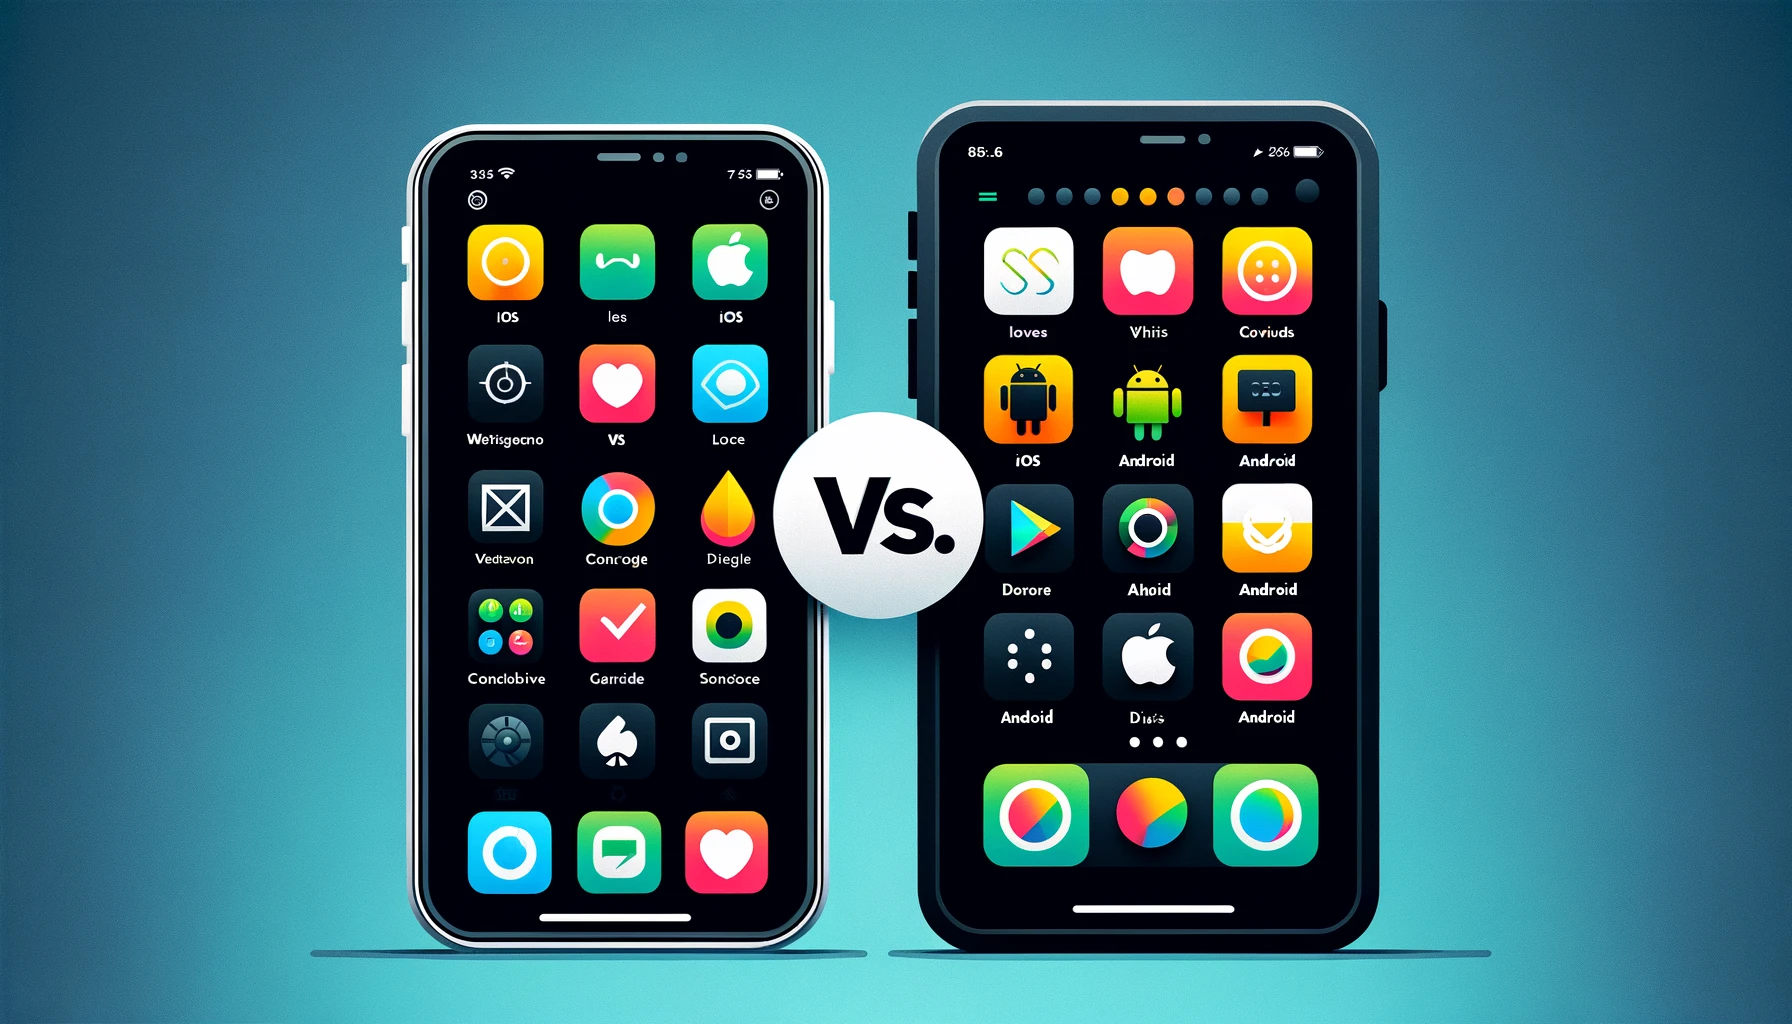
  • This is a type of non-functional testing whose main aim is to check the compatibility of applications with browsers, mobiles, networks, databases, operating systems, hardware platforms, etc.
  • Through this method, the behavior of a mobile app in different environments can be analyzed
  • With this testing, a tester can detect any error before the final launch of the mobile application in the market
  • This testing confirms that all the necessary requirements set by the developer and end-user have been met by the app
  • Helps to create top-notch bugs free applications, which helps in accelerating the reputation of the firm and moving the business towards success
  • Dynamic testing ensures the stability and workability of the mobile app before it finally gets released in the market

When to Perform Compatibility Testing:

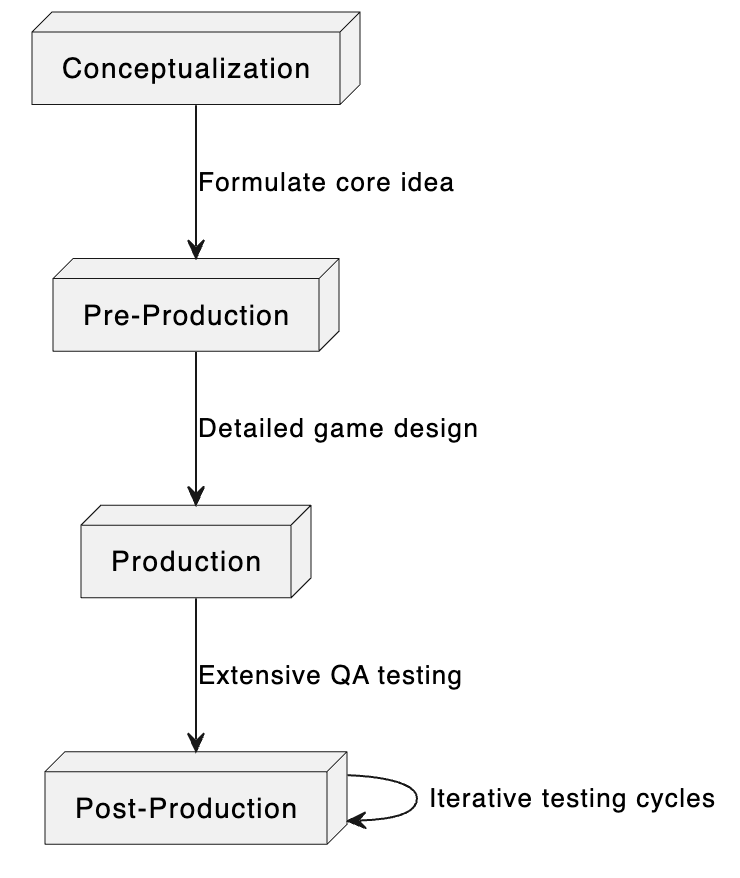
Compatibility testing is an important phase in the software testing process after a company has created what it feels can be termed a ‘stable’ version of its software that reflects the intended behavior of end users.

This stage runs after other testing efforts like alpha and acceptance testing that emphasize the integrity of overall stability and feature-based bugs.

Compatibility testing focuses on issues of compatibility between the software and other environments.

Early compatibility testing can make checks inoperative.

This is why initial compliance tests become irrelevant as minor changes are made to the system in later stages of development that can significantly alter the compatibility test result.

When Software Compatibility Testing is Unnecessary:

In the intricate dance of software development, compatibility testing often takes center stage, ensuring your application performs harmoniously across various platforms and environments.

However, there are moments—specific scenarios—where the spotlight dims on this critical testing phase. Let’s explore these situations with clarity and consideration.

Highly Constrained Environments

  • Controlled Configuration: Developing for a single, well-defined setup (OS, hardware, browser) means predictability reigns supreme. With no wild cards in the deck, compatibility testing might seem like an unnecessary encore.

Insignificant Internal Applications

  • Small, Controlled User Base: For internal tools used within a standardized technological landscape, extensive compatibility testing could be overkill. Yet, a cursory glance to ensure smooth operation on key configurations can prevent unforeseen hiccups.

Proofs of Concept (POCs) and Prototypes

  • Core Functionality Focus: In the embryonic stages of development, the aim is to showcase the idea’s viability, not its adaptability across diverse platforms. Full-scale compatibility testing can wait until the foundation solidifies.

Extreme Time Constraints

  • Prioritization is Key: When deadlines loom like towering wave, some compatibility tests may be jettisoned to stay afloat. However, prioritizing tests for the most critical platforms ensures the ship doesn’t sink before reaching port.

Important Considerations and Caveats

“Unnecessary” Doesn’t Mean “Ignored”

  • Basic Compatibility Checks: Even in scenarios where extensive testing seems redundant, a few strategic tests can illuminate major issues before they darken your doorstep.

Market and User Expectations

  • Audience Needs: The scale of compatibility testing should align with your software’s intended reach. Niche applications may navigate narrower channels, while consumer-facing software sails the open seas of platform diversity.

Long-term Costs

  • Future-proofing: Skipping compatibility testing might streamline your immediate journey, but beware of icebergs ahead—support costs, technical debt, and user dissatisfaction can rapidly accumulate.

Always Proceed with Caution

Opting to dial back on compatibility testing isn’t a decision to be made lightly. Consider the landscape ahead, chart your course with these factors in mind:

  • Scope of the Project: The application’s size and complexity can guide the extent of necessary testing.
  • Target Market: Understanding the diversity of your user base helps tailor your testing strategy.
  • Risk Tolerance: Assess the potential fallout of compatibility issues to gauge how much risk you’re willing to shoulder.
  • Costs vs. Benefits: Balancing the immediate resources saved against the long-term implications of forgoing thorough testing ensures you don’t save now only to pay dearly later.

In the realm of software development, every decision shapes the journey. When compatibility testing takes a backseat, proceed with eyes wide open, balancing innovation with the unwavering commitment to deliver a seamless user experience.

Types of Compatibility Testing

compatibility testing
#1) Forward testing:  makes sure that the application is compatible with updates or newer mobile operating system versions.
#2) Backward testing:  checks whether the mobile app has been developed for the latest versions of an environment also work perfectly with the older version. The behavior of the new hardware/software has been matched against the behavior of the old hardware/software.

Read Also: 6 Types Of Software Testing Models

Compatibility type of testing can be performed on operating systems, databases, systems software, browsers, and mobile applications. The mobile app testing is performed across various platforms, devices, and networks.

Who is Involved in Compatibility Testing?

In the realm of software testing, various team members play key roles in conducting compatibility testing:

1. Developers:
In the design stage, developers evaluate the performance of applications on a particular platform. This platform could be the only release platform for this program. Developers concentrate on making sure that the application works well in this target platform.

2. Testers:
Quality assurance teams, whether internal or external, are involved in system-wide compatibility testing. Testers test the application compatibility across various devices, major operating systems, and browsers. They want to find and solve the possible problems that can happen in many environments.

3. Customers:
Insights from customers using hardware or configurations that have not gone through a rigorous testing process by the team are valuable. The experiences are then the first real benchmarks of specific layouts which may uncover incompatibilities otherwise missed through testing.

What is Tested in Compatibility Tests?

Compatibility testers typically assess various aspects of the software to ensure its seamless performance across diverse environments:

1. Performance:

Stability testing involves determining the stability of a program by assessing its overall responsiveness. This helps locate any incidents of system crashes on certain gadgets or platforms.

2. Functionality:

Compatibility testing verifies the standard characteristics and functionality of an application to determine its suitability for delivering quality outputs. For instance, a CRM may fail to offer back-end sales data or analytics for users running legacy operating systems.

3. Graphics:

This is where compatibility testing comes in, because it deals with some of the potential issues that may arise when displaying graphical elements on multiple browsers or devices. These checks ensure a functional program even on different screen resolutions.

4. Connectivity:

Compatibility tests look at how well the program interacts with the user’s device and its database, including detecting items such as printers. For example, such tests may show whether the app fails to communicate with its database over 4G networks.

5. Versatility:

Compatibility testing guarantees the adaptability of an application to both old and new versions of a given OS. Backward and forward compatibility tests allow ensuring the users to avoid lock out from a program because of an old version.

Process of Compatibility Testing

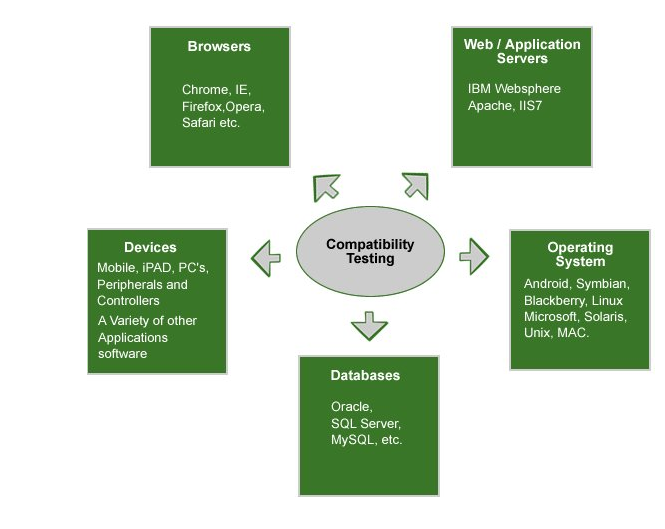
The compatibility test is conducted under different hardware and software application conditions, where the computing environment is important, as the software product created must work in a real-time environment without any errors or bugs.
Some of the main computing environments are the operating systems, hardware peripherals, browsers, database content, computing capacity, and other related system software if any.

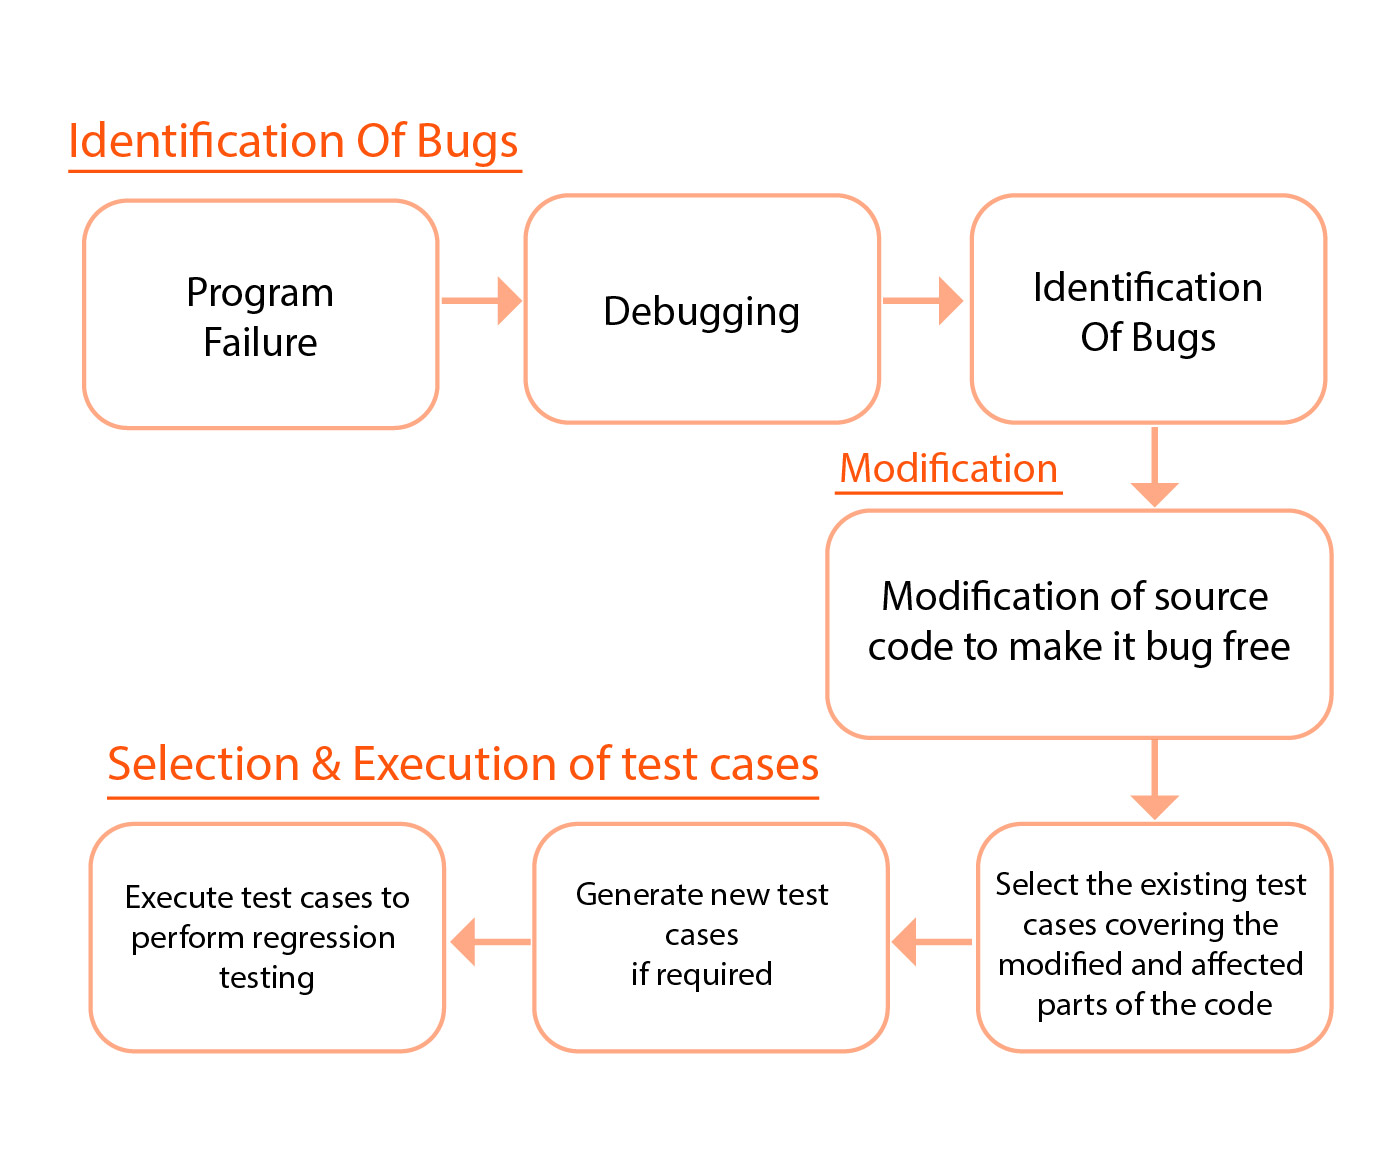
The Initial Phases of Conducting Compatibility Testing are as follows:

  • Define the platforms on which mobile app is likely to be used
  • Create the device compatibility library
  • Make a drawing of various environments, their hardware’s, and software to figure out the behavior of the application in different configurations
  • Initiate a testing environment and start testing compatibility across multiple platforms, networks, and mobile devices. After noticing the behavior report any error or bugs detected and get them fixed.
  • Again perform the testing by following the same process, till no bugs can be found.

compatibility testing
Categories of Compatibility Testing

  • Hardware –To ensure compatibility across various hardware devices
  • Operating system – To make sure that the software works equally across various OS’s
  • Network – Software is tested with various fluctuating parameters of a network
  • Devices – How the software is performing across various devices
  • Versions – To check the compatibility across various versions of OS across devices backward and forward compatibility testing has to be performed

Advantages of Compatibility Testing

  • Customer complaints can be avoided in the future
  • Feedback in the testing stage will enhance the development process
  • Apart from compatibility, scalability, and usability,  stability  will be revealed
  • Makes sure that every prerequisite is set and agreed by the engineer and the client
  • Ensures success in business
  • Reputation and goodwill of the company will increase

Challenges of Compatibility Testing:

When companies engage in compatibility testing during software testing, they encounter several challenges including:

1. Limited Time:
Although the automation tools are quite efficient, compatibility tests should coincide with agreed development timeline by a company. It is rather hard for a team of testers to decide which devices and browsers should be used to ensure higher test coverage.

2. Lack of Real Devices:
Compatibility testing usually involves using virtual machines that mimic real devices, which is much cheaper and faster than buying actual components and platforms. But, this method may violate result integrity due to the fact that performance can vary in accordance with user interaction using actual devices.

3. Difficult to Future-Proof:
Since compatibility testing is confined to the current platforms, there is no guarantee that the application will work as intended under future Windows or Google Chrome operating systems. Solving problems after release is more expensive, and the application can potentially be rendered obsolete due to issues with compatibility.

4. Infrastructure Maintenance:
Many automated tests involve in-house testing across a number of platforms, especially mobile apps resulting in high infrastructure cost. Therefore, authenticating compatibility for mobile applications could require a set of real mobile devices that would provide consistency but at quite an expensive price, also requiring continuous replacement.

5. High Number of Combinations:
Compatibility tests comprise several elements, including operating systems, type of browsers and hardware versions in addition to firmware screen resolution. With enough time, even accommodating all the universal combinations is rather impossible. Compatibility and configuration tests should focus on the most common device combinations to achieve maximum coverage.

How To Do Compatible Testing?

Have a clear idea about the platform the app will be working on
The person and team involved in the process must have good platform knowledge
Set up the environment and before the actual test do a trial run.
Report the issues properly and make sure that it has been rectified. If you are finding new bugs make sure that after the rectification old fix is working fine.

Examples of Compatibility Test Cases and Scenarios:

Compatibility test cases provide the foundation for testing team’s strategy, which specifies inputs; testing strategies and expected outputs; these expected outputs are matched to actual results.

Because of the variety of devices and configurations that are included, this procedure is usually wide-ranging.

Common Compatibility Test Cases:

1. HTML Display:
Provide correct display of HTML web applications across different devices and media types.

2. JavaScript Usability:
Check the functionality and user-friendliness of the program’s JavaScript code.

3. Resolution Testing:
Compare the performance of your application at different screen resolutions.

4. File Directory Access:
Check the program’s ability to open and manage file directory.

5. Network Connectivity:
Verify that the application readily connects to all viable networks.

Specific Examples in Software Testing:

1. Social Networking App:
Validate the full functioning of a mobile app on iOS and Android devices on various device models.
Look into problems like animated GIF rendering on selected iPhone versions to guarantee uniform user experience.

2. Video Game:
Ensure the adaptability of graphical options in video games, such as screen resolution and UI scaling.
Work out problems, such as aliasing mistakes that will give nasty blurry graphics due to irregular graphic cards.

3. CRM Cloud System:
Evaluate the applicability of customer relationship management solutions with databases, especially those that use cloud storage.

Provide seamless functionality across various networks such as 3G and 4G for non-internet users.
Perform extensive testing on various operating systems, and sort out the bugs that appear only in certain platforms like Linux devices.

Tools For Compatibility Testing
compatibility testing tools
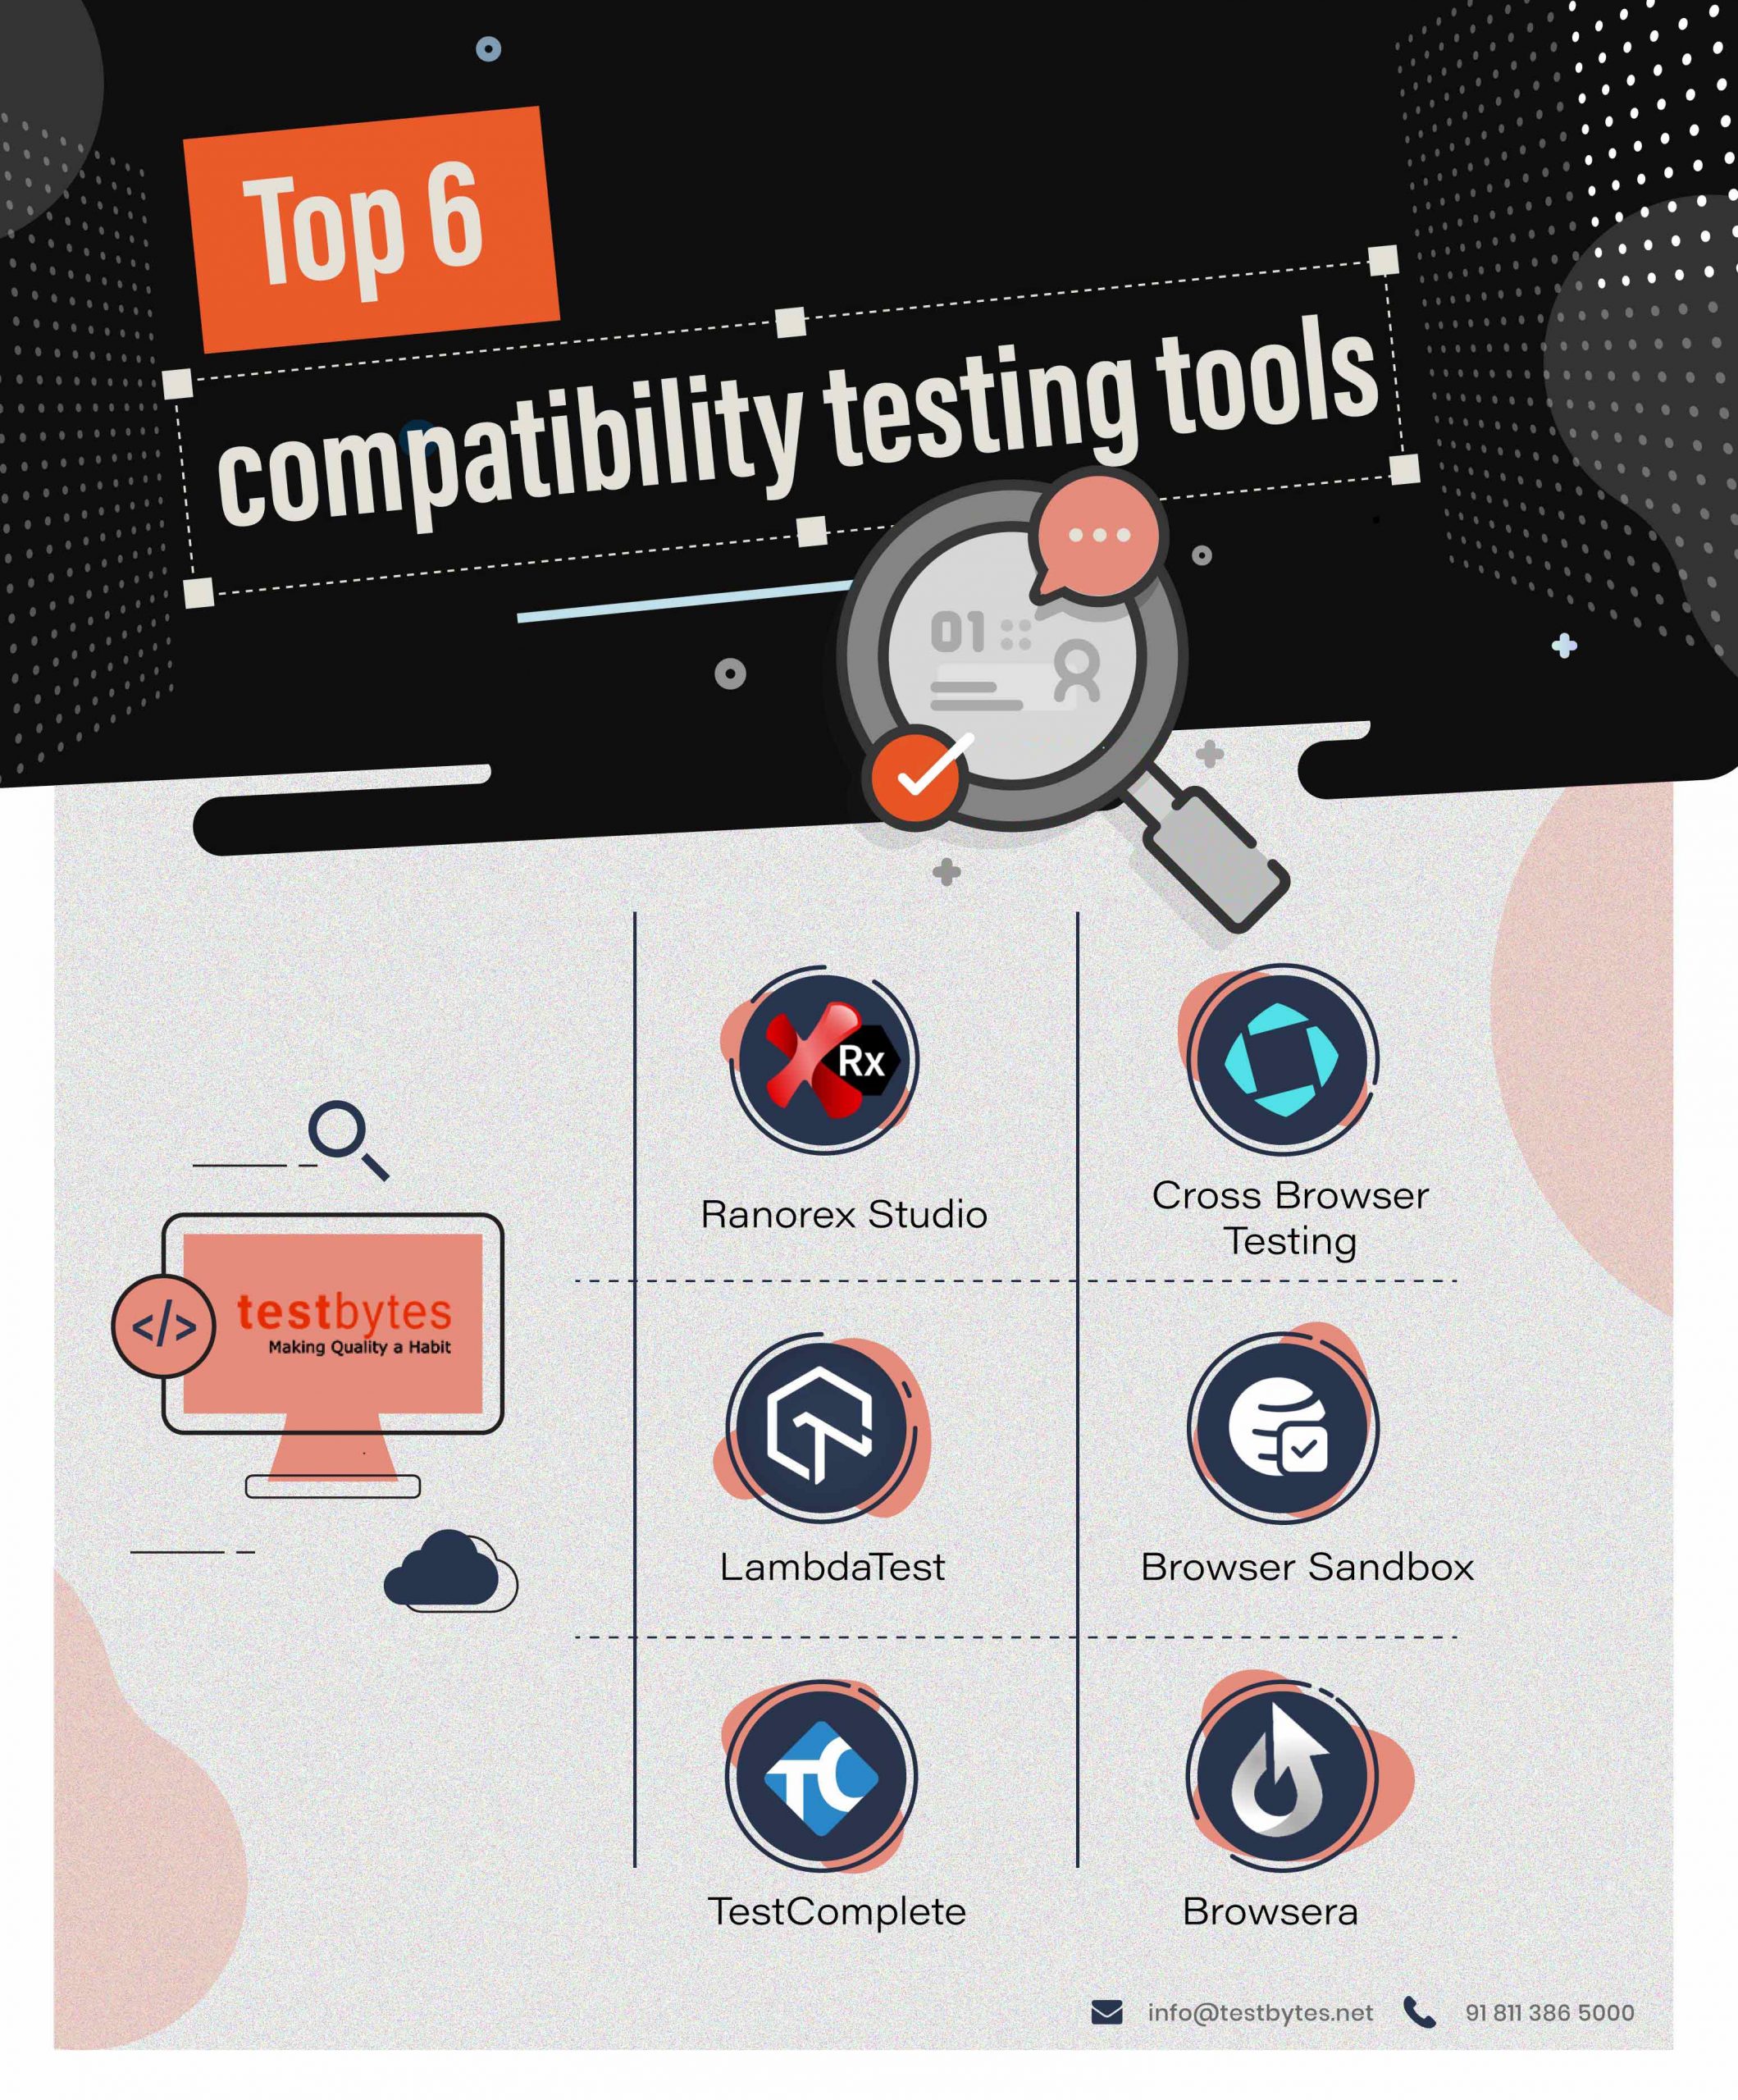
Tools make the process much easier. Major tools used in the industry include,


Conclusion

The main intention behind performing testing is to make sure that the software is working fine in any kind of platform/software/configuration/browsers/hardware etc.

Testing compatibility will reduce the gross error of the software. Thus, this comparatively inexpensive process is a boon to ensuring that your product is a success.

There are some most common defects which can be found in the mobile application by the compatibility tester; Differences in the UI with respect to appearance and feel, issues with font size and alignment, concern with respect to Scroll Bar and marked changes in CSS style and color, issues like broken tables or frames, etc.

Testbytes overcomes challenges associated with this testing, like system integration, app distribution management, performance and security, platform, OS, and device integration, and the physical characteristics of mobile devices, etc., and offers comprehensive mobile app testing services.

How to Install Appium Server and Node on Windows through Command Line

Are you ready to dive deeply into the exciting world of mobile application testing with Appium but feeling a tad overwhelmed about where to begin? You’ve hit the jackpot by landing here!
Consider this guide your go-to pal, guiding you through the ins and outs of setting up Appium Server and Node.js on your Windows machine, and guess what? We’re doing it all using the charm of the Command Line.
That’s right—we’re skipping the maze of GUI setups in favor of some good old-fashioned command-line wizardry.

We’re here to simplify the whole process into easy-to-follow steps that even those new to the game can tackle without breaking a sweat.

Whether you’re preparing to put your innovative app through its paces or aiming to make your testing workflow as smooth as silk, getting Appium and Node.js up and running on your system is your starting line.

So, why not pour yourself a cup of your preferred drink, and let’s tackle this setup together, one command at a time? Stick with us, and before you know it, you’ll be all set to dive into your testing quests with gusto!

banner

Let’s understand How the Architecture of Appium Works

Appium is basically an HTTP server. This server is written in Node.js and it helps to create multiple web Driver session against different platforms. This Appium server receives request from java client which listens for commands from Appium Server.
Let’s have a look at Appium in detail with this video representation.

The way of working of Appium server is almost the same as in selenium RC. The way iOS and android interact with server is quite different. In case of Ios, an Appium proxy commands to a UIAutomation Script. This script would be running in MAC environment.
This application in Ios is called Instruments. In case of android almost everything is same where the server proxy commands to a UIAutomator test case. UIAutomator is a native UI Automation framework which supports junit test cases.
Now let us look at the command line way in which you can install Appium Server on your windows machine.

Installing Appium Server and Node on Windows

Mentioned below is a step-by-step guide on how to install Appium Server and Node on a Windows machine using the command line:

Step #1: Install Node.js

  • Open a command prompt by pressing Win + R, typing cmd, and pressing Enter.
  • Check if Node.js is already installed by running the following commands:
  • Node -v npm -v 
  • If Node.js is not installed, download the latest version from the official website and follow the installation instructions.

Step #2: Install Appium Server

  • Open the command prompt and install Appium globally using npm:
  • npm install -g appium 
  • Verify the installation by checking the Appium version:

appium -v 

Step #3: Install Appium Dependencies for Android

If you plan to automate Android applications, you must install Appium dependencies for Android. Follow these steps:

  1. Install the Android SDK:
  • Download Android Studio from the official website.
  • Run the installer and follow the on-screen instructions.
  • Open Android Studio, go to “Configure” > “SDK Manager,” and install the necessary SDK components.
  1. Set the ANDROID_HOME environment variable:
  • Open the System Properties window by right-clicking on “This PC” or “Computer” and selecting “Properties.”
  • Click on “Advanced System settings” > “Environment Variables.”
  • Add a new system variable named ANDROID_HOME and the path to the Android SDK as the variable value.

Add Android tools to the system PATH:

  • Edit the Path variable in the System Variables section and add the following paths:

perlCopy code

%ANDROID_HOME%\platform-tools %ANDROID_HOME%\tools %ANDROID_HOME%\tools\bin 

Step #4: Install Appium Dependencies for iOS (Mac only)

If you plan to automate iOS applications, you must install Appium dependencies for iOS. Follow these steps:

  • Install Xcode from the Mac App Store.
  • Install Appium dependencies using npm:

npm install -g appium-doctor 

  • Run appium-doctor to check for any missing dependencies:

Follow the instructions provided by Appium-doctor to install any missing dependencies.

Step #5: Start Appium Server

  • Open a command prompt and start the Appium server:
  • Appium will start, and you’ll see logs indicating that the server is listening on a specific address and port.

Note: If you encounter any issues related to ports being in use, you can specify a different port using the –port option:

bashCopy code

appium –port 4725 

Step 6: Test Appium Installation

After installing Appium successfully, it is time to test the installation by running a simple test script. Create a new file with a .js extension (e.g., test.js) and add the following code:

const wdio = require(‘webdriverio’); const opts = { port: 4723, capabilities: { platformName: ‘Android’, platformVersion: ‘YOUR_ANDROID_VERSION’, deviceName: ‘YOUR_DEVICE_NAME’, app: ‘PATH_TO_YOUR_APK’, automationName: ‘UiAutomator2’, }, }; const driver = wdio.remote(opts); (async () => { await driver.init(); const field = await driver.$(‘ID_OR_XPATH_OF_AN_ELEMENT’); await field.setValue(‘Hello, Appium!’); await driver.deleteSession(); })(); 

Replace the placeholder values (YOUR_ANDROID_VERSION, YOUR_DEVICE_NAME, PATH_TO_YOUR_APK, and ID_OR_XPATH_OF_AN_ELEMENT) with appropriate values for your Android device and application.

Run the test script using the following command:

node your_test_script.js

If everything is set up correctly, Appium will launch your application on the specified device, interact with the specified element, and close the session.

Why Appium?

If you are wondering why Appium is a preferred choice for mobile testing, here are some of the common reasons:

  • Cross-Platform Compatibility: Appium supports Android and iOS, allowing you to write tests for both platforms using a single codebase.
  • Programming Language Agnostic: You can write Appium tests in multiple programming languages, including Java, Python, C#, and more.
  • Open Source: Because Appium is open source, a worldwide community of developers is constantly improving it. This ensures that it stays up-to-date with the latest mobile technologies.
  • No App Modification: Appium tests your app in the same way that users use it, without modifying the app. This provides a more realistic testing environment.

Prerequisites of Installing Appium

Before installing Appium, make sure you have the following prerequisites:

  • Java Development Kit (JDK): Appium is built on Java, so you must install the JDK on your machine. You can download the latest JDK version from the official Oracle website.
  • Android Studio: If you plan to automate Android applications, install Android Studio to set up the necessary Android dependencies. Download Android Studio from the official website.
  • Xcode: For automating iOS applications, you’ll need Xcode. Install it from the Mac App Store if you’re using a Mac.
  • Node.js: Appium is built on Node.js, so you need to have Node.js installed. Download the latest version from the official Node.js website.

Conclusion

Hence, now you got to know that installation of Appium is damn easy with the command line rather than doing it manually. NPM is a wonderful package installer and makes your task easier. Install it and start the automation. All the best!!

FAQs

Why is Appium important in iOS and Android App testing? Is it because of its architecture?

Appium plays a pivotal role in iOS and Android app testing, primarily due to its unique architecture, which allows for seamless cross-platform testing.

This tool operates on a client-server model, enabling testers to write tests in their preferred language using standard APIs. Its significance lies in the ability to test native, hybrid, and mobile web apps without needing to alter the app code.

By supporting Android and iOS platforms, Appium facilitates a more efficient testing process, reducing the time and resources spent on writing and maintaining separate tests for each platform.

This approach not only enhances productivity but also ensures consistency in testing across different environments.

How Appium Architecture Works?

Test Script Initialization:

  • The developer writes a test script using their preferred programming language and the corresponding Appium client library.

Appium Server Startup:

  • The developer starts the Appium Server, specifying the desired capabilities such as the platform (Android or iOS), device details, application path, and other relevant configurations.

Connection Establishment:

  • The Appium client library in the test script initiates a connection to the Appium Server by providing the server’s address (IP and port) and the desired capabilities for the test session.

WebDriver Commands:

  • The test script, through the Appium client, sends WebDriver commands to the Appium Server. These commands include actions like tapping on an element, entering text, or navigating between screens.

Translation and Execution:

  • The Appium Server translates the WebDriver commands into corresponding actions supported by the mobile platform. For example, a WebDriver “click” command might translate to a tap on the screen.

Interaction with Mobile Device:

  • The translated commands are then executed on the mobile device, interacting with the application just as a user would. This interaction includes gestures, input, and navigation.

Response Handling:

  • The Appium Server captures the responses from the mobile device and communicates them back to the Appium client. These responses may include success or failure indicators, as well as any relevant data.

Test Script Completion:

  • The test script processes the responses received from the Appium Server, making decisions based on the success or failure of each command. The script may also include assertions to verify the expected behavior of the application.

Session Closure:

  • Once the test script completes its execution, the Appium Server closes the WebDriver session, releasing the resources associated with the test session.

How To Start the Appium server in CMD?

To start the Appium server via the Command Prompt (CMD) on Windows or Terminal on macOS/Linux, you first need to have Appium installed. If you haven’t installed Appium, you can install it using Node.js’s package manager (npm) with the following command:

npm install -g appium

Once Appium is installed, you can start the server by opening CMD or Terminal and running the following command:

appium

This command starts the Appium server with the default settings, typically listening on port 4723. If you want to specify a different port or customize other settings, you can use various flags. For example, to start the Appium server on port 5000, you can use:

appium -p 5000

For more advanced configurations and options, you can refer to the official Appium documentation or use the appium --help command to see a list of all available command-line options.

Is node js mandatory for Appium?

Yes, Node.js is mandatory for Appium. Appium is built on the Node.js platform and uses JavaScript for its execution. The installation of Appium itself is typically managed through npm (Node Package Manager), which is a part of Node.js.

Therefore, having Node.js installed on your system is a prerequisite for installing and running Appium for automated mobile application testing.

How to install Appium using npm on Windows?

To install Appium on Windows using npm, follow these steps:

  1. Open Command Prompt as an administrator.
  2. Ensure Node.js is installed by running node -v. If not installed, download and install it from nodejs.org.
  3. Install Appium by executing npm install -g appium.
  4. Verify the installation with appium -v.

This installs Appium globally on your Windows system, making it accessible from any command prompt.

How do I run an Appium server?

To run an Appium server, follow these simple steps:

  1. Open your command prompt or terminal.
  2. Type appium and press Enter.

This command starts the Appium server with default settings. You can customize its behavior using various flags (e.g., appium --port 4723 to specify a different port).

How to install node on Windows Terminal?

To install Node.js on Windows using Windows Terminal, follow these steps:

  1. Visit the official Node.js website (nodejs.org) to download the Windows installer.
  2. Choose the version you need (LTS for stability or Current for the latest features).
  3. Once downloaded, run the installer (.msi file) and follow the installation prompts. Ensure to select the option to add Node.js to the PATH if asked.
  4. After installation, open Windows Terminal.
  5. Verify the installation by running node -v and npm -v to check Node.js and npm versions, respectively.

This process installs Node.js and npm (Node Package Manager), enabling you to run Node.js applications and install packages globally.

How to install node test?

To verify that Node.js is installed on your system:

  • Open your terminal or command prompt.
  • Type node -v and press Enter. This command will show the installed Node.js version, indicating that Node.js is installed.
  • You can also check npm (Node Package Manager), which comes with Node.js, by typing npm -v and press Enter. This will display the installed npm version.

Installing a Package Named “test”

If there’s a specific npm package you’re looking to install named “test” (this is a hypothetical scenario as there might not be a package with this exact name meant for general use), you can install it using npm with the following command:

npm install test

For installing any package for development purposes and saving it to your project’s package.json file, you can use:

npm install test –save-dev

Replace “test” with the package name you intend to install. If you’re experimenting with or learning about npm packages, you can replace “test” with a real package name, like “express” for a web server framework or “jest” for testing.

Note

If you’re new to Node.js and npm, it’s worth mentioning that “test” is often used in documentation and tutorials as a placeholder for the actual package name you wish to install or the command to run tests defined in a package.json file. To run tests defined in your package’s package.json, you would use:

npm test

This command runs the test script specified in the “scripts” section of package.json.

Game Testing Tutorial: How To Perform Game Testing ?

Video games hold a substantial share of the software market, creating a constant demand for innovation and complexity in the gaming industry.

Game development involves a collaborative effort among various professionals, including game designers, writers, visual artists, sound designers, and, crucially, game testers.

Therefore, it is important to be aware of the comprehensive process of game development and the pivotal role played by game testing in the entire process. Understanding the intricate phases of game development and the strategic implementation of testing strategies is essential for delivering a flawless gaming experience to users.

Game Development Process: Step-by-Step

Phase #1

Conceptualization The game development journey starts with conceptualizing the game, involving brainstorming to formulate the core idea, theme, and unique selling points.

Existing intellectual properties in various media or original concepts might serve as inspiration for this fundamental idea. This stage is critical for aligning the game’s vision across the development team and stakeholders.

Phase #2

Pre-Production In pre-production, detailed game design documents (GDDs) are prepared, outlining gameplay mechanics, narratives, character designs, and environment concepts.

This phase sees the creation of technical prototypes to validate gameplay ideas and mechanics.

Storyboards and concept art are developed to visually represent game narratives, environments, and characters, facilitating a shared understanding and vision among the creative team.

Phase #3

Production The production phase marks the bulk of game asset creation and coding. It involves the detailed development of game levels, character models, textures, animations, and game-specific logic.

Programming teams work on developing the game engine (if custom), integrating third-party libraries, and coding game mechanics, physics, AI behavior, and user interface elements.

This phase requires rigorous coordination between artists, designers, and programmers to ensure consistency and adherence to the game’s vision and design documents.

Phase #4

Post-Production Post-production focuses on refining the game through extensive QA testing. The game, now in its alpha state, is scrutinized for bugs, performance issues, and gameplay imbalances.

Feedback from alpha testing leads to adjustments and bug fixes, progressing the game to a beta state for wider testing, including compatibility testing and compliance checks with platform-specific standards.

This phase is iterative, with multiple testing cycles, feedback, and refinement until the game meets quality and compliance benchmarks for launch readiness.

Phases in game testing

Marketing

Marketing Simultaneously with late development stages or post-production, the marketing phase ramps up to generate anticipation and demand. This includes creating promotional materials, engaging with media and influencers, and showcasing the game at industry expos.

Marketing strategies are tailored based on target demographics and platforms, focusing on highlighting the game’s features and unique aspects.

For indie developers or smaller studios, this phase might also involve direct community engagement through social media and crowdfunding platforms to build a supportive player base pre-launch.

What do you think the Game Testing Stage is intended to reveal?

The testing stage is a critical component of the game development process.

In addition, revealing potential bugs in the program—for example, in-game objects not running legitimately—. It should likewise check for irregularities in the fictional structure of the game, consistency (and culmination) of artwork, and additionally be testing the gameplay—is the game connecting with, too simple, or too hard, for instance?

Who is a Game Tester?

Game testers play a pivotal role in ensuring the quality of a game before its final release. They thoroughly test games on various platforms, including consoles and desktops, to identify bugs and defects. Without game testers, games could suffer from numerous issues, potentially damaging the reputation of the development company.

What are the requirements to Become a Game Tester

  • Attentive behavior
  • Understanding of video game console controllers
  • Awareness of SDLC
  • Good communication skills
  • Great writing skills
  • Primary computer programming aptitudes

Central Skills

  • Principles and perception
  • Analytical thinking
  • Knowledge of computer hardware parts
  • Investigating and exploring aptitudes
  • Versatility to tedious and redundant obligations

Typically, gaming companies don’t have a specific degree requirement. The skills are quite often tested at the interview. Still, education plays a significant role in game testing. The titans of the gaming industry prefer to hire employees with degrees in:

  • software development
  • computer programming
  • Computer science or some other technical field.

What does a Games Tester do?

Some of the key responsibilities of a game tester include the following:

  • Be repetitive and unpredictable to identify and break down potential issues.
  • Test different versions of games on various platforms.
  • Explore specific areas of the game and test all available options.
  • Play through different modes and characters to reveal glitches.
  • Report errors, spelling mistakes, and language issues.
  • Document bug reports in a bug-tracking system.
  • Understand the difference between reporting bugs and reporting features.
  • Test the game repeatedly in various conditions to ensure stability.
  • Analyze new game versions to check if previous bugs have been addressed.


The process involved in Game Testing

By far, we know that testing has an imperative function in Game development. A game is tested at the distinctive level of its development procedure. Usually, in the software engineering method, the Software test design document contains all the data about testing the product. However, game testing is not quite the same as testing the software.

testbytes-mobile-app-testing-banner

There are numerous steps included other than test cases for a game, generally in light of the fact that almost all game testing is black box testing. The developers generally don’t test their own games, nor do they have time to test them completely, nor is it a wise idea to test games by themselves.

Before presenting their code for integration with the rest of the game or as third-party code for use by other game developers, game developers only test small portions of it.

6 Steps of the game testing are as follows:

  1. Plan and Outline the Test – Although quite a bit of this plan was done before in the programming test plan document, still with each new prototype of the game, this document should be returned to upgrade any adjustments in the test cases, specifications, and new setup support. The game tester ought to guarantee that no new issues are presented.
  2. Set up the Test – All the teams should upgrade their code, documents, tests, and test environment and regulate it with each other. The test development group should mark the bugs settled and the test time taken to confirm them.
  3. Play out the Test – Run the test suit once more. In the event that any bug is discovered, test around the error to ensure that the bug is real.
  4. Report the Outcomes – Complete insights about the bugs are reported.
  5. Repair the Bug – The game testing team engages in this step by uncovering the bug to the development team and giving direct testing to track the bug.
  6. Return to Stage 1 and Retest – A new build is delivered after one cycle.

The game test is performed in a structured way. Regardless of the size of the game and the time required for creating the game, all game testing should follow the fundamental structure.

Parts of Games That Undergo Testing

  • the menu and the menu functions
  • art (character model, terrain or world, texture, objects, crowd, etc.)
  • animation (the likeness and quality of the realism, movement, and frame rate)
  • music
  • audio and the sound effects (in connection with the facial animation, e.g., the animation series and lip sync)
  • any movie clips
  • camera (zoom in and out, cinematic view, replay)
  • title screens
  • game logic and flow
  • world/scene/level
  • the action properties
  • the player’s properties
  • the situation to advance to the subsequent level (what are the commands?)
  • the application of environmental objects
  • the object/event triggers
  • increasing levels of difficulty
  • the scoring
  • the AI logic (for both offensive play and defensive play; player positioning and movement)
  • statistics (pre-game and in-game, like high score and player statistics)
  • SFX – Special effect
  • NIS – Non-Interactive Sequence
  • the gamepad
  • the vibration/shock effect of the gamepad
  • the usability of the button functions
  • the application of multi-button actions (also known as button mashing)
  • the use of analog and digital mode
  • legal text
  • the game options (game start or menu selection, game pause, pause menu options, hints, and scrolling, such as driving by the accessible choices on the screen, so forth.)

Types of Game testing that need to be followed in the Testing Process

The game development cycle on all platforms has phases that are known as milestones. The milestones show that the game is at a specific level of development. The milestones, usually, are first playable, alpha phase, beta phase, gold phase, and post-release phase. The initial playable version is related to that of a demo version; here, the feel of the game is perceived and evaluated.

In a simplistic view, testing is recognizing bugs found in the game so the issue can be resolved. There are diverse types of tests that can be classified as black-box testing and clear-box testing. Their testing goal and general procedures are trivialities (e.g., test planning, test design, testing execution, regression testing, and bug reporting), yet their aim stresses various parts of the game. Let’s know what those techniques are:

Black Box Testing

It centers on the playability or functional parts of the game. For instance, testing the UI (e.g., the utilization of buttons and the selection menus), the “look and feel” (e.g., the designs and animation), and the real gameplay.

For Black Box testing, the game tester must know how to play the game, the utilization of the gamepad, and the game flow and the rules.

Blackbox Testing in Game testing

Clear Box Testing

It centers on the design and integration parts of the game software. For instance, the utilization of a database, pipelines, the integration and reconciliation of game segments like the AI engine, the rendering engine, sound, etc.

For Clear Box testing, the game tester must comprehend what coding is. The software tester employs a run-time troubleshooting environment, encourages the code or pieces of code with input, i.e., setting variables, data, and so forth, and interprets the test outcome.

Clear Box Testing in game testing

Functional Testing

 Its purpose is likely to be to recognize deviations from functional necessities. It comes down to driving through the game repeatedly to distinguish issues and the environments in which they can be rectified.

Functional Testing Diagram

Stress/Load Testing

When testing the games, it is fitting to create conditions that require a huge computational load. So, the game tester can check system execution in an unpleasant condition. With load testing, it is less demanding to see and fix possibly perilous code segments in time. Test for odd circumstances, like loading a game with no memory card, running the game for 48 hours, and checking how the game reacts.

Stress/Load Testing in Game Testing

Combinatorial Testing

 This type of testing is a process of experimental design that is applied for commercial software testing and to create test cases. Using combinatorial testing for game testing improves test performance efficiency, produces high-grade quality, decreases cost, and ensures reliable phase containment.

Every conceivable sequence of values of the parameters is incorporated into this test. Here the parameters are chosen from game elements, functions, events, character attributes, play options, settings, customization choices, and so forth.

combinatorial testing flow diagram

Compatibility Testing

 Much of the time, game programming is performed on laptops or PCs. Notwithstanding, numerous games can be intended for different devices: smartphones, game consoles, communicators, and so forth. Game development is performed on the test systems of these gadgets, yet they vary greatly from the original. In this way, later on, a few challenges may arise when beginning the game on the original gadget.

Plus, one should give careful consideration to the authorization of programming. In case of any aberrations, the game can be returned for correction, which takes additional time and a loss of funds. So, it is vital to check whether the game fulfills the necessities of the devices.

Feature Testing

 This testing is performed to confirm the smooth functioning of the features in the game. For covering discrete features, detailed test cases are more appropriate. Task-based experiments require a predominant level of detail. At the point when there is an assortment of features for various player statuses, test frameworks get convenient and beneficial.

Critical Path Test

Critical path testing is a procedure to recognize the critical paths in the game. This type of testing technique uncovers the conditions that cause disappointment.

Play Testing

Playtesting is the technique of game testers playing the game to break down non-useful features like fun variables, balance, difficulty levels, and so forth. Here, a selected team of testers plays the incomplete variants of the game to check the work process.

Limitation testing:

The games are regularly converted into the languages of the nations where they are assumed to be made available on the market. It happens that translators can’t give a totally exact interpretation, which would be completely reliable with the game events. Indeed, even if interpreted appropriately, it may not indicate the circumstances and abrade on the ears of the local speakers. Thus, after localization, it is helpful to test the game by natives of those nations where the ultimate game would be available.

Smoke Testing

 It is performed to test a new CD burn. The name Smoke Testing originates from the engineering lab testing new automobile engines. Before a new engine is taken for road testing, the engineers would just begin the engine and check whether it runs. In the event that smoke turns out from the motor, they would know promptly that a few sections don’t work appropriately.

Much like making another form, the game tester will essentially run the game; if it continues crashing, the tester will know a few sections are incorrect.

Regression Testing

 This type of game testing is done to retest the unaltered parts of the product. Here, test cases are re-checked to investigate whether the operation of the past elements of the application works fine and that new changes have not presented any new mistakes or vulnerabilities.

Multiplayer Testing

 Multiplayer testing is an entirely different beast in itself. Numerous players, all the while, associate with the game world, with game servers, with PC-controlled opponents, and with each other. Such huge numbers can turn out badly.

Furthermore, it regularly requires a complete team of game testers, various troublesome risk-based decisions to make, and the need to invest boundless amounts of time and energy in testing distinctive situations.

A comprehension of multiplayer game configuration and how to test proficiently as a group is required for this sort of game testing technique.

Sound Testing

 Sound testing is common in all products that make some sort of sound or play media. But games have a one of a kind feature that other software does not need to consider on a similar level. Game music must include the user in the game and upgrade the gameplay. Not only should the sound play without missing or shuttering components, but it ought to likewise add to the gameplay. This demands broad sound aptitude and a particular comprehension of game audio. Quite a specific master of domain awareness.

Ad-hoc Testing

 Ad-hoc testing is likewise, at times, alluded to as general testing. It is a less organized test. Ad hoc testing enables the game tester to investigate paths in view of their instinct. There are two types of ad hoc testing.

In the first place, there is free testing, which is a testing game with no arrangement or documentation. The other is direct testing, which is a solitary test performed spontaneously to answer a particular issue.

Test Flow Diagrams

Test flow diagrams are practiced to produce models depicting game behavior from the player’s point of view. Game testing involves examining the model along every potential path to examine unexpected game situations. A test Flow diagram is a formal way to test design. Since it is graphical in nature, it is simple to review, investigate, and give feedback on the test designs.

Complex test flow diagrams can interpret compact features, but typically, small test flow diagrams are preferable.

Test Trees

A test tree is a usability procedure for sorting out test cases that supports selecting an appropriate set of tests for a given arrangement of code changes. Test Tree enhances the general comprehension of complex game traits and deals with conceivably complicated functions, particularly when these functions connect with other game principles, elements, and functions.

The test tree is developed by disintegrating the element into a subset until the bottom nodes distinguish elements to utilize or spec to perform while game testing.

What is Bug Hunting?

Bug Hunting is a regular practice for some game testing companies worldwide, yet some test administrators wrongly feel they go Hunting when their game testers casually play with the application, keeping in mind the end goal of discovering “border case errors.”. Bug Hunts are Informal Testing activities; this should not be mixed up with playing with the system without a reason or goal.

  • Bug Hunts should be directed as team activities.
  • Bug Hunts are there so as to include non-testers and find less-ordinary bugs.
  • Bug Hunts require the system to be steady to be helpful.

Thus, to accomplish something (and not waste your time and efforts!!) on performing these Bug Hunts, you have to follow a particular procedure, execute planning and preparation activities, as well as observe and control the procedure all through its execution.

Types of Game Bugs in Game Testing

Crash

A crash bug is a severe issue that freezes or completely shuts down the game, often leading to a “Crash to Desktop” (CTD) scenario. Executing particular commands, loading into new areas, or coming across specific enemies are just a few examples of the in-game actions that can cause these bugs. Crashes are considered high-priority bugs, and game developers prioritize eliminating them to ensure a smooth gaming experience..

mobile app

General

General bugs are issues that do not halt game progression but still disrupt the gameplay experience. For example, a character disappearing unexpectedly, though not affecting the main storyline, can be classified as a general bug.

While these bugs may not be game-breaking, they can lead to player frustration and impact the game’s overall quality.

Minor

Minor bugs are small issues that have a minimal impact on gameplay but still need attention.

Examples include a character’s mouth not moving during dialogue or other subtle graphical glitches. Although minor bugs may not be prioritized, they contribute to the overall polish and professionalism of the game.

Severe

Severe bugs hinder the player’s progress without causing a game crash. These bugs can range from a disappearing character crucial for advancing a quest to a malfunctioning door preventing access to the next game area.

While not as critical as crash bugs, severe bugs are significant and must be addressed to maintain a coherent gaming experience.

Graphics

Graphics bugs primarily involve issues with the visual elements of the game, including texture errors and map imperfections. An example of a graphics bug is an incorrect ground texture applied to a door.

Addressing graphics bugs is essential for maintaining the aesthetic appeal and immersion of the game.

Sound

Sound bugs relate to issues with in-game audio, such as incorrect timing or missing music cues. These bugs can occur anywhere in the game, from the main menu to the closing credits.

Sound bugs can disrupt the game’s overall atmosphere and must be corrected for a complete gaming experience.

Algorithm Bugs

Algorithm bugs occur at collision detection points within the game. Incorrectly placed walls or floors can cause players to leave the intended map boundaries, indicating a failure in collision detection.

Fixing algorithm bugs is crucial to prevent players from getting stuck or experiencing unintended interactions within the game environment.

Fatal

Fatal bugs are game-breaking issues that prevent players from advancing further due to critical functionality failures.

An example is a jumping bug where a player needs to jump to progress, but the jumping mechanism fails, hindering progression. Fatal bugs demand immediate attention to ensure the game works correctly at all levels.

Configuration Trigger

Configuration trigger bugs occur when game settings have not been adequately tested, leading to failures.

These bugs can affect graphics and sound settings, potentially causing textures to disappear or altering audio configurations.

Configuration trigger bugs are uncommon in well-known games made by skilled programmers, but they can appear in online games that are downloadable.

How to Write a Bug Report Effectively?

A career as a computer games tester isn’t all fun and buffoonery. When you find a bug, you have to report it. Composing a game error report may look like a basic assignment. However, it is accompanied by a lot of duties. This is a correspondence from which other individuals will construct a plan of action with respect to game improvement. Those activities frequently incorporate submitting costly assets to settle the issue.

Here are a few tips for creating a bug report as a game tester. An adequate game bug report contains:

  • Title or Subject –

  1. Compile the critical elements of the issue.
  2. A basic overview of what, where, why, when, and how it is generated, featuring the most vital contemplations.
  3. Shows how extreme it is.
  4. Others utilize it to design a course of action; thus, it should be comprehended at once.
  • Classification

  1. A concise depiction of what, where, why, when, and how is generated with each and every detail.
  2. Here you ought to portray precisely “everything” about the issues.
  3. Classify it in such a manner that the reader can follow it entirely from the classification and comprehend totally what is going on.
  4. You may utilize industry-standard language to help precisely depict the issue.
  • Generation Steps –

  1. Well-ordered guide on the best way to replicate the issue.
  2. You ought to consider the individual heeding this guide has never observed the product and may even be new to the platform. Show them correctly what to do to reproduce the issue.
  3. Abstain from industry-standard language to guarantee the guide can be trailed by anybody.
  • Extra Information –

  1. Give additional helpful data.
  2. Assessment and theory, you can discuss how this bug may influence the player and conceivable inevitabilities created by the issue (such as bad customer reviews)
  3. Conclusions about different ways this may influence the game.

(Note: This segment is unnecessary in creating a report, though.)


What are the Opportunities as a Game Tester

Game-producing organizations, to achieve more profits, are always contracting computer game testers. So, finding the right source for the organization, whoever is hiring, is absolutely necessary. There are essentially three sorts of game testers. These are:

  1. Freelance Game Tester: The game testers who are freelancing are all around experienced and search out organizations that outsource forthcoming games to test the games. These testers are regularly the backbone of the game testing method. These game testers are usually contracted on a project-to-project basis. These testers are mostly used for black-box testing. Promptness, clarity, and communication in writing are critical attributes you should have.
  2. Full-Time Corporate Video Game Tester: There are potential people for being hired by big game-producing companies for full-time. For individuals who have a passion for playing games, no other activity can be as fascinating as this. Furthermore, the main capability required for this sort of employment is experience. No degrees or certificates are mandatory.
  3. Second-Party Testers: These game testers work on the testing team of a secondary or subsidiary organization under a bigger company. The second-party game testers can be either fully employed or contracted. Because of their close association with game developers, they frequently obtain access to more advanced tools. This usually results in a powerful focus on test cases and white-box testing. Most second-party testers are at least somewhat experienced in the game testing process.

Further, if you are looking forward to embracing video game testing as your profession, you must become more acquainted with the levels of game testing that are in charge of testing distinctive parts of the game. Quality assurance, Alpha testing, and Beta testing are the three primary kinds of game testing processes you will dependably need to begin with when you select this field as a profession. Alongside, there are other testing processes too.

Levels of Game Testing

  1. Alpha Testing

    • The initial testing phase is where the game is evaluated for major bugs.
    • Involves internal testing by the development team.
  2. Beta Testing

    • A select group of outside users test the game during pre-release testing.
    • Aims to identify potential issues and gather user feedback.
  3. Quality Assurance (QA) Testing

    • Comprehensive testing phase to ensure the game meets quality standards.
    • Conducted by experienced game testers.

What is Gold Testing or Post-Release Testing?

This is the testing stage, where the game is completely tested, has been launched to the general population has a totally finished product, and players have total access to the game.

Despite the fact that the game is completely completed, there is plenty of chances where a player can discover glitches or even game-crashing bugs. Under these circumstances, the developers need to discharge patches with a specific goal to fix them.

In the Gold testing level, every single crucial bug (hangs, crashes, and function disappointments) is resolved. 90% of every single significant bug (performance and functionality) is solved.

85% of every minor bug (system execution problems that hit a few users) is settled. Furthermore, release-level performance (i.e., 60-fps frame rate) is accomplished.

During its life cycle, if the game was delivered with even a couple of terrible bugs, it’s the ideal opportunity for an update or patch.

For each patch, the dev team must return to the whole list of bugs and consolidate some new, clean features. Every individual bug patch or polish element implies more testing (yet should be prepared).

Each new fix must be tested to detect whether it works with the base game and prior patch versions.

Mobile Game Testing

While many testing techniques overlap between different platforms, mobile game testing presents its own set of challenges and considerations. Ensuring a mobile game functions seamlessly, adheres to specific requirements, and provides an exceptional user experience is no small feat, especially given the diverse array of mobile configurations. 

The Significance of Mobile Game Performance

Mobile games captivate players with striking graphics, animations, and rich media. However, if the performance of a mobile game is lacking, these captivating elements become futile. Gamers expect a smooth, uninterrupted experience with consistent progress in gameplay. The importance of performance assessment cannot be overstated, as it directly impacts the player’s satisfaction and engagement.

Testing Navigation Flow, Usability, and User Experience

Emphasizing the genuine user experience, mobile game testing necessitates using actual devices rather than relying on emulators. Intricacies such as battery consumption, the impact of battery chargers, and potential intrusions significantly influence the overall user experience and entertainment value. Testing on real devices allows for a more accurate assessment of these factors.

Graphics Execution and Early-Stage Performance Tests

The graphics execution of a mobile game is intricately linked to user experience. While striking graphics and animations enhance the visual appeal, their effectiveness diminishes if the game’s performance lags. To address potential performance blockages, it is essential to conduct performance tests during the early stages of game development. Identifying and resolving performance issues early in the development process ensures a streamlined gaming experience.

Three Basic Phases of Mobile Game Testing

  • Device Performance Testing
  1. Start-Up of Game: The initial screen should appear within 1-2 seconds of pressing the game icon. b. Memory Consumption: Adding functionalities increases memory usage, requiring careful management. c. Software/Hardware Variation: Test the game on various devices with different RAM and processor specifications. d. Battery Time: Continuous gameplay should not excessively drain the battery or cause the device to overheat. e. App in Background: Resuming the game from the background should retain its previous state. f. Usage with Other Apps: The game should run seamlessly when used simultaneously with other applications.
  • Network Performance Testing
  1. Jitters: Networks using packet switches cause address delays in data transmission. b. Network Speed: Test the game on 2G, 3G, and 4G or 5G networks, including mobile networks and Wi-Fi.
  • Testing API/Server Performance
  1. API Calls: Limit the number of calls from the game to ensure optimal performance. b. Information To and From Server: Efficiently handle data transmission between the game and server. c. Server Down Time: Implement failover database servers to ensure continuous availability in case of server issues.


Conclusion

Effective game testing is a structured and comprehensive process that involves various types of testing techniques. From functional testing to stress testing and bug hunting, each step is crucial in ensuring a flawless gaming experience for users. Understanding the components of games that undergo testing, the types of testing involved, and the techniques used are essential for game testers and developers to deliver high-quality games to the market. The iterative nature of the testing process ensures continuous improvement and refinement, ultimately contributing to the success of the gaming industry.

How To Use Apache JMeter To Perform Load Test On Mobile App

In an era where mobile app performance is critical, Apache JMeter emerges as a powerful tool for conducting thorough load tests.

This technical guide delves into using JMeter to simulate real-world user traffic and network conditions, critically analyzing how a mobile app withstands varied load scenarios.

It involves configuring JMeter for mobile environments, setting up proxy settings for accurate request capture, and crafting realistic user interaction scripts.

The process aims to uncover performance metrics, such as response times and error rates, essential for pinpointing scalability and efficiency issues.

This comprehensive approach ensures that your mobile application is not only functional but also resilient under heavy user load, a key to maintaining a competitive edge in the dynamic app market.

app testing

Understanding Load Testing and Its Significance for Mobile Apps

Load testing involves simulating real-world usage scenarios to evaluate how an application behaves under different levels of demand. For mobile apps, factors like network latency, varying device capabilities, and fluctuating user loads can significantly impact performance.

Load testing helps identify potential bottlenecks, such as server overloads or inefficient code, allowing developers to optimize their apps for a smoother user experience. It enables them to anticipate and address performance issues before they affect end-users, thereby enhancing reliability and satisfaction.

Getting Started with Apache JMeter

Apache JMeter is an open-source Java-based tool renowned for its versatility in performance testing, including load testing mobile applications. Mentioned below is the guide that can help you get started with Apache JMeter:

Download and Install Apache JMeter: Visit the official Apache JMeter website and download the latest version. Installation instructions are provided for different operating systems, ensuring a smooth setup process.

Familiarize Yourself with the Interface: Apache JMeter features a user-friendly interface with various components such as Thread Group, Samplers, Logic Controllers, and Listeners. Understanding these components is crucial for creating effective test plans.

Prepare Your Mobile App for Testing: Ensure your mobile app is ready for testing by deploying it on a test environment accessible to Apache JMeter. This may involve configuring the network.

JMeter Configurations

To perform a load test on mobile applications using Apache JMeter, you’ll need to set up JMeter and configure your mobile device to connect through a proxy. Here’s a summarized guide based on information from multiple sources:

Install Apache JMeter: Ensure Java Development Kit (JDK) is installed on your PC. Download Apache JMeter and run it.

Configure JMeter for Recording:

  • Add a Thread Group to your Test Plan in JMeter.
  • Add a Logic Controller, such as a Recording Controller, to the Thread Group.
  • Add a Listener, like the View Results Tree, to observe requests and responses.
  • Add an HTTP(S) Test Script Recorder to your Test Plan. Set the port (e.g., 8080 or 8888) that will be used for recording.

Configure Mobile Device for Proxy:

  • Connect both your PC and mobile device to the same Wi-Fi network.
  • On your mobile device, go to Wi-Fi settings and modify the network settings to use a manual proxy.
  • Set the proxy hostname to your PC’s IP address and the proxy port to the one you specified in JMeter.

Install JMeter’s Certificate on Mobile Device:

  • Find the ApacheJMeterTemporaryRootCA.crt file in JMeter’s bin folder.
  • Transfer and install this certificate on your mobile device. You may need to set a screen lock password if prompted.

Record Mobile App Traffic:

  • Start the HTTP(S) Test Script Recorder in JMeter.
  • Operate the mobile app as normal. JMeter will record the HTTP requests made by the app.
  • Stop the recording in JMeter once you’re done and save the Test Plan.

Run and Analyze the Test Plan:

  • Execute the recorded script in JMeter.
  • Use the View Results Tree Listener to analyze the responses of each request.

A video tutorial to make the process clearer:

Designing Effective Load Test Plans

Creating comprehensive load test plans is essential for obtaining meaningful insights into your mobile app’s performance. Here’s a step-by-step guide to designing effective load test plans using Apache JMeter:

  1. Identify Test Scenarios: Start by identifying the key user scenarios or workflows within your mobile app. These could include actions such as logging in, browsing products, making purchases, or interacting with multimedia content.
  2. Define User Behavior Profiles: Determine the distribution of user interactions based on factors like frequency, concurrency, and duration. This helps simulate realistic usage patterns during load tests.
  3. Configure Thread Groups: Thread Groups in Apache JMeter allow you to define the number of virtual users (threads) and their behavior. Adjust parameters such as ramp-up time and loop counts to simulate gradual increases in user load.
  4. Select Appropriate Samplers: Samplers represent different types of requests sent to the server, such as HTTP requests for REST APIs or JDBC requests for database interactions. Choose the relevant samplers based on your mobile app’s architecture and functionalities.
  5. Add Timers and Logic Controllers: Timers help introduce delays between user actions, mimicking real-world user behavior. Logic Controllers enable conditional and iterative execution of test elements, enhancing test realism and flexibility.
  6. Configure Assertions: Assertions verify the correctness of server responses, ensuring that the mobile app functions as expected under load. Define assertions to validate response status codes, content, or performance thresholds.
  7. Set Up Listeners for Result Analysis: Listeners capture and display test results in various formats, including tables, graphs, and summary reports. Choose appropriate listeners to monitor key performance metrics such as response times, throughput, and error rates.

Executing and Analyzing Load Tests

Once your load test plan is configured, it’s time to execute the tests and analyze the results. Follow these steps to execute load tests using Apache JMeter:

  1. Start the Test: Run the load test plan within Apache JMeter by clicking the “Start” button. Monitor the progress as virtual users simulate user interactions with the mobile app.
  2. Monitor System Resources: Keep an eye on system resource utilization during load tests, including CPU, memory, and network bandwidth. Excessive resource consumption may indicate performance bottlenecks that require attention.
  3. Collect and Analyze Results: After the load test completes, review the results collected by Apache JMeter’s listeners. Pay attention to performance metrics such as response times, latency, throughput, and error rates. Identify any anomalies or areas for improvement.
  4. Generate Reports: Apache JMeter offers built-in reporting capabilities to generate comprehensive test reports in formats like HTML, CSV, or XML. Share these reports with stakeholders to communicate test findings and recommendations effectively.

Conclusion

So, after understanding the complete process, we can conclude certain benefits linked with JMeter mobile performance testing:

  • Zero investment since it is an open-source tool!
  • Accessible on both Android and iOS devices.
  • The simplest and most efficient tool to check mobile performance.
  • It is very user-friendly and has an interactive UI.

Hopefully, after going all through this guide, you will be capable of recording a JMeter script for mobile performance testing.

FAQs

iOS vs Android App Testing: What’s The Difference?

In the rapidly evolving mobile app market, testing for iOS and Android platforms is pivotal. As of 2024, the global mobile application store spend reached a staggering $171 billion,

ios and android app stats 2024
ecent report by Mordor Intelligence predicts that the mobile app testing industry will be worth $16.71 billion by 2029, up from $6.56 billion this year. That’s a growth rate of 17% per year!

The reason for this growth is the increasing popularity of smartphones and the ever-growing demand for high-quality apps.​​ The post-pandemic increase in reliance on mobile apps is what is driving this growth, underscoring their significance in the digital age.

In 2022, mobile ad spending reached $362 billion, up 7.7% from the previous year. In 2023, Android and iOS app consumer spending soared to $135 billion, with iOS commanding 66% of this market. Games accounted for 60% of consumer spending, and iOS’s 76% market share helped subscription revenues reach $45.6 billion.

These trends underscore the importance of mobile app testing in ensuring functionality, user experience, and security across diverse devices and platforms, a crucial factor in the success of mobile applications.

Here are the Key Differences Between  iOS and Android App Testing

#1) Open vs Closed Source

Android’s Open-Source Linux OS:

Android, based on Linux, is renowned for its open-source nature, offering a level of flexibility that’s akin to a playground for developers. What does this mean? Well, developers have the freedom to tinker with the system’s source code, leading to a diverse range of customization options. It’s like having a box of Legos where you can build, modify, and rebuild as you see fit.

Implications for App Development and Testing:

  • Creativity and Innovation: This openness fosters a hotbed for creativity and innovation. Developers can experiment, leading to unique app features and functionalities.
  • Fragmentation Challenges: However, it’s not all sunshine and rainbows. The diverse range of devices running Android, combined with varying OS versions, creates a fragmentation challenge. Testing needs to be more thorough and encompass a broader range of scenarios.
  • Community Support: The open-source community is a treasure trove of resources, offering support, libraries, and tools, that can significantly speed up development and troubleshooting.
  • iOS’s Closed-Source System: The Walled Garden Contrastingly, iOS operates in a walled garden. Apple’s closed-source system means the underlying code is not openly accessible. This exclusivity brings a different set of benefits and challenges.

Implications for App Development and Testing:

  • Consistency and Quality Control: The closed ecosystem allows Apple to maintain a high level of consistency and quality control over its apps. It translates into a more uniform and controlled environment for app development and testing.
  • Limited Customization: Developers might find their wings clipped in terms of customization and deep system-level changes.
  • Streamlined Testing: With a limited range of devices and OS versions, testing for iOS can be more streamlined and predictable, reducing the complexity and time involved in ensuring app stability and performance.


#2)Device Diversity and Testing Complexity: A Tale of Two Platforms

Navigating the world of mobile app testing is akin to exploring two distinct planets regarding device diversity. On the one hand, we have Android’s device fragmentation, and on the other, iOS’s limited device range. Each presents its unique set of challenges and advantages for developers and testers.

Android’s Device Fragmentation: A Double-Edged Sword Android’s vast array of devices is both its strength and its Achilles’ heel. The open-source nature of Android has led to a plethora of devices with different screen sizes, resolutions, and hardware capabilities. This diversity, while offering a wide reach, turns app testing into a herculean task.

The Challenges:

  • Multiple Scenarios: Testers must account for numerous scenarios, ensuring the app functions smoothly across a wide range of devices.
  • Performance Variability: From high-end smartphones to budget-friendly devices, performance testing becomes a critical aspect of guaranteeing a consistent user experience.
  • Increased Resource Demand: The need for extensive testing means more time and resources are required, potentially impacting development timelines and budgets.

iOS’s Limited Device Range: A Blessing for Testers In contrast, Apple’s tightly controlled ecosystem with a limited range of devices simplifies the testing process. The homogeneous nature of iOS devices means fewer variables to contend with, making the process more streamlined and predictable.

The Advantages:

  • Streamlined Testing: A smaller set of devices reduces complexity, allowing for more focused and efficient testing.
  • Consistency: With fewer device variations, maintaining a consistent user experience becomes more manageable.
  • Resource Optimization: Less device variability allows for a more focused allocation of testing resources, potentially speeding up the development cycle.

#3) Navigating the Update Maze: Android vs iOS Software Updates

Regarding software updates, Android and iOS present a world of difference, each with its own unique impact on app testing and the end-user experience.

This variance is not just about who gets the latest features first; it’s about how these updates affect the entire ecosystem of users, developers, and testers.

Android’s Update Rollouts: A Varied Landscape

Android’s approach to software updates is like a multi-flavored buffet. Due to its open-source nature and a wide range of manufacturers, updates are rolled out in a staggered and varied manner.

Each manufacturer often adds its own spin to the update, which means the same Android version can behave differently on devices from different manufacturers.

Implications for Testing and UX:

  • Testing Complexity: This diversity requires developers to test their apps across multiple Android versions and device models, increasing the complexity and resources needed.
  • User Experience Inconsistency: Users on different devices may have varying experiences with the same app, depending on their Android version and device capabilities.

iOS’s Streamlined Updates: Consistency is Key

On the flip side, iOS’s updates are like a well-orchestrated symphony. Apple’s tight control over its ecosystem means that software updates are rolled out uniformly to all compatible devices.

This consistency ensures that most iOS users are on the latest version within a short period of time.

Implications for Testing and UX:

  • Simplified Testing: Uniform updates across all devices simplify the testing process, allowing for a more focused approach.
  • Consistent User Experience: Users enjoy a more consistent app experience across different devices, as most will be running the same iOS version.

#4) Software Updates and Compatibility: Android vs. iOS

In the realm of mobile app testing, understanding the intricacies of software updates and compatibility for Android and iOS is pivotal.

These platforms differ significantly in how they roll out updates, and these differences have profound implications for app testing and user experience.

Android’s Fragmented Update Landscape

Android’s update rollout can be likened to a patchwork quilt. Being an open-source platform with a multitude of manufacturers, updates are not uniform. Manufacturers often customize updates, leading to different versions of Android running on various devices at any given time.

Impact on App Testing:

  • Testing Diversity: App developers face the challenge of testing their apps across a wide range of Android versions and devices, increasing the complexity of ensuring compatibility.
  • User Experience Variation: Users might have different experiences with the same app, depending on their device’s Android version, which can lead to inconsistency in app performance and user satisfaction.

iOS’s Uniform Update Rollouts

Contrastingly, iOS updates are more like a synchronized swim. Apple’s controlled environment allows for simultaneous updates across all its devices. This means a significant proportion of iOS users quickly migrate to the latest version.

Impact on App Testing:

  • Streamlined Testing Process: The uniformity of iOS updates eases the burden on app testers, as they have to account for fewer variations in OS versions.
  • Consistent User Experience: With most users on the latest OS version, ensuring a consistent user experience across different devices is more manageable.

#5) App Security and User Trust: A Critical Balance in Android and iOS

In today’s digital age, app security is not just a feature; it’s a cornerstone of user trust. The approaches Android and iOS take towards security play a pivotal role in shaping the user experience and trust. Let’s break down the security landscape of these two platforms.

Android’s Open Ecosystem: A Double-Edged Sword

Android’s open-source nature, while fostering innovation and flexibility, also brings unique security challenges. Its vast and diverse user base, coupled with the range of devices and OS versions, creates fertile ground for security vulnerabilities.

Key Security Concerns:

  • App Store Policies: Google Play’s app vetting process, though robust, can sometimes be less stringent than Apple’s, potentially allowing risky apps to slip through.
  • Fragmentation: With numerous devices running outdated versions of Android, maintaining security consistency is challenging, leaving some users vulnerable to exploits.

Ensuring Security:

  • Regular Updates: Providing timely security updates and encouraging users to install them is crucial.
  • Developer Vigilance: Developers must prioritize security in their app design, particularly when requesting user permissions.

iOS’s Walled Garden: Safety in Control

Apple’s closed ecosystem approach to iOS has its advantages in terms of security. The tight control over hardware and software integration, along with a stringent app review process, enhances overall security.

Key Security Strengths:

  • Strict App Review: Apple’s rigorous app review process significantly reduces the likelihood of malicious apps entering the App Store.
  • Regular, Uniform Updates: The ability to push updates to all devices simultaneously helps quickly address security vulnerabilities.

Ensuring Security:

  • User Awareness: Educating users on the importance of keeping their devices updated and being wary of phishing or fraudulent apps.
  • Developer Compliance: Ensuring apps comply with Apple’s security guidelines is crucial for maintaining user trust.

#6)Hardware and Performance Testing: The Android Diversity Challenge

In the world of Android, the sheer diversity of hardware presents a unique challenge for app developers, particularly in performance testing. Unlike the more uniform hardware ecosystem of iOS, Android spans a wide array of devices with varying specifications.

Diverse Hardware Landscape

Android’s open-source nature has led to an expansive range of devices from multiple manufacturers, each with different screen sizes, processors, RAM capacities, and more. This variety means an Android app could be running on a high-end smartphone with the latest technology or a budget device with limited capabilities.

Implications for App Testing:

  • Performance Variation: Apps must be tested across devices with different hardware capabilities to ensure consistent performance. This includes assessing how the app runs on low-end devices as well as the latest flagship models.
  • Resource Optimization: Understanding the limitations of various hardware configurations is crucial. Developers need to optimize their apps to run efficiently across the spectrum of Android devices.
  • User Experience Consistency: Ensuring a consistent user experience across diverse hardware is a significant challenge. An app that performs well on a high-end device must be tested and possibly adjusted to perform similarly on less capable devices.

Testing Strategies:

  • Wide-Ranging Testing: Developers must conduct tests over a broad range of devices, representing different hardware configurations and performance capabilities.
  • Performance Metrics: Focusing on key performance metrics like load times, memory usage, and battery consumption is essential for optimizing across varied hardware.
  • Continuous Monitoring: Post-launch, monitoring app performance across different devices is vital to address any issues that users with specific hardware might encounter.

Key Takeaways

Key Differences Android iOS
1) Open vs Closed Source
Nature Open-Source Linux OS Closed-Source System
Implications – Creativity and innovation – Consistency and quality control
– Fragmentation challenges – Limited customization
– Community support – Streamlined testing
2) Device Diversity and Testing
Device Fragmentation Vast array of devices Limited range of devices
Implications – Multiple testing scenarios – Streamlined testing process
– Performance variability – Consistent user experience
– Increased resource demand – Resource optimization
3) Software Updates
Update Rollouts Varied and staggered Uniform and simultaneous
Implications – Testing complexity – Simplified testing process
– User experience inconsistency – Consistent user experience
4) Security and User Trust
Security Approach Open ecosystem Walled garden
Key Concerns – Less stringent app store policies – Strict app review process
– Fragmentation and outdated versions – Regular, uniform updates
Security Measures – Regular updates, developer vigilance – User awareness, developer compliance
5) Hardware and Performance
Hardware Diversity Wide range of devices More uniform hardware
Testing Implications – Performance variation – More predictable performance testing
– Resource optimization – Easier optimization due to uniformity
– Ensuring user experience consistency – Consistent user experience

Frequently Asked Questions (FAQs) about iOS and Android App Testing

#1) What are the main differences in testing apps for iOS vs. Android?

The main differences lie in the operating systems, with iOS being closed-source and Android being open-source, leading to variations in device fragmentation, update rollouts, security measures, and hardware diversity.

#2) Is it more challenging to test apps on Android or iOS?

Testing can be more complex on Android due to device fragmentation and diverse hardware options. iOS, with its limited range of devices and more controlled ecosystem, can simplify the testing process.

#3) How do software updates affect app testing?

Software updates can significantly impact app testing. Android’s varied update process across different devices and manufacturers requires testing across multiple versions. iOS’s uniform updates allow for a more streamlined approach to testing.

#4) What should developers focus on for effective app testing?

Developers should focus on device compatibility, performance optimization, ensuring security, and providing a consistent user experience. This includes testing on various devices, especially Android, and adhering to platform-specific guidelines.

#5) How important is security in app testing?

Security is crucial in app testing. It’s vital to ensure that apps are safe from vulnerabilities, particularly on Android, due to its open-source nature. iOS apps must comply with Apple’s stringent security guidelines.

How to Test a Mobile Application ? [A Detailed Guide]

As smartphones become more and more important in the world of mobile app development, developers and testers play key roles in shaping the landscape. Even though there are millions of apps on the market, only a few are able to stand out. In this very competitive field, coming up with new ideas is only the beginning. Making sure applications work perfectly becomes the most important aspect of success.

What is mobile application testing?

Mobile application testing (MAT) explores the complex realm of making sure mobile-optimized software applications run smoothly on a variety of platforms and conditions. It’s a complex field with many different technical nuances.

Tests for functionality:

Non-Functional Testing:

  • Confirming that the application conforms with rules regarding accessibility for people with impairments.
  • Testing an app’s functionality and adapting its content for various linguistic and cultural contexts is known as localization.
  • Assessing how easy and comprehensive the processes are for installing and uninstalling apps.
  • Monitoring and enhancing an app’s effect on the battery life of a device.

Technical Details:

  • Automation: For effective and scalable testing, use automated testing frameworks and tools like Appium, XCTest, and Espresso.
  • Device Labs and Cloud-based Testing: Without being constrained by physical space, testing can be done on a variety of devices and configurations by leveraging cloud services and hardware emulation platforms.
  • Testing APIs: App programming interfaces (APIs) that drive the functionality of mobile apps are validated.
    Performance Optimization Techniques: Code profiling and memory leak detection are two techniques that can be used to improve the stability and responsiveness of apps.

Extra Things to Think About:

  • Security Testing Tools: To find security flaws and possible code injection threats, use specialized tools like Burp Suite and MobiSec.
  • Testing procedures should be integrated into CI/CD pipelines for quicker feedback and better quality throughout the development lifecycle. This is known as continuous integration and continuous delivery, or CI/CD.
  • Emerging Technologies: Modifying testing protocols to account for new technologies such as mobile app integration of artificial intelligence (AI), virtual reality (VR), and augmented reality (AR).

Testing mobile applications necessitates a thorough knowledge of a variety of technical topics, reliable testing procedures, and ongoing adjustment to the constantly changing mobile environment. Testers can guarantee great mobile app experiences for users across a wide range of devices and levels of complexity by learning these subtleties.

Step#1: Know the mobile application testing essentials

Device and Platform Landscape:

  • Fragmentation: Android’s diverse device and OS fragmentation remains a challenge. 2023 data shows Android 13 adoption is still slow, with older versions like Android 11 and 12 dominant. Testing across a representative range of devices and OS versions is crucial.
  • iOS Evolution: While iOS fragmentation is minimal, the rapid release cycle presents challenges. Ensure your testing strategy accounts for the swift adoption of new iOS versions among a large user base.
  • Emerging Platforms: Consider the growing importance of wearables, foldable phones, and gaming consoles for specific app categories.

Connectivity and Performance:

  • Network Fluctuations: Test app performance under various network conditions (Wi-Fi, cellular data, varying bandwidths) to mimic real-world user experiences.
  • Battery Drain: Battery optimization is a key user concern. Implement battery consumption testing tools and techniques to identify and address power-hungry elements.
  • Location-Based Services: Apps relying on GPS or other location services require thorough testing in different geographical areas and network conditions.

Security and Privacy:

  • Data Protection: With privacy regulations like GDPR and CCPA in place, robust data security testing is paramount. Utilize security testing tools and strategies to identify vulnerabilities and ensure data-handling compliance.
  • API Security: APIs powering mobile apps require dedicated security testing to prevent unauthorized access and potential data breaches.
  • Biometric Authentication: Integrate testing for features like fingerprint and facial recognition, including potential spoofing attempts and accessibility considerations.

Usability and Accessibility:

  • Touch and Gesture Control: Thoroughly test intuitive touch and gesture interactions to ensure a smooth and responsive user experience.
  • Accessibility Compliance: Ensure apps are accessible to users with disabilities by adhering to WCAG guidelines and testing with assistive technologies.
  • Localization and Internationalization: For global audiences, test app functionality and content adaptation for different languages and cultural contexts.

Automation and Emerging Trends:

  • AI-powered Testing: Explore the potential of AI-powered testing tools for automated script generation, anomaly detection, and intelligent test selection.
  • Cloud-based Testing Platforms: Leverage cloud-based testing services to access a vast range of devices and configurations for efficient and scalable testing.
  • Performance Optimization Techniques: Utilize performance profiling tools and code analysis techniques to optimize app resource consumption and responsiveness.

Types of Mobile Application

The type of mobile app you are testing plays a very important role in defining your testing process. So, be very clear about which type of mobile app you are going to test. They are largely categorized into three different types:

  1. Mobile web applications: These are the web pages that you open through the mobile browser.
  2. Native Apps: These are the applications that are developed for one particular platform. (iOS, Android, Windows 10 Mobile, Tizen, BlackBerry).
  3. Hybrid: It is an amalgamation of mobile web apps and native apps.

Step #2: How to strategize your mobile application testing efforts?

Navigating the intricate terrain of mobile app testing requires a solid roadmap. A well-defined strategy is the compass that guides your efforts, ensures efficiency, and ultimately delivers exceptional app experiences. Here are some key steps to conquer the mobile app testing mountain:

1. Define Your Objectives:

  • What are you testing for? Identify core goals, whether it’s functionality, performance, security, or user experience.
  • Who are your users? Understanding their demographics, devices, and usage patterns helps prioritize testing scenarios.

2. Chart Your Course:

  • Choose your testing types: Functional, non-functional, compatibility, security—decide which types align with your objectives.
  • Select your tools and techniques: Utilize automation frameworks like Appium, XCTest, or cloud-based testing platforms for scalability.

3. Conquer Device Diversity:

  • Map your device landscape: Consider popular devices, OS versions, and screen sizes relevant to your target audience.
  • Embrace emulators and simulators: Leverage hardware emulation platforms for efficient testing across a wide range of configurations.

4. Focus on the User Journey:

  • Plan user flow testing: Define and test key user scenarios to ensure a smooth and intuitive experience.
  • Integrate usability testing: Gather user feedback at different stages to identify and address potential usability issues.

5. Prioritize and Optimize:

  • Apply risk-based testing: Focus on critical functionalities and high-risk areas based on potential impact and likelihood of failure.
  • Optimize your test suite: Continuously refine and maintain your test scripts for efficiency and effectiveness.

6. Embrace Automation:

  • Automate repetitive tasks: Free up resources for manual testing by automating regression testing and basic functionality checks.
  • Explore AI-powered tools: Consider utilizing AI-powered testing solutions for intelligent test selection and anomaly detection.

7. Build Bridges and Collaborate:

  • Communicate effectively: Share testing plans, progress reports, and findings with developers and stakeholders.
  • Foster a culture of collaboration: Encourage feedback loops and joint problem-solving for continuous improvement.

8. Embrace the Climb:

  • Stay updated on trends: Keep your finger on the pulse of new technologies and emerging testing methodologies.
  • Adapt and refine: Be flexible and adjust your strategy based on project needs, user feedback, and industry advancements.

Step #3: How To Test?

Choosing between mobile manual and automated testing involves weighing the strengths of each approach. Manual testing proves invaluable for exploratory scenarios, usability, and tasks requiring human intuition, especially during initial testing phases and UI/UX evaluation.

Automated testing excels in repetitive, high-volume test scenarios, offering efficiency, consistency, and swift feedback. Striking a balance between these methods is key to meeting dynamic testing needs, leveraging manual testing for qualitative insights and automated testing for streamlined, repetitive tasks. The decision hinges on project specifics, emphasizing the harmonious integration of human expertise and automation efficiency.

Which is better – Emulators or simulators?

The choice between emulators and simulators in app testing depends on the specific testing needs, goals, and context of the project. Both emulators and simulators have their advantages and limitations, and the decision often comes down to the nature of the testing requirements. Let’s explore the key differences and considerations:

Emulators:

  1. Advantages:
    • More Realistic Environment: Emulators provide a more realistic representation of the actual device environment, including hardware and software.
    • Support for Native Apps: Emulators are better suited for testing native applications that interact closely with device hardware.
  2. Considerations:
    • Resource Intensive: Emulators can be resource-intensive, requiring significant system resources to run multiple instances for different devices.
    • Slower Execution: Emulators may run slower than simulators, especially when simulating complex device interactions.
  3. Use Cases:
    • Emulators are preferred for testing scenarios that require a closer approximation to real-world device behavior, especially for native applications or cases where hardware features need to be emulated.

Simulators:

  1. Advantages:
    • Faster Execution: Simulators generally run faster than emulators, making them more efficient for quick testing iterations.
    • Easier Setup: Simulators are often easier to set up and use, making them accessible for rapid testing in various scenarios.
  2. Considerations:
    • Less Realistic Environment: Simulators may not fully replicate the complexities of real device hardware, leading to potential differences in behavior.
    • Limited Hardware Interaction: Simulators may not accurately simulate certain hardware interactions, limiting their effectiveness in certain testing scenarios.
  3. Use Cases:
    • Simulators are suitable for scenarios where the focus is on quick testing iterations, broad compatibility testing, or when the specific hardware characteristics are less critical.

Considerations for Choosing:

  1. Testing Goals: Consider the specific goals of your testing. If you need a highly accurate representation of real device behavior, especially for native apps interacting with hardware, emulators may be more suitable.
  2. Resource Constraints: Assess your system resources. Emulators tend to be more resource-intensive, and if you need to run multiple instances simultaneously, simulators might be a more practical choice.
  3. Testing Speed: If rapid testing iterations are a priority and you can tolerate some level of abstraction from real device behavior, simulators may offer quicker testing cycles.
  4. Application Type: The nature of your application (web, hybrid, or native) and its dependencies on specific hardware features may influence the choice between emulators and simulators.

Cloud-based testing of the mobile application

Scalability: Cloud-based testing ensures thorough coverage across a variety of operating systems, device models, and configurations by giving access to a wide range of real devices and emulators/simulators.

Efficiency: By reducing testing cycles and speeding up time-to-market, testing teams can run tests concurrently. Teams that are geographically separated can collaborate thanks to the cloud’s remote accessibility, which guarantees consistent testing environments.

Flexibility: By automating the testing process and boosting overall efficiency, cloud-based testing enables smooth integration with CI/CD pipelines. This flexibility ensures this adaptability to the shifting demands of development projects.

Cost-effectiveness: Businesses can save money by avoiding the requirement for large physical device labs and related maintenance expenses. Because cloud platforms can scale on demand, teams can assign resources according to project requirements and minimize costs.

Real-world Network Conditions: Cloud-based testing makes sure that programs are assessed in real-world network scenarios, which helps to find problems with responsiveness and performance. This realism improves the applications’ dependability in a range of use cases.

Accessibility: Cloud-based testing enables testing teams to work together more easily by facilitating remote device access and guaranteeing consistent testing environments across geographic boundaries.

Integration: To facilitate automated testing procedures, the cloud offers smooth integration with CI/CD pipelines. This integration supports a continuous and more effective testing methodology while also streamlining workflows.

Thorough Coverage: Testing teams can attain thorough coverage by utilizing a varied array of cloud-based devices, guaranteeing that applications function flawlessly and are compatible with a broad spectrum of devices and configurations.

Which one is better—mobile manual or automated testing?

The choice between mobile manual and automated testing depends on project requirements. Manual testing is effective for exploratory testing, usability, and scenarios requiring human intuition. It’s beneficial for initial testing and UI/UX evaluation.

On the other hand, automated testing excels in repetitive, high-volume test scenarios, ensuring efficiency, consistency, and quicker feedback. Combining both approaches optimally addresses the dynamic testing needs, leveraging the strengths of manual testing for qualitative assessment and automated testing for repetitive, time-intensive tasks.

Ultimately, the decision hinges on the project’s nature, timeline, and the balance between human insight and the efficiency of automation.

Step #2: Stages of Mobile application testing

Let us now learn about the various stages of the mobile application. Here is the list:

1. Documentation Testing

The beginning of mobile testing takes place during documentation testing, the preparatory stage.
Even before the development of the app starts, the testers are handed over screen layouts, navigational charts, and other requirements that are obscure in the design.
In this phase, you need to analyze the requirements for wholeness and discrepancy. All the discrepancies found in this stage are required to be resolved before the development begins
The documentation phase marks the creation and analysis of requirements (specification, PRD), Test Cases, a test plan, and a traceability matrix.

2. Functional testing

It helps you test whether your mobile application works as expected and in accordance to the requirement specifications. While you are performing functional testing for your app, keep the following factors in mind:

  • Business functionality of your app like banking, social networks, ordering and delivery of food, education, tickets, the game industry, etc.
  • Target audiences like companies, students, entrepreneurs, etc.
  • Distribution channels like Google Play, direct delivery, App Store, etc.

The basic validations that you need to test in functional testing are:

  • Installing and running the application
  • Fields testing
  • Business functionalities testing
  • Interruptions testing
  • Constant user feedback testing
  • Update testing
  • Device resources testing

3. Usability Testing

Usability testing ensures that your application offers convenient browsing to your customers and creates an intuitive interface that abides by industry standards. It promises fast and easy-to-use applications. The usability of your application is judged based on these three basic criteria:

  • Satisfaction
  • Efficiency
  • Effectiveness

4. UI (User Interface) testing

User Interface (UI) testing ensures that your application’s GUI meets all the required specifications.

5. Compatibility (Configuration) testing

Compatibility (Configuration) testing validates the optimal performance of your application on different devices based on their size, screen resolution, version, hardware, etc. Compatibility testing also takes care of

  • OS Configuration
  • Browser Configuration
  • Database Configuration
  • Device Configuration
  • Network Configuration

Compatibility testing can be further divided into
Cross-platform testing: Testing your mobile application compatibility with different operating systems: Windows, iOS, Android, BlackBerry, etc.
Cross-browser testing:    Testing your mobile application compatibility in different browsers (Google Chrome, Mozilla Firefox, Opera Mini, etc.
Database testing:    Testing your mobile application compatibility in different database configurations: DB2, Oracle, MSSQL Server, MySql, Sybase.
Device Configuration testing:  Testing your mobile application compatibility on different devices based on

  • Device type: smartphone, tablet, etc.
  • Device configuration: processor type, RAM, battery capacity, screen resolution, etc.

Network configuration testing:   Testing your mobile application compatibility in different network configurations (TDMA, GSM) and standards (2G, 3G, 4G).

6. Performance testing

Performance testing helps you test your application’s reaction and constancy under a specific workload.
Performance testing attributes

  • Load Testing: Done to check the application’s behavior under normal and extreme loads.
  • Stress Testing: Done to test the application’s ability to sustain stress. It ensures that your application is capable of bearing undue stress.
  • Stability Testing: Tests if your application can work well for a longer period within normal loads.
  • Volume Testing: Conducted to test your application’s performance when subjected to a huge volume of data.
  • Concurrency testing: Tests the performance of your application when multiple users are logged in.

7. Security testing

Security testing validates the security features of your application. It also analyzes the risks of application hackers, protection, viruses, and unauthorized access to extremely sensitive data.

8. Recovery testing

Recovery testing tests the ability of your application to withstand and successfully recover from possible and potential failures caused by software issues, hardware failures, or communication problems.

9. Localization testing

Localization testing tests the adaptability of your application for a specific target audience based on cultural specifics.

10. Change-related testing

Finally, when complete testing is done, you might find some bugs, resulting in a certain piece of code to change to eliminate those bugs. After these code changes you again need to carry out a round of testing. This basically includes:

  • Re-testing or confirmation testing: to test that all the detected defects are successfully fixed.
  • Regression testing: sometimes, code changes can even disturb the functioning of existing and properly working functions. Regression testing is done to ensure that the new changes did not lead to the appearance of new bugs.

11. Beta testing

 Beta testing is done by real users on real devices to validate usability, functionality, compatibility, and reliability.
Before pushing your app forward for beta testing, take into account the following factors

  • A number of testing participants
  • Testing duration
  • Shipping
  • Demographic coverage
  • Testing costs

Beta testing is a good investment, ensuring a better quality of your mobile app.

12. Certification testing

Certification testing tests whether your application meets the standards, licensing agreements, terms of use and requirements of stores like the App Store, Google Play, and Windows Phone.
How to Test a Mobile Application

Challenges of mobile application testing

  • Device Fragmentation: Diverse devices and OS versions, with Android leading the chaos.
  • Network Fluctuations: Consider spotty coverage, varying bandwidths, and offline scenarios.
  • Security & Privacy: Data breaches, API vulnerabilities, and privacy regulations demand vigilance.
  • Performance woes: battery drain, resource hogging, and lag under diverse conditions.
  • Usability & accessibility: touch and gesture control, screen sizes, and catering to diverse abilities.
  • Automation Hurdles: Balancing automation benefits with manual testing finesse.
  • Keeping Up with Trends: New technologies like AR/VR and AI integration introduce new testing needs.
  • Resource Constraints: Balancing testing needs with budget and time limitations.
  • Communication & Collaboration: Bridging the Gap between Testers, Developers, and Stakeholders.
  • Constant Testing Cycle: Adapting to rapid release cycles and evolving user expectations.

Tips to test mobile application

Preparing for the Pre-Test:

  • Understand Your App Completely: Prior to testing, become an expert by studying the architecture, functionalities, and possible points of failure.
  • Think Mobile First: Give up thinking like a desktop! Think about context-specific features, smaller screens, and touch interactions.
  • Chart the Hardware Environment: To customize testing, determine your target devices, operating systems, and hardware constraints.

Testing Recommended Procedures:

  • Accept Real Devices: For more accurate testing and bug finding, give real devices precedence over emulators.
  • Tool Selection Intelligence: Select testing tools according to your requirements and level of experience, not just what’s popular.
  • Cloud Testing Advantage: For effective testing across a range of devices, take advantage of cloud-based testing platforms.
  • Open Developer Secrets: For in-depth investigation and analysis, make use of developer options and hidden debugging menus.
  • Emulation Allies: Use emulators and simulators efficiently to find bugs early and conduct rapid iterations of testing.

Efficiency and Optimisation:

Performance Under the Microscope: Carry out thorough performance tests with a range of load levels, device configurations, and network conditions.
Automation Balance: For thorough coverage, strike a balance between the effectiveness of automation and the dexterity of manual testing.
Boost Your Beta Testing: Before launching, use beta testing to find usability problems and obtain feedback from actual users.

Additional Tips:

Make the Most of Your Time: Set aside specific time for each testing stage, including performance, security, and functional testing.
Consider accessibility: By using accessibility testing techniques, you can make sure your app works for a range of skill levels.
Keeping up: Accept lifelong learning, investigate novel testing instruments and techniques, and adjust to changing fashions.
It’s All About Communication: To guarantee seamless testing and problem-solving, work well with developers, designers, and stakeholders.
Security Highlight: Never disregard security testing! To protect user data and the integrity of your app, make use of security tools and best practices.

Popular Mobile app testing tools

For functionality testingAppium, Selendroid, Robotium, Ranorex.
For usability testing: Reflector, User Zoom,  Loop.
For mobile application interface testing: iMacros, FitNesse, Jubula, Coded UI,  LoadUI.
For compatibility testing:  CrossBrowserTesting, BrowserStack,  Browsera, Litmus,  Rational ClearCase,  Ghostlab.

For performance testing: Apteligent, NeoLoad,  New Relic.
For Security Testing: OWASP Zed Attack Proxy, Retina CS Community, Google Nogotofail, Veracode,  and SQL Map.
Hope this article might have given an overview of mobile application testing. Stay tuned for more such informational articles.

Selenium vs Puppeteer vs Chai Mocha

The software life cycle has undergone drastic changes in the last decade.
So much to the extent that the role of the tester has completely changed! With the coming in of the PDO (Product Driven Organization) structure, there are no more testers and developers but only full-stack engineers.
The bottom line is testing still needs to be done.
Who does that? How does it fit in the 2-week agile sprint? Is manual testing even possible in such a short time?
The Answer
To start with, the scope for manual testing has been reduced. Agree to it or not. This is what happens in real-life scenarios. Since testing is still a task on our User Stories, it needs to be completed. Most teams take the help of automation tools.
Now here is the challenge, many small and even big companies are going to open-source automation tools which give them the flexibility to customize as per their need without any investment.
There are several tools available for you to choose from based on the kind of application you have like a web-based app or a mobile app a desktop software etc.

Selenium

Selenium is a popular open-source framework for automating web applications. Jason Huggins created it originally as a tool called “JavaScriptTestRunner” to automate repetitive tasks in web testing. Later, he changed the name to Selenium after hearing a joke about mercury poisoning from selenium supplements.
Selenium has a thriving community of developers, testers, and quality assurance professionals who help it grow and improve. The open-source nature encourages frequent updates and improvements. As of my most recent knowledge update in September 2021, the most recent version was Selenium 4, which introduced a number of significant changes and features.
Support for multiple programming languages such as Java, Python, C#, and others is one of Selenium’s key features. Selenium WebDriver for browser automation, Selenium IDE for recording and playback, and Selenium Grid for parallel testing across multiple machines and browsers are among the tools available.
Several factors contribute to selenium’s popularity. First and foremost, it is open-source, which means it is freely available to developers and organizations of all sizes. Because it supports a wide range of programming languages and browsers, it is highly adaptable to a variety of testing environments. Furthermore, the active community keeps Selenium up to date with the latest web technologies and provides solid support and documentation.

Puppeteer

Puppeteer is a well-known open-source Node.js library that offers a high-level API for controlling headless or full browsers via the DevTools Protocol. It was created by Google’s Chrome team, making it a dependable and powerful tool for browser automation and web scraping tasks.
Puppeteer has a vibrant and growing community of web developers and enthusiasts who actively contribute to its development and upkeep. Puppeteer has evolved since my last knowledge update in September 2021, and new versions have been released, each bringing improvements, bug fixes, and new features.
Some notable features of Puppeteer include the ability to capture screenshots and generate PDFs of web pages, simulate user interactions such as clicks and form submissions, and navigate through pages and frames. It also works with a variety of browsers, including Google Chrome and Chromium, and supports both headless and non-headless modes.
Puppeteers are highly regarded for a variety of reasons. For starters, it offers a simple and user-friendly API that simplifies complex browser automation tasks. Its compatibility with the Chrome DevTools Protocol enables fine-grained control over browser behavior. Puppeteer’s speed and efficiency make it a popular choice for web scraping, automated testing, and generating web page snapshots for a variety of purposes.
Several factors contribute to selenium’s popularity. First and foremost, it is open-source, which means it is freely available to developers and organizations of all sizes. Because it supports a wide range of programming languages and browsers, it is highly adaptable to a variety of testing environments. Furthermore, the active community keeps Selenium up to date with the latest web technologies and provides solid support and documentation.

Chai & Mocha

Chai and Mocha are two distinct JavaScript testing frameworks that are frequently used in web development. They play complementary roles, with Chai serving as an assertion library and Mocha serving as a testing framework, and when combined they provide a robust testing solution. Let’s take a look at each one:

Chai:

  • Chai is a Node.js and browser assertion library that provides a clean, expressive syntax for making assertions in your tests.
  • It provides a variety of assertion styles, allowing developers to select the one that best meets their testing requirements, whether BDD, TDD, or assert-style.
  • Chai’s extensibility allows developers to create custom assertions or plugins to extend its functionality.
  • Its readability and flexibility are widely praised, making it a popular choice among JavaScript developers for writing clear and comprehensive test cases.

Mocha:

  • Mocha is a versatile JavaScript test framework that provides a structured and organised environment in which to run test suites and test cases.
  • It supports a variety of assertion libraries, with Chai being one of the most popular.
  • Mocha provides a simple and developer-friendly API for creating tests, suites, and hooks.
  • Its ability to run tests asynchronously is one of its key strengths, making it suitable for testing asynchronous code such as Promises and callbacks.
  • Both Chai and Mocha are open-source projects with active developer communities that contribute to their growth and upkeep.

Their popularity stems from their ease of use, versatility, and widespread adoption within the JavaScript ecosystem. The expressive syntax of Chai and the flexible testing framework of Mocha combine to form a formidable combination for writing robust and readable tests, which is critical for ensuring the quality of web applications and JavaScript code. Because of their ease of use and extensive documentation, developers frequently prefer this pair for testing in JavaScript projects.

Installing Selenium, Puppeteer and Chai Mocha

Installing Selenium:

Install Python: Selenium primarily works with Python, so ensure you have Python installed. You can download it from the official Python website.
Install Selenium Package: Open your terminal or command prompt and use pip, Python’s package manager, to install Selenium:
pip install selenium
WebDriver Installation: Selenium requires a WebDriver for your chosen browser (e.g., Chrome, Firefox). Download the WebDriver executable and add its path to your system’s PATH variable.
Verify Installation: To verify your installation, write a simple Python script that imports Selenium and opens a web page using a WebDriver.

Installing Puppeteer:

Node.js Installation: Puppeteer is a Node.js library, so you need Node.js installed. Download it from the official Node.js website.
Initialize a Node.js Project (Optional): If you’re working on a Node.js project, navigate to your project folder and run:
npm init -y
Install Puppeteer: In your project folder or a new one, install Puppeteer using npm (Node Package Manager):
npm install puppeteer
Verify Installation: Create a JavaScript or TypeScript script to launch a headless Chromium browser using Puppeteer.

Installing Chai Mocha:

Node.js Installation: Chai Mocha is also a Node.js library, so ensure you have Node.js installed as mentioned in the Puppeteer installation steps.
Initialize a Node.js Project (Optional): If you haven’t already, initialize a Node.js project as shown in the Puppeteer installation steps.
Install Chai and Mocha: Use npm to install both Chai and Mocha as development dependencies:
npm install chai mocha –save-dev
Create a Test Directory: Create a directory for your test files, typically named “test” or “tests,” and place your test scripts there.
Write Test Scripts: Write your test scripts using Chai’s assertions and Mocha’s testing framework.
Run Tests: Use the mocha command to run your tests. Ensure your test files have appropriate naming conventions (e.g., *-test.js) to be automatically detected by Mocha.

Criteria Selenium Puppeteer Chai Mocha
Purpose Web application testing across Headless browser automation for JavaScript testing framework for
various browsers and platforms. modern web applications. Node.js applications.
Programming Supports multiple languages: Java, Primarily used with JavaScript. JavaScript for test assertions and
Language Support Python, C#, etc. Mocha as the test framework.
Browser Cross-browser testing across major Chrome and Chromium-based N/A (Not a browser automation tool)
Compatibility browsers (e.g., Chrome, Firefox, browsers.
Edge, Safari).
Headless Mode Supported Supported N/A (not applicable)
DOM Manipulation Limited support for interacting with the DOM. Provides extensive support for interacting with the DOM. N/A (focused on test assertions)
Ease of Use Relatively complex setup and usage. User-friendly API and clear Straightforward API for defining
documentation. tests and assertions.
Asynchronous Yes, with explicit wait commands. Native support for asynchronous Yes, supports asynchronous code.
Testing operations and Promises.

Use Cases:

  • Selenium is widely used for automating the testing of web applications across different browsers and platforms.
    Example: Automating the login process for a web-based email service like Gmail across Chrome, Firefox, and Edge. Puppeteer: Headless Browser Automation
  • Puppeteer is ideal for tasks like web scraping, taking screenshots, generating PDFs, and automating interactions in headless Chrome.
    Example: Automatically navigating a news website, capturing screenshots of articles, and saving them as PDFs. Chai Mocha: JavaScript Testing
  • Chai Mocha is primarily used for unit and integration testing of JavaScript applications, including Node.js backends.
    Example: Writing tests to ensure that a JavaScript function correctly sorts an array of numbers in ascending order.

Let us see how the tools discussed here can help you with your testing tasks.

Testing Type Selenium Puppeteer Chai Mocha
Functional Yes Yes Yes
Regression Yes Yes Yes
Sanity Yes Yes Yes
Smoke Yes Yes Yes
Responsive Yes No No
Cross Browser Yes No Yes
GUI (Black Box) Yes Yes Yes
Integration Yes No No
Security Yes No No
Parallel Yes No Yes


Advantages and Disadvantages

Selenium’s Benefits and Drawbacks:

Advantages:

  • Selenium supports a variety of web browsers, allowing for comprehensive cross-browser testing.
  • Multi-Language Support: Selenium supports multiple programming languages, making it useful for a variety of development teams.
  • Selenium has a large user community, which ensures robust support and frequent updates.
  • Robust Ecosystem: It provides a diverse set of tools and frameworks for mobile testing, including Selenium WebDriver,
  • Selenium Grid, and Appium.
  • Selenium has been in use for a long time, making it a stable and reliable option.

Disadvantages:

  • Complex Setup: Selenium can be difficult to set up and configure, particularly for beginners.
  • Selenium tests can be time-consuming, especially when dealing with complex web applications.
  • Headless Browser Support is Limited: Headless browser support in Selenium is not as simple as it is in Puppeteer.
  • Because of its extensive features and complexities, Selenium can have a steep learning curve.

Puppeteer Advantages and Disadvantages:

Advantages:

  • Headless Mode: Puppeteer includes native support for headless browsing, which makes it useful for tasks such as web scraping and automated testing.
  • Puppeteer is simple to install and use, especially for developers who are familiar with JavaScript.
  • Puppeteer’s integration with the Chrome browser is excellent because it is maintained by the Chrome team.
  • Puppeteer is optimized for performance and can complete tasks quickly.
  • Puppeteer is promise-based, which makes it suitable for handling asynchronous operations.

Disadvantages:

  • Puppeteer primarily supports Chrome and Chromium-based browsers, which limits cross-browser testing capabilities.
  • Puppeteer is dependent on JavaScript, so it may not be suitable for teams working with other programming languages.
  • Smaller Community: Puppeteer’s community is smaller than Selenium’s, which may limit available resources and support.

Chai Mocha’s Benefits and Drawbacks:

Advantages:

  • Chai Mocha was created specifically for testing JavaScript applications, making it ideal for Node.js and front-end testing.
  • Support for Behavior-Driven Development (BDD) testing: Chai Mocha supports BDD testing, which improves collaboration between developers and non-developers.
  • Chai, a component of Chai Mocha, provides flexible assertion styles, making it simple to write clear and expressive tests.
  • Plugins from the community: Chai has a thriving ecosystem of plugins that can be used to extend its functionality.

Disadvantages:

  • Chai Mocha is primarily focused on JavaScript, which limits its utility for projects involving other programming languages.
  • Chai Mocha is not suitable for browser automation or cross-browser testing, which Selenium and Puppeteer excel at.
  • It has a limited scope because it is intended for unit and integration testing but lacks features for end-to-end testing and browser automation.

Hope this data comparison is helpful for you to decide which one to pick up for your team and project. My suggestion, if you are dealing with only Chrome then go for Puppeteer.
But if you want your application to run across all platforms and you want it to be tested in multiple browsers and platforms Selenium would be the right choice.
With Selenium, the coding and tool expertise required is also limited, which means you can build up your team and competency faster.
So our personal choice is Selenium which offers more features and online support forums for guidance as well.
Take your pick.

Selenium IDE Tutorial For Beginners

Welcome to a fascinating journey into the Selenium IDE world, aspirant testers and tech enthusiasts.

This tutorial is your key to mastering Selenium IDE’s amazing features, whether you’re a novice eager to delve into the world of automated testing or a seasoned professional looking to improve your skills.

Prepare for an exciting journey as we uncover this tool’s secrets and give you the knowledge and abilities to write reliable, effective test automation scripts. So prepare for an insightful Selenium IDE tutorial that will elevate your testing game by grabbing your virtual testing lab coat and donning your coding glasses.

Latest News About Selenium IDE

Selenium IDE encountered a fork in its journey when Firefox’s unfortunate withdrawal of support presented itself.

A brand-new Selenium IDE that is independent of any particular browser was developed as a result of the quick response of the committed Selenium community to the challenge.

This updated Selenium IDE, developed as a web extension, offers a plethora of improvements and features that address the changing requirements of automated testing.

The new Selenium IDE, which embraces a cross-browser approach, supports popular browsers like Chrome and Firefox, giving testers the ability to seamlessly run their automated tests across various platforms.

The new Selenium IDE features a new and dynamic interface with enhanced recording capabilities, advanced debugging tools, and comprehensive test reports that continue to streamline the test automation process for both novices and experts.

+This tenacious transformation proves the Selenium community’s unwavering dedication to offering an exceptional testing experience and guarantees that Selenium IDE continues to flourish even in the face of shifting technological environments.

Features of the New IDE

Cross-Browser Compatibility: By supporting popular web browsers like Chrome and Firefox, the new Selenium IDE enables testers to create and run tests on various platforms.

Improved Recording and Playback: Testers can easily record and automate their interactions with web applications thanks to improved recording capabilities. The playback feature makes sure that tests go off without a hitch and consistently.

Intelligent Element Locators: The IDE offers intelligent locators that adjust to changes in the application’s structure, simplifying test maintenance and lowering the demand for ongoing updates.

Strong Debugging Tools: With features like breakpoints, step-by-step execution, and variable inspection, debugging is made simple. The root causes of failures can be found and efficiently resolved by testers.

Test Data Management: The IDE provides a range of adaptable options for handling test data, such as data-driven testing, which enables testers to run the same test against various datasets.

Customizable: Selenium IDE can be customized and extended using plugins and custom scripts, allowing testers to improve its functionality in accordance with their unique needs.

Test reporting and metrics: The IDE generates thorough reports that include specific information about test results, such as pass/fail status, execution time, and screenshots. These reports help identify areas that need more attention and offer insightful information about test coverage.

Collaboration and Knowledge Sharing: Test scripts are easily shared and worked on by teams, encouraging productive teamwork and knowledge exchange.

Integration with Selenium Grid: Thanks to the new Selenium IDE’s seamless integration with Selenium Grid, testers can distribute tests across multiple machines and run them concurrently, greatly cutting down on the time it takes to complete a test.

Support for Continuous Integration (CI): The IDE easily integrates with well-known CI/CD tools, giving testers the ability to incorporate automated tests into their development workflows and achieve continuous testing.

About Selenium IDE

Selenium integrated development environment that is plugged into Firefox. It is an automation testing tool that is very simple, easy and user-friendly.  It offers easy installation, learning, and creation of test scripts. Selenium IDE is based on record and playback principle. It is good for all kinds of testing.

Features of Selenium IDE That Makes it the Best!
selenium ide features
Selenium is a widely used automation testing tool and offers extensive features. Some of the common features of Selenium IDE are:

  • It offers an easy and simple record and playback features
  • Supports Intelligent field selection
  • Auto-completion of Selenium commands
  • Walkthrough tests
  • Easy Debugging capabilities
  • Easy setting of breakpoints
  • Save tests as HTML, Ruby, Python, C# scripts, or any other format
  • Supports Selenium user-extensions.js
  • Supports automatic assertion of title for all pages
  • Supports easy customization
  • Does not require programming skills

The Drawback of Selenium IDE

Selenium IDE is a Firefox plug-in hence it supports only Firefox and the test scripts Created in Selenium IDE can only be executed in the Firefox browser.

Step-by-Step Tutorial about learning Selenium IDE

Downloading and Installing Selenium IDE

Now when we have a good idea on what is Selenium IDE, let us move to the next step of Downloading and Installing Selenium IDE.
To download Selenium IDE you need to have Mozilla Firefox, if you have it well and good if you don’t have it, download it.

Steps to download and install Selenium IDE

1)     Launch Mozilla Firefox Browser.
2)      Open Selenium IDE Add-ons page by typing URL: https://addons.mozilla.org/en-us/firefox/addon/selenium-ide/ in your browser. Next Click on Add to Firefox button.
11111
3)     You will get a popup asking for your permission to install Selenium IDE Add-ons or not. Click the Install button over the popup.

4)     Firefox will then install Selenium IDE software and you will get a popup asking you to restart the Firefox. Click the restart button. The Selenium installation will now be reflected on your browser.
5)     After you restart you ur browser you can find the selenium IDE under the tools menu list present at the top bar

6)     Click on selenium ide your selenium ide will launch

Sections of Selenium IDE

Selenium IDE is divided into different sections. Before start working on it, you must know about these categories:

Menu Bar

present at the uppermost of the Selenium IDE window. The menu bar consists of five sub-modules.

File Menu

 File Menu Create, Save and Export Test Case and Test Suite of Selenium IDE. You can open the file menu by pressing Alt + F, or by clicking on the File menu.

Under File menu you can find:

  • New Test Case: It creates a new blank Test Case
  • Open: It  Open already saved Test Cases.
  • Save Test Case: Saves the opened Test case.
  • Save Test Case As: Saves opened Test Case in a specific location and has a specific name.
  • Export Test Case As: Assists exporting test cases in various languages like Ruby/Python/Java/C# in both Selenium Remote Control and Selenium WebDriver Format.
  • Recent Test Cases: Returns a list of few last saved Test Cases.
  • Add Test Case: Search test cases and merge them into the currently opened test case.
  • Properties: returns the properties opened test case.
  • New Test Suite: creates a blank Test Suite
  • Open Test Suite: Opens existing Test Suite.
  • Save Test Suite: Saves opened Test Suite.
  • Save Test Suite As: Saves opened Test Suite in a specific location and has a specific name.
  • Export Test Suite As: Assists exporting test Suite in various languages like Ruby/Python/Java/C# in both Selenium Remote Control and Selenium WebDriver Format.
  • Recent Test Suites: Returns a list of few last saved Test Suite.

Default Interface of Selenium IDE
Edit Menu

Edit Menu helps to Cut Copy Paste and Insert Command in Selenium IDE Test. You can open the Edit menu by pressing Alt + E, or by clicking on the Edit menu.
Under the Edit menu you can find:

  • Undo: last action or few last performed actions are undone
  • Redo: Re-do the last undone action or series of last undone actions.
  • Cut: Copies and removes the selected command or test step from the current location to some other location in the test.
  • Copy: Copies selected command or test step from current location to some other location in the test. But it does not remove the command from the previous locations.
  • Paste: Pastes cut/copied command to a selected location in the test.
  • Delete: Deletes the chosen command.
  • Select All: Select all the commands in Test Step Pane.
  • Insert New Command: Insert a  row at a selected location to write new commands
  • Insert New Comment: Insert a  row at a selected location to write a new comment

Read also: Selenium 4: New Features and Updates

Actions Menu

Helps us to learn Options to Record Play Run And Debug Selenium IDE Test.

  • Record: It Records the user actions on the webpage via the Firefox Web Browser. While recording, the menu item keeps displaying a chack against items.
  • Play Entire test suite: it play-back/re-run every Test Case in the Test Case Pane, following top to bottom approach.
  • Play the current test case: play-back the selected Test Case.
  • Playtest Suites periodically: let the specified test suite to execute at specific times. It is the best way when test suits are required to be rerun periodically as it does not require any human intervention, once specified it will rerun test cases automatically
  • Toggle Breakpoint: allows you to specify one or more breakpoint(s) to forcefully break the execution at specified steps.
  • Set / Clear Start Point: it permits the testers to select a start point to start executing the test. It is important for subsequent runs.
  • Pause / Resume: this enables the pausing and resuming of the test at any point between the test execution.
  • Step: it permits to step through the playing-back of the test case. It is important for debugging purposes.
  • Execute this command: This allows testers to execute a particular command instead of executing the complete test case. It is important when testers want to see the behavior of any specific command
  • Fastest/Faster/Slower/Slowest: it allows you to set the execution speed from fastest to lowest concerning the responsiveness of the application under test.

Other categories available at Menu Bar are:

Options Menu and Help Menu

Tool Bar

The ToolBar includes the Buttons that Control the execution of test cases, for debugging the test cases, setting up the speed of the test, Stopping, Playing and Recording of test cases.

Test Case Pane

All the test cases recorded by IDE are available in Test Case Pane. It can open more than one test case at the same time and supports easy shuffling between the test cases.

It also offers Test Execution Result Summary including entire Test Suite status, Total number of Test Executed, etc.

Test Case Pane

It is the place where Test Case Steps are recorded. All the user actions are recorded in the order they are performed. It also allows the editing and changing of the test cases

Output Pane

The bottom pane or the Log Pane offers the following functions

  • Log, 
  • Reference, 
  • UI-Element, and 
  • Rollup 

The function performed depends upon which tab is selected.

Record the Selenium IDE Test Case.

  1. Launch Firefox Selenium IDE. Type the URL. Click the Record button, a red button on the top right corner. It will record Test Cases.
  2. In Firefox, type the same URL as in step 1. Firefox will take you to the related webpage.
  3. Right-click anywhere on this page, you will get Selenium IDE context menu. In the context menu go to Show Available Commands> Web Page Name.
  4. Click on MyAccount
  5. Enter UserName and Password and then click on the login button.
  6. To stop the recording click the record button again. Click on the Table tab and you will be able to see the recorded commands.
  7. Click on the Source tab to see HTML Code.

Read also: 11 Awesome Selenium Alternatives For Testers in 2019

Save the Selenium IDE Test Case.

  1. To save a test case go to File Menu and click on Save Test Case As.

File -> Save Test Case As.

  1. Choose the desired location and give your file a name and click on Save.
  2. You can see the name of the saved test case on the left-hand side.
  3. The file will be saved as HTML.

Playback Selenium IDE Test Script

Open a new tab Firefox. Click the Play button in Selenium IDE. It will execute the previously recorded tests.
Selenium Commands

Selenium commands or Selenese are a set of test cases that are deployed to test web applications using Selenium.
Selenium commands are of three types:

Actions

Actions commands control the state of the application. Operations under action commands are:

  1. type this box,
  2. click this link
  3. select option.

Some of these commands can be suffixed with AndWait like click and wait, type and wait. This prompts Selenium to wait until the web page is loaded. If these commands fail, the existing test is stopped.

Accessors

These commands automatically create Assertions and inspect the state of the application.

Assertions

They inspect the state of the application adapts to what is anticipated.
They can be further divided into three categories:

  • Assert:
  • Verify:
  • WaitFor:

Some of the Commonly used commands in Selenium IDE:

  • type: Set the value of the input field
  • open: Opens a web page through the given URL.
  • click clicks on a checkbox, link, button or radio button.
  • clickAndWait: When you click on the checkbox, link, button or radio button, and a new page is loaded it calls waitForPageToLoad.
  • select: It selects an option drop-down.
  • selectFrame: It is used to select a frame from the present window.
  • verify title/assert title: Authenticates an anticipated page title.
  • verifyElementPresent: Confirms if the
  • indicated element is present on the page.
  • highlight: Altersthe backgroundColor of the indicated element.
  • pause: Wait for the indicated time period
  • echo: Prints indicated message in your Selenium command tables.

What are Locators?

Locators in Selenium IDE are used to find and match the elements in the web page that are required to communicate with. The use of the right locator promises faster, more trustworthy and low maintenance tests. But choosing the right locators can sometimes become a challenging task.

Locators in selenium IDE


Locators tell on which GUI elements do Selenium IDE needs to operate on. The correct identification of the locators is very important and it is equally challenging.
There are many commands in Selenium IDE that do not require Locators, but most of the commands do require locators. The locators to be used depends on the AUT.
The various types of locator are:

Locator: ID

It is a common way to locate different elements as every element has a unique ID.

Target Format: id=id of the element

Consider any test app, let it be Facebook.

  • Check the “Email” text box using Firebug and note down Locator: ID
  • Launch Selenium IDE and write “id=(Locator ID you retrieved in the first step)” in the Target box. When you click on the Find button next to the target box, the “Email ID” text box will be emphasized with a yellow and green border. This means that Selenium IDE has located the “Email ID” text box correctly.

Locator: Name

Locator name is quite similar to Locator: ID. The only difference is that here we use name instead of ID.
Target Format: name=name of the element.
Consider any test app, let it be Facebook.

  • Check the “Email” text box using Firebug and note down Locator: Name
  • Launch Selenium IDE and write “Name=(Locator name you retrieved in the first step)” in the Target box. When you click on the Find button next to the target box, the “Email ID” text box will be emphasized with a yellow and green border. This means that Selenium IDE has located the “Email ID” text box correctly.

Locator: Link

This locator is used for hyperlink texts. It can be used by beginning the target with “link=” tailed by hyperlink text.
Target Format: link=link_text

Consider any web app as a text app.

  • Check any element that has a hyperlink text and  using Firebug and notes down Link Text
  • Launch Selenium IDE and write “Link =(Link Text you retrieved in the first step)” in the Target box. When you click on the Find button next to the target box, the corresponding text box will be emphasized with a yellow and green border. This means that Selenium IDE has located the element correctly.

Locator: CSS

CSS Selectors are though a complex method to locate elements on a web page, but they are the most preferred method of locating elements in advanced Selenium as they can even detect elements that have no name or no ID.
CSS Selectors are also strung patterns That has the ability to recognize an element based on its arrangement of HTML tag, id, class, and attributes. CSS Selectors have many formats, but the most  common are:

  • Tag and ID
  • Tag and class
  • Tag and attribute
  • Tag, class, and attribute
  • Inner text

Locator: Xpath

XPath is a language for navigating the DOM (document object model) of a web page. It can locate any element on the web page and is hence the most potent and supple locator.

Some of the Firefox Add-ons that can help in finding  XPath of an element:

Locator: DOM

The Document Object Model is an HTML document that can be accessed using JavaScript. It uses hierarchical dotted notation to locate an element on the page.

Conclusion

If you wish to learn more about selenium we have comprised a tutorial just for you which will take you deep into the tool.

Get an eBook: Download PDF

A Study Towards Regression Testing Techniques and Tools

Regression testing verifies that no new mistakes have been added to the programme after the adjustments have been made by testing the modified portions of the code and the portions that may be impacted due to the alterations. Regression is the term for anything coming back, and in the context of software, it refers to a defect.

When should you do regression tests?

1. When a new feature is added to the system and the code is changed to accommodate and incorporate that feature with the current code.
2. When a software flaw has been found and is being fixed by debugging the code.
3. When a code change is made to improve performance.

App Bug fixing

Regression testing procedure:

Initially, anytime we make changes to the source code for whatever reason—such as adding new functionality or optimising existing code—our software fails in the previously created test suite for apparent reasons when it is run. After the failure, the source code is debugged to find the program’s faults. The necessary changes are done after finding the problems in the source code. Then suitable test cases are chosen from the test suite that already exists and covers all the updated and impacted portions of the source code. If more test cases are needed, we can add them. Regression testing is ultimately carried out utilising the chosen test cases.

Regression testing procedure

  • All test cases are chosen with in this manner from the test suite that is already in place. Although it is the simplest and safest method, it is not very effective.
  • Randomly choose test cases: This strategy involves choosing test cases at random from the test suite already in place; however, it is only effective when every test case has an equal capacity to identify faults, which is extremely uncommon. Because of this, it is rarely used.
  • Choose test cases that cover and test the updated portions of the source code and the parts that are affected by these modifications are chosen in this approach.
  • Pick higher priority test cases: In this method, each test case in the test suite is given a priority code based on its capacity to identify bugs, client requirements, etc. The test cases with the greatest priorities are chosen for regression testing after giving the priority codes.The test case with the highest priority is ranked first. A test case with priority code 2 is less significant than one with priority code 1, for instance.

Read Also: Difference Between Regression Testing and Retesting

  • Tools for regression testing: In regression testing, we often choose test cases from the current test suite itself, ; so, we don’t need to compute their expected outcome and it can thus be readily automated. Automating the regression testing process will be extremely effective and time saving.

The following are the most often used regression testing tools:

  • Selenium
  • WATIR (Web Application Testing In Ruby)
  • QTP (Quick Test Professional)
  • RFT (Rational Functional Tester)
  • Winrunner
Regression testing provides the following benefits:
  • It makes sure that no new defects have been created after the system has received new functionality.
  • Since the majority of the test cases chosen for regression testing are already part of the test suite, their anticipated results are known. As a result, automated tools may readily automate it.
  • It aids in preserving the source code’s quality.
The drawbacks of regression testing include:
  • If automated tools are not employed, it may take a lot of time and resources.
  • Even after relatively minor modifications to the code, it is necessary.

Selenium

It is one of the best automated tools for testing web applications for regression. You may use Selenium Web Driver to create robust browser-based regression automation suites and tests.

A selection of Selenium’s functionalities is available for automating web applications. It is still one of the best tools available for cross platform and browser-based regression testing. Data-driven testing and automated test scripts that cycle over data sets are supported by Selenium. For large-scale quality assurance teams with knowledgeable testers, this is the right course of action. However, small and mid-size teams struggle with its high learning curve.

Features of the Tool:

  1. Selenium supports several OSs, browsers, and environments.
    It works with many different programming languages and testing frameworks.
  2. It is, without a doubt, a fantastic tool for performing regular regression testing.

Read Also: Optimum Software Developer to Software Tester Ratio?

WATIR (Web Application Testing In Ruby)

A Ruby programming language-based open-source package, Watir stands for Web Application Testing in Ruby. It allows for the creation ofto create and maintain simple-to-read and maintain tests on a light and adaptable user interface.

Watir enables a range of user interaction features for website testing, including the ability to click links, complete forms and validate texts across a number of browsers.

Features of the Tool:

  • Extremely portable and user-friendly gadget
  • Excellent browser interaction features are included with this programme.
  • Designed to test web applications.
    Enables the creation of understandable, maintainable, and easy automated tests.
  • Support for cross-platform technologies
    Numerous large corporations, like SAP, Oracle, Facebook, etc., use it
  • Technology independent

QTP (Quick Test Professional)

It is an automated functional testing tool that consumes high resources and requires a license. QTP provides customer support in the form of selenium community forums. For parameterization in QTP, built-in tools are available. QTP supports only Windows and VB Script. There is support for testing on both web and desktop-based applications. There is built-in test report generation within the tool QTP, and there is a built-in object repository in QTP. QTP is user-friendly, and there is a build-in recovery scenario in QTP. Browsers supported in QTP are specific versions of Google Chrome, Mozilla Firefox, and Internet Explorer.

Benefits of Automation using QTP

  • It allows for recording and replay.
  • It allows testers refer to the screen object attributes when recording scripts on an active screen.
  • It has a great system or procedure for identifying objects.
  • It supports a variety of add-ins, including those from PeopleSoft, Oracle, Java, SAP, NET, and others.
  • Through an active screen, you may improve the current tests even without the AUT.
  • It supports well-known automation frameworks, including data-driven testing, modular testing, and keyword testing.
    It has an internal IDE.
  • It can be connected with test management programmes like Winrunner, Quality Center, and Test Director.
  • It is simple to manage several suite kinds, including Smoke, Regression, and Sanity.
  • It works with XML.
  • Through QTP, test reporting is possible for analytical purposes.
    Easily maintained.

RFT (Rational Functional Tester)

An object-oriented automated functional testing tool called Rational Functional Tester can run automated functional, regression, GUI, and data-driven tests. HTML, Java,.NET, Windows, Eclipse, SAP, Siebel, Flex, Silverlight, Visual Basic, Dojo, GET, and PowerBuilder programmes are just a few of the many applications and protocols that RFT supports.

Benefits

The following are the primary advantages of Rational Functional Tester:

  • Reusability: Tests may be immediately performed on several iterations of an application, cutting down on the time required for regression testing.
  • Consistency: The exact same actions will be taken each time an RFT script-based test is executed.
  • Productivity: Automated testing is quick and flexible, requiring no additional resources.
  • Rational Team Concert and Rational Clear Case are two source control management technologies that RFT interfaces with. Users may manage their RFT functional test assets using either Rational Clear Case or Rational Team Concert by integrating RFT with these source control management programs.
  • RFT and Rational Quality Manager have excellent integration. Users may run test scripts from within Rational Quality Manager after integrating RFT with RQM using the adaptor.

Features

  • Broad skills match: The RFT tool is designed for users with a range of technical skills to ensure that your quality assurance team is not limited to basic testing and that other subject matter experts in your company can participate in and comprehend the test flow using a visual storyboard format.
  • New software versions can employ user interface features that technology has learned, reducing time spent writing new test scripts.
  • Automated scripts – Rational Functional Tester gives your development teams the ability to write scripts with keyword associations that are simple to reuse, increasing productivity.
  • Using the Eclipse Java Developer Toolkit editor, your team may quickly and easily develop Java test scripts. It includes sophisticated debugging features and automates code completion

Read Also: How Much Does App Testing Cost?

Winrunner

For functional testing, Win Runner is a popular automated software testing tool. Mercury Interactive created it. C and web technologies including VB, VC++, D2K, Java, HTML, Power Builder, Delphe, and Cibell (ERP) are supported. WinRunner makes it simple to create tests by capturing your application development process. You may navigate your application’s GUI (Graphical User Interface) elements by pointing and clicking.

A test script written in the C-like Test Script Language is generated by WinRunner. With hand programming, we can improve our test scripts even further. The Function Generator, which is part of WinRunner, makes it simple and quick to add functions to our recorded tests.

The crucial features of WinRunner include:

  • We are able to do functional and regression testing on a range of application software created in languages, including PowerBuilder, Visual Basic, C/C++, and Java. Additionally, we are able to test ERP/CRM software programs.
  • Runs tests on many browser settings, including Internet Explorer and Netscape Navigator, as well as all versions of the Windows operating system.
  • In the “record” mode, we may record GUI operations. A test script is automatically generated by WinRunner.
    To compare actual and anticipated outcomes, we can add checkpoints. Bitmap checkpoints, GUI checkpoints, and web links are some examples of the checkpoints.
  • It offers a tool for test case synchronization.
    A recorded test may be transformed into a data-driven test using Data Driver Wizard. So, within a test script, we may swap out data for variables.
  • During automated testing, database checkpoints are utilised to validate data in a database. We will maintain database integrity and transaction correctness by highlighting the records that are added, removed, changed, or updated.
  • WinRunner is taught to detect, record, and replay custom objects using the Virtual Object Wizard.
  • The reporting tools offer the ability to create test results automatically and examine flaws.
  • Many testing-related tasks may be automated by integrating WinRunner with the testing management programme, TestDirector.

Silktest

Silk Test is a solution for corporate application regression and function testing. It was first created by Segue Software, which Borland purchased in 2006. Micro Focus International purchased Borland in 2009. QA Partner was the original name of the product from 1993 to 1996.

Silk Test provides a range of clients:

  • Silk Test Workbench supports visual automated testing (much like the previous TestPartner) and uses the VB.Net scripting language.
  • For automated scripting, Silk Test Classic makes use of the domain-specific 4Test language. Similar to C++, it is an object-oriented language. Classes, objects, and inheritance are all used.
  • UFT Developer, formerly known as Silk4J, enables automation in Eclipse using Java as the scripting language.
  • UFT Developer, formerly Silk4Net, enables the same functionality in Visual Studio using VB or C#.

Conclusion

An essential component of software development processes is test automation. Similar to this, automated regression testing is regarded as a crucial component.

Product teams may obtain more detailed feedback and react immediately with a speedy regression testing procedure. Regression testing finds new vulnerabilities early in the deployment cycle, saving firms the expense and work of fixing the accumulated flaws. Apparently, a little change can occasionally have a cascading effect on the product’s essential capabilities.

Because of this, developers and testers must not let any modification—no matter how small—that falls outside of their sphere of influence.
Functional tests don’t take into account how new features and capabilities interact with the old ones; they merely look at how they behave. Therefore, determining the main cause and the product’s architecture is more challenging and time-consuming without regression testing.

How to Outsource Website Testing Services?

Before we go into why website testing is being outsourced, let’s look at what this entails. Outsourcing is an agreement made by one company with another for website testing.

There are some best practices expected by clients who outsource website testing.

1. Clarify the needs:

Outsourcing website testing needs a clear work scope. If your customer does not offer them, you must define and explain the needs. Don’t put it off; make it simple for the client to work with you. Both parties should evaluate the scope on a regular basis to ensure that there are no disputes or misunderstandings.

2. Create a sense of collaboration with the customer:

Make yourself a member of the client’s team, not a remote add-on. Know who the players are, what their habits are, and when they will evolve so that you can fit into their processes. Harmonize with the development team, follow their rhythm, and accept their vision.

3. Make use of varied time zones:

Assume the developers are in the United States and the testers are in Europe. After coders in America finish their job for the day, they may send their build to testers in Europe, whose day begins hours later. Use the time overlap to connect while taking advantage of your clients’ leisure to get a lot of work done and show them the results the next day.

4. Enhance communication:

To eliminate knowledge asymmetry, timely communication is necessary when outsourcing website testing. Many technologies, such as instant chat (Google Talk, MSN), email or SMS, shared documents and dashboards, problem tracking systems, configuration management tools, screen sharing, and so on, can be employed. Before the project begins, both parties should agree on the communication routes.

Read Also: 7 Important Tips for Successful QA Outsourcing

5. Be flexible and adaptable:

Each company has its own workflow and methods. As an outsourced website testing services firm, we adhere to our customers’ QA protocols, which necessitates the use of adaptable teams. When working with a new client, the outsourced QA testing team should be able to swiftly learn new workflows and the testing process, as well as adapt to a new work style.

6. Recognize your customer’s cost structure:

Your client is outsourcing website QA to you because you can deliver a service at a lower cost than they could if they performed it themselves. Perhaps you are giving skills that would be too expensive to acquire and bring in-house. Understanding the specific scenario for each of your clients can help you determine whether you are pricing yourself out of a project or whether there is a broader area of services for you to supply.

7. Emphasis the need of effective written language skills:

English is the worldwide business language. English is frequently the second language of both the customer and the outsourced team. This can be difficult when conversing often via email. One of the most critical criteria for project success is smooth and effective communication between the customer and the outsourced QA team in charge of testing. Make certain that your communication is succinct, thorough, and correct.

8. Be the authoritative figure:

Be the expert in the area where the client wants you to be an expert – quality assurance and testing. Be or become a domain specialist, such as one in financial software. Highlight your expertise and ability to apply it to completely evaluate your client’s goods. Finally, become a specialist in the client’s unique application.

Read Also: 10 Reasons Why Outsourcing App Testing is the Best

9. Make yourself visible:

Lack of visibility with key executives in your customer’s organisation may be terrible since you want your worth to be recognised throughout the client. It may be challenging to gain higher awareness as the single member of the outsourced QA testing team. First, identify important managers and provide them with regular updates, statuses, and outcomes (particularly if they are positive). Visit the client and make a point of seeing and speaking with those important managers, even if just for a few minutes.

10. Establish communication priorities:

Although most of the items on this list imply it, it cannot be overstated. Communicate with a goal in mind. Don’t just bombard your customer with information. Selective communication is required. Ensure that the appropriate information and analysis are sent to the appropriate individual. A developer may value a great deal of technical detail, but the development manager is interested in timeline information.

app testing

Why outsource website testing is necessary?
Enhancing existing projects

If you want to test your own website, you may have no prior expertise or experience. As a result, hiring a website testing firm is the ideal option. In general, the most experienced of these organisations have gone through trial and error during their career in the sector and are continually analysing risks and errors and correcting them, which works in your favour when you hire them. They are capable of delivering the efficient outcomes you want.

Global economic disparities

Website testing costs far less in poor nations than in developed countries. You may employ a whole testing team from India or China at the same cost as hiring one or two testers in the United States or Germany. As a result, outsourcing website testing will help you save money.

Find the best candidate for the position

Your location, business size, and other factors all have an impact on the website testing constraints you encounter during a project. For example, you could wish to include one of the most recent technologies into your project. However, you may not be able to find somebody with relevant experience to assist you. Or perhaps you started a project, but were unable to complete it due to a lack of resources or experience. Outsourcing is useful in these instances. You may locate someone suited for the job from all around the world with the skills to complete your testing needs on time and within budget.

Task prioritisation

Prioritising jobs is an excellent approach to increase work productivity while also managing time so that all essential project activities are finished on time. Even if your team handles the majority of them, things like app development, marketing and other management activities may still require people. Outsourcing is the ideal answer in these cases.

Conclusion

Outsourcing the testing of any product is always a good alternative. It helps us concentrate on our core work and save time. Testing outsourcing allows us to prioritise tasks and achieve excellent milestones. Outsourcing is the best solution for testing in all types of development.