Path coverage testing is a testing technique that falls under the category of white-box testing. Its purpose is to guarantee the execution of all feasible paths within the source code of a program.
If a defect is present within the code, the utilization of path coverage testing can aid in its identification and resolution.
However, it is important to note that path coverage testing is not as mundane as its name may suggest. Indeed, it can be regarded as an enjoyable experience.
Consider approaching the task as a puzzle, wherein the objective is to identify all conceivable pathways leading from the initiation to the culmination of your program.
The identification of additional paths within a software system contributes to an increased level of confidence in its absence of bugs.
What is Path Coverage Testing?
A structural white-box testing method called path coverage testing is used in software testing to examine and confirm that every possible path through a program’s control flow has been tested at least once.
This approach looks at the program’s source code to find different paths, which are collections of statements and branches that begin at the entry point and end at the exit point of the program.
Now, let’s break this down technically with an example:
Imagine you have a simple code snippet:
def calculate_discount(amount):
discount = 0
if amount > 100:
discount = 10
else:
discount = 5
return discount
In this code, there are two paths based on the condition: one where the amount is greater than 100, and another where it’s not. Path Coverage Testing would require you to test both scenarios:
- Path 1 (amount > 100): If you test with calculate_discount(120), it should return a discount of 10.
- Path 2 (amount <= 100): If you test with calculate_discount(80), it should return a discount of 5.
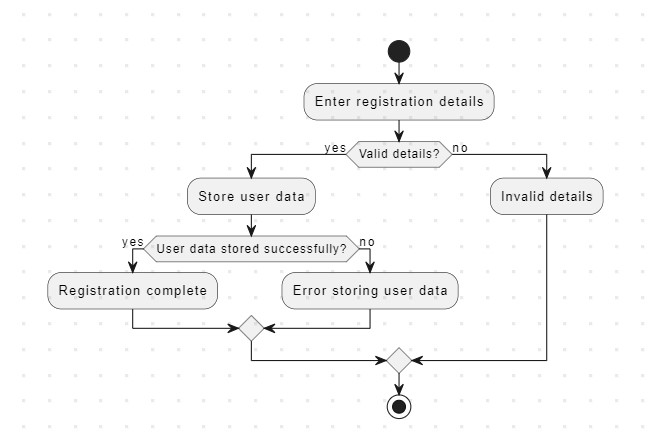
Let’s see another example of the user registration flow with the help of a diagram
Steps Involved in Path Coverage Testing:
In order to ensure thorough test coverage, path coverage testing is a structural testing technique that aims to test every possible path through a program’s control flow graph (CFG).
Path coverage testing frequently makes use of the idea of cyclomatic complexity, which is a gauge of program complexity. A step-by-step procedure for path coverage testing that emphasizes cyclomatic complexity is provided below:
Step #1) Code Interpretation:
Start by carefully comprehending the code you want to test. Learn the program’s logic by studying the source code, recognizing control structures (such as loops and conditionals), and identifying them.
Step #2) Construction of a Control Flow Graph (CFG):
For the program, create a Control Flow Graph (CFG). The CFG graphically illustrates the program’s control flow, with nodes standing in for fundamental code blocks and edges for the movement of control between them.
Step #3) Calculating the Cyclomatic Complexity:
Determine the program’s cyclomatic complexity (CC). Based on the CFG, Cyclomatic Complexity is a numerical indicator of a program’s complexity. The formula is used to calculate it:
CC = E – N + 2P
Where:
The CFG has E edges in total.
The CFG has N nodes in total.
P is the CFG’s connected component count.
Understanding the upper limit of the number of paths that must be tested to achieve complete path coverage is made easier by considering cyclomatic complexity.
Step #4) Determine Paths:
Determine every route that could lead to the CFG. This entails following the control’s path from its point of entry to its point of exit while taking into account all potential branch outcomes.
When determining paths, you’ll also take into account loops, nested conditions, and recursive calls.
Step #5) Path counting:
List every route through the CFG. Give each path a special name or label so you can keep track of which paths have been tested.
Step #6) Test Case Design:
Create test plans for each path that has been determined. Make test inputs and circumstances that will make the program take each path in turn. Make sure the test cases are thorough and cover all potential paths.
Step #6) Run the Test:
Put the test cases you created in the previous step to use. Keep track of the paths taken during test execution as well as any deviations from expected behavior.
Step #7) Coverage Evaluation:
Analyze the testing-related coverage achieved. Track which paths have been tested and which ones have not using the path labels or identifiers.
Step #8) Analysis of Cyclomatic Complexity:
The number of paths covered should be compared to the program’s cyclomatic complexity. The Cyclomatic Complexity value should ideally be matched by the number of paths tested.
Step #9) Find Unexplored Paths:
Identify any paths that the executed test cases did not cover. These are CFG paths that have not been used, suggesting that there may be untested code in these areas.
Step #10) Improve and iterate:
Make more test cases to cover uncovered paths if there are any. To ensure complete path coverage, this might entail improving already-existing test cases or developing brand-new ones.
Step #11) Re-execution:
To cover the remaining paths, run the modified or additional test cases again.
Step #12) Examining and Validating:
Examine the test results to confirm that all possible paths have been taken. Make sure the code responds as anticipated in all conceivable control flow scenarios.
Step #13) Report and supporting materials
Keep track of the path coverage attained, the cyclomatic complexity, and any problems or flaws found during testing. This documentation is useful for quality control reports and upcoming testing initiatives.
The Challenge of Path Coverage Testing in Complex Code with Loops and Decision Points
It takes a lot of test cases or test situations to perform path coverage testing on software with complex control flows, especially when there are lots of loops and decision points.
This phenomenon results from the complex interaction between conditionals and loops, which multiplies the number of possible execution paths that must be tested.
Recognizing the Challenge
Decision Points Create Branches in the Control Flow of the Program: Decision points, frequently represented by conditional statements such as if-else structures, create branches in the program’s control flow.
Every branch represents a different route that demands testing. The number of potential branch combinations grows exponentially as the number of decision points increases.
Complexity of Looping: Loops introduce iteration into the code. Depending on the loop conditions and the number of iterations, there may be different paths for each loop iteration.
Because there are more potential execution paths at each level of nested loops, the complexity increases in these situations.
Combination Explosion: The number of possible combinations explodes when loops and decision points coexist.
Each loop may go through several iterations, and during each iteration, the decision points may follow various paths.
As a result, the number of distinct execution paths can easily grow out of control.
Test case proliferation examples include:
Consider a straightforward example with two decision points and two nested loops, each with two potential outcomes:
- Loop 1 iterates twice.
- Three iterations in Loop 2 (nested within Loop 1).
- First Decision Point: Two branches
- Second decision point: two branches
To test every possible path through the code in this simple scenario, you would need to create 2 x 3 x 2 x 2 = 24 unique test cases.
The necessary number of test cases can easily grow out of control as the code’s complexity rises.
Techniques for Controlling Test Case Proliferation
Priority-Based Testing:
Prioritize testing paths that are more likely to have bugs or to have a bigger influence on how the system behaves. This can direct testing efforts toward important areas.
Equivalence Partitioning
Instead of testing every possible path combination in detail, group similar path combinations together and test representative cases from each group.
Boundary Value Analysis
Testing should focus on boundary conditions within loops and decision points because these frequently reveal flaws.
Use of Tools
To manage the creation and execution of test cases for complex code, make use of automated testing tools and test case generation tools.
In conclusion, path coverage testing can result in an exponential rise in the number of necessary test cases when dealing with complex code that contains numerous decision points and loops. To successfully manage this challenge, careful planning, prioritization, and testing strategies are imperative.
Advantages and Disadvantages of Path Coverage Testing
Advantages of Path Coverage Testing:
- Provides comprehensive code coverage, ensuring all possible execution paths are tested.
- Effectively uncovers complex logical bugs and issues related to code branching and loops.
- Helps improve software quality and reliability by thoroughly testing all code paths.
- Utilizes a standardized metric, Cyclomatic Complexity, for assessing code complexity.
- Useful for demonstrating regulatory compliance in industries with strict requirements.
Disadvantages of Path Coverage Testing:
- Demands a high testing effort, particularly for complex code, leading to resource-intensive testing.
- Requires an exponential growth in the number of test cases as code complexity increases.
- Focuses on code paths but may not cover all potential runtime conditions or input combinations.
- Maintaining a comprehensive set of test cases as code evolves can be challenging.
- There is a risk of overemphasizing coverage quantity over quality, potentially neglecting lower-priority code paths.
FAQs
What is path coverage testing vs branch coverage?
| Aspect | Path Coverage Testing | Branch Coverage |
| Objective | Tests every possible path through the code. | Focuses on ensuring that each branch (decision point) in the code is exercised at least once. |
| Coverage Measurement | Measures the percentage of unique paths executed. | Measures the percentage of branches that have been taken during testing. |
| Granularity | Provides fine-grained coverage by testing individual paths through loops, conditionals, and code blocks. | Provides coarse-grained coverage by checking if each branch decision (true or false) is executed. |
| Complexity | More complex and thorough as it requires testing all possible combinations of paths, especially in complex code. | Comparatively simpler and may not require as many test cases to achieve coverage. |
| Bugs Detected | Effective at uncovering complex logical bugs and issues related to code branching, loops, and conditional statements. | May miss certain complex bugs, especially if they involve interactions between multiple branches. |
| Resource Intensive | Requires a high testing effort, often resulting in a large number of test cases, which can be resource-intensive. | Typically requires fewer test cases, making it more manageable in terms of resources. |
| Practicality | May not always be practical due to the sheer number of paths, especially in large and complex codebases. | Generally more practical and is often used as a compromise between thorough testing and resource constraints. |
| Completeness | Offers a higher level of completeness and confidence in code coverage but can be overkill for some projects. | Provides a reasonable level of coverage for most projects without being excessively detailed. |
| Examples | Used in critical systems, safety-critical software, and where regulatory compliance demands thorough testing. | Commonly used in standard software projects to ensure basic code coverage without excessive testing. |
What is 100% Path Coverage?
In the context of software testing, 100% path coverage refers to the accomplishment of complete coverage of all potential execution paths through the code of a program.
It indicates that every single path in the code, including all branches, loops, and conditional statements, has undergone at least one test.
Every possible combination of choices and conditions in the code must be put to the test in order to achieve 100% path coverage.
This involves taking into account both the “true” and “false” branches of conditionals as well as loops and all of their iterations.
In essence, it makes sure that each logical path through the code has been followed and verified.
Although achieving 100% path coverage is the ideal objective in theory for thorough testing, in practice it can be very difficult and resource-intensive, especially for complex software systems.
Since there are so many potential paths and so much testing to do, it may not be feasible to aim for 100% path coverage in many real-world situations.
As a result, achieving 100% path coverage is typically reserved for extremely important systems, applications that must be safe, or circumstances in which regulatory compliance requires thorough testing.
A more practical approach might be used in less important or resource-constrained projects, such as concentrating on achieving sufficient code coverage using strategies like branch coverage, statement coverage, or code reviews while acknowledging that 100% path coverage may not be feasible or cost-effective.
Does 100% Path Coverage Mean 100% Branch Coverage?
No, complete branch coverage does not equate to complete path coverage. 100% branch coverage focuses on making sure that every branch (decision point) in the code is tested at least once, as opposed to 100% path coverage, which tests every possible execution path through the code, including all branches, loops, and conditional statements. In other words, achieving 100% branch coverage ensures that all possible paths, including combinations of branches, have been tested, but it does not ensure that all possible paths have been taken.
A more thorough and challenging criterion is 100% path coverage, which calls for testing every path through the code, which may involve covering multiple branches in various combinations.
Is path Coverage Black Box Testing?
Path coverage testing is typically regarded as a white-box testing method rather than a black-box testing method.
Black-box testing is primarily concerned with evaluating a system’s usability from the outside, without having access to its internal structure or code.
The specifications, requirements, and anticipated behaviors of the system are frequently used by testers to create test cases.
Path coverage testing, on the other hand, is a white-box testing technique that needs knowledge of the internal logic and code structure.
The structure of the code, including its branches, loops, conditionals, and decision points, is known to testers, who use this information to create test cases.
Making sure that every possible route through the code has been tested is the aim.
While white-box testing methods like path coverage testing concentrate on looking at the code’s internal structure and behavior, black-box testing aims to validate the functionality of the software based on user requirements.
What are the Two Types of Path Testing?
Path testing can be divided into two categories:
Control Flow Testing:
A white-box testing method called control flow testing aims to test various paths through the code in accordance with the program’s control flow structure.
Different branches, loops, and decision points are all included in the test cases’ execution of the code.
Example: Take into account a straightforward program with an if-else clause:
if x > 0: y = x * 2
alternatively: y = x / 2
You would develop test cases for both ends of the if-else statement when conducting control flow testing. The “x > 0” branch would be put to the test in one test case, and the “x = 0” branch in the other.
Data Flow Analysis
Data manipulation and use within the code are the main topics of data flow testing, also referred to as data dependency testing.
In order to find potential data-related problems, such as uninitialized variables or incorrect data transformations, it entails developing test cases that investigate the flow of data through the program.
Consider the following snippet of code, for instance:
x = 5 y = x + 3 z = y * 2
To make sure that the values of variables are correctly transmitted through the code, you would create test cases for data flow testing.
For instance, you could develop a test case to ensure that the value of z after the calculations is indeed 16.
White-box testing methods such as control flow testing and data flow testing both offer various perspectives on the behavior of the code.
Data flow testing focuses on the flow and manipulation of data within the code, whereas control flow testing emphasizes the program’s control structures and execution paths. To achieve thorough code coverage and find different kinds of defects, these techniques can be used separately or in combination.