Web Application Testing Manually (Step by Step A Complete Guide)

Web applications are a subset of application software, and application software is nothing more than the applications that consumers utilise. Every day, we utilise web applications, such as Facebook, LinkedIn, Amazon, and online portals; everything falls under the category of web applications. Software testing is a component of the software development process and an activity that detects and identifies faults in software. The primary goal of testing is to deliver a quality product to the client.

Manual testing is the process of comparing the behaviour of created code (software, module, API, feature, etc.) to the intended behaviour (requirements). In Manual Web Application Testing, when it comes to web apps, there is a lot that goes into creating world-class user experiences. Naturally, it all starts with extensive manual software testing. As a result, manual testing is an essential component of any comprehensive software testing process.

What exactly is manual testing?

Manual testing of web applications is the process of executing test cases by hand. This type of testing occurs in the absence of automated technologies. In reality, because Web Application Manual Evaluating necessitates manually testing a software product, the end product is precise. Testers check for faults that may interfere with the app’s usability. Manual testing is used by businesses to validate their products. Similarly, businesses attempt to analyse and qualify a web app product based on factors, such as correctness, completeness, usability, efficiency, and others.

Manual software testing is the first step in creating pleasing user interfaces. Manual testing is used by businesses as a fundamental strategy to producing high-quality software products. Businesses seldom believe in complete automation. This is due to the fact that comprehensive automation comes with a number of financial and time restrictions. Manual testing, albeit labour demanding, is a vital requirement for determining automation viability. Manual testers help firms uncover flaws and gain a realistic understanding of how customers will interact with their online apps.

Read Also: Manual or Automated Testing: Which to Use?

Why is manual testing essential in the development of web applications?

Manual software testing is the secret sauce in the majority of web app development projects’ testing phases. When it comes to testing web apps for aesthetic concerns, automated testing technologies are ineffective. Human sensitivity is the best judge of things, like gestures, image colour, letter size, and so on. As a result, automated testing makes it harder to validate a web app’s User Experience and User Interface.

  • Efficiency

Manual testing successfully overcomes the constraints introduced by automated testing. As a result, app development teams focused on user experience and GUIs that are regularly evolving rely significantly on manual testing to ensure success.

When teams are creating apps from the ground up in the early phases of web app development, the majority of features are in active deployment. It is preferable to begin with manual testing during this time. Because, when it comes to manual testing, one key benefit is its seamless execution for bespoke modules based on business needs. Manual testing can be accomplished with ease and perfection without the need of any fancy code or sophisticated applications.

  • Cost effective

When compared to expensive test automation technologies, the cost of manual testing is significantly less. Integrating the high-level expertise required to run automation tools is an added cost. Manual testing abilities are easy to learn and cost less money. Furthermore, manual testing is easier to implement.

Read Also: How to Improve Your Manual Testing Skills ?

In the event of unanticipated changes in the web app development process, manual testing is a readily flexible and well-suited solution. It’s also a good option for developers who need to test the web app after making modifications. Human observation and intuition can be used during manual testing. It contributes significantly to the overall consumer experience.

Furthermore, manual exploratory testing assists firms in proactively searching for edge situations and unanticipated concerns. Manual testers will occasionally hand-code tests. Hand-coded test suites might take many weeks to complete. In such circumstances, manual testing gives organisations with immediate benefits.

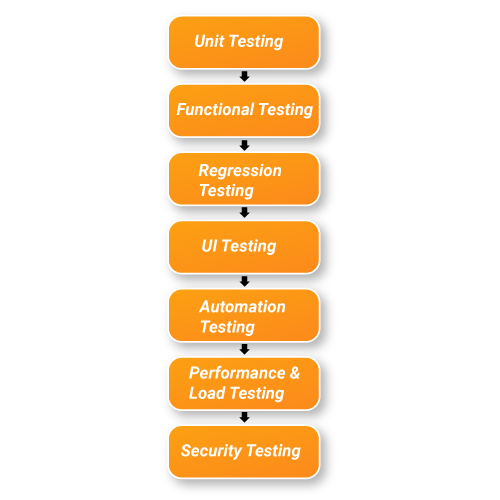
Manual Web Application Testing Techniques

The following are the many forms of Manual Testing for Web Applications that firms must perform:

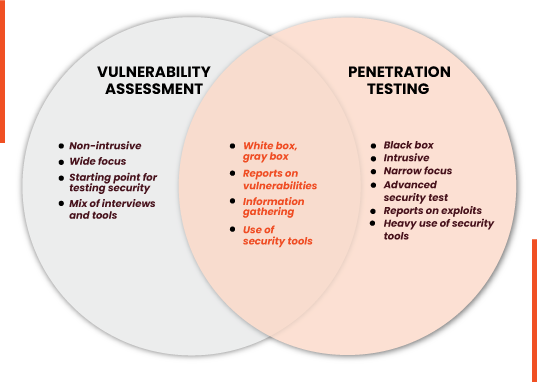
1. Black Box or Functional Testing:-

The internal details of a programme are not accessible during functional testing, and the software is viewed as a black box. A test engineer is solely concerned with the component of the programme that is visible outside of the programme, namely input and output.

A test engineer adds input to a programme, examines the program’s externally visible output, and decides whether or not the programme output is the intended output. The program’s requirements definition and the attributes of the program’s input and output domains are used to pick inputs. A test engineer is only concerned with the functionality and features specified in the programme specification.

2. White Box or Structural Testing:-

In structural testing, the attention is mostly on source code, with a particular emphasis on control flow and data flow. The flow of control from one command to another is referred to as control flow.

Control can be passed from one instruction to another in a variety of methods, including one instruction after another, function calls, message passing, and interrupts. Conditional statements disrupt the program’s typical, sequential flow of control. The transmission of values from one variable or constant to another variable is referred to as data flow. The data flow component of a programme is determined by the definitions and usage of variables.

Read Also: Top 10 Manual Testing Tools

3. Unit Testing:-

Unit testing is the isolation of programme units. However, there is no agreement on what constitutes a unit. Functions, processes and techniques are examples of frequently known units. A class in an object-oriented programming language can also be thought of as a programme unit.

A programme unit is a piece of code, such as a function or class method, that is executed from outside the unit and can invoke additional programme units. Furthermore, it is believed that a programme unit will implement a well-defined function that will provide a certain amount of abstraction to the implementation of higher level functions. A programme unit’s function may or may not be directly related to a system-level function.

4. System Testing:-

System testing is the process of validating the entire and fully integrated software product. A system test is used to examine the end-to-end system requirements. Typically, software is just one component of a broader computer-based system.

Finally, the programme is linked to other software/hardware systems. System testing is described as a sequence of tests designed only to exercise the entire computer-based system.

5. Integration Testing:-

Integration testing is a sort of testing in which software modules are conceptually integrated and evaluated as a group. A typical software project comprises of several software modules written by various programmers. The goal of this level of testing is to identify flaws in the interaction of various software components when they are integrated.

Integration testing focuses on data transfer between these modules. As a result, it is also known as ‘I & T’ (Integration and Testing), ‘String Testing,’ and, on occasion, ‘Thread Testing.’ Software developers and integration test engineers collaborate to do integration testing. The goal of integration testing is to build a relatively stable system capable of withstanding the rigours of system-level testing.

Read Also: How to Do Security Testing For Web Applications

6. Acceptance Testing:-

Acceptance testing is a formal test that is performed to assess whether a system meets its acceptance criteria—the requirements that the system must meet in order to be approved by the client. It assists the client in deciding whether to accept or reject the system. If the acceptance test cases fail, the client normally has the right to refuse delivery of the product.

7. Regression Testing:-

Regression testing is another type of testing that occurs throughout a system’s life cycle. When a system component is changed, regression testing is undertaken. The main goal of regression testing is to ensure that the update did not create any new flaws in the area that was not modified.

To be more specific, regression testing is not a separate level of testing. New tests are not developed during regression testing. Instead, tests are chosen, prioritised, and performed from an existing pool of test cases to guarantee that nothing breaks in the new software version. Regression testing is a costly procedure that consumes the majority of testing effort in the industry.

8. Smoke Testing:-

Smoke testing enters the picture when the developer team delivers build software. The goal of smoke testing is to discover whether or not the built programme is testable. It is done during the “software development” process. This is often referred to as “Day 0.” It is a time-saving method.

It minimises testing time since testing is done only when the application’s essential functionalities are not working or when key issues are not addressed. The workflow of the application’s main and key functions is the focus of Smoke testing.

9. Performance Testing:-

It is the most crucial aspect of non-functional testing. This testing generally describes how rapidly the server replies to the user’s request. While performing performance testing on the application, we will focus on numerous elements, such as response time, load, and application stability. We will do performance testing after the programme has been stabilised and transferred to production, and it may be used by numerous users concurrently, which may cause some performance concerns. The tester does one round of performance testing to avoid these performance concerns.

10. Load Testing:-

Load testing is an essential part of performance testing that is used to evaluate the software’s performance by applying some load. We also learn about its technique, why we need to perform load testing, the purpose of load testing, examples, different load testing strategies, and the benefits and drawbacks.

In non-functional software testing, load testing is an integral component of performance testing. Load testing is the process of assessing the performance of an application by introducing a load that is less than or equal to the desired load.

11. Stress Testing:-

Stress testing is an important aspect of performance testing and is used to evaluate an application’s behaviour by delivering a load larger than the anticipated load. We also learn about its procedure, why we need to undertake stress testing, goal of stress testing, examples, various elements of stress testing, and the benefits and drawbacks.

12. Endurance Testing:-

Endurance testing involves assessing the system’s performance under various load situations over an extended period of time. Endurance testing is an important component of non-functional testing. It is also known as Soak testing and Lifespan testing in general. Endurance testing is performed at the end of the performance run cycle. We conducted endurance testing to measure the reaction of a tested component under probable duplicated scenarios for a particular load and time. Simply said, the term “endurance” is used to indicate something’s ability to last, which is also known as durability, ability, or endurance.

13. Exploratory Testing:-

If no need exists, we do one round of exploratory testing. So, for this, we will first explore the application in all conceivable ways, learning the application’s flow, producing a test document, and then testing the application; this method is known as exploratory testing. If we want to understand an application, we will first perform unit or component testing.

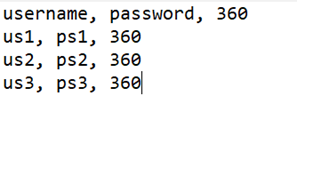
For example, if the application has a login page with many elements, we will understand each part and perform component testing, but we are actually doing exploratory testing because we are exploring the application.

Conclusion

Manual testing has been determined to be the mother of all sorts of testing since it necessitates extensive knowledge from the inside out, and all other types of testing stem from manual testing. Much of the testing literature is riddled with jargon, which is understandable given that testing technology has evolved over decades and through the efforts of dozens of writers.

Testing is critical to obtaining and assessing the quality of a software product. On the one hand, we increase product quality by repeating a test-find-defect-fix cycle during development. When we do system-level testing before releasing a product, we analyse how good our system is.

What is Cloud Testing? Benefits, challenges, tools and more!

Traditional Software testing requires costly and dedicated infrastructure and sources.

Software is growing in complexity which makes it very tough and pricey to build and preserve testing facilities that imitate actual-existence environments in-house.

The maximum consistent issue in software services and products is evolution. This evolution is mainly due to new technologies and person/patron necessities; one such technology is Cloud Computing aka cloud testing.

In cloud testing, Cloud computing environments are used to simulate an actual global state of affairs.

Cloud refers to software programs checking out the usage of assets from the cloud infrastructure this is acquired on-call at a reasonable cost due to the pay-according-to-use nature of cloud computing.

It does not shop facts on private computer systems. It gives on-call the availability of PC offerings like servers, data storage, networking, databases, and so on.

What is cloud computing?

The “cloud” has been used as a metaphor for the Internet browser and an Internet connection Cloud computing is on-demand access, through the net, to computing resources—programs, servers facts Storage, improvement tools, networking skills,

Cloud computing is a way of leveraging the Internet to consume software or other IT offerings on call. Users’ percentage processing electricity, Storage space, bandwidth, reminiscence, and software.

Users will pay as they pass and handiest use what they need at any given time, preserving the price to the consumer. Cloud computing is a business model as well.

Instead of buying and installing the physical infrastructure essential to run software packages, Cloud computing gives a streamlined, simplified strategy to this complexity and the capital expenditure it necessitates.

Cloud computing models.

There are 3 models of Cloud Services:

Saas:  Software as a service is a cloud version that provides programs over the internet as a carrier.

Users no longer to install and hold the software on their devices, they can get access to it through the net, rather than managing the software and hardware with the aid themselves.

It is likewise called a Web-based software program, hosted software.

It runs on SaaS service provider servers and manages software applications, inclusive of security, availability, and overall performance.

Paas: Platform as a Service (PaaS) is a cloud model in which hardware and software assets are provided to users over the net by a third-party supplier.

These resources are required for application development. A PaaS service provider hosts the hardware and software on its infrastructure and developers install hardware and software to run new software applications freely.

Iaas: Infrastructure as a service (IaaS) is a cloud version that provides digital computing sources over the net. A user can get a very new digital system with the desired configurations and the use of IAAS without spending an extra price.

Types of Cloud

  • A public cloud is a service provided by a cloud computing service provider to most people. These services can be availed by any person who desires to use them; all they need to do is pay for the offering’s services.
  • Private cloud, this the infrastructures are provided for the different use of an organization. The company can be the proprietor of the infrastructure, or a 3rd party might also own them.
  • Community cloud, the infrastructures are given for using a particular group of users from organizations that represent the specific community.
  • A hybrid cloud is the combination of the above model.

What is Cloud Testing?

Cloud testing means software testing by the resources from the cloud infrastructure. In this kind of testing, the software program to be examined takes the benefit of cloud infrastructure and technology to simulate an actual global scenario.

Cloud computing has affected all components of the software program existence cycle, including software testing.

Testing as a Service (TaaS) is terminology like SaaS, IaaS, and PaaS in cloud computing. it consists of the usage of the cloud and testing of the cloud.

TaaS is a model in which testing activities are purchased or hired on the customer’s demand from the third party which has all the testing resources for a real-world environment.

This model gains more recognition when technology and customers’ requirements become more complex, and the need for high-quality, error-free, easy-to-use, and flexible software arises.

TaaS has aloof the problem of installing and maintaining the test environment and sourcing of test assistance.

This helps to reduce the costs of software production. Almost all software testing can be completed e on the cloud

Why do you need Cloud testing/ benefits of cloud testing?

  • Cloud testing has become very critical in software program development these days, and the need to perform testing as a service (TaaS) can’t be overemphasized.
  • In conventional software testing, the company desires to have the hardware and software program for testing, and it is very high priced to hold the hardware and software program and also to resume their license.
  • Cloud technology brings support using presenting a way to check the software in a completely challenging and dynamic environment the use of the pay-as-you-use feature of the cloud, cuts the fee of software production.
  • Virtualization, a vital function of cloud generation gives a manner to check software programs in one-of-a-kind surroundings like extraordinary working structures, configuration, and systems.
  • Using cloud testing helps to improve the performance of software program testing by way of decreasing the time to construct the test environment.

Cloud Testing tools.

SOASTA: CloudTest is a production overall performance testing device for Web packages. It can simulate thousands of virtual public cloud infrastructure services.

ITKO LISA: This product is designed to improve the effectiveness of the software program development teams, especially the ones concerned with cloud computing and custom applications

LOADSTORM: This is a tool that is straightforward and much less high-priced. It is used for load checking out of internet-primarily based and mobile applications.

BLAZE METER: This tool is utilized in measuring load checking out and peer-to-peer overall performance of cellular applications, websites, and application programming interfaces.

iGATE PATNI: Two businesses, iGATE and Patni, got into an alliance and gave delivery to one of India’s largest IT businesses, iGATE Patni. This organization also provides a TaaS solution, which is a cloud-based framework for dynamically scalable and occasional-fee take-look at automation.

Types of testing that can be performed in cloud testing:

FUNCTIONAL TESTING

Functional testing is a high-quality warranty check that deals with all of the consumer necessities, affords the capacity to ensure the system works as anticipated, and gives each developer and user a guarantee that the product meets client requirements.

Functional testing of the Internet and non-internet-based programs can be accomplished in the cloud.

NON-FUNCTIONAL TESTING

This testing is also referred to as the performance testing technique; it’s miles executed to make certain that the utility meets the overall performance expectation of the user.

The scope of nonfunctional requirement testing is broader in cloud testing than in conventional testing.

Performance testing

The maximum essential element of performance testing is to investigate the software’s firmness and scalability.

Pace determines whether or not the application responds speedily; firmness determines whether or not the software remains equal under changing conditions and scalability, which determines the best consumer load a system can manage.

Stress checking out and cargo trying out is each variety of performance testing.

Cloud Testing Vs Conventional Testing

Parameters Cloud Testing Conventional Testing
Definition Cloud Testing is one form of software testing wherein the software program packages are examined by way of using cloud computing services. Conventional testing is a sort of testing in which software is examined primarily based on pre-defined testing standards in line with the exceptional management machine to maintain standards.
Test Environment Cloud testing offers test surroundings-based applications as well as on-user and utilization of applications to test as per custom requirements and satisfaction. Conventional testing has a pre-described environment for checking out any software. This testing was performed in a check lab with restrained assets.
Cost of Testing The cost of testing in cloud testing is much less compared to conventional testing as there is no need to maintain physical infrastructure for testing. Users and clients handiest pay what they use. The cost of testing in conventional is better as we need to hold physical infrastructures and software as nicely required for trying out.


Benefits of Cloud Testing.

  • Availability of Mandatory testing environment: In cloud testing, the client’s environment can be effortlessly reflected for effective testing without making an investment in the extra hardware and software program resources for testing.
  • Less costly: Cloud testing is extra cost-efficient than conventional types of testing. Customers, and the testing team, pay for the simplest of what they have used.
  • Quicker testing: It is quicker than the traditional method of testing as corporal infrastructure management for testing is removed.
  • Scalability: Cloud computing assets may be expanded and decreased every time required, based on the demands.
  • Customization: Cloud testing may be custom-designed in keeping with the usage, price, and time primarily based on the style of users and user surroundings.
  • Tragedy regaining: It can be done without difficulty viable as the statistics backup is taken on the cloud vendors as well as at the user’s stop.

Challenges of Testing in the Cloud 

Performing Testing periodically

Performing Testing Periodically Test labs in agencies commonly sit idle for a longer duration, consuming capital, electricity, and real property.

Just about 50% of the infrastructure earmarked for testing is underutilized.

As cloud computing is a common environment wherein a single Server with a couple of CPUs, RAM, and SAN or NAS garage are divided among many users via digital hosts or IP addresses.  All users in a cloud computing environment are in the end accessing a physical system.

Therefore, at a time if any person is the usage of the assets intensely then it can create overall performance issues for the alternative customers at the same time.

So, the performance testing results from the team may vary on occasion depending on the load of the cloud environment. This is one of the tests demanding situations in a cloud environment

Data migration

Migration of information from one cloud carrier company to another turns into a tough project understanding the different database schema requires plenty of time.

Integration Concerns:

A distributed application offers many special servers which might be on a web page or off-web site.

In the cloud environs, the dispensed application will deal with many specific digital machines which will be onsite or offsite and there will be response time challenges in the integration of these virtual machines.

The company simply orders the digital machines on the cloud without knowing their bodily locations. However, if machines are placed at a long distance, then latency troubles can occur frequently.

Testing of all components

Performing cloud testing calls for testing all the components associated with an application that needs to be tested just like the server, garage, and network, and also validating them in all layers.

Qualitative Services

Business is frequently concerned with the migration of their critical packages to the cloud environment.

They have the principle situation approximately service availability, scalability, flexibility, and continuity.

Critical commercial enterprise packages are enterprise touchy and can incur a big loss to the agency both in terms of popularity and money if the carrier-level agreements with the patron aren’t met effectively.

Therefore, the cloud computing environment desires to offer demonstrated take a look at outcomes in terms of service availability, scalability, flexibility, and continuity.

Functional Testing aspects

The business application running on the cloud computing surroundings is needed to bypass the behavioral elements of the utility in conjunction with system testing, acceptability testing, integration testing, and interoperability testing.

All of those tests must have been completed before any employer ought to flow its business-crucial application to the cloud computing surroundings.

The testing surroundings ought to resemble the actual cloud environs to obtain the high-fidelity test results.

Operational challenges

Obscure from technical challenges, there are a pair of operational challenges as follows.

Lack of Standardization 

There’s a loss of widespread solutions to integrate the general public cloud with inside data centers. there’s an absence of interoperability.

Hence, it’s miles tougher to switch carriers if the office desires to.

Security Concerns in the Public Cloud 

Data within the cloud is also stored in a remote location that will lie outside the company’s legal reach.

Privacy and Data Security in Cloud packages are multi-tenant in nature, owing to the same the threat of unauthorized data access cannot be ruled out.

The tester has to confirm that there’s no leakage of data while testing the business application over the net in a cloud environment.

Data inside the cloud may be stored in an exceedingly faraway location that would lie out of doors the company’s legal attain.

The tester desires to ensure that there is also no leakage of data at the same time as testing the commercial enterprise application in a cloud environment.

Usage 

Because there are just a few options accessible, improper utilization may occasionally result in expense increases for newer firms. To encourage cost efficiency, businesses should thoroughly assess their demands before choosing a cloud vendor.

Planning 

The assembly, use, and disassembly of the environment should be carefully planned by the project teams and test teams.

To reap the utmost benefits of Cloud, the usage has got to be planned properly.

Performance 

As cloud infrastructure is shared, there are also scenarios where performance dips.

There could also be planned downtimes/maintenance windows on the cloud vendor side which might impact performance too

Accessibility and Recovery Testing

The Other challenges that the testing team could countenance are as follows.

Application data replication testing should be tested with the help of a third-party vendor as replication is not under the control of the tester in the case of the cloud environment.

Lastly, the tester needs to deliver their due diligence to procure accurate test results which should be comparable to the physical server environments.

Environment Configuration

for cloud testing, it becomes hard to manipulate the infrastructures like servers, storage, and so forth. Deployment and testing consequently, lead to troubles.

Use of Multiple-Cloud Models: It will become hard to manage more than one cloud at a time which can lead to complications, security, and synchronization issues.

Upgradation in Cloud: The biggest assignment of cloud testing is to do up-gradation in the cloud and ensure it does not affect the prevailing users and data.

Conclusion

Hope you like the article about what is cloud testing. Traditional software testing is great, but the cloud makes work faster and easier.

However,  relying on the cloud all the time is not a wise decision as well. It’s your requirement that should define the technology.

Performance Tester Salary in India

How much does a performance tester/performance engineer earn in india based on their experience and expertise? if you reached this blog seeking the answer your direction is right! Let’s have a look at performance tester salaries in India.
Let us now look at the performance tester salary of employees at present vs average expected salary in various IT hubs in India.
Performance Tester Salary in Pune
After Mumbai Pune is the second-best tech hub in the state, Pune plays a pivotal role in the growth of the IT hub in Maharashtra.
The salary packages for performance testers vary based on the city and also the size or number of organizations in the area. There are several companies in Pune with excellent opportunities for performance testers.  There are more than 80+ companies are Pune that has performance testing as one of their major services.
Based on data gathered from performance testers, we are trying to compare the current as well as the expected salary of employees who are looking for a job change

Experience Current salary Expected salary
2-4 yrs 4-6 LPA 5-7 LPA
4-5 yrs 8-7 LPA 7-8 LPA
5-6+ yrs 7-9 LPA 10-12 LPA


Performance Tester Salary in Bangalore
Bangalore in our very own Silicon Valley, the biggest IT hub of the country. Bangalore has always been the favorite of IT-based employees owing to the salary package offered by the companies there. When it comes to performance tester salary story remains the same. Let’s have a look

Experience Current salary Expected salary
2-4 yrs 5.7-6.25 LPA 5.20-7.30 LPA
4-5 yrs 8.15-7.20 LPA 7-8 LPA
5-6+ yrs 7.5-9 LPA 10.5-12.5 LPA

 Performance Tester Salary in Chennai
Chennai is one of the fast-growing and one of the biggest IT hubs in South India. Today Chennai is home to many big companies and well-known IT parks of the country including Elcot SEZ, Tidel Park, MEPS, Ramanujan IT  Park, Mahindra World City, ASV Suntech Park, RMZ Millenia, and many more.
Chennai is the right place to be if you are a fresher. The place offers a decent package as well as a fertile ground for budding performance testers.  Let’s have a look at the salary disparities.

Experience Current salary Expected salary
2-4 yrs 5.1-5.25 LPA 5.3-6.30 LPA
4-5 yrs 6.75-7 LPA 7.2-8.3 LPA
5-6+ yrs 7.5-9 LPA 10.5-12.5 LPA

Performance Tester Salary in Hyderabad
Another upcoming IT hub of South India is Hyderabad which is locally also called Cyberabad for obvious reasons. There are many IT hubs created in the area for the promotions of IT Infrastructure.
At present Hyderabad is home to many well-known names in IT including Google, Microsoft, GE, Qualcomm, Facebook, Amazon, and more. This list itself speaks volumes of the opportunities available in the region for every IT professional.

Also Read: Salary of testers in various countries revealed

Let’s have a look at the current average salary employees are drawing vs the expected average salary of performance testers

Experience Current salary Expected salary
2-4 yrs 3.7-5.8 LPA 5-7 LPA
4-5 yrs 6.5-8 LPA 7-8 LPA
5-6+ yrs 7-9 LPA 8-10 LPA

Performance Tester Salary in Mumbai
Mumbai! the name says it all. It’s a known fact that Mumbai is indeed one of the most prominent tech hubs in India. The salary package offered by various companies dwindles drastically owing to the budget variances of the company located there. From MNCs and here is what we got to know from the survey we conducted from performance testers working in Mumbai.

Experience Current salary Expected salary
2-4 yrs 4.20 -5.8 LPA 5-6.5 LPA
4-5 yrs 6.05-7 LPA 6-7 LPA
5-6+ yrs 8-8.5 LPA 9-11 LPA


Conclusion
Hope the idea about performance tester salary in India is clear now.  It’s expected that the role of a performance tester to performance engineer will happen widely across the dev world soon.

Unfathomable value of app testing! How much does app testing cost?

The user is always the king. They decide whether your innovative app is truly an innovation. However, it’s a known fact that bad user reviews are something unavoidable if you look at it from a realistic perspective. But yes! We can avoid a lot of user wrath from the play store and keep your app in that 4-star rating that’s optimum for success.
It’s true that knowingly none jeopardizes quality. But often people behind app development show a blind eye towards validating quality. Overconfidence regarding the stability of the build can prove to be disastrous.
Mobile app test cost calculator
Developing an app might not cost you much but what user seeks is quality and quality comes with a price and it can’t be discarded
There exists a usuality where app development companies are keener on the manual way of testing. Checking the functional aspect of the app is indeed needed however, there other factors that direly need to be validated before the release.
How does testing help in validating the quality aspects of an app/software? And what are those aspects?
importance of testing
Types of testing that can validate the quality of an app
There are around 2.9 million apps (it’s climbing even as we speak) in the Google play store and 1.96 million apps in the Apple App Store. Competition is sky high! To survive you need quality as an upper hand and that’s the value that testing delivers
Performance – Do you wish to measure the stability, scalability, speed, the responsiveness of your software under various loads? Then performance testing is the answer
Functionality – Functional requirement of the software needs to be validated before the release that’s the situation where functional testing can be of great help. The process helps in validating each and every function of the software.
Security – You are living in an age where breaches have become a common occurrence. To avoid loss in millions and that reputation you have built as a result of years of hard work, all the security loopholes have to be sealed off. While performing a security audit of your software all the weak links can be traced out and corrected eventually for safe software.
Compatibility – an uncountable amount of devices exists with varied screen size, OS, browsers, etc. to make sure that your software is performing as it is supposed to be, you need to validate the compatibility.
Installation testing – A software system comprises various components. To make sure that it’s installed smoothly across various devices and OS versions and types you need to check it through installation testing.
Localization – Are you are that your software behaves as per the cultural norms of people across the world? You can find that out by localization testing. Testers with varied demographics will test your software for appropriateness.
Beta testing – Before release software has to be tested within a real user environment to make sure that a robust product is set out in the market. Beta testing is the name of the process where your software will be exposed in a closed user environment so that real-time user feedback can be recorded.
Usability – You have pictured your app to be used in a certain way for a documented functionality. However, that need not be the case with a user. To make sure that the app is meant for the user perspective we have to test the usability of it.
Does testing cost more than development?
The minimum cost of developing an app will range from $2000 to tens of thousands of dollars based on the complexity. However, when you go for QA you should look at the value it brings to the table and then weigh it against the development cost.  If there is a loose end at your side It can tarnish the image of your company beyond repair and would put an end to your business once and for all. So you can’t weigh the cost of quality and even if it’s above developmental cost in the long run it would be beneficial and would be the would reason for the success of your app.
My App is 100% unit tested. Why do I need dedicated QA?

  • 100% unit test does not mean 100% test coverage
  • Testers test the software from a user perspective. Creators of the app will always be biased
  • Testers make use of negative testing that reveal a lot of bugs
  • Testers have the ability to prioritize the bug considering the biggest picture
  • Testers have specific domain expertise and they clearly know what users are seeking
  • Testers apply all of their creativity in functionality testing creating various scenarios
  • Testers ask a lot of question about the requirement so that he can find issues with the requirement stage itself
  • Testers know that the testing process can be repetitive their mindset is built on the obvious
  • Testers will be stern about their findings rather being biased

How much will it cost to test your app?
Costing is dependent on various factors. That’s the reason why many are in dark regarding the estimation of software testing.
When it comes to the costing part test bytes have created a detailed estimation engine that can calculate the costing, effort, and timeline required to test your app.
The most astounding factor about the calculator is that the generated costing would be 85-90% accurate which is far better than any other estimation method out there in the market.
Click here and you will be led to a cost calculator where you will be asked to enter certain details for effective and in-depth evaluation.
Let’s go through them
Domain-specific testing assures much more detailed evaluation and validation. By knowing the domain, we will be able to designate testers who have sound experience and track record in the chosen domain.
How much does testing cost (test cost calculator) screen 1
Testing strategy and procedure will have change based on the OS type. OS type will also have an impact on cost too.
How much does testing cost (test cost calculator) screen 2
There exist a plethora of screen sizes at present. Your app has to be tested in the most common screen sizes to ensure that the app’s appearance and each screen size will have an impact on the cost.

Similar to screen size, your app has to be tested on various devices to ensure that it’s performing fine. And it has to be done on a combination of emulator + real device basis and it will have an impact on costs.
How much does testing cost (test cost calculator) screen 4
If it’s a standalone app there won’t be any cost difference. However, if your app has third-party integration it has to be tested and obviously, it will add up to the cost.
How much does testing cost (test cost calculator) screen 5
 
it’s mandatory to test the functionality, usability, and compatibility of your app. By adding more testing type’s maximum stability, scalability, and security of the app can be validated.
When it comes to testing security, there are two types of testing black box and gray box testing.
Since security testing is an intricate process and requires much more effort and time than that of any other type, its cost will be shown separately and will be added to the final cost.
How much does testing cost (test cost calculator) screen 6
Each testing cycle means the entry and exit point of the QA of your app. Enhancements will require more cycles and it will be reflected in the cost.  So you must specify how much testing cycle will be required.
For a better understanding have a look at the diagram and find out what happens in every cycle

Once you have submitted all the data you will receive a mail that will explain in detail the estimation by compartmentalization.
Let’s have a look
The first section will have all the details you have submitted when you tried our test cost calculator
How much does testing cost (test cost calculator) screen 8
 
The next section will have the text execution break down in an easy to understand graphical representation as well as in detailed tabular format.
How much does testing cost (test cost calculator) screen 9
How much does testing cost (test cost calculator) screen 10
Based on user input there is also a module wise division of text execution effort
How much does testing cost (test cost calculator) screen 11
Your requirement will decide what type of testing strategy is needed for your app. And each testing type requires specific effort. This section contains testing types that are by default mandatory and the types that you have opted for and our suggestions in testing types to make sure that your app is robust not in terms of certain aspects but all.


Beneath the graphical representation, there will be the final amount and time required to test your app.
*You might be thinking why the range has so much disparity.  Many dwindling factors come into the picture while estimation, for instance, remuneration of a senior test engineer will differ from that of a junior tester and obviously that will affect costing too. It’s up to the user to choose the expertise of the tester.

 Conclusion
Transparency and efficiency is the key to a long-lasting client – business relationship. We understand that very well and that’s the reason why we are constantly trying to bring forth innovations and integrations to our core system. This cost calculator we have is the most advanced and detailed in existence. Hope it can be of help to those who wish to get a detailed estimate quickly.

11 Effective Mobile App Testing Strategies

Having a good strategy in testing an app is as important as having a good test plan. Effective mobile app testing strategies will make sure that maximum efficiency is maintained and the cost is kept at bay.
let’s have a look at effective mobile app testing strategies.
What and why we need a mobile app testing strategy?
A strategy is very important to achieve a goal. It lists out the things to do as part of testing to achieve the quality objective with maximum coverage in the available time.
Regarding mobile applications, the time to market is reducing with every passing day.
To beat the competition you need to launch your mobile app with excellent quality asap or at least before your competitor. This is where the importance of a testing strategy comes in.
A testing strategy aims to ensure good quality, high performance, and maximum test coverage in a limited time. Here are a few things that need to be covered as part of a mobile app testing strategy:

  1. Devices: There is an exhaustive list of mobile devices available in the market. This count is also increasing exponentially. This makes it close to impossible to test your application on all devices. The best option thus would be to design a strategy to select the devices based on the adoption in that particular market or based on the expected user base.
  2. Emulators/Simulators: Another more viable option would be to go in for emulators and simulators. This way you will be able to get more coverage of the devices with limited cost.
  3. Types of testing: One of the main objectives of designing the test strategy would be to list out the different types of testings needed for the mobile application. This would be based on the functionality of the mobile app, the markets it is launched in, the expected user base, and many more.

Mobile app testing process
What’s the difference between a mobile app test plan and a test strategy?
Test strategy and plan are often used together and also interchangeably. But they are not the same. There are subtle differences between a mobile testing plan and mobile testing strategy. Let us look at some of these differences below:

Mobile Test Plan Mobile Test Strategy
A plan would include scope, objective, and the effort required to perform the mobile app testing.
 
A strategy is essentially a guiding document that determines how mobile app testing should be done.
A mobile app test plan would include the details of the testing process like the requirements tested, entry, and exit criteria, the testing timelines, pre-requisites, etc. A mobile app strategy document, on the other hand, would include the team organization structure, testing status communication structure, communication strategy, and other such details.
 
A mobile app test plan is prepared at a team level by the team lead for circular within the project and testing teams. A mobile app strategy document is prepared by the test manager for presentations at the leadership level to understand the plan for testing.
 
A test plan is at a project level and specific to that project alone. It includes requirement mapping and can not be used for other projects. A test strategy for mobile app testing would be a generic document that can be leveraged for other similar projects as well with some modifications.
 
A mobile test plan can easily be changed with concurrence from the respective stakeholders. A strategy is a more rigid document that does not change after each iteration or project. It is ideally a directional or guiding document for the testing efforts.
 

Know More: Wish to know how to test a mobile app?

app testing methodology
What are the different types of effective mobile app testing strategies?
Here we look at the different types of testing strategies that must be part of your mobile app testing strategy document to achieve a good quality product.
App Bug fixing (App testing strategies)
Strategy no: 1 Cross-Platform Testing
There are different types of mobile OS available in the market. The main being android and iOS.
It is essential to plan to test the mobile application on all platforms to ensure the application works as expected on all platforms.
Most applications will have a separate code set for android and iOS, hence it is important to test the application cross-platform to find any issues.
Strategy no: 2 Functionality Testing
The main testing has to be related to the functionality of the application that we are developing.
The USP for any application is how well it performs the task it is intended to. So, it is very important to test to complete functionality in and out.
Every flow in the application needs to be tested to ensure there are no broken functionalities or flows.
Strategy no: 3 Type of application
There are mainly 3 types of mobile applications

  • Native application – the ones developed specifically for the Android or iOS platform
  • Mobile Web application – browser-based applications on the mobile phone and
  • Hybrid – a mix of the above two

While planning for testing, good coverage is needed for all three types of applications to ensure stability and performance.
Strategy no: 4 UI and UX testing
The user interface (UI) and user experience (UX) are the next things that need to be planned well without fail.
The user interface is what the users see and how they interact with your mobile application.
The UI should be designed in a way that it is to understand and navigate through the app for all categories of users.
Similarly, for UX also the navigation between the pages and the time taken to generate the reports of output as per the application should be well within the pre-defined SLA.
With the numerous mobile apps available in the market today, your app may not get a second chance if the consumer or end-user does not like it.
Strategy no: 5 Backend Testing
Backend testing is done to ensure the data is getting stored in the right places and in the right format.
During the testing, we need to ensure that the data entered by the user is saved correctly, against the right profile, and also it should be easily retrievable.
Backend testing also involves checking the different places where the data is saved and reflected in the application and that it is done correctly.
Saving and retrieving the correct user profile would be another major use case for backend testing.
Strategy no: 6 Network compatibility Testing
Mobiel applications behave according to the variances in internet strength
In this case, network compatibility testing needs to be included in your test strategy as well.
This will include testing the application in different network configurations like with data and wifi.
Different signal strength, bandwidth, and then measuring the TPS (transactions per second) to see if is within the planned SLA.
Strategy no: 7 Storage Testing
Storage testing has become an important part of the mobile app testing strategy very recently.
With the growing number of apps being used and limited space available for use.
People tend to avoid apps that need too much space to download or more data to use.
Thus it is important to check and rectify these parameters for better acceptance from the end-users.
Strategy no: 8 Data flow testing
Most mobile applications are not stand-alone and need one or the other input from systems and servers outside the app.
It thus becomes an important part of the strategy to include the testing of the data flow from one system to the other.
Strategy no: 9 Localization Testing
While this may not be needed for all apps, if needed it would be good to have in your strategy.
Localization testing involves testing the application for location-based parameters like language, maps, and any other things related to the locations. These are sometimes legal requirements also for some locations.
Strategy no: 10 Device Testing:
There are a plethora of devices in existence now. To make sure that your app is working fine on all of them you need to check the app’s performance, functionality, and UI on real devices.
It’s a challenging as well as a daunting task. And there are thousands of devices with varied screen size out there. So in this situation depending on emulators has been seen as a common practice.
But it’s true that emulators are not an absolute solution. So the perfect solution here would be to test the app in screen size that’s commonly used and then for other options use emulators.
Pen testing cost + app testing strategies
Mobile App Testing Strategy for Agile Projects
Agile is a relatively new buzzword. It translates to faster time to market, more flexibility in terms of features, frequent deliveries, and better results.
While everyone agrees on the importance of testing and quality, the testing window in Agile is usually very less.
Hence, in addition to what is already discussed in the previous section here are some pointers that need to be considered as part of the mobile app testing strategy.

  1. Early Testing

To start with, testing has to start as early as possible in the sprint. Even if the code can not be moved to a separate QA or stage environment, plan to test in lower environments to get the initial results that the team can work on.

  1. Establish an alignment between the dev and testing team

There is a dire need to set up a communication channel that can help team members be aware of the changes happening this includes the changes in development and testing.
Using tools for code check-ins and bug tracking is also helpful in keeping the team informed.

  1. Infrastructure Readiness

Mobile application testing is dependent on real devices and simulars.
Ensure these are made available in sufficient number with a buffer so we do not end up with damaged and non-functional devices which will eventually eat up the already crunched test window.
The availability of a stable test environment before the sign-off should also be part of the strategy.

  1. Exploratory Testing

Testers with expertise in mobile application testing would be able to pinpoint the problem areas in a mobile application based on their previous works.
Hence exploratory testing should be added to the strategy to ensure we can get maximum coverage in lesser time. This also helps to prioritize the areas of testing and channelizing the efforts in the right direction.

  1. Automation Testing

By automating the requirements and features from the first iteration itself will give you time to work on new and more business-critical features.
Thus the mobile app testing strategy should focus on implementing an automation framework that can be scaled-up and utilized over the different iterations and beyond.
Final Thoughts…
The strategy is what drives the team towards working on the common goal of best quality and performance by your mobile application. So, it is very important to have a well-thought-out and detailed mobile app testing strategy document with a futuristic view.
A mobile app testing strategy is like an anchor for a ship. It steers it in the right direction and helps the ship to reach its destination safely and happily.

What is a Vulnerability Assessment? A Detailed guide

The definition of the term vulnerability assessment from a security perspective is to deeply evaluate, define, classify and prioritize vulnerabilities so that They can be corrected. The process is carried out by vulnerability scanners such as Nikto2, Netsparker, OpenVAS, W3AF, etc.
To know in detail, we have incorporated all the necessary details that you need to know about vulnerability assessment, along with its implementation. So you won’t put your company’s IT system at risk.
Let’s get started!
how to do vulnerability assessment
What Is a Vulnerability Assessment?
An organization’s system consists of various components, such as end-points, applications, and network infrastructures.
All of these provide equal opportunities for hackers to enter into the IT system.
The role of vulnerability assessment here is to check all these elements for vulnerabilities that may be present at any level.
Hence, ensuring proper protection of the system against unauthorized accesses.
A few key points that also get covered under vulnerability assessment are:

  • Defining the vulnerabilities
  • Identifying the vulnerabilities
  • Classification of vulnerabilities
  • Prioritization of vulnerabilities
  • Laying out knowledge about vulnerabilities
  • Providing suitable solutions to the available threats and vulnerabilities

vulnerability assessment methodology
In simple terms, it can also be stated that vulnerability assessments are done in every organization to find and prioritize the available vulnerabilities. This way, the system’s loopholes can be fixed, and all the breaches can be avoided.
These vulnerabilities can be divided into two categories:

  • Code Bugs: Sometimes, developers leave bugs/flaws in the code. It becomes a vulnerable point because confidential information can get leaked through it.
  • Security Gaps: While all enterprises ensure their system’s complete security, they may leave a gap in their internal processes. It can provide space for intruders to enter their environment and get access to whichever information they want.

What is a Vulnerability Assessment?
5 Crucial Steps in Vulnerability Assessment

  • Identify the potential hazards
  • Determine the risks
  • Evaluate the defense system
  • Record the findings
  • Periodical review

Top 15 Vulnerability assessment tools 

  1. Netsparker
  2. OpenVAS
  3. W3AF
  4. Arachni
  5. Acunetix
  6. Nmap
  7. OpenSCAP
  8. GoLismero
  9. Burp Suite
  10. Comodo HackerProof
  11. Intruder
  12. Retina CS Community
  13. Crashtest Security
  14. GamaScan
  15. Nexpose

Why Is Vulnerability Assessment Crucial?
Vulnerability assessment has now become a vital part of every organization.
It is essential because it provides the enterprises with proper knowledge and understanding of security weaknesses in their environment.
Moreover, the process offers awareness of accessing the present vulnerabilities and the risks associated with them.
Therefore, helping the organizations to avoid any security breaches that can put their business in jeopardy.
Other benefits of vulnerability assessment include:
Pen testing cost
Defining Risk Levels
Whether you believe it or not, your organization’s security is always under threat.
While this risk is inevitable, you can certainly identify the underlying vulnerabilities with proper assessment. It will help in resolving the dangers and make your system more secure.
Avoid Automated Attacks
Intruders have become smart nowadays. They don’t leave any chance of creating trouble for you. That is why they use automated attacks to check the availability of vulnerabilities in your system and take advantage of it.
Where this makes their work more convenient, it brings more significant risk for your organization. Under vulnerability assessment, experts use the same tools as these hackers. So they can avoid these automated attacks.
 

Also Read:  Best vulnerability assessment tools used for security audit

Prioritizing Risks
Even if you are aware of all the available risks to your organization’s IT system, you may still end up making a mistake. Most people’s standard error here is that they focus more on unnecessary vulnerabilities while leaving behind the significant ones.
But this mistake won’t happen with the help of vulnerability assessment.
The process won’t only identify the threats, but it will also help prioritize them based on their severity.
Therefore, you can ensure that the more significant vulnerabilities get resolved first, and the less severe ones get assessed only after that.
Time And Money Savings
A data breach doesn’t only waste time and money on security restructuring. If your enterprise goes through an attack, you also have to deal with some legal formalities.
Moreover, you will have to invest effort and money in PR to maintain your company’s image.
On the other hand, a vulnerability assessment can easily help you avoid all this hassle by securing the system from known threats.
Hence, you will then be able to focus on more crucial tasks while remaining carefree about the security of your system.

What Are The Types Of Vulnerability Assessment?
Vulnerability assessment is further divided into various types, depending on the area of the IT environment that is being checked. Here are some of the common kinds:

  • Network-Based: As the name suggests, this method is opted to find out the vulnerabilities in the organization’s wired and wireless networks.
  • Host-Based: This includes a proper examination of network hosts through ports and services. It works on hosts like servers and workstations.
  • Web Application: Web applications are an easy point for hackers to enter into the system. This method helps identify the loopholes in the app architecture that can lead to breaches.
  • Database: Attacks like SQL injection can lead to severe data losses in an enterprise. Database methods include scanning the entire database for any available vulnerabilities to avoid these attacks.

Other kinds of end-point or network scan can be done to find the risk against any available threats to the organization’s IT system, such as phishing assessment and penetration testing.
Difference between vulnerability assessment and vulnerability management

Vulnerability assessment Vulnerability Management
Vulnerability assessment has a fixed time period for its occurrence It’s an ongoing process
The process used to find the severity of vulnerabilities Used to manage Vulnerability assessment or pen testing
Performed with the help of automation tools It’s a collective process
Vulnerability assessment is just a part of the cybersecurity program It’s a detailed process that can handle all the security-related issues

Vulnerability Assessment vs Penetration testing. What’s the difference between vulnerability assessment and penetration testing

Vulnerability Assessment Penetration Testing
Used to assess vulnerabilities with the help of a tool that’s capable of doing the scan in an automated fashion It’s a manual process where each module of software is tested for vulnerabilities individually
Usually done  through automation Performed by combining automated as well as the manual process
Performed often Performed once in a year mostly
Comprehensive list of vulnerabilities which may include false positives Serves as a call to action document about vulnerabilities that can be easily exploited
Can be performed by in-house security staff Can only be performed by a third party company who has required resources at the disposal

Vulnerability Assessment vs Penetration Testing


Also Read: How much will it cost for penetration testing?

 
The vulnerability assessment process differs for every enterprise due to its distinct infrastructures.
However, we can still build a basic 5-step procedure that works for most organizations. So it will provide you with an overview of how things get done in this process.
Step 1: Initial Planning
The first step includes proper analysis of the infrastructure to decide all the systems and networks to be checked.
You also need to identify the critical systems and data that have to be protected at any cost.
For example, the databases that hold essential information about your enterprise have to be scanned appropriately.
Remember that each of the professionals working on the process should expect the same output of vulnerability assessment.
It will help in proceeding further suitably. Plus, there should be proper communication throughout the planning so that any errors can be avoided.
Step 2: Scanning
Once you receive a complete list of systems and networks that have to be checked, the next step is to scan them.
Here, you will have to find all the available vulnerabilities in them. The information found on this step won’t be refined.
Therefore, you need not get overwhelmed with the long record of risks and vulnerabilities because several of them can be false positives.
Step 3: Analysis
It isn’t possible to resolve all the received vulnerabilities as some of them can be wrong.
That is why a proper analysis has to be done to find the underlying cause of these vulnerabilities.
Thus, they can get sorted based on their integrity. However, this isn’t the only objective covered in this step.
Along with the viability test, the associated risks, potential impact, and solutions of each vulnerability also get checked here.
After that, the threats are prioritized based on their severity. This helps resolve the more impactful vulnerabilities first and leave the rest for later assessment to cause no significant harm to the enterprise.
A report of the discovered vulnerabilities also gets prepared here, and it includes the following points:

  • Vulnerability definition
  • Scanning date
  • A complete description of the vulnerability
  • Common Vulnerabilities and Exposures (CVE) Scores
  • Systems and networks affected by the vulnerability, with their details.
  • Available remediation techniques for the vulnerability
  • Vulnerability PoC (Proof of Concept)

Step 4: Remediation
The ultimate aim of a vulnerability assessment is to eliminate all the available vulnerabilities and make the system secure against the risks.
So if you don’t resolve the found security gaps, there won’t be any use of the previously done steps.
That is why this step includes remediation of the vulnerability found in the earlier procedure.
It can involve a simple code update or a more thorough understanding of what is wrong in the system.
You may need to install new applications, implement the latest security patches, or use other tools for the purpose.
The resolving of vulnerabilities will begin with the high priority vulnerabilities, and then you will have to move to less significant ones.
Experts may recommend leaving some of the no-impact vulnerabilities that aren’t worth the time and effort required to resolve them.
Step 5: Repetition
Vulnerability assessment isn’t a one-time process. Rather, it is a regular activity that must be done under expert guidance to ensure that the organization’s system remains secure from any threat.
That is why the final step here is to create a cycle of this procedure according to your enterprise’s needs.
The importance of a vulnerability assessment increases when you have introduced a new prominent feature, application, or network into the infrastructure.
Therefore, you must make sure that the process gets repeated every once in a while, and the entire IT system remains secure.
And in these five steps, the entire process gets done. You can adjust the steps and include a more thorough study of the vulnerabilities in it based on your enterprise’s requirements.
In case you aren’t sure about something, you can also opt for a service provider.
As they deal with different organizations every day, they will be able to offer you the most reliable solution for your individual needs.
Vulnerability assessment process
Using Tools For Vulnerability Assessment
Earlier, the process of vulnerability assessment was conducted by the security professionals who knew about the latest threats in the market.
So they conveniently checked the entire IT system against these risks and implemented the required security measures.
This was time-consuming and inefficient, as various unknown threats got left out from the inspection.
Then came the use of automated vulnerability assessment tools. These tools usually opt for the same methods that are used by professional intruders.
Hence, they are able to catch all the vulnerabilities that may give the system’s access to hackers.
The top vulnerability assessment tools include:

  • Netsparker
  • Intruder
  • Aircrack
  • OpenVAS
  • Nikto
  • Microsoft Baseline Security Analyzer
  • Acunetix
  • AppTrana
  • SolarWinds Network Vulnerability Detection
  • Nexpose Community
  • Tripwire IP360
  • Retina CS Community
  • Wireshark
  • Nessus Professional
  • Secunia Personal Software Inspector

How To Choose The Vulnerability Assessment Tools?
Just like it is crucial to conduct a vulnerability assessment, it is also vital to pick the correct tool for the purpose.
Your choice should majorly depend on your enterprise’s requirements. The factors that you must consider before opting for a specific vulnerability assessment tool are:
Compatibility
The first aspect you need to check in your chosen tool is whether or not it is compatible with your organization’s systems and networks.
In case it misses out on even one of these components, it will be of no use for you.
Only a compatible tool will be able to provide you with accurate information on the available vulnerabilities, prioritization, and remediation.
Therefore, you must ensure that your selected product fulfills all the requirements.
Testing Repetition
The final step of a vulnerability assessment is to repeat the process in a pre-determined duration to make certain that the overall system remains secure at any point in time.
Now, the tool you pick for this purpose depends on the intervals you choose for vulnerability assessment.
Usually, this factor can be categorized into two types:

  • Continuous: These tools work round the clock. Thus, you need not worry about the security aspect anytime, as the tool will take care of that. It is mostly preferred in places where the risks of data breaches are exceptionally high.
  • Intermittent: Another category of tools are the ones that work on some intervals. While it ensures proper security, it won’t check the systems round the clock. Most organizations prefer this type of tool, as it provides them with the desired results without much hassle.

You can pick either of them based on how much your enterprise is under risk of security breaches.
Cloud Support
Clouds have become a crucial part of every organization because they are easy to maintain, provide access from any point, and don’t cost much.
Along with their extensive benefits, these cloud platforms can also become a bane for your enterprise if you don’t ensure its security.
That is why your chosen vulnerability assessment tool should support the scanning of cloud-based platforms.
Remember to opt for this feature even if you don’t use any clouds currently.
This way, you won’t have to worry about switching your vulnerability assessment tool whenever you decide to move to cloud platforms.
Vulerability assessment protection
Update Quality and Speed
Quality and speed are the two most essential factors in the modern world. They make certain that the delivered product or service is reliable and efficient.
That is why they need to be checked in your vulnerability assessment tool as well.
The vendor must provide quality updates within the best possible time. For example, the time gap between a new threat being discovered and the vendor updating the tool for detecting the same should be as small as possible.
Prioritization
Prioritization is the most crucial step of the entire vulnerability assessment process.
This step alone makes sure that more significant threats get handled first so that no complication occurs later.
That is why you need to check the selected tool’s prioritization procedure.
Every vulnerability assessment tool uses an algorithm to prioritize the detected vulnerabilities.
Depending on the vendor, various factors may be incorporated into this algorithm to produce a more refined priority list of risks.
You have to go through these aspects and ensure they work properly according to your enterprise requirements.
Industry Standards
The tool selected by you must obey all the industry standards in which your enterprise works. For example, the pharma sector requires vulnerability checks for its supply chain and mobile workforce.
On the other hand, the banking industry needs to ensure that their systems are updated and secured. So whichever domain you work in, the tool should fulfill its basic requirements and standards.
By checking all these essential factors, you will make certain that your chosen vulnerability assessment tool doesn’t fall short in any aspect. Hence, it will provide you with the best results.
Conclusion
No matter how secure and protected you keep your enterprise’s environment, intruders always find a way to get through the layers.
You can still ensure that your system’s weak points don’t create a more severe problem. For this, you can opt for a vulnerability assessment.

Jmeter Tutorial: Learn about the tool in a jiffy!

Jmeter Tutorial blog by us will help you in learning about the famous tool and what’s it is used for.  Usually, Apache JMeter is used for performance testing. Performance testing is one of the important testings to be performed on AUT. It will let you know the load which your application can handle and what happens if that load exceeds prescribed limits.
Through, meter tutorial let us know more about JMeter and see how it can be used for performance testing. 

About JMeter – Jmeter tutorial introduction
JMeter is an open-source software which is designed by Apache Foundation. It is used to apply load to AUT to know its performance. With the help of JMeter, you will be able to apply a heavy load to the application with concurrent or multiple traffic to emulate real-time user behavior.
For applications such as Amazon who release flash day sales, it is very important to do performance testing. On a single day and in a time interval of 5 mins many customers hit the site and we must make sure that the application behaves expectedly without any flaws. One more application where performance testing is very important is the railway ticket booking website where a large chunk of people hit the server at the same time. In these cases, it becomes very necessary to test out the website under heavy load. 
JMeter is usually used for testing of web or FTP application. With JMeter, you will able to identify how many concurrent users a server can handle. Thinking of hitting Amazon with 1000 concurrent users. For achieving the scenario, you cannot purchase 1000 machines to achieve the behavior. JMeter allows you to hit the Amazons server with 1000 requests concurrently. JMeter simulated real-time user’s behavior intelligently. JMeter sends requests to the target server and then retrieves the statistical information of the server. With this information, it generates test reports in different formats. 
Some benefits which you gain via JMeter is a User-friendly GUI, Graphical Test Results, easy installation, and platform independence. It has an amazing record and playback feature which makes it very easy to learn even for the novice. Also, its script test can be integrated with Selenium tests and beach shells for more robust automated testing. Through the Jmeter tutorial, we are trying to et up a tutorial for people to learn about this magnificent tool.

Step-by-step  Jmeter tutorial

How to Download and Install Apache JMeter
JMeter is a java application and it needs Java in the machine so that it can run seamlessly. JMeter can be installed in Windows, Linux, Ubuntu, and Mac operating systems. Before installing JMeter, make sure that you have Java installed in your machine. You can check by hitting the command in your terminal. java -version
If java version is highlighted then java is installed in your system and if nothing appears then install Java by clicking here
How to Download and Install Apache JMeter

  1. Now it is the time to download JMeter. Download the latest version by clicking here. Download the binary file shown below. 

download JMeter
2. The installation of JMeter is very easy. The download binary file must be unzipped into the folder where you want to download JMeter. The unzipped folder would like just as below snapshot.

3. Run JMeter in GUI mode by clicking on the bin folder and then jmeter.bat file. 

4. After clicking, JMeter will open just as below. 
How to Download and Install Apache JMeter
More on Thread Group, Samplers, Listeners and Configuration of JMeter

  • Thread Group is basically the application of multiple threads to AUT. Each thread represents one user who is accessing the application. With the help of the thread group, you can apply a number of threads which is defined by you. 

More on Thread Group, Samplers, Listeners and Configuration of JMeter

  • Samplers allow JMeter to support testing of different protocols such as HTTP, FTP, JDBC, and others. 

  • FTP Request: If you want to do performance testing for the FTP server then you can use the config element of the FTP request. You can send a download a file or upload a file request to the FTP server. You need to add parameters to the sampler such as server name, remote file name (to be downloaded or uploaded), port number, username, and password. 


  • HTTP request

With this help of the HTTP request sampler, you can request an HTTP request to the server. With the help of this request, you can retrieve HTML files and images from the server. 
HTTP request

  • JDBC request

With this help of a JDBC request sampler, you can perform database performance testing. You will be able to send a JDBC request to the server. You should be able to add the SQL query in the query tag. 
JDBC request

  • SMTP Server

If you want to test the mail server then you must use the SMTP server sampler. With this protocol, we can send emails. 

  • CSV Data set Config

If you want to test the website with different users who are having different credentials, you must take the help of CSV data set the config to pass the credentials. You can store the credentials in the text file. It will read lines from the file using a delimiter. 
You must pass the data in a text file the same as the below snapshot.

  • HTTP Cookie Manager

When you log in to some website then your browser stores cookie so that you do not have to login again and again. Similarly, an HTTP cookie manager also does the same task for you. If the website is returning cookie in response, then it will save a cookie for you to maintain a session.  You can add an HTTP cookie manager in your test plan with the help of the config element. When you will record sessions using Blaze meter, it will automatically record cookies in the HTTP cookie manager. 
HTTP Cookie Manager

  • Listeners

Listeners listen to the results fetched by the JMeter and let you analyze the results with the help of visual reports. 
Listeners

  • View Results Tree: You get to see all the user requests in HTML format using view results listener. 

  • Aggregate Reports

With the help of aggregate reports, you can get total samples, average, median, minimum, maximum, and throughput. 

  • Jmeter Timers

Once you start sending requests to your AUT, you should have timers between each request so that it can simulate real-time behavior and the server does not get confused with so many requests hitting the server. Let us see the different kinds of timers which we can integrate to simulate real-time behavior

  • Constant Timer


It delays each request by the same amount of time. 

  • Gaussian Random Timer

Gaussian Random Timer
It delays each request by any random amount of time. You can define the deviation around which the delays would be adjusted. Also, offset can be added with the gaussian distribution of deviation value and then the total delay time can be calculated. 

How to do load testing with Apache Jmeter? Click here

  • Uniform Random Timer

Uniform Random Timer
It also delays each request by a random amount of time. You can define the random delay maximum time and the offset value which will be added to the random value. 

  • Bean shell, BSF and JSR223 timers

Bean shell timers introduce a delay time between each request using bean shell scripting. BSF timer is used to add a delay time between each request using BSF scripting language. Similarly, JSR223 adds a time delay using the JSR223 scripting language. 
The most used timers are constant and gaussian timers. 
Assertions in JMeter
Assertions are very useful in any kind of testing as verification and validation are the heart of testing. You must compare the results with the expected results to know if we are getting the correct response or not. Let us have a look at the most common types of assertions. 

  • Response assertion

It allows you to check the response against pattern strings. Take an example of Amazon.com. If you hit the server with some product then the response list should contain the product mentioned in the search list given in the request payload. 
You can choose text response and add the test which you want to validate. I have added the text in patterns to test. 
Response assertion
Also, we can validate the status code with the response assertion Select the field to test as response code and mention the code in the patterns to test. 

  • Duration Assertion

Duration Assertion
It tests that the server’s response is received time limits. If it is taking more than the time mentioned, then the assertion will be failed. 

  • Size Assertion

Size Assertion
It checks the response has the expected number of bytes contained in it. If it is above the defined limit, then assertion will be failed. In the below snapshot, if the response has equal or less than 5000 bytes then the assertion will be passed. 

  • XML and HTML Assertion

XML assertion verifies that the response data has correct XML syntax while HTML assertion verifies that the HTML syntax of response is correct. 
Controllers in JMeter
Controllers are used in JMeter to handle requests in an organized manner. There are different kinds of controllers that can be integrated with the JMeter Test Plan. These controllers let you handle the order of requests to be sent to the server. Let us have a look at different kinds of controllers. 

  • Recording Controller

Recording Controller
JMeter will record your testing steps but for storing them in a container you require a recording controller. 

  • Simple Controller


Simpler Controller is just a container to store your requests. You can give a meaningful name to the controller. In this way, if you want to duplicate the requests, you can simply add the simple controller without again and again adding so many requests. It is just for clubbing requests and in the view, results graph you will not see any controller name. 

  • Loop Controller

It allows the requests to run a specified number of times or forever if the number has not been defined. 

  • Transaction Controller


The transaction controller is similar to the simple controller which records the overall time for the requests to finish. It has an additional benefit over simple controller as you will be able to see the controller name which has the clubbed requests instead of individual requests name in view results graph. 

  • Module Controller

Module Controller
It is based on the idea of modularity which says that a set of requests can be clubbed in a simple or transaction controller. A module controller can be used to add any set of requests by selecting the controller. Suppose if you have 3 simple controllers named login, search and logout, then with the module container you will be able to select which you want to simulate again so that you don’t have to add the same requests again and again. 

  • Interleave Controller


This controller pickups one sampler per iteration and it is executed from top to bottom. In the below snapshot, we are having one interleave controller having 3 samplers names News Page and FAQ Page and Gump Page. It is running with 2 threads and a loop count of 5. So, a total of 10 requests will be executed per thread. 

  • Runtime Controller

This controller controls the execution of its samplers for the given time. If you specify the run time as 10 seconds, then JMeter will run your tests for 10 seconds. 
Runtime Controller

  • Random Controller

It is the same as the Interleave controller but instead of running from top to bottom, the random controller picks any requests randomly. 

  • If Controller

It runs the requests only when a set of conditions is fulfilled. 
Apache Jmeter tutorial 7
Processor in JMeter
Processors are used for modifying the samplers. There are two types of processors. 

  • Pre-processor are the processors which are applied before sampler requests. If you want JMeter to check all the links on the page and then retrieve the HTML. You can add HTML link parser which will parse links before a request is made to the server. 
  • Post-Processor: If the request is made to the server and is the requests send you an error then the post-processor should stop the further execution. 


In the above snapshot, if you choose Stop Test Now. This will stop the test if there will be any error in the response.
There is one more post-processor named debug processor which tracks the values of variables that are in the requests. 
Apache Jmeter tutorial 6
Jmeter Distributed (Remote) Testing
It is used to do testing on multiple systems. Applying all the load on a single server is not appropriate and can bring unexpected results. It is good to perform distributed testing with master-slave architecture.         There will be one master who will be driving various clients which will be again JMeter servers which will be putting load to the application under test. The firewall should be switched off in all the machines as it can block the traffic. All machines should share the sub-network and the JMeter version should be kept the same in all the machines to avoid any kind of complexities. 

Steps to setup master-slave architecture (Jmeter tutorial bonus)
1.       Go to the slave server and then go to the bin directory where JMeter is downloaded. You must then execute a file named JMeter-server.bat. Suppose the slave machine has IP address 120.178.0.9. 
2.       Now, go to the master machine and go to the bin directory. There, you have to edit JMeter.properties file. You must add the IP of the slave machine in front of remote_hosts. 
3.       Now for running the tests, you must go to the GUI of JMeter. Select the Run section on the menu bar of JMeter and then select a remote start and then the IP address of the slave machine. 
Apache Jmeter tutorial 5
Detailed Steps to Use JMeter for Performance & Load Testing (Jmeter tutorial exclusive)
1.       Start JMeter. 
2.       Add the BlazeMeter extension to the google chrome browser. Now hit the URL on the google chrome browser and record the flow with BlazeMeter. Once the steps have been captured then you can download the file from BlazeMeter in JMX extension. 
3.       You can then open the JMX file in your JMeter. It will appear as below. 
Apache Jmeter tutorial
4. Now, you must add a number of threads, ramp-up periods, and loop count. Number of Threads is the total number of users accessing the website. The number of times per thread will execute. Ramp-up period is the delay that should be applied before starting the next user. Suppose if you have 1000 users and a ramp period of 1000 seconds then delay between every user request will be 1000/1000 = 1 second.  

5. Now, add the listeners to view the graphical results. Let us add the most used listeners such as View Results and Assertions Results. 
Apache Jmeter tutorial
6. You can also name the requests in different transaction controllers such as login can go to login controller, authenticate, and secure to security controller and logout to sign off the controller. If you want to execute extensive tests, then these controllers will help you running many requests. 
7. Add Post-processor which would stop the tests in case you get any errors in the response. 
Apache Jmeter tutorial
8. Add Constant timer with a time period of 300 ms between each user request.
Apache Jmeter tutorial
9. For each request, you can add assertions to validate that if the requests are giving proper response. Different Response assertions can be used to validate the status code as 200 and to validate the test in the output response. You can also add duration assertion to check if the requests are completed in a particular amount of time. Size assertion can be used to check the response in bytes. 
Apache Jmeter tutorial
10. Now, run the tests using the green run button on top. Now it’s time to analyze view results and assertion results. 
Apache Jmeter tutorial
You have to analyze the throughput and deviation. Throughput is the server’s ability to handle a number of requests per minute. The higher the throughput the higher is the capacity of the server to handle user requests. The deviation is the second parameter which is of utmost importance in this graph to be analyzed. It means the variation from the average. Throughput should be higher, and deviation should be least. These parameters, you will be getting from the client which you have to validate and send a report to the client with these graphs. 
Also, you must remember in this Jmeter tutorial,  is the Assertion report. 
You will see the different assertions been passed and failed in this tree so that you can know which ones are failing. 
One more important listener is the View Results Tree listener. You will be seeing which requests got passed and which ones got failed. The ones which are in green color are passed and the ones which are in red color are failed. 
The last important listener which you can add is the Summary report which will let you know total samples, average, Min, Max, Error %, Deviation, and Throughput. This report is of the utmost importance to stakeholders. Let us see how it looks. 
Conclusion for Jmeter Tutorial
That sums Use JMeter tutorial to use performance and load testing so that your application is robust and can sand load without giving unexpected results. Use the wonderful elements of JMeter to share excellent reports with the stakeholders. 
Hope you are satisfied with our Apache Jmeter tutorial. Please get back to us if you have any suggestions

21 Best API Testing Tools That are insanely good –

API testing tools, the right strategies, and processes have become cardinal when it comes to software development and CI/CD workflow nowadays. Before we get into the details of API testing tools let’s have at the process in a concise manner.
What is an API?
API or application programming interface is a set of tools, rules, and protocols that help in developing a software application. An API also defines how various components of software should interact with each other.
Why API testing is needed?

  • Investigating an app at API level would be catastrophic so it’s better to do it at first
  • Core functionalities of the API can be validated
  • Consumes less time than that of GUI functional testing
  • Test data is mostly derived as JSON or XML. So the process, not language dependant
  • Can be easily integrated with GUI testing

API Testing ad
What is API testing in software testing?
Testing API becomes a much-needed part of the complete software ware testing. It forms the second layer of testing and requires almost 20% of testing efforts. Since there is no GUI, API testing is done at the message level. It includes testing the REST API’s, and soap web services. These APIs can be sent over HTTP, JMS, HTTPs, and MQ.
API testing flow
Because of API testing characteristics, it cannot be done manually, and hence there arises a need for various API testing tools for automated API testing. Various testing is done during API testing are security testing, functionality testing, load testing, reliability testing, API documentation testing, and proficiency testing.
Wish to know about the app testing process? Click here
Here let’s have a look at some of the top API testing tools for the year 2020.

  1. ReadyAPI

Ready APi testing tool
ReadyAPI is a popular API testing tool by Smartbear. Some of its prominent features are:

  • It assists in functional, security, and load testing of RESTFUL, SOAP, GRAPHQL, and other web services.
  • Ensure complete quality checks for all the web services.
  • It is a four in one tool assimilating API performance testing, API functional testing, API & web virtualization, and API security testing.
  • Supports integration of API testing with CI/CD pipeline.
  • Supports command-line
  • Supports the creation of comprehensive functional API tests and data-driven functional API tests.
  • Removes dependencies.
  • Native support for DOCKER, GIT, AZURE, JENKINS, etc.
  • Parallel execution of functional tests and job queuing.
  1. AcceIQ

accelq APi testing tool
AcceIQ is a cloud-based continuous testing podium for API automation testing. It assists in API testing without even writing a single code. It helps in automating various testing stages like test design, planning, test generation, and execution. Some of the features of AcceIQ are:

  • Dynamic environment management
  • Simplified API automation testing
  • Supports chain API tests for complete testing
  • API test planning, test case management, execution and tracking governance
  • Requirements tracking is interrelated with business processes
  • Defect tracking
  • Enhanced regression suite planning
  • Execution tracking
  • Seamless CI/CD and JIRA/ALM integration
  • Links business process with matching API
  • Extendable framework
  • No vendor lock,
  • Open-source aligned
  1. Katalon studio

Katalon studio api testing tool png
It is free to use, API automation testing tool. It is an all-inclusive automation tool providing solutions to the testers.
Some of its features are:

  • Support for both SOAP and REST API
  • All-inclusive API automation support
  • Data-driven approach.
  • Supports both automated and exploratory testing
  • AssertJ compatible
  • Support CI/CD integration.
  • Easy to use even for non-techies
  1. RoboHydra server

robo hydra logo png
It is perfect API testing tools for the users who don’t have a server but requires one. Some of its prominent features are:

  • Allows connecting clients-under-test to it and run the tests.
  • It is very versatile
  • Can test any HTTP, Https, or WebSockets client.
  • Can manage GUIs for mobile applications, public API, and complex java-based programs.
  • Supports exploratory testing and debugging
  • Ability to reverse proxy requests, increasing its utility considerably.
  1. SoupUI

Soap UI API testing tool PNG
SoapUI is a famous API testing tool for functional testing. It allows the automation testing of soap, rest APIs, and web services. SoupUI comes as a free version and a pro version, pro version offering more features than the free version. Some of the features of both of them are mentioned below:
Free package:

  • It allows access to full source code and to create their preferred features.
  • Quick and easy creation of tests using drag and drop, point-and-click
  • Scripts can be reused.

Pro package:

  • Powerful data-driven testing
  • Support CI/CD integrations
  • Supports asynchronous testing
  1. Postman

POstman API testing tool
One o f the most preferred API automation testing tool. It is best for the testers who want to evade coding in IDE using development language. Its features are:

  • Easy-to-use
  • Rich interface
  • Supports both automated and exploratory testing
  • Supports mac, windows, LINUX & chrome apps
  • Supports swagger & RAML formats
  • Offers run, test, document and monitoring features
  • Easy knowledge sharing
  • Support for GRAPHQL request and GRAPHQL variables, schemas, and GRAPHQL query auto-completion function.
  1. Tricentis Tosca

Tricentis Tosca API Testing tool
Tricentis Tosca is API testing tool for agile and DevOps. Some of its prominent features are:

  • Supports various protocols: AMQP, HTTP(S) JMS, RABBIT MQ, IBM MQ, SOAP, TIBCO EMS, REST, NET TCP
  • Maximize reuse
  • Integrates with AGILE and DevOps cycle
  • Sustainable automation
  • API testing on mobile, packaged apps, cross-browser, etc…
  • Reduced regression testing timing
  1. Apigee

Apigee API Testing tool
Apigee is an award-winning cross-cloud API testing tool.  It allows us to measure and test API performance. Its important features are:

  • It is powered by JAVA script
  • It is multi-step.
  • Supports design monitor, deploy, and scale APIs
  • Identify performance issues
  • Easily create API proxies
  • Deploy API proxies in the cloud
  • Supports cloud, on-premise, or hybrid deployment model
  • It is useful for digital business, and the data-rich mobile-driven APIs
  • It is secure,
  • Self-healing with Apigee-Monit,
  • Virtual host management
  1. Jmeter

Jmeter API testing tool
Jmeter though was created for load testing, it also supports functional API testing. Some of its prominent features are:

  • Replay test results
  • Supports CSV files
  • Integration between Jmeter and Jenkins
  • Supports both static and dynamic resources performance testing
  1. Rest-assured

Rest assured api testing tool logo
It is a java domain-specific language tool. It is used for testing rest API services. It is bundled with many features, permitting users to continue testing without much coding. Let’s have a look at some of its features:

  • Integration with serenity automation framework
  • Supports BDD
  • Requires only native knowledge of HTTP
  • Supports apache johnson
  • OSGi support.
  • It is an open-source tool
  1. Assertible

Assertible API testing tool logo
Features of Assertile are,

  • Supports continuous integration and delivery pipeline.
  • Integration with Slack, GitHub, and Zapier.
  • Validates HTTP responses
  • Offers sync features that automatically update tests with every change in API.
  • Supports encrypted variables that enhance API testing security practices.
  1. Karate DSL

Karate API testing tool logo
Karate DSL is an API testing tool that’s perfect for BDD methodology. Features of Karate DSL includes,

  • Quicker API testing
  • Build on cucumber-JVM
  • It helps in the creation of scenarios for API-based BDD tests easily.
  • Runs java project
  • No java knowledge required to write tests
  • Even non-programmers can write tests easily using karate DSL
  • It is open source
  1. Airborne

Airborne API testing tool
If you are a ruby API developer, airborne can be your perfect API testing partner. Some of its most inviting features are:

  • It is an open-source API automation test tool
  • Compatible with rack- and rails-based applications.
  • It is developed in ruby and RSPEC
  • It has no user interface of its own
  • Have wrappers to simplify calls
  • Ability to reuse parts of API calls.
  • Requires users to learn a few important methods and basics of RUBY and RSPEC
  • May important features for the API framework.
  • Allows to prolong and generate assertions, and chaining
  1. Swagger

Swagger Api testing tool
Swagger is an API testing tool for functional, security, and performance testing. Some of its features are:

  • Easy to quick creation, management, and execution of API tests.
  • Capability to inspect API request-responses,
  • Easy validation of schema rules
  • Automatically generate assertions
  • Complex load scenarios generation
  • Support services from REST, SOAP to Graphql
  • Open-source
  1. Fiddler

Fiddler API testing tool
Fiddler is another prominent API testing tool. Some of its features are:

  • Users can monitor, modify, and recover HTTP requests.
  • Supports HTTP caching and compression
  • Detects bottlenecks in the website
  • Perfect for layman testers to proficient testers
  • Log and debug HTTP traffic
  • Supports security testing.
  1. Webinject

webinject logo png
Webinject is one of the trusted API testing tools. Some of its prominent features are:

  • Creates fully automated test suites for functional, regression, and acceptance testing.
  • Allows testing of all applications with HTTP interface, including CGI, JSP, AJAX, SOAP, SERVLETS, REST, AND XML web services.
  • Collects and analyses result to prepare an automated report.
  • It also acts as a test runner.
  • It can function on different platforms using PERL interpretation.

Wish to know about the talk of the town when it comes to programming languages? Click here!

  1. HttpMaster express

HttpMaster express API testing tool logo
HttpMaster express is a renowned name among API testing tools. Some of its main features you can count upon are:

  • Supports testing of rest-based web services,
  • Monitors API responses
  • Efficient command-line interface
  • Supports request data builder and response data-viewer
  • HTTPMASTER offers the standard rest methods
  • Also offers custom verbs, defined global parameters
  • Supports customized API requests
  • Integration with dynamic data with their requests.
  • Compatible with swagger
  1. Rest console

Rest Console API testing tool
Rest console is a perfect API testing tool for building, debugging, and testing. Some of its features are:

  • It is a rest-based HTTP client visualizer and constructor
  • Intuitive interface
  • Easy identification of errors.
  • Support basic, plain, and OAuth validation,
  • Customizable interface
  • Allows users to develop customized headers
  • Supports auto-complete feature.
  • Flexible authentication protocols
  • Supports custom authentication.
  • Easy keyboard navigation and shortcuts
  1. Restsharp

Restsharp API testing tool
With full .net compatibility, Rest Sharp is one of the best API testing tool. Some of the features that make it one of the best API testing tools are:

  • Supports exhaustive testing.
  • Easy application creation
  • Streamlined interface
  • Free-to-use HTTP client library
  • Supports post, get, patch, put, options, head, and delete operations.
  • It is intuitive
  • Easy to use and install,
  • Supports serialization and deserialization support synchronous and asynchronous requests.
  • Support analysis of XML and JSON.
  • Supports uploading files and forms in multiple parts.
  • Supports validation protocols like basic, OAUTH1, NLTM, OAUTH2, and parameter-based authentication.
  1. PyRestTest

pryrest api testing tools
Another efficient tool used for mac based and LINUX based systems is. Some of its common features you can count upon are:

  • Easy to use
  • It supports YAML or JSON.
  • It is written in Python
  • Can support many add-ons.
  • Ideal for smoke-tests
  • Can create full test scenarios,
  • Deploys on-server quickly
  • Good for system health-checks.
  • Supports creation, extraction, and validation tools.
  • For a failed scenario it returns an exit code, which can be converted into parseable logs.
  1. Unirest

UnirestApi testing tool logo
Unirest is a library of almost every HTTP request client. Hence it is one of the highly preferred API automation testing tools. Some of its prominent features are:

  • Support for major programming languages: NODE, PYTHON, RUBY, OBJECTIVE-C, PHP, .NET, AND JAVA.
  • Includes a documentation page for reference
  • Unirest can combine with XUNIT or BDD runner
  • Includes code snips


Conclusion
There are various API testing tools available in the market offering various different features. Though some of the basic features are common. Your best pick will depend on your requirements.
Study your project requirements and API testing tools features in detail and figure out the best API testing tool for yourself.

How to test a taxi booking app like Uber?

How to test a taxi booking app like Uber? They are extremely complex and demand high data security.  On the top, they have to offer unvarying stability and high UX. If you are thinking about testing. you need assistance from someone who knows what they do.
However, some might be thinking that they have put a lot of effort when it comes to the development of the app, they have extremely skilled developers and they can carry out the process with ease.
But remember one thing, user perspective is what matters, your developers might be partial, and this might be has a huge weightage considering the competition that you are going to face and the huge amount of money hat’s been invested.
Testing is indeed extra cost, but the amount of risk it mitigates is immense.
But the question prevails! How to test a taxi booking app like Uber?
before we get into that, let’s know about the need in detail.

Why thorough testing is needed
Every customer user app needs thorough testing to succeed in the market. No customer would be willing to use a non-secure or slow app. In this digital age, competition is very high and most likely you will not get a second chance. Here are some reasons why a thorough and meticulously planned testing effort is needed for a taxi booking app:

  1. Security of Customer/Driver Data: the app would include the customer’s and drivers’ personal data (PII). Any security breach in this area can lead to legal complications for the app company and owner. 
  2. Integrated Payment and Wallets: Most booking app would have an integrated payment gateway to enable easy payment for the rides. These gateways and payment options need to be tested minutely to make sure the clients’ money is safe. 
  3. Easy to Use UI: The app should be designed in such a way that different types of users including aged people and people who are new to the internet can use the app with ease. 
  4. Accuracy of data: The app needs to be tested to ensure data accuracy in multiple points. This will include the data of the customer, driver, the trip details, the offers, the fares, the distance calculations, and much more. The accuracy of every data displayed on the app needs to be verified for its correctness. 

Uber App Screen
What to test in a taxi booking app?
Now that we have understood why testing is so important for the taxi booking app, let us look at some important focus areas and test points. While this list is not exhaustive, it will give you a fair idea of how to get started. Feel free to add points as per the app and requirements in hand.
From a Customer Perspective

  1. Customer Data: The customer data in the app needs to be tested to ensure it is accurate. This will include the personal details, the payment details (if they wish to save), the trip details, favorite pick-up and drop location, the offers available, and more.  
  2. User and driver registration: Registration for both customers and drivers needs to be tested to check the data is getting saved corrected in the server. The users and the drivers should be able to add, edit, and delete their details as well. 
  3. Map Related and live tracking: Testing the map related functionalities are very critical for any taxi booking app. This includes opening the app in the current location, finding cabs in the vicinity, and live tracking of the cab movement before and after confirming the booking. 
  4. Time Tracking: The live movement of the cab should be linked to the time taken to reach the destination or time to reach the customer. These values need to be constantly changed to verify the functionality is working fine. This can be tested by simulating a moving vehicle and then calculating the location and time. A critical requirement here would be the refresh. This needs to be decided by the business, ideally, it should be 1 sec or less, so the customer does not see a lag. But based on the system design and the load the business may decide for 2-5 secs also. 
  5. OTP: Most apps will have an OTP generation system for authenticating the user at the time of registration and even when boarding a cab. The OTP needs to be validated against the customer data with valid and invalid entries. The number of retries allowed is another important yet overlooked point. If the OTP is regenerated, the system should accept only the latest OTP and none of the previous ones should be accepted. Ignore this if not applicable to your app. 
  6. Wallet Transactions and history: Most apps will have an option to load money into the wallet using a pre-established payment gateway. The wallet needs to be checked for money top-up, balance, transaction history, refund, and offers. The same will be true for other payment options like debit card, credit card, UPI, and other options as per the app.
  7. Trip – distance and time: The details regarding the trip needs to be tested. This will include the distance between the pick-up and drop location. The way chosen should be the shortest way with the least traffic based on the congestion points in the location. The estimated time of travel and other details of the trip as per the business needs. 
  8. Trip Modification: The user should be allowed to make changes to the trip. This will include cancellation and changing the destination point. In the case of the latter, the trip distance, time, amount, and route should change accordingly. Check if there is a limit on the number of times the user can make the changes. If there is a limit like 2 or 3 then it needs to be tested that the 4th change is rejected by the system. 
  9. Cab Sharing: Most of the apps would allow the sharing of the cab between people. In this case, it is important to test the distance between the shared pick-up points. This limit must be set by the business. Check with the requirements and then test to make sure the sharing pick-ups are scheduled within that range. 
  10. Driver and cab details: The customers should be able to view all the driver details and his previous customer ratings. They should also be able to see the cab number and the model along with the driver’s contact number. As per the app, these may contain driver pictures as well. 
  11. Push messages and SMS: Every app has its own requirements for SMS, email, and push notifications. These will include notifications for booking confirmation, cab arrival, driver details, OTP, trip completion, the amount payable, cancellation request, feedback request, and others. Each of these needs to be tested to make sure they are time-bound as per the business requirements.
  12. Search: One of the most important aspects of the map search. This will include searching for cabs in the current location and location as per the user’s interest. Suggestions for the location once the user starts typing will be good to have feature. The search should show the cabs available in the area along with a route map. It should inform the customer of the distance and time to the nearest cab. 
  13. Offers: Every now and then, the company may come with offers and discounts for all or specific customers. The offer code and their validity need to be tested along with any specific requirements for availing the offers. The amount being reduced after availing the offer is another test area. 
  14. Feedback and Rating system: The app should include a feedback and rating system for both the customer and the driver. They should be able to give feedback and ratings to each other. These ratings need to be analyzed to improve the drivers and the services provided.
  15. Customer Support and Escalation: The app will have customer support and escalation mechanism in place. This can include support through email, call, or chat. Each must be tested along with the different escalation levels. 

From a Driver Perspective

  1.  Driver Data: Like the customer data, the app will also contain the driver data, his incentive, the number of trips undertaken, the star ratings (if available), his payment schedule, and other details. This again needs to be tested to make sure the mapping in the database or server is correct and the queries used to fetch the data is as expected. 
  2. Trip Visibility and Options: The driver should be able to see the customer search within a specific distance as per his current location as fixed by the business. He should have the option to accept or decline the trip as well. Once accepted the trip should be hidden for the other drivers. 
  3. Benefits and Trip history: Most drivers will be paid based on the number of trips they have undertaken, and the benefits would increase with the increase in the daily or weekly completed trip count. All these details along with the payment options and history should be available for the driver to verify. 
  4. Hiding Customer Personal Data: Customer data is very critical especially the phone numbers. This information need not be shared with the drivers. To contact the customers there should be a hotline number and the customer details should be hidden from the driver. 

Types of Testing 
For all the above test cases, there are different types of testing that will be done. Here is a list of these:

  1. Manual Testing: Critical business functionalities need to be tested manually. Manual testing is also needed in cases where the team does not have the time or money for automation or when the automation feasibility for the features is low. 
  2. Automation Testing: The app will have a lot of validations. If the testing is to be done only once, then automation is not required. But if there are likely to be regular updates or new features added, it would be better to have an automation suite in place to reduce the future testing efforts and save time as well. 
  3. Security Testing: The app server or database contains personal data of the customers and the drivers. This will include the names, address, phone number, mobile number along with the payment details that can include the bank or card numbers. The security of this data is very important. The app should be safeguarded against external attacks. 
  4. Performance Testing: Based on the anticipated load performance testing needs to be done so that the search, map loading time, and other transactions are well within the SLA at peak and off-peak loads.  Based on these results the business will decide to scale-up the infrastructure if needed.
  5. Integration Testing: There are several systems involved in the app. This includes the GPS tracking or mobiles of the driver and customer, the database or server, and the booking app. The integration between these systems needs to be verified for accuracy and data flow. 
  6. DB testing: Customer and driver details along with all the trip information are store in the database. Hence, DB testing is imperative. While testing we need to ensure that the basic operations like adding a record, editing a record, deleting a record, fetching the record are being performed as per the expectation. 
  7. Exploratory Testing: Exploratory testing is a kind of informal testing in which the user would just explore the application trying to go through all the different pages and verify that nothing is broken. 
  8. Responsive Testing: Responsive testing needs to be done to ensure that your taxi booking app renders itself well in devices with different screen sizes and resolution. With so many new devices entering the market and the extensive usage of the internet, responsive testing of the app needs to be taken very seriously. 
  9. UAT Testing: The ultimate testing for any app or software must be the UAT or User Acceptance Testing. UAT gives the usage pattern and the most frequently used areas of the app. This will be helpful in deciding the future features of the app. 

app crash
How do I test the Uber app?
Apps like uber are bound to be installed across many devices with varied OS versions.  Performance testing has to be done at intervals to make sure that the app is working fine and it has what it takes to meet up customer expectations.
While testing make sure that

  • Complete assessment of the business requirement of the apps
  • Identify the important performance testing metrics
  • Create perfect and realistic test scenarios
  • Analyze and validate the test result and measurements
  • Preparation of reports that can also be useful for developers.

Tips for testing apps like uber

  • Apart from the normal workflow of the registration module, you must also make sure that social media login and integration is carried over the system with ease.
  • Check email authentication process to make sure that your domain will not be marked as spam
  • Make sure that there are unnecessary links attached to the mail send by the system
  • Make sure that the user is able to differentiate auto-generated messages
  • Make sure that the geographic information system (GIS)  is in sync with the system and functionalities
  • Check the OS compatibility of the app with various versions
  • Make sure that the information provided to the user is concise and precise
  • Proper localization testing needs to done to make sure that it’s not hurting any sentiments
  • Real drivers and passengers have to be used for testing rather than a simulated environment
  • A payment gateway is integral for taxi booking apps. make sure that it doesn’t have any loophole and is working fine
  • Trace out all the security loopholes in the system
  • Test the authorization workflow and functionality
  • Gamification is indeed the star nowadays. Make sure that it’s in a way that will make the driver and the customer feel rewarded
  • Test the system in varied internet strength and load

Top 10 Taxi booking Apps

  1. Uber
  2. Lyft
  3. Ola Cabs
  4. Taxify
  5. DIDI
  6. Cabify
  7. Lecab
  8. Curb
  9. Gett
  10. GoCatch


Which are the tools that can be used for taxi booking app testing?
While the listed set of testing might be overwhelming, here is a list of tools available in the market to get you started.

  1. Appium and Appium Studio
  2. TestComplete
  3. Calabash
  4. Webload
  5. Zed Attack Proxy
  6. Android Debug Bridge
  7. Lambda Test
  8. Studio Press
  9. DBFit, SQLUnit
  10. Visual Studio Team Edition

Hope you have a fair idea now about how to test a taxi booking app now. This should be enough to get you started and rest you can improvise when you are at it. 

AngularJS Testing Tutorial – Cypress, Karma and Protractor

AngularJS testing using selenium is not a good approach. Due to the asynchronous behavior of the application selenium is not able to handle the asynchronous calls.
So it is necessary to make use of angularJS testing tools so that asynchronous behavior of the application can be handled. Let us see some good approaches to test angular JS websites below.
Unit Testing AngularJS Apps
To make sure that unit testing is happening easily when it comes to AngularJS Testing, Angular JS has been provided with dependency injection for your XHR requests.  The main reason behind is to simulate requests.  The model can also be tested by altering the DOM directly.  in short, individual sort function can be tested in isolation.
ad angular js
What is Karma?
Karma is a JS runner created by the angular JS team themselves. and is one of the best when it comes to AngularJS Testing.
Jasmine is the framework for testing angular JS code while karma provides us with various methods which makes it easier to call Jasmine tests.
For installing karma, you need to install node JS in your machine. After installing node JS, install Karna using npm installer.
How to test AngularJS apps using Karma?
First of all,
One can install karma using below command
npm install karma –save-dev
After running this command, karma dependencies will be installed. It will be present in package.Json after you run the above command. For making karma available globally use -g option so that you can invoke it from anywhere.
Now, the next step is to install karma plugin which would help us in using the jasmine framework and google chrome browser. Run the below command:
npm install karma-jasmine karma-chrome-launcher –save-dev
After running this command, start making tests in command prompt. For creating tests, run the following command.
mkdir tests        // for making tests directory
touch tests/test1.controller.test.JS     //For creating a test called test1
After creating a test, now it is time to put code in test1.
describe(test1,function(){
beforeEach(module(test1));
var$controller;
beforeEach(inject(function(_$controller_){
$controller=_$controller_;
}));
describe(‘sub’,function(){
it(‘1 – 1 should equal 0’,function(){
var$scope={};
varcontroller=$controller(test1Controller,{$scope:$scope});
$scope.x=1;
$scope.y= 1;
$scope.sub();
expect($scope.z).toBe(0);
});
});
});
Now, after creating the test you should know how to create a test runner, and before creating that we should know the configuration required for the test runner. For configuring the test runner perform the following steps.
karma init karma.conf.JS
Now, for running the tests using the test runner run the following command.
karma start karma.conf.JS
The test output should look like the underlying code.
> @ test /Users/devuser/repos/test1
> ./node_modules/karma/bin/karma start karma.conf.JS
INFO [karma]: Karma server started at http://localhost:8080/
INFO [launcher]: Starting browser Chrome
INFO [Chrome 80]: Connected on socket 2absOkNfa1asasaX0fCJ with id 66276373
Chrome 80 test1 encountered a declaration exception FAILED
ReferenceError: module is not defined
at Suite.<anonymous>(/Users/devuser/repos/repo1/tests/test1.controller.test.JS:3:13)
at /Users/devuser/repos/repo1/tests/test1.controller.test.JS:1:1
Chrome 80): Executed 1 of 1 (1 FAILED) ERROR (0.01 secs / 0.005 secs)
Now, add the following lines to your package.JSon.
{
“scripts”:{
“test”:”karma start karma.conf.JS”
},
Now with the help of this script, we will be able to run any test using npm command. Using the below command, run the jasmine tests.
npmtest
Now, it is time to add the controller logic and for adding it run the following commands.
mkdir app
touch app/test1.controller.JS
Add the following code in test1.controller.JS
angular.module(test1,[]).controller(‘testController’,functiontestController($scope){
$scope.sub=function(){
$scope.z=$scope.x-$scope.y;
};
});f
For adding the angular dependencies, run the following commands. Make a directory called lib in your project and then add all libraries in that folder.
mkdir lib
curl -o lib/angular.min.JShttps://code.angularJS.org/1.4.0-rc.2/angular.min.JS
curl -o lib/angular-mocks.JShttps://code.angularJS.org/1.4.0-rc.2/angular-mocks.JS
Now, it is time to edit the karma config file so that it comes to know about the test folder and the library folder so that jasmine tests can run successfully.
files:[
‘lib/angular.min.JS’,
‘lib/angular-mocks.JS’,
‘app/*.JS’,
‘tests/*.JS’
],
Now, run the tests using the npm test. Your test will run now successfully.
How to test AngularJS applications using Protractor?
Protractor work flow
Protractor is impeccable when it comes to AngularJS Testing. In Angular JS applications are hard to test since the application web elements cannot be captured very easily.
Angular JS applications have some extra attributes like ng-repeater, ng-controller, and ng-model which can be identified using Selenium locators. Protractor is a NodeJS program which is written in JavaScript. The pre-requisite of using Protractor is Selenium and NPM.
Let us see how you can proceed with the installation of Protractor. Run the following command to start with the installation of the protractor.
npm install –g protractor
It will install protractor in your system. Using  -g will make it available globally in your system. Now, after installation of protractor If you want to check the version of the protractor. You can find the following by running the following command.

Protractor –version
For running the protractor tests against the application under test, you would need webDriver manager. Now, you must update the webDriver manager to the latest version. For updating it, run the following command.
webdriver-manager update
Now you must be imagining how would you start the webdriver-manager. You can start it by running in the background by running the following command. It will then listen to all your protractor tests which have to be run against the angular JS application.
webdriver-manager start
Now to see if the webdriver manager plugin if it is properly running or not. Go to the URL: http://localhost:4444/wd/hub/static/resource/hub.htmland you will see the webdriver manager plugin running on it.
Now, we will see how to design the test cases in protractor. To start with designing o the test cases you need 2 files. One is the spec file and the other is the config file. The configuration file has the location for the protractor tests. Also remember, chrome is the default browser for a protractor. While the second file, the spec file has the logics and locators which would be used to interact with the application.
Now, let’s take a test case in which we have to go to URL: https://angularJS.org, and then you have to type your name in the textbox. After entering you will see your name as Hello Name!
Now, let us start with the steps which are required for making this test case and to execute it. In your folder, you will have 2 files. One is spec.JS and the other is conf.JS. The logic for spec.JS which will be there in it.
describe(‘Enter yourname, function() {it(‘should add a Name as your name, function() {browser.get(‘https://angularJS.org’); element(by.model(‘yourName’)).sendKeys(‘Name’);  var name= element(by.xpath(‘html/body/div[2]/div[1]/div[2]/div[2]/div/h1’));expect(name.getText()).toEqual(‘Hello Name!’);  });});
Now, if you see that describe comes from the Jasmine framework. It is basically a module and it can be a class or a function. We are giving this module name as “Enter Your Name”. So, for starting the function we start it with describe keyword. Just like a class can have many methods or a TestNG class can have so many test cases. Similarly, in the Jasmine framework, it starts a new test case.
browser.get(‘https://angularJS.org’);
This command is used for opening the browser with URL mentioned as https://angularJS.org. Now, you must identify the elements. So, you have to inspect the element just like you do in Selenium. You can use By.model for the elements who have ng-model as an attribute.
You can store Web elements in a variable. You can declare a variable using var keyword. Now, it is time to have some assertions. You get the text out of this web element and then compare it to the expected text.
Now, you are done with spec.JS and let us start with the conf.JS. You have to define the path of spec here so that tests can be identified easily.
Paste the following code in conf.JS
exports.config = {seleniumAddress: ‘http://localhost:4444/wd/hub’,  specs: [‘spec.JS’]};
Selenium address is the location where it can communicate with the selenium webdriver. Spcs tell the location of spec.JS
Now, for running the test, first navigate to the directory in which spec.JS and conf.JS are located. First thing to keep in mind that webdriver-manager should be started. If not started, you have to first start it with following command.
webdriver-manager start
Now, it’s time to run the configuration file. After starting the webdriver-manager plugin, run the config.JS file using protractor. Fire the following command.
protractor conf.JS
You have seen how many specs got passed and how many got failed.
Now let’s see how the failure is going to be reflected in the console. We make the assertion false.
Modify the code in spec.JS
describe(‘Enter your name, function() {it(‘should add a Name as your name, function() {browser.get(‘https://angularJS.org’); element(by.model(‘yourName’)).sendKeys(‘Name’);  var name= element(by.xpath(‘html/body/div[2]/div[1]/div[2]/div[2]/div/h1’));expect(name.getText()).toEqual(‘Hello!’);  });});
You will see F which means failed test case. You will get to know the complete description where the test case got failed.
Now, you must be imagining how would the reports be integrated with Jasmine. Let’s install the Jasmine reporter. Run the following command:
npm install –save-dev jasmine-reporters@^2.0.0      
If you want jasmine reporter to installed globally. For installing globally, run the following command.
npm install –g jasmine-reporters@^2.0.0
You have to now modify the conf.JS. You have to add Jasmine reporter in it. Add the following code in it.
exports.config = {seleniumAddress: ‘http://localhost:4444/wd/hub’,      capabilities: {          ‘browserName’: ‘Chrome’      },      specs: [‘spec.JS’],     framework: ‘jasmine2’ ,onPrepare: function() {          var jasmineReporters = require(‘C:/Users/User1/node_modules/jasmine-reporters’);jasmine.getEnv().addReporter(new jasmineReporters.JUnitXmlReporter(null, true, true)          );     }   };
Now, run the tests using protractor conf.JS. You will see the junitresult.xml in the folder path given in conf.JS.
Open the XML file and see the result of the test case. In this way, you can take the help of protractor to test angular JS websites.
How to test the AngularJS app using Cypress?
Cypress is very close to the application. It just has a very thin layer between production code and testing code. It is Javascript E2E testing framework.
It is an open-source AngularJS Testing framework Cypress has bundled various packages such as Mocha, Chai, and Sinon. The only supportive language with Cypress is Javascript. When you open the cypress application using command cypress open, the following application will open.
This application is divided into two parts. On the left side, you write commands. There are different keywords to it. VISIT is for opening the URL and GET is for getting a webelement. CLICK is for clicking on the webelement. Using ASSERT, we can add assertions to our test cases.
For installing Cypress, you should have node.JS installed in your machine. You can then use the npm installer to add dependencies of Cypress.
npmicypress -D
Now for opening the cypress test runner, run the following command.
npx cypress open
If you want your application and Cypress to run at the same time then you have to make some changes in your package.JSon.
“cypress”: “concurrently \”ng serve\” \”cypress open\””
Add these lines in package.JSon.
Now, run the following command
npm run cypress
When you add a new project in cypress then you will have below folder structure.
Fixtures have static data that has to be used by your tests. You can use them by cy.fixture() command.  In the integration folder, you will have your integration tests. The plugin helps you to tweak to your test cases. Just like plugins have a file named index.JS which have a method which will run before every spec file. In Support files, you can have your reusable code.
Now, it is time to create your first test in the integration folder. You name it as test1.spec.JS. You will see it in the Cypress test runner also. Cypress API is present under the global cy project. Now let us put some code in it.
describe(“Test1”, () => {
it(“should visit home page”, () => {
cy.visit(“http://localhost:4200/login”);
});
});
It makes use of description and it blocks from the mocha syntax. It makes the beginning of the test cases. Once you will run this test In the test explorer, on the right side, the execution starts.
When you will run Cypress for the first time, you will see that the cypress.JSon file will get generated. In this, you can store your configuration values. Now let’s store our base URL in cypress. JSON so that we don’t have to change the URL in every test case.
{
“baseUrl”:”http://localhost:4200″
}
It’s time to change the code in spec.JS also.
describe(“Test1”,()=>{
it(“shouldvisit home page”,()=>{
cy.visit(“/login”);
});
});
Now for getting webelement, you can make use of a cypress selector background in the test runner. It is present on the left side of the test runner. You can get the XPath from there.
Use this way to get the webelements.
cy.get(‘.btn-link’).click();
cy.url().should(‘include’, ‘/register’)
This assertion will check the check has registered keywords in it. Hence, we are done with the first test case in cypress.

Conclusion
Now, we have seen different ways of AngularJS Testing. Make use o
f these and test the application in the best possible ways. Optimize your code and have the best test integration practices so that the client can be satisfied with your test metrics. All the best.