Selenium Tutorial For Beginners [Step by Step]

Everybody knows about the impeccable selenium! The ultimate tool for testing web applications! for you to learn in detail about how to carry out automation testing, we have written an extensive Selenium tutorial just for you!
This blog comprises of three part,
1. Selenium Tutorial For Beginners
2. Selenium Intermediate Level Tutorial
3. Selenium Advanced level Tutorial

Selenium Tutorial For Beginners

What makes Selenium better?

You don’t need to code anything in Selenium and with this; any beginner will be able to record and play the simplest web application scripts.
Usually, Selenium RC needs a server to be up and running for sending commands to the browser. It is used for cross-browser testing and you can write the code in any language.
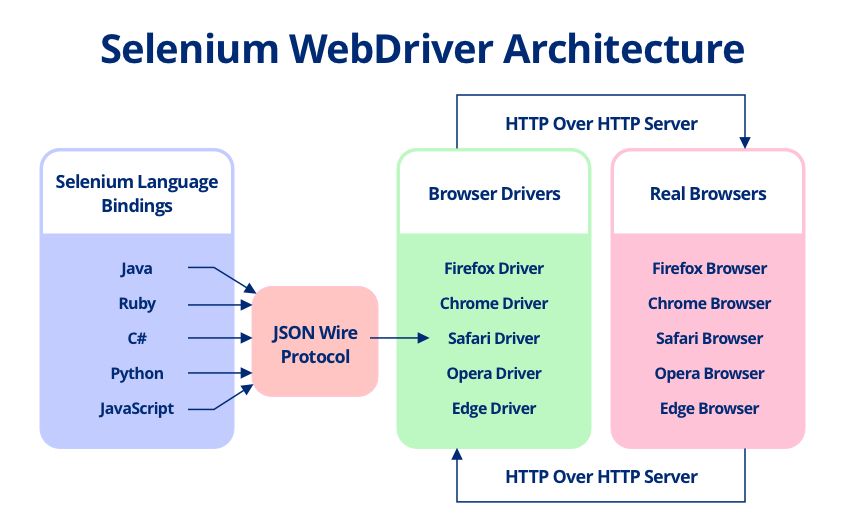
Selenium Web Driver is a better version of IDE and RC. It directly sends commands to the browser without the need of a server to be up and running.

Different languages can be used for coding the scripts like Java, C#, PHP, Python, Perl, and Ruby. Selenium Grid is used for parallel testing in multiple browsers and environments. It used the hub and node concept where hub acts as a source of Selenium commands and each node is connected to it.
Now, here we will discuss Selenium WebDriver. How a beginner can start learning Selenium WebDriver and how he can excel in it.
Now, first, we will look at the steps we need to follow to download Selenium Web Driver in your machine.

Ways to download and install Selenium WebDriver

  • You should have Java installed in your machine. This is the pre-requisite for Selenium Web Driver to work.
  • You can visit the page: http://seleniumhq.org/download/ and download the client drivers and language bindings. You have the select binding for Java.
  • This download will be named – selenium-2.25.0.zip.
  • Now, you can import all the Jars in Eclipse. You have to right click on the project and import jar files by selecting all the downloaded jar files. For this, you can click on the Libraries tab and then click on “Add External JARs”.

Now Let’s look the First Selenium WebDriver Script

Let’s take an example of the first Selenium Script which we would create using Selenium basic methods.
Let’s first look at the script in detail. In this script, we will do the following test steps.

  • Go to the home page of the test application
  • Verify the title of the page
  • Do a comparison of the result.
  • Close the browser after the script is done.

package projectSelenium;
import org.openqa.selenium.WebDriver;
import org.openqa.selenium.chrome.ChromeDriver;
public class seleniumTest {
public static void main(String[] args) {
System.setProperty(“webdriver.chrome.driver”,”C:\\chromeDriver.exe”);
WebDriver driver = new ChromeDriver();
String baseUrl = “https://google.com”;
String expectedTitle = “Google”;
String actualTitle = “”;
        // launch Fire fox and direct it to the Base URL
driver.get(baseUrl);
        // get the actual value of the title
actualTitle = driver.getTitle();
/*
* compare the actual title of the page with the expected one and print
* the result as “Passed” or “Failed”
*/
if (actualTitle.contentEquals(expectedTitle)){
System.out.println(“Test Passed!”);
} else {
System.out.println(“Test Failed”);
}
driver.close();
}
}

Things to look at the above code:

  • In the first two lines, we have imported two packages. You have to import – org.openqa.selenium and org.openqa.selenium.firefox.FirefoxDriver.
  • The most important step is to instantiate the browser. This is done by line

WebDriver driver = new ChromeDriver();
//This is done to invoke a chrome browser.
You can invoke a FireFox browser by following line of code
WebDriver driver = new FirefoxDriver();
You can invoke an IE browser by following line of code:
WebDriver driver = new InternetExplorerDriver ();
Also, while invoking a browser you have to pass the path of the executable file. You can do it by following line of code:
System.setProperty(“webdriver.chrome.driver”,”Path of chrome driver”);
System.setproperty(“webdriver.ie.driver”,”Path of ie driver”);

  • Get() method is used to enter a url in a browser.
  • getTitle() method of selenium webdriver is used to fetch the title of a web page.
  • Now, we have to compare the expected title with the actual title.

If(expectedTitle.equals(actualTitle))
{
System.out.println(“TEST PASSED”):
}

  • For terminating the browser, close() method is used. Driver.close() closes the active browser window. If you want to close all the opened browser windows by selenium web driver then you can use driver.quit().
  • You can run this test by right clicking on the program and then select as “Run As” as “Java Application”.
  • Next thing which is of utmost important while writing a test script is to identify web Elements which will be explained in detail in the below section.

Locating Web Elements

Locating web elements is very easy. Various selectors are available for that process. find Elements is one such 2 in which selenium webdriver is used for locating a web element and then, you can perform an action on that.

Know More: Selenium Automation Testing With Cucumber Integration

Let’s see some of the methods by which you can identify web element on a web page.

  • className – It will locate web element based on the class attribute. Eg: By.className(“abc”);
  • cssSelector – used to locate web element based on css selector engine. Eg:- By.cssSelector(“#abc”);
  • id – If some web element has id attribute, then you can directly identify the web element using id tag. Eg:- By.id(“abc”);
  • linkText – It will find a link element by text mentioned by you in the test script. By.linkText(“Login”);
  • name – If any web element has name attached to it then you can identify it using name attribute. Eg: By.name(“name”);
  • partialText – It will find a link element by text containing the text mentioned by you in the test script. By.partialText(“abc”);
  • tagName – It will locate all elements which will have this tag.
  • xpath – It is the most used locator in a selenium test script. It will identify the element using html path. It can be relative or absolute. Absolute xpath traverses the path of the web element by root and relative takes the reference of any web element and then traverse to that specified web element. It is better to refer an element by relative xpath rather than absolute xpath.

Basic Actions on a web element

You can click on a web element by using click() method of selenium web driver. You can locate a web element and then perform an action on it.
Eg: driver.findElement(By.xpath(“”)).click();
Also, you can send keys to a particular web element by using send Keys() method of selenium web driver. You can locate a web element and then you can enter some text in it using sendKeys() method.
Eg: driver.findElement(By.xpath(“”)).sendKeys(“name”);
Also, there are other actions which you can perform on a web element by using action class.
WebElement wb = driver.findElement(By.xpath(“”));
Actions actions = new Actions(Driver);
Actions.moveToElement(wb).build(). Perform ();
You can even switch to alert boxes which come when you click on some webelement. You can do it by switchTo().alert() method.
Eg code:
WebElement wb = driver.findElement(By.xpath(“”));
Wb.click();
Driver.switchTo().alert();
Now, you will be able to access the alert box. You can retrieve the message displayed in the text box by getting the text from it.
String alertMessage = driver.switchTo().alert().getText();
Also, you can accept the alert box by function accept(). You can see the sample code as below:
Driver.switchTo().alert().accept();
You can even check conditional operations on a web element.
Also, check whether a web element is enabled or not. If it will be enabled then you can do some operation on it.
Apart from all these, you can check if some web element is displayed or not. In the case of radio buttons, you can check if the radio button is selected or not. You can do these checks by – isEnabled(), isSelected() and isDisplayed() option.

Waits in Selenium Web Driver
Selenium Web Driver
If you want some step to get completed before any other step then you have to wait for the prior step to get completed. In manual testing, it is very easy to achieve but in automation testing, it is bit tedious and you have to wait for the previous step to get completed or a condition to be fulfilled before moving on wards to the next step.
This can be achieved by adding waits in between. There are two types of wait- explicit and implicit wait. If you are expecting a particular condition to be fulfilled before moving to the next step,
Another feature is that you can use explicit wait while if you just want a universal wait, then you can go ahead to use implicit wait. The implicit wait is used to set the default time out for the whole script.
A perfect automation script is made by adding both type of waits – Explicit and Implicit. You have to judiciously use both types of waits to make an efficient test case.

Know More : Top 50 Selenium Interview Questions and Answers

Explicit Wait

Syntax of Explicit Wait:
WebDriverWait wait = new WebDriverWait(WebDriverRefrence,TimeOut);
wait.until(ExpectedConditions.visibilityOfElementLocated(By.xpath(“”));
Expected Condition can be used with so many conditions. Some conditions which can be used with it are:

  • alertIsPresent()
  • elementSelectionStateToBe()
  • elementToBeClickable()
  • elementToBeSelected()
  • frameToBeAvaliableAndSwitchToIt()
  • invisibilityOfTheElementLocated()
  • invisibilityOfElementWithText()
  • presenceOfAllElementsLocatedBy()
  • presenceOfElementLocated()
  • textToBePresentInElement()
  • textToBePresentInElementLocated()
  • textToBePresentInElementValue()
  • titleIs()
  • titleContains()
  • visibilityOf()
  • visibilityOfAllElements()
  • visibilityOfAllElementsLocatedBy()
  • visibilityOfElementLocated()

Implicit Wait

Syntax of Implicit Wait:
driver.manage().timeouts().implicitlyWait(TimeOut, TimeUnit.SECONDS);
For this, you have to import a package into your code. The package name is java.util.concurrent.TimeUnit;

Selenium Intermediate Level Tutorial

Through the section Selenium Tutorial for Beginners, We gave you the basic info that you need to know about the tool. Now let’s go further and learn much more about this impeccable web app testing tool.
How to upload a file in Selenium test cases?
To upload a file, first, you have to identify the element on which you have to upload your file. There you can directly use sendKeys() function of selenium web driver. You can pass the path of the location in sendKeys. In this way, you will be able to upload a file using selenium web driver.

public static void main(String[] args) {
System.setProperty(“webdriver.gecko.driver”,”path of gecko driver”);
String baseUrl = “http://www.google.com /upload/”;
WebDriver driver = new FirefoxDriver();
driver.get(baseUrl);
WebElement element = driver.findElement(By.id(“id of element”));
uploadElement.sendKeys(“C:\\newhtml.html”);
//Here,  above you have to pass the path of the file where your file is located.
// Then you can click the upload file link
driver.findElement(By.xpath(“”)).click();
}
How to use a web table in selenium script
You have to access a web table and the elements present in the table. You can get it by making an xpath. Suppose you have had1 0a table with four blocks.
selenium intermediate tutorial
The first thing which you have to do is to find the XPath of the web element in this web table. Let’s say you want to get to the third element in the above web element.
The coding of the above web table is as below:

Selenium Intermediate Level TutorialSelenium Intermediate Level Tutorial
Now, you can analyze that first there is a table and then there is a tbody. In that tbody there are two rows. One row is having two tables. The first row is having two cells – First and Second. The second row is having two cells – Third and Fourth.
Our goal is to reach to the third cell. Let’s try to make the XPath of it.
The XPath of it will be //table/tbody/tr[2]/td[1]
So, the table is the parent node from which we will iterate to go the third element. From there, we will go to the tbody section and then the second row. From there we will get the first column.
Let’s write a script to get the text out of it.
public static void main(String[] args) {
String url = “http://testsite.com/test/write-xpath-table.html”;
WebDriver driver = new FirefoxDriver();
driver.get(baseUrl);
String txtWebelement = driver.findElement( By.xpath(“//table/tbody/tr[2]/td[1]”).getText();
System.out.println(txtWebelement);
driver.close();
}
}
Let’s take an example of a nested web table. You have to then analyze it carefully and get the XPath of it. Let’s look at the example below to get more information on it.
Selenium Intermediate Level Tutorial:
So, if you want to access the web element which is having text 10-11-12 then you can do it by traversing from the table and then iterating through the rows and columns to reach there.
Xpath would be: //table/tbody/tr[2]/td[2]/table/tbody/tr[2]/td[2]
public static void main(String[] args) {
String url = “http://testsite.com/test/write-xpath-table.html”;
WebDriver driver = new FirefoxDriver();
driver.get(baseUrl);
String txtWebelement = driver.findElement( By.xpath(“//table/tbody/tr[2]/td[2]/table/tbody/tr[2]/td[2]
”)getText();
System.out.println(txtWebelement);
driver.close();
}
}
This way, you can iterate through the rows and columns to reach to a specific cell from a web table.
Now, one of the most important concepts in selenium which will help you in many cases when you won’t be retrieving any text from a web element or to enable a web element to get the text or to perform any action on it.
Let’s talk about JavaScript Executor in detail. It is an interface which helps to execute javascript.
JavaScript Executor
Sometimes you are not able to click on a web element using click() function. You can then use javascript executor to execute click function on a web element. Let’s have a look at the code.
WebDriver driver= new FirefoxDriver();
// JavascriptExecutor interfaceobject creation by type casting driver object
JavascriptExecutor js = (JavascriptExecutor)driver;
You can now click on a webelement using below command.
WebElement button = driver.findElement(By.xpath(“”));
Js.executeScript(“arguments[0].click();”,button);
Also, if send keys isn’t working. You can make use of java script executor to send keys. Let’s look at the example below.
WebDriver driver= new FirefoxDriver();
// JavascriptExecutor interfaceobject creation by type casting driver object
JavascriptExecutor js = (JavascriptExecutor)driver;
js.executeScript(“document.getElementById(‘id’).value=”value;”);
You can even make use of java script executor to refresh a web page. You can do it by following command:
WebDriver driver= new FirefoxDriver();
// JavascriptExecutor interfaceobject creation by type casting driver object
JavascriptExecutor js = (JavascriptExecutor)driver;
js.executeScript(“history.go(0)”);
Sometimes, getText() doesn’t work and then you have to make use of java script executor to get text of a web element. You can do it by following line of code:
WebDriver driver= new FirefoxDriver();
// JavascriptExecutor interfaceobject creation by type casting driver object
JavascriptExecutor js = (JavascriptExecutor)driver;
js.executeScript(“history.go(0)”);
Sysout(js.executeScript(“return document.documentElement.innerText;”).toString());
You can even get the title and URL of a web page using java script executor. The procedure is very simple. Let’s have a look at the following lines of code.
WebDriver driver= new FirefoxDriver();
// JavascriptExecutor interfaceobject creation by type casting driver object
JavascriptExecutor js = (JavascriptExecutor)driver;
System.out.println(js.executeScript(“return document.title;”).toString());
System.out.println(js.executeScript(“return document.URL;”).toString());
Desired Capabilities Concept in selenium web driver
You can make the set of configurations on which you want a particular test script to run. You can pass browser name, version to specify the type of environment on which you want a test case to run.
Let’s see some of the capabilities which you can set in a test case for IE browser.
//it is used to define IE capability
DesiredCapabilities cap = DesiredCapabilities.internetExplorer();
cap.setCapability(CapabilityType.BROWSER_NAME, “IE”);
cap.setCapability(InternetExplorerDriver.INTRODUCE_FLAKINESS_BY_IGNORING_SECURITY_DOMAINS,true);
In the above capability, we have passed the capability browser name and we have ignored the security domain.
After setting the capabilities you can pass the capabilities to the web driver instance so that it executes the test on a particular configuration.
Let’s have a look at the complete set of code.
public static void main(String[] args) {
//it is used to define IE capability
DesiredCapabilities cap = DesiredCapabilities.internetExplorer();
cap.setCapability(CapabilityType.BROWSER_NAME, “IE”);
cap.setCapability(InternetExplorerDriver.INTRODUCE_FLAKINESS_BY_IGNORING_SECURITY_DOMAINS,true);
System.setProperty(“webdriver.ie.driver”, “path of executable”);
WebDriver driver = new InternetExplorerDriver(capabilities);
driver.get(“http://gmail.com”);
driver.quit();
}
Handling a drop down in selenium web driver
You have to first import following packages: org.openqa.selenium.support.ui.Select.
First, you have to identify from DOM whether the dropdown is of select type or not. If it is of select type then you have to go for the below steps.
Then, you have to uniquely identify the select tag. You have to first make the object of Select class and pass the element for which you have to choose the options from the drop-down.
Select dropdown = new Select(driver.findElement(By.xpath(“”)));
Now, there are three main methods which you have to use to select any element from this select object.

  1. selectByVisibleText
  2. selectByIndex
  3. selectByValue

You can either select any element from this drop-down by matching the visible text with that of the text passed by you. You can also select any web element from the drop-down using an index. Last option is to select by value tag.
Also, there are some more functions which are available. Some of them are selectAll() and deselectAll() too select and deselect all the elements when more than one element can be selected.
But, if the dropdown is not of select type then you can’t go for the conventional method. You have to follow another method. You have to uniquely identify the web element on which you have to select a dropdown option. You can identify it and the sendKeys() function of selenium web driver to send keys to the uniquely identified dropdown.
WebElement dropdown = driver.findElement(By.xpath(“”));
Dropdown.sendKeys(“value to be selected”);
How to select the checkbox and radio button is selenium
Sometimes, you come across situations where you have to select checkboxes and radio buttons. You can do it easily with selenium web driver. You just have to use click() function of web driver to click on checkbox and radio button. You can even check of the web element is selected or not.
.isSelected() checks if any web element is selected or not.
It gives false if the web element is not selected and it gives true if the web element is selected.
This way, you can handle radio buttons and checkboxes in a selenium script.

Selenium Advanced level Tutorial

Now, you know almost the stuff which is required for selenium intermediate and beginner level. Now, you are proficient enough to deal with all the advanced level of selenium web driver. You can then practice those and while you are done with those, you can move forward to the advanced level of course.
Let’s see what lies ahead and what can give you an edge in your interviews. You can look at this advanced course so that you can be ahead of all the candidates who just know the basic and intermediate selenium course. Let’s have a look at Selenium Advanced level Tutorial

Selenium Grid
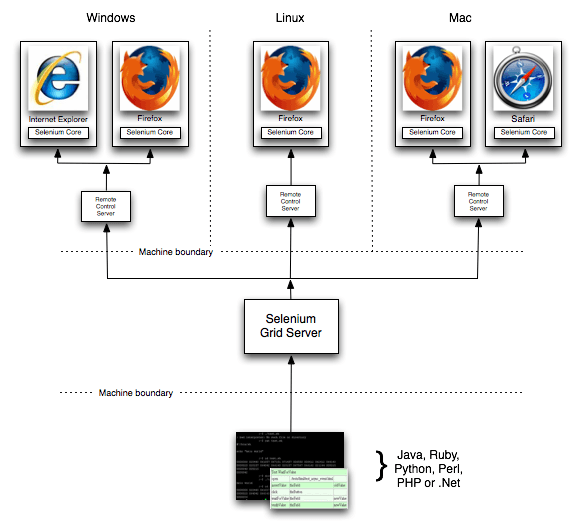

Selenium Grid is issued for running various tests on different browsers, operating systems, and machines in parallel. It used a hub and node concept. You don’t want test cases to run on a single machine. You have your machine as a hub and various systems on which test cases will be distributed. You call those machines as nodes.
The hub is the central point and there should be only one hub in a system. This hub is your machine from which you want to distribute the test cases among all the clients.
This is the machine on which test cases will run and those will be executed on the nodes. There can be more than one node. Nodes can have different configurations with different platforms and browsers.
Let’s see how you can establish a selenium grid in your machine.
You can download the selenium grid server from the official site. You can place Selenium server.jar in a hard drive. You have to place it in all nodes and hub c drive.
Open the command prompt in your hub and then, go to C directory. There you have to fire the below command java -jar selenium-server-standalone-2.30.0.jar -role hub
Now, if you want to check if the selenium grid server is running on localhost that is 4040 port or not. You can visit the local host on your browser.
You have to then go to C directory of the node and open command prompt in it. Also, when you have made the selenium grid server up in the hub, you have to note down the IP address and port.
java -Dwebdriver.gecko.driver=”C:\geckodriver.exe” -jar selenium-server-standalone-3.4.0.jar -role webdriver -hub ip address of hub -port port number of hub
When you fire the above command, again go to hub browser and the port number 4040. Refresh the page and you will see IP address which will be linked to the hub.
Now, you have set up machines with different configurations. But how would the hub know which test case would be run on which node.
This will be done by desired capabilities which will tell that this test script would run on a particular set of configuration.
One can do it using below source code:
This way, you will be able to distribute the test cases across different machines and browsers. You will be able to do parallel testing using Selenium Grid.

Maven and Jenkins Integration with Selenium

Maven is a build management tool which is used to make the build process easy. Maven avoids hard coding of jars and you can easily share the project structure across the team using artifact and version id.
Every team member would be at the same page. You can make a maven project by going to File – New – Other – Maven project. You have to then specify the artifact id and then version id. You will be prompted to select a template. For starting, select a quik start template.
You will get a folder structure where you will be having two folders – src/main/java and src/main/test. In java folder, you will maintain all other stuff except tests while in test folder you will maintain all the test cases.
You will be having pom.xml file where you have to define all the dependencies so that it can download from the maven repository and place them in ./m2 repository in your local project structure.
You can get the dependency from the maven official site and then place in pom.xml. It will download all the required jars.
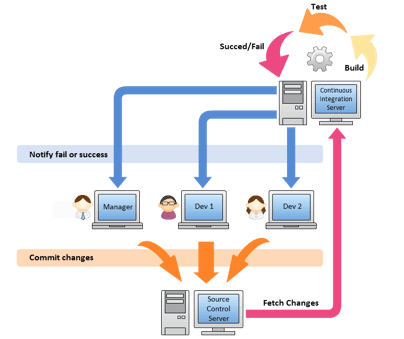
Also, Jenkins issued for continuous integration of the latest build with the production environment. Whenever a developer will fire the latest build then the smoke test will start running on that build.
If the build gets passed then it can be deployed to the production else the developer and tester would get a notification about the failed build. It makes the delivery cycle very fast.
Also, you can do it by downloading Jenkins war file and then running it so that Jenkins server will be up and running on port number 4040.

After doing that you can install all the necessary plug-ins. You can then create a new item and does the post-build actions.
Also, you can pass the path of git repository from which it will fetch the latest build. If you are using a local server then you pass the path of pom.xml from the system.
You can even set nightly runs with Jenkins, You have to specify the time when you want your test to run. They will run and you will get the reports on the Jenkins server the next morning. Isn’t it time-saving?

Database Testing using Selenium WebDriver

Integrating Selenium tests to the database is so easy in the latest version of the tool. You have to make use of JDBC library for database connections. It allows connection of Java and databases. First, make a connection to the database with the following command:
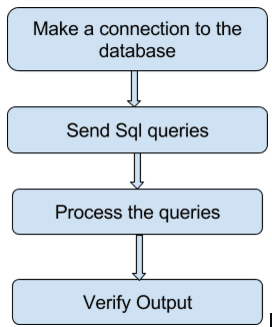
DriverManager.getConnection(URL, “userid”, “password” )
After doing that you can load the JDBC driver. You can do it by following lines of code:
Class.forName(“com.mysql.jdbc.Driver”);
Now, you have to send the query to the database. How will you do it? You can create an object of a statement class and then execute the query using the statement object.
Statement stmt = con.createStatement();
stmt.executeQuery(select *  from employee;);
Now, you can get the result in the result set. You can do it by following command:
ResultSet rs= stmt.executeQuery(query);
After doing all the operations, you can close the connection.
Con.close();
In this way, you can get the result set and then do all the validations on the result set.

How to take screenshots in selenium web driver

You should get the screenshot of the failed test cases so that you can get to know where exactly is the problem. This will help in better-debugging skills.
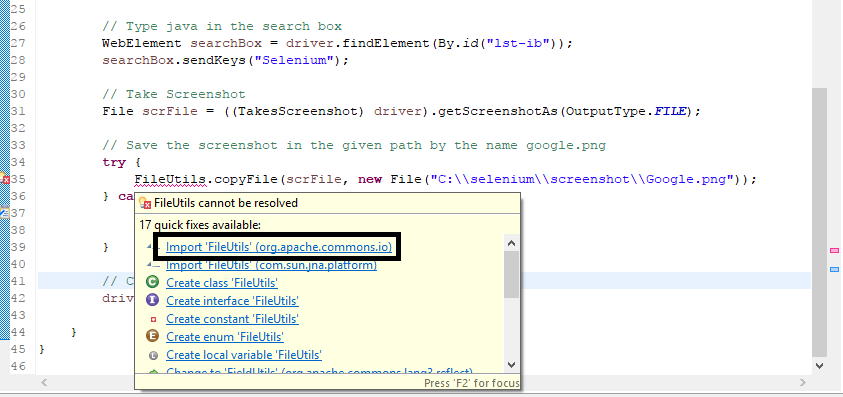
Let’s look at the steps involved in taking a screenshot:
TakesScreenshot scrShot =((TakesScreenshot)webdriver);
This step caste a driver instances to Takes Screenshot interface. Now, you have one method which is getting screenshots which will get the image file.
File SrcFile=scrShot.getScreenshotAs(OutputType.FILE);
Now, you have taken the screenshot but you have to place it somewhere. You can create some folder which will be used for storing all the screenshots captured during the execution.
You can do it by following the line of code:
FileUtils.copyFile(SrcFile, DestFile);
This is the way to capture screenshots. But if you want that only the screenshot is taken when a test case fails. You can use ITestListener.
It has various methods and one of the methods is onFailure() which will do the specified task when every there is any failure in a test case.
So you can put this code in that method so that whenever any test fails it will take the screenshot and place it in the folder specified by you.

How to drag and drop in a web page using Selenium Web driver

Now if you want o drag and drop something o a web page, you would be confused. It is very simple. You have to make use of Actions class which gives you a method dragAndDrop() which will drag and drop a web element from a source destination to the desired destination.
Actions actions = new Actions(driver);
Actions. dragAndDrop(Sourcelocator, Destinationlocator).build().perform();
Make sure that the source locator and destination locator have correct xpaths. In this way, you will be able to drag and drop any element on a web page.

How to do right click and double click on a web page

You can do a right-click on a web page using Actions class. Actions class provides a doubleClick method which allows to double click on a web element. You can do it by following lines of code:
Actions actions = new Actions(driver);
WebElement elementLocator = driver.findElement(By.id(“ID”));
actions.doubleClick(elementLocator).perform();
You have to do right-click in selenium using action class only. It is very easy. It provides a method – contextClick() and then right click on a web element.
Actions actions = new Actions(driver);
WebElement elementLocator = driver.findElement(By.id(“ID”));
actions.contextClick(elementLocator).perform();
This way, you will be able to right click and double click on a web element.
How to switch to an iFrame

iFrame is a web page which is embedded into another web page. Whenever you want to click on a web element, which is in another iframe. First, you have to switch to that iframe and then perform an action on it.
You can do switching by
Driver.switchTo().frame(index or name or id of iframe);
Conclusion
Before learning Selenium it’s better to have a thorough understanding of any object-oriented language. languages that Selenium support includes, Java, Perl, C#,  PHP, Ruby, and Python Currently.
We genuinely hope this tutorial has helped in understanding selenium better.

Get a eBook : Download PDF

24 Best Test Management Tools For Testers

Test management tools are of utmost importance to the software testers because they somewhat ease out the task of the testers. These tools also play a key role in streamlining the test process.
A good test management tool must check the following boxes; easy installation, reporting system, defect tracking system, import-export system, and most importantly, it should be compatible with other test management tools.
This list brings to you the top 24 best test management tools of 2020.

1. Test Case Lab
 

This is a feature-loaded test management tool. It checks all the boxes that a good test management tool must-have. TestCaseLab allows the QA engineer to create test cases, group those cases, and lastly execute test runs.
You can individually search, edit, and delete different cases in this tool. Most of all, this tool has an easy installation process and can be done without the help of IT
Features

  • Can be used to manage test cases and merge it with bug trackers
  • Progress of each test can be monitored
  • All the activities of the project can be tracked and the wrong action can be undone
  • Test cases can be converted other projects
  • Search option
  • Real-time sync during collaboration
  • Already available integration is, JIRA

2. Test Lodge

Test lodge is the best test management tool of all time. The user interface is easy and intuitive. It has all the essential features which enable the QA engineer to create test plans, suites, and cases.
Apart from that, it also facilitates bug tracking with inbuilt integration with other top bug tracking tools and a fairly useful graphical reporting system.
Features

  • An online test management tool
  • Helps in organizing testing work right away
  • Can be integrated with issue tracking tools
  • Test plans can be created from scratch with the help of templates
  • Test suites can be created using a simple interface. All you have to do is import test cases from a spreadsheet
  • Each test can be marked as failed or passed
  • Can integrate with other tools
  • Impeccable dashboard and reporting features
  • An entire team can be kept in sync and tasks can be managed

3. Practitest

This is one of the few end-to-end test management tools. You get a 30-day free trial and after that, you have to pay some nominal charges for using Practitest.
It allows seamless integration with Redmine, Pivotal tracker, and Jira and a few other systems. Also, communicating the test results is ever so easy with this test management tool.
Features

  • End to end QA management for manual and automation testing
  • Visibility of the project can be ensured with customizable dashboards and reports
  • The existing bug tracker can be integrated with other tools
  • Bugs can be tracked with the help of advanced filters
  • Can be used to perform exploratory testing
  • Work can be turned into effective without losing critical information
  • Duplicate bugs can be identified and deleted
  • Can be customized in accordance with needs
  • Time management feature plan testing assignments easily

4. Qtest

According to the critics, this is the number 1 test management tool as it enables the QA engineers to create test cases, group those cases, and lastly execute test runs smoothly.
It pairs with 3rd party test management tools which make QTest all the more powerful. Individuals and test teams can collectively use this tool.
This eliminated the need for e-mail to communicate test results to each other. QTest is very prevalent in the agile development field.
Features

  • Tracking, organize and reporting of tests can be using an easy interface
  • Tests can be centralized
  • Flexible configurations
  • Impeccable integration features
  • Test execution can be tracked and managed
  • Real-time reporting and analytics features

5. Test Collab

It has all the essentials of a good test management tool. Integration with JIRA, GogBugs, and Redmine is the unique selling proposition of this tool.
The main screen of the software shows important information like project quality trend, control testing metrics, time spent on a test and so on.
Features

  • Can be used for creating and commencing Test plans, execution, requirements, test cases
  • Time estimate for testing can be calculated before critical release
  • Chat facility to increase interaction between developers and testers
  • Integrate with the defect management system
  • When a test fails it will be automatically pushed to the issue manager

6. Zephyr

Automation is the focus of Zephyr and hence you will see a lot of automation tools in Zephyr starting from Selenium to Bamboo and Jenkins.
It comes with a trial period of 30 days after which you have to purchase the tool for further use.
Features

  • Real-time Jira integration
  • Helps in better team collaboration
  • Better visibility on software projects
  • Can be used to manage all the aspect of software quality life cycle
  • Customised Jira workflows
  • Test case re-usability

7. Quality Centre
 

This test management tool is maintained by Micro Focus. Created by HP, It has the following features; metrics management, agile testing, requirements management, test and defect management, and agile testing. This tool is available for a 30-day free trial.
Features

  • Easy to use
  • Impeccable, release management,  requirement management, test case management, test execution management, defect management and report management.
  • Defects report can be shared across multiple projects
  • Integration with third-party tools is easy

8. Test Link

This is an open-source test management tool. Test Link can very well collaborate with bug trackers. Create test cases, group those cases, and lastly execute test runs with a fair amount of ease.
It has metrics and chart support built into it which comes in very handy during a presentation and communicating test results.
9. Testuff

Testuff supports testing a super wide range of software. Integration with top bug trackers is built into this tool.
The best part about this tool is that it allows the tester to attach a video of the defect to the test report. Also, it comes with twitter integration which makes sharing the test result with the team seamless.
Features

  • Compliant to methodologies such as Agile, exploratory testing, waterfall, Top-Down, Bottom-up etc.
  • Efficient work allocation and management
  •  Test results from various tools can be integrated
  • Can automatically adapt to any mobile device
  • Unlimited record and playback option
  • Regular monthly updates

10. Test Rail

Test Rail is a basic test management tool. It packs all the basic functions and comes with a 30-day free trial. The user interface is clean and has an inbuilt issue tracker. Test Rail gives real-time reports on your progress. It also has the capacity to work collectively with a bunch of automation tools.
Features

  • Manage test cases,  suites and execution efficiently
  • A sudden boost in test productivity
  • Can be integrated with bug trackers and automated tests
  • Powerful metrics and reporting

11. Testflo

Test management within JIRA is best done TestFLO. Automation tools like Bamboo and Selenium work smoothly with TestFLO. Defects and requirements of different test cases are maintained. Apart from this, TestFLO has all the components of a good test management tool. The trial period on this one is of 30 days.
Features

  • The major component of  PROBE.Studio, ERP Toolkit solution
  • Just copy the Business design document to Excel file and the data can be imported to the TestFLO repository.
  • Impeccable requirement traceability
  • Test progress tracking
  • Test preconditions are reusable
  • Built-in-report features
  • Reporting can be done through JIRA dashboards and Issue Navigator
  • Automated test results can be imported from Jenkins or Bamboo

12. Qmetry

Metry allows the testers to test projects within JIRA. This makes the entire test cycle very seamless. The user interface of QMetry is simple and its main features include requirement tracking, test case management, test execution, reporting, user management, and issue management.
Features

  • Helps Agile+DevOps team to increase the quality of the product
  • End-to-end test management
  • Text execution management
  • Efficient integration with CI/CD tools
  • Multiple releases and execution can be handled simultaneously
  • Leakage can be prevented by parallel testing
  • Granular project reporting with analytics and dashboard

13. QASE

QASE is the one and only notable cloud test management tool. Both individuals and test teams use it. As a matter of fact, this is one of the most liked test management tools. Using this test management tool is known to substantially increase productivity. Managing test cases, preparing test plans, and performing test runs is very easy with Qase.
Features

  • An effective test management tool for DEV and QA teams
  • Helps in organizing test cases to logical groups
  • It allows you to define test case severity, describe pre-conditions, priority, etc.
  • Can be used to create test plans and run tests
  • Role-based access controls for different groups
  • Can be integrated with Jira integration, Redmine integration, YouTrack integration, Slack integration
  • With the help of REST API, automated tests results can be sent to Qase

14. HipTest

Hiptest is the preferred test management tool of DevOps and Agile Collaboration is very easy with this tool. It is widely used in over 150 countries.
Hippest is easy to install and if you face any difficulty with the tool, just contact the Hiptest customer care. Hiptest supports just over 20 frameworks including Specflow, Cucumber, Selenium, Junit, etc.
Features

  • An easy-to-use editor that will help you to edit your scenario
  • Best platform for BDD
  • Creates a direct relationship between tests and acceptance criteria so that it can be validated with living documentation of the application
  • Acceptance test can be co-designed and shared understanding can be maintained using the tool
  • Test refactoring will become easier than ever
  • Manual and automated tests can be created, assigned and executed
  •  Living documentation feature
  • Working condition of features of the product can be tracked from the start to release
  • Features can be updated directly from the repository

15. ReqTest

It allows the tester to report bugs on the same instant of their sighting. Reporting is a joy with ReQtest as there is support for diagrams, charts, and metrics. Test productivity increases with this software as it gives a real-time progress report.
Features

  • Efficient management of test plans, cases, and runs
  • Advanced bug tracking
  • Immense support for Agile model of development
  • Cloud-based tool
  • Efficient requirement management module
  • An advanced bug tracking module

16. Testpad

You can invite guest testers to test. All you need to do is sent an e-mail invite. There is no need for the guest tester to create an account on Testpad. This feature is very useful and handy. Apart from that, Testpad has all the necessary tools integrated into it.
Features

  • Helps you to replace the usage of spreadsheet
  • Helps in manual testing
  • Keyboard driven interface
  • Helps in Agile model of development
  • Checklists make test plans easier
  • You can get details of the test run  on your mobile

17. Aqua

AQUA stands for aligned quality assurance. It makes management of automated and manual test cases very easy. Requirements and defects are also mentioned in the same tool.
Features

  • Test cases can be structured and managed in projects
  • Test cased can be automatically generated with the help of field requirements
  • Manual tests can be automated
  • Support CI (continuous integration) by initiation and implementation of tests

18. QA Complete

QA Complete sets the benchmark for all test management tools. It comes with seamless synchronization with QA tools like Bugzilla, JIRA, Test Complete, Jenkins, Soap UI and so on. You can individually search, edit, and delete different cases in this tool.
Features

  • Helps in optimizing speed and quality of testing
  • Helps in achieving continuous agility in Agile to automation, DevOps to Analytics

19. XQual

XQUAL is not a mainstream penetration testing software. Instead, it aims to eliminate common errors while test management like slippage, regression, bugs. These arise mainly due to improper management of the test.
Features

  • Helps in defining requirement specification and bug tracking
  • Helps in gaining pace for the project
  • Integrated solution helps in reducing cost of the project
  • Be it automated test or manual test Xqual has the ability to record in run time.
  • Vivid displaying of results, excellent result tracking features
  • Excellent spring tracking features
  • Test execution can be scheduled and helps in continuous integration

20. IBM Rational Quality Manager

The name is enough for this test management tool. It has a separate section where the testers can see the progress on different test cases all at once.
Features

  • Web-based quality management solution
  • Customizable test plans
  • Helps in compliance audits
  • Accelerated manual and automated testing
  • Cloud-based software
  • Excellent integration features

21. Gemini

It has a simple and intuitive user interface. You can maintain test records on Gemini and review them later. It allows assigning tasks to different team members. Apart from this, it has all the necessary features of a good project management tool.
Features

  • Can be used to capture requirement and track progress in a private or collaborative environment
  • One of the best when it comes to integration
  • Complex changes can be broken down into small manageable items
  • Easy to generate reports
  • Email alert  option
  • Badges that show notifications if there is any change

22. Deviniti

Deviniti is an impeccable tool for managing team, development process and testing tools. The tool also helps in gathering requirements, writing test cases, define test plans report defects, etc.
Features    

  • Every code changes in the repository will reflect in the CI/CD pipeline too
  • A secure repository of its own that will help in easy communication within different technologies helps in mutual integration and increases productivity.
  • Built-in the pipeline that can help in creating an ideal project environment
  • Can be used to optimize the existing environment

23. Klaros Test Management
 

With the help of Klaros, you can document, control and plan tests efficiently. It can also be integrated to test automation tools, defect management tools and requirement management tools.
Features

  • Tasks for testers can be assigned with the press of a button
  • Tasks can be organized on the basis of a hierarchy and review it
  • Staff utilization, quality, and test progress can also be monitored
  • Manual and automated test cases are evaluated
  • Results can be exported in Excel, PDF or XML format

24. Silk central

With the help of Silk Central, you now unify all the testing related activities to one single platform. Real-time analysis is the forte of this platform.
Features

  • Can be used to validate end-to-end processes
  • Impeccable collaboration and traceability features
  • Supports Agile, conventional as well as hybrid methodologies
  • Analysis and reports can be accessed in real-time.
  • Helps in conducting risk-based demand-driven testing

Conclusion

List does not end here there are plenty of test management tools in the market made by various vendors. The 24 listed here are the most used. However, using tools basically depends on personal interest and various other technical factors.

17 Top-Notch Penetration Testing Tools (2021 Update)

There is a bunch of penetration testing tools available on the internet. This article brings to you the 15 most coveted, critically acclaimed, and best penetration testing tools.
What is penetration testing?
Cyber attacks can happen at any point in time. To be on the safer side you need to know thoroughly about the loose ends of your software defense. Penetration testing unravels the vulnerabilities of your software so that you can tighten it later.
Following Penetration Testing Tools are Covered in this Blog.

      1. Netsparker
      2. Coreimpact
      3. Metasploit
      4. W3AF
      5. Nessus
      6. Cain & Abel
      7. Accunetix
      8. Probe.ly
      9. Wiresharker
      10. Kali Linux
      11. Burpsuite
      12. Zedattackproxy(ZAP)
      13. Openvas
      14. Sboxr
      15. Webscarab
      16. nmap
      17. Hashcat

1. Netsparker
Netsparker is perhaps the most accurate penetration testing tool. It automatically identifies vulnerabilities in both web API and applications.
Features

  • Considered as a pioneer in web application security
  • NETSPARKER eliminates the need for the penetration tester to manually sit and test different vulnerabilities.
  • All the real vulnerabilities are brought into the limelight just with a simple scan and it is capable of finding vulnerabilities like cross-site scripting, SQL injection, and so on. You can simply download and install it from the internet.
  • Can easily integrate with CI/CD and other systems in software development, in short, a fully customizable workflow can be created
  • Verified bugs are automatically posted to the bug tracking system

2. Core impact
It is one of the oldest penetration testing tools present in the market. The range of exploits in this penetration testing tool is impeccable.
Features

  •  Core Impact has Metasploit exploits, automated wizard processes, PowerShell commands, etc. Exploits written by Core Impact are commercial grade and widely used in both companies and security consultancies. The price of this tool is on the higher side but you get exactly what you are paying for.
  • Has the ability to replicate attack across systems, devices, and applications
  • Security posture can be validated by methods used by dreaded cyber-criminals
  • An up-to-date library on leading threats
  • Programmable self-destruct capability so that no loose end will be left behind
  • The reporting feature of the tool can be used for compliance validation
  • Can be used for network testing
  • Can capture information shared between a real user and the website

Also Read: Top 10 Automation Testing Tools 2020

3. Meta sploit
It is one of the most prevalent and advanced penetration testing tools for penetration testing. It has a set of exploits that can enter a system bypassing its security. If the exploit successfully enters the system, a payload is run which basically provides a framework for testing.

Features

  • This is a commercial product; therefore you have to purchase it after the free trial if you want access to all the features. Metasploit is compatible with Windows, Linux, and Mac OS X.
  • There are modules that can send a sequence of commands that can focus on a particular type of vulnerability
  • Metasploit can be used to gain as much information to learn about the weakness of a software system.
  • Has a database that can store system log, host data, and evidence
  • A multi-function payload module

4. W3AF
This is a free penetration testing tool and to be frank, does a great job. It has a bunch of useful features like fast HTTP requests, injecting payloads, various HTTP requests, and so on.
Features

  • The user interface of W3AF is compatible with Windows, Linux, and Mac OS X. Unlike other tools, this one is free to download and use.
  • Has web and proxy servers that can be easily integrated into the code of the software
  • Helps in sending lightning speed HTTP request owing to the surplus of extension
  • Various type of logging methods such as Console, Text, CSV, HTML, and XML
  • Be it any part of the HTTP request, W3af can inject any type of payload

5. Nessus
Nessus is a very capable vulnerability scanner with a website scan, IP scan, and has a sensitive data search specialist module. All these functionalities are built into Nessus and help in finding vulnerabilities in the system, capable of handling all testing environments.
Features

  • Up-to-date database that’s updated on a daily basis
  • Can be used to expose scalability
  • (Nessus Attack Scripting Language) NASL is used as the scripting language
  • Nessus can identify an FTP server on a non-standard port, or even a web server running on  port 8080
  • The tool can make services like HTTPS, SMTP look like SSL so that they can be injected into a PKI-type environment.

6. Cain & Abel
This is the perfect tool for decoding passwords and network keys. Cain & Abel accomplishes this by using different methods like network sniffing, cryptanalysis attacks, cache uncovering, dictionary, and routing protocol analysis. This is a free tool but is only available for Windows operating systems
Features

  • Can crack WEP(Wired Equivalent Privacy)
  • VoIP conversations can be recorded
  • LSA (Local Security Authority ) can be dumped
  • Password related issue can be resolved

7. Acunetix
It is a full-fledged, fully automatic vulnerability scanner capable of scanning over 4500 different types of vulnerabilities.
Features

  • The best feature of this tool is that it can complete several tests automatically which sometimes takes hours to complete. The results generated on this tool are accurate and fast.
  • Acunetix supports all systems including JavaScript, HTML5, and CMS.
  • Can detect over 4500 vulnerabilities
  • Hidden inputs that haven’t revealed in  black-box scanning can be revealed
  • Javascript of websites and SPAs can be crawled
  • Ability to create management and compliance report
  • Can integrate with CI tools
  • Configurable workflow
  • Replication of e-mail injection attack

8. Probe.ly
Probe.ly not only finds vulnerabilities but also suggests a possible fix on it. The user interface of this tool is ridiculously intuitive and has all the necessary features for penetration testing.
Features

  • Probe.ly is capable of finding out upward of a thousand different types of vulnerabilities including OWASP TOP10.
  • Guidance to fix the issue will also be provided by Probe.ly
  • Can integrate with other tools
  • Can do intrusive and non-intrusive scans
  • Available also as a plugin for integration with CI tools
  • Has the ability to generate scan result, compliance report and the coverage report

9. Wireshark
This is less of a penetration testing tool and more of a network analyzer. It is compatible with Windows, Linux, Mac OS X, FreeBSD, NetBSD, Solaris, and so on and so forth. Wireshark is free to download and install on all operating systems. All the information gathered by Wireshark is presented in a systematic manner on TShark utility.
Features

  • Can inspect 100s of protocols
  • Detailed VoIP analysis
  • Offline analysis and live capture
  • Data that has been captured by Wireshark

10. Kali Linux
Kali Linux is developed and maintained by Offensive Security. It is an open-source tool which basically means that anyone can use it and add features to it.
Version tracking, tool listings, and meta-packages are integrated into Kali Linux for penetration testing.
Kali Linux is free to download and use on almost all operating systems.
Features

  • Debian based Linux distribution
  • 600+ pre-installed tools designated for security research, penetration testing, web app testing, etc.
  • Multilingual support
  • Completely customizable

11. Burp Suite
This penetration testing tool has an intruder tool mainly for executing attacks. The intruder tool has limited functionality but all of its functions can be unlocked by purchasing it. This tool makes penetration testing very time efficient. Burp Suite is compatible with Windows, Linux, and Mac OS X.
Features

  • Impeccable web vulnerability scanner
  • CI integration
  • Advanced manual tools
  • Can detect server-side vulnerabilities that are completely invisible
  • Pioneer in using OAST (out-of-band techniques)
  • Can perform  interactive application security testing (IAST)
  • Advanced web application crawler
  • Can perform javascript analysis

12. Zed Attack Proxy (ZAP)
ZAP is free to download and use. It basically scans web applications for vulnerabilities. There are different types of scanners integrated into the ZAP penetration testing tool.

Features

  •  The main feature of ZAP is perhaps the proxy intercepting tool which is particularly useful in different test scenarios. is compatible with Windows, Linux, and Mac OS X.
  • Easy to integrate
  • Automated scanners
  • Both manual, as well as automated pen-testing, are used
  • Can mimic  activities of a hacker to expose the vulnerability
  • It will stand between a browser and a tester so that it can intercept and inspect messages

13. Open VAS 
Open vas is a vulnerability scanner that is capable of performing authenticated testing, unauthenticated testing, and various protocols (both high and low) Performance tuning, etc. Open VAS also has an inbuilt powerful language that can be used for performing any type of vulnerability test.
Features

  • More than 50,000 vulnerability tests
  • A comprehensive vulnerability management solution
  • Open-source
  • Open VAS is controlled by the service layer

14. SBOXR
Over 30 DOM security issues can be traced out by Xbox. Python/Ruby capability makes Sboxr an impeccable tool
Features

  • Ease of use
  • Can be used by DEV, QA as well as security teams
  • Detailed reporting
  • Good customer support

15. WebScarab
Used for analyzing application that uses HTTP and HTTPS protocol for communication. Since the tool is written in JAVA it’s portable to many platforms. It has several modes of operation as well as plugins.
Features

  • Operates as an intercepting proxy
  • Review and modify requests
  • Can be used to intercept both HTTP and HTTPS communication
  • Primarily designed for those who can write codes

16. nmap
nmap is a free network discovery and security auditing software that’s widely used for managing service upgrade schedules, network inventory, and monitoring host or service uptime
Features

  • Helps in mapping out networks filled with IP filters
  • Supports OS like, Linux, Microsoft Windows, FreeBSD, OpenBSD, Solaris, IRIX, Mac OS X, HP-UX, NetBSD, Sun OS, Amiga, etc.
  • Can be used to scan large network

17. Hashcat
One of the fastest password cracking software in existence and the first and only in-kernel rule engine.
Features

  • Open-source
  • Multiple OS, device, platform, and hash support
  • Supports hex-salt and hex-charset
  • Has a built-in benchmarking system
  • Automatic performance tuning

Conclusion
The 15 above-mentioned penetration testing tools are the best in the business and will get the job done for you. The only thing you have to check out is the compatibility with your operating system.

A Complete Beginners Guide to Cross Browser Testing

In a present-day technology-driven world, where people have numerous choices to pick their preferred browser, it becomes very important to have your website go through cross browser testing. Any anomaly in the loading of a website can lead to the loss of its user’s trust from it.
Hence when you know your users have an extensive option of browsers, ensure your website is compatibles with all of them. Some of the frequently used browsers are Internet Explorer, Safari, Firefox, Chrome, etc.
What is Cross Browser Testing?
Cross browser testing validates the proper working of your application over different browsers. It verifies that your website works steadily and as per requirements. It can be used both for web and mobile applications
What kinds of applications should be tested for cross browser testing?
Applications that are Customer facing are more desirable to be executed for cross-browser testing. But finally, the question arises that most of the applications are meant for end-users only.
Let us consider a scenario. There is a company, and it has an application for its inventory management and another application for the end-users to purchase its products.

Now the application for inventory management is used only by the internal staff of the company and company has complete right to limit the browser usage to a single browser, but for the second app that is meant for end-users, the company has no powers to restrict the usage of browsers by its customers.
Hence it becomes very important for the company to get the second application properly tested for cross browser testing.

Why is cross browser testing needed?

Cross browser testing as discussed earlier is done to test the application’s compatibility with multiple browsers. Some of the other common reasons for executing cross-browser testing are:

  • To find defects in the applications and be able to rectify them.
  • To enhance user-experience across all browsers.
  • To increase the efficiency of the app
  • To find any probable drawbacks
  • To test if the app looks the same across various browsers.
  • To validate if all the functionalities of the app work fine on various browsers.
  • To verify if it fulfills the client’s requirements across all the browsers.

Who Performs This Testing?
The answer to this question might end in a single word –“Testers”. But it is not exactly the case. The testers play an important role in cross browser testing, but business analysts, clients; stakeholders have an equally important role in deciding upon the number and names of the browsers, the testing has to be conducted on.
Analyzing the statistics of the users using different browsers, they pick up a few browsers that are more frequently used by the application users. It is next to impossible for the testers to perform cross browser testing on 1000’s of browsers available in the market.
The analyst team and the clients make a list of the most frequently used browsers by the application end-users and testers then perform testing over it.

How to Perform Cross Browser Testing?

Talking about the most important part – performing the cross-browser testing, the very first thing that has to be decided is whether to perform manual testing or automation testing.
Manual testing can be performed for cross-browser testing, but considering the multiple machines, multiple OS, Multiple browsers, manual testing can lead to many problems, and various challenges. Hence automation testing is a preferred method of testing for cross browser testing.
Manual Method
When executing cross browser testing manually, it is very difficult to test the application on the number of diverse browsers. In manual testing, the app can be tested over a few limited browsers only and hence delimiting the efficiency of the app.
Also, manual testing for cross-browser testing is both costly and time-consuming.
Automated Method
Cross-browser testing requires running the same test suit over various browsers. This is a recurrent task, and can result in errors if done manually and is also very time-consuming and costly when done manually.
Hence, cross browser testing is generally executed using automation testing. Cross browser testing is more cost and time effective when done using automated testing tools.
A lot many tools are available that assists in cross-browser testing.
Recommended Tools
1. LambdaTest
LambdaTest is used to test web app on over 2000+ combinations of different browser and operating system. It is a cloud-based cross-browser testing platform.

It allows executing Selenium automation tests on Selenium grid. It helps conduct live interactive cross browser testing of websites and web app on the cloud.
2. Cross Browser Testing
Cross browser testing has a vast competency to execute manual, visual, and Selenium tests in the cloud on over 2050+ real desktop and mobile browsers.

The amazing Record & Replay feature permits recording live test and run that recorded test in parallel for faster testing.
3. Experitest
Experitest allows executing a parallel test on different browsers and mobile devices.
4. Selenium
Selenium with an easy transaction of browser can help test the web applications easily in parallel. It is a well-known automated testing tool.
5. BrowserStack
This cloud-based web and mobile testing allow on-demand browsers, operating systems, and real mobile devices testing.
6. Browserling
Browserling is a live interactive for testing effortlessly. Browserling offers speedy access to all the common browsers and popular operating systems.

When to do cross browser testing?

When to do cross-browser testing depends on testing methodology and testing timelines.
This test can be performed:
#1) As soon as possible:
You should start testing as soon as possible, whenever any page is ready to start testing it on different browsers. Though it will increase the efforts, it will help resolve defects at early phases of the software testing life cycle.
#2) When the application is complete:
Start with testing once the development of the complete app is done. It will save a lot of efforts of repeatedly testing single web pages. But it will be less cost-effective than the above scenario, but will ensure defect detection and resolving the defects before code release.
#3) When the application is released:
Though testing the code after release is not a good time for testing, but it is never too late if it means providing quality to the users. It is better than giving bad experience to the users.
Cross-browser testing requires various browsers to tests the supplication. These browsers can be:

  • Locally installed.
  • Installed on a virtual machine.
  • Tools that have their browsers for testing
  • On cloud

In short, the cross-browser testing can be done on one of- Dev/QA/Production environments.
What to Test?

  1. Base Functionality: if the app works per the requirements. Also, it includes Links, dialogues, menus etc.
  2. Graphical User Interface: Look and feel of the application.
  3. Response: response of the application to users actions
  4. Performance: timely and proper Loading of the page

It is not necessary that if your browser works well on one browser it will work well on the others too. Hence cross-browser testing is very important. It let the testers know what a defect that is found in different browsers is.
Based on what defects are found in which particular browser, the developers resolve the defects. And if in case the application does not at all open up in any of the browsers, the users can be easily told about it.
To summarize “how” to cross-browser test

  • Collect and analyse the Traffic statistics to understand which browsers to test.
  • Analyse which functionalities of the application to be tested on which browser. Though it is advisable to test the complete applications on every browser, considering the time to test and the cost of testing it is not a feasible idea. The best approach is to test the complete application on one browser and test the most critical and used functionalities over the remaining browsers.
  • Next perform the testing, test all its functionalities and look and feel features.
What are the effective strategies to be followed while performing cross browser testing?

1. Understand the fundamental concept of cross browser testing
Before you start with cross-browser testing, it is very important to understand all the basic concepts of it. Be sure you are clear on all the concepts like
What is cross browser testing?
Its requirements and objectives.
When you are required to do it.
Skills you are required to know to perform cross-browser testing.
The complete procedure to do it.
When you have all the above answers follow a systematized procedure to carry out cross-browser testing.
2. Delineate a checklist
Preparing a checklist can help you execute your tests in an organized way saving you on time and efforts.
They help in setting scope for your cross-browser testing. It can also help you to estimate the time required for the testing and can assure you that you don’t miss out on any browser or operating system.
Your checklist can include the below-given tabs –

  • Operating Systems
  • Devices
  • Browsers and their versions
  • Combinations of the above three
  • Design and Animation Authentications to be checked
  • Functional Authentications to be checked
  • Content Authentications

3. Getting the Correct Combination
The main objective of Cross Browser Testing is to test the proper working of web applications on multiple browsers and operating systems.
With new versions of browsers and operating systems releasing almost every month, the possible combinations keep growing and thus increasing the efforts and time required for testing.
In such cases, the best strategy for you is to consider the most recent versions and the most popular versions.
As per to W3C, 97% of the internet users uses 4 major browsers i.e. Chrome, Firefox, IE and Safari.
4. Mobile
The web world has now moved out from your desktops and laptops and has spread its wings to the mobile devices.
With a number of platforms available to access the websites, it becomes very important that your website design is responsive.
Your website should be easily accessible on desktops, tablets, and mobile for being available to a large section of people.
But with numerous devices available, it is difficult to test them on all the devices.
So a better strategy in such a scenario is to use tools to simulate the environment of the diverse device than testing them manually on every device.
Or another strategy could be to use Google Analytics or other similar tools and find out the most commonly used device and to carry out the testing in those specific devices.
5. Summarize the Test Scenarios
Seeing the vast possibilities of test scenarios, it is better to summarize them first.Start with choosing the major browsers first and then covering other browsers.
Check if you need to test the complete application or checking a part of it will suffice.
Your strategy should be to prioritize testing. Try to check critical functionalities on major browsers and major platforms first and then proceed to the rest.
6. Use of Virtual Environments and Emulators
Checking various combinations of browsers is a tiring and time-consuming job.
While testing various combinations of browsers and platforms it is advisable to set up virtual machines with their own operating system and a different set of browsers.
Few browsers like chrome also offer you the freedom to access different extensions to help you emulate other browsers.
Emulator and Virtual machines are definitely time saving and efficient strategies for cross browser testing.
7. Use of Automation Testing
In cross-browser testing, not only the change in your code requires retesting but changes in the browsers and operating system also requires you to retest your code.
In such scenario carrying out manual testing every time could be very hectic and time-consuming for you.
In cross-browser testing, we always suggest you carry out automation testing to save on time and for better efficiency.
8. Best Time for Cross Browser Testing
It is always better to start testing in the early phase of development. Keep testing unit by unit.
And you should then repeat unit testing once the development phase is over.
Testing in the later phases can be very tiring and is prone to more faulty results
Cross Browser Testing using Selenium Web-driver
Selenium is one of the most widely used testing tools. It is commonly used for cross browser testing. It can be used to perform cross browser testing over various browsers. Here is how you can use Selenium for cross browser testing:
To perform cross browser testing on applications using Selenium, we use TestNG parameter feature. It is passed from TestNG.xml file, and based the parameter Selenium initiate the browser.

Read also : What is Compatibility Testing? Types, Process And Advantages

Step 1- Write testcase
package SampleTestcases;

1
2
3
4
5
6
7
8
9
10
11
12
13
14
15
16
17
18
19
20
21
22
23
24
25
26
27
28
29
30
31
32
33
34
35
36
37
38
39
40
import org.openqa.selenium.WebDriver;
import org.openqa.selenium.firefox.FirefoxDriver;
import org.openqa.selenium.ie.InternetExplorerDriver;
import org.testng.annotations.Parameters;
import org.testng.annotations.Test;

public class TestCase1 {

@Test

// Here this parameters we will take from testng.xml
@Parameters(“Browser”)
public  void test1(String browser) {

if(browser.equalsIgnoreCase(“FF”)){

WebDriver driver=new FirefoxDriver();

driver.manage().window().maximize();

driver.get(“http://www.facebook.com”);

driver.quit();

}
else if(browser.equalsIgnoreCase(“IE”)){

System.setProperty(“webdriver.ie.driver”, “./server/IEDriverServer.exe”);

WebDriver driver=new InternetExplorerDriver();

driver.manage().window().maximize();

driver.get(“http://www.facebook.com”);

driver.quit();
}
}

}

Step 2- Build testng.xml and specify

1
2
3
4
5
6
7
8
9
10
11
12
13
14
15
16
17
18
19
20
21
22
23
24
25
26
27
28
29
30
<?xml version=”1.0″ encoding=”UTF-8″?>
<!DOCTYPE suite SYSTEM “http://testng.org/testng-1.0.dtd”>
Here parallel is an attribute which specify the mode of execution and thread-count specify how many browser should open
<suite name=”Suite” parallel=”tests” thread-count=”2″>

<test name=”Test”>

<parameter name=”Browser” value=”FF” />

<classes>

<class name=”SampleTestcases.TestCase1″/>

</classes>

</test>

<test name=”Test1″>

<parameter name=”Browser” value=”IE” />

<classes>

<class name=”SampleTestcases.TestCase1″/>

</classes>

</test>

</suite>

Step 3- Execute the .xml file
To make testng.xml, right click on the test case and then go to TestNG and then to convert to TestNG>. It will create a testng.xml. Make changes to it as per the above xml file and finish. You will now have testng.xml file in your project.
Step 4 – Verify the output.
Note- Only testng.xml can be used for executing Cross Browser Testing using Selenium.
Conclusion
Cross-browser testing is yet another type of software testing that enhances the quality of your software. It ensures that users get a good experience irrespective of the browser they use. One thing that has to be kept in mind is that there is a different between cross-platform testing and cross-browser testing.

One should now confuse between the two, cross-platform testing is used to test software compatibility on different platforms like Windows, MAC, Linux, etc. where as cross browser testing as discussed earlier is used to test software compatibility on different browsers like Chrome, Firefox, IE, etc. Though, we sometimes need to combine the two, to test the software application response on the combinations of various browsers and platforms.

Types of Test Estimation Techniques in Software Testing

Test estimation is one of the most active forms of work criteria that is used to ensure that the task is done with a proper approximation. In addition to this, it helps in working on the total time taken by a team to work on the time period.
This time management holds a lot of importance in any software testing. The success of a project depends on proper execution and estimation that works on the development cycle of a project. It is also important due to the reputation of a client that worked on the basis of estimation only.
What to estimate?
There are so many things in a test that are counted for the estimation of test cases such as:

  • TimeIt is one of the most vital necessities of any project. It is considered at the priority for the completion of an overall project with delivery as per the deadline.
  • CostAnother of the vital thing is to keep in mind is the budget of a project. It will work on the total amount that will be invested in a project for the completion of a project.
  • ResourcesWithout proper resources, it will be difficult to complete any project. It is essential for the testing team to have proper resources to ensure that the project is done as per the requirements. It can be people, funding, facilities, equipment, etc. These resources made sure that the project is completed within the time
  • Human SkillsThe skills matter a lot as well with experience and knowledge. This is considered for all the members of the team that can affect the estimation as well.


Ways to estimate
There are different techniques to estimate the software such as:

  • Delphi technique for the wide-band
  • Breakdown structure on the working basis
  • Use-case point approach
  • 3-point estimation technique for software testing
  • Testing point and function point analysis
  • Ad-hoc method
  • Percentage distribution

A Four-Step Process For Estimation
There is a total of a four-step process that is followed by the other techniques. These are divided into four major steps such as:

  • Division of project in smaller modules
  • Allocating these divided tasks among members of the team
  • Estimating total efforts that are put up in tasks
  • Estimating validation

Now, let us go through these proper steps into details.
1. Division of project in smaller modules
There is no doubt that dividing the overall task into small units have a lot of accuracy to it. This is the technique that is similar to the work breakdown structure. These modules are essential to ensure to work on the sub-modules as well. The smallest tasks will be easy to resolve and work on as compared to the whole project.
2. Allocating these divided tasks among members of the team
Once, the tasks are divided into the small modules then make sure to assign them properly. Keep the testing module for testing team, development for developers, an environment built for test administrator, etc.
3. Estimating total efforts that are put up in tasks
The estimation technique will work on two essential parts such as three-point estimation and functional point method. In the later part, the method is divided as per the size, cost, and duration of the project. Whereas in the further point, the best-case estimation, worst case estimation, and likely estimation are calculated.
4. Estimating validation
The final step for the overall project is the aggregation of the project as per the estimation in the management The approval and review of this aggregated estimation are checked in this part of the project. It works on reason and logical part of a project.
Best Practices For Test Estimation
There are different tips that fall under the category of the accuracy of the testing. Such as:

  • Buffer time – There is no doubt that a project might consist of some unpredictable things. It can be more time taken by the testing team, members quitting jobs and so on. Hence, it becomes essential to add on some extra time in case of any mishaps. It gives time for the team to overcome some hurdles and ensure that the project is delivered on time.
  • Reference experience of pastHere reference means a past project in which the team worked on. These play a vital role in the completion of a project where the time is estimated as per the past experience. There is a huge possibility that a part project or a part of it is similar to the latest one. Hence, it becomes easy to avoid any of the difficulties that one might have tackled in the past. Also, it gives an idea of how things might work out in case a route is taken.

Know : Software Testing Process – What Happens in Software Testing?

  • Estimation on planning account resourceThere are so many things that might fall into account if a single thing comes up. One might fall sick or have to take an urgent leave. In such a case, it becomes essential to have a few days of space to ensure that the delivery is done on time. Also, the realistic approach is an efficient part of such space to ensure that no major defaults are done.
  • Re-estimationOne needs to understand that it is known as estimation because there might be a few things that can go wrong. Hence, it becomes essential for the team to keep checking and modifying the estimation in order to keep fixing them as per the projected There might be a few things that can modify the date of delivery in which, one has to convince customer as well.
  • Bug cycle In software testing, one can never be sure about the bugs in a project. Hence, it becomes essential to put enough time in the test cycle to get things done and still have more time left. This will help in putting things in a flow to get a parameter work done.
  • The scope of the projectAnother of the essential thing is that the scope of a project must be defined well. This will also include the test scripts, test data, and test bed to set off the work.


Conclusion
The overall software test estimation is one of the most vital approaches that is used in a project. Professionals will work on the experience to get involved with the industry approach.
It works on the use case and test case point with a proper practice that will get in help with an open mind. These customization will work amazingly well with the process. Hence, it will ensure the success of the project.

27 Useful Chrome Extensions for Software Testers

Web browsers like Chrome and Mozilla are more than your average browsers as they accomplish much more than the basic browsers. These two browsers, especially Chrome is of great use to the software testers. The number of extension available for software testers on Chrome beats any other platform by a mile.

These extensions are easy to install and help you accomplish more in the same timeframe. These extensions come in pretty handy for software testers as they make the job a tad bit easy. Chrome is by far the most popular browser mainly because it is highly functional, good user interface, and a wide array of extensions. All these features make it the browser of choice of the software testing community.
Here is a list of the top chrome extensions for software testers.
1. SCREEN RULER: Screen ruler is an essential extension which allows for you to measure the height and width of an object on the screen. Using Screen Ruler, software testers can find out defects in the UI. Also, this helps to create a web application with an appropriate number of pixels.
2. WHAT FONT: Cosmetic issues like font size, style, and color are also to be verified by the software testers. WhatFont enables the software testers to easily identify a particular text on a web page. All you have to do is select the font about which you want to gather information.
3. COLOR ZILLA: It is similar to WhatFont but the only difference is that it identifies colors instead of texts and fonts. The extension comes in handy when you want to match the color scheme of a web page to meet the design specifications.
4. SPELL CHECKER: What this extension does is pretty clear from the name. It corrects spelling mistakes on the web page. It is able to check spellings of 12 different languages. The best part is that you can add your own words to the Spell Checker dictionary.
5. Grammarly: It is one of the best and most popular Chrome extensions. Not only it corrects spelling mistakes but also rectifies grammatical errors. The checking is done instantaneously and is free for download. This is a must-have extension for all those who are into e-mails, blogging, editing, and proofreading.
6. IE TAB: IE here stands for internet explorer. This Chrome extension allows you to test the compatibility of your web page with all versions of Internet Explorer. All this is done on the Chrome browser.
7. PERFECT PIXEL: If you want that the design on the web page is a replica of some other page, this chrome extension will get the job done for you. Pixel comparison with other pages is possible with this Chrome extension.
8. SESSION MANAGER: Software testers are required to open the same website links and URL’s multiple times in a day. With Session Manager, the tester can create a group of websites that they open together every so often. Session Manager allows the tester to open and close that group of websites with one click. Also, you can save, delete, restore, and update the group.

9. iMACROS: It does everything that Session Manager does. But apart from that, you can record actions on a particular webpage and review is later. This extension doesn’t have any direct implications in software testing but can improve productivity when you are actually testing software.
10. AXE: This turns the Chrome Browser into a software tester. The extension itself is very light and full of handy features. If aXe supervises the codes that you write on the basis of Web Content Accessibility Guidelines and communicates and mistakes or deviations on the same instant.
11. RESOLUTION TEST: As the name suggests, this extension tests your application on a wide variety of screen resolutions.
12. AWESOME SCREENSHOT: Most of the software testers make use of this Chrome extension to grab screenshots of the test as evidence. Testers can also grab the screenshot of a particular region on the screen, annotate, highlight and crop it. The screenshot can be easily shared with other testers or you can just save it to your desktop.
13. WEB DEVELOPER: This extension was initially introduced for Firefox. The functionality on the Firefox version was limited but the Web Developer Chrome Extension came with a bunch of useful features. It allows you to manage cookies, anchor information, control browser cache, populate forms inspect web elements, highlight web elements, and so on. All these features come in pretty handy during software testing.

Also Read: What is Monkey Testing? Features, Examples with Types

14. FIREBUG LITE: This Chrome extension works in conjunction with Chrome developer tools. Its main job is to cast visuals of DOM elements, HTML elements etc. All the inspection takes place with a single click.
15. SCREENCASTIFY: This is another screen recorder. It records all the activities on the web page in the form of a video which you can view at a later point in time or you can just share it with the developers as evidence that you conducted the test. The recording is fairly simple; hit record and leave the rest to Screencastify.
16. COOKIE EDITOR: This extension does exactly what its name suggests. You can edit, protect, add, and delete cookies. Exporting cookies in JSON format is ever so easy with Cookie Editor.
17. CLEAR CACHE: You can simply set the extension to clear app cache, file systems, local storage, passwords, downloads, form data, browsing history and so on. Clear Cache avoids the need to manually clear the cache every time during testing.
18. CACHE KILLER: Cache Killer is an extension of Clear Cache. It clears the cache whenever you load a new web page. You can toggle on or off Cache Killer with a single click.
19. GHOSTERY: Network outages have become pretty common nowadays. Ghostery deals with this problem really nicely. It shows the behavior of an application when the network is down. You can see different trackers present on a web page and also you can disable or enable a particular tracker.
20. EXPLORATORY TESTING CHROME EXTENSION: Having is extension is a boon for exploratory testers as it makes their job a lot more easy and convenient. Just take the screenshot of a particular session and annotate different part of it with ideas, questions, and notes.
21. PROXY SWITCHYSHARP: As the name suggests, this Chrome extension enables you to switch between different proxies in a quick and efficient manner. This is a must-have extension for those who have to move back and forth between proxies quite often. It allows for you to change/hide the IP address which has huge implications during penetration testing.
22. JSON VIEW: It is very difficult to understand JSON data when testing RESTful API’s. This Chrome extension represents the JSON data in a simple tree view which is readable.
23. WEB DEVELOPER FORM FILLER: Fill all the fields in a form using just a single key. This saves time when filling redundant forms and is a great tool for those into exploratory testing.
24. BUG MAGNET: This is another very handy tool for exploratory testers. It stores all the names, postcodes, e-mails etc. to fill in the forms with a single click.
25. WAVE EVALUATION TOOL: WCAG guidelines have been set so that all web pages are designed according to the guidelines. Wave Evaluation Tool makes sure that a particular web page follows the WCAG guidelines. This is perhaps the best tool for accessibility testing.

26. ACCESSIBILITY DEVELOPER TOOLS: This is an extension of the Wave Evaluation Tool. When you run the extension, it generates a list of all the violations of the WCAG guidelines.

Read Also: What is Compatibility Testing and How is it Conducted?

27. D3CODER: One of the best tools for penetration testing is D3coder. It allows for you to encode and decode UNIX timestamp, rot13, CRC32 hashing, and base 64.

7 Qualities of a Software Testing Expert

Testers are the gatekeepers of any software and application that goes out into the market. They have the highest and the most important responsibility – ensuring the quality of the product.

A tester needs to ensure that the product that is certified pass by them is of the utmost quality and gives a very good user experience to the end-users too.
In today’s fast-paced world where technology and applications are changing at drastic speeds, there is no second chance for any software however good it may be. So we need to make sure to it get it right in the first place itself. That is where you need your unicorn tester.
Most people tend to believe that testing is the simplest part of any SDLC, but this is not true. It actually takes a lot of hard work and understanding of the complete requirement along with being able to see the bigger picture of the product. There are a number of qualities that one must have to become a good tester. Here we take a look at some of the main traits of an exceptional tester:
1. Organize, Co-relate and Understand
A good software testing expert would get involved in the project right from its inception until its production rollout and beyond. He needs to clearly understand the requirements as put forth by the client and he should be the first person to asking clarification when needed. He should be thorough and clear with the requirements because that is what the foundation of a software product is.
He should be an expert in data organization, result from analysis and should be quick to make out inferences based on the data. For e.g. during the development phase, if there is the change in requirement or a bug fix leading to a code change, he should be able to at least theoretically predict the impact of the changes.

Know More: Top 10 Software Testing Certifications 2019

Also when it comes to testing result analysis, he should be able to make the go/no go decision with the help of data available to him. Hence being able to understand organize all the data and also co-related is one of the primary qualities of any good tester.
2. Know the Product and its users
Irrespective of the LOC (line of code) or the complexity of the code the final verdict is given by the user based on how well it serves their purpose and how easy the product is to use. So a good tester would always think and use the product like an end user.
A software testing expert should also have a very good knowledge about the complete product along with an exceptional understanding of how the different modules interact with each, how the data flows from one module to another and also where and how the data is stored.
After a BA(business analyst), a tester is the second best person who knows the product inside out.
Different application whether they commercial software or personal use software would be used by a wide category of users some may be very techno-savvy, while some others may still be trying to get a grip on the technology, some might be kids while some might be the not so educated types.
A good software testing expert will ensure the test AUT (Application under test) is tested in a way which replicates these users of different categories. Understanding the customer and the product is thus a very important characteristic a tester should try to develop if he wants to become a successful tester.
3. Always remember the basic principles of testing
However much you know the product. A good software testing expert would always start with the basics. This would include a sanity test to check for the stability of the application and ensure nothing is broken. He would then follow the basic principles of boundary value analysis, 60-20 rule etc. to check that all data validations are in place.

He would also be ready with detailed test cases before the build is ready for testing which would make it easy for anyone to come and execute those test cases. Elaborate and detailed test cases are very important for replication of any issue found during the testing phase.
4. Excellent communication – verbal, written and tactical too
Communication among teams is very important. A good software testing expert needs to be a tactical communicator too. Many times a tester may find himself in a situation where he is torn between sternly sticking to his point of view of application functionality or going with what the developers say.
It is in this situation that he needs to use his words judiciously in a way that benefits both sides and ultimately work towards delivering a better product.
Verbal and written communication is also very important when discussing and reporting issues in the product. Clear and crisp bug reports help the developers to better understand the issue resulting in faster defect fixes.
Also reporting testing issues can be quite a challenge since we all work together as a team and have good personal relationships as well. Here again, a good tester would be able to report the issues with causing any issues within the team or on a personal front.
5. Recognize the importance of Details
A good software testing expert would be exceptionally good in understanding the details. He should be careful as well as mindful of even the smallest details especially in the requirement document, during the testing as well as during the reporting of issues.
Being careful of even the smallest details gives them the upper hand over developers and this way they are also able to steer the product development in the right track.
6. Unrelenting under pressure
The testing team, in general, is put under a lot of pressure be it to complete the testing within a specific time, to give sign off or during discussions with during bug triage.
A good tester will make sure he does not give in to any kind of pressure and should make sure that he is following all processes as per the process.
It is also important while he is stern on the process and guidelines he should also be flexible with the team and try to be available in critical situations on the need basis. He needs to strike a balance between the two situations.
7. Continuous Learner
Testing is one area where you have to keep on learning new things every day. Each day you need to make a fresh start forgetting how you have been doing things in the past.

This is one reason why the job of a tester is so challenging. While in other areas like development having a work in the same product for longer duration would be an advantage, from a testing perspective it could be a disadvantage, as you may not be able to look at it in a new perspective.
So a good tester needs to learn and unlearn quickly and should be able to make a fresh start with a fresh new perspective each day.
It is not that easy a job to be a tester. It takes a lot of time effort and conscious learnings on the part of an individual to become a tester who truly adds value to the product.
But don’t lose heart, even the smallest journeys begin with a single step, so if you want to be a unicorn tester for your organization start today and work towards that one goal.
Keep the above points in mind and relentlessly work on improving your skills and knowledge. You can do it if you think you can.

Know More: How to Get a Job in a QA Testing Company? Requirements and Traits

5 Tips to Enhance the Efficiency of Software Testing

There is no doubt that one of the major software testing work phases deals with higher pressure.

In such a case, accurate metrics can help in ensuring that the company can improve and progress the work with the indicators.
It is one of the most essential factors of software testing to be consistent in the workflow.

This ensures that the critical bugs are found on time and can be contributed with accuracy. It holds great value for the improvement of software before it is launched in the market.
Even after perfection, it is possible that there are a few unidentified bugs in the system.

This can be eliminated with the help of accurate testing techniques. So, here are the tips that can help to smoothen the overall software testing process and increase efficiency.
Video Courtesy: CA Technologies
1. Testing Culture Cultivation – One of the major things that must be kept in mind while one is running an application in testing is It becomes essential to work on a stable work culture for testing to ensure that no major points are missed out.

in addition to this, it will also help in having a stable quality for software even in the development process. In order to work with a stable workflow, it is essential to have the follow up on these basic points:

Know More : Software Tester Salary in India, USA, Uk and Canada

  • It is essential to understand that the quality assurance phase is not the final setup. When it comes to agility in the development phase, then it becomes one of the major additions to the overall It is essential to have an integral element for ongoing and regular development.
  • Another essential thing added to the testing culture is the reporting of bugs that are added as per the information. If proper communication is maintained among team members including developers then it will be easy for the team to work on any sort of bugs.
  • Another is efficient tools which are required to ensure that testing is done with reliability and ease. This holds a lot of value with the technical leads to ensure that code is tested with accuracy.
  • In order to give the best results, it is essential to have proper documentation as per the user demand. The user manual must be up-to-date with the addition of all major software and its visibility to ensure stability.

2. Test Preparations – If the preparations of the product are not well-maintained then the only result will be obtained. Hence, it is essential for the company to have proper software exploration to guarantee growth. In order to obtain this, it is essential to follow certain steps.

  • It gives a proper product map to guarantee workflow and work with accurate requirements of a project. In addition to this, if the graphical model is established then it will be easy to get a better understanding and concise of the workflow.
  • The test management tools must be kept flexible so that in case of any error, an alternative can be put in use. This will help with easy adaptation and no obstacle in case of an error that can taper workflow.
  • It is essential to keep software stability as the main goal if one has to grow with agility. This will give an insight into growth and ensure that no bugs are obtained giving positive results for the overall
  • In addition to this, it is essential to have the proper data flow understanding to know the overall components. This gives a better understanding of the security issue and failures to recognize the application. Also, it helps in detecting bugs faster and with a proper report schedule.

3. Considerations for Testing – While testing software, it becomes essential to have proper guidance and workflow. Hence, it becomes important to make sure that the essential things are ticked in the testing This will guarantee a stable growth and workflow with the straight points and get assured working system.

  • The first and foremost thing to keep in mind is the entire journey of software from development to user-end. This gives a better understanding of the overall interaction that might occur with the software.
  • Load testing is one of the most vital types of testing that must be performed for better results. It also gives surety that software is to the mark with any sort of hitches and gains steady traffic to increase user growth.
  • Other than this, it is essential for the testing team to cover up logical acceptance tests to ensure that no major bugs are left in the software. It will also give a clear idea about the items along with discussions to get clarity on sets.
  • The quality of code is another vital point that must be covered up in order to ensure that no major things are messed up. This will guarantee a stable growth and helps in working up with accurate paraments, factors, numbers, and

4. Testing Efficiency Improvement – The whole task is done in order to ensure that work stability and efficiency are maintained. In addition to this, it gives better assurance for quality to maintain working with the manager or team.

  • It is essential for the testing team to have a proper plan set to achieve the goals. However, if no planning is done then it is easy for a team to face failure that will not sit well with the software. In such a case, it becomes important for experts to work with a plan that has proper test cases, scope, objectives, executions, deadlines, limitations, budgets, etc. in mind.
  • As per the saying, it is essential to focus on the quality of the test cases instead of their quantity. Even with fewer test cases, but a better one, it is easy to achieve more accuracy with more cases. So, no need to focus on the one that might not be reliable but the one that can guarantee growth.
  • With the advancement in the terms of automation, it will be the right choice to add it in testing as well. This will guarantee that a company works with efficient and effective testing of software. In addition to this, it will also have cheaper and short-term addition in the combination of inputs and environment.

5. Test Results Leveraging – Just because the overall testing of the software is completed, doesn’t mean that it will guarantee any sort of success in the software. Even after the testing phase, it is possible that the test will fail but instead of getting frustrated over it, one can troubleshoot it. This can easily give the solution to that bug which will help out in the overall flow.

Know More: 50 Quick Ideas To improve the Software Testing Process

  • Software testing is not only about finding the bugs and working on them. This will also include reaching the main cause that is ending up failing the test cases. It is essential to work on the bugs log to get a proper idea about the errors and their solutions to guarantee efficient testing.
  • While testing software, there might be a point where a bottleneck or deadlock condition arises. In such a case, it is better to work on the performance slowly to identify the cause. Also, it is essential to have profiled the database of the software that can provide an accurate solution to all with the logs, speed, and tracing of the database.
  • Pattern recognition is now becoming one of the major points in the software. This helps in the easy identification of bugs and then sends out alerts to work on them efficiently. It can be a similar code or even the small bugs that sometimes are unidentified or unnoticed.

Conclusion


At last, don’t forget to put up your years of experience in the testing phase. This will help to guarantee that no major points are missed out on in the working of the software. Also, it will be easy for the team to work efficiently with proper planning.

How To Do Performance Testing For Web Application Using Jmeter?

Performance testing is done to ensure whether the application is capable enough to bear the load. It can analyse the system’s performance under high load. Jmeter performance testing offers various benefits like it can be used to test the performance of both static and dynamic resources.

Dynamic resources can be JSP, Servlets and AJAX. Static resources can be Javascript and HTML.
There are two kinds of web application testing done using Jmeter.
1. Load Application Testing: The process is mainly used to predict the expected usage by simulating various conditions.
2. Stress Application Testing: Be it any web application the architecture of it can only support a certain number of users at a time. With the help of stress testing load above this capacity will be given on the server after which it behaves weirdly. By doing so, maximum load the web server can handle can be found out.
This can be understood in a much better way by below diagram:
How to create a Performance test in Jmeter
Let’s test the Google website for 1000 users with the help of Jmeter.

  • Add Thread Group

First, start the JMeter application and click on test plan option on the dashboard.          Click on add option and then Thread(Users). Afterwards, click on Thread Group.
The Flow would be:

Add -> Threads (Users) -> Thread Group

  • Enter thread properties in the thread group control panel. You have to enter a certain number of things like :

Number of Threads: Number of users which you want to target to the target website. For example, here we will use 100
Loop Count: 10 (Number of times to execute testing)

Know More: Step by Step Implementation of App Performance Test

Ramp-Up Period: 100 (It is the delay which Jmeter has to wait before starting the next user). 100 seconds is the time which we have used.
Now, you must be confused between thread count and loop count. It is very easy to understand.
Thread count means how many concurrent users Jmeter will create to connect to the web server.
Loop count would be the number of times, Jmeter would simulate one user connecting to the target server.
Suppose in the above example: Jmeter would create 100 concurrent users connecting to the server while one user would be connecting to the server 10 number of times.

  • Adding JMeter elements

There are various JMeter elements which can be used to the test case. Let’s see what they are:
1. HTTP request default
Now, you have created a thread group and you can attach HTTP request element        to it by following the below path:

Add -> Config Element -> HTTP Request Defaults.

In the HTTP request control panel, enter the website name which you have to define. In our example, it would be “www.google.com”.
2. HTTP request
You can add this element to the thread group by following below path:
Add -> Sampler -> HTTP Request.
Now, in the control panel of the HTTP request, you have to enter the URL      request you want to send to Google. If you give the command as “calendar” in path field, Jmeter will send request http://www.google.com/calendar to google server. If you will keep it blank then send request http://www.google.com/ to google server.

  • Adding Graph Result to the test output

Jmeter can show the results in graph format. You have to right click on the test plan and then follow the below path:

Add -> Listener -> Graph Results

In this way, you will be able to see the results in graph format.

  • How to run the test and get the test result

You can see the test button on the toolbar to start the testing process. You would be able to see the test result in real time. When you will simulate 100 users which will access Google server then you will get the real-time output.
But all output lines would not be in the same colour. Some would be in black, blue, red and green colours. Black colour means the total number of current samples sent. Blue colour represents the current average of all samples sent. Red colour represents the current standard deviation. Green colour represents throughout rate that represents the number of request per minute the server handled.
How to analyse the graph results in Jmeter
There are two main parameters which you should focus while looking at the result graphs. Throughput and deviation are those which are very important while looking at any JMeter output graph.

Know More: Performance Testing-Types, Stages and Advantages

Throughput is the ability of the application to handle a heavy load. Throughput should be very high ideally. Deviation indicated deviation from average. It should be very low.
In the above graph, throughput is 867/minutes. It means this server can handle 867 requests per minute. This data is of yahoo website. While if you will test Google.com then you see throughput is 1000/ minute. Google has higher throughput than yahoo.
These parameters can vary on other factors also. Which include internet speed at JMeter site, current server load at google server, your CPU power and many others. It’s not necessary that you will get the same results every time as they can vary because of other factors.
Conclusion
So start the web application testing using Jmeter and see how much load one website can handle. In this way, you can see why your site stops responding and one of the reasons can be low load-bearing capacity.

If you had some difficulty while doing the above test then try to not connect to the internet via a proxy. If you are connecting through a proxy then don’t connect via that. Try opening a new JMeter instance and then try to run the test.
By following these you would be able to run the test cases with Jmeter. So, keep doing performance testing with JMeter and make your site less prone to vulnerable attacks. All the best!!

AI and Bots: Are They The Future of Software Testing?

Software testing has taken an indispensable place with the increasing complexities of the software.
With the rising complexities, new software technologies, ever rising data, software testing is now taking an entirely new dimension. In such a scenario Bots and AI are gradually taking over the manual testing.

But does that means Bots and AI will wipe out testing jobs? Not at all, they will only change how the complete testing process completes.
The information and knowledge regarding AI and bots is quickly increasing with the growing usage of robotics and AI.
And gradually they are taking over the manual efforts in many fields including software testing.
And it is because robotics and artificial intelligence are cost-proficient, easy to use, and time-productive.
When it comes to machine learning in software testing and developments, bots can be much more easily and quickly trained compared to people.
Bots and AI involvement in Software Testing and Development
Bots and AI are predicted to rule the software testing world soon. They have affected the proficiency of software development and testing in many terms.

  1. Testing Scope and Workloads

It is a common practice to add new features to the software. As new features are introduced, the new code is added.
This code further requires software testing to ensure proper working.
This testing sometimes requires creating and running a new set of test cases and sometimes it even demands a rerun of the existing test cases to ensure the new functionality has not altered or affected the existing functionality.

This adds up to the workload of testers and also increases the testing scope.
AI robot can easily recreate the tests to integrate new parameters and can also run parallel tests without adding the workload to the tester.

  1. Debugging Capability

AI and bots can tirelessly work for 24 by 7. They are great when the test cases list is long, or when testing on disturbed systems, etc.
In short, they are very viable on running time-consuming test cases, which would otherwise be tiring for the testers.
They viably expand the time for which test cases can be run without requiring human intervention.
It reduces human efforts by running test cases without human efforts and letting the testers to only inspect the test results and resolve the issues if any.

  1. Advanced Continuous Testing

Continuous testing can enhance the quality of your software. Continuous testing helps report abnormalities clean-up infested information.
But carrying out repeated testing is not a viable option for human testers.
But this task can be very well carried out by bots and AI, resulting in enhanced software quality.

Now vs. Future of AI and bots in Software Testing.
Currently, AI and bots are confined to search for defects only in dedicated parts.
They are not yet tuned to go beyond it and test for bugs in any newly added component.
In the future with more advanced bots and AI, it might discover changes in even the minimal changes in the system.
It would interpret the client’s expectations and produce numerous test cases based on it in minimal time, much faster than human efforts. Currently, AI capability in this aspect is quite limited.
Though we can’t predict what actually AI holds, its capability will definitely see a rise.

Know More: Quality Assurance VS Quality control

The AI and bots can go far beyond our expectations and can take software testing to a completely new standard. What that cannot be expected today might be a reality of tomorrow.
AI and bots have a significant role in the current scenario of software testing.
They have definitely made testing much easier, and quicker. But with advancements made in the field of AI and bots, we will soon see AI and bots taking over the complete software testing, with human intervention required only in managing these bots.

Conclusion:
AI and bots have amazed us enough with their amazing capabilities. But what they still have in store for us cannot be predicted at the moment.
The time is not far away when AI and bots will take over all the manual efforts in software testing. Software testing will soon be easier, cost-efficient and time-efficient using AI and bots.