What is Compliance Testing? How to do it?

Compliance testing evaluates and assesses whether your software fulfills all the regulations, standards, requirements of specifications, etc. that it has to stand true on.

The process can be considered more as an auditing task to ensure that it fulfills required standards.

It is many times also referred to as conformance testing.

Attributes of compliance testing

  • Robustness
  • Performance
  • Interoperability
  • Functions
  • Behavior of system

What are the prerequisites of compliance testing?

  • The product development should be complete with all the features working as expected.
  • The documentation and user manuals for the product should be available to help understand and recheck for compliance.
  • The online support and documentation, if applicable should be the latest version.
  • Functional and integration testing should be complete and should satisfy the exit criteria.
  • Escalation matrix should be available along with the point of contact for development, testing, and management teams
  • All licenses should be up to date.

Importance of Compliance Testing

Here are a few points that will help you understand its utility.

  • To validate if your software fulfills all the system requirements and standards.
  • To assess if all the related documentation is complete and correct.
  • To validate the software design, development, and evaluation are carried out as per specifications, standards, norms, and guidelines.
  • To validate if system maintenance is determined as per specified standards and recommended approach.
  • To assure that your software is free from any sort of complaints from regulatory bodies, regulatory compliance testing is performed.

Who executes Compliance testing?

Many companies do not consider it mandatory. Why? executing the test largely depends on the management.

However, If they consider a need to execute compliance testing, they hire or ask the in-house team to conduct compliance testing.

Many organizations also deploy a panel of experts or a regulatory body to assess and validate various regulations, specifications, policies, and guidelines.

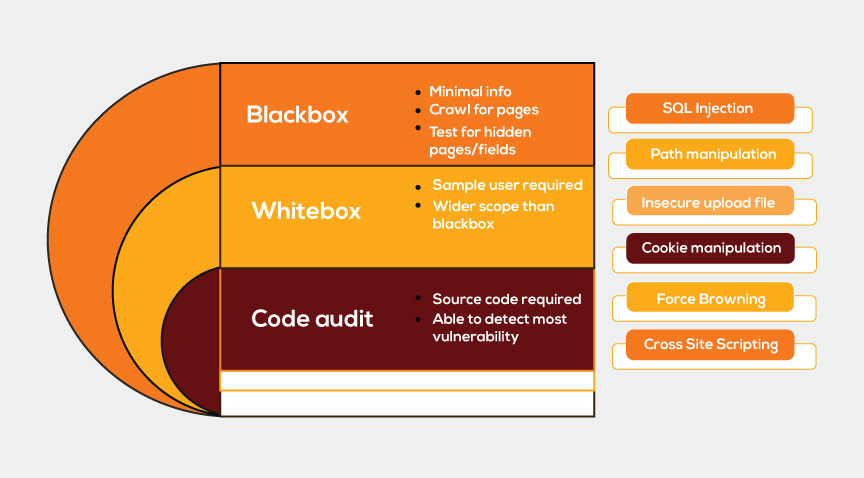
Vulerability assessment protection

What to test in Compliance testing?

The process is initiated by the management taking care of the complete understanding of the team about various regulations, specifications, guidelines, etc.

To ensure the best results and quality assurance, all the regulations and standards should be clearly mentioned to the team to avoid any ambiguities.

  • Requirement objectives
  • Scope of requirements
  • Standards that rule the implementation
  • Call of the software to be developed

What are the examples of compliance testing?

Some of the examples of compliance testing are:

  • User Access Rights and Security Regulations
  • Program change and control procedures
  • The procedure and guidelines for documentation
  • The guidelines for program documentation
  • Logs review
  • Audit of the software artifacts including licenses

What is not tested in compliance testing?

Some teams consider system and integration testing to be part of compliance testing as well. But that is not true.

Compliance does not mean re-running the system or functional tests.

On the contrary, compliance tests are a set of specifically designed tests that are carried out at the end of the software development cycle before rolling out the software product to production.

When to perform Compliance Testing?

There are some countries where compliance testing is mandatory and they have specific guidelines as well to accomplish this testing.

In most other countries, it is purely a management call. If the management wants to strictly follow the set guidelines, rules, and best practices, it will be pushing for a compliance test.

For the compliance tests to be carried out, the first step would be to chart out a detailed document with the procedures, standards, and methodology. It will be based on these that the compliance tests are designed.

Also, the compliance test would differ from one domain to another. Thus these tests need to be designed as per the industry and domain needs.

How to perform compliance testing?

it is more like an audit and follows no specific testing methodology.

You can simply carry it out like other general testing methods.

Here is an overview of the generic compliance testing methodology that may help you in performing it.

  • The first step is to collect precise details about all specified standards, norms, regulations, and other relevant criteria.
  • In the next step, you are required to document all the norms and standards clearly and precisely.
  • In the third step, you will have to keenly assess all the development phases against the documented standards and norms to identify and detect any deviations or flaws in the implemented process.
  • The next step includes creating a report and reporting all the flaws to the concerned team.
  • Lastly, you are required to re-verify and validate the affected areas post-fixation to ensure conformance to the required standards.
  • If required certification is provided to the system for the compliance of required norms and standards.

What is the need for compliance testing?

Here are the reasons

  • Safety: The safety of the customers and the safety of the product are the primary reasons for conducting compliance tests. Compliance tests are designed to find negligence issues and to ensure all safety standards are met.
  • Quality: Improved and proven quality is another reason why we should push for compliance testing for the products. Apart from the compliance test, it is also important to conduct periodic audits.
  • Legal Requirements: In some cases, the companies are legally bound to conduct compliance tests before releasing the products. If these tests are not performed legal action can be taken against the company and their license can also be canceled.
  • Customer Satisfaction: Customers would have more confidence in a product that is tested and is marked compliant. It is thus good for the company and its reputation as well.
  • Conformance: Compliance with the physical standards ensures conformance and compatibility with other products in the market that might be from different manufacturers.

Who sets the standards for compliance testing?

Most commonly, there are external organizations that come with the standards in compliance testing for various industries and are then accepted by a majority of the industries.

Some organizations are

Based upon the required standards and your system type there are many compliance testing tools that are available in the market.
Here are the names of a few commonly used compliance testing tools.

  • EtherCAT conformance testing tool
  • MAP2.1 conformance testing tool
  • Software Licence Agreement OMS Conformance Tester 4.0
  • CANopen Conformance test tool

Advantages of Compliance Testing

Unfortunately, compliance testing has not yet become a widely accepted part of STLC, but it is advisable to carry around to assure better performance and compliance of your software.

Listed below are a few points that might help you to better understand the advantages of carrying out the process

  1. It assures proper implementation of required specifications
  2. It validates portability and interoperability
  3. It validates whether the required standards and norms are properly adhered to
  4. Validate that the interfaces and functions are working as expected
  5. Can help you identify the areas that are to be confirmed with those which are not to be confirmed such as syntax and semantics

Disadvantages of Compliance Testing

Here are some challenges that you might incur while doing compliance testing

  1. To get the best results, you need to identify the class of the system, and then the testing has to be carried out based on the class following a suitable methodology
  2. You will have to specific specifications into Profiles, Levels, and Modules
  3. You will need to have the complete know-how of different standards, norms, and regulations of the system to be tested.

What is the need for compliance testing?

One may wonder why they need compliance testing when functional, system, and integration testing are already done.
Here are the reasons, why we need compliance testing.

  • Safety: The safety of the customers and the safety of the product are the primary reasons for conducting compliance tests. Compliance tests are designed to find negligence issues and to ensure all safety standards are met.
  • Quality: Improved and proven quality is another reason why we should push for compliance testing for the products. Apart from the compliance test, it is also important to conduct periodic audits.
  • Legal Requirements: In some cases, the companies are legally bound to conduct compliance tests before releasing the products. If these tests are not performed legal action can be taken against the company and their license can also be canceled.
  • Customer Satisfaction: Customers would have more confidence in a product that is tested and is marked compliant. It is thus good for the company and its reputation as well.
  • Conformance: Compliance with the physical standards ensures that conformance and compatibility with other products in the market that might be from different manufacturers.

Types of compliance testing?

  1. Mandatory Testing: In some countries for security-related software products, compliance testing is legally mandatory. This testing is either performed by a govt agency or a third party appointed by the govt. For the product to be released it requires certifications from the govt. Failing to comply with tests could mean withdrawing the product from the market, fines, payment of damages, or more.
  2. Obligatory Testing: When 2 companies are working with each other, one company may ask for a compliance test report from the other. Failure to perform the tests could lead to contract termination and subsequent loss of business.
  3. Voluntary Testing: To ensure that the process is carried out in an unbiased manner, companies may engage third parties to do compliance testing. The company may not be legally bound to do the test but want to perform the tests to ensure the best product rollout.
  4. Internal Testing: Companies can also engage the teams internally to perform compliance tests to improve the performance of their products and services. This is not a regulation but is done based on the directive from the management.

Standards in compliance testing

  1. SO 9001 (Quality Management System)
  2. ISO/IEC 27001 (Information Security Management)
  3. ISO 13485 (Medical Devices)
  4. HIPAA (Health Insurance Portability and Accountability Act)
  5. PCI DSS (Payment Card Industry Data Security Standard)
  6. GDPR (General Data Protection Regulation)
  7. Sarbanes-Oxley Act (SOX)
  8. COBIT (Control Objectives for Information and Related Technologies)
  9. IEEE 829 (Software Test Documentation)
  10. OWASP Top Ten (Web Application Security)

Forms of compliance testing

 Internal Testing

This is performed internally by the organization to ensure that the software and processes adhere to the policies, standards, and best practices of the business. It contributes to the quality and consistency of software development.

External or legally required testing for compliance:

Compliance testing of this nature is mandated by law by governmental authorities or industry-specific regulatory organizations. It guarantees compliance of the software with obligatory regulations, laws, and standards. There may be legal repercussions for noncompliance.

Testing for mandatory or obligatory compliance:

Comparable to testing that is mandated by law, this is necessary to comply with particular industry standards and regulations. Instances of such adherence encompass healthcare software conformity with the Health Insurance Portability and Accountability Act (HIPAA) and payment processing applications’ adherence to the Payment Card Industry Data Security Standard (PCI DSS).

Testing for Voluntary Compliance:

Organizations may elect to undergo voluntary compliance testing as a means of showcasing to clients or business partners their dedication to quality and safety. Compliance with industry-recognized standards, even in the absence of legal requirements, may be required.

Compliance testing in various forms is of the utmost importance in guaranteeing that software satisfies the mandatory criteria, be they those mandated by legislation, industry standards, or internal quality assurance processes. They aid in ensuring that software is dependable, secure, and conforms to stakeholders’ expectations.

Conclusion:

Delivering glitch-free software enhances your customer’s trust in you. Compliance testing is another step that assures that your system is free from any flaws and glitches…

What is Boundary Value Analysis?

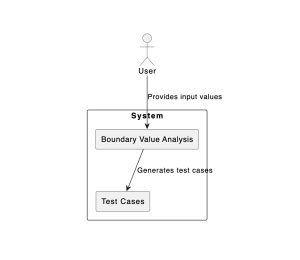
BVA (Boundary Value Analysis) is a software testing technique that focuses on testing values at the extreme boundaries of input domains. It is based on the observation that defects frequently occur on the outskirts of valid input ranges rather than in the center. Testers hope to identify potential issues and errors more effectively by testing boundary values. BVA is widely used in black-box testing and is especially useful for detecting off-by-one errors and other boundary-related issues.

Here’s an example of Boundary Value Analysis:

Consider the following scenario: You are testing a software application that calculates discounts for online purchases. The application provides discounts based on the amount of the purchase and has predefined discount tiers.

  • Tier 1: 0% discount for purchases less than $10.
  • Tier 2: 5% discount for purchases from $10 (inclusive) to $50 (exclusive).
  • Tier 3: 10% discount for purchases from $50 (inclusive) to $100 (exclusive).
  • Tier 4: 15% discount for purchases of $100 or more.

In this scenario, you want to apply Boundary Value Analysis to ensure the discount calculation works correctly. Here are the boundary values and test cases you would consider:

  • Boundary Value 1: Testing the lower boundary of Tier 1.
    • Input: $9.99
    • Expected Output: 0% discount
  • Boundary Value 2: Testing the upper boundary of Tier 2.
    • Input: $10.00
    • Expected Output: 5% discount
  • Boundary Value 3: Testing the lower boundary of Tier 3.
    • Input: $50.00
    • Expected Output: 10% discount
  • Boundary Value 4: Testing the upper boundary of Tier 3.
    • Input: $100.00
    • Expected Output: 10% discount (Tier 3)
  • Boundary Value 5: Testing the lower boundary of Tier 4.
    • Input: $100.01
    • Expected Output: 15% discount
  • Boundary Value 6: Testing the upper boundary of Tier 4.
    • Input: $1,000.00
    • Expected Output: 15% discount (Tier 4)

By testing these boundary values, you ensure that the software handles discounts at the tier’s edges correctly. If there are any flaws or issues with the discount calculation, this technique will help you find them. Boundary Value Analysis improves software robustness and reliability by focusing on critical areas where errors are likely to occur.

Boundary Value Analysis Diagram


What are the types of boundary value testing?

Boundary value testing is broadly classified into two types:

Normal Boundary Value Testing: This type is concerned with testing values that are precisely on the boundary between valid and invalid inputs. Normal boundary value testing, for example, would examine inputs like 1, 100, and any values in between if an input field accepts values between 1 and 100.

Robust Boundary Value Testing: This type of testing includes values that are slightly outside of the valid boundary limits. Using the same example, robust boundary value testing would use test inputs such as 0, 101, -1, and 101 to see how the system handles them.

While these are the two most common types of boundary value testing, there are also variations and combinations based on the specific requirements and potential risks associated with the software being tested.

What is the difference between boundary value and equivalence testing?

Aspect Boundary Value Testing Equivalence Testing
Focus Concerned with boundary values Focuses on equivalence classes
Objective To test values at the edges To group similar inputs
Input Range Tests values at boundaries Tests values within classes
Number of Test Cases Typically more test cases Fewer test cases
Test Cases Includes values on boundaries Represents one from each class
Boundary Handling Checks inputs at exact limits Tests input within a class
Risk Coverage Addresses edge-related issues Deals with class-related issues
Applicability Useful for validating limits Suitable for typical values

The goal of boundary value testing is to discover issues related to boundary conditions by focusing on values at the edges of valid ranges. Equivalence testing, on the other hand, groups inputs into equivalence classes in order to reduce the number of test cases while maintaining effective test coverage. Both techniques are useful and can be used in tandem as part of a comprehensive testing strategy.

Advantages and DIsadvantages of Boundary Value Analysis

Benefits of Boundary Value Analysis:

  • BVA focuses on the edges or boundaries of input domains, making it effective at identifying issues related to these critical points.
  • It provides comprehensive test coverage for values near the boundaries, which are often more likely to cause errors.
  • BVA is simple to understand and implement, making it suitable for both experienced and inexperienced testers.
  • It can detect defects in the early stages of development, lowering the cost of later problem resolution.

The following are the disadvantages of boundary value analysis:

  • BVA’s scope is limited to addressing boundary-related defects and potentially missing issues that occur within the input domain.
  • Combinatorial Explosion: BVA can result in a large number of test cases for systems with multiple inputs, increasing the testing effort.
  • Overlooking Class Interactions: It fails to account for interactions between different input classes, which can be critical in some systems.
  • BVA makes the assumption that system behavior near boundaries is linear, which may not be true for all applications.
  • BVA may not cover all possible scenarios or corner cases: While it is effective in many cases, BVA may not cover all possible scenarios or corner cases.


FAQs

What’s boundary value analysis in black box testing with an example

BVA is a black-box testing technique that is used to test the boundaries of input domains. It focuses on valid and invalid input ranges’ edges or boundaries to test values. The primary goal is to ensure that a system correctly handles input values at its limits, as this is frequently where errors occur.

Here’s an illustration of Boundary Value Analysis:

Consider the following scenario: You are testing a simple calculator application, and one of its functions is to add two numbers. The application accepts integers from -100 to +100.

Boundary Values: The following are the boundary values in this scenario:

Lower Boundary: -100 Upper Boundary: +100 BVA Test Cases:

Test with the smallest valid input possible:

Input 1: -100
Input 2: 0
-100 is the expected outcome. (At least one valid input)
Test with the most valid input possible:

Input 1: 100
Input 2: 50
150 (Maximum valid input) is the expected result.
Just below the lower boundary, perform the following test:

Input 1: -101
Input 2: 50
Expected Outcome: Error (outside of the valid range)
Just above the upper limit, perform the following test:

Input 1: 101
Input 2: 50
Error (outside valid range) is the expected outcome.
By using Boundary Value Analysis in this example, you ensure that the calculator application handles edge cases at the input range’s minimum and maximum boundaries, as well as values just outside the boundaries, correctly. This assists in identifying potential boundary value errors or issues.

Equivalence Partitioning and Boundary Value Analysis, What’s the difference?

Aspect Equivalence Partitioning Boundary Value Analysis
Definition Divides the input domain into groups or partitions, where each group is expected to behave in a similar way. Focuses on testing values at the edges or boundaries of the input domain.
Objective Identifies representative values or conditions from each partition to design test cases. Tests values at the extreme boundaries of valid and invalid input ranges.
Usage Suitable for inputs with a wide range of valid values, where values within a partition are expected to have similar behavior. Effective when values near the boundaries of the input domain are more likely to cause issues.
Test Cases Typically, one test case is selected from each equivalence class or partition. Multiple test cases are created to test values at the boundaries, including just below, on, and just above the boundaries.
Coverage Provides broad coverage across input domains, ensuring that different types of inputs are tested. Focuses on testing edge cases and situations where errors often occur.
Example For a password field, you might have equivalence partitions for short passwords, long passwords, and valid-length passwords. In a calculator application, testing inputs at the minimum and maximum limits, as well as values just below and above these limits.
Applicability Useful when you want to identify a representative set of test cases without focusing solely on boundary values. Useful when you want to thoroughly test boundary conditions where errors are more likely to occur.

Both Equivalence Partitioning and Boundary Value Analysis are valuable black-box testing techniques, and the choice depends on the specific characteristics of the input data and where potential issues are expected to arise.


What is Path Coverage Testing? Is It Important in Software Testing?

Path coverage testing is a testing technique that falls under the category of white-box testing. Its purpose is to guarantee the execution of all feasible paths within the source code of a program.

If a defect is present within the code, the utilization of path coverage testing can aid in its identification and resolution.

However, it is important to note that path coverage testing is not as mundane as its name may suggest. Indeed, it can be regarded as an enjoyable experience.

Consider approaching the task as a puzzle, wherein the objective is to identify all conceivable pathways leading from the initiation to the culmination of your program.

The identification of additional paths within a software system contributes to an increased level of confidence in its absence of bugs.

What is Path Coverage Testing?

A structural white-box testing method called path coverage testing is used in software testing to examine and confirm that every possible path through a program’s control flow has been tested at least once.

This approach looks at the program’s source code to find different paths, which are collections of statements and branches that begin at the entry point and end at the exit point of the program.

Now, let’s break this down technically with an example:

Imagine you have a simple code snippet:

def calculate_discount(amount):
discount = 0

if amount > 100:
discount = 10
else:
discount = 5

return discount
In this code, there are two paths based on the condition: one where the amount is greater than 100, and another where it’s not. Path Coverage Testing would require you to test both scenarios:

  • Path 1 (amount > 100): If you test with calculate_discount(120), it should return a discount of 10.
  • Path 2 (amount <= 100): If you test with calculate_discount(80), it should return a discount of 5.

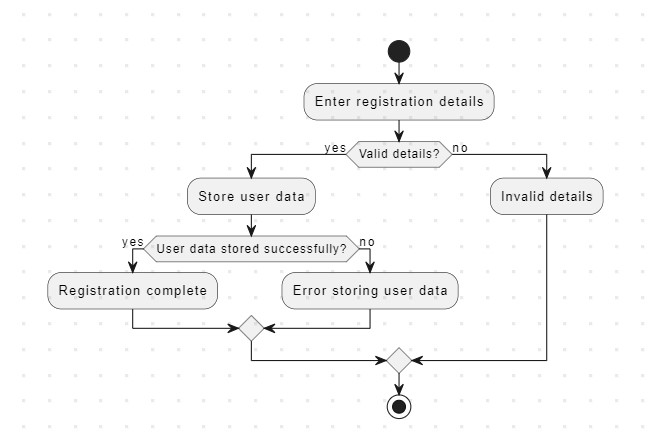
Let’s see another example of the user registration flow with the help of a diagram

path coverage testing example

Steps Involved in Path Coverage Testing:

In order to ensure thorough test coverage, path coverage testing is a structural testing technique that aims to test every possible path through a program’s control flow graph (CFG).

Path coverage testing frequently makes use of the idea of cyclomatic complexity, which is a gauge of program complexity. A step-by-step procedure for path coverage testing that emphasizes cyclomatic complexity is provided below:

Step #1) Code Interpretation:

Start by carefully comprehending the code you want to test. Learn the program’s logic by studying the source code, recognizing control structures (such as loops and conditionals), and identifying them.

Step #2) Construction of a Control Flow Graph (CFG):

For the program, create a Control Flow Graph (CFG). The CFG graphically illustrates the program’s control flow, with nodes standing in for fundamental code blocks and edges for the movement of control between them.

Step #3) Calculating the Cyclomatic Complexity:

Determine the program’s cyclomatic complexity (CC). Based on the CFG, Cyclomatic Complexity is a numerical indicator of a program’s complexity. The formula is used to calculate it:

CC = E – N + 2P

Where:

The CFG has E edges in total.

The CFG has N nodes in total.

P is the CFG’s connected component count.

Understanding the upper limit of the number of paths that must be tested to achieve complete path coverage is made easier by considering cyclomatic complexity.

Step #4) Determine Paths:

Determine every route that could lead to the CFG. This entails following the control’s path from its point of entry to its point of exit while taking into account all potential branch outcomes.

When determining paths, you’ll also take into account loops, nested conditions, and recursive calls.

Step #5) Path counting:

List every route through the CFG. Give each path a special name or label so you can keep track of which paths have been tested.

Step #6) Test Case Design:

Create test plans for each path that has been determined. Make test inputs and circumstances that will make the program take each path in turn. Make sure the test cases are thorough and cover all potential paths.

Step #6) Run the Test:

Put the test cases you created in the previous step to use. Keep track of the paths taken during test execution as well as any deviations from expected behavior.

Step #7) Coverage Evaluation:

Analyze the testing-related coverage achieved. Track which paths have been tested and which ones have not using the path labels or identifiers.

Step #8) Analysis of Cyclomatic Complexity:

The number of paths covered should be compared to the program’s cyclomatic complexity. The Cyclomatic Complexity value should ideally be matched by the number of paths tested.

Step #9) Find Unexplored Paths:

Identify any paths that the executed test cases did not cover. These are CFG paths that have not been used, suggesting that there may be untested code in these areas.

Step #10) Improve and iterate:

Make more test cases to cover uncovered paths if there are any. To ensure complete path coverage, this might entail improving already-existing test cases or developing brand-new ones.

Step #11) Re-execution:

To cover the remaining paths, run the modified or additional test cases again.

Step #12) Examining and Validating:

Examine the test results to confirm that all possible paths have been taken. Make sure the code responds as anticipated in all conceivable control flow scenarios.

Step #13) Report and supporting materials

Keep track of the path coverage attained, the cyclomatic complexity, and any problems or flaws found during testing. This documentation is useful for quality control reports and upcoming testing initiatives.

The Challenge of Path Coverage Testing in Complex Code with Loops and Decision Points

It takes a lot of test cases or test situations to perform path coverage testing on software with complex control flows, especially when there are lots of loops and decision points.

This phenomenon results from the complex interaction between conditionals and loops, which multiplies the number of possible execution paths that must be tested.

Recognizing the Challenge

Decision Points Create Branches in the Control Flow of the Program: Decision points, frequently represented by conditional statements such as if-else structures, create branches in the program’s control flow.

Every branch represents a different route that demands testing. The number of potential branch combinations grows exponentially as the number of decision points increases.

Complexity of Looping: Loops introduce iteration into the code. Depending on the loop conditions and the number of iterations, there may be different paths for each loop iteration.

Because there are more potential execution paths at each level of nested loops, the complexity increases in these situations.

Combination Explosion: The number of possible combinations explodes when loops and decision points coexist.

Each loop may go through several iterations, and during each iteration, the decision points may follow various paths.

As a result, the number of distinct execution paths can easily grow out of control.

Test case proliferation examples include:

Consider a straightforward example with two decision points and two nested loops, each with two potential outcomes:

  • Loop 1 iterates twice.
  • Three iterations in Loop 2 (nested within Loop 1).
  • First Decision Point: Two branches
  • Second decision point: two branches

To test every possible path through the code in this  simple scenario, you would need to create 2 x 3 x 2 x 2 = 24 unique test cases.

The necessary number of test cases can easily grow out of control as the code’s complexity rises.

Techniques for Controlling Test Case Proliferation

Priority-Based Testing:

Prioritize testing paths that are more likely to have bugs or to have a bigger influence on how the system behaves. This can direct testing efforts toward important areas.

Equivalence Partitioning

Instead of testing every possible path combination in detail, group similar path combinations together and test representative cases from each group.

Boundary Value Analysis

Testing should focus on boundary conditions within loops and decision points because these frequently reveal flaws.

Use of Tools

To manage the creation and execution of test cases for complex code, make use of automated testing tools and test case generation tools.

In conclusion, path coverage testing can result in an exponential rise in the number of necessary test cases when dealing with complex code that contains numerous decision points and loops. To successfully manage this challenge, careful planning, prioritization, and testing strategies are imperative.

Advantages and Disadvantages of Path Coverage Testing

Advantages of Path Coverage Testing:

  • Provides comprehensive code coverage, ensuring all possible execution paths are tested.
  • Effectively uncovers complex logical bugs and issues related to code branching and loops.
  • Helps improve software quality and reliability by thoroughly testing all code paths.
  • Utilizes a standardized metric, Cyclomatic Complexity, for assessing code complexity.
  • Useful for demonstrating regulatory compliance in industries with strict requirements.

Disadvantages of Path Coverage Testing:

  • Demands a high testing effort, particularly for complex code, leading to resource-intensive testing.
  • Requires an exponential growth in the number of test cases as code complexity increases.
  • Focuses on code paths but may not cover all potential runtime conditions or input combinations.
  • Maintaining a comprehensive set of test cases as code evolves can be challenging.
  • There is a risk of overemphasizing coverage quantity over quality, potentially neglecting lower-priority code paths.

FAQs

What is path coverage testing vs branch coverage?

Aspect Path Coverage Testing Branch Coverage
Objective Tests every possible path through the code. Focuses on ensuring that each branch (decision point) in the code is exercised at least once.
Coverage Measurement Measures the percentage of unique paths executed. Measures the percentage of branches that have been taken during testing.
Granularity Provides fine-grained coverage by testing individual paths through loops, conditionals, and code blocks. Provides coarse-grained coverage by checking if each branch decision (true or false) is executed.
Complexity More complex and thorough as it requires testing all possible combinations of paths, especially in complex code. Comparatively simpler and may not require as many test cases to achieve coverage.
Bugs Detected Effective at uncovering complex logical bugs and issues related to code branching, loops, and conditional statements. May miss certain complex bugs, especially if they involve interactions between multiple branches.
Resource Intensive Requires a high testing effort, often resulting in a large number of test cases, which can be resource-intensive. Typically requires fewer test cases, making it more manageable in terms of resources.
Practicality May not always be practical due to the sheer number of paths, especially in large and complex codebases. Generally more practical and is often used as a compromise between thorough testing and resource constraints.
Completeness Offers a higher level of completeness and confidence in code coverage but can be overkill for some projects. Provides a reasonable level of coverage for most projects without being excessively detailed.
Examples Used in critical systems, safety-critical software, and where regulatory compliance demands thorough testing. Commonly used in standard software projects to ensure basic code coverage without excessive testing.

What is 100% Path Coverage?

In the context of software testing, 100% path coverage refers to the accomplishment of complete coverage of all potential execution paths through the code of a program.

It indicates that every single path in the code, including all branches, loops, and conditional statements, has undergone at least one test.

Every possible combination of choices and conditions in the code must be put to the test in order to achieve 100% path coverage.

This involves taking into account both the “true” and “false” branches of conditionals as well as loops and all of their iterations.

In essence, it makes sure that each logical path through the code has been followed and verified.

Although achieving 100% path coverage is the ideal objective in theory for thorough testing, in practice it can be very difficult and resource-intensive, especially for complex software systems.

Since there are so many potential paths and so much testing to do, it may not be feasible to aim for 100% path coverage in many real-world situations.

As a result, achieving 100% path coverage is typically reserved for extremely important systems, applications that must be safe, or circumstances in which regulatory compliance requires thorough testing.

A more practical approach might be used in less important or resource-constrained projects, such as concentrating on achieving sufficient code coverage using strategies like branch coverage, statement coverage, or code reviews while acknowledging that 100% path coverage may not be feasible or cost-effective.

Does 100% Path Coverage Mean 100% Branch Coverage?

No, complete branch coverage does not equate to complete path coverage. 100% branch coverage focuses on making sure that every branch (decision point) in the code is tested at least once, as opposed to 100% path coverage, which tests every possible execution path through the code, including all branches, loops, and conditional statements. In other words, achieving 100% branch coverage ensures that all possible paths, including combinations of branches, have been tested, but it does not ensure that all possible paths have been taken.

A more thorough and challenging criterion is 100% path coverage, which calls for testing every path through the code, which may involve covering multiple branches in various combinations.

Is path Coverage Black Box Testing?

Path coverage testing is typically regarded as a white-box testing method rather than a black-box testing method.

Black-box testing is primarily concerned with evaluating a system’s usability from the outside, without having access to its internal structure or code.

The specifications, requirements, and anticipated behaviors of the system are frequently used by testers to create test cases.

Path coverage testing, on the other hand, is a white-box testing technique that needs knowledge of the internal logic and code structure.

The structure of the code, including its branches, loops, conditionals, and decision points, is known to testers, who use this information to create test cases.

Making sure that every possible route through the code has been tested is the aim.

While white-box testing methods like path coverage testing concentrate on looking at the code’s internal structure and behavior, black-box testing aims to validate the functionality of the software based on user requirements.

What are the Two Types of Path Testing?

Path testing can be divided into two categories:

Control Flow Testing:

A white-box testing method called control flow testing aims to test various paths through the code in accordance with the program’s control flow structure.

Different branches, loops, and decision points are all included in the test cases’ execution of the code.

Example: Take into account a straightforward program with an if-else clause:

if x > 0: y = x * 2
alternatively: y = x / 2

You would develop test cases for both ends of the if-else statement when conducting control flow testing. The “x > 0” branch would be put to the test in one test case, and the “x = 0” branch in the other.

Data Flow Analysis

Data manipulation and use within the code are the main topics of data flow testing, also referred to as data dependency testing.

In order to find potential data-related problems, such as uninitialized variables or incorrect data transformations, it entails developing test cases that investigate the flow of data through the program.

Consider the following snippet of code, for instance:

x = 5 y = x + 3 z = y * 2

To make sure that the values of variables are correctly transmitted through the code, you would create test cases for data flow testing.

For instance, you could develop a test case to ensure that the value of z after the calculations is indeed 16.

White-box testing methods such as control flow testing and data flow testing both offer various perspectives on the behavior of the code.

Data flow testing focuses on the flow and manipulation of data within the code, whereas control flow testing emphasizes the program’s control structures and execution paths. To achieve thorough code coverage and find different kinds of defects, these techniques can be used separately or in combination.


Selenium vs Puppeteer vs Chai Mocha

The software life cycle has undergone drastic changes in the last decade.
So much to the extent that the role of the tester has completely changed! With the coming in of the PDO (Product Driven Organization) structure, there are no more testers and developers but only full-stack engineers.
The bottom line is testing still needs to be done.
Who does that? How does it fit in the 2-week agile sprint? Is manual testing even possible in such a short time?
The Answer
To start with, the scope for manual testing has been reduced. Agree to it or not. This is what happens in real-life scenarios. Since testing is still a task on our User Stories, it needs to be completed. Most teams take the help of automation tools.
Now here is the challenge, many small and even big companies are going to open-source automation tools which give them the flexibility to customize as per their need without any investment.
There are several tools available for you to choose from based on the kind of application you have like a web-based app or a mobile app a desktop software etc.

Selenium

Selenium is a popular open-source framework for automating web applications. Jason Huggins created it originally as a tool called “JavaScriptTestRunner” to automate repetitive tasks in web testing. Later, he changed the name to Selenium after hearing a joke about mercury poisoning from selenium supplements.
Selenium has a thriving community of developers, testers, and quality assurance professionals who help it grow and improve. The open-source nature encourages frequent updates and improvements. As of my most recent knowledge update in September 2021, the most recent version was Selenium 4, which introduced a number of significant changes and features.
Support for multiple programming languages such as Java, Python, C#, and others is one of Selenium’s key features. Selenium WebDriver for browser automation, Selenium IDE for recording and playback, and Selenium Grid for parallel testing across multiple machines and browsers are among the tools available.
Several factors contribute to selenium’s popularity. First and foremost, it is open-source, which means it is freely available to developers and organizations of all sizes. Because it supports a wide range of programming languages and browsers, it is highly adaptable to a variety of testing environments. Furthermore, the active community keeps Selenium up to date with the latest web technologies and provides solid support and documentation.

Puppeteer

Puppeteer is a well-known open-source Node.js library that offers a high-level API for controlling headless or full browsers via the DevTools Protocol. It was created by Google’s Chrome team, making it a dependable and powerful tool for browser automation and web scraping tasks.
Puppeteer has a vibrant and growing community of web developers and enthusiasts who actively contribute to its development and upkeep. Puppeteer has evolved since my last knowledge update in September 2021, and new versions have been released, each bringing improvements, bug fixes, and new features.
Some notable features of Puppeteer include the ability to capture screenshots and generate PDFs of web pages, simulate user interactions such as clicks and form submissions, and navigate through pages and frames. It also works with a variety of browsers, including Google Chrome and Chromium, and supports both headless and non-headless modes.
Puppeteers are highly regarded for a variety of reasons. For starters, it offers a simple and user-friendly API that simplifies complex browser automation tasks. Its compatibility with the Chrome DevTools Protocol enables fine-grained control over browser behavior. Puppeteer’s speed and efficiency make it a popular choice for web scraping, automated testing, and generating web page snapshots for a variety of purposes.
Several factors contribute to selenium’s popularity. First and foremost, it is open-source, which means it is freely available to developers and organizations of all sizes. Because it supports a wide range of programming languages and browsers, it is highly adaptable to a variety of testing environments. Furthermore, the active community keeps Selenium up to date with the latest web technologies and provides solid support and documentation.

Chai & Mocha

Chai and Mocha are two distinct JavaScript testing frameworks that are frequently used in web development. They play complementary roles, with Chai serving as an assertion library and Mocha serving as a testing framework, and when combined they provide a robust testing solution. Let’s take a look at each one:

Chai:

  • Chai is a Node.js and browser assertion library that provides a clean, expressive syntax for making assertions in your tests.
  • It provides a variety of assertion styles, allowing developers to select the one that best meets their testing requirements, whether BDD, TDD, or assert-style.
  • Chai’s extensibility allows developers to create custom assertions or plugins to extend its functionality.
  • Its readability and flexibility are widely praised, making it a popular choice among JavaScript developers for writing clear and comprehensive test cases.

Mocha:

  • Mocha is a versatile JavaScript test framework that provides a structured and organised environment in which to run test suites and test cases.
  • It supports a variety of assertion libraries, with Chai being one of the most popular.
  • Mocha provides a simple and developer-friendly API for creating tests, suites, and hooks.
  • Its ability to run tests asynchronously is one of its key strengths, making it suitable for testing asynchronous code such as Promises and callbacks.
  • Both Chai and Mocha are open-source projects with active developer communities that contribute to their growth and upkeep.

Their popularity stems from their ease of use, versatility, and widespread adoption within the JavaScript ecosystem. The expressive syntax of Chai and the flexible testing framework of Mocha combine to form a formidable combination for writing robust and readable tests, which is critical for ensuring the quality of web applications and JavaScript code. Because of their ease of use and extensive documentation, developers frequently prefer this pair for testing in JavaScript projects.

Installing Selenium, Puppeteer and Chai Mocha

Installing Selenium:

Install Python: Selenium primarily works with Python, so ensure you have Python installed. You can download it from the official Python website.
Install Selenium Package: Open your terminal or command prompt and use pip, Python’s package manager, to install Selenium:
pip install selenium
WebDriver Installation: Selenium requires a WebDriver for your chosen browser (e.g., Chrome, Firefox). Download the WebDriver executable and add its path to your system’s PATH variable.
Verify Installation: To verify your installation, write a simple Python script that imports Selenium and opens a web page using a WebDriver.

Installing Puppeteer:

Node.js Installation: Puppeteer is a Node.js library, so you need Node.js installed. Download it from the official Node.js website.
Initialize a Node.js Project (Optional): If you’re working on a Node.js project, navigate to your project folder and run:
npm init -y
Install Puppeteer: In your project folder or a new one, install Puppeteer using npm (Node Package Manager):
npm install puppeteer
Verify Installation: Create a JavaScript or TypeScript script to launch a headless Chromium browser using Puppeteer.

Installing Chai Mocha:

Node.js Installation: Chai Mocha is also a Node.js library, so ensure you have Node.js installed as mentioned in the Puppeteer installation steps.
Initialize a Node.js Project (Optional): If you haven’t already, initialize a Node.js project as shown in the Puppeteer installation steps.
Install Chai and Mocha: Use npm to install both Chai and Mocha as development dependencies:
npm install chai mocha –save-dev
Create a Test Directory: Create a directory for your test files, typically named “test” or “tests,” and place your test scripts there.
Write Test Scripts: Write your test scripts using Chai’s assertions and Mocha’s testing framework.
Run Tests: Use the mocha command to run your tests. Ensure your test files have appropriate naming conventions (e.g., *-test.js) to be automatically detected by Mocha.

Criteria Selenium Puppeteer Chai Mocha
Purpose Web application testing across Headless browser automation for JavaScript testing framework for
various browsers and platforms. modern web applications. Node.js applications.
Programming Supports multiple languages: Java, Primarily used with JavaScript. JavaScript for test assertions and
Language Support Python, C#, etc. Mocha as the test framework.
Browser Cross-browser testing across major Chrome and Chromium-based N/A (Not a browser automation tool)
Compatibility browsers (e.g., Chrome, Firefox, browsers.
Edge, Safari).
Headless Mode Supported Supported N/A (not applicable)
DOM Manipulation Limited support for interacting with the DOM. Provides extensive support for interacting with the DOM. N/A (focused on test assertions)
Ease of Use Relatively complex setup and usage. User-friendly API and clear Straightforward API for defining
documentation. tests and assertions.
Asynchronous Yes, with explicit wait commands. Native support for asynchronous Yes, supports asynchronous code.
Testing operations and Promises.

Use Cases:

  • Selenium is widely used for automating the testing of web applications across different browsers and platforms.
    Example: Automating the login process for a web-based email service like Gmail across Chrome, Firefox, and Edge. Puppeteer: Headless Browser Automation
  • Puppeteer is ideal for tasks like web scraping, taking screenshots, generating PDFs, and automating interactions in headless Chrome.
    Example: Automatically navigating a news website, capturing screenshots of articles, and saving them as PDFs. Chai Mocha: JavaScript Testing
  • Chai Mocha is primarily used for unit and integration testing of JavaScript applications, including Node.js backends.
    Example: Writing tests to ensure that a JavaScript function correctly sorts an array of numbers in ascending order.

Let us see how the tools discussed here can help you with your testing tasks.

Testing Type Selenium Puppeteer Chai Mocha
Functional Yes Yes Yes
Regression Yes Yes Yes
Sanity Yes Yes Yes
Smoke Yes Yes Yes
Responsive Yes No No
Cross Browser Yes No Yes
GUI (Black Box) Yes Yes Yes
Integration Yes No No
Security Yes No No
Parallel Yes No Yes


Advantages and Disadvantages

Selenium’s Benefits and Drawbacks:

Advantages:

  • Selenium supports a variety of web browsers, allowing for comprehensive cross-browser testing.
  • Multi-Language Support: Selenium supports multiple programming languages, making it useful for a variety of development teams.
  • Selenium has a large user community, which ensures robust support and frequent updates.
  • Robust Ecosystem: It provides a diverse set of tools and frameworks for mobile testing, including Selenium WebDriver,
  • Selenium Grid, and Appium.
  • Selenium has been in use for a long time, making it a stable and reliable option.

Disadvantages:

  • Complex Setup: Selenium can be difficult to set up and configure, particularly for beginners.
  • Selenium tests can be time-consuming, especially when dealing with complex web applications.
  • Headless Browser Support is Limited: Headless browser support in Selenium is not as simple as it is in Puppeteer.
  • Because of its extensive features and complexities, Selenium can have a steep learning curve.

Puppeteer Advantages and Disadvantages:

Advantages:

  • Headless Mode: Puppeteer includes native support for headless browsing, which makes it useful for tasks such as web scraping and automated testing.
  • Puppeteer is simple to install and use, especially for developers who are familiar with JavaScript.
  • Puppeteer’s integration with the Chrome browser is excellent because it is maintained by the Chrome team.
  • Puppeteer is optimized for performance and can complete tasks quickly.
  • Puppeteer is promise-based, which makes it suitable for handling asynchronous operations.

Disadvantages:

  • Puppeteer primarily supports Chrome and Chromium-based browsers, which limits cross-browser testing capabilities.
  • Puppeteer is dependent on JavaScript, so it may not be suitable for teams working with other programming languages.
  • Smaller Community: Puppeteer’s community is smaller than Selenium’s, which may limit available resources and support.

Chai Mocha’s Benefits and Drawbacks:

Advantages:

  • Chai Mocha was created specifically for testing JavaScript applications, making it ideal for Node.js and front-end testing.
  • Support for Behavior-Driven Development (BDD) testing: Chai Mocha supports BDD testing, which improves collaboration between developers and non-developers.
  • Chai, a component of Chai Mocha, provides flexible assertion styles, making it simple to write clear and expressive tests.
  • Plugins from the community: Chai has a thriving ecosystem of plugins that can be used to extend its functionality.

Disadvantages:

  • Chai Mocha is primarily focused on JavaScript, which limits its utility for projects involving other programming languages.
  • Chai Mocha is not suitable for browser automation or cross-browser testing, which Selenium and Puppeteer excel at.
  • It has a limited scope because it is intended for unit and integration testing but lacks features for end-to-end testing and browser automation.

Hope this data comparison is helpful for you to decide which one to pick up for your team and project. My suggestion, if you are dealing with only Chrome then go for Puppeteer.
But if you want your application to run across all platforms and you want it to be tested in multiple browsers and platforms Selenium would be the right choice.
With Selenium, the coding and tool expertise required is also limited, which means you can build up your team and competency faster.
So our personal choice is Selenium which offers more features and online support forums for guidance as well.
Take your pick.

What is White Box Testing? Techniques, Examples and Types

The significance of guaranteeing the quality and dependability of applications cannot be overstated in the fast-paced world of software development.

This is where White Box Testing comes in, a potent process that probes deeply into the inner workings of software to reveal possible faults and vulnerabilities.

By examining its different methods and examples, we will demystify the idea of white box testing in this extensive blog article.

Join us on this trip as we shed light on the many forms of White Box Testing and how they play a critical part in enhancing software quality and security—from comprehending the basic concepts to uncovering its practical implementations.

This article will provide you priceless insights into the realm of White Box Testing, whether you’re an experienced developer or an inquisitive tech enthusiast.

What is White Box Testing With an Example?

White Box Testing is also known by other names such as:

  • Clear Box Testing
  • Transparent Box Testing
  • Glass Box Testing
  • Structural Testing
  • Code-Based Testing

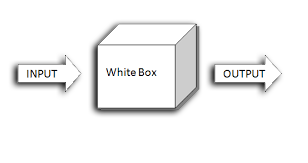
White Box Testing is a software testing process that includes studying an application’s core structure and logic. It is carried out at the code level, where the tester has access to the source code and is knowledgeable of the internal implementation of the product.

White Box Testing, as opposed to Black Box Testing, which focuses on exterior behavior without knowledge of the underlying workings, tries to guarantee that the code performs as intended and is free of mistakes or vulnerabilities.

This testing method gives useful insights into the application’s quality and helps discover possible areas for development by studying the program’s structure, flow, and pathways.

White Box TestingIn white box testing, the tester has to go through the code line by line to ensure that internal operations are executed as per the specification and all internal modules are properly implemented.
Example

Let’s consider a simple example of white box testing for a function that calculates the area of a rectangle:

def calculate_rectangle_area(length, width):
if length <= 0 or width <= 0:
return “Invalid input: Length and width must be positive numbers.”
else:
area = length * width
return area

Now, let’s create some test cases to perform white box testing on this function:

Test Case 1: Valid Input

  • Input: length = 5, width = 3
  • Expected Output: 15

Test Case 2: Invalid Input (Negative Value)

  • Input: length = -2, width = 4
  • Expected Output: “Invalid input: Length and width must be positive numbers.”

Test Case 3: Invalid Input (Zero Value)

  • Input: length = 0, width = 6
  • Expected Output: “Invalid input: Length and width must be positive numbers.”

Test Case 4: Valid Input (Floating-Point Numbers)

  • Input: length = 4.5, width = 2.5
  • Expected Output: 11.25

Test Case 5: Valid Input (Large Numbers)

  • Input: length = 1000, width = 10000
  • Expected Output: 10,000,000

In this situation, white box testing entails analyzing the function’s core logic and creating test cases to make sure all code paths are covered.

In order to determine if the function operates as intended in various contexts, test cases are designed to assess both valid and invalid inputs.

White box testing allows us to both confirm that the function is correct and find any possible defects or implementation problems.

White Box Testing Coverage

#1) Code level: Errors at the source code level, such as syntax mistakes, logical mistakes, and poor data handling, are found using white box testing.

#2) Branch and Path Coverage: By making sure that all potential code branches and pathways are checked, this testing strategy helps to spot places where the code doesn’t work as intended.

#3) Integration Issues: White box testing assists in identifying problems that may develop when several code modules are combined, assuring flawless system operation.

#4) Boundary Value Analysis: White box testing exposes flaws that happen at the boundaries of variable ranges, which are often subject to mistakes, by examining boundary conditions.

#5) Performance bottlenecks: By identifying regions of inefficient code and performance bottlenecks, engineers are better able to improve their products.

#6) Security issues: White box testing reveals security issues, such as errors in input validation and possible entry points for unauthorized users.

White Box Testing’s Role in SDLC and Development Process.

White box testing is necessary for the Software Development Life Cycle (SDLC) for a number of crucial reasons.

White box testing, sometimes referred to as clear box testing or structural testing, includes analyzing the software’s core logic and code. This testing technique may be used to find a variety of flaws and problems, including:

Code-level Errors: White box testing uncovers issues at the source code level, such as syntax errors, logical errors, and improper data handling.

Branch and Path Coverage: This testing approach ensures that all possible branches and paths within the code are tested, helping identify areas where the code doesn’t function as intended.

Integration Problems: White box testing aids in detecting issues that may arise when different code modules are integrated, ensuring seamless functioning across the entire system.

Boundary Value Analysis: By exploring boundary conditions, white box testing reveals bugs that occur at the limits of variable ranges, which are often prone to errors.

Performance Bottlenecks: It helps pinpoint performance bottlenecks and areas of inefficient code, allowing developers to optimize the software for better performance.

Security Vulnerabilities: White box testing exposes security vulnerabilities, such as input validation flaws and potential points of unauthorized access.


Difference Between White Box Testing and Black Box Testing

Both of them are two major classifications of software testing. They are very different from each other.

  1. White box testing refers to the line-by-line testing of the code, while black box testing refers to giving the input to the code and validating the output.
  2. Black box testing refers to testing the software from a user’s point of view, whereas white box testing refers to the testing of the actual code.
  3. In Black box testing, testing is not concerned about the internal code, but in WBT, testing is based on the internal code.
  4. Both the developers and testers use white-box testing. It helps them validate the proper functioning of every line of the code.
Aspect Black Box Testing White Box Testing
Focus Tests external behavior without knowledge of code Tests internal logic and structure with knowledge of the source code
Knowledge No access to the internal code Access to the internal code
Approach Based on requirements and specifications Based on code, design, and implementation
Testing Level Typically done at the functional and system level Mostly performed at the unit, integration, and system level
Test Design Test cases based on functional specifications Test cases based on code paths and logic
Objective Validate software functionality from the user’s perspective Ensure code correctness, coverage, and optimal performance
Testing Types Includes Functional, Usability, and Regression Testing Includes Unit Testing, Integration Testing, and Code Coverage
Tester’s Knowledge Testers don’t need programming expertise Testers require programming skills and code understanding
Test Visibility Tests the software from an end-user perspective Tests the software from a developer’s perspective
Test Independence Testers can be independent of developers Testers and developers may collaborate closely during testing
Test Maintenance Requires fewer test case modifications May require frequent test case updates due to code changes

Steps to Perform White Box Testing

Step #1 – Learn about the functionality of the code. As a tester, you have to be well-versed in programming language, testing tools, and various software development techniques.
Step #2– Develop the test cases and execute them.

Types of White Box Testing/Techniques Used in White Box Testing

The term “white box testing,” also known as “clear box testing” or “structural testing,” refers to a variety of testing methods, each with a particular emphasis on a distinct element of the core logic and code of the product. The primary categories of White Box Testing are as follows:

Statement coverage testing

During the testing process, this approach seeks to test every statement in the source code at least once.

Example: 

@startuml

title Statement Coverage Testing

actor Tester as T

rectangle Program {

    rectangle Code {

        T -> C : Test Case 1

        T -> C : Test Case 2

        T -> C : Test Case 3

        T -> C : Test Case 4

    }

    rectangle Execution {

        C -> E : Execute Test Case 1

        C -> E : Execute Test Case 2

        C -> E : Execute Test Case 3

        C -> E : Execute Test Case 4

    }

}

@enduml

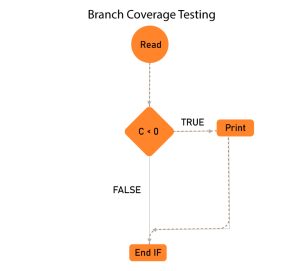
Branch coverage testing

Branch-Coverage-Testing

Testing for branches or decision points is known as branch coverage, and it makes sure that every branch or decision point in the code is tested for both true and false outcomes.

Path coverage testing

path-coverage-testing

Path coverage testing is a software testing technique that ensures that all possible execution paths through the source code of a program are tested at least once. It aids in the identification of potential defects or issues in the code by ensuring that every logical path is tested.

Example: 

Suppose you have a program with a conditional statement:

python

Copy code

if x > 5: print(“x is greater than 5”) else: print(“x is not greater than 5”)

Path coverage testing would involve testing both paths through this code:

  • When x is greater than 5, it should print “x is greater than 5.”
  • When x is not greater than 5, it should print “x is not greater than 5.”

Condition coverage testing

The goal of condition coverage testing, commonly referred to as “decision coverage,” is to make sure that all potential outcomes of boolean conditions inside the code are evaluated at least once. This method aids in ensuring that every choice or branch in the code gets executed on its own.

Example:

def check_voting_eligibility(age, is_citizen):

if age >= 18 and is_citizen:

return “You are eligible to vote.”

else:

return “You are not eligible to vote.”

In this example, the function check_voting_eligibility takes two parameters: age (an integer) and is_citizen (a boolean). It then checks whether a person is eligible to vote by evaluating two conditions: whether their age is 18 or older and whether they are a citizen.

To achieve condition coverage testing, we need to create test cases that cover all possible combinations of conditions and their outcomes. Here are some example test cases:

Test case where the person is eligible to vote:

assert check_voting_eligibility(20, True) == “You are eligible to vote.”

Test case where the person is not a citizen:


assert check_voting_eligibility(25, False) == “You are not eligible to vote.”

Test case where the person is not old enough to vote:

assert check_voting_eligibility(15, True) == “You are not eligible to vote.”

Test case where both conditions are false:

assert check_voting_eligibility(12, False) == “You are not eligible to vote.”

By designing these test cases, we ensure that all possible combinations of condition outcomes are covered:

  • Test case 1 covers both conditions evaluating to True.
  • Test case 2 covers the condition evaluating to False.
  • Test case 3 covers the age condition evaluating to False.
  • Test case 4 covers both conditions evaluating to False.

When executing these test cases, we can determine if the function behaves as expected for all possible combinations of input conditions. This approach helps identify potential bugs or inconsistencies in the code’s logic related to condition evaluation.

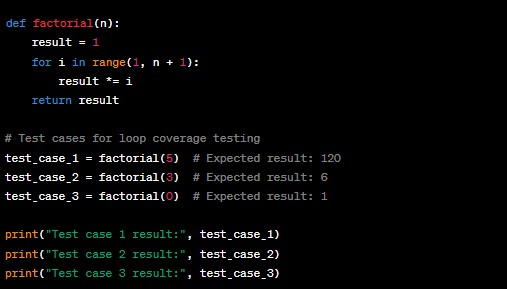
Loop Coverage Testing

Testing loops in the code to make sure all conceivable iterations are carried out is the subject of the loop coverage testing approach.

Let’s consider an example of loop coverage testing using a simple program that calculates the factorial of a given number using a for loop:

Loop-Coverage-Testing

In this example, the ‘factorial’ function calculates the factorial of a given number using a ‘for’ loop. Loop coverage testing aims to test different aspects of loop behavior. Here are the scenarios covered:

Test case 1: Calculating the factorial of 5. The loop runs from 1 to 5, multiplying result by 1, 2, 3, 4, and 5. The expected result is 120.

Test case 2: Calculating the factorial of 3. The loop runs from 1 to 3, multiplying result by 1, 2, and 3. The expected result is 6.

Test case 3: Calculating the factorial of 0. Since the loop’s range is from 1 to 0+1, the loop doesn’t execute, and the function directly returns 1.

Boundary Value Analysis

It evaluates how the program behaves at the border between acceptable and unacceptable input ranges.

Data flow testing

Data flow testing looks at how data moves through the program and confirms that data variables are handled correctly.

Control flow testing:

Control flow testing analyzes the order of the statements in the code or the control flow.

Testing using Decision Tables

Based on predetermined criteria, decision tables are used to test different combinations of inputs and their related outputs.

Mutation Testing

In order to determine how well the test suite is able to identify these alterations, mutation testing includes making minor modifications or mutations to the code.

These numerous White Box Testing approaches are used to test the underlying logic of the program thoroughly and achieve varying degrees of code coverage. Depending on the complexity of the product and the testing goals, testers may combine various approaches.

Top White Box Testing Tools

#1) Veracode

Veracode is a prominent toolkit that helps in identifying and resolving the defects quickly, economically and easily. It supports various programming languages like .NET, C++, JAVA, etc. It also supports security testing.

#2) EclEmma

EclEmma is a free Java code coverage tool. It has various features that ease the testing process. It is widely used by the testers to conduct white box testing on their code.

#3) JUnit

JUnit is a widely-used testing framework for Java that plays a crucial role in automating and simplifying the process of unit testing. It provides a platform for developers to write test cases and verify their Java code’s functionality at the unit level. JUnit follows the principles of test-driven development (TDD), where test cases are written before the actual code implementation.

#4) CppUnit:

CppUnit is a testing framework for C++ that was created to facilitate unit testing for C++ programs. It is based on the design concepts of JUnit. It allows programmers to create and run test cases to verify the accuracy of their C++ code.

#5) Pytest

This C++ test framework by Google has an extensive list of features including test Discovery, Death tests, Value-parameterized tests, fatal & non-fatal failures, XML test report generation, etc. It supports various platforms like Linux, Windows, Symbian, Mac OS X, etc.

Advantages of White Box Testing

  • Code optimization
  • Transparency of the internal coding structure
  • Thorough testing by covering all possible paths of a code
  • Introspection of the code by the programmers
  • Easy test case automation

Disadvantages of White Box Testing

  • A complex and expensive procedure
  • Frequent updating of the test script is required whenever changer happens in the code
  • Exhaustive testing for large-sized application
  • Not always possible to test all the conditions.
  • Need to create a full range of inputs making it a very time-consuming process


Conclusion

White box testing is a predominantly used software testing technique. It is based on evaluating the code to test which line of the code is causing the error. The process requires good programming language skills and is generally carried out by both developers and testers.

FAQs

#1) How can developers ensure adequate code coverage when performing White Box Testing?

By using a variety of techniques, developers may guarantee proper code coverage in White Box Testing.

They should start by clearly defining test goals and requirements, making sure that all crucial features are included. It is best to write thorough test cases that cover all potential outcomes, including boundary values and error handling.

To track the amount of code that is exercised by tests, code coverage tools like Jacoco or Cobertura may be utilized. It is crucial to remedy low-coverage regions by adding test cases or making adjustments after regularly analyzing code coverage metrics to do so.

To carry out thorough testing effectively, test automation should be used, and branch and path coverage guarantees that all potential choices and code routes are checked.

Working together with the QA team ensures thorough integration of White Box and Black Box Testing. Developers may improve code quality and lower the chance of discovering bugs by adhering to certain best practices.

#2) What are some best practices for conducting effective White Box Testing in a development team?

Effective White Box research Following various best practices is necessary while testing in a development team. Here are a few crucial ones:

Clear needs: As this information informs test case creation, make sure that the team has a complete grasp of the functional and non-functional needs for the project.

Comprehensive Test Cases: Create detailed test cases that cover all possible code pathways, decision points, and boundary conditions. This will guarantee complete code coverage.

Code reviews: These should be conducted on a regular basis to guarantee code quality, spot possible problems, and confirm that tests are consistent with code changes.

Test Automation: Use test automation to run tests quickly and reliably, giving you more time for exploratory testing and a lower risk of human mistakes.

Continuous Integration: Include testing in the process to spot problems before they become serious and to encourage routine code testing.

Test Data Management: To achieve consistent and reproducible test findings, test data should be handled with care.

Code coverage : metrics should be regularly monitored in order to identify places with poor coverage and focus testing efforts there.

Collaboration with QA Team: Encourage cooperation between the QA team and the developers to make sure that all White Box and Black Box Testing activities are coordinated and thorough.

Regression testing: Regression testing should be continuously carried out to ensure that new code modifications do not cause regressions or affect working functionality.

Documentation: Test cases, processes, and results should all be well documented in order to encourage team collaboration and knowledge sharing.

#3) What is the black box testing?

Black box testing is a software testing method where the internal workings or code structure of a system are not known to the tester. The focus is solely on validating the system’s functionality against specified requirements.

Testers input data, observe outputs, and assess the system’s behavior without knowledge of its internal logic. This approach mimics user interactions, ensuring that the software performs as expected from an end-user perspective. Black box testing is crucial for uncovering defects, ensuring software reliability, and validating that the application meets user expectations without delving into the intricacies of its internal design.

The four main types of black box testing are Functional Testing, Non-functional Testing, Regression Testing, and User Acceptance Testing. Functional Testing assesses specific functionalities, Non-functional Testing evaluates non-functional aspects like performance, Regression Testing ensures new changes don’t impact existing features, and User Acceptance Testing verifies if the system meets user expectations.

Selenium IDE Tutorial For Beginners

Welcome to a fascinating journey into the Selenium IDE world, aspirant testers and tech enthusiasts.

This tutorial is your key to mastering Selenium IDE’s amazing features, whether you’re a novice eager to delve into the world of automated testing or a seasoned professional looking to improve your skills.

Prepare for an exciting journey as we uncover this tool’s secrets and give you the knowledge and abilities to write reliable, effective test automation scripts. So prepare for an insightful Selenium IDE tutorial that will elevate your testing game by grabbing your virtual testing lab coat and donning your coding glasses.

Latest News About Selenium IDE

Selenium IDE encountered a fork in its journey when Firefox’s unfortunate withdrawal of support presented itself.

A brand-new Selenium IDE that is independent of any particular browser was developed as a result of the quick response of the committed Selenium community to the challenge.

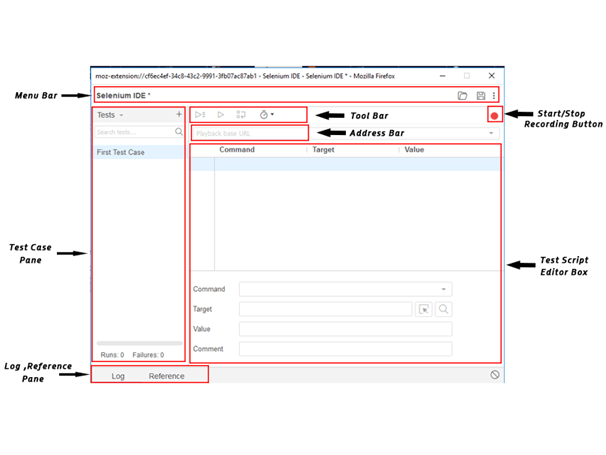
This updated Selenium IDE, developed as a web extension, offers a plethora of improvements and features that address the changing requirements of automated testing.

The new Selenium IDE, which embraces a cross-browser approach, supports popular browsers like Chrome and Firefox, giving testers the ability to seamlessly run their automated tests across various platforms.

The new Selenium IDE features a new and dynamic interface with enhanced recording capabilities, advanced debugging tools, and comprehensive test reports that continue to streamline the test automation process for both novices and experts.

+This tenacious transformation proves the Selenium community’s unwavering dedication to offering an exceptional testing experience and guarantees that Selenium IDE continues to flourish even in the face of shifting technological environments.

Features of the New IDE

Cross-Browser Compatibility: By supporting popular web browsers like Chrome and Firefox, the new Selenium IDE enables testers to create and run tests on various platforms.

Improved Recording and Playback: Testers can easily record and automate their interactions with web applications thanks to improved recording capabilities. The playback feature makes sure that tests go off without a hitch and consistently.

Intelligent Element Locators: The IDE offers intelligent locators that adjust to changes in the application’s structure, simplifying test maintenance and lowering the demand for ongoing updates.

Strong Debugging Tools: With features like breakpoints, step-by-step execution, and variable inspection, debugging is made simple. The root causes of failures can be found and efficiently resolved by testers.

Test Data Management: The IDE provides a range of adaptable options for handling test data, such as data-driven testing, which enables testers to run the same test against various datasets.

Customizable: Selenium IDE can be customized and extended using plugins and custom scripts, allowing testers to improve its functionality in accordance with their unique needs.

Test reporting and metrics: The IDE generates thorough reports that include specific information about test results, such as pass/fail status, execution time, and screenshots. These reports help identify areas that need more attention and offer insightful information about test coverage.

Collaboration and Knowledge Sharing: Test scripts are easily shared and worked on by teams, encouraging productive teamwork and knowledge exchange.

Integration with Selenium Grid: Thanks to the new Selenium IDE’s seamless integration with Selenium Grid, testers can distribute tests across multiple machines and run them concurrently, greatly cutting down on the time it takes to complete a test.

Support for Continuous Integration (CI): The IDE easily integrates with well-known CI/CD tools, giving testers the ability to incorporate automated tests into their development workflows and achieve continuous testing.

About Selenium IDE

Selenium integrated development environment that is plugged into Firefox. It is an automation testing tool that is very simple, easy and user-friendly.  It offers easy installation, learning, and creation of test scripts. Selenium IDE is based on record and playback principle. It is good for all kinds of testing.

Features of Selenium IDE That Makes it the Best!
selenium ide features
Selenium is a widely used automation testing tool and offers extensive features. Some of the common features of Selenium IDE are:

  • It offers an easy and simple record and playback features
  • Supports Intelligent field selection
  • Auto-completion of Selenium commands
  • Walkthrough tests
  • Easy Debugging capabilities
  • Easy setting of breakpoints
  • Save tests as HTML, Ruby, Python, C# scripts, or any other format
  • Supports Selenium user-extensions.js
  • Supports automatic assertion of title for all pages
  • Supports easy customization
  • Does not require programming skills

The Drawback of Selenium IDE

Selenium IDE is a Firefox plug-in hence it supports only Firefox and the test scripts Created in Selenium IDE can only be executed in the Firefox browser.

Step-by-Step Tutorial about learning Selenium IDE

Downloading and Installing Selenium IDE

Now when we have a good idea on what is Selenium IDE, let us move to the next step of Downloading and Installing Selenium IDE.
To download Selenium IDE you need to have Mozilla Firefox, if you have it well and good if you don’t have it, download it.

Steps to download and install Selenium IDE

1)     Launch Mozilla Firefox Browser.
2)      Open Selenium IDE Add-ons page by typing URL: https://addons.mozilla.org/en-us/firefox/addon/selenium-ide/ in your browser. Next Click on Add to Firefox button.
11111
3)     You will get a popup asking for your permission to install Selenium IDE Add-ons or not. Click the Install button over the popup.

4)     Firefox will then install Selenium IDE software and you will get a popup asking you to restart the Firefox. Click the restart button. The Selenium installation will now be reflected on your browser.
5)     After you restart you ur browser you can find the selenium IDE under the tools menu list present at the top bar

6)     Click on selenium ide your selenium ide will launch

Sections of Selenium IDE

Selenium IDE is divided into different sections. Before start working on it, you must know about these categories:

Menu Bar

present at the uppermost of the Selenium IDE window. The menu bar consists of five sub-modules.

File Menu

 File Menu Create, Save and Export Test Case and Test Suite of Selenium IDE. You can open the file menu by pressing Alt + F, or by clicking on the File menu.

Under File menu you can find:

  • New Test Case: It creates a new blank Test Case
  • Open: It  Open already saved Test Cases.
  • Save Test Case: Saves the opened Test case.
  • Save Test Case As: Saves opened Test Case in a specific location and has a specific name.
  • Export Test Case As: Assists exporting test cases in various languages like Ruby/Python/Java/C# in both Selenium Remote Control and Selenium WebDriver Format.
  • Recent Test Cases: Returns a list of few last saved Test Cases.
  • Add Test Case: Search test cases and merge them into the currently opened test case.
  • Properties: returns the properties opened test case.
  • New Test Suite: creates a blank Test Suite
  • Open Test Suite: Opens existing Test Suite.
  • Save Test Suite: Saves opened Test Suite.
  • Save Test Suite As: Saves opened Test Suite in a specific location and has a specific name.
  • Export Test Suite As: Assists exporting test Suite in various languages like Ruby/Python/Java/C# in both Selenium Remote Control and Selenium WebDriver Format.
  • Recent Test Suites: Returns a list of few last saved Test Suite.

Default Interface of Selenium IDE
Edit Menu

Edit Menu helps to Cut Copy Paste and Insert Command in Selenium IDE Test. You can open the Edit menu by pressing Alt + E, or by clicking on the Edit menu.
Under the Edit menu you can find:

  • Undo: last action or few last performed actions are undone
  • Redo: Re-do the last undone action or series of last undone actions.
  • Cut: Copies and removes the selected command or test step from the current location to some other location in the test.
  • Copy: Copies selected command or test step from current location to some other location in the test. But it does not remove the command from the previous locations.
  • Paste: Pastes cut/copied command to a selected location in the test.
  • Delete: Deletes the chosen command.
  • Select All: Select all the commands in Test Step Pane.
  • Insert New Command: Insert a  row at a selected location to write new commands
  • Insert New Comment: Insert a  row at a selected location to write a new comment

Read also: Selenium 4: New Features and Updates

Actions Menu

Helps us to learn Options to Record Play Run And Debug Selenium IDE Test.

  • Record: It Records the user actions on the webpage via the Firefox Web Browser. While recording, the menu item keeps displaying a chack against items.
  • Play Entire test suite: it play-back/re-run every Test Case in the Test Case Pane, following top to bottom approach.
  • Play the current test case: play-back the selected Test Case.
  • Playtest Suites periodically: let the specified test suite to execute at specific times. It is the best way when test suits are required to be rerun periodically as it does not require any human intervention, once specified it will rerun test cases automatically
  • Toggle Breakpoint: allows you to specify one or more breakpoint(s) to forcefully break the execution at specified steps.
  • Set / Clear Start Point: it permits the testers to select a start point to start executing the test. It is important for subsequent runs.
  • Pause / Resume: this enables the pausing and resuming of the test at any point between the test execution.
  • Step: it permits to step through the playing-back of the test case. It is important for debugging purposes.
  • Execute this command: This allows testers to execute a particular command instead of executing the complete test case. It is important when testers want to see the behavior of any specific command
  • Fastest/Faster/Slower/Slowest: it allows you to set the execution speed from fastest to lowest concerning the responsiveness of the application under test.

Other categories available at Menu Bar are:

Options Menu and Help Menu

Tool Bar

The ToolBar includes the Buttons that Control the execution of test cases, for debugging the test cases, setting up the speed of the test, Stopping, Playing and Recording of test cases.

Test Case Pane

All the test cases recorded by IDE are available in Test Case Pane. It can open more than one test case at the same time and supports easy shuffling between the test cases.

It also offers Test Execution Result Summary including entire Test Suite status, Total number of Test Executed, etc.

Test Case Pane

It is the place where Test Case Steps are recorded. All the user actions are recorded in the order they are performed. It also allows the editing and changing of the test cases

Output Pane

The bottom pane or the Log Pane offers the following functions

  • Log, 
  • Reference, 
  • UI-Element, and 
  • Rollup 

The function performed depends upon which tab is selected.

Record the Selenium IDE Test Case.

  1. Launch Firefox Selenium IDE. Type the URL. Click the Record button, a red button on the top right corner. It will record Test Cases.
  2. In Firefox, type the same URL as in step 1. Firefox will take you to the related webpage.
  3. Right-click anywhere on this page, you will get Selenium IDE context menu. In the context menu go to Show Available Commands> Web Page Name.
  4. Click on MyAccount
  5. Enter UserName and Password and then click on the login button.
  6. To stop the recording click the record button again. Click on the Table tab and you will be able to see the recorded commands.
  7. Click on the Source tab to see HTML Code.

Read also: 11 Awesome Selenium Alternatives For Testers in 2019

Save the Selenium IDE Test Case.

  1. To save a test case go to File Menu and click on Save Test Case As.

File -> Save Test Case As.

  1. Choose the desired location and give your file a name and click on Save.
  2. You can see the name of the saved test case on the left-hand side.
  3. The file will be saved as HTML.

Playback Selenium IDE Test Script

Open a new tab Firefox. Click the Play button in Selenium IDE. It will execute the previously recorded tests.
Selenium Commands

Selenium commands or Selenese are a set of test cases that are deployed to test web applications using Selenium.
Selenium commands are of three types:

Actions

Actions commands control the state of the application. Operations under action commands are:

  1. type this box,
  2. click this link
  3. select option.

Some of these commands can be suffixed with AndWait like click and wait, type and wait. This prompts Selenium to wait until the web page is loaded. If these commands fail, the existing test is stopped.

Accessors

These commands automatically create Assertions and inspect the state of the application.

Assertions

They inspect the state of the application adapts to what is anticipated.
They can be further divided into three categories:

  • Assert:
  • Verify:
  • WaitFor:

Some of the Commonly used commands in Selenium IDE:

  • type: Set the value of the input field
  • open: Opens a web page through the given URL.
  • click clicks on a checkbox, link, button or radio button.
  • clickAndWait: When you click on the checkbox, link, button or radio button, and a new page is loaded it calls waitForPageToLoad.
  • select: It selects an option drop-down.
  • selectFrame: It is used to select a frame from the present window.
  • verify title/assert title: Authenticates an anticipated page title.
  • verifyElementPresent: Confirms if the
  • indicated element is present on the page.
  • highlight: Altersthe backgroundColor of the indicated element.
  • pause: Wait for the indicated time period
  • echo: Prints indicated message in your Selenium command tables.

What are Locators?

Locators in Selenium IDE are used to find and match the elements in the web page that are required to communicate with. The use of the right locator promises faster, more trustworthy and low maintenance tests. But choosing the right locators can sometimes become a challenging task.

Locators in selenium IDE


Locators tell on which GUI elements do Selenium IDE needs to operate on. The correct identification of the locators is very important and it is equally challenging.
There are many commands in Selenium IDE that do not require Locators, but most of the commands do require locators. The locators to be used depends on the AUT.
The various types of locator are:

Locator: ID

It is a common way to locate different elements as every element has a unique ID.

Target Format: id=id of the element

Consider any test app, let it be Facebook.

  • Check the “Email” text box using Firebug and note down Locator: ID
  • Launch Selenium IDE and write “id=(Locator ID you retrieved in the first step)” in the Target box. When you click on the Find button next to the target box, the “Email ID” text box will be emphasized with a yellow and green border. This means that Selenium IDE has located the “Email ID” text box correctly.

Locator: Name

Locator name is quite similar to Locator: ID. The only difference is that here we use name instead of ID.
Target Format: name=name of the element.
Consider any test app, let it be Facebook.

  • Check the “Email” text box using Firebug and note down Locator: Name
  • Launch Selenium IDE and write “Name=(Locator name you retrieved in the first step)” in the Target box. When you click on the Find button next to the target box, the “Email ID” text box will be emphasized with a yellow and green border. This means that Selenium IDE has located the “Email ID” text box correctly.

Locator: Link

This locator is used for hyperlink texts. It can be used by beginning the target with “link=” tailed by hyperlink text.
Target Format: link=link_text

Consider any web app as a text app.

  • Check any element that has a hyperlink text and  using Firebug and notes down Link Text
  • Launch Selenium IDE and write “Link =(Link Text you retrieved in the first step)” in the Target box. When you click on the Find button next to the target box, the corresponding text box will be emphasized with a yellow and green border. This means that Selenium IDE has located the element correctly.

Locator: CSS

CSS Selectors are though a complex method to locate elements on a web page, but they are the most preferred method of locating elements in advanced Selenium as they can even detect elements that have no name or no ID.
CSS Selectors are also strung patterns That has the ability to recognize an element based on its arrangement of HTML tag, id, class, and attributes. CSS Selectors have many formats, but the most  common are:

  • Tag and ID
  • Tag and class
  • Tag and attribute
  • Tag, class, and attribute
  • Inner text

Locator: Xpath

XPath is a language for navigating the DOM (document object model) of a web page. It can locate any element on the web page and is hence the most potent and supple locator.

Some of the Firefox Add-ons that can help in finding  XPath of an element:

Locator: DOM

The Document Object Model is an HTML document that can be accessed using JavaScript. It uses hierarchical dotted notation to locate an element on the page.

Conclusion

If you wish to learn more about selenium we have comprised a tutorial just for you which will take you deep into the tool.

Get an eBook: Download PDF

Website Testing Guide: How to Test a Website?

Overview of Website Testing Blog

  1. What is Website Testing?
  2. Reasons to Test Your Website
  3. Website Testing Checklist
  4. Types of Web Testing
  5. Techniques to reduce your website testing efforts
  6. Website Testing Tips
  7. Website Testing Tools

What is website testing?

The practice of examining and assessing a website or online application to find possible problems, vulnerabilities, and opportunities for improvement is known as website testing, sometimes known as web application testing.

Website testing’s major objective is to make that the site works as intended, performs effectively, and offers a satisfying user experience while ensuring security and dependability.

Functionality Testing: This type of testing verifies that the website’s features, functionality, and user interactions work as expected. It includes testing links, forms, navigation, search functionality, user registration, login/logout, and other interactive elements.

Usability Testing: Usability testing focuses on evaluating the website’s user-friendliness and user experience. It involves assessing the website’s layout, design, navigation, and overall ease of use. Usability testing may include gathering feedback from real users through surveys, interviews, or user testing sessions.

Performance Testing: Performance testing assesses the website’s responsiveness, speed, and scalability under various load conditions. It measures factors such as page load times, server response times, resource utilization, and the website’s ability to handle concurrent user traffic.

Security Testing: Security testing aims to identify vulnerabilities and weaknesses in the website’s security controls. It includes testing for common security flaws such as cross-site scripting (XSS), SQL injection, authentication and authorization issues, session management vulnerabilities, and other security vulnerabilities.

Compatibility Testing: Compatibility testing ensures that the website functions correctly across different web browsers, operating systems, and devices. It involves testing the website’s compatibility with popular browsers (such as Chrome, Firefox, Safari, and Internet Explorer), mobile devices, and screen resolutions.

Accessibility Testing: Accessibility testing assesses the website’s compliance with accessibility standards and guidelines, making it usable for individuals with disabilities. It focuses on factors such as keyboard navigation, screen reader compatibility, color contrast, and alternative text for images.

Cross-Site Scripting (XSS) Testing: XSS testing involves evaluating the website’s vulnerability to cross-site scripting attacks, where malicious code can be injected into the website and executed in a user’s browser. It aims to identify and mitigate XSS vulnerabilities to prevent potential security breaches.

Cross-Site Request Forgery (CSRF) Testing: CSRF testing checks for vulnerabilities that could allow malicious entities to execute unauthorized actions on behalf of a user. It involves crafting requests and verifying if the website’s security mechanisms effectively prevent CSRF attacks.

Performance and Load Testing: This type of testing evaluates the website’s performance under heavy loads and stress conditions. It involves simulating high user traffic, concurrent user sessions, and data loads to identify potential bottlenecks, scalability issues, and performance degradation.

Regression Testing: Regression testing ensures that changes or updates made to the website do not introduce new issues or break existing functionality. It involves retesting previously tested features and functionalities to verify their continued proper functioning.

website testing
Reasons to test your website

Testing your website is very important and here are a few reasons to convince you about that:

Identify and fix issues/bugs

Finding and fixing problems is made easier by testing a website’s operation, appearance, or performance.

Early detection of these problems allows you to solve them before they affect user experience or develop into bigger difficulties.

Ensure functionality

Testing makes that all of your website’s features and capabilities operate as intended.

It checks to see whether buttons, links, forms, navigation, and other interactive features work properly. This makes it easier to create a seamless user experience.

Enhance user experience

Testing enables you to evaluate your website’s usability and user-friendliness.

You may enhance the website’s layout, design, navigation, and general usability by getting user comments and insights.

The happiness and engagement of customers are influenced by the user experience.

Enhance performance

Testing aids in gauging and enhancing your website’s performance. You may evaluate things like server response times, page load times, and resource use.

You may improve the speed, responsiveness, and scalability of the website by identifying and eliminating performance bottlenecks.

Ensure cross-browser and device compatibility

Testing makes sure that your website works properly on a variety of computers and mobile devices, including Chrome, Firefox, Safari, and Internet Explorer.

This makes it possible to reach a larger audience and offers a uniform user experience regardless of the platform that the user selects.

Improve security

Testing is essential for finding and fixing security flaws in your website.

By doing security testing, you may identify common security issues (such as XSS and SQL injection) and evaluate how well security safeguards are working.

By addressing these vulnerabilities, you may secure against prospective attacks, preserve user data, and prevent unwanted access.

Validate compliance

Testing enables you to confirm that your website complies with all applicable laws, regulations, and accessibility standards.

To do this, you must make sure that laws like the General Data Protection Regulation (GDPR) and accessibility standards like the

Web Content Accessibility Guidelines (WCAG) are being followed. Legal and regulatory risks are lessened with the use of compliance testing.

Support for updates and changes:

As you update your website or add new features, testing is essential to make sure that the changes don’t cause any problems or impair current functioning.

Regression testing assists in confirming that after changes, the website still functions as planned.

Improve brand reputation

Users get a dependable and consistent experience from a well-tested website.

It builds credibility and trust with your audience and enhances the reputation of your brand.

On the other hand, a website with a history of problems or poor performance might hurt your brand’s reputation.

Cost and time savings

While spending time and money on testing may seem like an extra effort, in the long run, it may save a lot of money and time.

Early issue detection and repair save money on costly repairs and lessen the possibility of serious difficulties developing after the website is live.

Website Testing Checklist

Before you begin with your website testing, be ready with a checklist so as not to miss any part of it.
For Functional Testing

  • Check whether usable HTML is used or not.
  • Validate different fields like dropdowns, text boxes, checkboxes, radio options, links, Combo box inputs, etc.
  • Verify CSS (Cascading Style Sheet)
  • Validate that internal links are appropriately linked to anticipated pages of your websites.
  • Validate that internal links are appropriately linked to anticipated pages of external websites.
  • Ensure the proper functioning of Email links.
  • Validate that there are no broken links generated in your website.
  • Validate that the web forms are consistent and hold the essential input and output controls. Also, validate that the data is properly captured.
  • Validate the database for effective data processing.
  • Cookie testing should not be missed for enhanced security of your users.
  • Check your website for appropriate error messages
  • make sure that the required and optional fields are properly handled.
  • Counter-check the security measures for proper storing of sensitive data.

For Performance Testing

  • Test your website for attributes like Speed, Responsiveness, Stability, Scalability, etc. under various load conditions.

For Web Usability Testing

  • Validate that Site Load-time is reasonable.
  • Inspect font size and spacing between lines is easily readable by the users.
  • Ensure the use of Flash & Add-ons.
  • Validate the correct usage of ALT Tags for all images.
  • In case of internal link breakage, the proper error message should be displayed.
  • Check the correct placement of the website logo.
  • Check tagline.
  • Validate the contact details.
  • Validate the navigation system is easy to understand for the users.
  • Make sure that the navigation labels are clear and concise.
  • Validate the correct usage of buttons and links for easy navigation.
  • Validate that the company logo is linked with the home page. (Not mandatory, but is commonly practiced)
  • Check the proper positioning and ease of usage of the search button
  • Ensure that the heading is clear and descriptive
  • Check the proper use of heading tags like H1, H2, etc.
  • Validate that critical content is displayed in average screen resolution on the first.
  • Make sure that steady usage of font styles and colors has been done across your website.
  • Validate the use of user-friendly and meaningful keywords
  • Validate that the titles are meaningful and self-explanatory

For Compatibility Testing

Validate your website with

  • Browsers and their versions.
  • Operating systems and their versions.
  • Hardware configurations.
  • Network environments.
  • Screen resolutions.

For Web Security Testing

  • Validate your website for password cracking.
  • Test your website for threat exposure.
  • Validate your website for URL management.
  • Validate SQL injection.
  • Validate your website for Cross-Site Scripting (XSS).

Types of Web Testing


Website testing can be broadly divided into various parts:
#1. Functional Testing
Tests the functionality of the website and ensures it works as per the requirement specification.
#2. Browser Compatibility Testing
Your users might be using different browsers and to offer a smooth browsing experience to ensure that you conduct a vivid round of browser compatibility testing. It ensures that your website works fine on various different browsers.
#3. Usability Testing
Your website should be easy to use for the users, it should provide easy navigation, usage, and look and feel to the users.
#4. Accessibility Testing
Accessibility testing can be called as a subset of usability testing, where testing is done whether your website can be easy to use by disabled people. It specifically tests if your website is designed in consideration of people with disability.
#5. Performance Testing
Your website has to bear some load on a day-to-day basis. Considering an average load condition, you should ensure that your website works fine under this load condition. Hence, performance testing of the website is done to test its stability and its responsiveness under a particular load.
#6. Stress and Load Testing
Your website can at times be subjected to undue load conditions and it should be fairly designed to work properly under such heavy load conditions. Hence it is important to conduct stress and load testing to test website stability under heavy load conditions.
#7. Site Monitoring
Regular downtimes can lessen the trust of your users on your website. Hence it is important to observe your website to test for downtime automatically.
#8. Conversion Rate Testing
Dealing with the testing of how to convert more visitors into customers, this has become the favorite website testing of the present-day world.
#9. Security Testing
Websites are prone to hacking; hence testing their security is at most important.
#10. Spelling and Grammar Checking
Spelling and grammar mistakes can have a bad impression for your brand, so thoroughly check your content for spelling and grammar errors.

Techniques to reduce your website testing efforts

Some of the techniques that you can imply to reduce your testing efforts are:

  • Automated testing

With automated testing, you can save a lot of time manually executing every test case and can further spend that time innovating better ways to enhance your testing efforts.

  • Mobile emulators and simulators

Since there are huge chances of people browsing your website through mobile devices, you need to test your website in various mobile devices and operating systems.
This can be a very tiring task to test your website on hundreds of available mobile devices, operating systems, and combustion of both. And hence an easy way out is to use mobile emulators and simulators.

  • Live web testing

Live web testing allows you to debug a website on various browsers and operating system combinations instantly available in the Cloud.

Website Testing Tips

Here are some website testing tips to get better results:

1) Integrate Exploratory Testing with Conventional Testing Techniques

Exploratory testing has a few shortcomings. You can simply overcome these by assimilating exploratory testing with other testing methods.

It helps in producing more reliable test results, and significantly reducing the time for testing.

2) Don’t miss on Sanity testing – it’s important!

Sanity testing can immensely help you in validating the functions and features of your website in a reduced time.

3) Validate All Third-Party Applications, Plug-ins, and Extensions

Test if the extensions and plug-ins are completely compatible with the web application and also detect the defects in them. Remember they can adversely affect the performance of your website.

4) Automate the chatbox testing

Chatbot testing has to be done in different testing environments and also the coordination among the bots needs to be rigorously tested.

This can be a painstaking task and hence it is better to automate chatbox testing efforts.

 5) Keep URL String Unalterable

Hackers have the ability to alter URL strings to access sensitive information or to redirect your site to some malicious link.

Try to keep your URL string unalterable to avoid any chances of malicious activities.

6) Test with a hacker’s IQ

Try testing your website with the intent of a hacker and try finding to hack a website with minimal resistance for best results.

7) Be a Part of the Development Team

With the increasing adaptation of Agile methodology and DevOps learn to work in coordination with developers, business analysts, and customers.

Website Testing Tools

Here are a few website testing tools that can decrease your testing efforts considerably.

  1. SoapUI
  2. TestingWhiz
  3. SOAPSonar
  4. SOAtest
  5. TestMaker
  6. Postman
  7. vRest
  8. HttpMaster
  9. Runscope
  10. Rapise
  11. WebInject
  12. Storm

Conclusion

Websites are different from desktop software, so treat them differently and follow website testing methodology to get the best testing results.  They are seamlessly integrating and interacting with other software around the globe. So testing is important as lot is at stake.

What is PlayTesting? How to Get Good Feedback For Your Game?

In the process of creating a video game, playtesting is like assembling a band of courageous explorers to go off on a perilous trip to test the game.

Players may assume the roles of heroes and villains in this vast experiment, exploring virtual realms and facing off against pixelated adversaries.

But the game is more than just about defeating dragons and looting dazzling objects.

No, there’s a lot more to it than that! During playtesting, game designers anxiously watch these brave players and take notes on every movement, emotion, and victorious or frustrated grunt they make.

It’s an exciting moment to find the player experience’s buried gems and track down elusive bugs that hide in the code’s deepest crevices.

So muster up your bravery, my fellow explorers, because playtesting is the forging ground where games are created and legends are born!

What is Playtesting?

play testing
Playtesting is a commonly used testing technique for games. This quality control method repeats itself at many points of the gaming application/software design process.

A nominated group of players play on-going versions of a game to find failings in the game, and to discover bugs and gaming glitches. It also focuses on describing out the unclear points, increasing fun features or decreasing boredom, etc.

Playtesting is a very generic technique for testing gaming apps and software. It has become an important part of the gaming software’s design phase.

The expectations of the gamers have made the designers consider end-users’ feedback at every stage of designing.

It helps to ensure that the final version of the game is as per the end user’s expectations.

What are the different types of playtesting?

Playtests are done at four points during the design process:

  • Gross Playtesting: It includes the group of testers who test the most basic running model of the gaming app, they look out for the basic faults in the gameplay. The design team involved in the designing of the game itself play tests the game.
  • In-House Playtesting: it is carried out by contracted play testers or people of the company. To find more glitches in gameplay and formulate the game for broader testing, In-House playtesting is done.
  • Blind Testing: the group of testers who have no prior experience with the game tests the app during blind testing. The testing by end users detects many faults that are often missed by professionals.
  • Final Playtesting: it is the last phase of playtesting, and is done before the game launch. This playtesting version is close to the final version of the game.


The playtesters have an important role in improving the game, and hence they are paid for the work.

And this pay is even higher when it is done in the earlier phases when the game is in more technical stages.

Playtesting in Video games

In video games, playtesting introduces the game to the audience during the development phase to collect their feedback and design flaws.

It ensures that the game will be commercially feasible upon release. It is very different from Quality Assurance (QA) testing, which aims at finding software bugs and not to identify their commercial feasibility.

Role-playing games

Role-playing games focus on the game’s mechanics and flow of the game. The feedback from players helps developers to adjust and alter the mechanics as per the final audience’s expectations.

Other games

Playtesting plays an important role in all other types of games, in deciding the mechanism, game flow, content, and visual appearance of the game.

It helps in delivering the game as per the user’s expectations so that the game is commercially viable when launched and does not end up being just a flop.

Playtesting can be carried out in either a traditional manner or using automated techniques.

The Traditional Way of Playtesting

Playtesting is conducted to recognize the player’s experience. The gaming process is categorized into three parts.

  1. Creation: designers use their imagination to create perfect graphics to justify the theme.
  2. Balancing: designers take help of other people or playtesting companies to ensure the game is challenging and modify their game and twist it to make it entertaining for everyone.
  3. Release: the game is released in the marketing.

What is automated playtesting?

Automated systems and scripts are used in automated playtesting, a method of game creation that eliminates the need for human interaction in simulating and analyzing gaming situations.

It entails programming agents or bots to play the game in accordance with predetermined rules and patterns, enabling developers to collect information and get insights on different gameplay elements.

The benefits of automated playtesting include scalability, consistency, and the capacity to repeatedly recreate certain situations.

Developers can effectively evaluate the mechanics, balance, and performance of games as well as spot any possible flaws or problems by automating the testing process.

Automated playtesting also lessens human bias and allows game creators to swiftly examine vast amounts of data, allowing for more well-informed judgments throughout the game development process.

Why do you need an automated Playtest?

Balancing is a time-consuming process, where the designers have to wait for weeks to get playtesters’ reviews.

After getting the reviews again days are spent to alter the game. It is hence a very time-consuming process. And there arose a need for automated playtesting.

Benefits of Automated Playtesting

The main idea behind automated play testing is to let virtual playtesters test the game.

By running them over the cloud and using the power of artificial intelligence the task that used to take weeks to be done could now be done within a few minutes. Virtual playtesting help in recurrent feedback reports.

Read also : Top 23 Gaming Glitches of All Times [Full-List with Video]

Playtesting had many benefits for game designers, but automated playtesting increased these benefits even further.

Some of the major benefits are:

Better Quality Content

Automated playtesting results in faster feedback, which assists the designers to do more revisions to the gaming content and hence ensures better content at a much faster pace.

It ensures that the final content users get is as per the end-users expectations.

More In-depth and Constant Playtest

With human playtesting, you might get confused with varied feedback. Due to the human factor, you ought to get different feedback from different.

This creates confusion for the designers and hence controls the best alterations. In automated play testing, such situations are wisely taken care of.

A QA (Quality Assurance) Byproduct

The automated playtesting also assists to find bugs and ensures that new features do not hinder the remaining game. It increases the games’ quality as a whole.

Disadvantages of Playtesting

Playtesting has many benefits, but one of the biggest risks that come along with playtesting is the fear of its leak to the internet even before its release.

Though there are ways to prevent this. If the game is not leaked, details can still be leaked.

Though manual playtesting is a very slow process and can delay the release date of the game.

But it has been taken care of by introducing automated play testing which is comparatively faster.

Since automation is costly, automated playtesting cannot be deployed by all the gaming agencies.

Tips For Better Playtesting

  • Create a comfortable and distraction-free playtesting environment.
  • Do not disregard user recommendations and comments because they are difficult to implement or would raise the game’s budget. Be honest and modest!
  • Playtesting may be done at any time. As soon as you have a working prototype of the game, you can give players access to it so they can provide insightful feedback and help you make quick changes. Early testing also gives you information that you may utilize to validate your game’s design later on.
  • You can be infatuated with the game you made. However, if a player has any reservations about any component of the game, they should consult with other players and take the appropriate action.
  • You already know what your game’s main element of engagement is. What if some players find the game’s other features to be more interesting? Finding it out can be very effective in enhancing the game as well as in marketing.
  • Avoid having in-depth discussions with people who are playing the game since it will sway their opinions.
  • While playtesting, capture their gaming session. It can reveal a lot.
  • Make a survey rather than recording user feedback.
  • Allow the user to abandon the game if they become tired of it. Never force someone to play a game simply because you paid for it. Make sure you ask them what’s wrong if they find it uninteresting.
  • Make sure your team includes people who are not simply professional gamers.
  • Take note of common pain points, frustrations, and positive aspects mentioned by playtesters.
  • Iterate and make changes based on the feedback received, aiming to improve the overall game experience.
  • Collect both quantitative and qualitative data to gain a comprehensive understanding of the player experience.

Conclusion:

Play testing is an important process of gaming development; it focuses on altering the game as per the expectations of its end users. A designated group of end-users tests the game to find unclear points, increasing fun features or decreasing boredom, etc.
Play testing increases the chances of the game to be accepted by its end users and be liked by them. After play testing there are few chances that game will be disowned by its users.

Exclusive Bonus: Download PDF

Strategies for Testing in AI Applications Best Practices and Key Considerations

Artificial Intelligence (AI): Artificial Intelligence (AI) is the latest technology to be leveraged across all industries and domains which are increasingly complex and continuously accessible marketplace, organizations must evolve. It is the ability of machines to perform tasks that usually require human intelligence.

How does Artificial Intelligence work?

  • AI works by merging big data sets with iterative processing algorithms and with intelligence to learn from features and patterns in the dataset that AI systems Analyze.
  • Each time an AI system performs a data cycle, it checks and measures its performance and gains additional knowledge.
  • AI science aims to create computer systems that can simulate human behaviour to solve complex problems using human-like thought processes.
  • AI systems use different technologies and different methods and processes to achieve this goal.

Mobile app test cost calculator

AI helps to access and manage the computing resources to train, test, and deploy AI algorithms and is playing a essential role in the software industry which also includes software testing. Testing is the basic activity aimed at detecting and solving technical issues in the software source code and assessing the overall product usability, performance, security, and compatibility. It’s not only the main part of quality assurance; it is also an integral part of the software development process.

Since AI has the ability of mimicking human intelligence, the penetration of AI in testing is on the rise.

Evolution of AI in Software Testing

According to the World Quality Report 2019-2020, it is stated that AI-based testing is on the rise, and to make testing smarter, more effective, and more efficient, organizations are adopting AI-based tooling and processes in software testing. Typically, the application of AI in software testing will make the entire testing process faster, clearer, easier, and budgeted. Therefore, AI-based testing will provide a strategic platform where software testers can leverage AI and take the testing process to a new level and thus deliver more quality results to businesses.

The paradigm of software testing has evolved significantly over the past two decades. Right from manual testing to automation testing, where selenium is considered to be one of the finest test automation tools, the testing journey has been quite encouraging. However, in today’s fast-paced IT world, the domain of software testing has to come up with innovative and well-researched testing methodologies.

AI algorithms can completely mimic human intelligence, and ML allows computers to learn automatically without any human intervention. Interestingly, AI and ML involve the development of unique and specific algorithms that can access data learn from that data by extracting patterns to make decisions, and these predictions are to be used in software testing effectively.

Read Also: Personality Analysis of Software Testers A Scientific Approach
Benefits of AI in Software Testing

benefits of Ai in software testing

1. Reduced Test Flakiness
By automating repetitive tasks and using algorithms to detect bugs and issues, AI helps to speed up the testing process and improve the accuracy of results. This means all the software can be tested more efficiently and effectively, saving time and resources while ensuring a higher-quality product.

2. Better Test Coverage
Artificial intelligence has the potential to automate manual tests and identify issues quickly, reducing the time required to detect bugs and errors. By automating testing activities and reducing human error, AI can help you deliver better quality software more quickly.

benefits of AI software testing

3. Faster Feedback Time
AI helps in faster detection of bugs in the product. Early detection results in improved product quality since the developers receive faster feedback about the product. Accelerated feedback time also improves developer productivity since issues are reported at a faster pace. The impact of AI-based testing multiplies by a huge margin when the tests are run in Continuous Integration pipeline.

4. Faster Test Script Generation
Codeless AI testing is significantly faster than either manual testing or traditional automated solutions, as testers save time generating code. This allows companies to increase their ability to run tests and deploy more quickly.

What is AI-based Testing?

AI-based testing is a software testing technique in which AI and Machine Learning (ML) algorithms are used to effectively test a software product.

Machine learning is one of the key techniques we use to achieve this. It forms the basis for many AI systems, but not all. AI and machine learning in software testing deliver better and more effective automation, relieving teams of the burden of repeating and refining testing.

Many software testing methods are now powered by Artificial Intelligence .The objective of AI-based testing is to make the testing process smarter and highly effective. With the inclusion of AI and ML in testing, logical reasoning and problem-solving methods can be applied to improve the overall testing process.

Moreover, enterprises are rushing towards tools that can leverage AI and ML algorithms and can be used for testing the software effectively. It has also been seen that businesses get many benefits from AI-based testing as it will enable faster and continuous testing, complete automation without any human intervention.

Read Also: AI and Bots: Are They The Future of Software Testing?
Some of the benefits of leveraging AI in software testing:

benefits of leveraging AI in Software testing


1. Visual validation:–

It helps to make sure that all the visual elements are engaging and can function properly. Improved accuracy: with the advent of AI in automation testing, repetitive tasks are handled more effectively and the results are recorded more accurately. AI has pattern recognition and image recognition capabilities that together help to detect visual bugs by performing visual testing on applications. It helps to make sure that all the visual elements are engaging and can function properly.

2. Improved accuracy:–                                                                                 

Through machine learning, AI helps to generate test data where testers can feed the data into an AI machine allowing it to perform various tests at every stage without the need for manual testing hence improving the reliability and security of the software.

In the manual testing method, the chances of human-prone errors are high, especially in situations of repetitive tasks. Automation testing helps in removing these human-prone errors. Thus, AI helps in removing the minute chances of errors and improves the overall accuracy of tests.

3. Better test coverage:–

AI in testing increases the test coverage as it can check the file contents, data tables, memories, and internal program states seamlessly. Saves time, money, and efforts: Software tests need to be repeated whenever there is an instance of change being made in the source code. AI in testing increases the test coverage as it can check the file contents, data tables, memories, and internal program states seamlessly. It also helps to determine if the program works as expected and delivers effective test coverage.

benefits of leveraging AI Software testing

4. Saves time, money, and efforts:-

Software tests need to be repeated whenever there is an instance of change being made in the source code. Manually this becomes time-consuming and takes a lot of effort from testers. But, with AI-driven tests, repetitive tasks are handled properly, quickly, and efficiently.

5. Faster time-to-market:–

AI uses a set of algorithms to analyze software functions and identify errors through automated testing, thus minimizing the headaches of repetitive software testing tasks (such as regression tests), improving accuracy, and accordingly shortening time to market. AI-driven tests support continuous testing, and thus products are released faster which helps businesses go early-to-market.

6. Reduces defects:–

AI-driven tests support continuous testing, and thus products are released faster which helps businesses go early-to-market. AI in testing helps in early and fast bug identification, which ultimately reduces the defects and makes the product bug-free, and reliable for end-users.

What are the 4 main categories of AI-driven testing tools?

AI-driven testing tools

1. Differential tools:-

Helps test different versions of similar applications. Carries out a comparison to understand differences, versions overbuilds and learn from classification feedback. Visual: Image-based testing needs visual validation. Differences are classified and application versions over each build are compared in this type of testing.

Tools leveraging AI and ML algorithms aim to proactively and automatically identify code quality issues, regressions, security vulnerabilities, and more. This is done through code scanning, unit test automated creations, and more. If your team lacks skills to address the above objectives or does not have the time to continuously address these tasks, consider some of these options. The outcome will be faster releases, improved quality through fewer escaped defects, and better productivity for developers. Some of the tools under this category are:

  • Launchable:

Launchable is based on an ML algorithm that predicts the likelihood of failure for each test based on past runs and whenever the source code changes under test. This tool lets the user record the test suite so that tests that are likely to fail are run first. One can choose this tool to run a dynamic subset of tests that are likely to fail, thereby reducing a long-running test suite to a few minutes.

It looks at code automatically upon a code pull request and performs a kind of code impact analysis that adapts to the recent code changes. It then selects only the most relevant subset of your regression suite to save time to approve the code changes and integrate them into the pipeline.

  •  Google OSS-Fuzz:

It is a fuzz testing tool that aims to make common open-source software more secure, stable, and reliable. This tool combines modern fuzzing techniques with scalable and distributed execution. This tool supports C/C++, Rust, Go, and Python code.

  • Facebook Infer:

Facebook’s Infer project also enables better code quality through its AI algorithm. The AI engine from Facebook can automatically find null pointer exceptions, memory leaks, concurrency race conditions, and more in Android and Java code. Similarly, it can also find the same issues together with wrong coding conventions or unavailable APIs in C, C++, and iOS/Objective C code.

  • DiffBlue:

DiffBlue connects into your source control repository (Git, Perforce, etc.) and creates a base line of unit testing automatically through AI. Once a regression is found, a flag will be thrown reporting the issue. The motivation for DiffBlue to create their solution was mostly to improve code quality by helping developers who do not like to own test creation.

Read Also: Software Testing Latest Trends & Technology in 2023
2. Visual AI testing tools

Visual testing is a software testing technique in which the look and feel of an application is tested by leveraging image-based learning and screen comparisons. With pattern and image recognition capabilities together, it helps detect visual bugs to test the look and feel of an application.

Visual AI testing tools address the pain of constant changes made to the UI (user Interface) layer together with an ever-growing number of platforms, screen sizes, and configurations that make testing coverage a nightmare for test engineers and developers. With the ever-growing number of platforms that vary in screen sizes and have different configurations, it has become a tedious task for test engineers and developers to effectively test the UI layer.

Also, the UI layer experiences constant changes from time-to-time as businesses wish to provide a better user experience. Therefore, today there is a dire need for visual AI testing tools that effectively test all variations of these UI layers.

Some AI/ML tools that fall into this category are:

  • Applitools
  • Percy.io

1. Applitools:

This is an AI-powered visual testing and monitoring platform. This has been named a next-generation test automation platform powered by Visual AI. The major features include Applitools Eyes which helps to increase test coverage and reduce maintenance. The Ultrafast grid helps with cross-browser and cross-device testing and accelerates functional and visual testing by 30 times. This Applitools platform integrates with all modern test frameworks and works with many existing testing tools like Selenium, Appium, Cypress, etc.

2. Percy by BrowserStack:

It is an all-in-one visual review platform that comes with amazing features such as pixel-by-pixel diffs, responsive diffs, and snapshot stabilization. This tool allows cross-browser rendering, high-speed rendering, and has parallelization capabilities. Percy helps teams automate visual testing. This Browserstack tool is used to typically capture screenshots and compare them against the baselines and display visual changes. It increases the visual coverage and helps teams to deploy code changes with confidence.

3. Declarative tools

Declarative tools have different use cases from the others but still aim to enhance test automation productivity and stability. Declarative tools that leverage ML and AI have significant abilities related to NLP, DSL, RPA, and MBTA methods. The common ground between the methods is to eliminate tedious, error-prone, repetitive actions through smart automation. While in this category we list RPA, this specific method is not solely around automation of testing, but also around automation of processes and tasks done manually.

These tools aim to enhance test automation productivity and stability. These tools leverage AI and ML and have significant abilities related to Robotic Process Automation (RPA), Natural Language Processing (NLP), Model-based Test Automation (MBTA), and Autonomous Testing Methods (AT). The main aim of these methods is to eliminate tedious, error-prone, repetitive tasks through smart automation. Some of the tools that fall under this category are:

Focusing on declarative testing, we can take as an example tools like:

  • Functionize
  • Tricentis
  • UIPath Test Suite
  • Automation Anywhere

1. Functionize:
Especially Functionize, specify leveraging NLP to create test automation scripts without any coding skills or development languages.

The major benefits of this tool type are as follows

Fast test automation creation.
No coding skills are required.                                                                                    Faster maintenance of test automation scenarios.

2. Tricentis:
This is an AI-driven, next-gen automation testing tool that allows Agile and DevOps teams to rapidly achieve test automation goals. It allows teams to go beyond continuous testing with AI. It allows automating end-to-end testing of software applications. This tool combines multiple aspects of software testing (test case design, test automation, test data design and generation, and analytics) to test GUIs and APIs from a business perspective.

3. UiPath Test Suite:
This is the latest Test Suite that can be used to automate and centralize the testing process and helps to launch resilient robots and ensures high-quality of every automation. The UiPath Test Suite consists of UiPath Studio Pro, UiPath Test Manager, and UiPath Orchestrator. Thus, UiPath test Suite can be used to automate tests in UiPath Studio Pro with drag and drop interfaces, helps to manage tests with UiPath Test Manager, and also helps to execute tests witn UiPath Orchestrator. Therefore, UiPath Test Suite is helping businesses with a 360 degree testing and is helping RPA developers to build more, test better, and fix never.

4. Automation Anywhere:
These types of tools should solve problems for the right persona depending on the skillset available.

4. Self-healing tools

Apply AI to testing to identify when a function has changed. Then, the test can automatically update itself to be relevant and not fail during execution. Element selection in tests is auto-corrected when the UI changes.

Code-based test automation is by nature less stable. It requires tuning constantly per platform or environment, and its entire foundation is the application objects. These objects tend to either change every few weeks, or worst case they are used inefficiently (e.g. XPATH vs. Object ID, etc.).

Some of the tools are as simple as a web browser plugin installation (Mabl, Testim). Some tools that assist in test maintenance with machine learning are richer in their abilities and are integrated into an end-to-end continuous testing solution (Perfecto, Tricentis).

  • Perfecto
  • Mabl

At the heart of these tools there is a ML algorithm that upon each execution and in between them “learns” the website and/or application under test. It scores the element locators from each screen in the app based on reliability and probability to be found successfully.

Code-based test automation is by nature less stable. It requires tuning constantly per platform or environment, and its entire foundation is the application objects. These objects tend to either change every few weeks, or worst case they are used inefficiently (e.g. XPATH vs. Object ID, etc.).

In automation tests, the problem of flakiness, reliability, and maintenance issues persist, and this is one of the main reasons why AI and ML have been introduced in test automation. To overcome these problems, self-healing tools have been developed that are mostly based on a record and playback mechanism, wherein the main ML engine resides in the self-healing of the recorded scripts. Some of the tools that fall under this category are:

  • Mabl:
    It is the leading intelligent test automation platform built for CI/CD. Mabl crawls your app screens and begins to run default tests that are common for most applications. It also uses ML algorithms to improve test execution and defect detection.
  • Testim:
    This tool uses AI and ML algorithms to automate testing to its full extent. AI is used to speed up the authoring, execution, and maintenance of the tests. Testim includes self-maintenance of automated tests that are ML-based. This results in the fast authoring of stable automated tests.
Best Practices for Testing AI Applications:

Assess Information Technology infrastructure

Successful execution of an AI strategy requires discipline and the best practices listed here. Responses may also contribute to adoption. Consider the use of resources in terms of the time, cost, complexity, and skill set required to build an AI model and demonstrate a business case.

Testing AI Application

Determine the use cases

Determine how the peers and competitors have strongly deployed AI platforms. Look for suppliers with a solid track record to mitigate risk. They talk to stakeholders about the utilization cases and the benefits of implementing AI.

Also, use AI accelerators from popular cloud service providers (CSPs), which may already be included in BPM (Business Process Management), RPA (Robotic Process Management), DMS (Document Management System), and iPaas (Integration Platform as a Services) platforms. Working with stakeholders and educating them on how to use AI solutions increases their likelihood of use and drives adoption across the organization.

Search for relevant use cases for the optimized deployment of artificial intelligence in each of the following areas:

  • Machine learning (ML)
  • Natural language processing (NLP)
  • Natural language understanding (NLU)
  • Optical character recognition (OCR)
  • Chatbots

Learn how your competitors and peers have successfully deployed AI platforms. Look for vendors with a reliable track record to reduce risk. Consult with stakeholders on your use cases and the advantages of implementing AI.  Also, leverage AI accelerators from prominent cloud service providers (CSPs) that may already be included within your LCAP, DMS, BPM, RPA, and iPaaS platforms. By working with your stakeholders and teaching them how to use your AI solution, the more likely they are to use it, driving organization-wide adoption.

Understand the Raw Data

Insufficient data may lead to misrepresented results and AI implementation failure. If you can comprehend the raw data, garner your business experts’ assistance to access a detailed interpretation. Comb through the data to ensure there aren’t any typos, missing components, skewed labels, and other errors. Ensure your data samples contain every element you need to analyze. Incomplete data may cause misleading represented results and AI execution failure. Ensure that the sample data contains all the elements required for analysis.

Losing focus on the raw data can lead to skewed results and loss of confidence on the machine learning models. If you do not understand the data, get help from business experts to gain a full understanding of the story the raw data is telling you. Analyze it to ensure that there are no missing values, incorrect labels, or typos and check that the sample contains the full spectrum of all users that you wish to analyze.

Also, consider the relationship between data labels and values that you are trying to predict based on dependent data and ensure that there is no biased data (data favoring a particular result). While analyzing the raw data, you will get an understanding of the limitations of your data set and model. This will help you communicate the scope and limitations of your predictions based on the pattern of the data to your stakeholders.


Train the models

You will need high-quality historical data to train your ML models. Use AutoML engines to build image, speech, video, and natural language, recognition models. With AutoML engines, any user can upload their images and automatically create an ML model using a drag-and-drop interface. Essentially, it imports data, tags the data, and trains the model. The best part is that an AutoML engine manages all the complicated work for you.

Training an ML model requires high-quality historical data. Generate natural language recognition, image, video, and speech using the Auto Machine Learning engine (AutoML). The AutoML engine allows users to upload images and automatically generate ML models using a drag-and-drop interface. Import the data, label the data and train the model. The best part is that the AutoML engine takes care of all the hard work.

Measure and record the results

You should experiment with artificial intelligence, but you should also incorporate disciplined tracking, monitoring, and measurement at every step using a critical approach. Also, it’s essential to continually audit your deployment to ensure it consistently aligns with your business objectives. Changing your strategy is more effective than accepting failure.

Continue testing your models and predictions to drive further improvements where necessary. Keep your data clean, and retain a master raw data set to use for every testing round. You can also use your master data set to test modified use cases. Monitor your model for potential risks and issues. Don’t forget to add time for managing any unexpected problems. While performing AI tests, one should also incorporate measurement, precise tracking, and monitoring using a complex approach throughout the action.

Also, it is essential to continuously check the deployment to ensure it is frequently coordinated with the business objectives.

Guide the team and cooperate

Artificial intelligence continues to get better, but it still requires the correct data. The issue is it’s difficult to find data science experts. Therefore, invest in continuing education for your stakeholders. Add to your training initiatives by creating an environment where collaboration is part of the culture. A crucial factor for AI implementation success is change management.

Create short-term and long-term objectives of what you expect to achieve using predictive analytics and then machine learning and then natural language processing and on down the AI list. Map out how each deployment affects each business line and how it enhances your employee workflows AI continues to improve, but it still needs relevant data. The problem is that it is difficult to find data science experts. Therefore, invest in further participatory education.

Admit all the wins

Celebrate every win, and involve every executive and stakeholder. Try to complete your projects within or before 12 weeks to encourage continued engagement. As you learn from each successful project, you can scale AI across more business lines and company locations. Use your goals as success benchmarks, and focus on your results. When focusing on the outcome, keep in mind that AI platforms can take structured and unstructured data sets.

Finally, using best practices for implementing AI requires a long-term perspective. Remember that AI deployment is a marathon and not a spring. Understand what AI is currently capable of executing, and be realistic about your timelines and your expectations.

App Bug fixing

Conclusion:-

A better understanding of the differences between AI and human intelligence is needed to better prepare for the future in which AI will have the most profound effect on our lives. With the advent of AI in software testing, businesses are now able to achieve faster tests and reliable products. Leverage next-gen AI-based testing services by next-gen testing services provider to get faster and quality releases with more efficiency and accuracy.

There are best practices for implementing AI in companies like Assessing IT infrastructure, determining the use cases, understanding the data, training, and measuring the records. An AI application needs to be tested for functionality and system levels. It is similar to testing of traditional software in aspects of test planning, test modelling, test design, and execution. Testing of an AI system becomes more challenging and function test quality evaluation becomes an integral part of AI application testing.

What is Security Posture Assessment?

An organization’s cybersecurity posture is assessed to make sure it is solid.

A posture assessment is one of several procedures that must be completed in order to advance the cybersecurity maturity level.

A company must have a strong cybersecurity system in place or else its security is at danger.

Most firms are now very concerned about data breaches, cyberattacks, and online dangers, therefore they are devoting time and resources to assessing their cybersecurity posture.

However, there are several cybersecurity techniques and providers accessible, which makes it challenging and confusing for a firm to choose one.

Before moving on, let’s take a closer look at the definition of posture evaluation.

Security posture assessment flowWhat is Security Posture Assessment?

A Security Posture Assessment (SPA) is a thorough assessment of the entire security posture of an organization.

It entails examining and evaluating several facets of a company’s security procedures, policies, and practices in order to identify weaknesses, dangers, and potential areas for development.

An organization’s security controls, procedures, and tactics are evaluated in order to learn more about their efficacy and resilience.

It assists in identifying areas of vulnerability in the security infrastructure and offers suggestions for risk reduction, security measure improvement, and alignment with industry best practices and compliance standards.

Several areas may be assessed as part of a security posture assessment, including:

  • Network security include examining the organization’s firewalls, routers, and other network components for holes in their setup, possible entry points for unauthorized users, and other vulnerabilities.
  • System security is assessing the security settings and configurations of workstations, servers, operating systems, databases, and other crucial systems to spot weaknesses and possible security holes.
  • Application security is the process of evaluating the safety of software, online, and mobile apps to spot weaknesses like poor input validation, weak authentication, or unsafe coding techniques.
  •  Analyzing physical access restrictions, security guards, surveillance systems, and other physical security measures to find gaps that might permit illegal entry or other breaches.
  •  Analyzing the organization’s methods for protecting data, such as data categorization, encryption, access restrictions, steps to stop data leaking, and backup and recovery processes.
  • Reviewing the organization’s security policies, incident response plans, disaster recovery plans, and employee awareness initiatives to make sure they are thorough, current, and well stated. Security Policies and Procedures.
  • Assessing the organization’s compliance with key security laws, industry standards, and regulatory requirements can help you find any gaps and make sure you’re in compliance.
  • Evaluation of the efficiency of security awareness programs and training given to workers to make sure they have the information and abilities to adhere to secure practices.

A thorough report detailing the findings, vulnerabilities, and suggestions for enhancing the organization’s security posture is often produced after the evaluation.

The report may be used as a road map for putting security improvements into practice, for prioritizing remediation initiatives, and for boosting overall security resilience.


Security posture assessment process
What are the different security postures?

Security postures describe the overarching strategy and mentality that an organization employs in relation to security. Several typical security postures are listed below:

Permissive Posture: In a permissive posture, companies put user comfort and ease of use ahead of strict security measures.

Users should be able to do their duties with the fewest limitations possible, which often leads to laxer security precautions.

This stance may be dangerous since it might make you more susceptible to intrusions and breaches.

Defensive: Taking a defensive stance places a significant emphasis on security procedures and controls that guard against possible dangers.

Multiple layers of security measures, including firewalls, intrusion detection systems, access restrictions, and encryption, must be put in place.

The emphasis is on limiting hazards and preventing illegal access.

Resilient posture: A resilient posture highlights the company’s capacity to tolerate and bounce back from security catastrophes.

It entails putting in place reliable backup and recovery systems, redundancy safeguards, and disaster recovery strategies.

The main objectives are to reduce downtime, ensure company continuity, and swiftly resume regular operations.

Agile Posture: Adopting an agile posture entails modifying security controls and procedures to keep up with quickly changing threats and technology.

It places a strong emphasis on adaptability and the capacity to act rapidly in the face of new security threats.

Continuous monitoring, threat information collection, and quick deployment of security updates and fixes are often components of this posture.

Risk-Aware Posture: Adopting a risk-aware posture is being aware of and skillfully handling security threats.

Organizations adopting this stance carry out thorough risk assessments, rank security expenditures according to risk categories, and put in place the necessary controls and mitigation techniques.

The emphasis is on striking a balance between risk management and corporate goals.

collaborative posture: A collaborative posture entails actively involving internal and external stakeholders in order to improve security.

It involves encouraging information sharing and cooperation with partners, developing a culture of security awareness, and integrating staff in security procedures and decision-making.

The goal is to instill security awareness within the company.

Organizations that value privacy rights and the protection of personal information adopt a privacy-focused stance.

This stance requires developing robust data protection safeguards, privacy policies, and consent processes in accordance  data protection legislation like GDPR, LGPD, PIPEDA, and CCPA as well as industry-specific regulations like GLBA, FISMA, CPS 234, the NYDFS Cybersecurity Regulation, and HIPAA,

Strategy for improving Security posture assessment

For improving the posture, you should have a tool in place which can do the following:

  • The tool you deployed must define your inventory inside the company.
  • The tool must be able to screen all the IT assets for all significant risks, including phishing, obsolete or unpatched software, malware, SQL injection, and others.
  • The tool should provide analytics from which to make references.
  • A critical level for these flaws should be established based on the degree of vulnerability it introduces into the system.
  • clearly state the security posture assessment’s goals. Identify the security infrastructure, policies, and procedures that need evaluation and improvement. To monitor progress, set quantifiable objectives and success criteria.
  • Make sure the evaluation addresses all pertinent security topics, such as network security, system security, application security, physical security, data security, and compliance needs. Gather information by using a mix of automated tools, manual testing, interviews, and documentation reviews.
  • Following a posture assessment, the system should be constantly monitored for new vulnerabilities.
  • Create a dedicated staff that will routinely maintain a security posture evaluation. If a certain crew will be looking at it, maintenance will be simple.
  • Participate important stakeholders in the evaluation process. This comprises the IT staff, the security teams, the management, the legal and compliance teams, and other pertinent departments. Their participation and cooperation will provide insightful information and aid in identifying important areas for development.
  • Utilize well-established security frameworks and standards, such as the CIS Controls, ISO 27001, or the NIST Cybersecurity Framework. These frameworks give best practices for putting security controls in place and offer a systematic method for evaluating security postures.
  • Make sure the assessment report contains concise, doable suggestions for correcting found weaknesses and vulnerabilities. Give best practices, instructions, and comprehensive processes for remediation. Adjust the advice to the organization’s unique situation, resources, and competencies.
  • Create a thorough remediation plan that specifies the procedures, deadlines, and accountable parties for carrying out the suggested security changes. Set goals, assign resources, and prioritize projects to keep track of.
  • Consider hiring outside security consultants or experts to undertake impartial analyses and provide unbiased viewpoints. The efficacy of the evaluation may be increased by the specific expertise, experience, and impartial viewpoints of outside specialists.
  • Promoting a solid security culture among the staff may go a long way toward preventing these occurrences. Employee awareness and education can help them to avoid clicking on harmful links, which will help to reduce the frequency of phishing assaults.

Planning a strategy for robust posture assessment

You should know how to have an effective strategy for making your system more robust and cyber-attack defensive.

The security posture assessment professionals have a very difficult task on their shoulders. They must establish the priorities of attacks that need to be dealt with first.

You should always know how to manage and mistake in case any cyber-security risk comes into your organization. Proper governance and having proper cyber-security programs in the organization will make sure that how planning a strategy is important.

It is always to identify the sensitive information because safeguarding them at any cost should be a part of our strategy. IT teams should regularly perform vulnerability scanning, phishing simulations, and penetration testing to minimize security thefts and increase the posture assessment level.

There are different frameworks for improving posture assessment. OCTAVE is one of the frameworks which is widely used.
It is an operational critical threat, asset and vulnerability evaluation which is useful for an organization that knows the major gaps and know how to fill these.

Another framework is FAIR which means Factor analysis of information risk. Last is the NIST RMF framework which should be implemented in case you avoid the first two frameworks due to compatibility issues. Risk assessment is a mandatory step in all the three frameworks and continuous assessments are a core part of the cyber-security level analysis.

Phases involved in Security posture assessment
Planning Phase: Validating the scope of the assessment, resource identification, stakeholders identification, developing a work-plan, etc. happens in this phase.
Documentation review: All the documents that are required to commence testing will be reviewed in this phase.
Assessment: Internet exposure, on-site audit, findings, analysis and -defining  cyber-security posture will be carried over in this phase
Reporting: All the deliverable will be listed in the report

When does your company need a cybersecurity posture assessment?

  • If you wish to know the current status of the cybersecurity
  • For implementing correct and mandatory cybersecurity measures
  • If you wish to have a detailed analysis to check on the vulnerabilities
  • Your company defensive system against cyber attacks is not up to the mark
  • if you wish to get ROI on you cybersecurity measures
  • If there is any kind of integration happening

Tips to improve your cyber-security posture

  • Have a real-time updatable inventory of the IT assets of your company
  • Continuous monitoring of IT assets and expose the system to planned cyber and see how the defensive mechanism is
  • Analyze the result and do a proper risk assessment and mark the vulnerability points
  • Once improved start from the first periodically


Conclusion

So, we learned how the organization used to ignore these threats and that lead to a drastic loss.

To safeguard your data and maintain cybersecurity have a robust and high-level cybersecurity posture assessment in place.

This is going to act as a barrier for your product, assets, and organizations. Start making your strategy today and make your organization risk free.