A Software Testing Traceability Matrix (STM) is a document that links and maps test cases to their respective requirements, ensuring that each requirement has been adequately tested.
It serves as a verification tool to confirm that all software requirements, as defined in the requirements specification document, are covered by test scenarios and cases.
The matrix facilitates identifying missing tests, understanding the impact of changes, and ensuring comprehensive test coverage.
By maintaining traceability from requirements through to test cases and defects, STMs provide clear visibility into the test coverage, project progress, and quality assurance process, aiding in effective project management and delivery.
Benefits of Using Traceability Matrix
The Software Testing Traceability Matrix (STM) is critical for several technical and project management reasons:
Ensures Coverage: STM guarantees that all requirements are tested, minimizing the risk of untested functionality being released. It systematically matches requirements with test cases, ensuring comprehensive coverage.
Impact Analysis: It facilitates efficient impact analysis by identifying which test cases are affected by changes in requirements, thereby streamlining regression testing and reducing the risk of introducing defects.
Defect Traceability: STM links defects to their corresponding requirements and test cases, making it easier to pinpoint the source of defects, understand their impact, and prioritize fixes.
Project Management: It gives stakeholders a transparent overview of testing progress and requirement coverage, aiding in project tracking, planning, and decision-making.
Compliance and Audit: For projects under regulatory scrutiny, STM demonstrates due diligence and adherence to quality standards by providing auditable evidence of requirement coverage and testing.
Efficiency in Test Maintenance: By clearly linking requirements to test cases, STMs simplify the maintenance of test suites, especially in agile and rapidly changing environments.
Communication: It enhances communication among team members by providing a clear and common understanding of what needs to be tested, the testing scope, and the rationale behind test case selection.
Types of Software Testing Traceability Matrix
Mentioned below are the key types of software testing traceability matrixes:
Forward Traceability
Forward traceability focuses on mapping requirements to test cases. It ensures that every requirement has corresponding test cases designed to validate it. This type of traceability ensures completeness in testing efforts by confirming that all specified functionalities are covered by test cases.
Backward Traceability
Backward traceability involves tracing test cases back to the originating requirements. It ensures that every test case has a clear association with one or more requirements. This type of traceability helps in validating the necessity of each test case and identifying any redundant or obsolete ones.
Bidirectional Traceability
Bidirectional traceability combines both forward and backward traceability, establishing a two-way mapping between requirements and test cases.
It ensures not only that each requirement has corresponding test cases but also that each test case is linked back to the originating requirements. This comprehensive approach provides a thorough understanding of the testing coverage and its alignment with the project requirements.
Vertical Traceability
Vertical traceability extends beyond requirements and test cases to encompass other artifacts throughout the software development lifecycle, such as design documents, code modules, and user manuals.
It enables stakeholders to trace the evolution of various elements across different phases of development, ensuring consistency and coherence in the final product.
Horizontal Traceability
Horizontal traceability focuses on establishing relationships between artifacts within the same development phase. For example, it may involve linking test cases to each other based on shared test objectives or dependencies.
This type of traceability enhances collaboration and coordination among testing teams, ensuring that efforts are synchronized and aligned toward common goals.
Basic Parameters to be included in TM (Traceability Matrix)
Requirement ID
Type and description
Test case no:
Requirement coverage in a number of test cases
Test design status and the execution of the test status
Unit test cases
Integration test cases
System test cases
Risks
UAT (User Acceptance Test) Status
Defects and current status
Tips for Effective Software Testing Traceability
Start Early: Incorporate traceability at the beginning of the project. Early integration ensures that all requirements are captured and traced throughout the project lifecycle.
Maintain Consistency: Use a consistent format for documenting requirements, test cases, and defects. Consistency makes it easier to trace and manage these artifacts as the project evolves.
Automate Where Possible: Utilize tools that support traceability and automate the process of linking requirements, test cases, and defects. Automation reduces manual errors and saves time.
Regular Updates: Keep the traceability matrix updated with changes in requirements, test cases, and defect status. Regular updates ensure the matrix remains an accurate reflection of the project state.
Involve Stakeholders: Engage project stakeholders in the traceability process. Their input can provide additional insights, ensuring comprehensive coverage and alignment with project objectives.
Review and Audit: Periodically review the traceability matrix for completeness and accuracy. Audits can uncover gaps in test coverage or discrepancies in the traceability links.
Use Unique Identifiers: Assign unique identifiers to requirements, test cases, and defects. Unique IDs simplify the process of tracing and reduce confusion.
Prioritize Traceability for Critical Requirements: Focus on establishing clear traceability for high-priority and critical requirements. Ensuring these requirements are thoroughly tested and traced is vital for project success.
Train the Team: Educate your team on the importance of traceability and how to effectively use the traceability matrix. Well-informed team members are more likely to maintain accurate and useful traceability records.
Leverage Traceability for Impact Analysis: Use the traceability matrix to conduct impact analysis for proposed changes. Understanding the relationships between requirements, test cases, and defects helps in assessing the potential impact of changes.
How to Create TM (Traceability Matrix)?
Creating a Traceability Matrix (TM) involves systematically linking project requirements with their corresponding test cases, test results, and any related issues or defects. This ensures that every requirement is adequately tested and accounted for. Here’s a step-by-step guide to creating an effective Traceability Matrix:
Step 1: Identify Your Requirements
Gather Requirements: Start by collecting all project requirements from the requirements documentation. This includes functional, non-functional, and system requirements.
Assign Unique Identifiers: Give each requirement a unique identifier (ID) for easy reference and tracking.
Step 2: Outline Your Test Cases
List Test Cases: Identify all test cases that have been designed to verify the requirements. This includes both automated and manual test cases.
Assign Identifiers to Test Cases: Similar to requirements, assign a unique ID to each test case for easy referencing.
Step 3: Create the Matrix Structure
Choose a Tool: Decide on a tool or software to create the matrix. This can range from simple tools like Microsoft Excel or Google Sheets to more sophisticated test management tools that offer traceability matrix features.
Set Up the Matrix: Create a table with requirements listed on one axis (usually the vertical axis) and the test cases listed on the other (usually the horizontal axis).
Step 4: Map Requirements to Test Cases
Link Test Cases to Requirements: For each requirement, indicate which test cases are intended to verify it. This can be done by placing a mark, such as a checkmark or a test case ID, in the cell where the requirement row and test case column intersect.
Ensure Full Coverage: Make sure every requirement has at least one test case linked to it. If any requirement is not covered, you may need to create additional test cases.
Step 5: Include Additional Information (Optional)
Add Test Results: You can extend the traceability matrix to include the results of each test case (Pass/Fail/Blocked).
Link to Defects: If applicable, include columns to link failed test cases to reported defects or issues, providing a direct trace from requirements to defects.
Step 6: Maintain the TM
Update Regularly: Keep the TM updated with any changes in requirements, additions or modifications of test cases, and updates in test results or defect status.
Review for Completeness: Periodically review the TM to ensure it accurately reflects the current state of the project and all requirements are adequately tested.
Step 7: Utilize the TM for Reporting and Analysis
Analyze Test Coverage: Use the TM to identify any gaps in test coverage and address them.
Support Impact Analysis: Leverage the TM to assess the impact of requirement changes on existing test cases and defects.
Creating and maintaining a Traceability Matrix is a dynamic process that requires ongoing attention throughout the project lifecycle. It’s a powerful tool for ensuring that all project requirements are met and that the final product is of high quality.
A Software Testing Traceability Matrix is a fundamental tool for managing and tracking the testing process in software development projects. By establishing clear correlations between requirements, test cases, and other artifacts, an STM enhances transparency, facilitates impact analysis, and ensures comprehensive test coverage. Understanding the different types of traceability matrices—forward, backward, bidirectional, vertical, and horizontal—empowers teams to tailor their testing approach according to project requirements and objectives. Ultimately, leveraging traceability matrices effectively contributes to delivering high-quality software products that meet stakeholder expectations and industry standards.
CMMI is a process improvement framework that provides organizations with guidelines for developing and refining their processes to improve performance, quality, and efficiency. It offers a structured approach to process improvement by defining a set of best practices that organizations can adopt and tailor to their specific needs.
CMMI can be applied to product and service development, service establishment, management, and delivery. It helps guide process improvement across a project, division, or entire organization.
CMMI models are used to identify and address essential elements of effective product development and maintenance processes.
What are the 5 levels of CMMI?
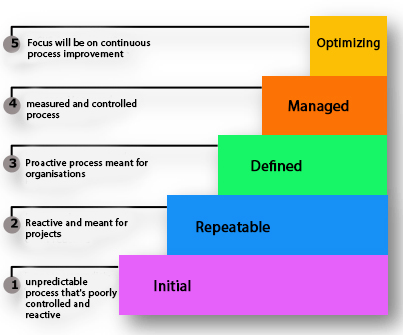
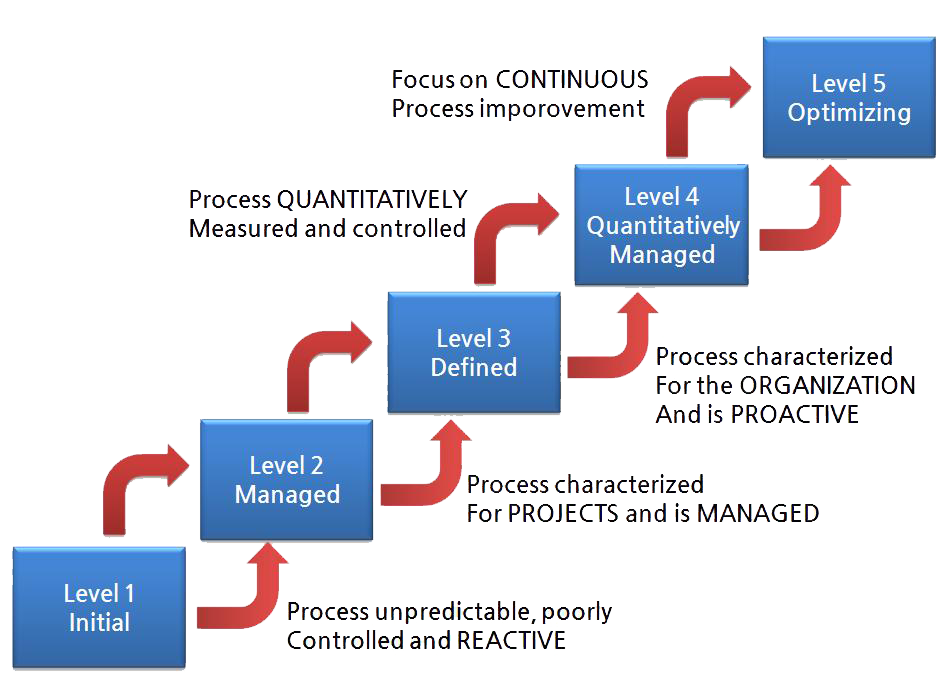
One of the defining features of CMMI is its maturity model, which provides a structured framework for assessing and improving an organization’s process maturity. CMMI defines five maturity levels, each representing a different stage in the organization’s journey toward process improvement and excellence.
Maturity Level 1: Initial
At Level 1, organizations have ad hoc, chaotic processes that are often unpredictable and poorly controlled. There is a lack of defined processes, and success depends on individual effort and heroics. Organizations at Level 1 typically struggle with inconsistency, cost and schedule overruns, and high failure rates.
Maturity Level 2: Managed
At Level 2, organizations begin to establish basic processes, discipline, and control. They define and document standard processes for project management, engineering, and support activities. While processes may still be somewhat reactive, there is a focus on planning, tracking, and ensuring that work is performed according to established procedures.
Maturity Level 3: Defined
At Level 3, organizations have well-defined and standardized processes that are tailored to specific projects and organizational needs. There is a focus on process improvement and optimization, with an emphasis on institutionalizing best practices and lessons learned. Processes are proactive and consistently applied across the organization.
Maturity Level 4: Quantitatively Managed
At Level 4, organizations implement quantitative process management practices to control and manage process performance. They collect and analyze data to understand variation, predict outcomes, and make data-driven decisions. There is a focus on continuous measurement and improvement to achieve predictable and stable process performance.
Maturity Level 5: Optimizing
At Level 5, organizations focus on continuous process improvement and innovation. They actively seek out opportunities to improve processes, products, and services through experimentation, innovation, and organizational learning. There is a culture of excellence and a commitment to driving ongoing improvement and innovation throughout the organization.
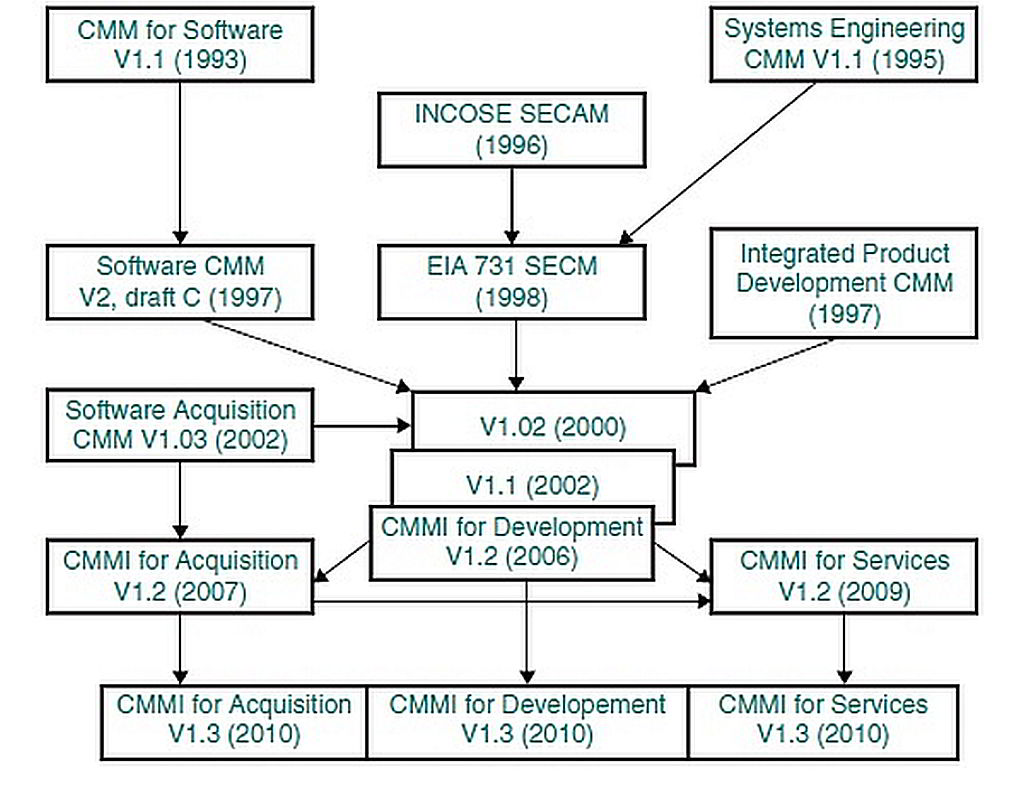
History And Evolution Of CMMI
The Capability Maturity Model Integration (CMMI) is a process-level improvement training and appraisal program that was developed by the Software Engineering Institute (SEI) at Carnegie Mellon University. It is a methodology used to develop and refine an organization’s software development process. The CMMI model provides organizations with the essential elements of effective processes, which will improve their performance.
Early 1980s: The concept of a maturity framework for software development processes began to take shape due to the U.S. Department of Defense’s concerns about the quality of software projects.
1986: The Software Engineering Institute (SEI) was established by the U.S. Department of Defense at Carnegie Mellon University. The SEI aimed to advance software engineering and quality assurance practices.
1987: The SEI introduced the Capability Maturity Model (CMM) for Software (SW-CMM), which outlined five levels of process maturity for software development.
Late 1990s: Recognizing the need for a more integrated approach that included different aspects of software development and organizational functions beyond software engineering, the SEI began developing the CMM Integration (CMMI).
2000: The initial version of CMMI was released, integrating various CMMs into a single improvement framework. This model was designed to be more comprehensive and flexible, allowing for customization to meet the needs of different organizations.
2002: CMMI Version 1.1 was released, providing minor updates and clarifications based on user feedback.
2006: CMMI Version 1.2 was introduced, offering significant improvements in usability, clarity, and consistency.
2010: CMMI Version 1.3 was released, which further refined the model and introduced more flexibility in its application across different areas, including services and development.
2018: CMMI V2.0 was launched, focusing on performance improvement, increasing the model’s relevancy in today’s agile and competitive business environment.
Evolution of CMMI
Key Components of CMMI
CMMI is structured around a set of key components that define its framework and guide process improvement. These components include:
Maturity Levels: CMMI defines five maturity levels that organizations can achieve as they improve their processes. These levels, ranging from Level 1 (Initial) to Level 5 (Optimizing), represent increasing process maturity and capability levels.
Process Areas: CMMI identifies areas organizations should focus on to improve performance. These process areas cover various aspects of project management, engineering, and support functions, such as requirements management, project planning, configuration management, and process improvement.
Goals and Practices: Each process area in CMMI defines specific goals that organizations should strive to achieve and practices they should implement to meet them. These goals and practices serve as benchmarks for evaluating the effectiveness of an organization’s processes and identifying areas for improvement.
Appraisal Method: CMMI provides an appraisal method for evaluating an organization’s adherence to its defined processes and assessing its maturity level. This appraisal method involves a structured assessment process conducted by trained appraisers to determine the organization’s level of process maturity and identify areas for improvement.
Different and Important CMMI Models
CMMI is not a one-size-fits-all approach; instead, it offers multiple models tailored to different domains and organizational needs. These models provide a structured framework for organizations to benchmark their current practices, identify areas for improvement, and establish a roadmap for achieving higher levels of maturity. Some of its key models include:
CMMI for Development (CMMI-DEV)
CMMI-DEV is one of the most widely used CMMI models and is specifically tailored for organizations involved in software and systems development. It provides a comprehensive set of best practices for managing and improving the development lifecycle, from requirements management to product delivery and maintenance. Some key process areas covered in CMMI-DEV include:
Requirements Management
Project Planning
Configuration Management
Supplier Agreement Management
Measurement and Analysis
Process and Product Quality Assurance
Verification and Validation
CMMI for Services (CMMI-SVC)
CMMI-SVC is designed for organizations primarily delivering services, such as consulting firms, IT service providers, and outsourcing companies. It focuses on establishing and improving processes related to service delivery, customer satisfaction, and service management. Its key process areas include:
Service System Development
Service Delivery
Service System Transition
Service System Acquisition
Service System Maintenance
Supplier Agreement Management
Process and Service Delivery Management
CMMI for Acquisition (CMMI-ACQ)
CMMI-ACQ is tailored for organizations involved in acquisition and procurement activities, such as government agencies, defense contractors, and purchasing departments. It provides guidance on managing the acquisition lifecycle, from soliciting requirements to accepting and managing supplier contracts. Its key process areas include:
Acquisition Requirements Development
Acquisition Planning
Acquisition and Technical Management
Acquisition Verification and Validation
Acquisition Evaluation
Supplier Agreement Management
Acquisition Process Management
These are just a few examples of the CMMI models available, each tailored to specific domains and organizational contexts. Organizations can choose the model that best aligns with their business objectives, industry requirements, and process improvement goals.
CMMI is both a process model and a behavioral model. It can be used to manage the logistics of refining performance by creating determinate standards; it can also develop a structure for boosting prolific and effective behavior throughout the system.
To conclude, the CMMI model is a pool of dependable best practices that help improve the quality, standards, and efficiency of software development processes. It includes various process areas like project planning, configuration management, etc.
Why is the Capability Maturity Model Integration (CMMI) Model important?
The CMMI model is being widely used by organizations to streamline and enhance their software development processes. It can also ensure that an organization will be able to complete the software within the given timelines and the allocated resources.
Being developed in the US defence sector, it is being widely trusted and used by organizations worldwide. Here are a few benefits of Capability Maturity Model Integration:
Consistency
CMMI radically enhances project predictability and consistency. It enhances the consistency of the complete process, thereby increasing the steadiness and reliability of the project.
Cost Saving
CMMI assists in early and more effective error detection and hence reduces the cost of rework considerably. It also reduces the cost burden because of schedule variability. It assists in enhanced cost predictability. The overall CMMI model plays a major role in cost savings in the software development process.
Self-Improvement
Organizations using CMMI are easily able to differentiate themselves by naturally improving process management and are becoming more competitive. Adopting CMMI is gradually becoming a benchmark for improved and enhanced process management.
Market demand
CMMI offers a set of industry best practices that enable the teams to reap the maximum benefit of it. Organizations are using it to best meet their customer’s demands. Also, the growing popularity of the process has given it a competitive edge and has established it as a benchmark for more efficient and streamlined software development.
Performance demand
CMMI helps improve the existing organizational processes and standards by analyzing their faults and overcoming them. Hence, CMMI can largely increase the performance of the processes. With extensive competition and high-performance demand, CMMI is gradually becoming a hot favorite of software organizations worldwide.
Process improvement
CMMI consists of a set of best practices or process management. Leveraging CMMI ensures process improvement. It includes 25 different process areas to provide an all-inclusive business process enhancement solution. The process areas in CMMI include 2 kinds of goals, 2 practices, and a large amount of useful data.
How To Implement CMMI In The Testing Process?
Implementing the Capability Maturity Model Integration (CMMI) in the testing process is a strategic approach to enhancing the quality and effectiveness of testing activities within an organization. Here are some key steps to effectively implement CMMI in the testing process:
Understand CMMI Framework: Before embarking on implementation, it’s essential to have a solid understanding of the CMMI framework, including its maturity levels, process areas, goals, and practices relevant to testing activities.
Assess Current Testing Processes: Conduct a thorough assessment of the current testing processes within the organization to identify strengths, weaknesses, and areas for improvement. This assessment will serve as a baseline for measuring progress and identifying specific areas where CMMI practices can be implemented.
Define Testing Goals and Objectives: Clearly define the goals and objectives of testing within the context of the organization’s overall business objectives. Establish measurable targets for improving testing processes, such as increasing test coverage, reducing defects, and improving time-to-market.
Tailor CMMI Practices: Tailor the CMMI practices to suit the organization’s specific testing needs and objectives. Identify relevant process areas and practices from the CMMI framework that can be implemented or adapted to improve testing processes.
Develop Testing Processes: Develop and document standardized testing processes based on the selected CMMI practices. Clearly define roles, responsibilities, workflows, and guidelines for conducting testing activities, including test planning, test design, test execution, defect management, and test reporting.
Implement Best Practices: Implement best practices identified from the CMMI framework to improve testing effectiveness and efficiency. This may include practices related to requirements management, test case development, test automation, peer reviews, and continuous improvement.
Training and Skill Development: Provide training and skill development opportunities for testing professionals to ensure they have the necessary knowledge and expertise to implement CMMI practices effectively. Foster a culture of learning and continuous improvement within the testing team.
Monitor and Measure Progress: Continuously monitor and measure progress towards achieving the defined testing goals and objectives. Use key performance indicators (KPIs) to track metrics such as defect density, test coverage, test execution time, and customer satisfaction.
Iterative Improvement: Continuously review and refine testing processes based on feedback, lessons learned, and changing business needs. Embrace a culture of iterative improvement to drive ongoing enhancements in testing effectiveness and maturity.
SCAMPI or Standard CMMI Appraisal Method for Process Improvement
Standard CMMI Appraisal Method for Process Improvement is a CMMI-endorsed assessment method that is used by CMMI society. This process is clearly defined in the SCAMPI Method Definition Document inside the CMMI appraisal reference documents. It is divided into 3 classes: Class A, B, and C.
SCAMPI A: The most widely used appraisal method is SCAMPI A, which is generally used after multiple processes have been executed. SCAMPI A is used to set benchmarks for organizations and provides official ratings. An on-site, certified lead appraiser performs it.
SCAMPI B: It is used to discover a target CMMI maturity level and is less official than SCAMPI A. It is also used to forecast success for evaluated practices and to evaluate where the business stands in the maturity process.
SCAMPI C: SCAMPI C is smaller, a supplier, and cheaper than SCAMPI A or B. It evaluates a business’s established practices and identifies how to align them with CMMI practices. It can address managerial issues or smaller processes. It is riskier than SCAMPI A and B but is more cost-effective.
Involvement of CMMI In Software Testing?
Implementing CMMI (Capability Maturity Model Integration) in software testing offers numerous benefits and addresses several key needs within the quality assurance and testing processes. Here’s why CMMI is important for software testing:
Enhanced Quality Assurance: CMMI provides a structured framework for quality assurance processes, ensuring that software testing is thorough, systematic, and aligned with the project’s objectives and requirements.
Process Standardization: It helps in standardizing the testing processes across the organization, leading to consistency in how testing is planned, executed, and managed.
Continuous Improvement: CMMI emphasizes continuous process improvement, allowing organizations to regularly evaluate and enhance their testing processes for better efficiency and effectiveness.
Risk Management: Implementing CMMI helps identify potential risks early in the testing phase, enabling timely mitigation strategies to be deployed, which in turn reduces the likelihood of project delays or failures.
Stakeholder Confidence: Achieving a certain CMMI maturity level signals to clients, stakeholders, and regulatory bodies that an organization follows industry-best practices in software testing, thereby boosting their confidence in the product’s quality.
Defect Reduction: By following a structured approach to testing, organizations can significantly reduce the number of defects in the software, leading to higher quality products.
Efficiency and Productivity: CMMI helps streamline the testing process, reducing redundancy and waste, which in turn improves the efficiency and productivity of the testing team.
Benchmarking and Performance Measurement: It provides metrics and benchmarks for evaluating the performance of testing processes, aiding in the identification of areas for improvement.
Competitive Advantage: Organizations that implement CMMI for software testing can gain a competitive edge by demonstrating their commitment to quality and process excellence.
Alignment with Business Objectives: CMMI ensures that testing processes are aligned with the organization’s business objectives, contributing to the overall strategic goals of the company.
How to implement CMMI in the testing process?
The implementation of CMMI to the testing process is very limited. But recently software testing companies have discovered that they can implement CMMI to their testing process to meet the crunched deadlines and to deliver the better-tested product.
Result?
Better quality of deliverables.
Enhanced customer satisfaction.
Assists in cost-saving.
Assures stability and high performance of the deliverables.
Let us now learn how we can implement CMMI to testing process:
Pick up the trained staff members
Create groups for the testing process
Refer to CMMI consultants
Implement testing processes
Pick the apt tools
Implement the CMMI model to the testing process
Gather client’s feedbacks
Enhance the implemented practices.
Test management using CMMI
Identify validation criteria for the integration environment
Create an integration environment
Create verification environment
Define test methods
CMMI tools
There are various CMMI tools available in the market. Choice of these tools depends on the business’s needs. During the Maturity level 2 or 3, you can take the help of your CMMI consultant to design customized tools. You might have to consider the following tools:
Bug tracker
Project and document management
Requirement and design management
Metrics tools
Estimation
Integration application
Decision and analysis tools
Conclusion: CMMI is a powerful framework for process improvement that offers organizations a structured approach to enhancing their performance, quality, and efficiency.
By defining best practices, benchmarking maturity levels, and providing guidance for process improvement, CMMI helps organizations achieve their business objectives and maintain a competitive edge in today’s dynamic marketplace. Whether in software development, healthcare, aerospace, or any other industry, organizations can benefit from adopting CMMI and embracing a culture of continuous improvement and excellence.
FAQs
Application of CMMI Across Industries
While CMMI has its origins in software engineering, its principles and practices are applicable to a wide range of industries and domains. Organizations in sectors such as aerospace, defense, healthcare, finance, automotive, and telecommunications have successfully adopted CMMI to improve their processes and achieve their business objectives.
In the aerospace and defense industry, for example, CMMI is widely used to ensure the safety, reliability, and compliance of complex systems and technologies. In healthcare, CMMI helps organizations enhance patient care, optimize clinical processes, and comply with regulatory requirements. In finance, CMMI enables organizations to manage risks, improve operational efficiency, and deliver innovative products and services to customers.
What is the difference between CMMI level 5 companies and CMMI level 3 companies?
Feature
CMMI Level 3 Companies
CMMI Level 5 Companies
Focus
Defined Processes
Continuous Process Improvement
Processes
Standardized and documented according to the organization’s set of standard processes.
Optimized and continuously improved based on quantitative data to achieve the organization’s business objectives.
Goals
Establish, use, and maintain a set of defined processes for projects.
Focus on process optimization and reducing variability in process performance to improve quality and efficiency.
Quantitative Management
Limited use of quantitative process performance data for process management.
Extensive use of quantitative data to manage and optimize processes.
Innovation
Focus on establishing a set of standard processes and ensuring projects adhere to them.
Emphasis on process innovation and making continuous process improvements based on quantitative performance data.
Performance Management
Projects are managed more qualitatively, with some quantitative performance measures used.
The performance of processes is managed quantitatively, aiming for predictable process performance across the board.
Optimization Techniques
Optimization efforts are not the primary focus.
Active and continuous process optimization efforts, using advanced statistical methods.
Process Standardization
Processes are well-defined and understood across the organization.
Processes are not only well-defined but also subject to continuous improvement efforts to enhance performance.
Capability Improvement
Focus on establishing a consistent process across projects.
Focus on continuous improvement and optimization of processes to achieve higher quality and efficiency.
Outcome Predictability
Projects are more predictable than at lower levels, but there is less emphasis on optimization.
High predictability of project outcomes due to optimized and controlled processes.
CMMI Level 3 is characterized by the organization having standardized and defined processes that are understood and used throughout. At this level, processes are well-documented, and projects are executed according to these processes.
CMMI Level 5, on the other hand, goes beyond establishing standardized processes to focus on continuous process improvement and optimization based on quantitative data. Organizations at Level 5 systematically use data and statistical methods to eliminate inefficiencies and improve process performance, leading to highly predictable and efficient outcomes.
Which is better, CMMI or ISO?
Here’s a brief comparison:
Feature
CMMI
ISO
Focus
Process maturity and improvement
Quality management systems and standardization across various industries
Approach
Maturity levels for process improvement
Set of standards for quality management systems and practices
Industries
Primarily software development, engineering, and services
Broad range of industries including manufacturing, technology, services
Flexibility
Prescriptive to some extent, with a focus on improvement at different maturity levels
Flexible, with principles that can be adapted to any organization size or type
Certification
Appraisal system that evaluates organizational maturity levels
Certification against the standard to demonstrate compliance
Objective
To improve processes in order to enhance performance and quality
To ensure products and services consistently meet customer and regulatory requirements
Global Recognition
Highly recognized in IT and software development sectors
Universally recognized across various sectors
Brief Overview:
CMMI is more focused on the maturity of processes and continuous improvement, making it suitable for organizations looking to enhance their processes systematically, especially in software development, IT, and engineering fields. It provides a structured path for process improvement across different maturity levels.
ISO standards, particularly ISO 9001 for quality management systems, are designed to ensure that organizations meet the needs of customers and other stakeholders while meeting statutory and regulatory requirements related to a product or service. ISO standards are applicable to a wide range of industries.
Which is better?
The choice between CMMI and ISO depends on the organization’s specific needs:
If the goal is to improve and optimize software development or service processes through a maturity framework, CMMI might be more appropriate.
If the goal is to implement a quality management system with broad applicability across various processes and industries, an ISO standard like ISO 9001 would be suitable.
Ultimately, the decision should be based on the organization’s specific goals, the industry in which it operates, and the specific improvements it seeks to achieve. Some organizations choose to implement both CMMI and ISO standards to leverage the strengths of each framework.
What Is CMMI Assessment?
A CMMI (Capability Maturity Model Integration) assessment is a systematic process used to evaluate an organization’s process maturity and adherence to the CMMI model. CMMI is a process and behavioral model that helps organizations streamline process improvement and encourage productive, efficient behaviors that decrease risks in software, product, and service development. The assessment is crucial for organizations aiming to improve their performance, efficiency, and capability to deliver high-quality products and services.
Purpose of CMMI Assessment
Evaluate Process Maturity: To determine the current level of process maturity of the organization against the CMMI levels (ranging from Level 1 to Level 5).
Identify Improvement Areas: To pinpoint strengths and weaknesses in existing processes and identify areas for improvement.
Benchmarking: To compare the organization’s processes against industry best practices and standards.
Certification: For organizations seeking formal recognition of their process maturity level.
Types of CMMI Assessments
Informal Assessments: These are self-assessments conducted internally to get a preliminary understanding of the organization’s alignment with CMMI practices.
Gap Analysis: A more structured form of assessment aimed at identifying the gaps between current processes and CMMI best practices.
Formal Assessments (Appraisals): Conducted by certified CMMI appraisers, formal assessments are thorough and are required for official certification. The Standard CMMI Appraisal Method for Process Improvement (SCAMPI) is the most recognized method, with SCAMPI A being the most rigorous form, leading to official recognition of the organization’s maturity level.
Process of CMMI Assessment
Preparation: Involves selecting the appraisal team, planning the assessment, and gathering necessary documentation and evidence of processes.
Training: Ensuring the appraisal team and organizational members understand CMMI concepts and the appraisal process.
Data Collection: Collecting evidence through document reviews, interviews, and observations to assess adherence to CMMI practices.
Data Validation: Validating the collected information to ensure it accurately reflects the organization’s processes.
Findings and Feedback: Identifying strengths, weaknesses, and areas for improvement. The appraisal team then provides these findings to the organization.
Final Report: The assessment culminates in a final report detailing the organization’s maturity level and recommendations for improvement.
Outcomes of CMMI Assessment
Maturity Level Rating: Organizations are rated on a scale from Level 1 (Initial) to Level 5 (Optimizing), indicating their process maturity.
Improvement Plan: Based on the assessment findings, organizations develop an improvement plan to address identified gaps and weaknesses.
Enhanced Capability: Implementing recommendations from the assessment can lead to improved processes, efficiency, and product quality.
CMMI assessments are valuable for organizations looking to systematically improve their process maturity, enhance performance, and ensure their products and services meet high quality and efficiency standards.
Where To Learn CMMI?
Learning Capability Maturity Model Integration (CMMI) involves understanding its framework, principles, and how to apply them to improve processes within an organization. Here’s a structured approach to learning CMMI:
1. Understand the Basics
Read the CMMI Model: Start with the latest version of the CMMI model, such as CMMI for Development, CMMI for Services, or CMMI for Acquisition, depending on your area of interest.
Official CMMI Website: Visit the CMMI Institute’s website for resources, official guides, and introductory materials.
2. Take Formal Training
CMMI Courses: Enroll in CMMI training courses offered by the CMMI Institute or its authorized training providers. These courses range from introductory to advanced levels.
Workshops and Seminars: Attend workshops and seminars on CMMI. These are often offered at industry conferences and can provide practical insights and networking opportunities.
3. Get Practical Experience
Join a CMMI Project: Gain experience by participating in a project within an organization that is implementing or has implemented CMMI. Hands-on experience is invaluable.
Case Studies: Study case studies of organizations that have successfully implemented CMMI. This can provide practical insights into the challenges and benefits of applying CMMI.
4. Engage with the CMMI Community
Forums and Discussion Groups: Join CMMI forums and discussion groups online. Engaging with the community can provide support, answer questions, and offer advice based on real-world experience.
CMMI Conferences: Attend CMMI conferences to learn from experts, meet practitioners, and stay updated on the latest developments and best practices.
5. Read Books and Articles
CMMI Books: There are several comprehensive books on CMMI that cover its methodology, application, and case studies.
Research Articles: Academic and industry publications can provide deeper insights into specific aspects of CMMI and its implementation.
6. Certification
Consider Certification: After gaining a solid understanding and practical experience, consider pursuing CMMI certification. Becoming a CMMI-certified professional can validate your knowledge and skills.
7. Continuous Learning
Stay Updated: CMMI models and best practices evolve. Stay informed about the latest versions and updates to the CMMI model by regularly visiting the CMMI Institute website and participating in continued education opportunities.
Additional Resources
CMMI Appraisals: Understanding the appraisal process can provide insights into how organizations are evaluated against the CMMI standards. Consider learning about the different types of appraisals (e.g., SCAMPI A, B, C).
Learning CMMI is a journey that combines theoretical knowledge with practical application. Engaging with the material, the community, and real-world projects is key to deeply understanding how to effectively implement CMMI practices in an organizational setting.
Testbytes adopts a unique manual testing methodology that stands out in the industry. Our approach integrates traditional testing techniques with innovative strategies to enhance accuracy and efficiency in identifying bugs and usability concerns.
By prioritizing user-centric scenarios, Testbytes ensures that applications are technically sound, intuitive, and engaging for end-users. This holistic approach underscores the importance of manual testing in delivering high-quality software products in today’s digital landscape.
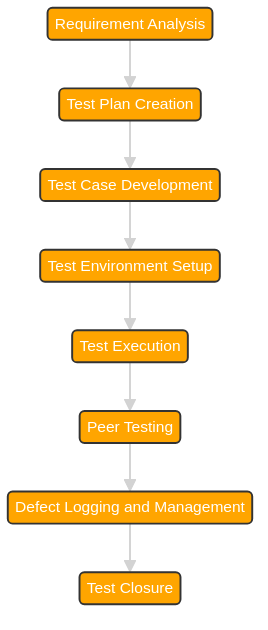
Testbytes Manual Testing Process
Requirement Analysis: The process begins with in-depth software requirements analysis. Testers gain an understanding of the functional and non-functional aspects of the application to ensure comprehensive test coverage.
Test Plan Creation: A test plan is developed based on the requirement analysis. This document outlines the strategy, objectives, schedule, resource allocation, and scope of the testing activities.
Test Case Development: Testers create detailed test cases that include specific conditions under which tests will be executed and the expected results for each condition. This step is crucial for systematic testing and covers various aspects such as functionality, usability, and performance.
Test Environment Setup: The necessary testing environment is set up before executing the test cases. This includes configuring hardware and software requirements that mimic the production environment as closely as possible.
Test Execution: Testers manually execute the test cases and document the outcomes during this phase. They compare the actual and expected results to identify any discrepancies or defects.
Peer Testing (Added Step):
Integration into Workflow: After individual test case execution, peer testing is introduced as an additional step. This involves having another tester, who did not originally write or execute the test case, review and re-run the tests.
Benefits: Peer testing brings a fresh perspective to the testing process, often uncovering issues the original tester might have overlooked. It enhances test coverage and accuracy by leveraging the collective expertise of the testing team.
Execution: Testers can perform peer testing in pairs or small groups, discussing findings and insights collaboratively. This step encourages knowledge sharing and can lead to more innovative testing approaches.
Test Closure: The testing process concludes with a closure report summarizing the testing activities, coverage, defect findings, and an overall assessment of the application’s quality. This report helps stakeholders make informed decisions about the software release.
Our Creative Approach Towards Manual Testing
Creating Charters and Use Cases from Requirements
We begin by translating the project requirements into detailed charters and use cases. This approach ensures a comprehensive understanding of the application’s expected functionality and user interactions. For each use case, identify the actors involved and outline their impact on the system and the expected outcomes. This methodical preparation lays a solid foundation for effective testing.
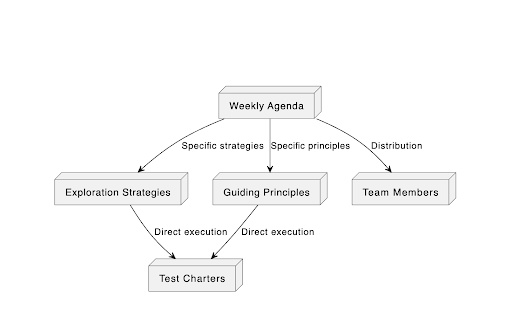
Utilizing Exploration Strategies and Guiding Principles
Similar to simulated user journeys or focused feature investigations, exploration strategies reveal defects that formal testing methods may overlook. Guiding principles, akin to practical wisdom or best practices, assist testers in efficiently traversing the intricate software environments.
Distribute a weekly agenda among the team members, detailing the specific exploration strategies and guiding principles to be applied, promoting a unified approach and cooperative endeavor toward enhancing product quality
Applying IPSOVI in Manual Testing:
The IPSOVI technique offers a structured approach for manual testing, covering every software aspect: Input, Process, Storage, Output, Verification, and Interface.
Testers identify inputs, assess processing logic, examine data storage, validate outputs, check verification mechanisms, and test interfaces for external communication.
This comprehensive method involves creating specific test cases, executing them to observe application behavior, and systematically documenting defects related to IPSOVI components.
Collaboration and review with the development team ensure thorough coverage and improvement.
Applying IPSOVI enhances software evaluation, leading to more reliable, high-quality applications by ensuring all critical areas are rigorously tested and validated.
Enhancing Manual Testing with Visual Validation Tools
Visual Validation Tools revolutionize manual testing by automating the visual comparison of applications across devices and platforms, ensuring UI consistency and enhancing user experience. Here’s how they contribute technically:
Automated Screenshot Comparisons: Quickly identify visual discrepancies across various environments.
Cross-Platform Consistency: Guarantee uniform appearance on different devices and browsers.
Pixel-Perfect Validation: Detect minute visual deviations with precision.
CI/CD Integration: Incorporate visual checks into automated pipelines for early issue detection.
Focus on UX: Free manual testers to concentrate on subjective user experience.
Visual Test Planning: Create intuitive diagrams representing test scenarios, requirements, and strategies.
Enhanced Communication: Facilitate clear, visual communication among team members.
Efficient Test Case Design: Organize and develop test cases by visually mapping out application features and their interactions.
Improved Coverage: Identify gaps in testing by visually assessing coverage areas.
Quick Reference: During testing cycles, use mind maps as a dynamic, easy-to-navigate reference tool.
How Do We Do Manual Testing Ticket Management:
Effective ticket management is crucial in manual testing to streamline issue tracking, resolution, and communication. By leveraging specialized tools and techniques, teams can enhance productivity and ensure software quality. Here’s how to approach ticket management in manual testing:
Centralized Ticketing System
Tool Integration: Adopt a centralized ticketing system like JIRA, Trello, or Asana to log, track, and manage defects. These platforms provide a unified view of all issues, facilitating better prioritization and assignment.
Features Utilization: Use tagging, statuses, and filters to categorize tickets by severity, type, and responsibility. This helps in quick navigation and the management of tickets.
Effective Ticket Logging
Detailed Reports: Ensure each ticket includes comprehensive details like reproduction steps, expected vs. actual results, and environment specifics. Attachments such as screenshots or videos can provide additional context.
Standardization: Develop a template or guideline for reporting issues to maintain consistency and clarity in ticket descriptions.
Severity Levels: Define and use severity levels (Critical, High, Medium, Low) to prioritize issue resolution based on impact and urgency.
Triage Meetings: Conduct regular triage meetings to review, assign, and re-prioritize tickets, ensuring that critical issues are addressed promptly.
Team Collaboration and Communication
Cross-functional coordination: Facilitate collaboration between testers, developers, and project managers within the ticketing system through comments, updates, and notifications.
Feedback Loop: Implement a feedback loop for resolved tickets, where testers verify fixes and provide feedback, ensuring issues are thoroughly addressed before closure.
Continuous Improvement
Analytics and Reporting: The ticketing system’s tools generate reports on common issues, resolution times, and testing progress. This data can inform process improvements and training needs
Manual Testing Ticket Management: Tools and Techniques
Effective ticket management is crucial in manual testing to streamline issue tracking, resolution, and communication. By leveraging specialized tools and techniques, teams can enhance productivity and ensure software quality. Here’s how to approach ticket management in manual testing:
Centralized Ticketing System
Tool Integration: Adopt a centralized ticketing system like JIRA, Trello, or Asana to log, track, and manage defects. These platforms provide a unified view of all issues, facilitating better prioritization and assignment.
Features Utilization: Use tagging, statuses, and filters to categorize tickets by severity, type, and responsibility. This helps in quick navigation and management of tickets.
Effective Ticket Logging
Detailed Reports: Ensure each ticket includes comprehensive details like reproduction steps, expected vs. actual results, and environment specifics. Attachments such as screenshots or videos can provide additional context.
Standardization: Develop a template or guideline for reporting issues to maintain consistency and clarity in ticket descriptions.
Prioritization and Triage
Severity Levels: Define and use severity levels (Critical, High, Medium, Low) to prioritize issue resolution based on impact and urgency.
Triage Meetings: Conduct regular triage meetings to review, assign, and re-prioritize tickets, ensuring that critical issues are addressed promptly.
Team Collaboration and Communication
Cross-functional coordination: Facilitate collaboration between testers, developers, and project managers within the ticketing system through comments, updates, and notifications.
Feedback Loop: Implement a feedback loop for resolved tickets, where testers verify fixes and provide feedback, ensuring issues are thoroughly addressed before closure.
Continuous Improvement
Analytics and Reporting: The ticketing system’s tools generate reports on common issues, resolution times, and testing progress. This data can inform process improvements and training needs.
Conclusion
Our methodologies are not just procedures; they are the blueprint for success in a digital age defined by user expectations and technological advancements. As we navigate the complexities of software development, our focus remains unwavering: to deliver products that exceed expectations, foster engagement, and drive success.
Don’t let quality be an afterthought in your software development process. Choose Testbytes for manual testing services prioritizing precision, user experience, and efficiency.
Are you ready to dive deeply into the exciting world of mobile application testing with Appium but feeling a tad overwhelmed about where to begin? You’ve hit the jackpot by landing here!
Consider this guide your go-to pal, guiding you through the ins and outs of setting up Appium Server and Node.js on your Windows machine, and guess what? We’re doing it all using the charm of the Command Line.
That’s right—we’re skipping the maze of GUI setups in favor of some good old-fashioned command-line wizardry.
We’re here to simplify the whole process into easy-to-follow steps that even those new to the game can tackle without breaking a sweat.
Whether you’re preparing to put your innovative app through its paces or aiming to make your testing workflow as smooth as silk, getting Appium and Node.js up and running on your system is your starting line.
So, why not pour yourself a cup of your preferred drink, and let’s tackle this setup together, one command at a time? Stick with us, and before you know it, you’ll be all set to dive into your testing quests with gusto!
Let’s understand How the Architecture of Appium Works
Appium is basically an HTTP server. This server is written in Node.js and it helps to create multiple web Driver session against different platforms. This Appium server receives request from java client which listens for commands from Appium Server.
Let’s have a look at Appium in detail with this video representation.
The way of working of Appium server is almost the same as in selenium RC. The way iOS and android interact with server is quite different. In case of Ios, an Appium proxy commands to a UIAutomation Script. This script would be running in MAC environment.
This application in Ios is called Instruments. In case of android almost everything is same where the server proxy commands to a UIAutomator test case. UIAutomator is a native UI Automation framework which supports junit test cases.
Now let us look at the command line way in which you can install Appium Server on your windows machine.
Installing Appium Server and Node on Windows
Mentioned below is a step-by-step guide on how to install Appium Server and Node on a Windows machine using the command line:
Step #1: Install Node.js
Open a command prompt by pressing Win + R, typing cmd, and pressing Enter.
Check if Node.js is already installed by running the following commands:
Node -v npm -v
If Node.js is not installed, download the latest version from the official website and follow the installation instructions.
Step #2: Install Appium Server
Open the command prompt and install Appium globally using npm:
npm install -g appium
Verify the installation by checking the Appium version:
appium -v
Step #3: Install Appium Dependencies for Android
If you plan to automate Android applications, you must install Appium dependencies for Android. Follow these steps:
Install the Android SDK:
Download Android Studio from the official website.
Run the installer and follow the on-screen instructions.
Open Android Studio, go to “Configure” > “SDK Manager,” and install the necessary SDK components.
Set the ANDROID_HOME environment variable:
Open the System Properties window by right-clicking on “This PC” or “Computer” and selecting “Properties.”
Click on “Advanced System settings” > “Environment Variables.”
Add a new system variable named ANDROID_HOME and the path to the Android SDK as the variable value.
Add Android tools to the system PATH:
Edit the Path variable in the System Variables section and add the following paths:
Step #4: Install Appium Dependencies for iOS (Mac only)
If you plan to automate iOS applications, you must install Appium dependencies for iOS. Follow these steps:
Install Xcode from the Mac App Store.
Install Appium dependencies using npm:
npm install -g appium-doctor
Run appium-doctor to check for any missing dependencies:
Follow the instructions provided by Appium-doctor to install any missing dependencies.
Step #5: Start Appium Server
Open a command prompt and start the Appium server:
Appium will start, and you’ll see logs indicating that the server is listening on a specific address and port.
Note: If you encounter any issues related to ports being in use, you can specify a different port using the –port option:
bashCopy code
appium –port 4725
Step 6: Test Appium Installation
After installing Appium successfully, it is time to test the installation by running a simple test script. Create a new file with a .js extension (e.g., test.js) and add the following code:
Replace the placeholder values (YOUR_ANDROID_VERSION, YOUR_DEVICE_NAME, PATH_TO_YOUR_APK, and ID_OR_XPATH_OF_AN_ELEMENT) with appropriate values for your Android device and application.
Run the test script using the following command:
node your_test_script.js
If everything is set up correctly, Appium will launch your application on the specified device, interact with the specified element, and close the session.
Why Appium?
If you are wondering why Appium is a preferred choice for mobile testing, here are some of the common reasons:
Cross-Platform Compatibility: Appium supports Android and iOS, allowing you to write tests for both platforms using a single codebase.
Programming Language Agnostic: You can write Appium tests in multiple programming languages, including Java, Python, C#, and more.
Open Source: Because Appium is open source, a worldwide community of developers is constantly improving it. This ensures that it stays up-to-date with the latest mobile technologies.
No App Modification: Appium tests your app in the same way that users use it, without modifying the app. This provides a more realistic testing environment.
Prerequisites of Installing Appium
Before installing Appium, make sure you have the following prerequisites:
Java Development Kit (JDK): Appium is built on Java, so you must install the JDK on your machine. You can download the latest JDK version from the official Oracle website.
Android Studio: If you plan to automate Android applications, install Android Studio to set up the necessary Android dependencies. Download Android Studio from the official website.
Xcode: For automating iOS applications, you’ll need Xcode. Install it from the Mac App Store if you’re using a Mac.
Node.js: Appium is built on Node.js, so you need to have Node.js installed. Download the latest version from the official Node.js website.
Conclusion
Hence, now you got to know that installation of Appium is damn easy with the command line rather than doing it manually. NPM is a wonderful package installer and makes your task easier. Install it and start the automation. All the best!!
FAQs
Why is Appium important in iOS and Android App testing? Is it because of its architecture?
Appium plays a pivotal role in iOS and Android app testing, primarily due to its unique architecture, which allows for seamless cross-platform testing.
This tool operates on a client-server model, enabling testers to write tests in their preferred language using standard APIs. Its significance lies in the ability to test native, hybrid, and mobile web apps without needing to alter the app code.
By supporting Android and iOS platforms, Appium facilitates a more efficient testing process, reducing the time and resources spent on writing and maintaining separate tests for each platform.
This approach not only enhances productivity but also ensures consistency in testing across different environments.
How Appium Architecture Works?
Test Script Initialization:
The developer writes a test script using their preferred programming language and the corresponding Appium client library.
Appium Server Startup:
The developer starts the Appium Server, specifying the desired capabilities such as the platform (Android or iOS), device details, application path, and other relevant configurations.
Connection Establishment:
The Appium client library in the test script initiates a connection to the Appium Server by providing the server’s address (IP and port) and the desired capabilities for the test session.
WebDriver Commands:
The test script, through the Appium client, sends WebDriver commands to the Appium Server. These commands include actions like tapping on an element, entering text, or navigating between screens.
Translation and Execution:
The Appium Server translates the WebDriver commands into corresponding actions supported by the mobile platform. For example, a WebDriver “click” command might translate to a tap on the screen.
Interaction with Mobile Device:
The translated commands are then executed on the mobile device, interacting with the application just as a user would. This interaction includes gestures, input, and navigation.
Response Handling:
The Appium Server captures the responses from the mobile device and communicates them back to the Appium client. These responses may include success or failure indicators, as well as any relevant data.
Test Script Completion:
The test script processes the responses received from the Appium Server, making decisions based on the success or failure of each command. The script may also include assertions to verify the expected behavior of the application.
Session Closure:
Once the test script completes its execution, the Appium Server closes the WebDriver session, releasing the resources associated with the test session.
How To Start the Appium server in CMD?
To start the Appium server via the Command Prompt (CMD) on Windows or Terminal on macOS/Linux, you first need to have Appium installed. If you haven’t installed Appium, you can install it using Node.js’s package manager (npm) with the following command:
npm install -g appium
Once Appium is installed, you can start the server by opening CMD or Terminal and running the following command:
appium
This command starts the Appium server with the default settings, typically listening on port 4723. If you want to specify a different port or customize other settings, you can use various flags. For example, to start the Appium server on port 5000, you can use:
appium -p 5000
For more advanced configurations and options, you can refer to the official Appium documentation or use the appium --help command to see a list of all available command-line options.
Is node js mandatory for Appium?
Yes, Node.js is mandatory for Appium. Appium is built on the Node.js platform and uses JavaScript for its execution. The installation of Appium itself is typically managed through npm (Node Package Manager), which is a part of Node.js.
Therefore, having Node.js installed on your system is a prerequisite for installing and running Appium for automated mobile application testing.
How to install Appium using npm on Windows?
To install Appium on Windows using npm, follow these steps:
Open Command Prompt as an administrator.
Ensure Node.js is installed by running node -v. If not installed, download and install it from nodejs.org.
Install Appium by executing npm install -g appium.
Verify the installation with appium -v.
This installs Appium globally on your Windows system, making it accessible from any command prompt.
How do I run an Appium server?
To run an Appium server, follow these simple steps:
Open your command prompt or terminal.
Type appium and press Enter.
This command starts the Appium server with default settings. You can customize its behavior using various flags (e.g., appium --port 4723 to specify a different port).
How to install node on Windows Terminal?
To install Node.js on Windows using Windows Terminal, follow these steps:
Visit the official Node.js website (nodejs.org) to download the Windows installer.
Choose the version you need (LTS for stability or Current for the latest features).
Once downloaded, run the installer (.msi file) and follow the installation prompts. Ensure to select the option to add Node.js to the PATH if asked.
After installation, open Windows Terminal.
Verify the installation by running node -v and npm -v to check Node.js and npm versions, respectively.
This process installs Node.js and npm (Node Package Manager), enabling you to run Node.js applications and install packages globally.
How to install node test?
To verify that Node.js is installed on your system:
Open your terminal or command prompt.
Type node -v and press Enter. This command will show the installed Node.js version, indicating that Node.js is installed.
You can also check npm (Node Package Manager), which comes with Node.js, by typing npm -v and press Enter. This will display the installed npm version.
Installing a Package Named “test”
If there’s a specific npm package you’re looking to install named “test” (this is a hypothetical scenario as there might not be a package with this exact name meant for general use), you can install it using npm with the following command:
npm install test
For installing any package for development purposes and saving it to your project’s package.json file, you can use:
npm install test –save-dev
Replace “test” with the package name you intend to install. If you’re experimenting with or learning about npm packages, you can replace “test” with a real package name, like “express” for a web server framework or “jest” for testing.
Note
If you’re new to Node.js and npm, it’s worth mentioning that “test” is often used in documentation and tutorials as a placeholder for the actual package name you wish to install or the command to run tests defined in a package.json file. To run tests defined in your package’s package.json, you would use:
npm test
This command runs the test script specified in the “scripts” section of package.json.
Video games hold a substantial share of the software market, creating a constant demand for innovation and complexity in the gaming industry.
Game development involves a collaborative effort among various professionals, including game designers, writers, visual artists, sound designers, and, crucially, game testers.
Therefore, it is important to be aware of the comprehensive process of game development and the pivotal role played by game testing in the entire process. Understanding the intricate phases of game development and the strategic implementation of testing strategies is essential for delivering a flawless gaming experience to users.
Game Development Process: Step-by-Step
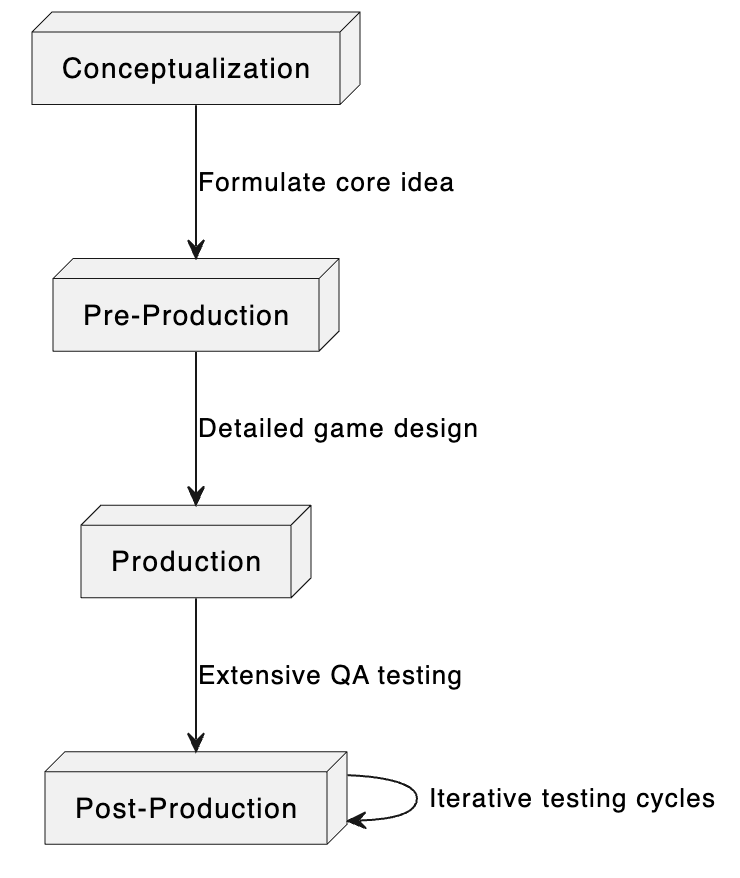
Phase #1
Conceptualization The game development journey starts with conceptualizing the game, involving brainstorming to formulate the core idea, theme, and unique selling points.
Existing intellectual properties in various media or original concepts might serve as inspiration for this fundamental idea. This stage is critical for aligning the game’s vision across the development team and stakeholders.
Phase #2
Pre-Production In pre-production, detailed game design documents (GDDs) are prepared, outlining gameplay mechanics, narratives, character designs, and environment concepts.
This phase sees the creation of technical prototypes to validate gameplay ideas and mechanics.
Storyboards and concept art are developed to visually represent game narratives, environments, and characters, facilitating a shared understanding and vision among the creative team.
Phase #3
Production The production phase marks the bulk of game asset creation and coding. It involves the detailed development of game levels, character models, textures, animations, and game-specific logic.
Programming teams work on developing the game engine (if custom), integrating third-party libraries, and coding game mechanics, physics, AI behavior, and user interface elements.
This phase requires rigorous coordination between artists, designers, and programmers to ensure consistency and adherence to the game’s vision and design documents.
Phase #4
Post-Production Post-production focuses on refining the game through extensive QA testing. The game, now in its alpha state, is scrutinized for bugs, performance issues, and gameplay imbalances.
Feedback from alpha testing leads to adjustments and bug fixes, progressing the game to a beta state for wider testing, including compatibility testing and compliance checks with platform-specific standards.
This phase is iterative, with multiple testing cycles, feedback, and refinement until the game meets quality and compliance benchmarks for launch readiness.
Marketing
Marketing Simultaneously with late development stages or post-production, the marketing phase ramps up to generate anticipation and demand. This includes creating promotional materials, engaging with media and influencers, and showcasing the game at industry expos.
Marketing strategies are tailored based on target demographics and platforms, focusing on highlighting the game’s features and unique aspects.
For indie developers or smaller studios, this phase might also involve direct community engagement through social media and crowdfunding platforms to build a supportive player base pre-launch.
What do you think the Game Testing Stage is intended to reveal?
The testing stage is a critical component of the game development process.
In addition, revealing potential bugs in the program—for example, in-game objects not running legitimately—. It should likewise check for irregularities in the fictional structure of the game, consistency (and culmination) of artwork, and additionally be testing the gameplay—is the game connecting with, too simple, or too hard, for instance?
Who is a Game Tester?
Game testers play a pivotal role in ensuring the quality of a game before its final release. They thoroughly test games on various platforms, including consoles and desktops, to identify bugs and defects. Without game testers, games could suffer from numerous issues, potentially damaging the reputation of the development company.
What are the requirements to Become a Game Tester
Attentive behavior
Understanding of video game console controllers
Awareness of SDLC
Good communication skills
Great writing skills
Primary computer programming aptitudes
Central Skills
Principles and perception
Analytical thinking
Knowledge of computer hardware parts
Investigating and exploring aptitudes
Versatility to tedious and redundant obligations
Typically, gaming companies don’t have a specific degree requirement. The skills are quite often tested at the interview. Still, education plays a significant role in game testing. The titans of the gaming industry prefer to hire employees with degrees in:
software development
computer programming
Computer science or some other technical field.
What does a Games Tester do?
Some of the key responsibilities of a game tester include the following:
Be repetitive and unpredictable to identify and break down potential issues.
Test different versions of games on various platforms.
Explore specific areas of the game and test all available options.
Play through different modes and characters to reveal glitches.
Report errors, spelling mistakes, and language issues.
Document bug reports in a bug-tracking system.
Understand the difference between reporting bugs and reporting features.
Test the game repeatedly in various conditions to ensure stability.
Analyze new game versions to check if previous bugs have been addressed.
The process involved in Game Testing
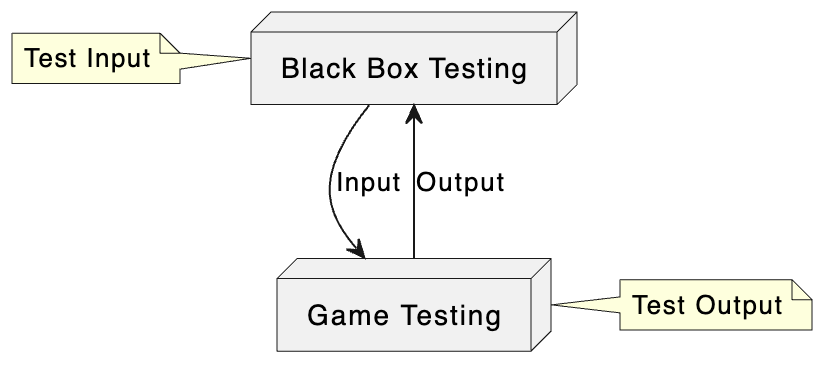
By far, we know that testing has an imperative function in Game development. A game is tested at the distinctive level of its development procedure. Usually, in the software engineering method, the Software test design document contains all the data about testing the product. However, game testing is not quite the same as testing the software.
There are numerous steps included other than test cases for a game, generally in light of the fact that almost all game testing is black box testing. The developers generally don’t test their own games, nor do they have time to test them completely, nor is it a wise idea to test games by themselves.
Before presenting their code for integration with the rest of the game or as third-party code for use by other game developers, game developers only test small portions of it.
6 Steps of the game testing are as follows:
Plan and Outline the Test – Although quite a bit of this plan was done before in the programming test plan document, still with each new prototype of the game, this document should be returned to upgrade any adjustments in the test cases, specifications, and new setup support. The game tester ought to guarantee that no new issues are presented.
Set up the Test – All the teams should upgrade their code, documents, tests, and test environment and regulate it with each other. The test development group should mark the bugs settled and the test time taken to confirm them.
Play out the Test – Run the test suit once more. In the event that any bug is discovered, test around the error to ensure that the bug is real.
Report the Outcomes – Complete insights about the bugs are reported.
Repair the Bug – The game testing team engages in this step by uncovering the bug to the development team and giving direct testing to track the bug.
Return to Stage 1 and Retest – A new build is delivered after one cycle.
The game test is performed in a structured way. Regardless of the size of the game and the time required for creating the game, all game testing should follow the fundamental structure.
Parts of Games That Undergo Testing
the menu and the menu functions
art (character model, terrain or world, texture, objects, crowd, etc.)
animation (the likeness and quality of the realism, movement, and frame rate)
music
audio and the sound effects (in connection with the facial animation, e.g., the animation series and lip sync)
any movie clips
camera (zoom in and out, cinematic view, replay)
title screens
game logic and flow
world/scene/level
the action properties
the player’s properties
the situation to advance to the subsequent level (what are the commands?)
the application of environmental objects
the object/event triggers
increasing levels of difficulty
the scoring
the AI logic (for both offensive play and defensive play; player positioning and movement)
statistics (pre-game and in-game, like high score and player statistics)
SFX – Special effect
NIS – Non-Interactive Sequence
the gamepad
the vibration/shock effect of the gamepad
the usability of the button functions
the application of multi-button actions (also known as button mashing)
the use of analog and digital mode
legal text
the game options (game start or menu selection, game pause, pause menu options, hints, and scrolling, such as driving by the accessible choices on the screen, so forth.)
Types of Game testing that need to be followed in the Testing Process
The game development cycle on all platforms has phases that are known as milestones. The milestones show that the game is at a specific level of development. The milestones, usually, are first playable, alpha phase, beta phase, gold phase, and post-release phase. The initial playable version is related to that of a demo version; here, the feel of the game is perceived and evaluated.
In a simplistic view, testing is recognizing bugs found in the game so the issue can be resolved. There are diverse types of tests that can be classified as black-box testing and clear-box testing. Their testing goal and general procedures are trivialities (e.g., test planning, test design, testing execution, regression testing, and bug reporting), yet their aim stresses various parts of the game. Let’s know what those techniques are:
Black Box Testing
It centers on the playability or functional parts of the game. For instance, testing the UI (e.g., the utilization of buttons and the selection menus), the “look and feel” (e.g., the designs and animation), and the real gameplay.
For Black Box testing, the game tester must know how to play the game, the utilization of the gamepad, and the game flow and the rules.
Clear Box Testing
It centers on the design and integration parts of the game software. For instance, the utilization of a database, pipelines, the integration and reconciliation of game segments like the AI engine, the rendering engine, sound, etc.
For Clear Box testing, the game tester must comprehend what coding is. The software tester employs a run-time troubleshooting environment, encourages the code or pieces of code with input, i.e., setting variables, data, and so forth, and interprets the test outcome.
Functional Testing
Its purpose is likely to be to recognize deviations from functional necessities. It comes down to driving through the game repeatedly to distinguish issues and the environments in which they can be rectified.
Stress/Load Testing
When testing the games, it is fitting to create conditions that require a huge computational load. So, the game tester can check system execution in an unpleasant condition. With load testing, it is less demanding to see and fix possibly perilous code segments in time. Test for odd circumstances, like loading a game with no memory card, running the game for 48 hours, and checking how the game reacts.
Combinatorial Testing
This type of testing is a process of experimental design that is applied for commercial software testing and to create test cases. Using combinatorial testing for game testing improves test performance efficiency, produces high-grade quality, decreases cost, and ensures reliable phase containment.
Every conceivable sequence of values of the parameters is incorporated into this test. Here the parameters are chosen from game elements, functions, events, character attributes, play options, settings, customization choices, and so forth.
Much of the time, game programming is performed on laptops or PCs. Notwithstanding, numerous games can be intended for different devices: smartphones, game consoles, communicators, and so forth. Game development is performed on the test systems of these gadgets, yet they vary greatly from the original. In this way, later on, a few challenges may arise when beginning the game on the original gadget.
Plus, one should give careful consideration to the authorization of programming. In case of any aberrations, the game can be returned for correction, which takes additional time and a loss of funds. So, it is vital to check whether the game fulfills the necessities of the devices.
Feature Testing
This testing is performed to confirm the smooth functioning of the features in the game. For covering discrete features, detailed test cases are more appropriate. Task-based experiments require a predominant level of detail. At the point when there is an assortment of features for various player statuses, test frameworks get convenient and beneficial.
Critical Path Test
Critical path testing is a procedure to recognize the critical paths in the game. This type of testing technique uncovers the conditions that cause disappointment.
The games are regularly converted into the languages of the nations where they are assumed to be made available on the market. It happens that translators can’t give a totally exact interpretation, which would be completely reliable with the game events. Indeed, even if interpreted appropriately, it may not indicate the circumstances and abrade on the ears of the local speakers. Thus, after localization, it is helpful to test the game by natives of those nations where the ultimate game would be available.
Smoke Testing
It is performed to test a new CD burn. The name Smoke Testing originates from the engineering lab testing new automobile engines. Before a new engine is taken for road testing, the engineers would just begin the engine and check whether it runs. In the event that smoke turns out from the motor, they would know promptly that a few sections don’t work appropriately.
Much like making another form, the game tester will essentially run the game; if it continues crashing, the tester will know a few sections are incorrect.
Multiplayer testing is an entirely different beast in itself. Numerous players, all the while, associate with the game world, with game servers, with PC-controlled opponents, and with each other. Such huge numbers can turn out badly.
Furthermore, it regularly requires a complete team of game testers, various troublesome risk-based decisions to make, and the need to invest boundless amounts of time and energy in testing distinctive situations.
A comprehension of multiplayer game configuration and how to test proficiently as a group is required for this sort of game testing technique.
Sound Testing
Sound testing is common in all products that make some sort of sound or play media. But games have a one of a kind feature that other software does not need to consider on a similar level. Game music must include the user in the game and upgrade the gameplay. Not only should the sound play without missing or shuttering components, but it ought to likewise add to the gameplay. This demands broad sound aptitude and a particular comprehension of game audio. Quite a specific master of domain awareness.
Ad-hoc Testing
Ad-hoc testing is likewise, at times, alluded to as general testing. It is a less organized test. Ad hoc testing enables the game tester to investigate paths in view of their instinct. There are two types of ad hoc testing.
In the first place, there is free testing, which is a testing game with no arrangement or documentation. The other is direct testing, which is a solitary test performed spontaneously to answer a particular issue.
Test Flow Diagrams
Test flow diagrams are practiced to produce models depicting game behavior from the player’s point of view. Game testing involves examining the model along every potential path to examine unexpected game situations. A test Flow diagram is a formal way to test design. Since it is graphical in nature, it is simple to review, investigate, and give feedback on the test designs.
Complex test flow diagrams can interpret compact features, but typically, small test flow diagrams are preferable.
Test Trees
A test tree is a usability procedure for sorting out test cases that supports selecting an appropriate set of tests for a given arrangement of code changes. Test Tree enhances the general comprehension of complex game traits and deals with conceivably complicated functions, particularly when these functions connect with other game principles, elements, and functions.
The test tree is developed by disintegrating the element into a subset until the bottom nodes distinguish elements to utilize or spec to perform while game testing.
What is Bug Hunting?
Bug Hunting is a regular practice for some game testing companies worldwide, yet some test administrators wrongly feel they go Hunting when their game testers casually play with the application, keeping in mind the end goal of discovering “border case errors.”. Bug Hunts are Informal Testing activities; this should not be mixed up with playing with the system without a reason or goal.
Bug Hunts should be directed as team activities.
Bug Hunts are there so as to include non-testers and find less-ordinary bugs.
Bug Hunts require the system to be steady to be helpful.
Thus, to accomplish something (and not waste your time and efforts!!) on performing these Bug Hunts, you have to follow a particular procedure, execute planning and preparation activities, as well as observe and control the procedure all through its execution.
Types of Game Bugs in Game Testing
Crash
A crash bug is a severe issue that freezes or completely shuts down the game, often leading to a “Crash to Desktop” (CTD) scenario. Executing particular commands, loading into new areas, or coming across specific enemies are just a few examples of the in-game actions that can cause these bugs. Crashes are considered high-priority bugs, and game developers prioritize eliminating them to ensure a smooth gaming experience..
General
General bugs are issues that do not halt game progression but still disrupt the gameplay experience. For example, a character disappearing unexpectedly, though not affecting the main storyline, can be classified as a general bug.
While these bugs may not be game-breaking, they can lead to player frustration and impact the game’s overall quality.
Minor
Minor bugs are small issues that have a minimal impact on gameplay but still need attention.
Examples include a character’s mouth not moving during dialogue or other subtle graphical glitches. Although minor bugs may not be prioritized, they contribute to the overall polish and professionalism of the game.
Severe
Severe bugs hinder the player’s progress without causing a game crash. These bugs can range from a disappearing character crucial for advancing a quest to a malfunctioning door preventing access to the next game area.
While not as critical as crash bugs, severe bugs are significant and must be addressed to maintain a coherent gaming experience.
Graphics
Graphics bugs primarily involve issues with the visual elements of the game, including texture errors and map imperfections. An example of a graphics bug is an incorrect ground texture applied to a door.
Addressing graphics bugs is essential for maintaining the aesthetic appeal and immersion of the game.
Sound
Sound bugs relate to issues with in-game audio, such as incorrect timing or missing music cues. These bugs can occur anywhere in the game, from the main menu to the closing credits.
Sound bugs can disrupt the game’s overall atmosphere and must be corrected for a complete gaming experience.
Algorithm Bugs
Algorithm bugs occur at collision detection points within the game. Incorrectly placed walls or floors can cause players to leave the intended map boundaries, indicating a failure in collision detection.
Fixing algorithm bugs is crucial to prevent players from getting stuck or experiencing unintended interactions within the game environment.
Fatal
Fatal bugs are game-breaking issues that prevent players from advancing further due to critical functionality failures.
An example is a jumping bug where a player needs to jump to progress, but the jumping mechanism fails, hindering progression. Fatal bugs demand immediate attention to ensure the game works correctly at all levels.
Configuration Trigger
Configuration trigger bugs occur when game settings have not been adequately tested, leading to failures.
These bugs can affect graphics and sound settings, potentially causing textures to disappear or altering audio configurations.
Configuration trigger bugs are uncommon in well-known games made by skilled programmers, but they can appear in online games that are downloadable.
How to Write a Bug Report Effectively?
A career as a computer games tester isn’t all fun and buffoonery. When you find a bug, you have to report it. Composing a game error report may look like a basic assignment. However, it is accompanied by a lot of duties. This is a correspondence from which other individuals will construct a plan of action with respect to game improvement. Those activities frequently incorporate submitting costly assets to settle the issue.
Here are a few tips for creating a bug report as a game tester. An adequate game bug report contains:
Title or Subject –
Compile the critical elements of the issue.
A basic overview of what, where, why, when, and how it is generated, featuring the most vital contemplations.
Shows how extreme it is.
Others utilize it to design a course of action; thus, it should be comprehended at once.
Classification
A concise depiction of what, where, why, when, and how is generated with each and every detail.
Here you ought to portray precisely “everything” about the issues.
Classify it in such a manner that the reader can follow it entirely from the classification and comprehend totally what is going on.
You may utilize industry-standard language to help precisely depict the issue.
Generation Steps –
Well-ordered guide on the best way to replicate the issue.
You ought to consider the individual heeding this guide has never observed the product and may even be new to the platform. Show them correctly what to do to reproduce the issue.
Abstain from industry-standard language to guarantee the guide can be trailed by anybody.
Extra Information –
Give additional helpful data.
Assessment and theory, you can discuss how this bug may influence the player and conceivable inevitabilities created by the issue (such as bad customer reviews)
Conclusions about different ways this may influence the game.
(Note: This segment is unnecessary in creating a report, though.)
What are the Opportunities as a Game Tester
Game-producing organizations, to achieve more profits, are always contracting computer game testers. So, finding the right source for the organization, whoever is hiring, is absolutely necessary. There are essentially three sorts of game testers. These are:
Freelance Game Tester: The game testers who are freelancing are all around experienced and search out organizations that outsource forthcoming games to test the games. These testers are regularly the backbone of the game testing method. These game testers are usually contracted on a project-to-project basis. These testers are mostly used for black-box testing. Promptness, clarity, and communication in writing are critical attributes you should have.
Full-Time Corporate Video Game Tester: There are potential people for being hired by big game-producing companies for full-time. For individuals who have a passion for playing games, no other activity can be as fascinating as this. Furthermore, the main capability required for this sort of employment is experience. No degrees or certificates are mandatory.
Second-Party Testers: These game testers work on the testing team of a secondary or subsidiary organization under a bigger company. The second-party game testers can be either fully employed or contracted. Because of their close association with game developers, they frequently obtain access to more advanced tools. This usually results in a powerful focus on test cases and white-box testing. Most second-party testers are at least somewhat experienced in the game testing process.
Further, if you are looking forward to embracing video game testing as your profession, you must become more acquainted with the levels of game testing that are in charge of testing distinctive parts of the game. Quality assurance, Alpha testing, and Beta testing are the three primary kinds of game testing processes you will dependably need to begin with when you select this field as a profession. Alongside, there are other testing processes too.
Levels of Game Testing
Alpha Testing
The initial testing phase is where the game is evaluated for major bugs.
Involves internal testing by the development team.
Beta Testing
A select group of outside users test the game during pre-release testing.
Aims to identify potential issues and gather user feedback.
Quality Assurance (QA) Testing
Comprehensive testing phase to ensure the game meets quality standards.
Conducted by experienced game testers.
What is Gold Testing or Post-Release Testing?
This is the testing stage, where the game is completely tested, has been launched to the general population has a totally finished product, and players have total access to the game.
Despite the fact that the game is completely completed, there is plenty of chances where a player can discover glitches or even game-crashing bugs. Under these circumstances, the developers need to discharge patches with a specific goal to fix them.
In the Gold testing level, every single crucial bug (hangs, crashes, and function disappointments) is resolved. 90% of every single significant bug (performance and functionality) is solved.
85% of every minor bug (system execution problems that hit a few users) is settled. Furthermore, release-level performance (i.e., 60-fps frame rate) is accomplished.
During its life cycle, if the game was delivered with even a couple of terrible bugs, it’s the ideal opportunity for an update or patch.
For each patch, the dev team must return to the whole list of bugs and consolidate some new, clean features. Every individual bug patch or polish element implies more testing (yet should be prepared).
Each new fix must be tested to detect whether it works with the base game and prior patch versions.
Mobile Game Testing
While many testing techniques overlap between different platforms, mobile game testing presents its own set of challenges and considerations. Ensuring a mobile game functions seamlessly, adheres to specific requirements, and provides an exceptional user experience is no small feat, especially given the diverse array of mobile configurations.
The Significance of Mobile Game Performance
Mobile games captivate players with striking graphics, animations, and rich media. However, if the performance of a mobile game is lacking, these captivating elements become futile. Gamers expect a smooth, uninterrupted experience with consistent progress in gameplay. The importance of performance assessment cannot be overstated, as it directly impacts the player’s satisfaction and engagement.
Testing Navigation Flow, Usability, and User Experience
Emphasizing the genuine user experience, mobile game testing necessitates using actual devices rather than relying on emulators. Intricacies such as battery consumption, the impact of battery chargers, and potential intrusions significantly influence the overall user experience and entertainment value. Testing on real devices allows for a more accurate assessment of these factors.
Graphics Execution and Early-Stage Performance Tests
The graphics execution of a mobile game is intricately linked to user experience. While striking graphics and animations enhance the visual appeal, their effectiveness diminishes if the game’s performance lags. To address potential performance blockages, it is essential to conduct performance tests during the early stages of game development. Identifying and resolving performance issues early in the development process ensures a streamlined gaming experience.
Three Basic Phases of Mobile Game Testing
Device Performance Testing
Start-Up of Game: The initial screen should appear within 1-2 seconds of pressing the game icon. b. Memory Consumption: Adding functionalities increases memory usage, requiring careful management. c. Software/Hardware Variation: Test the game on various devices with different RAM and processor specifications. d. Battery Time: Continuous gameplay should not excessively drain the battery or cause the device to overheat. e. App in Background: Resuming the game from the background should retain its previous state. f. Usage with Other Apps: The game should run seamlessly when used simultaneously with other applications.
Network Performance Testing
Jitters: Networks using packet switches cause address delays in data transmission. b. Network Speed: Test the game on 2G, 3G, and 4G or 5G networks, including mobile networks and Wi-Fi.
Testing API/Server Performance
API Calls: Limit the number of calls from the game to ensure optimal performance. b. Information To and From Server: Efficiently handle data transmission between the game and server. c. Server Down Time: Implement failover database servers to ensure continuous availability in case of server issues.
Conclusion
Effective game testing is a structured and comprehensive process that involves various types of testing techniques. From functional testing to stress testing and bug hunting, each step is crucial in ensuring a flawless gaming experience for users. Understanding the components of games that undergo testing, the types of testing involved, and the techniques used are essential for game testers and developers to deliver high-quality games to the market. The iterative nature of the testing process ensures continuous improvement and refinement, ultimately contributing to the success of the gaming industry.
In an era where mobile app performance is critical, Apache JMeter emerges as a powerful tool for conducting thorough load tests.
This technical guide delves into using JMeter to simulate real-world user traffic and network conditions, critically analyzing how a mobile app withstands varied load scenarios.
It involves configuring JMeter for mobile environments, setting up proxy settings for accurate request capture, and crafting realistic user interaction scripts.
The process aims to uncover performance metrics, such as response times and error rates, essential for pinpointing scalability and efficiency issues.
This comprehensive approach ensures that your mobile application is not only functional but also resilient under heavy user load, a key to maintaining a competitive edge in the dynamic app market.
Understanding Load Testing and Its Significance for Mobile Apps
Load testing involves simulating real-world usage scenarios to evaluate how an application behaves under different levels of demand. For mobile apps, factors like network latency, varying device capabilities, and fluctuating user loads can significantly impact performance.
Load testing helps identify potential bottlenecks, such as server overloads or inefficient code, allowing developers to optimize their apps for a smoother user experience. It enables them to anticipate and address performance issues before they affect end-users, thereby enhancing reliability and satisfaction.
Getting Started with Apache JMeter
Apache JMeter is an open-source Java-based tool renowned for its versatility in performance testing, including load testing mobile applications. Mentioned below is the guide that can help you get started with Apache JMeter:
Download and Install Apache JMeter: Visit the official Apache JMeter website and download the latest version. Installation instructions are provided for different operating systems, ensuring a smooth setup process.
Familiarize Yourself with the Interface: Apache JMeter features a user-friendly interface with various components such as Thread Group, Samplers, Logic Controllers, and Listeners. Understanding these components is crucial for creating effective test plans.
Prepare Your Mobile App for Testing: Ensure your mobile app is ready for testing by deploying it on a test environment accessible to Apache JMeter. This may involve configuring the network.
JMeter Configurations
To perform a load test on mobile applications using Apache JMeter, you’ll need to set up JMeter and configure your mobile device to connect through a proxy. Here’s a summarized guide based on information from multiple sources:
Install Apache JMeter: Ensure Java Development Kit (JDK) is installed on your PC. Download Apache JMeter and run it.
Configure JMeter for Recording:
Add a Thread Group to your Test Plan in JMeter.
Add a Logic Controller, such as a Recording Controller, to the Thread Group.
Add a Listener, like the View Results Tree, to observe requests and responses.
Add an HTTP(S) Test Script Recorder to your Test Plan. Set the port (e.g., 8080 or 8888) that will be used for recording.
Configure Mobile Device for Proxy:
Connect both your PC and mobile device to the same Wi-Fi network.
On your mobile device, go to Wi-Fi settings and modify the network settings to use a manual proxy.
Set the proxy hostname to your PC’s IP address and the proxy port to the one you specified in JMeter.
Install JMeter’s Certificate on Mobile Device:
Find the ApacheJMeterTemporaryRootCA.crt file in JMeter’s bin folder.
Transfer and install this certificate on your mobile device. You may need to set a screen lock password if prompted.
Record Mobile App Traffic:
Start the HTTP(S) Test Script Recorder in JMeter.
Operate the mobile app as normal. JMeter will record the HTTP requests made by the app.
Stop the recording in JMeter once you’re done and save the Test Plan.
Run and Analyze the Test Plan:
Execute the recorded script in JMeter.
Use the View Results Tree Listener to analyze the responses of each request.
A video tutorial to make the process clearer:
Designing Effective Load Test Plans
Creating comprehensive load test plans is essential for obtaining meaningful insights into your mobile app’s performance. Here’s a step-by-step guide to designing effective load test plans using Apache JMeter:
Identify Test Scenarios: Start by identifying the key user scenarios or workflows within your mobile app. These could include actions such as logging in, browsing products, making purchases, or interacting with multimedia content.
Define User Behavior Profiles: Determine the distribution of user interactions based on factors like frequency, concurrency, and duration. This helps simulate realistic usage patterns during load tests.
Configure Thread Groups: Thread Groups in Apache JMeter allow you to define the number of virtual users (threads) and their behavior. Adjust parameters such as ramp-up time and loop counts to simulate gradual increases in user load.
Select Appropriate Samplers: Samplers represent different types of requests sent to the server, such as HTTP requests for REST APIs or JDBC requests for database interactions. Choose the relevant samplers based on your mobile app’s architecture and functionalities.
Add Timers and Logic Controllers: Timers help introduce delays between user actions, mimicking real-world user behavior. Logic Controllers enable conditional and iterative execution of test elements, enhancing test realism and flexibility.
Configure Assertions: Assertions verify the correctness of server responses, ensuring that the mobile app functions as expected under load. Define assertions to validate response status codes, content, or performance thresholds.
Set Up Listeners for Result Analysis: Listeners capture and display test results in various formats, including tables, graphs, and summary reports. Choose appropriate listeners to monitor key performance metrics such as response times, throughput, and error rates.
Executing and Analyzing Load Tests
Once your load test plan is configured, it’s time to execute the tests and analyze the results. Follow these steps to execute load tests using Apache JMeter:
Start the Test: Run the load test plan within Apache JMeter by clicking the “Start” button. Monitor the progress as virtual users simulate user interactions with the mobile app.
Monitor System Resources: Keep an eye on system resource utilization during load tests, including CPU, memory, and network bandwidth. Excessive resource consumption may indicate performance bottlenecks that require attention.
Collect and Analyze Results: After the load test completes, review the results collected by Apache JMeter’s listeners. Pay attention to performance metrics such as response times, latency, throughput, and error rates. Identify any anomalies or areas for improvement.
Generate Reports: Apache JMeter offers built-in reporting capabilities to generate comprehensive test reports in formats like HTML, CSV, or XML. Share these reports with stakeholders to communicate test findings and recommendations effectively.
Conclusion
So, after understanding the complete process, we can conclude certain benefits linked with JMeter mobile performance testing:
The simplest and most efficient tool to check mobile performance.
It is very user-friendly and has an interactive UI.
Hopefully, after going all through this guide, you will be capable of recording a JMeter script for mobile performance testing.
FAQs
#1) How to run JMeter load test in non-GUI mode?
Running JMeter in non-GUI mode is efficient for load testing as it reduces resource consumption. Here’s a concise guide:
Prepare Your Test Plan: Before running JMeter in non-GUI mode, ensure your test plan is ready and saved in JMeter GUI mode.
Open Command Prompt or Terminal: Depending on your operating system, open Command Prompt (Windows) or Terminal (Linux/Mac).
Navigate to JMeter’s Bin Directory: Use the cd command to navigate to the bin directory where JMeter is installed.
Execute JMeter in Non-GUI Mode: Use the command:
jmeter -n -t [path to your JMeter test script .jmx file] -l [path to save the results file .jtl]
Replace the placeholders with the actual file paths.
View Results: After the test, use JMeter’s GUI mode to open the .jtl results file for analysis.
#2) How to write the script in JMeter for performance testing?
Writing a script in JMeter for performance testing involves several key steps:
Open JMeter: Start JMeter and select ‘Test Plan’ on the left pane.
Create Thread Group: Right-click on the Test Plan > Add > Threads (Users) > Thread Group.
Configure Thread Group: Set the number of threads (users), ramp-up period, and loop count.
Add HTTP Request: Right-click on Thread Group > Add > Sampler > HTTP Request. Configure server name or IP, port number, and HTTP request details.
Add Listeners: Right-click on Thread Group > Add > Listener. Listeners like View Results Tree or Summary Report help analyze the results.
Save and Run Test Plan: Save your test script and run it in JMeter.
Remember, the script should be tailored to simulate the specific user behavior and load patterns you want to test.
#3) Can we use JMeter for UI load testing?
It is not inherently designed for UI (User Interface) load testing in the way tools specifically built for browser-based UI testing are, like Selenium or LoadRunner. However, it’s essential to understand the distinction in the context of UI load testing:
Protocol-Level Testing vs. UI-Level Testing:
JMeter excels at testing the server-side functionality of web applications by simulating network traffic similar to that generated by browsers and other client applications. It’s great for testing APIs, web services, and websites at the HTTP/HTTPS level.
UI load testing, on the other hand, involves simulating user interactions directly with the graphical interface of an application. This requires rendering the UI, which JMeter does not do.
JMeter’s Scope and Capabilities:
JMeter can test how the back-end of a web application handles load, which indirectly impacts the UI performance. For instance, it can test how quickly the server processes requests and returns responses, which is a part of the overall UI responsiveness.
For direct UI performance testing, which includes rendering times, user interactions, and client-side logic performance, a tool that operates at the browser level is necessary
Integrating JMeter with UI Testing Tools:
Although JMeter isn’t a UI testing tool, it can be used in conjunction with UI testing tools like Selenium for comprehensive testing strategies. For example, JMeter can handle the backend load testing, while Selenium automates the user interface interactions.
This combination allows for a more holistic approach to performance testing, covering both the server’s ability to handle traffic and the client-side experience.
Headless Browser Testing:
Some modern testing approaches use headless browsers in conjunction with JMeter. A headless browser is a web browser without a graphical user interface that can be controlled programmatically. JMeter can trigger headless browsers to perform specific UI actions as part of a test plan.
Limitations:
It’s important to note that using JMeter for UI testing is more of a workaround and doesn’t provide the full spectrum of insights that a dedicated UI testing tool would offer.
In summary, while JMeter is a powerful tool for load testing at the server level, its use for UI load testing is limited and generally requires integration with other tools that are specifically designed for UI interaction and rendering.
#4) What cannot be tested using JMeter?
Apache JMeter, primarily designed for performance testing of web applications and services, has certain limitations and cannot be used for specific types of testing.
User Interface (UI) Rendering: JMeter cannot test the rendering of web pages or any graphical elements of the user interface. It doesn’t interact with web pages like a real user and cannot capture UI-related issues or measure client-side rendering times.
Browser-Specific Issues: Since JMeter does not execute JavaScript or render HTML like a web browser, it cannot test browser compatibility or detect issues specific to web browsers.
Mobile Application Testing: JMeter is unsuitable for testing the native functionalities of mobile apps. While it can test server-side services used by a mobile app, it cannot interact with or test the app’s UI on a mobile device.
Detailed Network Analysis: JMeter does not provide detailed insights into lower-level network protocols beyond HTTP/HTTPS, making it unsuitable for testing non-web-based network services or performing deep network analysis.
Security Vulnerability Testing: While JMeter can perform some basic security load tests, it is not equipped for comprehensive security testing, such as penetration testing or vulnerability scanning of applications.
#5) How to run JMeter load test in non-GUI mode?
Running JMeter load tests in non-GUI mode is preferred for performance testing, especially when handling large loads, as it consumes fewer resources. Here’s how you can execute JMeter tests in non-GUI (command line) mode:
Prepare Your Test Script:
First, ensure that your JMeter test plan (.jmx file) is ready. This should be done in the JMeter GUI mode.
Open Command Line Interface:
On Windows, open Command Prompt.
On macOS or Linux, open Terminal.
Navigate to JMeter bin Directory:
Use the cd command to navigate to the bin directory of your JMeter installation.
Test Maturity Model Integration (TMMI) is a structured framework that outlines a set of guidelines and criteria for evaluating and improving the maturity of software testing processes.
It provides organizations with a clear roadmap to enhance their testing capabilities systematically, aligning with best practices and industry standards.
TMMI plays a crucial role in the software testing industry by offering a standardized approach to assess and elevate the quality of testing practices. It helps organizations identify weaknesses in their current processes, fosters continuous improvement, and ensures that testing activities effectively support software development goals.
Adherence to TMMI can lead to higher-quality software, reduced time-to-market, and better alignment between testing and business objectives.
This blog post aims to:
Provide a comprehensive overview of the TMMI framework and its components.
Highlight the benefits of implementing TMMI in an organization’s testing processes.
Discuss the steps involved in achieving higher levels of test maturity according to TMM
What is Test Maturity Model Integration?
Test Maturity Model Integration (TMMi) is a framework designed to enhance and standardize software testing processes within organizations, thereby elevating their IT standards.
IT companies are increasingly adopting it to streamline their testing procedures and produce results that are more effective and efficient.
Here are the main components of TMMi, elaborated for better understanding:
Process Area:
These are distinct categories within TMMi, each focusing on specific test-related activities such as planning, design, and execution. They provide a structured approach to managing various aspects of the testing process.
Maturity Levels:
TMMi categorizes organizations into five maturity levels, ranging from Level 1 to Level 5. Each level represents a specific degree of process maturity and sophistication in software testing practices. As organizations move up the levels, they demonstrate a more refined and effective approach to testing.
Capability Levels:
For each process area, TMMi identifies specific capability levels. These levels help assess an organization’s proficiency in implementing test practices across different domains. This multi-level structure allows organizations to evaluate and enhance their testing capabilities systematically.
Appraisal Method:
TMMi provides a systematic method to assess and measure an organization’s test maturity and capability levels. This appraisal method is crucial for organizations to understand their current position and identify areas for improvement in their testing practices.
Key Practices:
For each process area and maturity level, TMMi outlines key practices. These are essential activities and guidelines that should be implemented to achieve the desired level of test maturity. They are benchmarks for organizations to follow and integrate into their testing workflows.
In essence, TMMi serves as a comprehensive guide for organizations aiming to achieve excellence in their software testing processes, ensuring that these processes are not only effective but also aligned with the overall goals of the organization.
Benefits of TMMI
Implementing TMMi in IT organizations has provided a range of benefits. Some of the notable advantages observed from various studies and surveys include:
Enhanced Software Quality: One of the primary benefits of TMMi is the enhancement of software quality. By focusing on structured and efficient testing processes, organizations can significantly improve the quality of their software products.
Increased Test Productivity: The adoption of TMMi practices has been associated with increased productivity in test processes. Organizations report being able to conduct more effective and efficient testing, leading to better utilization of resources.
Reduction in Product Risks: Implementing TMMi helps reduce the risks associated with software products. By identifying and addressing potential problems early in the development cycle, it is possible to reduce the likelihood of serious flaws and failures.
Cost and Time Savings: A key advantage of TMMi is the potential for cost and time savings. Structured testing processes can lead to more efficient use of resources and faster time-to-market for software products.
Defect Prevention: TMMi emphasizes the importance of preventing defects rather than merely detecting them at a later stage. This approach helps make the testing process integral to every phase of the software development lifecycle, ensuring early identification and rectification of potential issues.
Improved Customer Satisfaction: By delivering high-quality software that meets or exceeds customer expectations, organizations can see an improvement in customer satisfaction. This can lead to stronger customer relationships and an enhanced brand reputation.
Accreditation and Worldwide Assessment: TMMi provides a framework for accreditation and enables worldwide assessment of testing processes. This international recognition can be beneficial for organizations looking to benchmark their practices against global standards.
Key Components of TMMi
To understand the Test Maturity Model Integration concept, it is essential to know its major components. These components provide the fundamental building blocks that formulate the TMMi framework and offer crucial guidelines to improve the testing maturity of any organization.
The main components of TMMi include:
Process Area: This element describes processes involving different test elements such as planning, design, execution, etc.
Maturity Levels: TMMi classifies organizations into various maturity levels, from level 1 to level 5. These levels reflect varying degrees of maturity based on standard processes and ongoing improvement.
Capability Levels: TMMI states capability levels for all process areas, allowing a comprehensive evaluation of the organization’s ability to implement test practices in various fields.
Appraisal Method: TMMi offers an approach to evaluating and measuring the test maturity level and capability levels in the organization.
Key Practices: TMMi defines important practices for each process area and maturity level, indicating the main activities to be implemented in the organization’s testing.
TMMI was developed to provide a comprehensive framework that specifically addressed the challenges and complexities of software testing, distinct from broader models focused on software development.
B. The Evolution from Earlier Models to TMMI:
Before TMMI, the most prominent model for assessing and improving software processes was the Capability Maturity Model (CMM) and later its successor, the Capability Maturity Model Integration (CMMI).
While these models included aspects of software testing, they did not fully address the unique needs and challenges of the testing process. Recognizing this gap, experts in the field began to develop a model dedicated exclusively to testing.
TMMI was thus formulated, drawing inspiration from the structure and success of CMM/CMMI but tailored specifically to elevate the practice of software testing.
C. Key Contributors and Organizations Involved in TMMI Development:
The development of TMMI was a collaborative effort involving numerous software testing professionals and organizations. Key among these was the TMMI Foundation, a non-profit organization dedicated to the development and promotion of the TMMI framework.
This foundation played a central role in refining the model, ensuring its relevance and applicability to modern software testing practices. Additionally, input from various industry experts, academic researchers, and software organizations contributed to the evolution of TMMI, making it a comprehensive and globally recognized standard in software testing.
Core Principles of TMMI
Test Maturity Model Integration (TMMI) is a structured framework designed for evaluating and improving the test processes in software development. It provides a detailed roadmap for organizations to assess and enhance the maturity of their testing practices systematically. TMMI is structured around specific levels and process areas, focusing exclusively on testing activities and offering a step-by-step approach to elevate testing processes.
The core principles of TMMI revolve around the continuous improvement of testing processes, aiming for a higher quality and efficiency in software development. The main objectives include:
Establishing a structured and standardized approach to testing processes.
Promoting a culture of continuous improvement in testing activities.
Aligning testing processes with business needs and objectives.
Providing a clear and measurable path for testing process maturity.
Enhancing communication and collaboration within testing teams and with other stakeholders. TMMI aims to foster effective, efficient, and high-quality testing practices, leading to the overall improvement of software quality.
TMMI Levels of Maturity
TMMI consists of five maturity levels, each representing a different stage in the development and sophistication of an organization’s testing processes. These levels are hierarchical, with each level building upon the practices and processes established in the previous one.
Key Characteristics and Goals of Each Level:
Level 1 – Initial:
Characteristics: At this level, testing processes are ad hoc and unstructured. There is a lack of formalized testing practices, and processes are often reactive.
Goal: The primary goal is to recognize the need for structured testing processes and to begin establishing basic testing practices.
Level 2 – Managed
Characteristics: Testing processes are planned and executed based on project requirements. Basic testing techniques and methods are in place.
Goal: To establish management control over the testing processes and ensure that testing is aligned with the defined requirements.
Level 3 – Defined:
Characteristics: Testing processes are documented, standardized, and integrated into the software lifecycle. There is a clear understanding of testing objectives and methods across the organization.
Goal: To define and institutionalize standardized testing processes organization-wide.
Level 4 – Measured:
Characteristics: Testing processes are quantitatively managed. Metrics are used to measure and control the quality of the software and the efficiency of the testing processes.
Goal: To use metrics to evaluate the effectiveness and efficiency of the testing processes objectively and to improve these processes continuously.
Level 5 – Optimization:
Characteristics: Focus on continuous process improvement through innovative technologies and advanced testing methods. Testing processes are optimized and fully integrated into the organization’s business goals.
Goal: To optimize and fine-tune testing processes through continuous improvement, innovation, and proactive defect prevention.
The Progression Path Through the Levels:
Progressing through the TMMI levels involves:
Assessment and Planning: Organizations start by assessing their current testing processes against TMMI criteria and identifying areas for improvement.
Implementation of Practices: Based on the assessment, organizations implement the necessary practices and processes for each level, starting from basic testing procedures at Level 1 to more advanced and integrated processes at higher levels.
Evaluation and Measurement: After implementing the practices, organizations evaluate their effectiveness and measure their impact on software quality.
Continuous Improvement: As organizations progress, they focus on continuous improvement, refining and enhancing their testing processes and integrating new technologies and methods.
Institutionalization: The final goal is to institutionalize these processes, making them an integral part of the organization’s culture and operational framework.
Implementing TMMI in Organizations
Charting the Course: Adopting TMMI in Software Testing
Assess and Align: Conduct a GAP analysis to pinpoint strengths and areas for improvement based on your current testing practices and TMMI maturity levels.
Set Sail with Strategy: Define clear goals and objectives for your TMMI journey, considering your organizational strategy and resources.
Assemble the Crew: Build a dedicated team with champions, stakeholders, and experts to spearhead the implementation and provide ongoing support.
Raise the Sails, Stage by Stage: Prioritize and implement TMMI practices in a phased approach, starting with foundational areas like Test Policy and Strategy.
Continuous Improvement: Monitor progress, measure success, and refine your approach through ongoing assessments and feedback loops.
Challenges and Solutions
Change Management: Addressing resistance to change and fostering a culture of quality within the organization.
Resource Constraints: Securing budget, personnel, and training resources for effective TMMI implementation.
Tool Integration: Choosing and integrating testing tools that align with the adopted TMMI practices.
Metrics and Measurement: Establishing clear metrics to track progress and demonstrate the value of TMMI initiatives.
Long-Term Commitment: Sustaining momentum and continuous improvement beyond the initial implementation phase.
Success Story: TMMI Implementation Case Study
For an insightful case study on the successful implementation of Test Maturity Model Integration (TMMI), the BHP Billiton case is a notable example.
The solution involved simplifying test delivery, providing a common framework, leveraging tools for automation, and ensuring test coverage was fit for purpose. This led to significant improvements in testing capability, risk management, communication throughout the SDLC, and a reduction in post-production support. T
The outcome was a more efficient and effective Testing Center of Excellence, highlighting the benefits of a TMMi implementation in streamlining testing processes and improving software quality.
TMMI Assessment and Certification
The TMMI assessment and certification process is a structured approach to evaluate and enhance an organization’s testing maturity:
Process of TMMI Assessment:
Organizations undergo a comprehensive review of their testing processes against the TMMI framework. This includes evaluating test planning, execution, management, and improvement practices.
The assessment identifies strengths and areas for improvement, aligning with the five maturity levels of TMMI.
Obtaining TMMI Certification:
After a successful assessment, organizations can apply for TMMI certification. This involves submitting evidence of their compliance with TMMI criteria and processes to a recognized TMMI assessment body.
Once the compliance is verified and approved, the organization is awarded TMMI certification, signifying their testing process maturity.
Maintaining and Improving TMMI Maturity Levels:
Post-certification, organizations should focus on continuous improvement of their testing processes. This involves regular reviews, updates to testing practices, and training to align with evolving TMMI standards.
Periodic reassessment ensures that the organization not only maintains its TMMI maturity level but also strives for higher levels, reflecting ongoing improvement in testing processes.
This process ensures that organizations not only meet the current standards of testing quality but are also geared towards continual improvement and adaptation to new challenges in the field of software testing. For more detailed information, you can refer to the official TMMI website, TMMi Foundation.
TMMI and Agile Methodology
At first glance, TMMi, with its structured approach to test process improvement, and Agile, with its fast-paced, iterative cycles, seem like mismatched dance partners. But watch them on the floor, and you’ll witness a graceful tango of quality and agility.
TMMi sets the rules; Agile calls the steps: TMMi provides a framework for building reliable testing practices, while Agile empowers teams to adapt and respond to changing needs. By weaving TMMi practices into Agile sprints, like early test planning and risk-based testing, teams ensure quality stays in rhythm without sacrificing speed.
Automation: Tools and frameworks, synchronized with Agile cycles, handle repetitive testing, freeing testers to explore further and delve deeper. This collaborative dance between automation and human expertise delivers a flawless performance.
Feedback: Continuous feedback loops, embedded within Agile ceremonies, become the conductor, ensuring everyone stays in tune. Metrics and adjustments made on the fly keep the quality-agility tango smooth and thriving.
The result? Software that shines on stage is free of defects and delivered at lightning speed. It’s a win-win for both audiences: satisfied customers and empowered teams.
Conclusion
In conclusion, TMMI (Test Maturity Model Integration) stands as a pivotal framework in the realm of software testing, providing a structured pathway for organizations to enhance their testing processes and methodologies.
Its comprehensive approach, characterized by distinct process areas, maturity levels, capability levels, appraisal methods, and key practices, offers a clear blueprint for achieving testing excellence.
By adhering to TMMI’s guidelines, organizations can systematically improve the quality, efficiency, and effectiveness of their software testing efforts. This not only leads to higher-quality software products but also aligns testing processes with strategic business objectives.
As the landscape of software development continues to evolve, TMMI remains an invaluable asset for organizations seeking to adapt, excel, and maintain a competitive edge in the ever-changing world of technology.
Selenium is a suite of open-source tools mainly used to test web applications. It works as an API for browser automation. Selenium testing is clearly the most prevalent approach for QA testing, giving the capacity to make custom test automation situations that outfit an assortment of browsers and languages. Selenium is indeed good; is there any selenium competitors or selenium-like tools in the market?
Why Do People Use Selenium Web Testing Framework?
The Selenium Web Testing Framework is becoming increasingly popular as a choice among testers for a number of good reasons.
The Selenium Web Testing Framework is so popular among testers because it’s very flexible, compatible across different browsers, supports multiple programming languages, and, most of all, is an open-source tool.
It allows testers to write their scripts in languages like Java, Python, and C#, which makes integrating Selenium with other tools a breeze.
With Selenium, one can test web applications across different browsers and platforms, ensuring the test coverage is comprehensive.
The fact that there’s strong community support for this framework and regular updates are released contributes even more to its popularity.
For all of these reasons and more, the Selenium Web Testing Framework remains the preferred choice as a leading tool for automatic website testing in a variety of different environments.
Pros and Cons of Selenium Test Automation
Pros
Cons
Free and Open Source: No licensing fees, accessible to everyone.
Requires development skills: Scripting knowledge needed for test creation.
Cross-browser and platform compatibility: Tests can run on different browsers and operating systems.
Maintenance intensive: Scripts need updating as applications evolve.
Flexible and customizable: Adapts to specific testing needs with various frameworks and libraries.
Steep learning curve: Initial setup and framework understanding require time and effort.
Extensive community and resources: Abundant documentation, tutorials, and support available online.
Limited support for non-web applications: Not suitable for desktop or mobile app testing.
Promotes faster regression testing: Automates repetitive tasks, freeing up time for exploratory testing.
Can be fragile: Test scripts might break with UI changes, requiring adjustments.
Improves test coverage: Enables running more tests than manual testing allows.
Not a silver bullet: Doesn’t replace manual testing entirely, best used in combination.
Integrates with CI/CD pipelines: Automates testing as part of the development process.
Can be slow to develop tests: Scripting can be time-consuming compared to record-and-playback tools.
What Makes People Search for Alternatives to Selenium?
Complex Setup and Configuration: Selenium can require a significant amount of setup and configuration, especially for beginners or those unfamiliar with programming concepts.
Limited Support for Non-Web Applications: Selenium is primarily designed for web applications, and users working with desktop or mobile applications might seek more suitable tools.
Requires Strong Programming Skills: Writing tests in Selenium necessitates a good grasp of programming, which can be a barrier for non-technical testers or those looking for a simpler, no-code solution.
No Built-In Test Management and Reporting: Selenium lacks built-in features for test management and reporting, requiring integration with third-party tools, which can complicate the testing process.
Browser Compatibility Issues: While Selenium supports multiple browsers, maintaining cross-browser compatibility can be challenging due to the frequent updates of web browsers.
Performance and Scalability Issues: Some users may encounter performance bottlenecks with Selenium, especially when dealing with large test suites or requiring high concurrency in test execution.
Limited Support for Visual Testing: Selenium does not natively support visual testing (UI testing that involves comparing screenshots of web pages), which is crucial for ensuring UI consistency across different devices and screen sizes.
Community Support Variability: Although Selenium has a large community, the quality and timeliness of support can vary, leading users to seek tools with more reliable or official support channels.
Looking for More Comprehensive Solutions: Users may seek alternatives that offer a more integrated approach, including features like test creation, management, execution, and reporting in a single platform.
Interest in Latest Technologies: With the rapid advancement in AI and machine learning, testers are exploring new tools that incorporate these technologies for smarter, more efficient testing processes.
Applications have turned out to be progressively intricate in recent years, particularly with the utilization of prominent JavaScript structures, for example, Angular.js, React.js, Vue.js, and Ember.js for developing web applications; Selenium has assumed it to be challenging to adjust to these advances.
But there is no need to panic as there are great alternatives to Selenium available in the market. Here is our list of the
11 Best Alternatives to Selenium for the Year 2024.
Robot Framework is an open-source automation framework without licensing costs, supported by the Robot Framework Foundation.
It is designed to be open and extensible, allowing for integration with virtually any tool for powerful automation solutions.
Supports libraries implemented with Python, Java, or many other programming languages to extend its capabilities.
Operates across different platforms and environments, featuring an easy syntax with human-readable keywords for test cases.
It boasts a rich ecosystem of libraries and tools developed as separate projects, surrounded by a vibrant community offering support and contributions.
Suitable for both test automation and robotic process automation (RPA), offering comprehensive documentation for users at all levels.
Continuously developed with regular additions of new features and improvements.
Integration-friendly, seamlessly working with CI/CD tools like Jenkins and version control systems like Git.
Offers versatile testing capabilities, including acceptance testing, end-to-end testing, API testing, and more.
It comes with various built-in tools and libraries for immediate use in testing activities.
Allows for the creation of custom libraries to extend functionality further and adapt to specific testing needs.
Generates detailed reports and logs for in-depth analysis of test runs and features easy installation via package managers.
Enables real browser testing through libraries like SeleniumLibrary, and supports mobile application testing with libraries such as AppiumLibrary.
Capable of testing web services and APIs with dedicated libraries and allows for desktop application testing, showcasing its wide-ranging automation capabilities.
Cons Of Robot Framework
Performance may decrease with large test suites.
Non-developers might find a steep learning curve.
Requires external libraries for advanced testing.
UI testing can be less intuitive compared to specialized tools.
Debugging capabilities are limited.
Extensive documentation can be overwhelming for new users.
Integrating with modern DevOps tools may need extra setup.
Mobile and desktop testing require additional libraries.
Quality and speed of community support can vary.
Limited visual testing capabilities without extra libraries or solutions.
Cypress is a newly launched test automation framework that contributes another way forward. Cypress is a feature-rich tool that is entirely open source, with the exception of the dashboard application, and it is undeniably more strictly regulated by current development practices and devices than Selenium.
Features
Cypress offers real-time reloads, updating tests automatically with script changes.
Features “Time Travel” for viewing test states at each step, aiding debugging.
Automates waiting for commands and assertions to be completed, reducing flaky tests.
Allows control, stubbing, and testing of network traffic for in-depth testing scenarios.
Executes tests directly in the browser for consistent results.
Captures screenshots of failures and records videos of test runs for detailed analysis.
Supports cross-browser testing, including Chrome, Firefox, Edge, and Electron.
Provides an intuitive dashboard for detailed insights into test runs and debugging.
Handles both unit and end-to-end testing, making it versatile for web application testing.
Seamlessly integrates with CI tools for fitting into automated testing pipelines.
Supported by a strong community and comprehensive documentation.
Cons
Cypress has historically had limited browser support, focusing primarily on Chrome, though it has recently expanded to include Firefox and Edge.
It does not support testing scenarios that require interacting with multiple browser tabs simultaneously.
Cypress does not natively support running tests across multiple browsers in parallel.
Cypress tests can only be written in JavaScript, limiting flexibility for teams using other programming languages.
Some users report slower performance with very large test suites, affecting test execution time.
Testing content inside iFrames can be more complex and challenging with Cypress.
It is specifically designed for web application testing and may not be suitable for desktop or mobile applications.
New users, especially those not familiar with JavaScript, may experience a learning curve when getting started with Cypress.
One more effective alternative to Selenium is Katalon Studio. It integrated the ground-breaking programming of the Selenium system to accommodate a very well-planned GUI, and the outcome is an amazing test automation system.
Pros
Katalon Studio offers a comprehensive test automation solution for web, mobile, API, and desktop applications.
It supports codeless and scripted modes, making it accessible to users of all technical levels.
Integrates seamlessly with popular CI/CD tools like Jenkins, TeamCity, and Bamboo for automated testing pipelines.
Provides built-in support for behavior-driven development (BDD) with features for writing and managing Gherkin test cases.
Offers a centralized platform for managing test cases, test execution results, and project artifacts.
Features an intelligent object repository and an object spy tool for efficient object management and identification.
Includes a powerful test recording feature that simplifies the process of creating automated tests.
Supports data-driven testing, allowing users to execute tests with various data sets easily.
Facilitates collaboration among team members with its project sharing and version control capabilities.
Katalon Studio integrates with Jira, qTest, and other ALM tools for enhanced project management and tracking.
Provides advanced reporting and analytics features for detailed insights into test execution and outcomes.
Users can extend the functionality of Katalon Studio with custom plugins from the Katalon Store or by developing their own.
Cons
Katalon Studio’s extensive feature set can overwhelm beginners, presenting a steep learning curve.
The free version has limitations, requiring a paid subscription for full access to advanced features and capabilities.
Performance can be slower with large test suites or complex test scenarios, impacting test execution time.
Some users report occasional stability issues, especially when working with extensive or complex projects.
Integration with certain third-party tools and systems may require additional configuration or workarounds.
The codeless automation approach, while accessible, may not offer the same level of flexibility and control as custom scripting for more advanced testing needs.
Reports generated in the free version may lack the depth and customization options available in the paid version.
While it supports both web and desktop applications, mobile testing capabilities might not be as comprehensive as dedicated mobile testing tools.
Custom plugins or extensions may be necessary to meet specific testing requirements, adding complexity to the setup.
The community and support resources, though extensive, may not always provide immediate solutions to less common issues or advanced use cases.
Screenster gives visual User Interface test automation to web applications. It is the single device that approves the screens which users really see. While recording a UI test, Screenster breaks down the DOM and matches individual UI components to their performance on the screen. Thus, a tester can confirm each on-page component.
Features:
Offers visual regression testing, automatically detecting UI changes and anomalies.
Provides a cloud-based platform, eliminating the need for local setup and maintenance.
Enables automated test recording by capturing actions in the browser without writing code.
Supports testing across different browsers and devices to ensure consistent UI experiences.
Integrates baseline management, allowing easy review and approval of visual changes.
Facilitates team collaboration with shared test projects and results.
Generates detailed reports highlighting visual differences with screenshots.
Allows for easy test maintenance by updating baselines and reusing tests across projects.
Cons:
Visual testing can generate false positives due to minor and inconsequential visual differences.
May require manual review of test results to confirm genuine issues versus expected UI changes.
Limited to web applications, not suitable for testing non-web-based software or mobile applications natively.
Dependence on cloud infrastructure might raise concerns for teams with strict data security or privacy requirements.
Could be less flexible for complex test scenarios that go beyond UI comparison.
Pricing model may not fit all budgets, especially for small teams or individual developers.
Learning curve for users unfamiliar with visual regression testing concepts and best practices.
Integration with existing test suites or CI/CD pipelines may require additional setup.
CasperJS is an open-source, quick, lightweight, and simple-to-configure testing utility and navigation scripting embedded in CoffeeScript or JavaScript for PhantomJS and SlimerJS.
The tool has the capability of testing the page status, functional navigation, scrapping information off the website page, and also automatically checking network traffic.
Features:
Enables automated navigation scripting for web applications, simplifying the process of defining and executing navigation scenarios.
Facilitates the creation of automated tests, including functional and regression tests, for web applications.
Offers detailed event logging and screenshot capture capabilities to assist in debugging and test verification.
Supports headless browser testing through PhantomJS, allowing tests to run without a graphical user interface for faster execution.
Provides a straightforward syntax for writing test scripts, making it accessible for developers and testers with JavaScript knowledge.
Allows for page scraping and automation tasks, making it useful for web scraping projects in addition to testing.
Capable of simulating multiple user interactions with web pages, including clicking links, filling out forms, and capturing the resulting changes.
Integrates with other tools and frameworks for continuous integration and testing workflows.
Cons:
As development has been suspended, the tool may not receive updates, bug fixes, or support for newer web technologies and standards.
Limited to PhantomJS (also no longer actively maintained) or SlimerJS for browser environments, which may not reflect the latest browser behaviors accurately.
Lacks native support for testing across multiple real browsers, limiting its effectiveness in cross-browser testing scenarios.
The scripting approach can become cumbersome for very complex applications or tests that require extensive setup and teardown.
Users may encounter challenges integrating CasperJS with modern JavaScript frameworks and libraries due to its suspension and the rapid evolution of web technologies.
The community support and resources may dwindle over time, making it harder for new users to find help or existing users to solve emerging issues.
May not be the best choice for projects that prioritize long-term maintenance and compatibility with future web standards.
Watir is an open-source and free tool launched under the license of BSD. As the test scripts are written in Ruby, it is simple to adapt, particularly for Ruby designers.
Also, because the Ruby language is very brief, the tests made utilizing the Waitr tool are not at all difficult to create and upgrade. Along these lines, the long-term upkeep of the test suits requires less overhead.
Further, Watir’s web driver is based on the WebDriver system, which can drive the most famous systems out there, making Watir utterly usable with numerous browsers.
Features
Open-source Ruby library for automating web browsers, offering a powerful tool for web application testing.
Supports multiple browsers, including Chrome, Firefox, Internet Explorer, and Safari, directly through their respective drivers.
Enables interaction with web elements in a way that mimics human actions, such as clicking buttons, filling out forms, and navigating through pages.
Allows for the execution of tests on real browsers, ensuring that applications work as expected in real-world scenarios.
Integrates easily with testing frameworks like RSpec, Cucumber, and Test::Unit, allowing for the development of readable and maintainable test code.
Provides support for headless browser testing, enabling tests to run faster and in environments without a graphical interface.
Facilitates cross-browser testing, helping ensure that web applications function correctly across different browser types and versions.
It features a simple and intuitive API, making it accessible for beginners and experienced testers.
Cons
Primarily focused on web applications, with limited capabilities for testing non-web or mobile applications.
Being a Ruby library, it might not be the preferred choice for teams working primarily in other programming languages.
Some users might find the setup and configuration process challenging, especially when integrating with various browsers and driver versions.
The performance of tests can be affected by the speed and stability of the web browsers being automated.
Requires a good understanding of Ruby for writing more complex test scripts or extending the framework’s capabilities.
Like any open-source project, the speed and availability of updates and new features can depend on the community and contributors.
Cucumber removes any barrier between non-technical and technical project personnel.
Fundamentally, that is the crucial element of its mystery sauce. Actually, cucumber can go about as a selenium alternative or perform in pairs with selenium.
Features:
Supports Behavior-Driven development (BDD), allowing the creation of test cases in plain English, making them understandable to non-technical stakeholders.
Enables writing of specifications using Gherkin language, which is highly readable and serves as living documentation for the project.
Integrates with various programming languages including Ruby, Java, and JavaScript, making it versatile across different development environments.
Facilitates collaboration between developers, QA teams, and business analysts by using language that is easy to understand for all parties involved.
Offers support for various testing frameworks such as RSpec, Test::Unit, and JUnit, allowing for flexible test execution.
Provides detailed reports on test execution, making it easier to identify and address failures.
Supports scenario outlines and examples, enabling parameterized testing for covering multiple scenarios with a single test case.
Can be integrated into CI/CD pipelines, enhancing continuous testing practices.
Cons:
The abstraction layer introduced by Gherkin can sometimes lead to misunderstandings if not accurately expressed, affecting test accuracy.
Writing and maintaining step definitions requires additional effort, potentially slowing the development process.
The initial setup and learning curve can be steep for teams unfamiliar with BDD or Gherkin syntax.
Overusing Cucumber for simple unit tests that don’t benefit from BDD might lead to unnecessary complexity.
Requires diligent management of feature files and step definitions to avoid duplication and keep tests maintainable.
The performance of test suites can be slower compared to direct unit testing, especially for large projects.
Balancing the granularity of scenarios to be neither too broad nor too detailed can be challenging and time-consuming.
Dependency on the active involvement of business stakeholders to reap the full benefits of BDD may not always be feasible.
Ghost Inspector is a browser-based framework that works through a Chrome plugin. This tool is a Selenium IDE alternative that appears to get record/playback best in Ghost Inspector.
Features:
Offers easy creation of automated browser tests without the need for coding, using a Chrome extension for recording actions.
Allows tests to run in the cloud, eliminating the need for local test execution environments and infrastructure.
Provides immediate visual feedback by comparing screenshots of test runs, helping to catch UI changes or errors quickly.
Integrates with popular CI/CD tools and services like Jenkins, CircleCI, and GitHub for seamless automation workflows.
Supports the scheduling of tests to run automatically at specified intervals, ensuring regular monitoring of web applications.
Includes detailed reports and notifications for test outcomes via email, Slack, and other channels, keeping teams informed.
Offers a dashboard for managing tests, organizing them into suites, and tracking historical test results and trends.
Enables testing on various screen sizes and custom environments to ensure responsiveness and compatibility across devices.
Facilitates team collaboration with shared access to tests and results, enhancing communication and efficiency.
Inspector Cons:
While powerful for UI testing, it might not be as effective for testing backend processes or non-UI-based interactions.
Dependency on the cloud-based platform means limited control over the test execution environment compared to local or self-hosted solutions.
May incur additional costs for high usage levels, as pricing is based on test execution frequency and suite sizes.
Learning how to effectively use the recording tool and understand the nuances of test creation can take time for new users.
Limited programming capabilities mean complex test logic or custom scripting might be difficult to implement compared to more code-intensive testing frameworks.
Managing many tests and ensuring they remain up-to-date with application changes can be challenging.
While it offers integrations with several CI/CD tools, setup and configuration might require a learning curve for teams new to automation
TestCraft is a codeless Selenium test automation framework. It can rapidly integrate and use modules created by the community. Its advanced AI innovation and exceptional visual modeling enable quicker test generation and performance while wiping out the test support overhead. The tool considerably decreases maintenance costs.
Testers can also make completely automated test cases without coding in them. Users discover bugs quicker, deliver all the more often, coordinate with CI/CD, and enhance the general property of their digital products.
Scripts are adapted to change automatically because of the AI mechanism. Also, a tester can make significant changes with just a couple of clicks using this tool.
11. Protractor
It is an open-source automation framework created specifically for the automation of AngularJS web applications.
The protractor is based on JavaScript Selenium WebDriver, so it supports every one of the traits that are accessible with Selenium WebDriver.
With one or two commands, both Selenium WebDriver and the testing framework will be installed pleasantly. Protractor tests the application by communicating with it as a user.
This tool is formally called an E2E,i.e. end-to-end testing structure.
The utilization of JavaScript, one of the most simple-to-use programming languages to adapt, particularly for those who have an inadequate programming background makes this tool a good alternative.
With its ‘Automatic Waiting’ element, the test executes automatically to the following stage without waiting for the test and web page to sync.
Protractor also supports tools like Cucumber, Jasmine, and Mocha to compose test suites as it is a wrapper of WebDriverJS.
Puppeteer
It is a library for Node that automates headless Chrome or Chromium through the DevTools Protocol and gives high level API to developers. This enables the developers to perceive a web browser as an object and uses methods such as .goto () or .type (). Puppeteer is a browser- driven framework that was built and maintained by the Chrome DevTools team. Its main features are better management of Chrome, web scraping support, UI testing using screenshot and PDF capturing abilities as well as loading times measured by means of the Chrome Performance Analysis tool.
WebdriverIO
WebdriverIO is a framework that supports automated testing of modern web and mobile applications, playing the role of end-to-end testing under OpenJS Foundation. Being a NodeJS application, it performs tests in JavaScript/TypeScript. WebdriverIO is often used with WebdriverProtocol providing functions such as cross-browser testing. However, it is distinct from Cypress because of the absence of a commercial version. Important aspects of the product are an increased test suite scalability, reliability and stability testing; a flexible nature provided by built-in plugins as well as community contributions ; support for native mobile applications’ testing easy installation procedures.
Playwright
Playwright is an open-sourced test automation library built by contributors of Microsoft. It is a Node.js library which automates browsers such as Chromium, Firefox and WebKit using a unified API. Playwright supports programming languages such as Java, Python and NodeJS. However the frameworks developed prefer to be in NodeJS or Javascript/Typescript tools. The major features are ease of setup and configure, the ability to support Chrome , Edge, Safari as well as Firefox in a multi-browser manner; compatibility with multiple programming languages; parallel browser testing capability on different browsers or tabs.
NightwatchJS
BrowserStack develops and maintains NightwatchJS, a Node.js framework that uses the Webdriver Protocol. This framework allows running different testing types such as End-to-End, component and visual regression tests, accessibility, API unit integration. Importantly, it is easy to extend and personalize the framework using Nightwatch. One of the major highlights is fast installation and setup. In particular, NightwatchJS test scripts are written as legible code and the framework allows for testing in different browsers such as Chrome, Firefox, Edge among others.
Importantly, it expands its usability to in-house mobile app testing and hence is useful for every user. Moreover, NightwatchJS implements the page object pattern to assure better structure and test scripts’ maintainability.
Conclusion
We hope you like the list that we have complied. Go through them and choose which alternative to selenium suits your needs the best
Your software is in great risk of if it’s not been tested properly. Software industry is aware of this risk and they are giving more prominence to software testers than they used to be, in short, the career is booming at this point.
Testers and developers are integral part of a SDLC. But which career has got more scope?
Before jumping in to it let’s have a look at the major myths surrounding software testing career.
Anybody can test. Development is superior to testing.
Compensations will be less as related to Developers in the business.
There won’t be any career growth in Software Testing.
Just the individuals who can’t code take Software Testing as a profession.
Here are 18 reasons why these assumptions are incorrect:
1. Importance:
Normally there would be two teams working on a venture as both testing and development can’t be separated from each other.
Each written code must be reviewed for quality and with no team existence; it’d be difficult to develop the final product.
The fact here is that both software testing and software development teams are similarly critical.
It’s a myth that software tester is somewhat of a ‘lower’ rank employee than a software developer.
2. Responsibility:
At the point when any undertaking starts – software testing and developing team both get included to work in sync from the day one.
While the genuine responsibility of software developers starts substantially later, software testers often start at the time of checking the specification archives and proceeds for the duration of the existence of the project.
It’d be right to state that software testers regularly have a superior learning of the comprehensive working of the software frameworks they are taking a shot at.
3. Creativity:
Software testing is steadily showing signs of change, each day there are distinctive ventures and appropriately unique approaches to test them. For instance, all developed mobile apps are required to run on all mobile versions.
So, amid mobile app testing, it’s important to utilize multiple devices with different versions and their operating system platforms.
Another model is cross-browser testing that identifies bugs of a web app. Thus, testers need to get a little imaginative when testing.
The procedure won’t be illuminated for you; indeed, it takes a short spy work. By serving as the end-user, a tester needs to get innovative while considering scenarios that there might be irregularities.
4. A Specialized Talent:
Being a software tester is more often considered a choice since it’s an extremely energizing activity.
The people who haven’t generally worked on testing may believe its exhausting and may spread the incorrect word that you needn’t bother with any specialized skill to be great at it. This isn’t at all true.
Additionally, keeping in mind the goal to detect a few errors, and endeavor to recreate them, just tapping on buttons in a browser won’t be sufficient: you’ve to comprehend the framework under test, find and examine the correct server, have the capacity to utilize tools to slow down the system, and significantly more.
You can be a security tester, an API tester, a penetrating tester. A software tester isn’t an ousted software developer who just taps on some buttons and cross his fingers for a bug to mysteriously show up.
5. Salary Range:
Numerous individuals accept there is a critical distinction in pay between a software developer and software tester, with the former being paid considerably more. Is it right?
The early introduction might be misleading. The compensation relies upon numerous elements, comprising of the scope of work he/she is managing daily, the software testing organization an individual is working for, experience, professional aptitudes, and so forth.
Even, there isn’t much distinction between the salary range of a person from a development team and an accomplished tester. A few organizations, such as Microsoft and Google, give even a higher compensation to the software testers instead of software developers.
To some level, this appears as a result of a higher workforce demand for software testers according tothe latest employment market. Experts, who manage development testing, mobile testing, and website testing, frequently end up being more prevalent at the employment market than software developers.
6. Testers Too Code:
Obviously, in case that you expect to do the automated testing, you’ll be undeniably require coding skillsto be a great tester. It’s an era of automation. The job of an Automation Tester is to write code to automate the scripts. Testers also need to have coding skills.
So, it’s an aged myth in the industry that a person who cannot code can be a “Software Tester”.
7. Evolving Technologies:
Numerous new technologies are splashing up in the product testing world, especially Machine Learning and AI. Despite the fact that the development of both is still somewhat far away, they certainly have a practical usage from a testing viewpoint, and they’re arriving sooner than we might suspect.
They are now affecting the software testing field by making it more entangled, and that effect will just keep on developing. We’re starting to see AI and Machine Learning technologies engaged with more programs, and the potential for those advances to expand testing skills is stunning.
8. Challenging Job:
Testing is not simple, there are regularly puzzles and issues to solve. The software testing profession will possibly bring something different daily.
If you like a profession where you don’t need to think a lot then don’t seek a career in software testing industry. However, in case that you prefer a profession which keeps you on your toes, anybody will direct you towards software testing job as a really good choice.
9. Great Future:
In a world commanded by the technologies like AI, IoT, and Machine Learning, testing will continue to grow at its core.
Notwithstanding these progressions, it’s not unusual that the majority of the professionals emphasizes the requirement for software testers to be available to the revolution and become serious about adopting new techniques too.
As a result, traditional ways to deal with testing are evolving too. At last, such evolution’s are opening more doors for software testers in the testing world, as testing is continually progressing.
Ultimately, every expert believes to be positive about the future of emerging software testing domain. This is because the opportunities for testers are simply growing.
And these possibilities will get more interesting as well because the software testing is becoming a more challenging, engaging and in-demand field so, the future holds a lot.
10. Quality Assurance Demands:
Considering the importance of producing high-quality software, it can be stated that the role of
testers to guarantee quality assurance cannot be neglected. This demand will increase as firms
continue to plan the delivery of defect-free and consistent software.
11. Rising Complexity in Software Systems:
With more complex software systems, the requirement for comprehensive testing in order to
detect and eliminate possible problems increases. Testers play a crucial role in navigating the
functionality of modern software across multiple platforms and situations.
12. User-Centric Approach:
User experience is becoming more and more important which makes user-centric testing
critical. Testers are the key players in detecting usability issues; they ensure that apart from
correctness, software must also deliver user comfort and satisfaction.
13. Shift Left Testing Practices:
There is also the shift-left strategy, where testing is incorporated earlier in development. The
shift to early testing highlights the role that testers play in detecting and resolving problems at
an initial stage, thus lowering the overall project costs.
14. Regulatory Compliance:
Following industry regulations and standards is essential, especially in financial industries,
medical fields or cybersecurity. Testers play a major role in confirming that indeed the software
complies with these standards; this is to ensure compliance on any legal or ethical issues
involved.
15. CI/CD:
Implementation of CI/CD methodology demands continuous testing during the whole life cycle.
The role of testers is crucial for providing smooth integration and deployment processes,
allowing to release software more quickly and predictably.
16. Security Testing:
The growth of cyber-attacks has made security testing part and parcel to the software
development process. Testers who are experts in security help to detect the weaknesses and
provide strong protection against breaches.
17. Globalization and Localization Testing:
With the international implementation of software, it becomes vital to perform testing across
various languages, regions and cultures. Specializing in globalization and localization, testers
help ensure that software products are customized for different markets worldwide creating
more career prospects.
18. Adoption of DevOps Practices:
The proper incorporation of the DevOps practices focuses on promoting coordination between
development and operations. Testers, given their understanding of software quality assurance,
are also key to the seamless integration process associated with DevOps methodologies.
Final thoughts…
Software testing gets a poor knock. But, individuals who don’t think a software testing career is fulfilling, fun, and challenging certainly aren’t software testers. Because most testers absolutely love their profession, and wouldn’t lose it for any other profession in the world.
The process of developing software which is known as software development is an initial phase, but once the software has been produced and ready to be delivered to end-users, the software testers check the product with the conditions. Testing is an accomplishment of software with the aim of detecting a bug.
Hence, no customer will be satisfied if the software doesn’t work as planned. In a nutshell, testers play a role where they can help the enterprise to produce a quality product to win the customer trust.So, testing holds a brighter future in the technological world!
ecent report by Mordor Intelligence predicts that the mobile app testing industry will be worth $16.71 billion by 2029, up from $6.56 billion this year. That’s a growth rate of 17% per year!
The reason for this growth is the increasing popularity of smartphones and the ever-growing demand for high-quality apps. The post-pandemic increase in reliance on mobile apps is what is driving this growth, underscoring their significance in the digital age.
In 2022, mobile ad spending reached $362 billion, up 7.7% from the previous year. In 2023, Android and iOS app consumer spending soared to $135 billion, with iOS commanding 66% of this market. Games accounted for 60% of consumer spending, and iOS’s 76% market share helped subscription revenues reach $45.6 billion.
These trends underscore the importance of mobile app testing in ensuring functionality, user experience, and security across diverse devices and platforms, a crucial factor in the success of mobile applications.
Here are the Key Differences Between iOS and Android App Testing
#1) Open vs Closed Source
Android’s Open-Source Linux OS:
Android, based on Linux, is renowned for its open-source nature, offering a level of flexibility that’s akin to a playground for developers. What does this mean? Well, developers have the freedom to tinker with the system’s source code, leading to a diverse range of customization options. It’s like having a box of Legos where you can build, modify, and rebuild as you see fit.
Implications for App Development and Testing:
Creativity and Innovation: This openness fosters a hotbed for creativity and innovation. Developers can experiment, leading to unique app features and functionalities.
Fragmentation Challenges: However, it’s not all sunshine and rainbows. The diverse range of devices running Android, combined with varying OS versions, creates a fragmentation challenge. Testing needs to be more thorough and encompass a broader range of scenarios.
Community Support: The open-source community is a treasure trove of resources, offering support, libraries, and tools, that can significantly speed up development and troubleshooting.
iOS’s Closed-Source System: The Walled Garden Contrastingly, iOS operates in a walled garden. Apple’s closed-source system means the underlying code is not openly accessible. This exclusivity brings a different set of benefits and challenges.
Implications for App Development and Testing:
Consistency and Quality Control: The closed ecosystem allows Apple to maintain a high level of consistency and quality control over its apps. It translates into a more uniform and controlled environment for app development and testing.
Limited Customization: Developers might find their wings clipped in terms of customization and deep system-level changes.
Streamlined Testing: With a limited range of devices and OS versions, testing for iOS can be more streamlined and predictable, reducing the complexity and time involved in ensuring app stability and performance.
#2)Device Diversity and Testing Complexity: A Tale of Two Platforms
Navigating the world of mobile app testing is akin to exploring two distinct planets regarding device diversity. On the one hand, we have Android’s device fragmentation, and on the other, iOS’s limited device range. Each presents its unique set of challenges and advantages for developers and testers.
Android’s Device Fragmentation: A Double-Edged Sword Android’s vast array of devices is both its strength and its Achilles’ heel. The open-source nature of Android has led to a plethora of devices with different screen sizes, resolutions, and hardware capabilities. This diversity, while offering a wide reach, turns app testing into a herculean task.
The Challenges:
Multiple Scenarios: Testers must account for numerous scenarios, ensuring the app functions smoothly across a wide range of devices.
Performance Variability: From high-end smartphones to budget-friendly devices, performance testing becomes a critical aspect of guaranteeing a consistent user experience.
Increased Resource Demand: The need for extensive testing means more time and resources are required, potentially impacting development timelines and budgets.
iOS’s Limited Device Range: A Blessing for Testers In contrast, Apple’s tightly controlled ecosystem with a limited range of devices simplifies the testing process. The homogeneous nature of iOS devices means fewer variables to contend with, making the process more streamlined and predictable.
The Advantages:
Streamlined Testing: A smaller set of devices reduces complexity, allowing for more focused and efficient testing.
Consistency: With fewer device variations, maintaining a consistent user experience becomes more manageable.
Resource Optimization: Less device variability allows for a more focused allocation of testing resources, potentially speeding up the development cycle.
#3) Navigating the Update Maze: Android vs iOS Software Updates
Regarding software updates, Android and iOS present a world of difference, each with its own unique impact on app testing and the end-user experience.
This variance is not just about who gets the latest features first; it’s about how these updates affect the entire ecosystem of users, developers, and testers.
Android’s Update Rollouts: A Varied Landscape
Android’s approach to software updates is like a multi-flavored buffet. Due to its open-source nature and a wide range of manufacturers, updates are rolled out in a staggered and varied manner.
Each manufacturer often adds its own spin to the update, which means the same Android version can behave differently on devices from different manufacturers.
Implications for Testing and UX:
Testing Complexity: This diversity requires developers to test their apps across multiple Android versions and device models, increasing the complexity and resources needed.
User Experience Inconsistency: Users on different devices may have varying experiences with the same app, depending on their Android version and device capabilities.
iOS’s Streamlined Updates: Consistency is Key
On the flip side, iOS’s updates are like a well-orchestrated symphony. Apple’s tight control over its ecosystem means that software updates are rolled out uniformly to all compatible devices.
This consistency ensures that most iOS users are on the latest version within a short period of time.
Implications for Testing and UX:
Simplified Testing: Uniform updates across all devices simplify the testing process, allowing for a more focused approach.
Consistent User Experience: Users enjoy a more consistent app experience across different devices, as most will be running the same iOS version.
#4) Software Updates and Compatibility: Android vs. iOS
In the realm of mobile app testing, understanding the intricacies of software updates and compatibility for Android and iOS is pivotal.
These platforms differ significantly in how they roll out updates, and these differences have profound implications for app testing and user experience.
Android’s Fragmented Update Landscape
Android’s update rollout can be likened to a patchwork quilt. Being an open-source platform with a multitude of manufacturers, updates are not uniform. Manufacturers often customize updates, leading to different versions of Android running on various devices at any given time.
Impact on App Testing:
Testing Diversity: App developers face the challenge of testing their apps across a wide range of Android versions and devices, increasing the complexity of ensuring compatibility.
User Experience Variation: Users might have different experiences with the same app, depending on their device’s Android version, which can lead to inconsistency in app performance and user satisfaction.
iOS’s Uniform Update Rollouts
Contrastingly, iOS updates are more like a synchronized swim. Apple’s controlled environment allows for simultaneous updates across all its devices. This means a significant proportion of iOS users quickly migrate to the latest version.
Impact on App Testing:
Streamlined Testing Process: The uniformity of iOS updates eases the burden on app testers, as they have to account for fewer variations in OS versions.
Consistent User Experience: With most users on the latest OS version, ensuring a consistent user experience across different devices is more manageable.
#5) App Security and User Trust: A Critical Balance in Android and iOS
In today’s digital age, app security is not just a feature; it’s a cornerstone of user trust. The approaches Android and iOS take towards security play a pivotal role in shaping the user experience and trust. Let’s break down the security landscape of these two platforms.
Android’s Open Ecosystem: A Double-Edged Sword
Android’s open-source nature, while fostering innovation and flexibility, also brings unique security challenges. Its vast and diverse user base, coupled with the range of devices and OS versions, creates fertile ground for security vulnerabilities.
Key Security Concerns:
App Store Policies: Google Play’s app vetting process, though robust, can sometimes be less stringent than Apple’s, potentially allowing risky apps to slip through.
Fragmentation: With numerous devices running outdated versions of Android, maintaining security consistency is challenging, leaving some users vulnerable to exploits.
Ensuring Security:
Regular Updates: Providing timely security updates and encouraging users to install them is crucial.
Developer Vigilance: Developers must prioritize security in their app design, particularly when requesting user permissions.
iOS’s Walled Garden: Safety in Control
Apple’s closed ecosystem approach to iOS has its advantages in terms of security. The tight control over hardware and software integration, along with a stringent app review process, enhances overall security.
Key Security Strengths:
Strict App Review: Apple’s rigorous app review process significantly reduces the likelihood of malicious apps entering the App Store.
Regular, Uniform Updates: The ability to push updates to all devices simultaneously helps quickly address security vulnerabilities.
Ensuring Security:
User Awareness: Educating users on the importance of keeping their devices updated and being wary of phishing or fraudulent apps.
Developer Compliance: Ensuring apps comply with Apple’s security guidelines is crucial for maintaining user trust.
#6)Hardware and Performance Testing: The Android Diversity Challenge
In the world of Android, the sheer diversity of hardware presents a unique challenge for app developers, particularly in performance testing. Unlike the more uniform hardware ecosystem of iOS, Android spans a wide array of devices with varying specifications.
Diverse Hardware Landscape
Android’s open-source nature has led to an expansive range of devices from multiple manufacturers, each with different screen sizes, processors, RAM capacities, and more. This variety means an Android app could be running on a high-end smartphone with the latest technology or a budget device with limited capabilities.
Implications for App Testing:
Performance Variation: Apps must be tested across devices with different hardware capabilities to ensure consistent performance. This includes assessing how the app runs on low-end devices as well as the latest flagship models.
Resource Optimization: Understanding the limitations of various hardware configurations is crucial. Developers need to optimize their apps to run efficiently across the spectrum of Android devices.
User Experience Consistency: Ensuring a consistent user experience across diverse hardware is a significant challenge. An app that performs well on a high-end device must be tested and possibly adjusted to perform similarly on less capable devices.
Testing Strategies:
Wide-Ranging Testing: Developers must conduct tests over a broad range of devices, representing different hardware configurations and performance capabilities.
Performance Metrics: Focusing on key performance metrics like load times, memory usage, and battery consumption is essential for optimizing across varied hardware.
Continuous Monitoring: Post-launch, monitoring app performance across different devices is vital to address any issues that users with specific hardware might encounter.
Key Takeaways
Key Differences
Android
iOS
1) Open vs Closed Source
Nature
Open-Source Linux OS
Closed-Source System
Implications
– Creativity and innovation
– Consistency and quality control
– Fragmentation challenges
– Limited customization
– Community support
– Streamlined testing
2) Device Diversity and Testing
Device Fragmentation
Vast array of devices
Limited range of devices
Implications
– Multiple testing scenarios
– Streamlined testing process
– Performance variability
– Consistent user experience
– Increased resource demand
– Resource optimization
3) Software Updates
Update Rollouts
Varied and staggered
Uniform and simultaneous
Implications
– Testing complexity
– Simplified testing process
– User experience inconsistency
– Consistent user experience
4) Security and User Trust
Security Approach
Open ecosystem
Walled garden
Key Concerns
– Less stringent app store policies
– Strict app review process
– Fragmentation and outdated versions
– Regular, uniform updates
Security Measures
– Regular updates, developer vigilance
– User awareness, developer compliance
5) Hardware and Performance
Hardware Diversity
Wide range of devices
More uniform hardware
Testing Implications
– Performance variation
– More predictable performance testing
– Resource optimization
– Easier optimization due to uniformity
– Ensuring user experience consistency
– Consistent user experience
Frequently Asked Questions (FAQs) about iOS and Android App Testing
#1) What are the main differences in testing apps for iOS vs. Android?
The main differences lie in the operating systems, with iOS being closed-source and Android being open-source, leading to variations in device fragmentation, update rollouts, security measures, and hardware diversity.
#2) Is it more challenging to test apps on Android or iOS?
Testing can be more complex on Android due to device fragmentation and diverse hardware options. iOS, with its limited range of devices and more controlled ecosystem, can simplify the testing process.
#3) How do software updates affect app testing?
Software updates can significantly impact app testing. Android’s varied update process across different devices and manufacturers requires testing across multiple versions. iOS’s uniform updates allow for a more streamlined approach to testing.
#4) What should developers focus on for effective app testing?
Developers should focus on device compatibility, performance optimization, ensuring security, and providing a consistent user experience. This includes testing on various devices, especially Android, and adhering to platform-specific guidelines.
#5) How important is security in app testing?
Security is crucial in app testing. It’s vital to ensure that apps are safe from vulnerabilities, particularly on Android, due to its open-source nature. iOS apps must comply with Apple’s stringent security guidelines.

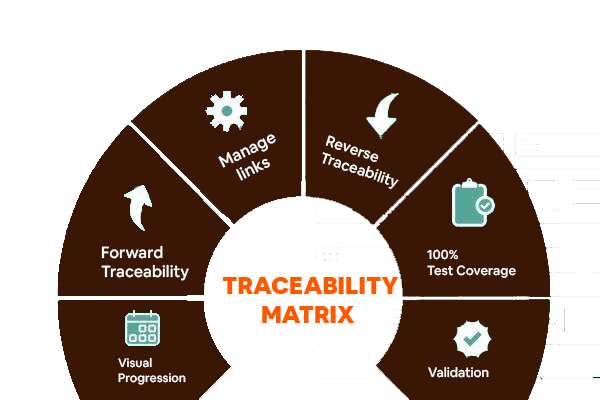
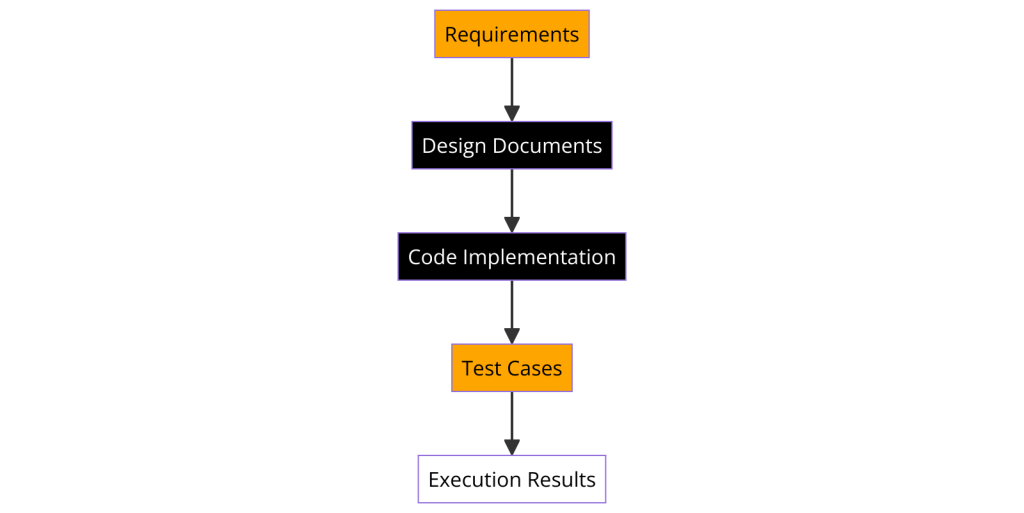
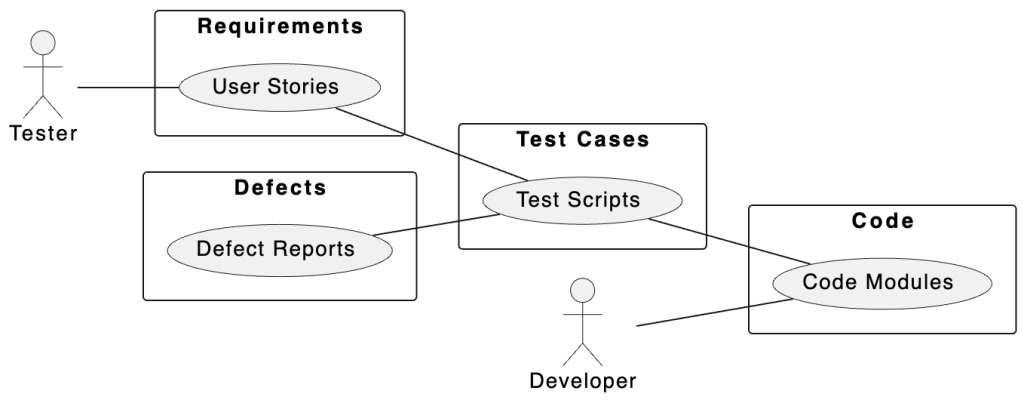


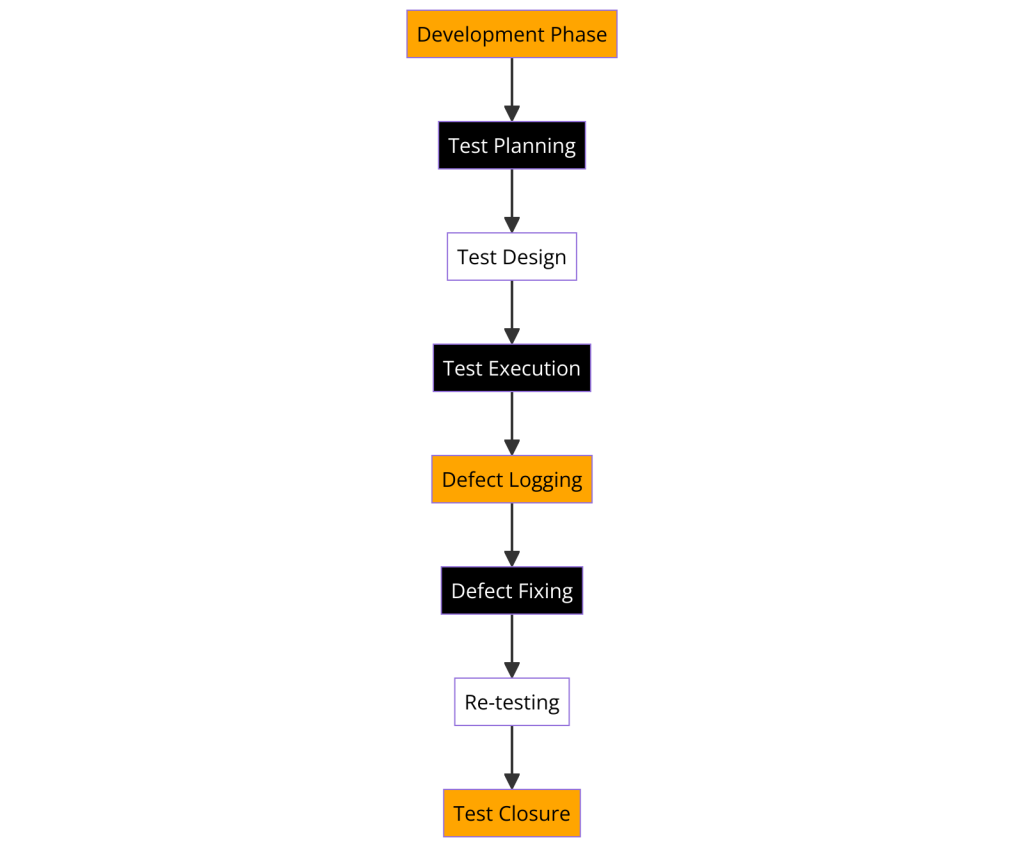
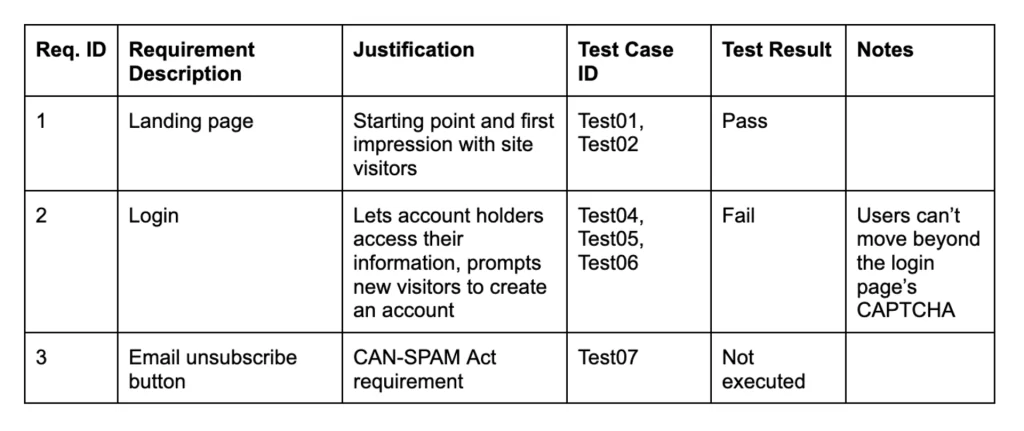
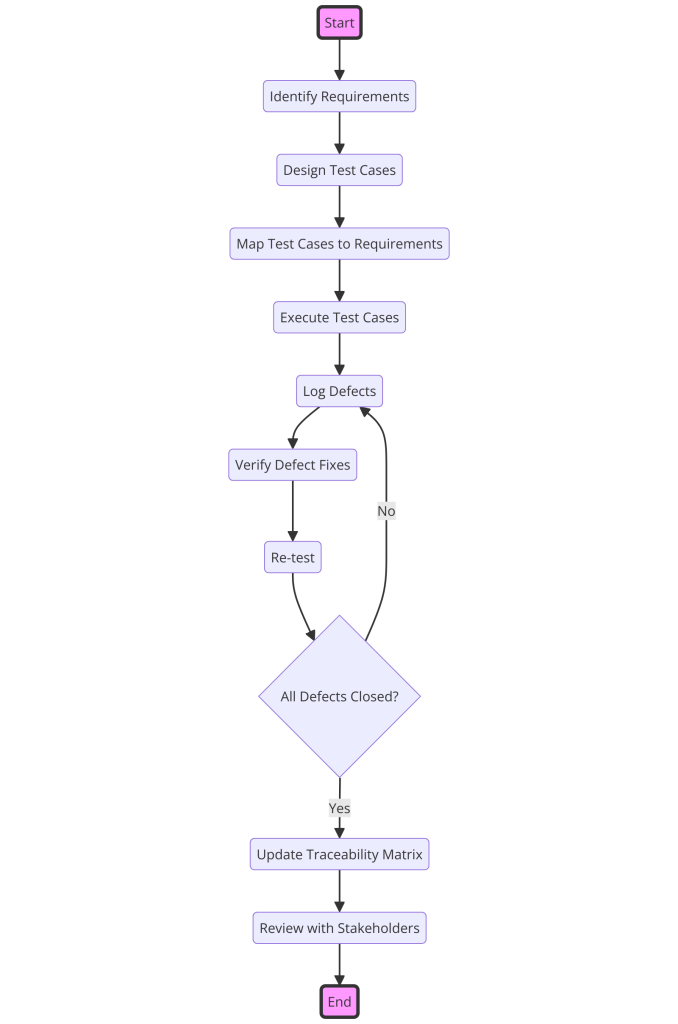
 Understanding the different types of traceability matrices—forward, backward, bidirectional, vertical, and horizontal—empowers teams to tailor their testing approach according to project requirements and objectives. Ultimately, leveraging traceability matrices effectively contributes to delivering high-quality software products that meet stakeholder expectations and industry standards.