How to Integrate Selenium With Gecko Driver : Full Tutorial

Mozilla Firefox browser’s versions greater than 47.0 were not compatible with Selenium WebDriver 2.53.0 or 2.53.1 that means Firefox browsers version after 47.0 can’t be used in Selenium without any drivers. As of version 3.0, the Selenium uses a driver to form a link with Firefox browser. This driver is known as Gecko Driver.

Before starting with the GeckoDriver you need to understand what is GeckoDriver, why it is required in Selenium WebDriver? Or how can it be used in Selenium? Let us start with the very basics.
What is a Web Browser Engine and What is Gecko Driver?
Web browser engine is a software program that is used to control and enter the content such as HTML, CSS, XML, images etc.
On the browser and therefore it is also known as layout engine or rendering engine. It is a component of browsers and helps in displaying web-content.
Gecko is a web browser engine which is developed by Mozilla Foundation and is written in C++. It is an open source engine which can be easily available for the user.
GeckoDriver is a proxy which is used to interact with the browsers (such as Firefox) that run the Gecko browser engine. GeckoDriver provides an HTTP API to communicate with Gecko browsers (like Firefox version 47 onwards).
Why Selenium Needs Gecko Driver?
Until Selenium version 2, it had Firefox driver which were used to interact with the Firefox browser (version till 47).
Now, Firefox (with Firefox browser version 48 onwards) has done some changes and due to some security reasons, it does not allow any third party driver to directly interact with the browser.
Also Read : How to Integrate Maven and Jenkins with Selenium 
That means the user cannot use Firefox driver of selenium version 2 to interact with the browser version 48 onwards.
Thus, we need Selenium 3 which has marionette drivers and with this user can directly interact with the Firefox browsers using a proxy which is GeckoDriver. Marionette driver is an automation driver for Mozilla’s Gecko engine.
Getting Started with GeckoDriver
This section will help you to install Selenium 3 Jars and GeckoDriver for Firefox browser. Below are the steps which you need to follow:
Step 1: To Add Selenium 3 jars
If you are using Selenium 2 jars, you can easily upgrade it to Selenium 3 Jars by following this link.
www.seleniumhq.org
Click on download option and you will find “Version 3.0.1” to download. Click on the link to download Selenium 3 jar.
Now, copy this jar file by using ‘CTRL + C’ and go to your selenium tool. You will find ‘lib folder’ in test explorer.
Select ‘lib folder’ and right click to open options and select New > Folder and set folder name as ‘selenium3jars’ to make it easily accessible or whatever name you want to use.
You will see, the ‘selenium3jars’ folder is created as a children folder under ‘lib folder’. Use ‘CTRL + V’ to paste selenium 3 jar file that you copied earlier and paste inside ‘selenium3jars folder’.
You’ll see the jar file has been successfully copied to the folder. Next thing you need to do is to add this jar file into your project. You need to select Selenium 3 jar file and right click to open the options palette. Then left click on Build Path > Add to Build Path to add jar file into your project easily.
You’ll see that Selenium 3 jar has been added to Referenced libraries that mean your selenium is ready to execute the tests via the driver.
Step 2: Installing Gecko Driver
To download GeckoDriver for your WebDriver you need to follow this link.
https://github.com/mozilla/geckodriver/releases
If you are running 32bit or 64bit Windows, MACOS, or Linux you can easily download the file which is compatible with your operating system.
You’ll see many versions to download, but you can choose the latest version from the options. You can easily download this zip file to your computer by clicking on the appropriate link.
If you are using windows operating system, you can download either win32.zip or win64.zip and if you are using MAC operating system then you can choose macos.tar.zip.
After downloading the zip file you can simply extract it in your preferred location and then copy the GeckoDriver.exe file using ‘CTRL + C’.
Again, you have to follow the same procedure to copy this file in the ‘lib folder’.
Go to Selenium and select the lib directory from the test explorer. Again, right-click to open option palette then left click on New > Folder to create a new folder.
automation testing
Then set the name as ‘geckodriver’ or any other name which is easier for you to recognize and click ‘Finish’. Then you have to add a GeckoDriver.exe file into the folder you have just created.
After adding a geckodriver.exe file to a folder, the next step is to use the following syntax to show the exact location of the executable file.
Syntax

System.setProperty(webdriver.gecko.driver”, ”location of gecko driver executable”);

You need to enter the exact location of the executable file in the above syntax. To see the location of your file, you can select a geckodriver.exe file from the folder and right click to open the options palette. Then left click on the properties to open details.
Select the location and copy all. Use this location address to enter this address in the syntax. For instance:

System.setProperty(“webdriver gecko driver”, “C:/Users/raghav/Desktop/Tools/Eclipse/Selenium/SeleniumTest/lib/geckodriver/geckodriver.exe”);

If you find it difficult to add the location manually or showing any unwanted errors, you can also use an alternative method to add an executable file to your project.
Go to your computer and search the above location in the file explorer. Then copy the executable file from the downloaded folder to the current address location.
Left click and drag the executable file from the download folder to the location of the searched folder. The dialogue box will appear saying to replace it or not. Click on replace button and copy the .exe file to the folder.
Step 3: Adding Latest Version of Firefox Browser
Download the latest version of Firefox by following this link
https://filehippo.com/download_firefox/
In the next step, you need to add the syntax and also the location of this browser.
Syntax

System.setProperty(webdriver.Firefox.bin”, “Location of Firefox exe”);

Again, you need to enter this syntax in your selenium tool and also the exact location of the Firefox.exe file.
To know the exact address of the .exe file you can select firefox.exe and right click to open option palette. Then left click on properties to know the location.
Copy the location and enter this address in the syntax. For instance:

System.setProperty(webdriver.Firefox.bin”, “C:\Program Files\Mozilla Firefox\firefox.exe”);

Use of Gecko Driver to Launch Firefox Browser

import org.openqa.selenium.WebDriver;[]
public class FirstSeleniumTest {
public static void main(String[] args) {
System.setProperty(“webdriver gecko driver”,      “C:/Users/raghav/Desktop/Tools/Eclipse/Selenium/SeleniumTest/lib/geckodriver/geckodriver.exe”);
System.setProperty(webdriver.Firefox.bin”, “C:\Program Files\Mozilla Firefox\firefox.exe”);
 WebDriver driver = new FirefoxDriver();
driver.get(Http://www.google.com/);

This code is used to generate a test for Firefox browser when executed. It will open the Firefox browser and go to the link which is specified in the code.
In this test, the Firefox will open selenium.org website and after successful loading of the file, the test will close the Firefox browser and execution will be completed.
You need to remember, if you want to move your project to a new location, the current address which you have specified in order to add Firefox.exe and geckodriver.exe will not run.
You need to specify their location again if you wish to move your project location.
Understanding the Code
1. Import org.openqa.selenium.WebDriver: This syntax is used to import every reference which is needed for the WebDriver This WebDriver is later needed to represent the new browser.
2. setProperty: This syntax is used to set the system property to have some value. The browser does not have its own inbuilt server which can run the automation code. Therefore, System.setProperty is needed for the browser to set a respective path.
3. WebDriver driver = new FirefoxDriver(): This syntax is generally an interface which contains methods defined by the user to perform on the Firefox browser.
4. get(http://www.google.com): This syntax will lead the browser to go to the specified link and open it.
Additional Tips:

  • Always run automation on a separate browser version
  • Use selenium 3 with latest (stable) version of Firefox
  • Have Java 8 or higher for Selenium 3

Why is TestNG Awesome? Advantages of Integrating it with Selenium

Basically, TestNG is a user – friendly automation framework that overcomes the drawbacks and limitations of Java Unit, thus introducing the entire new set of features which makes it more powerful and useful.

This automated testing framework helps in elimination of numerous limitation of the older framework. It facilitates the developer the ability to write more flexible and powerful tests.
TestNG Framework

  • TestNG is a testing framework designed for unit testing. Today it is used for every kind of testing.
  • Initially, it is developed to simplify a broad range of testing, no matter from system testing or Unit testing.
  • It is an open source framework which is inspired from the Java platform (JUnit) and NET platform (NUnit).
  • It can be used for any testing, be it API testing or UI testing.
  • It is introduced as a brand new automated framework whose functionalities make it more powerful and easier to use.

Features of TestNG

  • Maintains flexible runtime configuration.
  • Guards easy going plug-in API.
  • Supports Multi threaded testing.
  • Upholds parallel testing, group testing, partial testing and load testing.
  • Supports annotations of JUnit and have some more annotations to make testing easier.
  • Separates compile-time test code from run-time configuration/data info.
  • Supports testing integrated classes.
  • TestNG supports the ‘dependence’ method which is not available in JUnit.

How to Download or Install TestNG for a project
Before performing this step by step process, do not forget to visit these prerequisites to install selenium IDE.
In order to download TestNG plug-in, all you need to have is a selenium IDE and Active internet connection. But, if selenium IDE is already installed in your system, then follow these simple steps:
Step 1: Download and install the Java Software Development Kit (JDK)
Step 2: Download “Eclipse IDE for Java Developers”. You choose 32 bit or 64 bit as per your requirement.
Step 3: You can download the Selenium Java Client Driver. There would be different languages, choose only the Java from the options.
Step 4: Configure Eclipse IDE with Web Driver.
TestNG Basic Annotations
Annotations are a new feature in Java provided by JDK 5.0 version. Annotations can be used to describe metadata in java programs. To describe any information about the coding part, annotations are used. Following is the list of annotations usually used in TestNG:

Sr. No. Annotation Description
1. @BeforeSuite This annotation will always be executed before all tests are run inside a TestNG.
2. @AfterSuite This annotation will always be executed after all tests are run inside a TestNG.
3. @BeforeClass This annotation will always be executed before the first test method in a class is called on.
4. @AfterClass This annotation will always be executed after the first test method in a class is called on.
5. @BeforeTest Executed before any test method associated with the class inside <test> tag is run.
6. @AfterTest This annotation will always be executed before any test method associated with the class inside <test> tag is run.
7. @BeforeGroups This annotation will always be executed before the first test method associated with these groups is called on.
8. @Aftergroups This annotation will always be executed shortly after the first test method associated with these groups is called on.
9. @BeforeMethod This annotation will always be executed before each test method.
10. @AfterMethod This annotation will always be executed after each test method.
11. @DataProvider This annotation must return object [ ], it marks a method as supplying data for a test method.
12. @Factory This annotation will return the object and marks a method as a factory that will be used by TestNG as test classes.
13. @Listeners This annotation defines the listeners on a test class.
14. @parameters This annotation describes how parameters can be passed to a test method.
15. @Test This annotation marks a class as a part of the test.

Execution Procedure of Methods in TestNG with Annotations

import org.testng.annotations.Test;
import org.testng.annotations.BeforeMethod;
import org.testng.annotations.AfterMethod;
import org.testng.annotations.BeforeClass;
import org.testng.annotations.AfterClass;
import org.testng.annotations.BeforeTest;
import org.testng.annotations.AfterTest;
import org.testng.annotations.BeforeSuite;
import org.testng.annotations.AfterSuite;
 
public class TestngAnnotation {
// Case 1
@Test
public void testCase1() {
System.out.println(“Case I”);
}
// Case 2
@Test
public void testCase1() {
System.out.println(“Case II”);
}
@BeforeMethod
public void beforeMethod() {
System.out.println(“Before Method Annotation”);
}
@AfterMethod
public void afterMethod() {
System.out.println(“After Method Annotation”);
}
@BeforeClass
public void beforeClass() {
System.out.println(“Before Class Annotation”);
}
@AfterClass
public void afterClass() {
System.out.println(“After Class Annotation”);
}
@BeforeTest
public void beforeTest() {
System.out.println(“Before Test Annotation”);
}
@AfterTest
public void afterTest() {
System.out.println(“After Test Annotation”);
}
@BeforeSuite
public void beforeSuite() {
System.out.println(“Before Suite Annotation”);
}
@AfterSuite
public void afterSuite() {
System.out.println(“After Suite Annotation”);
}
}
Creating XML file in C:\>TestNG for executing annotations
<?xml version = “1.0” encoding = “UTF-8”?>
<!DOCTYPE suite SYSTEM “http://demo” >
<suite name = “Suite1”>
<test name = “test1”>
<classes>
<class name = “Annotation”/>
</classes>
</test>
</suite>
Test case compilation using javac
C:\TestNG>javac Annotation.java
Output:
Before Suite Annotation
Before Test Annotation
Before Class Annotation
Before Method Annotation
Case I
After Method Annotation
Before Method Annotation
Case II
After Method Annotation
After Class Annotation
After Test Annotation
After Suite Annotation
===============================================
Suite
Total tests run: 1, Failures: 0, Skips: 0
===============================================

Why use TestNG with Selenium?
Selenium tests alone cannot generate a proper format for the test results. However, with the help of TestNG, you can generate the proper format for the test results.

Read also :  10 Best Automation Testing Tools of 2018

TestNG is widely used by other selenium users because of its features and feasibility. Moreover, it is associated with several advantages through which a user can be very comfortable to leverage TestNG.
Following are the points why you need to use TestNG with selenium:

  • You don’t have to write a single line of code to generate a proper format for the test results as they are generated by default. The report usually includes a number of test cases runs or a number of test cases that failed or passed.
  • If you want to control the test executions, then you have access to multiple annotations which can control how the test can be run.
  • You can run your tests in arbitrarily big threads pools. You can simply group multiple test cases and convert them into an XML file and then set the priority of test case in a specific order.
  • It provides easy and flexible test configuration in which you don’t have to write a code to modify any test methods.
  • Using it you can create data-driven frameworks. You can use the @DataProvider annotation to support data-driven testing.
  • If you want to run your tests based on the parameters, TestNG supports parameter feature which will make your test cases or test suite very flexible. You can easily pass the parameter at runtime so that based on the requirement you can pass the parameter and you don’t have to modify your existing test.
  • If you have multiple classes to execute in the test suite, you can directly right click and run the complete test suite.
  • It is supported by a variety of tools and plugins. Also, it supports multiple IDE such as Webstorm, IntelliJ or NetBeans.
  • You can simply group the test cases with the use of TestNG. Suppose you have four categories of smoke, recreation, functional and non-functional. You can group all of these test cases and can run them individually.

Advantages of TestNG over JUnit                     
app testing

  • It gives an option to run out same test case with multiple sets of test data.
  • It provides default reports which are not provided if you are using JUnit.
  • It has a higher level of customization which enables the user to customize test case execution so that the user can run his script when something happens.
  • Test cases can also be grouped easily as compared to JUnit.
  • The annotations used in TestNG are very simple and easy to understand.


How to Integrate Maven and Jenkins with Selenium 

Using Selenium test scripts is easy but when it comes to build management and Continuous integration, Selenium alone is not that powerful.That’s why we integrate Maven and Jenkins with Selenium

You need to take help of other tools to integrate Continuous integration and deployment. This is exactly why Maven and Jenkins are needed.
What are Maven and Jenkins?
Jenkins is an open source continuous integration tool and it is cross platform which can be used on Windows, Linux, MAC and Solaris environment.
Jenkin will monitor a job which can be SVN checkout, cron or any application state.
It then fires an action when a particular step occurs in a job. Maven is a build management tool which makes the build process very easy.
With the help of maven you can define your project structure, dependencies and builds.
With the help of pom.xml you can define all the dependencies which would ease the process of build.
Maven automatically download the necessary files from maven repository and place them in. /m2 repository. Hence, we require Maven and Jenkins with Selenium.
Advantages of Using Maven and Jenkins

  • Jenkins provides a way to do smoke testing for every time the code changes and deployed to a new environment. It will make sure that the code is running properly.
  • You cans schedule your test cases with Jenkins so that if regression suite takes almost 6-7 hours to run then you can have nightly build run so that by the time you reach office it will be done.
  • Jenkins server will act as a common server for client as well as technical people to logon to it and see all test reports and test execution history.
  • Maven in turn reduces dependency on hard coding of jars.
  • Maven can make the build process very easy.
  • Also, at some time if you need to update the jars with a specific number, you don’t need to go to Build path and add that particular jar. You can just change the number of version in pom.xml and it will be done.
  • In a team where people are distributed across geographical locations it is easy to share artefact id and version id to clone the project rather than sharing on a common drive.

Steps to Install Maven with TestNg in Selenium
You should have Eclipse installed in your machines. Along with that, you need m2eclispe plug-in which you can download from Eclipse marketplace.
You can go to Eclipse marketplace and then search Maven and the first plug-in which will come, you can download that.
Let’s see how to create a Maven project.

  • Create a new Project by File -> New -> Other and then select Maven -> Maven project.
  • Click on Next and then you have to enter Artifact Id and Group Id. Group Id would be your Project Name and Artifact Id would be your Project folder name.
  • Select a template for your project. Select “Maven quikstart template”.
  • You will then get a WebDriver Test with a folder structure.
  • xml will be shown in the project structure. POM is the heart of the maven. In POM.xml project node you have to add following dependencies.

<dependencies>
<dependency>
<groupId>junit</groupId>
<artifactId>junit</artifactId>
<version>3.8.1</version>
<scope>test</scope>
</dependency>
<dependency>
<groupId>org.seleniumhq.selenium</groupId>
<artifactId>selenium-java</artifactId>
<version>2.45.0</version>
</dependency>
<dependency>
<groupId>org.testng</groupId>
<artifactId>testng</artifactId>
<version>6.8</version>
<scope>test</scope>
</dependency>
</dependencies>

  • This way, you can add dependencies in the POM.xml. You can search for dependency tag in Maven repository.
  • Create a TestNG class with name NewTest.xml and it will also be added to your project structure.
  • Now remember one thing that for running test through maven you need maven surefire plugin and along with testng.xml plugin for integrating with testng. Along with these two things, third plugin Maven compiler plugin is also required which is used for helping in compiling the code.

<build>
<plugins>
<plugin>
<groupId>org.apache.maven.plugins</groupId>
<artifactId>maven-compiler-plugin</artifactId>
<configuration>
<source>1.8</source>
<target>1.8</target>
</configuration>
</plugin>
<plugin>
<groupId>org.apache.maven.plugins</groupId>
<artifactId>maven-surefire-plugin</artifactId>
<version>2.20</version>
<configuration>
<suiteXmlFiles>
<suiteXmlFile>TestNG.xml</suiteXmlFile>
</suiteXmlFiles>
</configuration>
</plugin>
</plugins>
</build>

  • Now, you can go to Windows Path where pom.xml is placed. Open cmd there and fire commands.

1. mvn clean
2. mvn compile
3. 0mvn test // for all tests to be executed.
4. mvn -dtest // for a particular test to be executed.
Steps to Install Jenkins with Selenium
Let’s see how to configure Jenkins with Selenium so that client and all technical people would be able to handle a single server for all test results.
1. Click here and download correct package for your operating System. Then you can install Jenkins Unzip Jenkins to a specific folder and run its exe file.
2. When you are done with installation of Jenkins you have to fire a command in cmd to start your jenkins server.
java -jar jenkins.war
3. It will automatically host the server on 8080 port but if you don’t want it to run on 8080 port then you can specify the port number along with the command.
4. After that is done. You can visit https://localhost:8080 You can do the installation of necessary plugins. Then you can click on New Item and then select the Maven project.
5. Then you can click on Ok and a new job will be created with the name specified by you.
6. Now go to Manege Jenkins and then Configure Systems. Configure Maven and JDK there and go to Build Section and enter their full path of your pom.xml.
app testing
7. Now click on Apply. On the main page, click on “Build Now” link. Maven will automatically execute the test. After the build is done click on your project name.
8. In the left sticky bar you can see the execution history. You can click on the latest results to view the test results.
9. Even you cans schedule the test cases with Jenkins. You have to go to modify the configuration and there enter “Build Periodically” and enter the time in the manner like “0 23 * * *”. It will trigger everyday at 11 pm.
Conclusion
This way you can make your build process easier easy and can do continuous integration with Jenkins. This will increase the time efficiency and will help in better management of your test suite.

Recommended For you : 15 Top Selenium WebDriver Commands For Test Automation

Why the Need for Web Service Test Automation

Web service test automation solutions are the ones that help in testing and identifying whether a particular application communicates effectively and is able to access functions correctly from the web. These solutions also effectively help in confirming how a particular web service connected to them, behaves in different situations. In other words, this solution is an effective way to verify whether the services meet the terms of business logic and also deliver the desired output at the user’s end.
app testing
While it is well-known that web services provide flawless connection between two software applications over private intranets and the internet, the testing of these services is used to check the ways in which a single we service functions and managed load for a single client and balances the same with the increase in the number of users accessing it.
Web service testing is helpful in avoiding the delay in detection of errors, which, in turn, might lead to complex and costly repairs. When this process is automated, it gets easier to repeat tests as and when required. Therefore, using web services test automation is not only helpful in the development of sound and efficient web services development process but also in the assessment of their functionality, performance, and scalability.
Need of web services automation
While there can be numerous ways to conduct web services testing, but a typical one includes the following tasks:

  • Generating client or skeleton code for the web service.
  • Defining the required test inputs.
  • Imploring the web service using the client or skeleton code.
  • Generating client or skeleton code.
  • Response verification in terms of whether the actual response is similar to that of the expected outcome.

 Benefits of Web Service Test Automation
 Using web service testing automation can benefit the company in a number of ways. Some of these are as mentioned below: 

  1. Improved performance and reliability of SOA:

Service Oriented Architecture (SOA) is a set of services that communicate with each other. These services that are connected by web services, can either be a data transfer or a group of activities engaging in coordinating some other activity.
Using web service test automation tools can help in improving the performance and reliability of these SOAs. This is owing to their ability to communicate effectively and testing the ground on various measures.

  1. Eases testing:

Using a web service test automation tool helps in simplifying the process of testing web application. This is owing to their ability to effectively communicate with the web applications, which further adds on their ability to deliver the desired performance. Therefore, one can opt to use these tools for testing both SOA-based and REST API-based web services.

  1. Supports cloud environment

Cloud computing is a type of computing infrastructure and software model that gives its users access to shared pools of resources from any part of the world. This shared pool of resources can be computer networks, applications or servers and can be rapidly provided with minimal management effort, often over the Internet.
When a user is required to execute a test of web services that are available in a cloud environment, using a web service test automation tool makes it easier. Using this tool enables a faster and quicker testing.

  1. Simplifies testing over regression cycles

Regression testing cycle is a kind of software testing which is used to confirm whether software’s previous version performs in the same way like it did before the development of new version or interfacing with other software.
Web service automation helps in reducing the testing time and efforts it takes in testing a product over regression cycles.

  1. Ensures complete testing of product

 Using web service test automation vanishes the concept of testing one or some aspects of particular software. Instead, making use of this tool ensures a 100% functional test coverage of the same, hence, ensuring better performance.
It is, therefore, advisable to the companies to use this web service test automation. The reasons are multiple, from ease of use, reduced time to better performance.

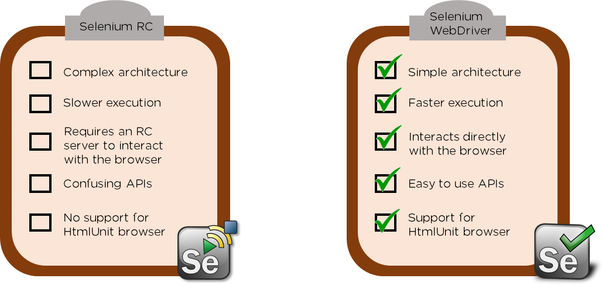
Difference Between Selenium RC and Webdriver

Testing is an integral part of any product’s development. Therefore, it is important for every organization to have a stringent quality testing strategy and framework that helps it ensure the best quality of its products. While a number of software are already present in different frameworks in the market, Selenium is one of the most preferred one.
Difference Between Selenium RC and Webdriver
Selenium is defined as a portable software-testing framework that can be used for web applications. It can be used for authoring tests without the need to learn scripting language Selenium IDE and test domain-Selenese to write tests in a number of popular programming languages, including C#, Groovy, Java, Perl, PHP, Python, Ruby and Scala. These tests can used to execute against different-or latest web browsers.
A user can use selenium on Windows, Linux, and OS X platforms as well. It is an open-source software, released under the Apache 2.0 license and is available for free for downloading.

Selenium includes a number of components and each of these have a specific function to perform development of web application test automation. Some of the common components are Selenium IDE (integrated development environment), Selenium client API, Selenium RC (Remote Control), Selenium WebDriver and Selenium Grid.
Difference Between Selenium RC and Webdriver
 While it is true that Selenium WebDriver python test automation framework is a successor of Selenium RC, there are still a number of similarities as well as differences between the two. This article can help you develop a better understanding about the same and help you avoid any sort of confusion between the two.

  1. Browsers

Both these tools can be used on different browsers such as, Firefox, IE, Chrome, Safari, Opera and others.

  1. Recording and playback

Whether a user is using RC or WebDriver, it is possible for him/her to record as well as playback the execution of a test.

  1. Executing test script

While RC requires one to start server again before executing the test script, the same is not a mandate in case of WebDriver.

  1. Type of program

RC is a separate java program that allow a user execute HTML test suites. Whereas WebDriver is a programming interface which is available in multiple languages.

  1. Platform for interaction

RC server executes the test as JavaScript commands whereas WebDriver performs on Selenium commands and a browser.

  1. API

The API (Application Programming Interface) of RC is easy and small. But these contain a lot of redundancies and a lot of confusing commands. Various browsers interpret commands differently.
On the other hand, the API of WebDriver is large and a bit complex. These are also simple to comprehend and do not contain any sort of redundancy or confusing commands.

  1. Object-oriented

Selenium RC’s are not much object-oriented whereas Selenium WebDriver’s are completely object-oriented

  1. App testing

One cannot test any sort of iPhone or Android application on Selenium RC whereas the same can be done using WebDriver.

  1. XPath attachment

Selenium RC requires one to attach complete XPath whereas the same is not mandatory in case of WebDriver.

  1. Implementation of listeners

It is not possible to implant listeners in Selenium RC whereas one can do the same with a WebDriver.

  1. Execution speed

As compared to Selenium RC, WebDriver is faster in its execution as it is directly connected with the browser. The use of JavaScript program called Selenium Core slows down the Selenium RC’s speed.

  1. Syntax

While the syntax of RC is quite complex, the same is simple and easy to understand in case of WebDriver.
The basic purpose behind introducing Selenium WebDriver test automation framework in the market was to deal with the problem areas of Selenium RC as well as increase the scope of testing.

It is recommended to make use of Selenium WebDriver test automation framework for testing purposes however, the same depends on one’s choice as well the requirements.

5 Major Types of Test Automation Frameworks

Test automation frameworks uses a software to execute tests and then determine whether the resulted outcomes and the predicted outcomes are the same or not. Every organization needs software testing adequately, as quickly and thoroughly as possible. To accomplish this, organizations are turning to use automated testing methods.
As test automation frameworks are application independent, it has the ability to expand with the needs of each application. It promotes automation technologies to improve test coverage and gain better quality products. These frameworks help testers to save thousands of manual test execution hours and reduce costs significantly.
Let’s briefly look into the 5 main test automation categories and its functions:

#1) Linear Automation Framework:
This is the most simple framework of all types. Here, individual scripts are used for each test case and they are executed individually. This process enables the conversion of small or medium sized manual scripts to corresponding automation scripts.
Key Features:

  • Very little planning is required to work with this framework
  • Testing doesn’t take much time
  • A tester does not need detailed knowledge of the framework as it uses record and playback to create linear scripts
  • Created scripts are independent of each other

#2) Module-based Testing Framework:
This framework is based on object oriented programming method and uses the concept of abstraction. While testing, the application is divided into different modules, where each module consists of individual test scripts. The separation of modules is done using an abstraction layer, so that if any changes occur, it wouldn’t affect the other modules.
Key Features:

  • This framework includes a high level of modularization, which reduces cost and makes maintenance much easier
  • It’s pretty much scalable
  • If defects are detected, only that part of the test script needs to be changed. The rest remains untouched
  • Create new driver scripts for performing tests easily

#3) Data-Driven Testing Framework:
In this type of testing, the necessary inputs and expected output results are stored in separate data files. Here, a single driver test can execute all the necessary test cases with different sets of data. A driver script consists of functions like reading the data files, navigating through the entire program etc.
Key Features:

  • It reduces the number of overall test scripts to implement all the available test cases
  • Test data used can be created before test implementation gets ready or even before the testing system or environment is set up
  • When it comes to maintenance and fixing of bugs, this framework ensures greater flexibility
  • To generate test cases, less amount of codes are used

#4) Keyword-Driven Testing Framework:
This is an application independent framework that utilizes data tables and self-descriptive keywords, which explain the functions to be performed on the testing application.
The external input data file showcases the functions through ‘directives’, which are seen within the test scripts. These directives are called keywords. Therefore, this keyword based testing is considered to be an extension of the data-driven framework.
Key Features:

  • Keywords can be re-used in multiple test cases
  • An automation expertise is not required to create new or maintain the existing test cases
  • Reduce the number of overall test scripts
  • Use a minimal amount of codes to generate test cases
  • For each test, the functionalities are documented in a table as step by step instructions

#5) Selenium Automation Framework (SAF):
SAF is the most widely used, customized, open-source framework today for automated web application testing. As it reduces the initial coding efforts, SAF increases the efficiency of automation than any other framework.
SAF helps enterprises to speed up the testing mechanism by using accelerators at the test design layer and provides a comprehensive reporting strategy for managing tests.
Key Features:

  • Intuitive and user-friendly interface for creating and executing test suites
  • Flexible, robust and extensible framework to carry out test automation on diverse sets
  • Enables users to perform multiple testing processes for web apps
  • Detailed reports on test execution results with consolidated summary and snapshot of errors
  • SAF is built on open source tools, libraries or frameworks that reduce cost for users
  • Avoid redundancy on test case execution
  • Increased test coverage to enhance quality and reliability of the end product
  • Has high interaction with Selenium community, therefore, enables quick updates and shorter learning curve
  • Increases flexibility of used resource and time


In order to move with the pace of software testing process, development and delivery, it is essential to implement the most effective, reliable and reusable test automation frameworks. It’s not advisable to still hang on to the traditional methods as tools alone can never provide a long-term automation success, when compared to the other latest test automation frameworks.

6 Popular Myths in Test Automation You Must Know

Despite the several benefits test automation has to offer, many software testers still find excuses to not completely utilize these benefits. Faster releases, quicker feedback, frequent test execution, increased test coverage to development team are a few of the many advantages it possesses. Quite a few myths surround test automation and this blog will help you to identify them and embrace what it has to offer.
app testing
The most challenging task for a software tester when it comes to test automation is to understand its limitations and set goals accordingly.
Myths Surrounding Automated Testing

  • Myth #1: It’s better than Manual Testing
  • For those who claim this, you need to understand one thing; automated testing is not testing per se. It is checking of facts. When we have certain knowledge about a system under test, we enforce checks in the form of automated testing. The result of such a check will help confirm our understanding of the system.

However testing is a form of investigation, which gives us new information about the system under test. Hence we should refrain from being lenient to one or the other since both methods are required to get quality insight about an application.

  • Myth #2: 100% Automated Testing
  • 100% test coverage is impossible to achieve; and the same goes for test automation. While it is possible for us to increase test coverage by using more data, configurations, covering various operating systems and browsers, achieving 100% is an unrealistic goal.

More tests don’t mean better quality or confidence. The important thing is how good your test design is. Focus need to be put on the more important areas of functionality rather that chasing a full coverage.

  • Myth #3: Quick ROI Every Time
  • When implementing a test automation solution, the development of a framework is necessary and this will support operations.  This can be useful and meaningful for test case selection, reporting, data driven, etc. The framework development should be considered as a project on its own and thus requires an array of skilled developers. The process is also a time consuming one.

Scripting automated checks takes longer initially even with a fully functional framework. Hence when it is necessary to provide a quick feedback on the new feature, checking it manually is faster.

  • Myth #4: Automated Checks Have Higher Defect Detection Rate
  • While it is true that vendor-supplied or home-made test automation solutions are highly capable of performing complex operations; they will never be able to replace a human software tester. He is capable of identifying even the most subtle anomalies in the application.

An automated check is capable of checking only what they were programmed to. Therefore the scripts are only as good as the person who wrote them. If not scripted properly the automation test can easily overlook major flaws in these applications. In short, checking can prove the presence of a defect, but not necessary its absence.

  • Myth #5: Unit Test Automation is All That We Need
  • It should be understood that a unit test is only capable of identifying programmer errors and not his failures. When all the components are tied together to form a system, a much larger aspect of testing comes into the limelight. Most organization has their automated checks at the system UI layer.

The sheer volatility of the functionalities during development makes the process of scripting automated checks a tedious task. Spending time on automation for a functionality that might change is not advisable and may cause difficulties in the later stages of development.

  • Myth #6: System UI Automation is everything
  • Relying solely on automated checks, especially at UI layer can have a truck-load of negative impacts. The development stage will face numerous changes in the UI in the form of enhanced visual design and usability. If a similar change in the functionality is not in place a false impression about the state of the application will be indicated in the checks.

automation testing
Automation checks in the UI layer has a slower execution speed compared to the ones in the unit and API layers. This will result in a slower feedback process to the team. The root cause analysis takes longer as the exact location of the bug is unknown. Therefore it becomes necessary to identify the layers where the use of an automated test may become helpful.
Automated checks is not a onetime thing, it needs constant monitoring and updating. Above all you need to understand the limitations and set realistic goals to get the most out of you automated checks and most importantly your team.