Why Should You Shift to Functional Automation Testing?

Do you get bored with manually testing your code for bugs again and again? Proper functioning of the code is the foremost thing that matters.  If your code does not act as per the requirement specification, it is no longer of any use.

Functional testing assures that your code functions as per the requirements. But alas! Even a small change or an alteration in your code can alter its working. Hence it is advisable to retest your code every time a change is made to the code.
But running same test cases again and again can be daunting. And there enters automation testing. Automating your functional testing can relieve you of a lot of burdens and can save you a lot of time.
What is Functional Automation Testing? 
Before moving on to functional automation testing, let us first know a little about Functional Testing.
As discussed earlier functional testing confirms that every function of your code works in accordance with the requirement specification. Functional testing requires you to send appropriate inputs and to verify the actual output with the expected output.
But being the foremost quality assurance process, you may be required to repeat functional testing. And hence to ease out your work it is advisable to automate your functional testing process.
Functional Automation testing is a process that assists you in easy and faster execution of your functional test cases. Manual testing requires you to execute the test case step by step, which can be time-consuming as it is done by hand.
And to outcast, this peril, automating functional test case comes as a savior saving on both time and efforts. It helps in executing functional test cases automatically with no human intervention.
Before moving forward let’s look into some drawbacks of manual functional testing.
Drawbacks of Manual Testing
Here are some weaknesses of manual testing that promote testers to adopt automated testing:

  • Manual functional testing is very time-consuming.
  • Functional testing like regression testing becomes very repetitive and losses testers’ interest.
  • It requires many resources.
  • It might miss out on a few scopes of functional testing.

Why Functional Automation Testing?
Considering the current scenario where we develop software at a fast speed and alterations and enhancements are done at an equally fast speed, we need a methodology where we can test our code with an equally high speed. And that is where a need arises for functional automation testing.

Know More: 7 Best Practices You can Consider for Functional Testing

Companies are now moving toward Agile and DevOps, increasing the importance of automation than ever before. The frequent integrations and enhancements in the code require test cases to run quickly and accurately. And automation functional testing assures the best accuracy and quick run avoiding all human errors.
The main reason for a switch to functional automation testing is to save on both time and money. It assists the quick feedback to the developers for any bugs and errors.
Apart from time and money savings, Functional automated testing also benefits in:

  • More precise benchmarking.
  • Fewer faults because of human error.
  • Gives wider test coverage.
  • Assists reusability.
  • Helps in faster release of the software.
  • Assists in faster feedbacks to the developers about the bugs in the code.

So are there any downsides to creating automated tests?
What’s the real story?
Functional test automation as software development
Functional automation tests or any other automation tests are a piece of software code that relies on one or other programing language. This makes it a complete software development activity where you develop a code to test another piece of code.

Developing functional testing code is equally complicated like other software development projects and presenting similar issues like them.
So take care to follow software development best practices to develop a successful functional automation test case.
Should you automate all your test cases?
Automating all the test cases does not seem to be a good idea. Rather, not everything is even automatable. To look out for what test cases you should ideally automate, consider the following things:

  • Deterministic test cases
  • Automate test cases that do not require manual communication
  • Test cases that deals with fiscal-related areas of the software
  • Test cases that deals with risk areas of the software
  • Test that requires running on different data sets.
  • Test cases those are difficult for manual testing.
  • Test cases those are required to run on various browsers, systems, etc.
  • Test cases that is time-consuming.
  • Stress/load test cases
  • Unit test cases

You can consider automating the more time-consuming and repetitive test cases. Though, the criterion may vary depending on various other conditions.
But what about Functional automation testing ROI? Let’s have a look into it.
Functional Automation Testing ROI 
Finally, it is ROI that majorly governs any business decisions. Whether to automate your test cases or not; is also largely dependent on ROI. The determination of ROI for automation testing is tricky. Here is a small formula that can help you find a rough estimate of the automation cost.

Know More: Difference Between Functional and Non Functional Testing

Automation Cost = automation tool cost + cost of the labor to automate test cases + maintenance cost
If your automation test cost turns out to be lower than the manual testing cost, you should look out for automating test cases.  Moreover, testing cost increases with every run in manual testing, whereas the ROI adds up with every run in automation testing
But there are some other factors apart from ROI that can affect your decision to whether or not to automate test cases.
What Not to Automate
Functional automation testing, no doubt save time and efforts. But automating all the test cases is not a good idea. There are certain types of test cases you should not consider automating.

  • Test cases that are to be performed only once.
  • Ad Hoc based test cases.
  • Test cases that do not have a predictive result.
  • Usability test cases.

Be wise in your selection of test cases to automate. Functional test case automation can be highly beneficial for you if done wisely.
Conclusion:
Functional testing is one of the most important phases of STLC. But sometimes functional testing can be very time-consuming and frantic task.

Automating function test cases is one most apt solution to overcome this snag. Functional automation testing can save you both time and money.
So be clever and consider functional automation testing for your upcoming projects.

Top 11 QA companies in India

Software testing or Quality Assurance is one of the most essential domains in the IT industry. Over the years, the domain has taken a new turn with a huge influence on the success of software or application.

This is helping in improving the business image and enhancing the quality of a project. The best thing is that it saves thousands of bucks to maintain or building the whole process or testing. To matter easier, there are a number of topmost companies that work specifically in the testing industry only. They provide cost-effective solutions to software with the best strategy to keep the top-notch quality.
Here is a list of top 11 companies that work in the testing domain to offer best services in India.
1. ISHIR
ISHIR’s Independent Testing and Quality Assurance (QA) services ensure that applications are vigorously examined using test methods with industry standards and QA processes. ISHIR has people and processes to build a test plan abroad for our clients. They follow rigorous testing procedures and standards and work in a structured environment that meets the Level 3 standards of SEI CMM. ISHIR offers a complete range of Software Testing and Quality Assurance (QA) services by maximizing the quality, performance, and availability of the software application while managing the costs and risks for our clients.
2. Testbytes
It is one of the biggest QA companies in Pune. The company is known as a community of software testers who are committed towards their profession and love to test bugs. The expertise of the company lies in App Testing for both Android and iOS. Along with this, Testbytes assures qualities of Web Apps together with automation testing, game testing, and desktop testing. With the best testing tool, the company ensures high software performance, utmost security, and functionality.
3. Resourcology
Another of the good testing company is Resourcology that deals in complying software development and testing cycle based on the concept of SDLC. In addition to this, the company covers testing of ERP, CRM, SAP, Web, and Mobile and all other types of Mainframe app. Their goal is to provide the best and error-free service to the customer ensuring that no errors are left. They also offer a trial form to ensure that the quality and solution is to the mark before signing the project.

Know More: Top 10 Mobile App Testing Companies in India

4. WebImprint
They are software testing Automation Company based in Mexico, India and Dubai. They provide quality management services and automated tests. They are also a solution provider for security testing, automation, acceptance testing, QA quality management system, validation testing, functional testing, performance testing, regression testing, system testing, integration testing and unit testing. They offer and guarantee faultless software at the customer’s end.
5. Mann India Technology
The Company is a Noida based QA  company that works with software development and is registered with the government as a private In addition to this, the company is famous for testing, development, design, on-time delivery, etc.

6. CresTech
CresTech is a leading software testing company with 300+ consultants spread across its delivery centers at Noida, Gurugram, Bangalore, Australia, and California in the US. It is an Independent company in the field of software testing to be assessed at CMMI Level 3 SVC. In addition, they work for test optimization, application performance, and transformation, application security, test automation, and mobile testing, etc.
7. Ironcode Gaming
This is the professional, creative and experienced company based in Dehradun. They deal in the development process of games and test off the product accurately. They work on different platforms such as Android, iOS, Window, Mac, and On top of that, the cross-platform is the main niche follow up by them and games are famous in the e-commerce market with Google Play, Amazon, Stream, Appstore, BigFish, AOL, Yahoo and Google. Their experts work in the direction of 2D/3D art, Game designing, Angkor, Riotball, Standing Game, etc. In addition to this, they follow the development concept to get the best service and work routine to follow up the testing and games.
8. Vyshnavi Information Technology
It is an international Information Technology Company rooted in the year 2001 with headoffice in Bangalore. The company has its development centers in Pune, the United States and Canada. . The company is a reputed firm for its Development, Design, testing, etc. Apart from Bangalore, the company also has offices in the US, Pune, and The main product for them is testing with a turn-key solution in the e-Governance, retail, mining, facilities, utility, etc. The firm is also famous as a product of Oracle Gold Partner and Microsoft Certified Gold Partner.

Know More: Top 25 Software Testing COmpanies to look out for in 2018

9. Terstriq QA Lab
With more than 12 years of experience in the industry, Terstriq has managed to have a strong reputation in the market. Quality Assurance, Project Management, Requirement Analysis, Test Planning and Execution, Software Quality Consulting and so forth serving to a vast industry domain, in the field of e-commerce, tourism, education, real estate, telecommunication, and many related fields.
10. Krify-Innovations
For the game fanatic, this is the QA company that might be familiar with and works in the direction of localization and working domains. There are a number of different platforms on which the company works in such as Mobile applications, Web, Wearable app development etc. They have a team of professionals that work for in-house games as well that include designing, development, testing, promotion, and With the workplace at Kakinada, Andhra Pradesh, India the company has managed to gain huge popularity over time along with global establishment at Chigwell and UK.
11. T&A Solutions
It is the Chandigarh based QA company that deals in the testing and development phase. The company deals in Manufacturing, R&D, Industrial Engineering, and Information Technology & Telecommunications Media Process Industries, Entertainment & Advertisement, Banking & Financial Services, FMCG & Consumer Durables, Pharmaceuticals & Medicine, IT Enabled Services Consulting, Marketing, Textiles & Garments Industries, Human Resource Personnel, and Industrial Relations.

The company is well known for its amazing and effortful work in development and non-development work phase. They are one of the major companies that have a chain of top quality and quantity workflow with a valuable customer.
These are a few of the top qa companies in India that are having a huge impact on the market over time. However, they are now reaching the global market and time is not far when they will be able to witness the success all across the world.

Mobile App Installation Testing: Ultimate Guide

Installation is a crucial aspect for the survival of any app. it doesn’t matter how well your app is working a minor flaw in installation sequence itself is enough for users to discard your app and never look back at it again. So, for the assurance, you need app installation testing.
Since we all believe in the saying that“Customer is the king” and “The first impression is the last impression”.
It is a must to keep our customers happy and leave a good impression on them. And thus it becomes very important to test your application for successful implementation to leave a good first impression on your customers.

So let us learn more about Application Installation Testing.
What is Application Installation Testing?
Application Implementation testing aka Application Installation Testing tests the successful installation of your mobile application across various mobile gadgets, models and operating systems.
Application Installation Testing is generally carried out before your application first interacts with its customers.
Application Installation Testing is the last phase of software testing life cycle (STLC).

Why should you do Application Installation Testing?
What if while installing your application, it corrupts the complete OS of user’s high-end mobile phone? FURY! Is all that you can expect.
To avoid such situations, it is a must that your application goes through an intensive round of Application Installation Testing.
Here are a few aspects that might help you apprehend the importance of Application Installation Testing.

  1. The first impression promotes the users to go deep into that thing and explore it. With an application, its implementation forms the first impression on its customers. Make sure your application is fit to be successfully installed by proper Application Installation Testing.
  2. Application Installation Testing makes sure that all the components of your application are entirely coordinated.
  3. Apart from Application Installation Testing, you cannot take application uninstallation testing lightly. After you uninstall the application from your hand-held device, it is important that all the related files are also deleted and application uninstallation testing ensures it commendably.


Type of Mobile Application Installation–Which one does your application supports?
Silent Installation: This kind of mobile Installation does not prompt any messages at the time of its installation. The related messages are saved in a log file.
Attended application installation: In attended mobile application installation, when you install your application; you are prompted and asked for various inputs. Few of the inputs that might be required from your end are:

  1. Accepting EULA/end user license.
  2. Entering the password is another input that you might be asked for.
  3. You can also be asked to give your input on various errors like internet connectivity issues.
  4. Some bigger applications can also ask you to use WiFi connection instead of mobile data for their installation.

Unattended mobile installation: In such type of installation you are not prompted during installation but if user intervention is required, it is done using an answer file where user mentions all the inputs that are required for installation.
Headless mobile installation/Network mobile Installation: Sometimes mobile networks install apps on their user’s mobile devices without having physical access to their devices. Such applications are installed from a network on a targeted mobile gadget.
Clean mobile Installation: In such mobile installation no older version of the application is installed, and it is being installed for the first time.
Automated mobile Installation: Such mobile installation is apt for applications where some prerequisite conditions are set and on meeting them the installation automatically starts.
Like for a few big applications user set a condition to be installed when the WiFi connection is on. When the application detects a WiFi connection on the gadget, it automatically installs it on the device.
Now when you know what type of installation does your application supports, its time to move on further.
Things to keep in mind before performing Application Installation Testing:

  1. Operating systems your application supports.
  2. Type of installation your application performs.
  3. The operating system on which you have to test your application.

How to perform Application Installation Testing?
Testing your application for proper installation is a must for a proper kick start of your application. Here are the steps that can help you carry out the testing properly.

  1. Check for an existing application and validate if your application checks for them too.
  2. Validate if installers draw all the instructions properly.
  3. Stop the installation process in between and check if the system returns to its original state.
  4. Manually check for the disk space and then validate if the application installer calculated the disk space appropriately.
  5. Confirm application responses for low disk space. Test if your application returns an appropriate error message when the disk space of your device is low.
  6. Test for registry changes that take place during the application installation process.
  7. Another important part that you need to consider isapplication uninstallation testing. After you uninstall the application from your hand-held device, it is important that all the related files are also deleted and application uninstallation testing ensures it commendably.

Know More: How To Test A Location-based App?

Test Cases for Application Installation Testing
Typical test cases you can test while performing Application Installation Testing:

  • Take into account your requirements and consider Test cases for all workflows.
  • Include test cases to check if the old version of an application is already installed and if it is available, and then have a test case to verify the installation of the application on the same path.
  • Have Test cases to check the Disk Space availability for installation.
  • Include Test cases which verify that your application prompts appropriate error message if an error occurs during installation.
  • Have Test cases to test the disk space before and just after installation.
  • Include Test script for checking the changes in the registry.
  • Include Test cases for the installation’s forced stop.
  • Include Test cases for custom installation and Default installation path.
  • Test your application installation when some other application of similar type is running concurrently.
  • Have test cases to test your application installation while an application that uses a lot of RAM for its operation is running.
  • Have Test cases for insufficient RAM condition and corresponding error message for it.
  • Test for inadequate disk space and corresponding error message for it.
  • Test application installation under high security, when the Firewall is on.
  • Test your installation process for variable Network speed.
  • Have test cases for multiple Concurrent installations.
  • Include Test cases for checking the Time in which installation and extraction process is completed.
  • Include test cases to test the path of extraction of application.
  • Test the log files that contain a list of all the events of installation.
  • Your testing should include test cases for Uninstallation and to test whether all related files are removed at the time of uninstallation.
  • Test for patch installation and Update installation.
  • Have Test cases to check uninstallation behavior when it is stopped in midway.
  • Have test cases to check the installer’s reaction when a newer version of the application is present, and the user is trying to install an older version.
  • Test if an older version of your application exists, the newer version is stored on the same path.
  • Have test cases for various interruptions like an incoming call or a message, low battery, putting in the charging socket, etc.
  • Have test cases to check the path of installation both in SD card and phone memory.


Challenges incurredinApplication Installation Testing
With, various mobile gadgets and operating systems the Application Installation Testing requires a complex execution and becomes time-consuming. It can also become very challenging sometimes. Some common challenges that can be faced while performing Application Installation Testing are:
Compatibility

    : With the wide increase in usage of mobile phones, year on year companies keep bringing new models of mobile phones and better versions of OS. It is important to check that your application is compatible with all of them. Checking your application’s compatibility with each of the gadgets and OS comes very challenging.

  • Interruptions: Testing should be done in various conditions. There are various conditions where your installation process might be interrupted like by an incoming call, low battery, a ping, etc. Checking for all such conditions can be another challenge for the tester.
  • Application Installation Testing is time-consuming, and the challenge is further enhanced with the running of multiple test cases on different configurations.
  • There are no clear test models, tools and test coverage criterion for Application Installation Testing that further increases the challenge for the testers.


Conclusion:
With the mobile application development industry blooming at a faster pace and more and more people finding their career in this field, it becomes very important to be best in it to survive this very tough competition.
Hence to offer your best make sure your application is free from all kinds of bugs and defects. And Application Installation Testing promises you a good starting interaction with your customers.
So make sure to conduct a round of Application Installation Testing before you launch your application in the market.

How To Test A Location-based App?

Geolocation is an important feature if you are developing a social media web or mobile application. According to a 2016 report by Pew Research Center, 90 percent smartphone users in the United States always keep the geolocation feature on.
There are bazillion apps out there that use GPS based features as the core functionality. But are they all successful?
No! Many of them fail owing to the lack of proper testing. What’s needed is correct methodology, tools, and the right team.

Click here to download our latest PDF on a GPS software system we tested lately

Testing a location-based app using mock location

To make the testing possible, you need a location simulator. Xcode is a popular simulator, which is used to test iOS apps. You can also use Location file formats called GPX and KML.
GPX or GPS Exchange Format is a document available in XML data format used to exchange location information of GPS data between your mobile application and the web service.

On the other hand, KML is the format the displays geographical data on Google Earth and other applications. It has a tag-based structure that uses nested attributes and elements, which is very similar to the XML standard.
To generate GPX or KML, you can use the many generators available online. Some of these include My Tracks, Google Earth to ADT plugin, RunKeeper, Google Earth, and KML Generator.

Generating GPX file using RunKeeper

Using RunKeeper is fairly simple but requires a bit of physical work. Let’s take a look:
Step 1 Download the RunKeeper app on your mobile phone.
Step 2  Finish the sign-up procedure and go to open ground. Make sure there are no buildings around.
Step 3  When you reach there, click on Start Activity and start walking around.
Step 4  Keep walking until you feel you have enough data. Hit STOP and click Yes I’m Done. Save the file and go back to your workplace.
Step 5  Open the RunKeeper website and log in using your username and password.
Step 6 Click on Activities and look for the Export GPX option. Download the file and save it on your computer.

Testing an Android App

Before you begin, create a GPX or KML route as mentioned in the images. Download Emulator Control and open the files on it (only one file at a time). Use DDMS perspective of Eclipse with ADT Plugin.
Step 1. Open Eclipse and click on Create a Project. Create an application that listens to Location Updates for the designated location provider.
Step 2  Click on Create Emulator. Go to your application’s folder in the project explorer. Right click on it and go to run as. Choose the option Android Application.
Step 3  Open Google Map. Go to DDMS and select Emulator Control.
Step 4  Go to Location Control, click on GPX, and open load your GPX file.
Step 5  After it uploads, select the file and hit the press button. Now you can start selecting mock locations. The process is the same for KML files.

Testing an iOS app

To test an iOS app, you will need a slightly different GPX file format. Use RunKeeper to convert the above Android-compatible route to iOS-compatible route. Also, you will need xCode simulator for this process.
Step 1 Open xCode project. Click Product > Debug > Simulate Location > Add GPX file to Your Project.
Step 2 Click on Location icon and then select your GPX file. The point on the map will start moving and you can start testing.

Testing location-based web applications using a mock location

With websites and web applications, testing geolocation is super easy. All you have to do is install VPN or Virtual Private Network, which is software that hides your current location.
You can send data without anyone else being able to track it. When you activate it, you simply have to change your current location to any location you want to and start testing.

Tips to remember while testing location-based apps

Location-based testing is challenging, which means you need to pay extra attention while performing it. Here are some tips that will help you out:

1. Mention the exact location

Choosing a location that is less than 100 meters from your point of testing can create a big difference in the results. If you aren’t sure you have pointed the right place, enter latitude and longitude of that location. You can find it easily on the internet.

2. Test flight mode

Testers often forget to test how the app works when the phone is on flight mode. It gives interesting results, so make sure you perform it.

3. Testing different conditions

Using a mock location to test is just one of the many conditions that you need to test. Others include app performance in motion, while talking phone, and during signal loss. Get creative and think of other conditions.

4. Check power-saving mode

When a person activates their phone’s power-saver mode, it has an effect on the GPS. Check how this affects your app’s performance. Also, if your app offers a power-saver mode, check the feature’s performance when you activate it.

5. Signal strengths

Always check your app’s location feature at varying signal strengths. It should be able to support GPS the maximum even at the lowest signal but if it doesn’t, you need to go back and make the changes. You can also check using different internet sources including Wi-Fi and 3G or 4G mobile data.

Perform a variety of tests while testing at mock locations including usability, security, functionality, and load testing.

7 Important Tips for Successful QA Outsourcing

Regular Quality Assurance of a product is a useful solution for detecting small bugs before they lead to severe issues.

Frequently, an in-house team might not have sufficient time or assets fundamental for complete QA testing process, driving numerous organizations rather outsource this task.

The Benefits of QA Testing Outsourcing

To begin with, you should know the benefits of outsourcing QA requirements, so that you can without much of difficulty can settle on a smart choice for your product testing necessities.
Because of the simplicity of assigning the QA workload and cost-adequacy, outsourcing QA administrations have turned out to be very influential.
Here are some essential advantages that QA outsourcing team can return to your business –

  • It saves your costs from investing in resources that you would have generally put into obtaining extra hardware and software.
  • QA outsourcing service providers guarantee your venture gets full coverage with the most exceptional testing tools.
  • Outsourcing helps in limiting the endeavors of the management.
  • It diminishes the general time period of the software development cycle. Thus, giving adequate time to market.
  • It can offer you the chance to get services of the fantastic outside aptitude and talent.
  • The final product delivered will be high in quality with the top-grade functions.

But before trusting the nature of basic software with one of the QA testing outsourcing agencies, the organization must consider some elements of QA vendor. So, with this post, we will tell you 7principles for successful QA outsourcing service to accomplish the ideal outcomes.

Know More: QA Career Path: What You Need to Know!

Portfolio

Study the organization’s portfolio as far as possible like its mission, vision, goals, involvement, and existing client. The organization ought to be settled in the outsourcing world and have decent compatibility in the industry.
You need to have a check on three factors to understand their capabilities:

  • References:

Obviously, you’ll put the proper effort of checking the references that the service provider shows to you, yet go past that and glance around.
Which QA outsourcing service providers are gaining progress in the business? Check market analysis and analyst reports? You will get a more transparent image of your imminent outsourcing company’s position and share in the overall industry.
When you get positive references, try to give accomplices opportunities on smaller undertakings first and afterward increment the range of responsibility as you develop trust.

  • Industry expertise:

Every industry space has its one of a kind business processes, so getting testers who have never served in your industry vertical will just back off your testing endeavors.
On the other side, a group of QA experts who see how your business functions not exclusively will add proficiency to testing, yet additionally can support in centering your quality endeavors on guaranteeing that the regions with the most top level of business impression get the most noteworthy testing preference.

  • Strong technical skills:

Proficient QAs give excellent testing administrations because they additionally have a certain engagement in software development. Thinking about various development levels and remaining mindful of different subtleties, they effectively develop automated tests.
Furthermore, the most talented software testers are ISTQB/CTAL/CTFL certified that proves their skill in testing technologies and methods which are compliant to industry norms.

Engagement models

Amongst the essential choices to make when outsourcing QA tasks are choosing an engagement model. A few variables go into this thought, covering -choosing the geological area, features of global business policy, understanding the landscape and settling on the outsourcing methodology.
The fundamental part of this determination is whether you’ll execute total outsourcing or incremental outsourcing.
Incremental outsourcing strategy enables you to relieve your risk by separating work into little, progressively reasonable tasks. Total outsourcing includes re-appropriating various ventures and projects to a company.

Sign a General Service Level Agreement

It is the agreement signed between the client and the service provider which characterizes the result anticipated from the QA outsourcing company.
A service-level agreement (SLA) ought to never be disregarded when you need your outsourcing partnership for software testing. An SLA secures the two parties. Further, it gives a nitty-gritty layout of venture particulars and due dates while tending to different problems that may emerge while testing.
At each level of testing, there ought to be clear standards and rules, as a general blueprint of your venture might be excessively dubious and can prompt miscommunication.
Some key rules to have in your SLA are –

  • Product quality measures including test case performance, test plan quality, defect detailing quality, traceability, and so forth.
  • Project management and reporting schedules
  • Knowledge exchange
  • Procedure compliance

Adaptability and Security

An outsourced QA staff needs to manage out of the blue changing necessities, testing plan changes, regression errors, missing testing records that are to be reproduced. An accomplished service provider has their skill and best practices to work in this continually evolving condition.

Plus, they should be sufficiently flexible to satisfy your particular internal procedures and principles.
Their testing system likewise should be adaptable to address the present undertaking’s issues and to adjust automated, and manual testing endeavors as presented automation can reduce the testing time and spending plan while various testing types better stay manual not to negotiate the testing quality.
Securing data is vital from a business point of view. QA outsourcing companies have data security strategies and norms. Numerous companies get their committed staff to work in an Offshore Development Center (ODC) where the group just work for a specific customer venture locale.
The entrance of any outer staff is limited in ODCs. ODCs likewise limit the utilization of cameras, mobile devices, storage gadgets like pen drives, and so forth.

Coordinate your staff with an outsourcing staff

Development and testing arrangement is amongst the most critical issues in QA outsourcing.
Frequently, outside testing groups need to deal with the hesitance of in-staff development team to communicate freely and openly. The absence of communication may result in poor comprehension of product prerequisites, vague bug reports, late changes of a testing plan, and, therefore, missed iteration objectives and due dates.
Along these lines, the allocated QA team needs to convince the developers that the best way to make an easily working arrangement infers collaboration and common comprehension, settle on a convenient communication means to make on-going participation between groups less difficult and speedier.
Further, as we discussed above that proper interaction is a key to coordination between in-house staff and QA outsourcing team so, communication skills become a priority too.
So, when contacting a potential QA service provider, consider the quality of communication that they provide. Things like their spoken and written English skills, their perception of your business aims and strategies, the speed at which they are ready to respond to your requests, the significance of their answers, and so forth matter here.
Another vital viewpoint is the potential to reach the right individual in the organization when required. It ought to be reasonably simple for you to reach the right responsible individual. It will make sure that any connection bottlenecks can be dodged throughout the project accomplishment.

Keep outsourcing team concentrated on QA

Outsourcing service providers who are testing for quality must only be undertaken for duties identified with quality assurance. Having the outsourcing collaboration on developing code can be counterproductive when they additionally need to test the code. Partial testing is bound to happen when engineers are normally increasingly reluctant to underline their own irregularities.
In case that an unbiased team is outsourced for QA testing, their testing strategies will seek the fundamental protocols that guarantee quality. At the point when QA outsourced testers are meticulous and report all faulty codes and bugs, little issues can be corrected instantly preceding they turn out to be costly errors.

Know More: How To Get a Job in QA Testing Company? Traits and Techniques

Frequently evaluate the outsourcing service provider

Evaluating a QA outsourcing service provider all the time guarantees that your organization achieves what you’ve aimedfor your product.
Your QA outsourcing agency assessment is to incorporate the most pertinent execution and pricing criteria. With these assessments, you can comprehend the company’s current position, choose whether to look for some other agency or discover possible outcomes to upgrade your current partnership.
You have to evaluate testing documentation minimum once per month. You additionally need to give the QA team standard review, distinguish hidden inefficient actions and cost drivers, adjust your business systems with the outsourcing company’s and reveal the underlying drivers of testing process entanglements.
If several bugs are missed or vaguely reported, your QA manager ought to give the vendor the necessary review for them to wipe out the genuine cause behind these flaws.
Final words…
The QA outsourcing service revolution has turned into a vital part of present-day IT organizations. The principal purpose of outsourcing QA services is to obtain upgraded quality at a moderate cost as well as allow the organization to concentrate on its main business operations.
app testing
When you comprehend that outsourcing QA vendor is reasonable for your organization, make certain to develop effective mutual collaboration with a certified QA testing vendor since such a methodology will undoubtedly present you plenty of benefits.

Selenium Tutorial For Beginners [Step by Step]

Everybody knows about the impeccable selenium! The ultimate tool for testing web applications! for you to learn in detail about how to carry out automation testing, we have written an extensive Selenium tutorial just for you!
This blog comprises of three part,
1. Selenium Tutorial For Beginners
2. Selenium Intermediate Level Tutorial
3. Selenium Advanced level Tutorial

Selenium Tutorial For Beginners

What makes Selenium better?

You don’t need to code anything in Selenium and with this; any beginner will be able to record and play the simplest web application scripts.
Usually, Selenium RC needs a server to be up and running for sending commands to the browser. It is used for cross-browser testing and you can write the code in any language.
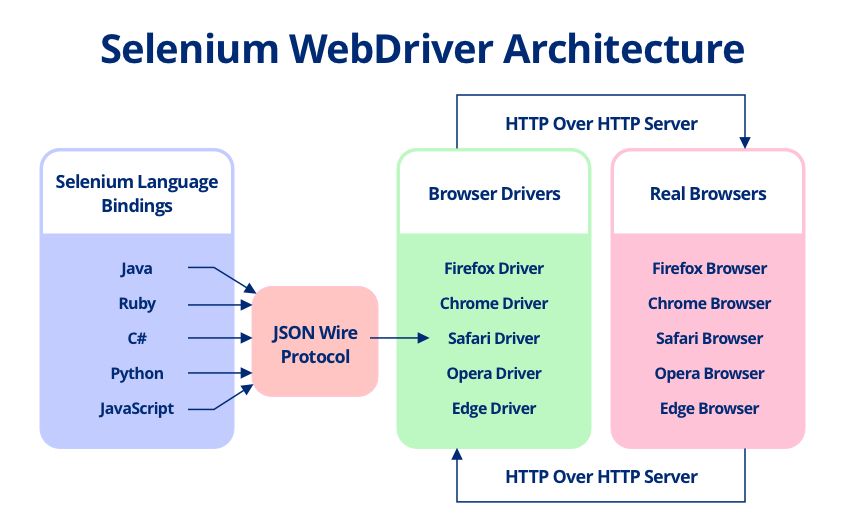
Selenium Web Driver is a better version of IDE and RC. It directly sends commands to the browser without the need of a server to be up and running.

Different languages can be used for coding the scripts like Java, C#, PHP, Python, Perl, and Ruby. Selenium Grid is used for parallel testing in multiple browsers and environments. It used the hub and node concept where hub acts as a source of Selenium commands and each node is connected to it.
Now, here we will discuss Selenium WebDriver. How a beginner can start learning Selenium WebDriver and how he can excel in it.
Now, first, we will look at the steps we need to follow to download Selenium Web Driver in your machine.

Ways to download and install Selenium WebDriver

  • You should have Java installed in your machine. This is the pre-requisite for Selenium Web Driver to work.
  • You can visit the page: http://seleniumhq.org/download/ and download the client drivers and language bindings. You have the select binding for Java.
  • This download will be named – selenium-2.25.0.zip.
  • Now, you can import all the Jars in Eclipse. You have to right click on the project and import jar files by selecting all the downloaded jar files. For this, you can click on the Libraries tab and then click on “Add External JARs”.

Now Let’s look the First Selenium WebDriver Script

Let’s take an example of the first Selenium Script which we would create using Selenium basic methods.
Let’s first look at the script in detail. In this script, we will do the following test steps.

  • Go to the home page of the test application
  • Verify the title of the page
  • Do a comparison of the result.
  • Close the browser after the script is done.

package projectSelenium;
import org.openqa.selenium.WebDriver;
import org.openqa.selenium.chrome.ChromeDriver;
public class seleniumTest {
public static void main(String[] args) {
System.setProperty(“webdriver.chrome.driver”,”C:\\chromeDriver.exe”);
WebDriver driver = new ChromeDriver();
String baseUrl = “https://google.com”;
String expectedTitle = “Google”;
String actualTitle = “”;
        // launch Fire fox and direct it to the Base URL
driver.get(baseUrl);
        // get the actual value of the title
actualTitle = driver.getTitle();
/*
* compare the actual title of the page with the expected one and print
* the result as “Passed” or “Failed”
*/
if (actualTitle.contentEquals(expectedTitle)){
System.out.println(“Test Passed!”);
} else {
System.out.println(“Test Failed”);
}
driver.close();
}
}

Things to look at the above code:

  • In the first two lines, we have imported two packages. You have to import – org.openqa.selenium and org.openqa.selenium.firefox.FirefoxDriver.
  • The most important step is to instantiate the browser. This is done by line

WebDriver driver = new ChromeDriver();
//This is done to invoke a chrome browser.
You can invoke a FireFox browser by following line of code
WebDriver driver = new FirefoxDriver();
You can invoke an IE browser by following line of code:
WebDriver driver = new InternetExplorerDriver ();
Also, while invoking a browser you have to pass the path of the executable file. You can do it by following line of code:
System.setProperty(“webdriver.chrome.driver”,”Path of chrome driver”);
System.setproperty(“webdriver.ie.driver”,”Path of ie driver”);

  • Get() method is used to enter a url in a browser.
  • getTitle() method of selenium webdriver is used to fetch the title of a web page.
  • Now, we have to compare the expected title with the actual title.

If(expectedTitle.equals(actualTitle))
{
System.out.println(“TEST PASSED”):
}

  • For terminating the browser, close() method is used. Driver.close() closes the active browser window. If you want to close all the opened browser windows by selenium web driver then you can use driver.quit().
  • You can run this test by right clicking on the program and then select as “Run As” as “Java Application”.
  • Next thing which is of utmost important while writing a test script is to identify web Elements which will be explained in detail in the below section.

Locating Web Elements

Locating web elements is very easy. Various selectors are available for that process. find Elements is one such 2 in which selenium webdriver is used for locating a web element and then, you can perform an action on that.

Know More: Selenium Automation Testing With Cucumber Integration

Let’s see some of the methods by which you can identify web element on a web page.

  • className – It will locate web element based on the class attribute. Eg: By.className(“abc”);
  • cssSelector – used to locate web element based on css selector engine. Eg:- By.cssSelector(“#abc”);
  • id – If some web element has id attribute, then you can directly identify the web element using id tag. Eg:- By.id(“abc”);
  • linkText – It will find a link element by text mentioned by you in the test script. By.linkText(“Login”);
  • name – If any web element has name attached to it then you can identify it using name attribute. Eg: By.name(“name”);
  • partialText – It will find a link element by text containing the text mentioned by you in the test script. By.partialText(“abc”);
  • tagName – It will locate all elements which will have this tag.
  • xpath – It is the most used locator in a selenium test script. It will identify the element using html path. It can be relative or absolute. Absolute xpath traverses the path of the web element by root and relative takes the reference of any web element and then traverse to that specified web element. It is better to refer an element by relative xpath rather than absolute xpath.

Basic Actions on a web element

You can click on a web element by using click() method of selenium web driver. You can locate a web element and then perform an action on it.
Eg: driver.findElement(By.xpath(“”)).click();
Also, you can send keys to a particular web element by using send Keys() method of selenium web driver. You can locate a web element and then you can enter some text in it using sendKeys() method.
Eg: driver.findElement(By.xpath(“”)).sendKeys(“name”);
Also, there are other actions which you can perform on a web element by using action class.
WebElement wb = driver.findElement(By.xpath(“”));
Actions actions = new Actions(Driver);
Actions.moveToElement(wb).build(). Perform ();
You can even switch to alert boxes which come when you click on some webelement. You can do it by switchTo().alert() method.
Eg code:
WebElement wb = driver.findElement(By.xpath(“”));
Wb.click();
Driver.switchTo().alert();
Now, you will be able to access the alert box. You can retrieve the message displayed in the text box by getting the text from it.
String alertMessage = driver.switchTo().alert().getText();
Also, you can accept the alert box by function accept(). You can see the sample code as below:
Driver.switchTo().alert().accept();
You can even check conditional operations on a web element.
Also, check whether a web element is enabled or not. If it will be enabled then you can do some operation on it.
Apart from all these, you can check if some web element is displayed or not. In the case of radio buttons, you can check if the radio button is selected or not. You can do these checks by – isEnabled(), isSelected() and isDisplayed() option.

Waits in Selenium Web Driver

Selenium Web Driver
If you want some step to get completed before any other step then you have to wait for the prior step to get completed. In manual testing, it is very easy to achieve but in automation testing, it is bit tedious and you have to wait for the previous step to get completed or a condition to be fulfilled before moving on wards to the next step.
This can be achieved by adding waits in between. There are two types of wait- explicit and implicit wait. If you are expecting a particular condition to be fulfilled before moving to the next step,
Another feature is that you can use explicit wait while if you just want a universal wait, then you can go ahead to use implicit wait. The implicit wait is used to set the default time out for the whole script.
A perfect automation script is made by adding both type of waits – Explicit and Implicit. You have to judiciously use both types of waits to make an efficient test case.

Know More : Top 50 Selenium Interview Questions and Answers

Explicit Wait

Syntax of Explicit Wait:
WebDriverWait wait = new WebDriverWait(WebDriverRefrence,TimeOut);
wait.until(ExpectedConditions.visibilityOfElementLocated(By.xpath(“”));
Expected Condition can be used with so many conditions. Some conditions which can be used with it are:

  • alertIsPresent()
  • elementSelectionStateToBe()
  • elementToBeClickable()
  • elementToBeSelected()
  • frameToBeAvaliableAndSwitchToIt()
  • invisibilityOfTheElementLocated()
  • invisibilityOfElementWithText()
  • presenceOfAllElementsLocatedBy()
  • presenceOfElementLocated()
  • textToBePresentInElement()
  • textToBePresentInElementLocated()
  • textToBePresentInElementValue()
  • titleIs()
  • titleContains()
  • visibilityOf()
  • visibilityOfAllElements()
  • visibilityOfAllElementsLocatedBy()
  • visibilityOfElementLocated()

Implicit Wait

Syntax of Implicit Wait:
driver.manage().timeouts().implicitlyWait(TimeOut, TimeUnit.SECONDS);
For this, you have to import a package into your code. The package name is java.util.concurrent.TimeUnit;

Selenium Intermediate Level Tutorial

Through the section Selenium Tutorial for Beginners, We gave you the basic info that you need to know about the tool. Now let’s go further and learn much more about this impeccable web app testing tool.
How to upload a file in Selenium test cases?
To upload a file, first, you have to identify the element on which you have to upload your file. There you can directly use sendKeys() function of selenium web driver. You can pass the path of the location in sendKeys. In this way, you will be able to upload a file using selenium web driver.

public static void main(String[] args) {
System.setProperty(“webdriver.gecko.driver”,”path of gecko driver”);
String baseUrl = “http://www.google.com /upload/”;
WebDriver driver = new FirefoxDriver();
driver.get(baseUrl);
WebElement element = driver.findElement(By.id(“id of element”));
uploadElement.sendKeys(“C:\\newhtml.html”);
//Here,  above you have to pass the path of the file where your file is located.
// Then you can click the upload file link
driver.findElement(By.xpath(“”)).click();
}
How to use a web table in selenium script
You have to access a web table and the elements present in the table. You can get it by making an xpath. Suppose you have had1 0a table with four blocks.
selenium intermediate tutorial
The first thing which you have to do is to find the XPath of the web element in this web table. Let’s say you want to get to the third element in the above web element.
The coding of the above web table is as below:

Selenium Intermediate Level TutorialSelenium Intermediate Level Tutorial
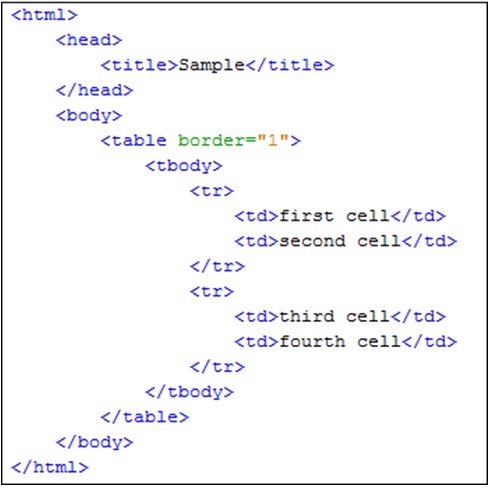
Now, you can analyze that first there is a table and then there is a tbody. In that tbody there are two rows. One row is having two tables. The first row is having two cells – First and Second. The second row is having two cells – Third and Fourth.
Our goal is to reach to the third cell. Let’s try to make the XPath of it.
The XPath of it will be //table/tbody/tr[2]/td[1]
So, the table is the parent node from which we will iterate to go the third element. From there, we will go to the tbody section and then the second row. From there we will get the first column.
Let’s write a script to get the text out of it.
public static void main(String[] args) {
String url = “http://testsite.com/test/write-xpath-table.html”;
WebDriver driver = new FirefoxDriver();
driver.get(baseUrl);
String txtWebelement = driver.findElement( By.xpath(“//table/tbody/tr[2]/td[1]”).getText();
System.out.println(txtWebelement);
driver.close();
}
}
Let’s take an example of a nested web table. You have to then analyze it carefully and get the XPath of it. Let’s look at the example below to get more information on it.
Selenium Intermediate Level Tutorial:
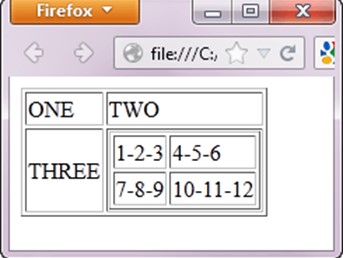
So, if you want to access the web element which is having text 10-11-12 then you can do it by traversing from the table and then iterating through the rows and columns to reach there.
Xpath would be: //table/tbody/tr[2]/td[2]/table/tbody/tr[2]/td[2]
public static void main(String[] args) {
String url = “http://testsite.com/test/write-xpath-table.html”;
WebDriver driver = new FirefoxDriver();
driver.get(baseUrl);
String txtWebelement = driver.findElement( By.xpath(“//table/tbody/tr[2]/td[2]/table/tbody/tr[2]/td[2]
”)getText();
System.out.println(txtWebelement);
driver.close();
}
}
This way, you can iterate through the rows and columns to reach to a specific cell from a web table.
Now, one of the most important concepts in selenium which will help you in many cases when you won’t be retrieving any text from a web element or to enable a web element to get the text or to perform any action on it.
Let’s talk about JavaScript Executor in detail. It is an interface which helps to execute javascript.
JavaScript Executor
Sometimes you are not able to click on a web element using click() function. You can then use javascript executor to execute click function on a web element. Let’s have a look at the code.
WebDriver driver= new FirefoxDriver();
// JavascriptExecutor interfaceobject creation by type casting driver object
JavascriptExecutor js = (JavascriptExecutor)driver;
You can now click on a webelement using below command.
WebElement button = driver.findElement(By.xpath(“”));
Js.executeScript(“arguments[0].click();”,button);
Also, if send keys isn’t working. You can make use of java script executor to send keys. Let’s look at the example below.
WebDriver driver= new FirefoxDriver();
// JavascriptExecutor interfaceobject creation by type casting driver object
JavascriptExecutor js = (JavascriptExecutor)driver;
js.executeScript(“document.getElementById(‘id’).value=”value;”);
You can even make use of java script executor to refresh a web page. You can do it by following command:
WebDriver driver= new FirefoxDriver();
// JavascriptExecutor interfaceobject creation by type casting driver object
JavascriptExecutor js = (JavascriptExecutor)driver;
js.executeScript(“history.go(0)”);
Sometimes, getText() doesn’t work and then you have to make use of java script executor to get text of a web element. You can do it by following line of code:
WebDriver driver= new FirefoxDriver();
// JavascriptExecutor interfaceobject creation by type casting driver object
JavascriptExecutor js = (JavascriptExecutor)driver;
js.executeScript(“history.go(0)”);
Sysout(js.executeScript(“return document.documentElement.innerText;”).toString());
You can even get the title and URL of a web page using java script executor. The procedure is very simple. Let’s have a look at the following lines of code.
WebDriver driver= new FirefoxDriver();
// JavascriptExecutor interfaceobject creation by type casting driver object
JavascriptExecutor js = (JavascriptExecutor)driver;
System.out.println(js.executeScript(“return document.title;”).toString());
System.out.println(js.executeScript(“return document.URL;”).toString());
Desired Capabilities Concept in selenium web driver
You can make the set of configurations on which you want a particular test script to run. You can pass browser name, version to specify the type of environment on which you want a test case to run.
Let’s see some of the capabilities which you can set in a test case for IE browser.
//it is used to define IE capability
DesiredCapabilities cap = DesiredCapabilities.internetExplorer();
cap.setCapability(CapabilityType.BROWSER_NAME, “IE”);
cap.setCapability(InternetExplorerDriver.INTRODUCE_FLAKINESS_BY_IGNORING_SECURITY_DOMAINS,true);
In the above capability, we have passed the capability browser name and we have ignored the security domain.
After setting the capabilities you can pass the capabilities to the web driver instance so that it executes the test on a particular configuration.
Let’s have a look at the complete set of code.
public static void main(String[] args) {
//it is used to define IE capability
DesiredCapabilities cap = DesiredCapabilities.internetExplorer();
cap.setCapability(CapabilityType.BROWSER_NAME, “IE”);
cap.setCapability(InternetExplorerDriver.INTRODUCE_FLAKINESS_BY_IGNORING_SECURITY_DOMAINS,true);
System.setProperty(“webdriver.ie.driver”, “path of executable”);
WebDriver driver = new InternetExplorerDriver(capabilities);
driver.get(“http://gmail.com”);
driver.quit();
}
Handling a drop down in selenium web driver
You have to first import following packages: org.openqa.selenium.support.ui.Select.
First, you have to identify from DOM whether the dropdown is of select type or not. If it is of select type then you have to go for the below steps.
Then, you have to uniquely identify the select tag. You have to first make the object of Select class and pass the element for which you have to choose the options from the drop-down.
Select dropdown = new Select(driver.findElement(By.xpath(“”)));
Now, there are three main methods which you have to use to select any element from this select object.

  1. selectByVisibleText
  2. selectByIndex
  3. selectByValue

You can either select any element from this drop-down by matching the visible text with that of the text passed by you. You can also select any web element from the drop-down using an index. Last option is to select by value tag.
Also, there are some more functions which are available. Some of them are selectAll() and deselectAll() too select and deselect all the elements when more than one element can be selected.
But, if the dropdown is not of select type then you can’t go for the conventional method. You have to follow another method. You have to uniquely identify the web element on which you have to select a dropdown option. You can identify it and the sendKeys() function of selenium web driver to send keys to the uniquely identified dropdown.
WebElement dropdown = driver.findElement(By.xpath(“”));
Dropdown.sendKeys(“value to be selected”);
How to select the checkbox and radio button is selenium
Sometimes, you come across situations where you have to select checkboxes and radio buttons. You can do it easily with selenium web driver. You just have to use click() function of web driver to click on checkbox and radio button. You can even check of the web element is selected or not.
.isSelected() checks if any web element is selected or not.
It gives false if the web element is not selected and it gives true if the web element is selected.
This way, you can handle radio buttons and checkboxes in a selenium script.

Selenium Advanced level Tutorial

Now, you know almost the stuff which is required for selenium intermediate and beginner level. Now, you are proficient enough to deal with all the advanced level of selenium web driver. You can then practice those and while you are done with those, you can move forward to the advanced level of course.
Let’s see what lies ahead and what can give you an edge in your interviews. You can look at this advanced course so that you can be ahead of all the candidates who just know the basic and intermediate selenium course. Let’s have a look at Selenium Advanced level Tutorial

Selenium Grid


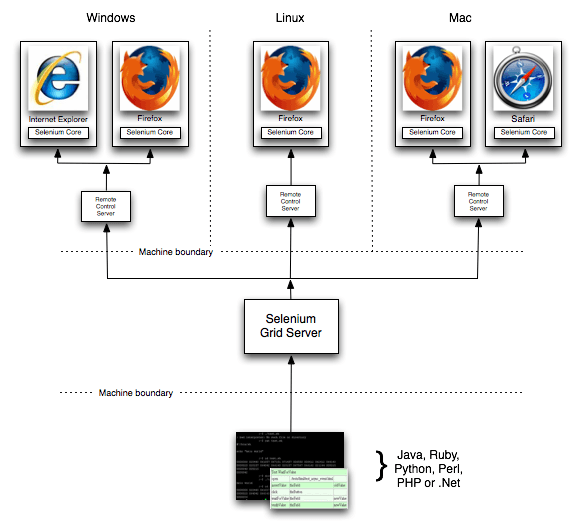
Selenium Grid is issued for running various tests on different browsers, operating systems, and machines in parallel. It used a hub and node concept. You don’t want test cases to run on a single machine. You have your machine as a hub and various systems on which test cases will be distributed. You call those machines as nodes.
The hub is the central point and there should be only one hub in a system. This hub is your machine from which you want to distribute the test cases among all the clients.
This is the machine on which test cases will run and those will be executed on the nodes. There can be more than one node. Nodes can have different configurations with different platforms and browsers.
Let’s see how you can establish a selenium grid in your machine.
You can download the selenium grid server from the official site. You can place Selenium server.jar in a hard drive. You have to place it in all nodes and hub c drive.
Open the command prompt in your hub and then, go to C directory. There you have to fire the below command java -jar selenium-server-standalone-2.30.0.jar -role hub
Now, if you want to check if the selenium grid server is running on localhost that is 4040 port or not. You can visit the local host on your browser.
You have to then go to C directory of the node and open command prompt in it. Also, when you have made the selenium grid server up in the hub, you have to note down the IP address and port.
java -Dwebdriver.gecko.driver=”C:\geckodriver.exe” -jar selenium-server-standalone-3.4.0.jar -role webdriver -hub ip address of hub -port port number of hub
When you fire the above command, again go to hub browser and the port number 4040. Refresh the page and you will see IP address which will be linked to the hub.
Now, you have set up machines with different configurations. But how would the hub know which test case would be run on which node.
This will be done by desired capabilities which will tell that this test script would run on a particular set of configuration.
One can do it using below source code:
This way, you will be able to distribute the test cases across different machines and browsers. You will be able to do parallel testing using Selenium Grid.

Maven and Jenkins Integration with Selenium


Maven is a build management tool which is used to make the build process easy. Maven avoids hard coding of jars and you can easily share the project structure across the team using artifact and version id.
Every team member would be at the same page. You can make a maven project by going to File – New – Other – Maven project. You have to then specify the artifact id and then version id. You will be prompted to select a template. For starting, select a quik start template.
You will get a folder structure where you will be having two folders – src/main/java and src/main/test. In java folder, you will maintain all other stuff except tests while in test folder you will maintain all the test cases.
You will be having pom.xml file where you have to define all the dependencies so that it can download from the maven repository and place them in ./m2 repository in your local project structure.
You can get the dependency from the maven official site and then place in pom.xml. It will download all the required jars.
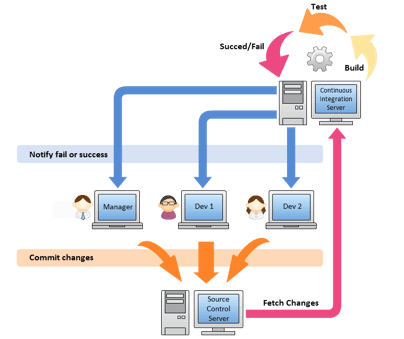
Also, Jenkins issued for continuous integration of the latest build with the production environment. Whenever a developer will fire the latest build then the smoke test will start running on that build.
If the build gets passed then it can be deployed to the production else the developer and tester would get a notification about the failed build. It makes the delivery cycle very fast.
Also, you can do it by downloading Jenkins war file and then running it so that Jenkins server will be up and running on port number 4040.

After doing that you can install all the necessary plug-ins. You can then create a new item and does the post-build actions.
Also, you can pass the path of git repository from which it will fetch the latest build. If you are using a local server then you pass the path of pom.xml from the system.
You can even set nightly runs with Jenkins, You have to specify the time when you want your test to run. They will run and you will get the reports on the Jenkins server the next morning. Isn’t it time-saving?

Database Testing using Selenium WebDriver

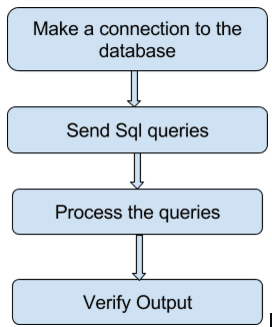
Integrating Selenium tests to the database is so easy in the latest version of the tool. You have to make use of JDBC library for database connections. It allows connection of Java and databases. First, make a connection to the database with the following command:

DriverManager.getConnection(URL, “userid”, “password” )
After doing that you can load the JDBC driver. You can do it by following lines of code:
Class.forName(“com.mysql.jdbc.Driver”);
Now, you have to send the query to the database. How will you do it? You can create an object of a statement class and then execute the query using the statement object.
Statement stmt = con.createStatement();
stmt.executeQuery(select *  from employee;);
Now, you can get the result in the result set. You can do it by following command:
ResultSet rs= stmt.executeQuery(query);
After doing all the operations, you can close the connection.
Con.close();
In this way, you can get the result set and then do all the validations on the result set.

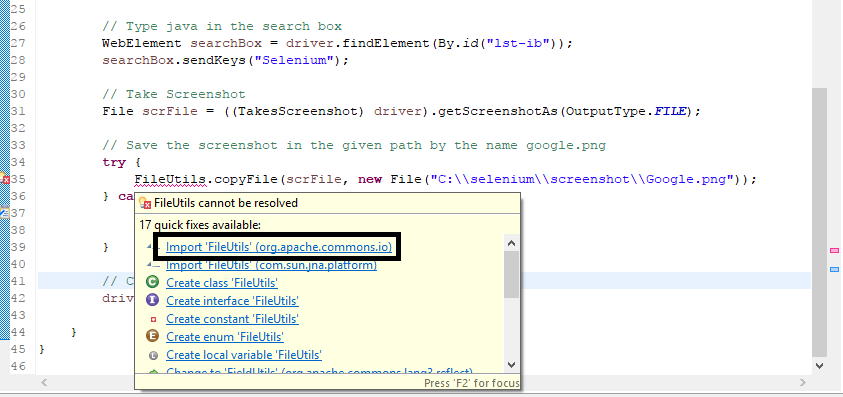
How to take screenshots in selenium web driver

You should get the screenshot of the failed test cases so that you can get to know where exactly is the problem. This will help in better-debugging skills.

Let’s look at the steps involved in taking a screenshot:
TakesScreenshot scrShot =((TakesScreenshot)webdriver);
This step caste a driver instances to Takes Screenshot interface. Now, you have one method which is getting screenshots which will get the image file.
File SrcFile=scrShot.getScreenshotAs(OutputType.FILE);
Now, you have taken the screenshot but you have to place it somewhere. You can create some folder which will be used for storing all the screenshots captured during the execution.
You can do it by following the line of code:
FileUtils.copyFile(SrcFile, DestFile);
This is the way to capture screenshots. But if you want that only the screenshot is taken when a test case fails. You can use ITestListener.
It has various methods and one of the methods is onFailure() which will do the specified task when every there is any failure in a test case.
So you can put this code in that method so that whenever any test fails it will take the screenshot and place it in the folder specified by you.

How to drag and drop in a web page using Selenium Web driver

Now if you want o drag and drop something o a web page, you would be confused. It is very simple. You have to make use of Actions class which gives you a method dragAndDrop() which will drag and drop a web element from a source destination to the desired destination.
Actions actions = new Actions(driver);
Actions. dragAndDrop(Sourcelocator, Destinationlocator).build().perform();
Make sure that the source locator and destination locator have correct xpaths. In this way, you will be able to drag and drop any element on a web page.

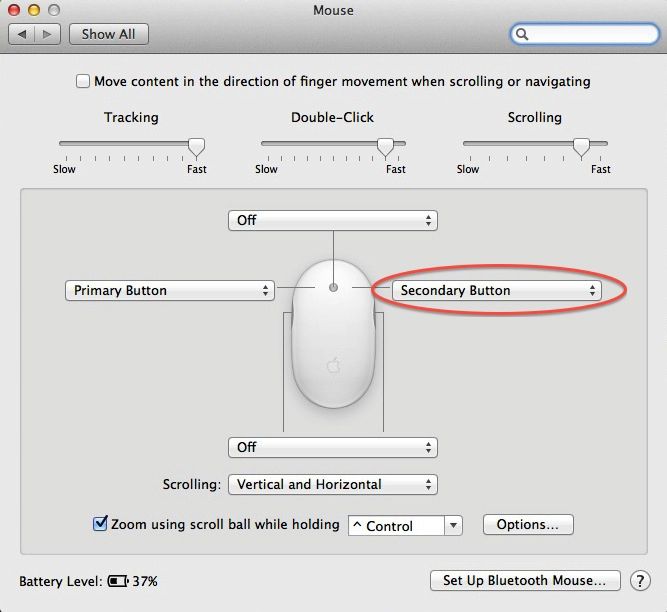
How to do right click and double click on a web page

You can do a right-click on a web page using Actions class. Actions class provides a doubleClick method which allows to double click on a web element. You can do it by following lines of code:

Actions actions = new Actions(driver);
WebElement elementLocator = driver.findElement(By.id(“ID”));
actions.doubleClick(elementLocator).perform();
You have to do right-click in selenium using action class only. It is very easy. It provides a method – contextClick() and then right click on a web element.
Actions actions = new Actions(driver);
WebElement elementLocator = driver.findElement(By.id(“ID”));
actions.contextClick(elementLocator).perform();
This way, you will be able to right click and double click on a web element.
How to switch to an iFrame

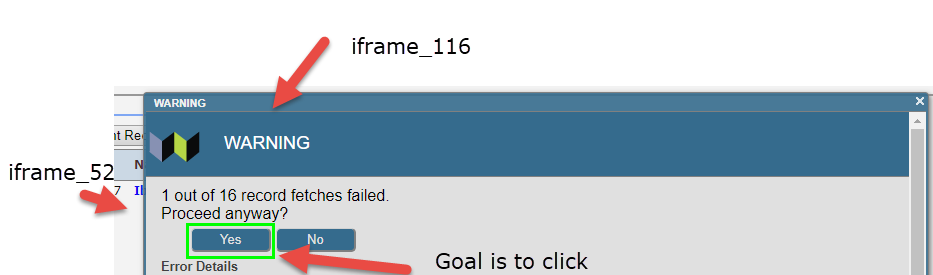
iFrame is a web page which is embedded into another web page. Whenever you want to click on a web element, which is in another iframe. First, you have to switch to that iframe and then perform an action on it.
You can do switching by
Driver.switchTo().frame(index or name or id of iframe);
Conclusion
Before learning Selenium it’s better to have a thorough understanding of any object-oriented language. languages that Selenium support includes, Java, Perl, C#,  PHP, Ruby, and Python Currently.
We genuinely hope this tutorial has helped in understanding selenium better.

Get a eBook : Download PDF